Search the Community
Showing results for tags 'rust'.
-
Version 0.1.15
821 downloads
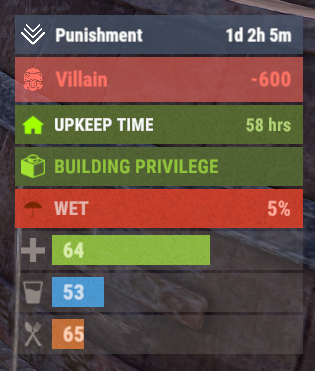
Useful auxiliary plugin that allows other plugins to customize the status bar through an API. Note: AdvancedStatus does not display any bars on its own. This is done by other plugins that work with it. An example plugin demonstrating interaction with AdvancedStatus. The ability to specify the frequency of calculating the number of bars; The ability to specify the order of the bar; The ability to change the height of the bar; The abillity to customize the color and transparency of the background; The ability to set a material for the background; The ability to switch between CuiRawImageComponent and CuiImageComponent for the image; The ability to get images from the local folder(*SERVER*\oxide\data\AdvancedStatus\Images); The abillity to set own image and customize the color and transparency of the image; The abillity to set sprite instead of the image; The ability to specify custom text; The ability to customize the color, size and font of the text; No need to pass all parameters; No need to manually delete your bar when unloading your plugin. { "Enable image load messages in the console?": false, "Client Status Bar Count Interval": 0.5, "Bar - Display Layer(If you have button bars, it's advisable to use Hud)": "Under", "Bar - Left to Right": true, "Bar - Offset Between": 2, "Bar - Default Height": 26, "Main - Default Color": "#505F75", "Main - Default Transparency": 0.7, "Main - Default Material(empty to disable)": "", "Image - Default Color": "#6B7E95", "Image - Default Transparency": 1.0, "Text - Default Size": 12, "Text - Default Color": "#FFFFFF", "Text - Default Font(https://umod.org/guides/rust/basic-concepts-of-gui#fonts)": "RobotoCondensed-Bold.ttf", "Text - Default Offset Horizontal": 0, "SubText - Default Size": 12, "SubText - Default Color": "#FFFFFF", "SubText - Default Font(https://umod.org/guides/rust/basic-concepts-of-gui#fonts)": "RobotoCondensed-Bold.ttf", "Progress - Default Color": "#89B840", "Progress - Default Transparency": 0.7, "Progress - Default OffsetMin": "25 2.5", "Progress - Default OffsetMax": "-3.5 -3.5", "Version": { "Major": 0, "Minor": 1, "Patch": 15 } } Note: Default values will be used if the external plugin does not pass the property itself. EN: { "MsgDays": "d", "MsgHours": "h", "MsgMinutes": "m", "MsgSeconds": "s" } RU: { "MsgDays": "д", "MsgHours": "ч", "MsgMinutes": "м", "MsgSeconds": "с" } OnAdvancedStatusLoaded: Called after the AdvancedStatus plugin is fully loaded and ready. OnPlayerGainedBuildingPrivilege: Called after the player enters their building privilege. OnPlayerLostBuildingPrivilege: Called after the player exits their building privilege. void OnAdvancedStatusLoaded() { Puts("The AdvancedStatus plugin is loaded and ready to go!"); } void OnPlayerGainedBuildingPrivilege(BasePlayer player) { Puts($"{player.displayName} entered the authorized building privilege zone."); } void OnPlayerLostBuildingPrivilege(BasePlayer player) { Puts($"{player.displayName} exited the authorized building privilege zone."); } [PluginReference] private Plugin AdvancedStatus; There are 13 methods: IsReady CreateBar UpdateContent DeleteBar DeleteCategory DeleteAllBars LoadImages LoadImage CopyImage DeleteImages DeleteImage BarExists InBuildingPrivilege There are 5 types of bar: Default - A simple bar that displays the provided information. Does not update the value of SubText by itself; Timed - Similar to the default bar, but it automatically disappears after the specified time in the TimeStamp parameter; TimeCounter - The SubText shows the remaining time until TimeStamp. Also automatically removed upon expiration of the TimeStamp; TimeProgress - Similar to the Timed bar, but additionally features an automatically filling progress bar; TimeProgressCounter - Similar to the TimeCounter bar, but additionally features an automatically filling progress bar. IsReady: Used to check if the AdvancedStatus plugin is loaded and ready to work. The IsReady method returns true if it is ready, or null if it is not. AdvancedStatus?.Call("IsReady");//Calling the IsReady method. If the result is not null(bool true), the plugin is ready. CreateBar: Used to create a bar or update bar values for a player. To call the CreateBar method, you need to pass 2 parameters. The first one is BasePlayer or <ulong>playerID. The second one is a dictionary with the parameters you need. In the CreateBar method, all parameters are optional, except for two: Id; Plugin. Parameters not specified when creating a new bar will use the values set in the AdvancedStatus plugin's configuration file. Parameters not specified during bar update will retain the values they had before the update. Note: The plugin does not update values automatically, you need to manually send new values. Dictionary<string, object> parameters = new Dictionary<string, object> { { "Id", "AdvancedStatusDemo_1" }, //<string>Unique identifier for the bar in your plugin. ***This is a required field. { "BarType", "Default" }, //<string>Type of the bar. There are 4 types: Default, Timed, TimeCounter and TimeProgress. { "Plugin", "AdvancedStatusDemo" }, //<string>Name of your plugin. ***This is a required field. { "Category", "Default" }, //<string>Internal plugin category of the bar. { "Order", 10 }, //<int>The position of your bar relative to others. Order is determined by increasing values(ASC). { "Height", 26 }, //<int>The height of your bar. A standard bar is 26 pixels. { "Main_Color", "#505F75" }, //<string>HTML Hex color of the bar background. { "Main_Transparency", 0.7f }, //<float>Transparency of the bar background. { "Main_Material", "assets/content/ui/uibackgroundblur.mat" }, //<string>Material of the bar background(empty to disable). { "Image", "scrap" }, //<string>Name of the image saved in the ImageLibrary or a direct link to the image if ImageLibrary is not used. { "Image_Local", "AdvancedStatusDemo_Scrap" }, //<string>The name of the image file(without its extension) located in *SERVER*\data\AdvancedStatus\Images. Leave empty to use Image. { "Image_Sprite", "" }, //<string>Sprite image of the bar. Leave empty to use Image_Local or Image. { "Is_RawImage", true }, //<bool>Which type of image will be used? True - CuiRawImageComponent. False - CuiImageComponent. { "Image_Color", "#6B7E95" }, //<string>HTML Hex color of the bar image. { "Image_Transparency", 1.0f }, //<float>Transparency of the image. { "Text", "Scrap" }, //<string>Main text. { "Text_Size", 12 }, //<int>Size of the main text. { "Text_Color", "#FFFFFF" }, //<string>HTML Hex color of the main text. { "Text_Font", "RobotoCondensed-Bold.ttf" }, //<string>Font of the main text. { "Text_Offset_Horizontal", 0 }, //<int>Horizontal offset for the main text. { "SubText", "35" }, //<string>Sub text. { "SubText_Size", 12 }, //<int>Size of the sub text. { "SubText_Color", "#FFFFFF" }, //<string>HTML Hex color of the sub text. { "SubText_Font", "RobotoCondensed-Bold.ttf" }, //<string>Font of the sub text. { "TimeStampStart", Network.TimeEx.currentTimestamp }, //<double>Responsible for specifying the start point of the time reference and 0% for TimeProgress and TimeProgressCounter bars. Used if the bar type is Timed, TimeCounter, TimeProgress or TimeProgressCounter. { "TimeStamp", Network.TimeEx.currentTimestamp + 6 }, //<double>Specifies the end time point after which the bar will be destroyed and 100% for TimeProgress and TimeProgressCounter bars. Used if the bar type is Timed, TimeCounter, TimeProgress or TimeProgressCounter. { "TimeStampDestroy", Network.TimeEx.currentTimestamp + 3 }, //<double>If TimeStampDestroy is specified and it is less than TimeStamp, the bar will be destroyed by TimeStampDestroy. Used if the bar type is Timed, TimeCounter, TimeProgress or TimeProgressCounter. { "Progress", (float)35 / 100f }, //<float>Progress. From 0.0 to 1.0. { "Progress_Color", "#89B840" }, //<string>Progress color. { "Progress_Transparency", 1f }, //<float>Progress transparency. { "Progress_OffsetMin", "25 2.5" }, //<string>Progress OffsetMin: "*left* *bottom*". { "Progress_OffsetMax", "-3.5 -3.5" }, //<string>Progress OffsetMax: "*right* *top*". { "Command", "kit" } //<string>If the field is not empty, the bar becomes clickable, and the specified command is executed upon clicking. Note: the command must be covalence. }; AdvancedStatus?.Call("CreateBar", player.userID.Get(), parameters); //Calling the CreateBar method with the passing of BasePlayer/playerID and a dictionary containing the required parameters. UpdateContent: Used to update only the content of an existing status bar. To call the UpdateContent method, you need to pass 2 parameters. The first one is BasePlayer or <ulong>playerID. The second one is a dictionary with the parameters you need. In the UpdateBar method, all parameters are optional, except for two: Id; Plugin. var parameters = new Dictionary<string, object> { { "Id", "MyID" }, //<string>Unique identifier for the bar in your plugin. ***This is a required field. { "Plugin", Name }, //<string>Name of your plugin. ***This is a required field. { "Text", "MyText" }, //<string>Main text. { "SubText", "MyText" }, //<string>Sub text. { "Progress", (float)amount / 100f }, //<float>Progress. From 0.0 to 1.0. }; AdvancedStatus?.Call("UpdateContent", player.userID.Get(), parameters); //Calling the UpdateContent method with the passing of BasePlayer/playerID and a dictionary containing the required parameters. DeleteBar: Used to remove the bar for a player. There are two methods for removing a bar by ID: with specifying a particular player; To call this method, you need to pass 3 parameters. The first one is BasePlayer or <ulong>playerID. The second one is Id of your bar and the third one is name of your plugin. without specifying a particular player (which removes it for all players) To call this method, you need to pass 2 parameters. The first one is Id of your bar and the second one is name of your plugin. AdvancedStatus?.Call("DeleteBar", player.userID.Get(), barID, Name); //Calling the DeleteBar method with the passing of BasePlayer/playerID, ID of the bar and the name of your plugin. AdvancedStatus?.Call("DeleteBar", barID, Name); //Calling the DeleteBar method with the passing of ID of the bar and the name of your plugin. If you try to delete a bar that doesn't exist, nothing bad will happen. So feel free to delete the bar without checking its existence. P.S. When unloading your plugin, there is no need to manually delete bars for players, AdvancedStatus will handle it automatically. DeleteCategory: Used to remove all bars associated with the plugin's category. To call the DeleteCategory method, you need to pass 2 parameters. The first one is category and the second one is name of your plugin. AdvancedStatus?.Call("DeleteCategory", "Default", Name);//Calling the DeleteCategory method by passing the category and name of your plugin DeleteAllBars: Used to remove all bars associated with the plugin. To call the DeleteAllBars method, you need to pass only 1 parameter. It is name of your plugin. AdvancedStatus?.Call("DeleteAllBars", Name);//Calling the DeleteAllBars method, passing the name of your plugin LoadImages: Used to check if the local images specified in the list are loaded. If any of the images are not loaded but their files exist in the images folder, the plugin will load them. To call the LoadImages method, you need to pass only 2 parameters. The first one is the <List<string>>list of image's name and the second one(optional) is <bool>force, which, if set to true, will force reload the image even if it already exists. AdvancedStatus?.Call("LoadImages", list, false);//Calling the LoadImages method, passing a list of image names LoadImage: Used to check if the local image is loaded. If the file is not loaded and exists in the images folder, the plugin will load it. To call the LoadImage method, you need to pass 2 parameters. The first one is the <string>image's name and the second one(optional) is <bool>force, which, if set to true, will force reload the image even if it already exists. AdvancedStatus?.Call("LoadImage", imgName, false);//Calling the LoadImage method, passing an image's name CopyImage: Used to create and load a copy of an existing image. To call the CopyImage method, you need to pass 3 parameters. The first parameter is the <string>source image's name, the second parameter is the <string>new image's name and the third one(optional) is <bool>force, which, if set to true, will force copy and reload the image even if it already exists. AdvancedStatus?.Call("CopyImage", "ZoneStatus_Default", "ZoneStatus_NewZone", false);//Calling CopyImage, passing the source image name and the new image name. DeleteImages: Used to delete a list of images and their files. To call the DeleteImages method, you need to pass 2 parameters. The first one is the <List<string>>list of image's name and the second one(optional) parameter is <bool>deleteFile, which, if set to true, will delete image's file too. AdvancedStatus?.Call("DeleteImages", list, true);//Calling DeleteImages, passing a list of image names. DeleteImage: Used for removing the image and the image file. To call the DeleteImage method, you need to pass 2 parameters. The first parameter is the <string>image's name and the second one(optional) parameter is <bool>deleteFile, which, if set to true, will delete image's file too. AdvancedStatus?.Call("DeleteImage", "ZoneStatus_NewZone", true);//Calling DeleteImage, passing the image name. BarExists: Used to check if the specified bar exists. To call the BarExists method, you need to pass 3 parameters. The first one is BasePlayer or <ulong>playerID. The second one is Id of your bar. And the third one is name of your plugin. (bool)AdvancedStatus?.Call("BarExists", player.userID.Get(), barID, Name);//Calling the BarExists method with the passing of BasePlayer/playerID, ID of the bar and name of your plugin. InBuildingPrivilege: Used to check if the player has authorized building privileges. To call the InBuildingPrivilege method, you need to pass BasePlayer or <ulong>playerID. (bool)AdvancedStatus?.Call("InBuildingPrivilege", player.userID.Get(), false);//Checking if the player has Building Privilege.$1.99 -
Version 1.0.0
9 downloads
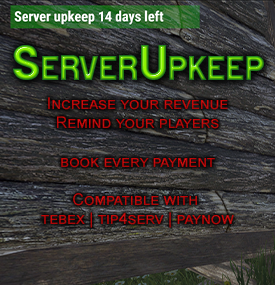
The ServerUpkeep plugin is a handy tool for Rust server owners. This way they can keep their community alive and better cover the costs of running them. Show your players how your server is doing. ServerUpkeep allows administrators to set a default retention period and notify players when the retention time expires. The plugin provides a visual representation and shows the number of days remaining. Administrators also have the ability to extend the ukeep duration if necessary with a simple console command. The plugin is compatible with Tebex, Tip4Serv and also for PayNow. Decide for yourself how many days ServerUpkeep will be credited. Features: What happens if the ServerUpkeep is not enough and the timer falls to 0? - Then the server will be shut down automatically. - You can then make an announcement on Discord or wherever to ask for support. Instructions for use: Simply enter the following in your shop under send command and adjust the days to be credited once the purchase has been completed, depending on the customer's purchase package. upkeep.add [days] You can also subtract days by simply putting the minus operator in front of it: upkeep.add -[days] Config: { „DefaultDays“: 7, „NextUpkeepTime“: „25.02.2024 21:56:32“ } DefaultDays are the days when the plugin is activated to prevent the server from shutting down again immediately after booting. NextUpkeepTime: Is required to calculate the remaining days. The time specification has no direct use yet but will be required for future updates. **load, run, enjoy**$10.99 -

Version 1.4.0
35 downloads
ChuteUp Features Do you want to really enjoy the parachutes in Rust or unlock another feature for your VIP? Then ChuteUp is exactly the right thing for your server. Let yourself be catapulted into the air with a simple command. Functions You can start the ChuteUp command with height information: /chuteup 600 To use the command, you need the authorization: chuteup.use Config load, run, enjoy Support Discord$6.99 -
Version 1.3.0
5,233 downloads
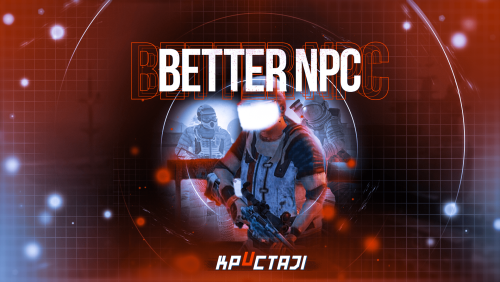
This plugin adds variety of NPC sets with very high number of parameter sets on standard and custom monuments. Also it is added during dropping the server AirDrop, locked crate and destroying a tank or helicopter Dependencies (optional, not required) AlphaLoot CustomLoot True PVE Kits Economics Server Rewards IQEconomic PveMode Custom maps Maps that have default settings for their custom monuments. For these maps, you will not need to create places for the appearance of NPCs, they have already been created by the map developer and are located inside the archive when buying the map You can also download all these files for all maps here Detroit: Irreparable Damage Oregon 2: Last Hope Lostly Island Frontier – American Old West Oregon: Land of Dead Badlands Foreign Lands Namalsk Kong: Skull Island Destroyed World Deathland Dreamland Last Train Pandora Railway Island Wasteland Cataclysm: Fury of Nature Last Oasis Crazy Island Standard monuments This item of the plugin settings is used for appearing NPCs in all standard monuments. All these settings are located in the Monument folder (oxide/data/BetterNpc/Monument). Each file in this folder corresponds to a standard monument If there is no standard monument file in the folder, you can create it (you need to name the file the same way as the standard monuments on the map inside the game). You can copy the settings from any other standard monument Configuration parameters: Enabled? [true/false] – It allows to enable/disable the appearance of NPC on the monument. If you need NPCs appearing on the map and don’t need it on another map, you can use this option simply The size of the monument – this parameter contains two values. It is the length and width of the monument. This parameter is necessary for random appearance of NPC on the monument and indication of limits of removal of standard NPCs on the monument (if it is necessary) Remove other NPCs? [true/false] – It deletes the standard NPCs inside the limits of this monument Presets – It is a list of all the NPC presets to appear on the monument (the description of the NPC preset settings is located below) Custom monuments This item of the plugin settings is responsible for the appearance of NPCs on custom monuments. All these settings are located in the Custom folder (oxide/data/BetterNpc/Custom). Each file in this folder corresponds to a custom monument If you have bought a map with already configured NPC appearance files for custom monuments you will copy these files into the Custom folder. If you want to create and configure the appearance of NPC in your custom location on the map, you will use the command in the administrators’ chat /SpawnPointAdd {name} (see the description of this command below in the instruction) Configuration parameters: Enabled? [true/false] – It allows to enable/disable the appearance of NPC on the monument. If you need NPCs appearing on the map and don’t need it on another map, you can use this option simply Position – It is a position of the custom monument on the map Rotation – It is a rotation of the custom monument on the map (this parameter is necessary for using custom places to appear of NPC on the monument, if the monument is used on more than one map) Radius – It is the radius of the custom monument from the position on the map Remove other NPCs? [true/false] – It removes the standard NPCs inside the limits of this monument Presets – It is a list of all the NPC presets to appear on the monument (the description of the NPC preset settings is located below) Roads This item of the plugin settings is used to appear NPCs on all types of roads. All these settings are located in the Road folder (oxide/data/BetterNpc/Road). Each file in this folder corresponds to a particular road type ExtraNarrow – It is a narrow, unpaved walkway ExtraWide It is a wide, paved, two-lane, beltway road Standard – It is a regular, paved road Configuration parameters: Enabled? [true/false] – It allows to enable/disable the appearance of NPC on the road. If you need NPCs appearing on the map and don’t need it on another map, you can use this option simply Presets – It is a list of all the NPC presets to appear on the road (the description of the NPC preset settings is located below) Biomes This item of the plugin settings is used to appear NPCs on all types of biomes. All these settings are located in the Biome folder (oxide/data/BetterNpc/Biome). Each file in this folder corresponds to a particular biome type (Arctic, Arid, Temperate, Tundra) Configuration parameters: Enabled? [true/false] – It allows to enable/disable the appearance of NPC on the biome. If you need NPCs appearing on the map and don’t need it on another map, you can use this option simply Presets – It is a list of all the NPC presets to appear on the biome (the description of the NPC preset settings is located below) In-game events This item of the plugin settings is used to appear the NPCs in standard Rust events. All of these settings are located in the Event folder (oxide/data/BetterNpc/Event). Each file in this folder corresponds to its own type of event The supported events: When the plane drops the server AirDrop, it will be guarded by specific NPC presets CH47 – When the chinook drops a locked crate during patrolling the map, it will be guarded by specific NPC presets Bradley – When someone destroys a tank, its crates will be guarded by specific NPC presets Helicopter – When someone shoots down a patrol helicopter, its crates will be guarded by specific NPC presets Configuration parameters: Enabled? [true/false] – It allows to enable/disable the appearance of NPC on the event. If you need NPCs appearing on the map and don’t need it on another map, you can use this option simply Radius – NPC appearance radius Presets – It is a list of all the NPC presets to appear on the event (the description of the NPC preset settings is located below) The NPC preset parameters Enabled? [true/false] – It is enabling/disabling the preset Minimum numbers – Day – It is the minimum number of NPCs from the day preset Maximum numbers – Day – It is the maximum number of NPCs from the day preset Minimum numbers – Night – It is the minimum number of NPCs from the night preset Maximum numbers – Night – It is the maximum number of NPCs from the night preset NPCs setting – It is all NPC settings of this preset (see the description of NPC settings for details) Type of appearance (0 – random; 1 – own list) – It is a type of NPC appearance. You can create your own list of places of NPC appearance. The NPC will appear only randomly. This parameter is not used in Road appearance types Own list of locations – It is your own list of NPC appearances. You need to use the number of locations at least the maximum possible number of NPCs in this preset. This parameter is not used in Road appearance types The path to the crate that appears at the place of death – It is the full path to the crate prefab that appears at the place of death of an NPC. If you don’t need this parameter, you should leave this blank Which loot table should the plugin use (0 – default; 1 – own; 2 – AlphaLoot; 3 – CustomLoot; 4 – loot table of the Rust objects; 5 – combine the 1 and 4 methods) – It is the type of the NPC loot table in this preset. Type 5 includes two types (1 and 4) at the same time and locates items from both types Loot table from prefabs (if the loot table type is 4 or 5) – It is a setting of the loot tables from Rust objects. You can see the loot table of Rust objects description for more details Own loot table (if the loot table type is 1 or 5) – It’s NPC’s own loot table. You can see the description of your own loot table for more details The NPC settings description Names is a list of NPC names. It is selected from the list randomly Health – It’s the HP amount of the NPC Roam Range – It’s the patrolling area distance. It’s the distance that the NPC can move from the place of appearance during patrolling Chase Range – It’s the chase range of the target. It’s the distance that the NPC can chase his target from the place of appearance Attack Range Multiplier – It’s the attack range multiplier of the NPC’s weapon Sense Range – It’s a target detection radius Target Memory Duration [sec.] – It’s the time that the NPC can remember his target Scale damage – It’s the damage multiplier from NPC to the player Aim Cone Scale – It’s the spread of NPC shooting, the default value in Rust is 2. It doesn’t take negative values Detect the target only in the NPCs viewing vision cone? [true/false] – It’s the parameter that allows detecting the target only in a certain NPC viewing. If you want to detect the target in 360 degrees, you will set the parameter “False” Vision Cone – It’s the NPC viewing. The range of values is from 20 to 180 degrees. If the previous parameter is False, this parameter is not used Speed – It’s the NPC speed. The default value in Rust is 5 Minimum time of appearance after death [sec.] – It’s the minimum time of NPC appearance after the death. This parameter is not used in the NPC Event places Maximum time of appearance after death [sec.] – It’s the maximum time of NPC appearance after the death. This parameter is not used in the NPC Event places Disable radio effects? [true/false] – You can disable/enable radio effects Is this a stationary NPC? [true/false] – If this parameter is True, the NPC will not move or run Remove a corpse after death? [true/false] – This parameter can control the deleting of NPC corpses (only backpacks are left). This parameter improves efficiency if there are a lot of NPCs Wear items – It’s a list of NPCs’ clothes and armor Belt items – It’s a list of weapons and items NPCs’ fast slots. Medical syringes are used for healing. If you give grenades to an NPC, he will use them. Smoke grenades are used for creating smoke screens (if you don’t need them, you should remove them from your inventory). If you give a Rocket Launcher to an NPC, he will raid the target’s building (if the target is inside it) Kits – It gives a pack of Kits plugin. If you don’t need this parameter, you should leave this blank. I recommend using the previous 2 points to configure NPC items A description of the Rust loot table settings Minimum numbers of prefabs –It’s the minimum numbers of prefabs that are needed to appear in the NPC loot table Maximum numbers of prefabs –It’s the maximum numbers of prefabs that are needed to appear in the NPC loot table Use minimum and maximum values? [true/false] – this parameter specifies whether to use the minimum and maximum numbers to limit the number of items List of prefabs – It’s a list of prefabs that need to add in the loot table. It is necessary to indicate the full path to the prefab and the probability of falling out this prefab A description of the own loot table settings Minimum numbers of items – It’s the minimum number of items Maximum numbers of items – It’s the maximum number of items Use minimum and maximum values? [true/false] – this parameter specifies whether to use the minimum and maximum numbers to limit the number of items List of items – It’s a total list of all items that can fall out in the NPC loot table. You can specify any standard items, their blueprints and any skinned or custom items The commands in the chat (for admins only) /SpawnPointPos {name} – To show the local admin’s position coordinates relative to the place where the NPC {name} appears /SpawnPointAdd {name} – To create the NPC appearance point {name} in the Admin’s custom coordinates. A file with this name will be created in the folder Custom and you can configure it as you need /SpawnPointAddPos {number} {name} – To write the local admin’s coordinate into the preset with the positional number {number} (starting from 1) to the place where the NPC {name} appears /SpawnPointAddWear {number} {name} – To write all the admin’s dressed clothes into the preset with the positional number {number} (starting from 1) to the place where the NPC {name} appears /SpawnPointAddBelt {number} {name} – To write all the admins’ quick slots cells into a preset with the positional number {number} ( starting from 1) to the place where the NPC {name} appears /SpawnPointShowPos {number} {name} – To show to the Admin all the custom NPC appearance points in the preset with the positional number {number} ( starting from 1) in the place where the NPC {name} appears /SpawnPointReload {name} – Reload Spawn Point with the name {name} Console commands (RCON only) ShowAllNpc – Shows the number of all NPCs of the BetterNpc plugin on your server Hooks object CanAirDropSpawnNpc(SupplyDrop supplyDrop) – It is called before an NPC appearance to guard an AirDrop. The returning of a non-zero value stops an NPC appearance object CanCh47SpawnNpc(HackableLockedCrate crate) – It is called before an NPC appearance to guard a locked chinook crate. The returning of a non-zero value stops an NPC appearance object CanBradleySpawnNpc(BradleyAPC bradley) – It is called before an NPC appearance to guard the boxes from crushed Bradley. The returning of a non-zero value stops an NPC appearance object CanHelicopterSpawnNpc(BaseHelicopter helicopter) – It is called before an NPC appearance to guard the crates from crushed patrol helicopter. The returning of a non-zero value stops an NPC appearance API void DestroyController(string name) – It destroys the place of appearance NPC with the name {name} void CreateController(string name) – It creates the place of appearance NPC with the name {name} These APIs can be used with standard monuments, custom monuments (NPC locations) and roads. The name of this monument is in standard monuments {name}. It is the name of the file in the Custom and Road folder in custom monuments and roads My Discord: KpucTaJl#8923 Join the Mad Mappers Discord here! Check out more of my work here! Creator of the default configuration – jtedal$31.00 -
Version 0.1.8
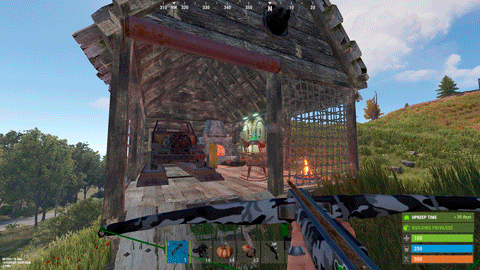
494 downloads
Plugin for Real PvE servers, featuring damage prevention, anti-griefing measures, claiming vehicles, an automatic loot queue in radtowns and raid zones and much more. The ability to set "server.pve" to "true", which allows the server to have a "PvE" flag; Damage from NPC's are enabled when server.pve is true; The ability to inflict damage to one's own structures with "server.pve true"; The ability to destroy(including external walls) or rotate one's structures without any time constraints; The ability to force the decay of building blocks with Twigs grade, even if there is wood in the Tool Cupboard; No one, except the owner or their friends, will be able to open their loot containers (chests, storages, bodies, etc.); Players can't gather resources within the Building Privilege of someone else; Administrators can bypass loot restrictions; The ability to schedule the killing of players if they disconnect within someone else's Building Privilege; Disabling backpack and active item drop upon death, even if backpack is full; The ability to disable 'Give' messages; The ability to modify the items given at spawn on the beach; The ability to create an unlimited number of custom permissions; The ability to allow players to bypass the queue; The ability to set limits on sleeping bags, shelters and auto turrets for each permission; The ability to set a multiplier for the prices of monuments and events for each permission; The ability to customize the price and amount of vehicles for each of your custom permissions; The ability to assign vehicles to each player; The ability to customize the assigned price and available amount of vehicles for each of your custom permissions; An assigned vehicle can't be damaged, looted or pushed by other players, but it can be pushed if it is within someone else's Building Privilege; The ability to loot monuments through a queue system; The ability to configure monuments, setting their looting price and time, and adjusting status bars for each monument; The ability to acquire the privilege to loot events (helicopters, bradleys, and raidable bases) through a purchase; The ability to customize the price of each event types and loot attempts (lives); NPCs only aggress against players who are looting monuments, events or raidable bases; Only players who are looting monuments, events or raidable bases can inflict damage to NPCs; RaidableBases are protected from griefing(no damage, no loot and etc). Only the owner can interact with the raid; Neutral RaidableBases can be purchased; Prices for purchasing neutral raids are configurable for each difficulty level; Configurable raid limits (currently available) along with discount multipliers for purchases, for each permission. File location: *SERVER*\oxide\data\RealPVE\PermissionConfig.json Default: https://pastebin.com/5VtWZZVr All permissions are created and configured in the config file under the "List of permissions" section. You can create as many permissions as needed and customize them flexibly. It is recommended to use the prefix "realpve" in the permission's name, for example: "realpve.vip". NOTE: The first permission will serve as the default permission for those who do not have any permissions. { "List of permissions. NOTE: The first permission will be used by default for those who do not have any permissions.": [ { "Permission Name": "realpve.default", "Bypass Queue": false, "Limit of beds": 15, "Limit of shelters": 1, "Limit of auto turrets": 12, "Monuments price multiplier": 1.0, "Events price multiplier": 1.0, "Limit of RaidableBases(at the time)": 1, "RaidableBases price multiplier": 1.0, "Vehicles settings": { "Horse": { "Limit": 1, "Price": 10.0 }, "Bike": { "Limit": 1, "Price": 5.0 }, "MotorBike": { "Limit": 1, "Price": 20.0 }, "Car": { "Limit": 1, "Price": 25.0 }, ... } }, { "Permission Name": "realpve.vip", "Bypass Queue": true, "Limit of beds": 20, "Limit of shelters": 2, "Limit of auto turrets": 15, "Monuments price multiplier": 0.9, "Events price multiplier": 0.9, "Limit of RaidableBases(at the time)": 2, "RaidableBases price multiplier": 0.9, "Vehicles settings": { "Horse": { "Limit": 5, "Price": 9.0 }, "Bike": { "Limit": 5, "Price": 4.5 }, "MotorBike": { "Limit": 5, "Price": 18.0 }, "Car": { "Limit": 5, "Price": 22.5 }, ... } } ], "Version": { "Major": 0, "Minor": 1, "Patch": 1 } } An example of a monument/event/rb multipliers using default permissions. For example, if you set the price for the Harbor at $1000, a player with the default permission(1.0) will pay $1000 * 1 = $1000. Meanwhile, a player with a VIP permission(0.9) will pay $1000 * 0.9 = $900. However, if a player possesses a misbehaving permission with a value of 1.1, they will need to pay $1000 * 1.1 = $1100. { "RealPVE command": "realpve", "Is it worth forcibly implementing PvE for a server?": true, "Use GameTip for messages?": true, "Is it worth preventing the sending of 'Give' messages?": true, "Which currency symbol and format will be utilized?": "{0}$", "Is it worth allowing a backpack to drop upon player death?": true, "Is it worth blocking damage to the laptop of the Hackable Crate?": true, "Is it worth preventing the pickup of plants spawned by the server in someone else's building privilege zone?": false, "Anti-Sleeper - Time in seconds after which a player will be killed if they disconnect while inside someone else's Building Privilege. Set to 0 to disable": 1200.0, "PatrolHelicopterAI - Monument Crash. If set to true, the helicopter will attempt to crash into the monument.": false, "PatrolHelicopterAI - Use Danger Zones. If set to false, the helicopter will function as it did before the April update.": false, "PatrolHelicopterAI - Flee Damage Percentage. A value of 1 or above will make the helicopter behave as it did before the April update.": 1.0, "Settings for the events": { "PatrolHelicopter": { "IsEnabled": true, "Is it worth removing fire from crates?": true, "Price": 50.0, "The number of deaths after which the event becomes public.": 5 }, "BradleyAPC": { "IsEnabled": true, "Is it worth removing fire from crates?": true, "Price": 50.0, "The number of deaths after which the event becomes public.": 5 } }, "Is Npc Random Raids enabled?": true, "Wipe ID": null, "Version": { "Major": 0, "Minor": 1, "Patch": 8 } } EN: { "MsgNoteText": "Welcome to our PvE server!\nThis server utilizes the RealPVE plugin.\nYou can find more details about the plugin at the following link: https://codefling.com/plugins/real-pve", "MsgAdminLootEnabled": "You have been added to the loot restriction ignore list!", "MsgAdminLootDisabled": "You have been removed from the loot restriction ignore list!", "MsgTeamFFireEnabled": "Friendly fire enabled by {0}!", "MsgTeamFFireDisabled": "Friendly fire disabled by {0}!", "MsgMonumentOccupied": "{1} occupied {0} in {2} minutes.", "MsgMonumentFree": "{0} is available for looting!", "MsgMonumentOfferTitle": "Unlock Treasures of {0}!", "MsgMonumentOfferDescription": "Tap the notification to pay {0}.\nAnd unlock access to undiscovered riches!", "MsgMonumentLooterDeath": "You died while looting {0}. You have {1} seconds.", "MsgMonumentLooterExit": "You have left the monument. You have {0} seconds to return!", "MsgMonumentLooterRemoved": "Time's up! You have been removed from the monument!", "MsgMonumentLootingNotFree": "You have been added to the loot queue. Loot cost: {0}", "MsgMonumentNotInQueue": "You are not in the queue! You need to re-enter the monument!", "MsgMonumentNoAccess": "no access", "MsgEventOccupied": "{0} is already occupied by {1}!", "MsgEventOfferTitle": "Claim {0}!", "MsgEventOfferDescription": "Tap the notification to pay {0}.\nAnd unlock access to undiscovered riches!", "MsgEventNewLooter": "You have claimed {0}. You have {1} death for your team.", "MsgEventDeathLimit": "{0} is no longer yours! You have exceeded your death limit!", "MsgEventComplete": "{0} destroyed at coordinates: {1}!", "MsgEventPatrolHelicopter": "Patrol Helicopter", "MsgEventBradleyAPC": "Bradley", "MsgRaidableBasesDisabled": "This Raidable Base is either disabled or not found!", "MsgRaidableBasesOccupied": "The Raidable Base is already occupied by {0}!", "MsgRaidableBasesLimit": "Limit exceeded! You have {0} out of {1} available Raidable Bases.", "MsgRaidableBasesPurchaseStart": "Payment successful! Please wait...", "MsgRaidableBasesPurchased": "You have successfully purchased the Raidable Base!", "MsgRaidableBasesPurchaseFailed": "You were unable to purchase the Raidable Base! Funds refunded.", "MsgRaidableBasesOfferTitle": "Claim {0} Raidable Base!", "MsgRaidableBasesOfferDescription": "Tap the notification to pay {0}.\nAnd unlock access to undiscovered riches!", "MsgRaidableBasesBarText": "{0} Base", "MsgRaidableBasesBarTextLootRemaining": "Loot Remaining", "MsgRaidableBasesBarTextLootCompleted": "Completed", "MsgRaidableBasesBarNoAccess": "no access", "MsgRaidableBasesEasy": "Easy", "MsgRaidableBasesMedium": "Medium", "MsgRaidableBasesHard": "Hard", "MsgRaidableBasesExpert": "Expert", "MsgRaidableBasesNightmare": "Nightmare", "MsgPrivlidgeClear": "{0} players have been removed from the Building Privilege.", "MsgPrivlidgeClearEmpty": "Only you are authorized in the Building Privilege.", "MsgVehicleDialogTitle": "Department of Motor Vehicles", "MsgVehicleDialogDescription": "ID: \nType: \nRegistration fee: \nCategory: ", "MsgVehicleDialogDescriptionValue": "<b>{0}</b>\n<b>{1}</b>\n<b>{4}</b>\n<b>{2}</b>", "MsgVehicleDialogDescriptionRegistered": "ID: \nType: \nRegistration date: \nCategory: ", "MsgVehicleDialogDescriptionRegisteredValue": "<b>{0}</b>\n<b>{1}</b>\n<b>{3}</b>\n<b>{2}</b>", "MsgVehicleDialogDescriptionNotOwner": "ID: \nOwner: \nRegistration date: \nType: \nCategory: ", "MsgVehicleDialogDescriptionNotOwnerValue": "<b>{0}</b>\n<b>{4}</b>\n<b>{3}</b>\n<b>{1}</b>\n<b>{2}</b>", "MsgVehicleCarDialogDescription": "ID: \nType: \nRegistration fee: \nCategory: ", "MsgVehicleCarDialogDescriptionValue": "<b>{0}</b>\n<b>{1}</b>\n<b>{4}</b>\n<b>{2}</b>", "MsgVehicleCarDialogDescriptionRegistered": "ID: \nType: \nReg date: \nCategory: ", "MsgVehicleCarDialogDescriptionRegisteredValue": "<b>{0}</b>\n<b>{1}</b>\n<b>{3}</b>\n<b>{2}</b>", "MsgVehicleCarDialogDescriptionNotOwner": "ID: \nOwner: \nReg date: \nType: \nCategory: ", "MsgVehicleCarDialogDescriptionNotOwnerValue": "<b>{0}</b>\n<b>{4}</b>\n<b>{3}</b>\n<b>{1}</b>\n<b>{2}</b>", "MsgVehicleCarGarageEmpty": "The car lift is empty!", "MsgVehicleDialogLink": "Register Vehicle", "MsgVehicleDialogUnLink": "Cancel registration", "MsgVehicleDialogIncorrectPassword": "The password must consist of 4 digits!", "MsgVehicleNotOwner": "You are not the owner!", "MsgVehicleCanNotInteract": "You are not the owner or their friend!", "MsgVehicleNoPermissions": "You do not have permissions for this action!", "MsgVehicleLinked": "The {0} has been successfully linked! You have {1} out of {2} available.", "MsgVehicleUnLinked": "The {0} has been successfully unlinked!", "MsgVehicleFailedDeauthorize": "You can only deauthorize by unlinking the vehicle from you.", "MsgVehicleLimit": "Limit exceeded! You have {1} out of {2} available.", "MsgVehicleDestroyed": "Your vehicle {0}({1}) has been destroyed!", "MsgVehicleFind": "Your vehicle {0} is located in grid {1}!", "MsgVehicleClear": "Removed {0} vehicles!", "MsgVehicleClearEmpty": "No vehicles found for removal!", "MsgVehicleNotFound": "Vehicle not found!", "MsgVehicleTugboatAuthorization": "To authorize in the tugboat, it must be claim!", "MsgVehicleLandVehicle": "Land", "MsgVehicleAirVehicle": "Air", "MsgVehicleWaterVehicle": "Water", "MsgVehicleWinterVehicle": "Winter", "MsgVehicleTrainVehicle": "Train", "MsgVehicleHorse": "horse", "MsgVehicleBike": "bike", "MsgVehicleMotorBike": "motor bike", "MsgVehicleCar": "car", "MsgVehicleBalloon": "air balloon", "MsgVehicleMinicopter": "minicopter", "MsgVehicleTransportHeli": "transportHeli", "MsgVehicleAttackHeli": "attack heli", "MsgVehicleRowBoat": "row boat", "MsgVehicleRHIB": "RHIB", "MsgVehicleTugBoat": "tugboat", "MsgVehicleSubmarineOne": "small submarine", "MsgVehicleSubmarineTwo": "submarine", "MsgVehicleSnowmobile": "snowmobile", "MsgVehicleTrain": "train", "MsgFree": "Free", "MsgNoDate": "null", "MsgEconomicsNotEnough": "Not enough funds!" } RU: { "MsgNoteText": "Добро пожаловать на наш PvE сервер!\nДанный сервер использует RealPVE плагин.\nПодробней о плагине можно узнать по ссылке: https://codefling.com/plugins/real-pve", "MsgAdminLootEnabled": "Вы добавлены в список игнорирования ограничения лутания!", "MsgAdminLootDisabled": "Вы удалены из списка игнорирования ограничения лутания!", "MsgTeamFFireEnabled": "{0} включил дружественный огонь!", "MsgTeamFFireDisabled": "{0} выключил дружественный огонь!", "MsgMonumentOccupied": "{1} занял {0} на {2} минут.", "MsgMonumentFree": "{0} можно лутать!", "MsgMonumentOfferTitle": "Откройте сокровища {0}!", "MsgMonumentOfferDescription": "Нажми на уведомление для оплаты {0}.\nИ разблокируй доступ к неизведанным богатствам!", "MsgMonumentLooterDeath": "Вы умерли во время лутания {0}. У вас есть {1} секунд.", "MsgMonumentLooterExit": "Вы покинули монумент. У вас есть {0} секунд на возвращение!", "MsgMonumentLooterRemoved": "Время вышло! Вы были удалены из монумента!", "MsgMonumentLootingNotFree": "Вас добавили в очередь на лутание. Стоимость лутания: {0}", "MsgMonumentNotInQueue": "Вас нет в очереди! Вам необходимо перезайти в монумент!", "MsgMonumentNoAccess": "нет доступа", "MsgEventOccupied": "{0} уже занят игроком {1}!", "MsgEventOfferTitle": "Займите {0}!", "MsgEventOfferDescription": "Нажми на уведомление для оплаты {0}.\nИ разблокируй доступ к неизведанным богатствам!", "MsgEventNewLooter": "Вы заняли {0}. У вас на команду есть {1} жизней.", "MsgEventDeathLimit": "{0} больше не ваше! Вы исчерпали свой лимит жизней!", "MsgEventComplete": "{0} уничтожен в координатах: {1}!", "MsgEventPatrolHelicopter": "Патрульный вертолет", "MsgEventBradleyAPC": "Танк", "MsgRaidableBasesDisabled": "Эта Рейд база выключена или не найдена!", "MsgRaidableBasesOccupied": "Эта Рейд база уже занята игроком {0}!", "MsgRaidableBasesLimit": "Лимит превышен! У вас {0} из {1} доступных Рейд баз.", "MsgRaidableBasesPurchaseStart": "Оплата прошла! Ожидайте...", "MsgRaidableBasesPurchased": "Вы успешно приобрели Рейд базу!", "MsgRaidableBasesPurchaseFailed": "Вам не удалось приобрести Рейд базу! Деньги возвращены.", "MsgRaidableBasesOfferTitle": "Займите Рейд базу уровня: {0}!", "MsgRaidableBasesOfferDescription": "Нажми на уведомление для оплаты {0}.\nИ разблокируй доступ к неизведанным богатствам!", "MsgRaidableBasesBarText": "Уровень: {0}", "MsgRaidableBasesBarTextLootRemaining": "Осталось лута", "MsgRaidableBasesBarTextLootCompleted": "Выполнено", "MsgRaidableBasesBarNoAccess": "нет доступа", "MsgRaidableBasesEasy": "Легко", "MsgRaidableBasesMedium": "Средне", "MsgRaidableBasesHard": "Сложно", "MsgRaidableBasesExpert": "Эксперт", "MsgRaidableBasesNightmare": "Кошмар", "MsgPrivlidgeClear": "Из шкафа выписано {0} ироков.", "MsgPrivlidgeClearEmpty": "Кроме вас в шкафу ни кто не авторизован.", "MsgVehicleDialogTitle": "ГИБДД", "MsgVehicleDialogDescription": "ID: \nТип: \nСтоимость регистрации: \nКатегория: ", "MsgVehicleDialogDescriptionValue": "<b>{0}</b>\n<b>{1}</b>\n<b>{4}</b>\n<b>{2}</b>", "MsgVehicleDialogDescriptionRegistered": "ID: \nТип: \nДата регистрации: \nКатегория: ", "MsgVehicleDialogDescriptionRegisteredValue": "<b>{0}</b>\n<b>{1}</b>\n<b>{3}</b>\n<b>{2}</b>", "MsgVehicleDialogDescriptionNotOwner": "ID: \nВладелец: \nДата регистрации: \nТип: \nКатегория: ", "MsgVehicleDialogDescriptionNotOwnerValue": "<b>{0}</b>\n<b>{4}</b>\n<b>{3}</b>\n<b>{1}</b>\n<b>{2}</b>", "MsgVehicleCarDialogDescription": "ID: \nТип: \nСтоимость регистрации: \nКатегория: ", "MsgVehicleCarDialogDescriptionValue": "<b>{0}</b>\n<b>{1}</b>\n<b>{4}</b>\n<b>{2}</b>", "MsgVehicleCarDialogDescriptionRegistered": "ID: \nТип: \nДата: \nКатегория: ", "MsgVehicleCarDialogDescriptionRegisteredValue": "<b>{0}</b>\n<b>{1}</b>\n<b>{3}</b>\n<b>{2}</b>", "MsgVehicleCarDialogDescriptionNotOwner": "ID: \nВладелец: \nДата: \nТип: \nКатегория: ", "MsgVehicleCarDialogDescriptionNotOwnerValue": "<b>{0}</b>\n<b>{4}</b>\n<b>{3}</b>\n<b>{1}</b>\n<b>{2}</b>", "MsgVehicleCarGarageEmpty": "Подъемник пустой!", "MsgVehicleDialogLink": "Поставить на учет", "MsgVehicleDialogUnLink": "Снять с учета", "MsgVehicleDialogIncorrectPassword": "Пароль должен состоять из 4-х цифр!", "MsgVehicleNotOwner": "Вы не являетесь владельцем!", "MsgVehicleCanNotInteract": "Вы не являетесь владелецем или его другом!", "MsgVehicleNoPermissions": "У вас нет прав для этого действия!", "MsgVehicleLinked": "{0} успешно привязан(а)! У вас {1} из {2} доступных.", "MsgVehicleUnLinked": "{0} успешно отвязан(а)!", "MsgVehicleFailedDeauthorize": "Вы можете выписаться только при отвязки транспорта от вас.", "MsgVehicleLimit": "Лимит превышен! У вас {1} из {2} доступных.", "MsgVehicleDestroyed": "Ваше транспортное средство {0}({1}) было уничтожено!", "MsgVehicleFind": "Ваше транспортное средство {0} находится в квадрате {1}!", "MsgVehicleClear": "Удалено {0} транспортных средств!", "MsgVehicleClearEmpty": "Транспортные средства для удаления не найдены!", "MsgVehicleNotFound": "Транспортное средство не найдено!", "MsgVehicleTugboatAuthorization": "Для авторизации в буксире, его необходимо поставить на учет!", "MsgVehicleLandVehicle": "Наземный", "MsgVehicleAirVehicle": "Воздушный", "MsgVehicleWaterVehicle": "Водный", "MsgVehicleWinterVehicle": "Зимний", "MsgVehicleTrainVehicle": "ЖД", "MsgVehicleHorse": "Лошадь", "MsgVehicleBike": "Велосипед", "MsgVehicleMotorBike": "Мотоцикл", "MsgVehicleCar": "Машина", "MsgVehicleBalloon": "Воздушный шар", "MsgVehicleMinicopter": "Мини коптер", "MsgVehicleTransportHeli": "Корова", "MsgVehicleAttackHeli": "Боевой вертолет", "MsgVehicleRowBoat": "Лодка", "MsgVehicleRHIB": "Патрульная лодка", "MsgVehicleTugBoat": "Буксир", "MsgVehicleSubmarineOne": "Маленькая подлодка", "MsgVehicleSubmarineTwo": "Подлодка", "MsgVehicleSnowmobile": "Снегоход", "MsgVehicleTrain": "Поезд", "MsgFree": "Бесплатно", "MsgNoDate": "пусто", "MsgEconomicsNotEnough": "Не достаточно средств!" } admin: loot - Enables or disables the ability for the player who enter the command to loot other players' boxes, bodies, backpacks, etc. Permission "realpve.admin" required. vehicle: find - helps to find a player's vehicle; unlink - unlinks the vehicle without the need to approach it; clear - unlinks all vehicles. team: ff - Enable/Disable damage to teammates. Only the group leader can use this command. Example: /realpve vehicle find *netID* This plugin provides the ability to claim vehicles, thereby preventing theft and griefing from other players. In permissions, you can set the price and quantity restrictions for each type of vehicle, ensuring flexible customization according to your preferences. An assigned vehicle can't be damaged, looted or pushed by other players, but it can be pushed if it is within someone else's Building Privilege. File location: *SERVER*\oxide\data\RealPVE\MonumentConfig.json Default: https://pastebin.com/XY1d9YaM This plugin introduces queue system and loot purchases for monuments. You can customize the price and time for looting for each monument. Within monuments, only the "Looter" and his friends have the ability to loot, pick up items or damage entities. Additionally, NPCs and animals within monuments do not aggress against other players and do not receive damage from them. If a player dies within the monument, they will have a grace period to return. This allows players to safely loot monuments without fear of griefing. Example of monument configuration: "ferry_terminal_1": { "Type(This parameter is just a hint. Changes won’t have any effect.)": "RadTown", "ShowSuffix": true, "Broadcast": true, "LootingTime": 900, "Price": 15.0, "BarSettings": { "Order": 10, "Height": 26, "Main_Color": "#FFBF99", "Main_Transparency": 0.8, "Main_Material": "", "Image_Url": "https://i.imgur.com/awUrIwA.png", "Image_Local(Leave empty to use Image_Url)": "RealPVE_ferry_terminal_1", "Image_Sprite(Leave empty to use Image_Local or Image_Url)": "", "Image_IsRawImage": false, "Image_Color": "#FFDCB6", "Image_Transparency": 1.0, "Text_Size": 12, "Text_Color": "#FFFFFF", "Text_Font": "RobotoCondensed-Bold.ttf", "SubText_Size": 12, "SubText_Color": "#FFFFFF", "SubText_Font": "RobotoCondensed-Bold.ttf" } } Type - This field serves only as an indicator for you. The changes won't have any impact; ShowSuffix - Suffix display. Some monuments (for example Warehouses) have suffixes in the name, like "Warehouse #12"; Broadcast - Enabling or disabling broadcasts when a monument is occupied or vacated; LootingTime - Time allocated for looting the monument; Price - The price for which you can start looting the monument. 0 means looting is free; BarSettings - Settings for the Advanced Status Bar. You can also choose the types of monuments by specifying them under the "List of tracked types of monuments" section. A list of all available types can be viewed on the MonumentsWatcher's page in the "Developer API" section. "List of tracked types of monuments": [ "RadTown", "RadTownWater", "RadTownSmall", "TunnelStation", "Custom" ] Events, similar to monuments, offer the opportunity to claim events. All events are configured in the config file under the "Settings for the events" section. You can customize the price of looting and looting attempts(deaths, including friends). Just like in monuments, only the "Looter" and his friends have the ability to loot and damage entities. Additionally, in events, NPCs do not aggress against other players. If a player(including friends) exceeds the death limit, the event became free, thereby providing other players with the opportunity to claim the event. Example of event configuration: "Settings for the events": { "PatrolHelicopter": { "IsEnabled": true, "Is it worth removing fire from crates?": true, "Price": 50.0, "The number of deaths after which the event becomes public.": 5 }, "BradleyAPC": { "IsEnabled": true, "Is it worth removing fire from crates?": true, "Price": 50.0, "The number of deaths after which the event becomes public.": 5 } } Price - The price to claim the event. 0 means looting is free; DeathLimit - Limit of deaths after which the event becomes free. File location: *SERVER*\oxide\data\RealPVE\NewbieConfig.json Default: https://pastebin.com/QHZCqpji An example of an item list given for the main inventory: "List of items for the main inventory": [ { "ShortName": "note", "Slot": 0, "Amount": 1, "SkinID": 0, "Text": "MsgNoteText" } ] P.S. In the Text field, you need to specify the language key. Or, you can just write any text, but there won't be a translation of the text. File location: *SERVER*\oxide\data\RealPVE\RaidableBasesConfig.json Default: https://pastebin.com/rpDng7Fd Integration with the RaidableBases plugin does not restrict its functionality in any way. On the contrary, it adds an anti-grief system that protects bases from malicious players. In raid bases, NPCs and other entities can only receive damage from the raid owner or their friends; Turrets and traps do not aggress against outsiders; You can customize the price of claiming to each difficulty and set individual discounts for each permission. You can still purchase raid bases using the /buyraid command. Raid bases without owners(buyable, maintained, manual and scheduled) can be bought for a price set in the configuration file or assigned to the first player who enters its radius, if the final price(price * discount) less or equals to 0. Additionally, as a bonus, upon buying this plugin, you receive 5 free bases for 3 difficulty levels, along with configured loot for them.$39.99 -
Version 0.1.5
302 downloads
A plugin creating a trigger box around Monuments and CargoShips to track entry and exit of players, npcs and entities from it. The list of all monuments can be viewed in the: Vanilla - *SERVER*\oxide\data\MonumentsWatcher\MonumentsBounds.json Custom - *SERVER*\oxide\data\MonumentsWatcher\CustomMonumentsBounds.json Note: MonumentsWatcher is utilized as an API for other plugins. You won't obtain any functionality beyond displaying monument boundaries without an additional plugin. The ability to automatically generate boundaries for vanilla and custom monuments; The ability to automatically regenerate boundaries for monuments on wipe; The ability to automatically adding languages for custom monuments; The ability to manually configure boundaries for monuments; The ability to track the entrance and exit of players, npcs and entities in a Monument and CargoShip; The ability to display boundaries. monumentswatcher.admin - Provides the capability to recreate or display monument boundaries. { "MonumentsWatcher command": "monument", "Use GameTip for messages?": true, "Is it worth recreating boundaries(excluding custom monuments) upon detecting a wipe?": true, "List of tracked types of monuments. Leave blank to track all": [], "Wipe ID": null, "Version": { "Major": 0, "Minor": 1, "Patch": 5 } } Monument bounds example: "airfield_1": { "Center": { "x": 335.881531, "y": 9.936, "z": 2096.53345 }, "CenterOffset": { "x": 0.0, "y": 15.0, "z": -25.0 }, "Size": { "x": 360.0, "y": 60.0, "z": 210.0 }, "Rotation": { "x": 0.0, "y": 44.06058, "z": 0.0 } }, ... Custom Monument bounds example: "exit69": { "MonumentType": 12, "Center": { "x": 336.676483, "y": 47.65218, "z": -39.02194 }, "CenterOffset": { "x": 0.0, "y": 0.0, "z": 0.0 }, "Size": { "x": 100.0, "y": 100.0, "z": 100.0 }, "Rotation": { "x": 0.0, "y": 0.0, "z": 0.0 } }, ... Note: MonumentType can be found in the Developer API section. ENG: https://pastebin.com/nsjBCqZe RUS: https://pastebin.com/ut2icv9T Note: After initialization, the names of custom monuments will also be added here. rotation - Sets the monument rotation based on the argument or the player's view direction; recreate - Recreating boundaries for all monuments; show - Displays the boundaries of the monument in which the player is located, either by specified ID or key. Example: Rotation: /monument rotation - Rotation of the monument towards the player's head direction, in which the player is located /monument rotation gas_station_1_0 256.5 - Monument rotation with specified arguments: monument ID and Y coordinate Display by monument key(Will display all monuments with such a key): /monument show gas_station_1 Display by monument ID(Will display one monument with the specified ID): /monument show gas_station_1_4 void OnMonumentsWatcherLoaded() Called when the MonumentsWatcher plugin has fully loaded. void OnCargoWatcherCreated(string monumentID, string type) Called when a watcher is created for a CargoShip. void OnCargoWatcherDeleted(string monumentID) Called when a watcher is removed for a CargoShip. void OnMonumentsWatcherLoaded() { Puts("MonumentsWatcher plugin is ready!"); } void OnCargoWatcherCreated(string monumentID, string type) { Puts($"Watcher for monument {monumentID}({type}) has been created!"); } void OnCargoWatcherDeleted(string monumentID) { Puts($"Watcher for monument {monumentID} has been deleted!"); } Entered hooks: void OnPlayerEnteredMonument(string monumentID, BasePlayer player, string type, string oldMonumentID) Called when a player enters any monument void OnNpcEnteredMonument(string monumentID, BasePlayer npcPlayer, string type, string oldMonumentID) Called when an NPC player enters any monument void OnEntityEnteredMonument(string monumentID, BaseEntity entity, string type, string oldMonumentID) Called when any other BaseEntity enters any monument void OnPlayerEnteredMonument(string monumentID, BasePlayer player, string type, string oldMonumentID) { Puts($"{player.displayName} entered to {monumentID}({type}). His previous monument was {oldMonumentID}"); } void OnNpcEnteredMonument(string monumentID, BasePlayer npcPlayer, string type, string oldMonumentID) { Puts($"Npc({npcPlayer.displayName}) entered to {monumentID}({type}). Previous monument was {oldMonumentID}"); } void OnEntityEnteredMonument(string monumentID, BaseEntity entity, string type, string oldMonumentID) { Puts($"Entity({entity.net.ID}) entered to {monumentID}({type}). Previous monument was {oldMonumentID}"); } Exited hooks: void OnPlayerExitedMonument(string monumentID, BasePlayer player, string type, string reason, string newMonumentID) Called when a player exits any monument void OnNpcExitedMonument(string monumentID, BasePlayer npcPlayer, string type, string reason, string newMonumentID) Called when an NPC player exits any monument void OnEntityExitedMonument(string monumentID, BaseEntity entity, string type, string reason, string newMonumentID) Called when any other BaseEntity exits any monument void OnPlayerExitedMonument(string monumentID, BasePlayer player, string type, string reason, string newMonumentID) { Puts($"{player.displayName} left from {monumentID}({type}). Reason: {reason}. They are now at '{newMonumentID}'."); } void OnNpcExitedMonument(string monumentID, BasePlayer npcPlayer, string type, string reason, string newMonumentID) { Puts($"Npc({npcPlayer.displayName}) left from {monumentID}({type}). Reason: {reason}. They are now in {newMonumentID}"); } void OnEntityExitedMonument(string monumentID, BaseEntity entity, string type, string reason, string newMonumentID) { Puts($"Entity({entity.net.ID}) left from {monumentID}({type}). Reason: {reason}. They are now in {newMonumentID}"); } [PluginReference] private Plugin MonumentsWatcher; There are 13 types of monuments: SafeZone(0): Bandit Camp, Outpost, Fishing Village, Ranch and Large Barn. RadTown(1): Airfield, Arctic Research Base, Abandoned Military Base, Giant Excavator Pit, Ferry Terminal, Harbor, Junkyard, Launch Site; Military Tunnel, Missile Silo, Power Plant, Sewer Branch, Satellite Dish, The Dome, Train Yard, Water Treatment Plant. RadTownWater(2): Oil Rig, Underwater Lab and CargoShip. RadTownSmall(3): Lighthouse, Oxum's Gas Station, Abandoned Supermarket and Mining Outpost. TunnelStation(4) MiningQuarry(5): Sulfur Quarry, Stone Quarry and HQM Quarry. BunkerEntrance(6) Cave(7) Swamp(8) IceLake(9) PowerSubstation(10) WaterWell(11) Custom(12) There are 21 api methods: GetMonumentDisplayName: Used to retrieve the nice name of the monument, considering the player's language. Returns an empty string on failure. To call the GetMonumentDisplayName method, you need to pass 3 parameters: monumentID as a string; userID as either a string or a ulong. You can provide 0 or empty string to get default(eng) language; displaySuffix() as a bool. Should the suffix be displayed in the name if there are multiple such monuments? This parameter is optional. (string)MonumentsWatcher?.Call("GetMonumentDisplayName", monumentID, player.userID, true); (string)MonumentsWatcher?.Call("GetMonumentDisplayName", monumentID, player.UserIDString, true); GetMonumentType: Used to retrieve the monument type. Returns an empty string on failure. To call the GetMonumentType method, you need to pass 1 parameter: monumentID as a string. (string)MonumentsWatcher?.Call("GetMonumentType", monumentID); GetMonumentPosition: Used to retrieve the position of the monument. Returns Vector3.zero on failure. To call the GetMonumentPosition method, you need to pass 1 parameter: monumentID as a string. (Vector3)MonumentsWatcher?.Call("GetMonumentPosition", monumentID); GetMonumentsList: Used to retrieve an array of monumentIDs for all available monuments. (string[])MonumentsWatcher?.Call("GetMonumentsList"); GetMonumentsTypeDictionary: Used to retrieve a dictionary of all available monuments with their types. (Dictionary<string, string>)MonumentsWatcher?.Call("GetMonumentsTypeDictionary"); GetMonumentsByType: Used to retrieve an array of all available monuments by type. To call the GetMonumentsByType method, you need to pass 1 parameter: monument type as a string. (string[])MonumentsWatcher?.Call("GetMonumentsByType", "SafeZone"); GetMonumentPlayers: Used to retrieve a list of players in the monument. Returns null on failure. To call the GetMonumentPlayers method, you need to pass 1 parameter: monumentID as a string. (HashSet<BasePlayer>)MonumentsWatcher?.Call("GetMonumentPlayers", monumentID); GetMonumentNpcs: Used to retrieve a list of npc players in the monument. Returns null on failure. To call the GetMonumentNpcs method, you need to pass 1 parameter: monumentID as a string. (HashSet<BasePlayer>)MonumentsWatcher?.Call("GetMonumentNpcs", monumentID); GetMonumentEntities: Used to retrieve a list of entities in the monument. Returns null on failure. To call the GetMonumentEntities method, you need to pass 1 parameter: monumentID as a string. (HashSet<BaseEntity>)MonumentsWatcher?.Call("GetMonumentEntities", monumentID); GetPlayerMonument: Used to retrieve the monumentID of the monument in which the player is located. Returns an empty string on failure. To call the GetPlayerMonument method, you need to pass 1 parameter: player as BasePlayer or userID as a ulong. (string)MonumentsWatcher?.Call("GetPlayerMonument", player); (string)MonumentsWatcher?.Call("GetPlayerMonument", player.userID); GetNpcMonument: Used to retrieve the monumentID of the monument in which the npc player is located. Returns an empty string on failure. To call the GetNpcMonument method, you need to pass 1 parameter: npcPlayer as BasePlayer or NetworkableId. (string)MonumentsWatcher?.Call("GetNpcMonument", npcPlayer); (string)MonumentsWatcher?.Call("GetNpcMonument", npcPlayer.net.ID); GetEntityMonument: Used to retrieve the monumentID of the monument in which the entity is located. Returns an empty string on failure. To call the GetEntityMonument method, you need to pass 1 parameter: entity as a BaseEntity or NetworkableId. (string)MonumentsWatcher?.Call("GetEntityMonument", entity); (string)MonumentsWatcher?.Call("GetEntityMonument", entity.net.ID); GetPlayerMonuments: Used to retrieve an array of monumentIDs for the monuments in which the player is located. Returns null on failure. To call the GetPlayerMonuments method, you need to pass 1 parameter: player as BasePlayer or userID as a ulong. (string[])MonumentsWatcher?.Call("GetPlayerMonuments", player); (string[])MonumentsWatcher?.Call("GetPlayerMonuments", player.userID); GetNpcMonuments: Used to retrieve an array of monumentIDs for the monuments in which the npc player is located. Returns an null on failure. To call the GetNpcMonuments method, you need to pass 1 parameter: npcPlayer as BasePlayer or NetworkableId. (string[])MonumentsWatcher?.Call("GetNpcMonuments", npcPlayer); (string[])MonumentsWatcher?.Call("GetNpcMonuments", npcPlayer.net.ID); GetEntityMonuments: Used to retrieve an array of monumentID for the monuments in which the entity is located. Returns an null on failure. To call the GetEntityMonuments method, you need to pass 1 parameter: entity as a BaseEntity or NetworkableId. (string[])MonumentsWatcher?.Call("GetEntityMonuments", entity); (string[])MonumentsWatcher?.Call("GetEntityMonuments", entity.net.ID); GetMonumentByPos: Used to obtain the monumentID based on coordinates. Returns an empty string on failure. To call the GetMonumentByPos method, you need to pass 1 parameter: position as a Vector3. (string)MonumentsWatcher?.Call("GetMonumentByPos", pos); IsPosInMonument: Used to check if the specified position is within the monument. Returns a false on failure. To call the IsPosInMonument method, you need to pass 2 parameters: monumentID as a string; position as a Vector3. (bool)MonumentsWatcher?.Call("IsPosInMonument", monumentID, pos); IsPlayerInMonument: Used to check if the player is in the monument. Returns a false on failure. To call the IsPlayerInMonument method, you need to pass 2 parameters: monumentID as a string; player as a BasePlayer or userID as a ulong. (bool)MonumentsWatcher?.Call("IsPlayerInMonument", monumentID, player); (bool)MonumentsWatcher?.Call("IsPlayerInMonument", monumentID, player.userID); IsNpcInMonument: Used to check if the npc player is in the monument. Returns a false on failure. To call the IsNpcInMonument method, you need to pass 2 parameters: monumentID as a string; npcPlayer as a BasePlayer or NetworkableId. (bool)MonumentsWatcher?.Call("IsNpcInMonument", monumentID, npcPlayer); (bool)MonumentsWatcher?.Call("IsNpcInMonument", monumentID, npcPlayer.net.ID); IsEntityInMonument: Used to check if the entity is in the monument. Returns a false on failure. To call the IsEntityInMonument method, you need to pass 2 parameters: monumentID as a string; entity as a BaseEntity or NetworkableId. (bool)MonumentsWatcher?.Call("IsEntityInMonument", monumentID, entity); (bool)MonumentsWatcher?.Call("IsEntityInMonument", monumentID, entity.net.ID); ShowBounds: Used to display the monument boundaries to the player. Note: Since an Admin flag is required for rendering, players without it will be temporarily granted an Admin flag and promptly revoked. To call the ShowBounds method, you need to pass 3 parameters: monumentID as a string; player as a BasePlayer; displayDuration as a float. Duration of displaying the monument boundaries in seconds. This parameter is optional. MonumentsWatcher?.Call("ShowBounds", monumentID, player, 20f);$1.99 -
Version 1.3.2
7,128 downloads
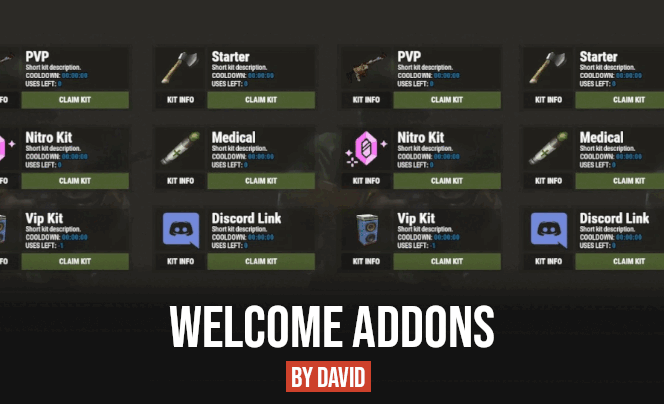
Bundle of four addons made for Welcome Panel UI. All four addons including preset default config files as you see them on screenshots.$14.99 -

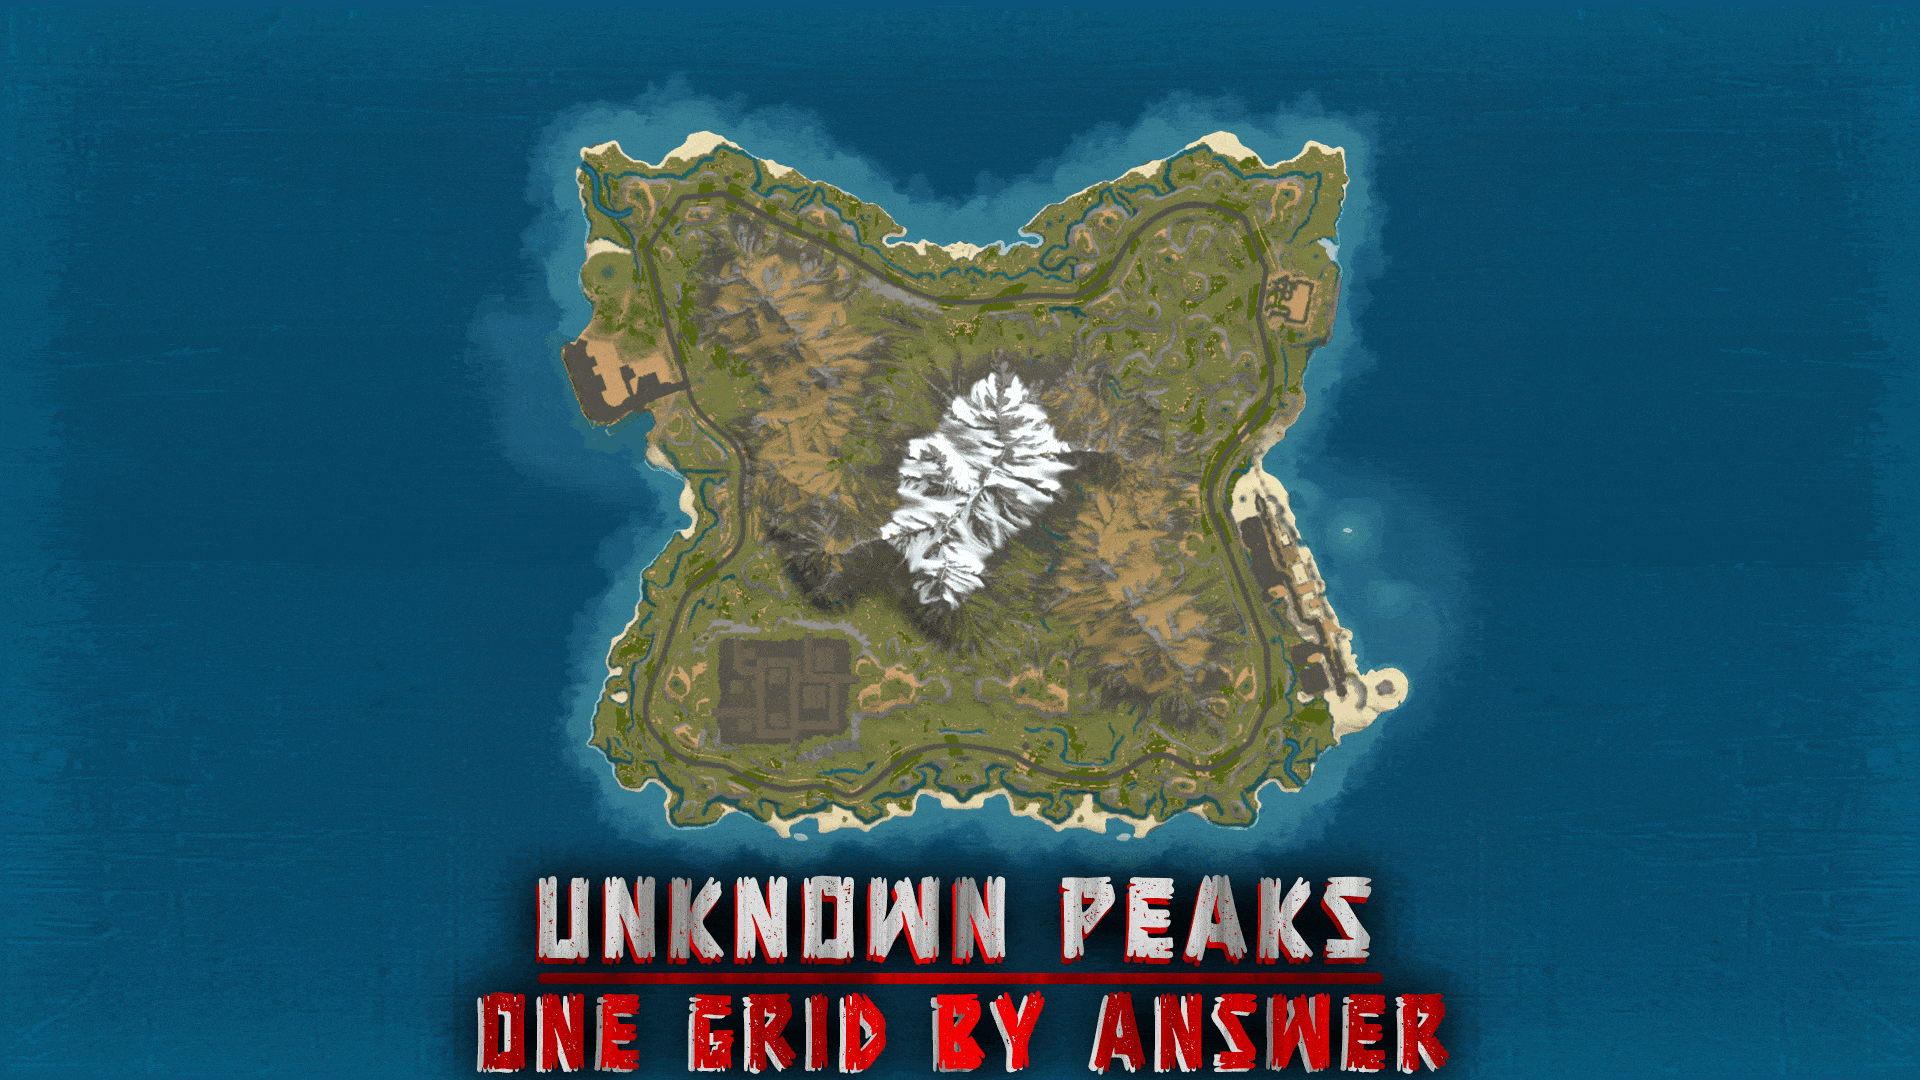
Version 2.3
120 downloads
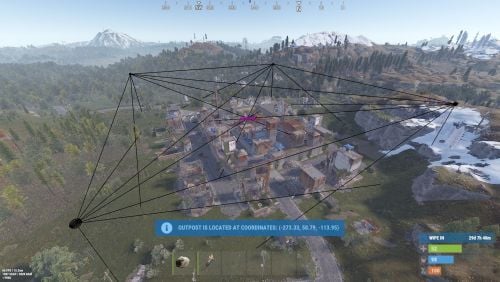
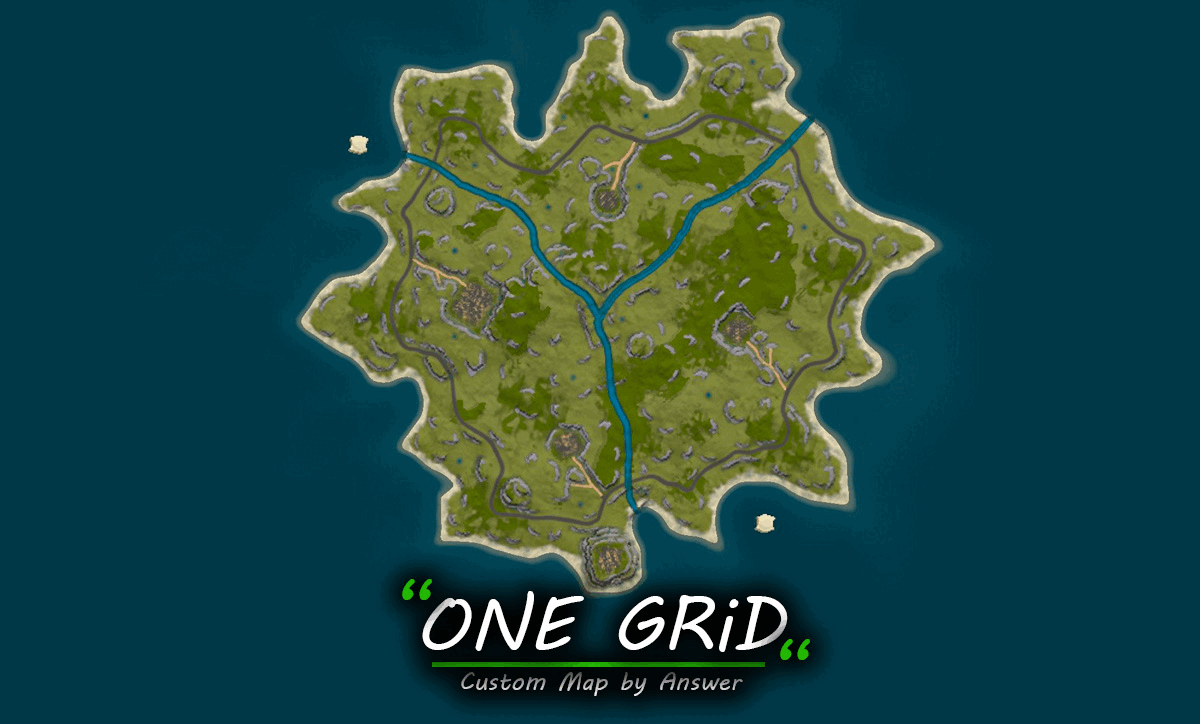
Small custom map, perfect for an action-packed one grid server. This map is constantly supported and updated for the current version of the game with all updates! Monuments: Gas station: default, added one more recycler Mining outpost: green puzzle + oil refinery & a fuse puzzle underground Red Hideout: Recycler, medical crate, a few barrels, blue puzzle, 2 entrances, oil refinery Secret vault: Green puzzle 2 default lighthouses 3 Train stations Oil rigs - 1 recycler inside the red card room on Large Fishing village: Outpost vending machines, Fortune wheel (Bandit camp wheel), one recycler, a few barrels, research table, repair bench, shop front Underwater Lab One cave with 2 pockets (2 spots to build) River Total prefab count: 1722 The map also comes with the password for the editor, just in case you don't like something and want to edit/remove it. DISCORD Need support? Join my brand new discord server @ discord.gg/TJxwpKT2Ge$14.99- 2 comments
- 2 reviews
-
- 2
-

-
- #rust
- #custom map
- (and 21 more)
-

Version 1.0.1
21 downloads
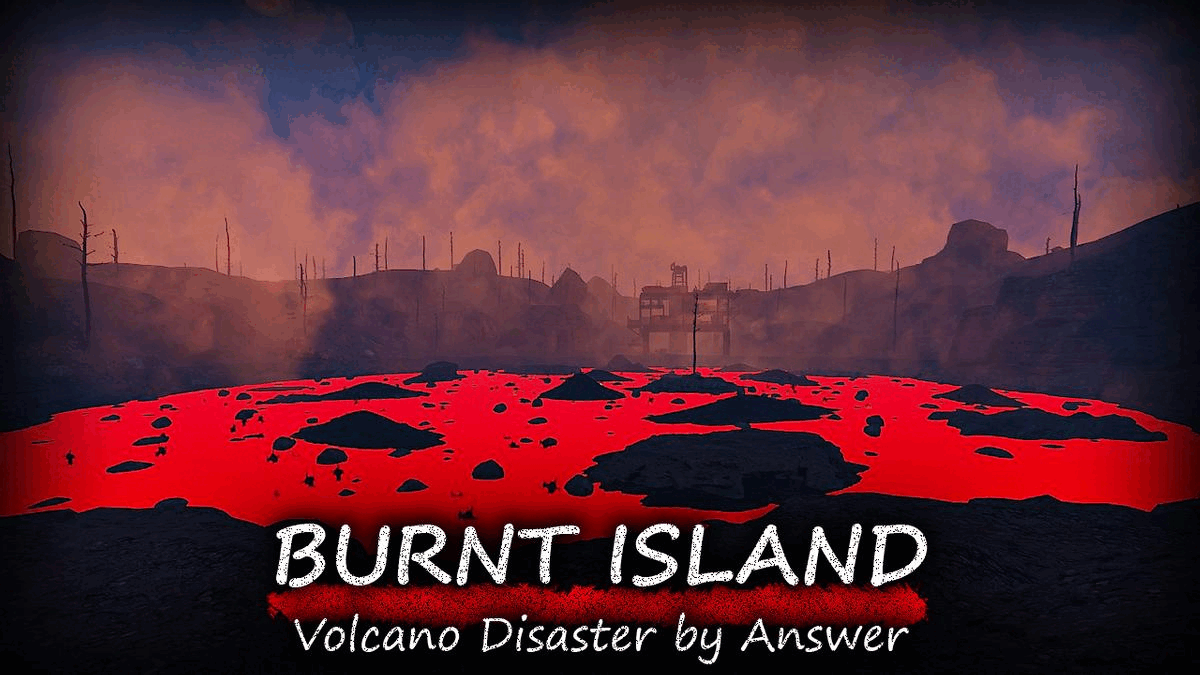
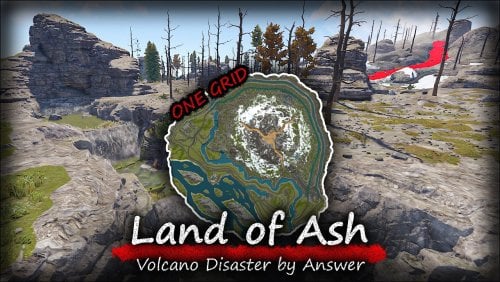
This map showcases two unique custom biomes, along with custom terrain, cliffs and rock formations. Volcanic Biome: Featuring dynamic landscapes of lava rivers and lakes, this biome captures the raw power of an active volcano. Radioactive Biome: Saturated with toxic waste and further contaminated by scientific experiments, this area is a hazardous zone where scientists are investigating an enigmatic green substance from a mysterious meteorite. Explore these biomes and uncover the secrets they hold! Map size - 4000 Prefab count: ~18k FEATURES > Players will take damage upon contact with lava / radioactive water > Volcanic biome is rich in dead pines, ores, rock formations and manually added custom vegetation. > Radioactive biome is rich in radioactive lakes & junkpiles, swamp trees and dead pines. Players will need a hazmat suit. > Ring Roads, Ring Rail > Buildable Bus stops > Custom Barge build spots on water - marked with X CUSTOM MONUMENTS > Tool Store > Deserted City > Military Camp > Sunken Vessel > Tugboat Docks > Large Mining Warehouse > 2x Comms Tower > Dweller Hideout > Tree House Camp > 2x Train Depot > Coaling Station > Satelite Tower > Cargobob crash > Sunken Containers > Custom Underwater Lab > Radioactive Dump > Meteorite: Mobile research labs > Mini Outpost - safe zone > Bandit Fishing Village - safe zone CUSTOM PREFABS > Checkpoint Bridge A > Checkpoint Bridge B > Volcano, lava rivers, lava lakes > Meteorite, radioactive rivers & lakes, custom junkpiles > Train Track bridges, road bridges > Waterfall > Custom Zipline locations - marked with Z EDITING - The password for the editor is included with the map. VANILLA MONUMENTS > Ferry Terminal > Mini Launch Site (optimized) > Junkyard (Flooded) > 2x Lighthouse (added more rock formations, vegetation and junkpiles) > Gas Station > Satelite Dish > Harbor > Abandoned Supermarket > Mining Outpost > Airfield > Missile Silo > Small Oil Rig > Large Oil Rig > HQM Quarry > Fishing Village NOTES – Need help? You can always contact me on my discord server @ discord.gg/TJxwpKT2Ge$39.90 -
Version 1.1.7
31 downloads
A world affected by multiple volcanoes and shattered in multiple islands. Scientists have taken advantage of this ‘opportunity’ and have set up a secret mining operation inside a volcano. This map is constantly supported and updated for the current version of the game with all updates! Map size – 3000 Prefab count: ~20k NOTES – If you need support, join my brand new discord server @ discord.gg/TJxwpKT2Ge HIGHLIGHTED FEATURES > Detailed terrain work – This map was made entirely manual. > The lava has fire effects, glows in the dark & players take damage if they touch it. > The lava “biome” is rich in dead pines, ores & rock formations (both normal & custom ones that players can build in) > Ring road, above ground ring rail, road tunnels through the mountains > Multiple islands for players to build on > Loot Barrels, vanilla junkpiles, custom junkpiles placed across Gigant Volcano > Custom caves for players to build in (marked with X) CUSTOM MONUMENTS > Gigant Volcano – 2 military crates in the middle, players are gonna have to do some parkour over lava. > Volcano – 2 smaller volcanoes, each one unique > Secret Mining Operation – Scientists, Blue Puzzle that leads to an elevator shaft, leading to an underground mine, containing a lava parkour leading to loot. > Plane Crash – Green Keycard Puzzle, recycler, loot > Burning Water Pumps – Green keycard spawn, recycler, loot > Broken Bridge A/B/C – each one is unique, contains scientists & loot (All bridges can be passed with some parkour) > Train Depots – Loot > Collapsed Tunnel – Loot, secret cave tunnel > Mini Launch Site – A lighter version of launch site, containing only around 700 prefabs > Lost Treasures – Junkpiles & Underwater loot > Hunter’s Hideout – Designed to be looted by boat > Stranded Vessel – Recycler, Green Keycard Puzzle // Inspired from the game Sea of Thieves > Combined Outpost – Safe zone CUSTOM PREFABS > Multiple bridge models, some are marked with * > Waterfall – 3 of the 4 are building locations, the one next to airfield contains loot inside. > Custom zipline towers > Custom caves for players to build in (marked with X) > Multiple tunnels through mountains EDITING – The password for the editor is included with the map. IMPROVED MONUMENTS > Flooded Sulfur Quarry – added loot, more decor, recycler > Stone Quarry – added loot, more decor, recycler > HQM Quarry – added loot, more decor, recycler FACEPUNCH MONUMENTS > 2x Fishing Villages > Lighthouse > Harbor > Airfield > Arctic Research Base > Desert Military Base > Underwater Lab > Small Oil Rig > Large Oil Rig$39.99- 3 comments
- 1 review
-
- 1
-

-
- #rust
- #facepunch
- (and 12 more)
-
Version 1.1.0
106 downloads
This map is constantly supported and updated for the current version of the game with all updates! Need help? Join my brand new discord server @ discord.gg/TJxwpKT2Ge CUSTOM MONUMENTS - Tool Store - Recycler - Medical Deposit - Green Keycard puzzle (Blue Keycard Spawn inside) - Abandoned Barm - Blue Keycard puzzle (Red Keycard Spawn inside) - Military Base - MLRS, Recycler, no puzzle - Cobalt Blacksite - Underground Bradley APC, Recycler, Oil Refinery, no puzzle - Lost Containers - Abandoned Barges - Fishing Village - Safe Zone, recycler, all outpost vending machines, fortune wheel, marketplace (drone shop), mission vendors (NPCs), repair & research bench DEFAULT MONUMENTS - 2 Lighthouses - Small Oil Rig, Large Oil Rig - 3 Train stations - 1 Underwater Lab NOTES - All cliffs and rock formations are placed manually, - Manually added vegetation (Flowers, Bushes) around most cliffs, - All terrain is manually done. - The map comes with the password for the editor.$19.99 -
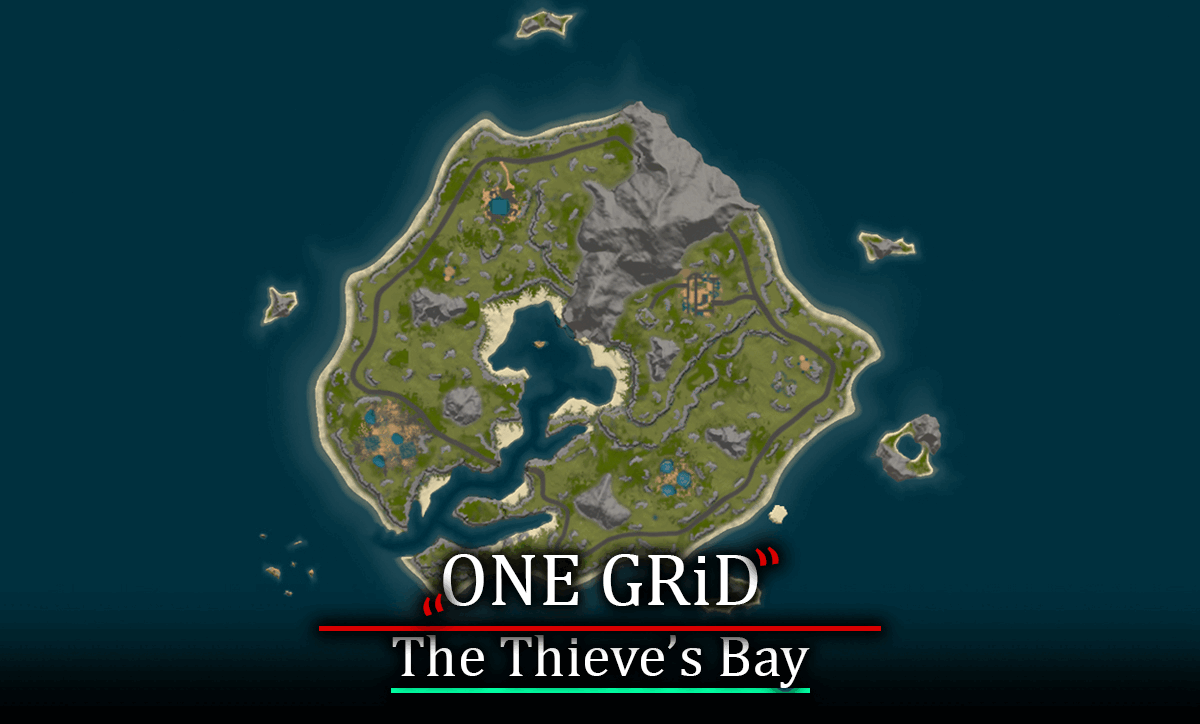
Version 1.0.0
13 downloads
This ‘one grid’ map features a really unique landscape and set of custom monuments, while keeping it high performance, containing only ~2900 prefabs. – This map’s main custom monument is Bradley City, containing a blue keycard puzzle, a chinook drop zone point, scientists, and the bradley APC, so players will have to look both ways before crossing the street. This map is constantly supported and updated for the current version of the game with all updates! NOTES – Need help? You can always contact me on my discord server @ discord.gg/TJxwpKT2Ge – The password for the editor is included with the map. HIGHLIGHTED FEATURES – Ring road – Buildable bus stops – Low prefab count (high fps) – Designed to work with the harbor-cargo update – 2 caves in the mountain for players to build in. (1 custom, 1 vanilla) CUSTOM MONUMENTS – Sunken Satelite Dish – Sunken HQM Quarry – loot, scientists, metal & sulfur ores – Bradley City – Blue keycard puzzle, loot, scientists, Bradley APC, recycler, chinook drop zone point – This monument was designed for PVP, with plenty of cover, parkour and custom ziplines. – Bandit Fishing Village – Safe zone, fortune wheel, outpost vending machines, airwolf (minicopter) vendor. VANILLA MONUMENTS – Harbor – Gas station – Ferry Terminal – Lighthouse - added floating junkpiles and rock formations, making it higher & added zipline point towards ferry terminal) – Large Oil Rig – Small Oil Rig – Underwater Lab$21.90 -
Version 1.6
59 downloads
This map was designed for action packed one grid servers & is constantly supported and updated for the current version of the game with all updates. NOTES – If you need support, join my brand new discord server @ discord.gg/TJxwpKT2Ge – The password for the editor is included with the map. CUSTOM MONUMENTS > Stranded Vessel - Inspired from the game Sea of Thieves // Recycler, Green Keycard Puzzle (Blue Keycard spawns inside) > Improvised Airfield - Bradley APC, Recycler, Blue Keycard Puzzle (Red Keycard spawns inside) > Active Crash Site - MLRS, 2 scientists > Water Fountain - "Hidden" loot on the buttom, custom zipline tower on top // the rocks inside are climbable > Mini Outpost (Safe-zone) - All outpost vending machines, fortune wheel, recyclers > Sunken Treasure - Loot & Green Keycard Puzzle underwater // Custom zipline tower that leads to mainland > Hijacked Rafts - Around 7 scientists, custom zipline tower in the middle // note: players cannot build on the rock formations CUSTOM PREFABS > Custom tunnel through the mountain > Custom bridge > Custom zipline tower > Waterfall - Custom zipline tower that leads to stranded vessel > Custom Islands for players to build on > The entire map is manually made. FACEPUNCH MONUMENTS > Underwater Lab > Small Oil Rig > Large Oil Rig > Fishing Village > Lighthouse$21.90 -
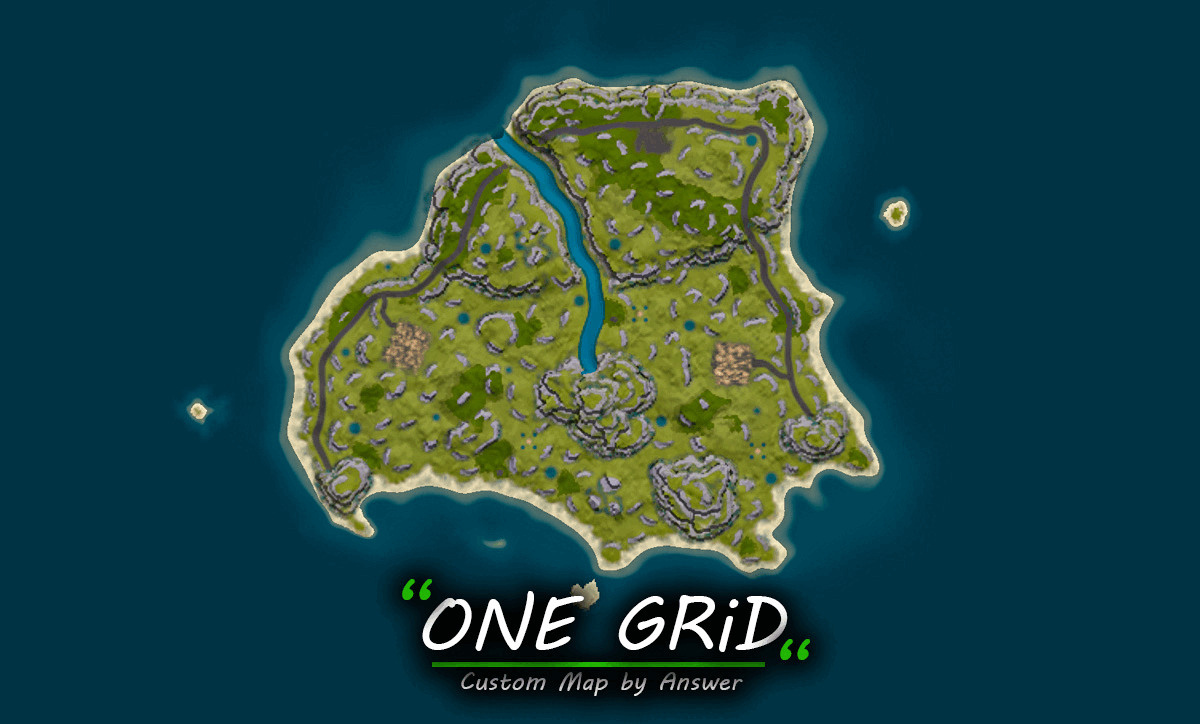
Version 1.0.3
67 downloads
Small custom map, perfect for an action-packed one grid server. This map is constantly supported and updated for the current version of the game with all updates! Monuments: - Medical Deposit (Green puzzle) - Mining outpost (Default + added green card desk) - Cobalt Armory (Blue puzzle - In the screenshots its green, but I fixed it) - Lighthouse (Default) - Fishing village (Marketplace (Drone shop), outpost vending machines, bandit camp fortune wheel, research, repair bench) - Underwater Lab (Default) - Both oil rigs (Default) - Abandoned custom boats around the shores (Mostly decorative, but they also have 2 loot barrels) - Abandoned tents in some forests (One tent contains a primitive crate + 2 loot barrels) - 3 Train stations DISCORD Need support? Join my brand new discord server at discord.gg/TJxwpKT2Ge$14.90 -
Version 1.0.6
10 downloads
A one grid map affected by a volcano, containing a secret mining rig underneath - operated by scientists and guarded by bradley. This map is constantly supported and updated for the current version of the game with all updates! NOTES – If you need support, join my brand new discord server @ discord.gg/TJxwpKT2Ge – The password for the editor is included with the map. HIGHLIGHTED FEATURES > Detailed terrain work – This map was made entirely manual. > The lava glows in the dark & players take damage if they touch it. > The lava “biome” is rich in dead pines, ores & rock formations > Ring road, above ground ring rail > Multiple islands for players to build on > Custom caves for players to build in (marked with X) CUSTOM MONUMENTS ((FAQ: this map contains all key cards)) > Gigant Volcano - 1 military crate in the middle, players are gonna have to do some parkour over hot lava. > Secret Mining Rig - placed in a gigant cave underneath the volcano, surrounded by lava, containing a Blue Keycard puzzle, multiple scientists and the Bradley APC. The entrances are marked with a red "O" on the map. > Burning HQM Quarry - recycler, scientists > Burning Water Pumps - recycler, loot, scientists > Coaling Station - Green card puzzle (blue card inside), wagon extraction point, contains scientists & loot > Underground Depot - contains blue card puzzle, wagons & loot - guarded by tunnel dwellers > Flooded Sulfur Quarry - scientists > Flooded Stone Quarry - scientists > Train Depot > Bandit Fishing Village - Safe zone CUSTOM PREFABS > Custom rail bridge > Custom road bridges (marked with *) > Custom caves for players to build in (marked with X) > Custom log bridges above the river > Custom zipline tower > Multiple waterfalls FACEPUNCH MONUMENTS > Lighthouse > Oxum's Gas Station > Small Oil Rig > Large Oil Rig > Underwater Lab$24.90 -
Version 1.0.9
82 downloads
Small custom map, perfect for an action-packed one grid server. This map is constantly supported and updated for the current version of the game with all updates! Features: - Custom monuments - Manually placed & painted cliffs - Manually made all the terrain - 1 Underwater laboratory - 3 Train stations - Both oil rigs - 3 rivers - "Tropical" themed forests (They include palm trees (that also respawn)) - 2 entrances in the big mountain that lead to a cave pocket each (unique spots to build) - Decorative custom boats along the beaches - they also include 2 loot barrels - High performance map - around 3300 total prefab count Custom monuments: - Abandoned Farm Blue Puzzle - Forester's Village - Safe zone Contains airwolf (Helicopter NPC vendor), recycler, level 1 workbench, bandit's fortune wheel, marketplace (drone shop), repair bench, research, outpost's vending machines. - Chemical Facility Green Puzzle + Fuse puzzle underground Vanilla monuments: - Mining outpost - 2 Lighthouses - Fishing Village - Added 3 decorative boats DISCORD Need support? Join my brand new discord server at discord.gg/TJxwpKT2Ge$19.99- 5 comments
-
- 1
-
-
- #onegrid
- #custom monuments
- (and 17 more)
-

Version 0.1.7
232 downloads
This plugin automates the collection of dung from horses and their feeding, by adding Industial Adapters and BoxStorage to the HitchTrough and Composter. Also auto spliting dungs in the Composter container. Note: During plugin unloading, modified entities are not removed, to prevent the removal of pipes every time the plugin/server is restarted. To remove modifications from entities, you should use the "idung unload" command. industrialdung.admin - Provides unrestricted access to the plugin's functionality. This includes the ability to add/remove or clear modificated entities from other players. Note: In the configuration file, within the "Max ammount of modified entites per group" section, you can specify limits for any existing permission by simply listing its name. "Max ammount of modified entites per group": { "MyPermission": { "HitchTroughs": 5, "Composters": 2 }, ... If you want to create a new permission, you can also include it in the list, but the name must begin with "industrialdung". { "Chat command": "idung", "Use GameTip for messages?": true, "Use auto splitting in the Composter?": true, "AutoModify - Default value for new players": true, "Wood Storage Box Workshop Skin ID": 2911301119, "The list of items(short name) available for the composter. Leave empty to use vanilla": [ "horsedung", "fertilizer", "plantfiber" ], "Max ammount of modified entites per group": { "industrialdung.default": { "HitchTroughs": 5, "Composters": 2 }, "industrialdung.vip": { "HitchTroughs": 10, "Composters": 4 }, "realpve.vip": { "HitchTroughs": 15, "Composters": 6 } }, "Popup - Duration": 6.0, "Popup - Icon Url": "https://i.imgur.com/4Adzkb8.png", "Popup - Icon Color": "#CCE699", "Popup - Icon Transparency": 0.8, "Popup - AnchorMin": "0 1", "Popup - AnchorMax": "0 1", "Popup - OffsetMin": "30 -90", "Popup - OffsetMax": "270 -40", "Popup - Text Size": 14, "Popup - Text Color": "#FFFFFF", "Popup - Text Font(https://umod.org/guides/rust/basic-concepts-of-gui#fonts)": "RobotoCondensed-Bold.ttf", "Popup - SubText Size": 12, "Popup - SubText Color": "#FFFFFF", "Popup - SubText Font": "RobotoCondensed-Regular.ttf", "Popup - Text FadeIn": 1.0, "Popup - Sound Prefab Name": "assets/bundled/prefabs/fx/invite_notice.prefab", "Version": { "Major": 0, "Minor": 1, "Patch": 7 } } EN: { "MsgNotAllowed": "You do not have permission to use this command!", "MsgNotHitchOwner": "You are not the owner of this hitch trough!", "MsgNotComposterOwner": "You are not the owner of this composter!", "MsgNotEntity": "You need to look at the hitch trough/composter or provide correct net ID!", "MsgNotModifiedEntity": "This entity is not modified!", "MsgLimitReached": "You cannot to modify this entity as you have reached your limit of {0}!", "MsgPopupTextHitch": "Modify this hitch trough?", "MsgPopupTextComposter": "Modify this composter?", "MsgPopupSubText": "Click on the notification to confirm", "MsgHitchTroughAdded": "The hitch trough has been successfully modified!", "MsgComposterAdded": "The composter has been successfully modified!", "MsgMyRemovedHitch": "The modification from the hitch trough has been successfully removed!", "MsgMyRemovedComposter": "The modification from the composter has been successfully removed!", "MsgMyAllRemoved": "All your modifications from the hitch troughs and composters have been successfully removed!", "MsgPlayerMsgAllRemoved": "All {0}'s modifications from the hitch troughs and composters have been successfully removed!", "MsgAllRemoved": "All modifications from the hitch troughs and composters have been successfully removed!", "MsgAutoModifyEntityEnabled": "Automatic entity modification is enabled!", "MsgAutoModifyEntityDisabled": "Automatic entity modification is disabled!" } RU: { "MsgNotAllowed": "У вас недостаточно прав для использования этой команды!", "MsgNotHitchOwner": "Вы не являетесь владельцем данной кормушки!", "MsgNotComposterOwner": "Вы не являетесь владельцем данного компостера!", "MsgNotEntity": "Вам необходимо смотреть на кормушку/компостер или указать корректный net ID!", "MsgNotModifiedEntity": "Данная сущность не является модифицированной!", "MsgLimitReached": "Вы не можете модифицировать данную сущность, так как вы превысили свой лимит в {0}!", "MsgPopupTextHitch": "Модифицировать данную кормушку?", "MsgPopupTextComposter": "Модифицировать данный компостер?", "MsgPopupSubText": "Нажмите на уведомление для подтверждения", "MsgHitchTroughAdded": "Кормушка успешно модифицирована!", "MsgComposterAdded": "Компостер успешно модифицирован!", "MsgMyRemovedHitch": "Модификация с кормушки успешно удалена!", "MsgMyRemovedComposter": "Модификация с компостера успешно удалена!", "MsgMyAllRemoved": "Все ваши модификации из кормушек и компостеров успешно удалены!", "MsgPlayerMsgAllRemoved": "Все модификации из кормушек и компостеров игрока {0} успешно удалены!", "MsgAllRemoved": "Все модификации из кормушек и компостеров успешно удалены!", "MsgAutoModifyEntityEnabled": "Автоматическая модификация сущностей включена!", "MsgAutoModifyEntityDisabled": "Автоматическая модификация сущностей выключена!" } 1. idung add - Adding a modification to the HitchTrough/Composter that you are looking at from a distance of no more than 10 meters. idung add *netID* - Adding a modification to the HitchTrough/Composter with the specified netID; 2. idung remove - Removing a modification from the HitchTrough/Composter that you are looking at from a distance of no more than 10 meters. idung remove *netID* - Removing a modification from the HitchTrough/Composter with the specified netID; 3. idung clear - Removing all modification from your HitchTroughs and Composters. idung clear *userID* - Removing all modification from specified player's HitchTroughs and Composters. Permission "industrialdung.admin" required. idung clear all - Removing all modification from all HitchTroughs and Composters. Permission "industrialdung.admin" required. 4. idung auto - Enabling/Disabling automatic modification of HitchTroughs and Composters, if possible. 5. idung aclear - Removing all modifications from the HitchTroughs and Composters that were not added to the data files for some reason. Permission "industrialdung.admin" required. 6. idung unload - Unloading the plugin with the removal of all modifications from HitchTroughs and Composters without deleting them from the data file. Permission "industrialdung.admin" required.$9.99- 51 comments
- 2 reviews
-
- 1
-

-
- #rust
- #industrial
- (and 25 more)
-
Version 2.1.3
2,461 downloads
Allows bases to become raidable when all players in a base become inactive. Compatible with TruePVE and NextGenPVE servers. Abandoned Bases checks each building on the server in order to determine which bases are inactive. Bases become inactive when all players authorized on the tool cupboard have been offline for the configured amount of days. When a base becomes inactive there are one of two outcomes. 1.) It will be immediately destroyed if it does not meet the configured minimum requirements. 2) It will become raidable for a configurable period of time, and when the time expires the base will be destroyed. Each zone has a map marker, allows PVP and is surrounded by a dome that protects it from being attacked from the outside. Players who zone hop will be flagged with a PVP delay where they can still be attacked for a configurable amount of time. Command /sar - requires abandonedbases.convert permission and converts a base into an abandoned base - this can be used on any base that you are authorized to and will cause the base to be destroyed when the timer expires Command /sab - starts a manual check for each building on the server in order to determine which bases are inactive (requires abandonedbases.admin permission) Command /sar radius - requires abandonedbases.convert permission and converts a base into an abandoned base and uses the specified radius for the dome / zone radius. Min and max radius are configurable. Command /sar cancel - requires abandonedbases.convert and abandonedbases.convert.cancel permissions - completely cancels an event (destroys map marker and dome, disables PVP and prevents base from being despawned) effectively allowing the base to be taken over Command /sar claim - requires abandonedbases.convert and abandonedbases.convert.claim permissions and converts a finished abandoned base into a claimed base that can be taken over by players Command /sar purge - converts all bases on the server into abandoned bases for purge day (requires abandonedbases.convert, abandonedbases.admin and abandonedbases.purgeday permissions) This is a two part command that requires you type /sab afterwards to begin. Requires abandonedbases.purgeday, abandonedbases.convert, and abandonedbases.admin permissions. Announcements are muted during purge to prevent spam. Time To Wait Between Spawns (15) will delay how quickly every base is converted Permissions (ADMINS REQUIRE PERMISSIONS TOO) abandonedbases.convert - required to use /sar command abandonedbases.convert.free - converting is free for users that have this permission abandonedbases.convert.claim - required to use /sar claim command abandonedbases.purgeday - required to use /sar purge command abandonedbases.admin - required to use /sab and purge commands abandonedbases.notices - users with this command can see all in-game notices from the plugin abandonedbases.attack - lets players hunt bases and convert them by attacking if they're abandoned abandonedbases.attack.time - shows players how much time is left before a base becomes abandoned when they attack it abandonedbases.attack.lastseen - required to see the last time the player was online when attacking a base Auto-add abandonedbases.immune to configuration if one does not exist already (lifetime set to "none") - abandonedbases.immune will not be automatically added if the configuration contains a different immunity permission already - abandonedbases.immune will give the user immunity to any base they've built at or are authed at from becoming abandoned - abandonedbases.exclude does not provide immunity and is explicitly intended for the plugin to ignore the player only - abandonedbases.exclude is intended for admins, mods, staff or helpers to be able to freely make repairs or auth at bases without interfering with the abandoned timer abandonedbases.exclude: excludes the user from being checked as an authorized user to a TC this permission should not be used to exempt users - exempt users with immunity by assigning them a permission from a role that has the lifetime set to "none" example roles that includes permission abandonedbases.immune and lifetime set to "none" to properly exempt a user or group by granting abandonedbases.immune to a user or group: "Purge Settings": [ { "Permission": "abandonedbases.immune", "Lifetime (Days)": "none" }, { "Permission": "abandonedbases.vip", "Lifetime (Days)": "7" }, { "Permission": "abandonedbases.veteran", "Lifetime (Days)": "5" }, { "Permission": "abandonedbases.basic", "Lifetime (Days)": "3" } ], Purge Settings Permission - The permission to use with this setting Lifetime (Days) - The amount of time in days before a base is considered abandoned. Set to none to not consider players with this permission as inactive. Conversions Before Destroying Base (1) - The amount of times a base can become abandoned before it is finally destroyed when the Despawn Timer expires. Comes with 3 configured permissions and lifetime days by default Abandoned Settings Blacklisted Commands (command1, command2, command3) - Commands players are not allowed using at a raid or marked with PVP delay Marker Name (Minutes) (Abandoned Player Base [{time}m]) - Text shown on map marker for minutes Marker Name (Seconds) (Abandoned Player Base [{time}s]) - Text shown on map marker for seconds Foundations Required (4) - Minimum amount of foundations required to become raidable Walls Required (3) - Minimum amount of walls required to become raidable Sphere Amount (10) - Increase to darken the dome, or decrease to brighten it Sphere Radius (50) - How big the dome is in meters Use Dynamic Sphere Radius (false) - Allow the dome to detect the best dome size Max Dynamic Radius (75.0) - How maximum size of the dynamic radius Min Custom Sphere Radius - The minimum radius allowed when using /sar <radius> Max Custom Sphere Radius - The maximum radius allowed when using /sar <radius> PVP Delay (15.0) - The amount of time in seconds that players can take damage after leaving the dome Despawn Timer (1800.0) - The amount of time in seconds that players have to finish the raid Reset Despawn Timer When Base Is Attacked (true) - When enabled this will reset the above despawn timer back to 1800 seconds by default Do Not Destroy Base When Despawn Timer Expires (false) - Use this to override and prevent a base from being destroyed when Despawn Timer expires Backpacks Can Be Opened (true) - When enabled players will be allowed to open their backpacks while inside of the dome Backpacks Can Be Looted By Anyone (false) - Bypass PreventLooting plugin and allow backpacks to be lootable if enabled Corpses Can Be Looted By Anyone (true) - Bypass PreventLooting plugin and allow backpacks to be lootable if enabled Allow PVP (true) - Allows PVP while inside of the dome, and when flagged with a PVP delay Seconds Until Despawn After Looting (600) Seconds Until Despawn After Looting Resets When Damaged (true) Cancel Automated Events If Abandoned Owner Comes Online (false) Message Raiders When Event Ends During Automated Cancellation (true) Change Marker Color On First Entity Destroyed (true) Cooldown Between Conversions (3600) - Time required between each manual conversion of a base using /sar Cooldown Between Events (3600) - Time between each event - prevents looting, damage and using /sar claim Cooldown Between Cancel (3600) - Time the player must wait to use /sar cancel Cooldown Between Conversions Ignored During Purge (true) Cooldown Between Cancel Ignored During Purge (true) Cooldown Between Events Ignored During Purge (true) Prevent Hogging Ignored During Purge (false) Run Once On Server Startup (false) - Check for abandoned bases immediately after server startup is complete Run Every X Seconds (0.0) - The time in seconds to check for each building on the server in order to determine which bases are inactive Kill Inactive Sleepers (false) - When enabled players with a permission from purge settings will be executed when they are offline for the configured amount of lifetime days Let Players Kill Abandoned Sleepers (false) - Allows players to kill anyone sleeping inside of an abandoned base rather than the server killing them automatically Economics/ServerRewards Cost To Manually Convert (0 = disabled) - Used with /sar command to convert any base into an abandoned base Use Map Marker (true) Require Event Be Finished Before It Can Be Canceled (true) Various auto turret settings Hooks (implemented in 2.1.4) participants - anyone that has actively participated (excludes admin if configured, and those in noclip or vanish) - this should not contain null elements participantIds - contains the userid of all participants - this list is better as anyone offline and dead will be included in this but not in the participants list because they would be null! intruders - anyone currently inside of the event (does not exclude anyone) - this should not contain null elements intruderIds - contains the userid of everyone inside of the event (does not exclude anyone) - this list is better as anyone offline and dead will be included in the list but not in the intruders list because they would be null! void OnPlayerPvpDelayStart(BasePlayer player, ulong userid, Vector3 eventPos, float radius, List<BasePlayer> intruders, List<ulong> intruderIds, List<BaseEntity> entities) void OnPlayerPvpDelayExpiredII(BasePlayer player, ulong userid, Vector3 eventPos, float radius, List<BasePlayer> intruders, List<ulong> intruderIds, List<BaseEntity> entities) void OnAbandonedBaseStarted(Vector3 eventPos, float radius, bool allowPVP, List<BasePlayer> participants, List<ulong> participantIds, List<BaseEntity> entities) void OnAbandonedBaseEnded(Vector3 eventPos, float radius, bool allowPVP, List<BasePlayer> participants, List<ulong> participantIds, List<BaseEntity> entities) void OnPlayerEnteredAbandonedBase(BasePlayer player, Vector3 eventPos, float radius, bool allowPVP, List<BasePlayer> intruders, List<ulong> intruderIds, List<BaseEntity> entities) void OnPlayerExitedAbandonedBase(BasePlayer player, Vector3 eventPos, float radius, bool allowPVP, List<BasePlayer> intruders, List<ulong> intruderIds, List<BaseEntity> entities) void OnAbandonedBaseDespawned(Vector3 eventPos, float radius, bool allowPVP, List<BasePlayer> intruders, List<ulong> intruderIds, List<BaseEntity> entities) Convert Bases and/or Claim Bases Credits: misticos for giving permission to use some of his code$30.00- 463 comments
- 8 reviews
-
- 16
-
-
-
- #rust
- #rust plugin
- (and 6 more)
-
Version 1.9.3
854 downloads
Features Allows players to store items in portable bags Allows limiting the number of bags players can use at once Allows placing bags into storage containers, with limits Allows placing bags inside other bags, with limits Allows restricting which items can go inside bags Allows players to upgrade bags linearly Allows using Economics and Server Rewards for purchasing bag upgrades Allows players to recycle bags Allows items to be pulled into bags automatically Allows unlimited types of bags to be defined, each with different appearance, capacity and rules Allows players to open and switch bags quickly via a UI Allows players to create custom key binds to open and close bags Allows creating bags that are preloaded with items from Kits Allows bags to be placed in wearable slots, including the backpack slot Allows a visual backpack to be displayed while the player is wearing a bag Quick start Give yourself a bag Grant the bagofholding.givebag permission to an administrator role. For example, run the command o.grant group admin bagofholding.givebag. Give yourself a bag with the command boh.givebag <player> generic.small (replace <player> with your in-game name). By default, this bag has 18 slots, and can hold any type of item, but it cannot hold other bags (unless those other bags are empty). Click on the bag in your inventory and click the "Open Bag" button. This will display the bag container in the loot panel, allowing you to place items into the bag. Upgrade the bag Grant the bagofholding.upgrade.generic.small permission to an appropriate role. For example, run the command o.grant group default bagofholding.upgrade.generic.small. Open the bag. Click the "Upgrade" button. Click the "Purchase upgrade" button (costs 300 scrap by default). This will upgrade the bag capacity to 24 slots, and it will change the bag's appearance. Note: Every bag has a separate permission which determines whether players can upgrade that specific type of bag. If you intend to allow players to upgrade bags, you will have to grant quite a few different permissions. We suggest using a permissions manager UI plugin for this. Enable gather mode Set Gather mode -> Enabled to true in the config. Reload the plugin. Open the bag. Click the "Gather: Off" button so that it changes to "Gather: On". This will show a flame icon on the bag, indicating that it is in gather mode. Drop and pick up an item. You will see the item get pulled into the bag automatically. Add bags to loot tables Note: If you are using a dedicated loot plugin to add bags to loot tables, this built-in feature might not work. For best results, configure your dedicated loot plugin to spawn bags instead. Set Loot spawns -> Enabled to true in the config. For testing, set the spawn chance for one type of bag to 100.0 for the assets/bundled/prefabs/radtown/crate_normal.prefab container prefab. Reload the plugin. Spawn some containers to confirm that they can spawn bags in them. For example, run the command spawn crate_normal in the client F1 console while aiming at the ground, and look for a bag in the container. If none of the loot containers are spawning with a bag in them, then you are probably using a loot plugin which is conflicting, in which case you may need to configure loot spawns in your dedicated loot plugin. Once you have confirmed that this feature is working on your server, configure the spawn chances to your liking. Once you have configured the spawn chances to your liking, you can use the bagofholding.spawnloot command to spawn bags into existing loot containers according to the config. You can also remove all bags from loot containers using the bagofholding.clearloot command if you accidentally added too many. Realistic backpacks If you want to allow backpacks to be usable only in the backpack slot, along with a 3D visual backpack model, proceed with the following steps. Set Wearable bags -> Allow wearing bags in the backpack slot to true in the config. This allows players to equip a bag in the backpack slot. Set Visual backpack -> Display while a bag is worn in the backpack slot to true in the config. This causes the visual backpack model to appear when the player is wearing a bag in the backpack slot. Set Player wearable bag limits -> Enabled to true in the config. This causes the player wearable inventory to have different bag limits than the rest of the player inventory. Set Player wearable bag limits -> Default limits -> Max total bags to 1 in the config. This allows players to wear at most one non-empty bag. Technically, this number could be set higher and it wouldn't matter, as long as you don't permit bags to be worn in other slots, since there is only one backpack slot. Set Player bag limits -> Default limits -> Max total bags to 0 in the config. This prevents players from placing non-empty bags in their main/belt inventory. Reload the plugin. Change bag theme By default, bags use fantasy-themed skins. Alternatively, you may choose leather-themed or tactical-themed skins. You may also choose between colored chevron icons (default) and colored circle icons which are larger and therefore easier to see. Bag skins can be directly changed in the config, but for first time users, this plugin provides multiple commands to help you edit the config in bulk. To change the bag theme, run the command boh.settheme <theme>. For example, boh.settheme tactical_chevrons. This command will update the skin IDs in the config and update existing bags in your server to the appropriate theme. Available themes are: fantasy_chevrons, fantasy_circles,leather_chevrons,leather_circles, tactical_chevrons, tactical_circles. This command works best when using a freshly generated config. If you have significantly altered the config (i.e., changed the number of bags per category), then you may have to use a lower level command such as boh.setskins, or manually update the config. In addition to the skins assigned to the preset themes which include 6 variations (no icon, light blue, green, yellow, orange, blue), there are 5 additional colors available (gray, white, black, red, pink). See the "Alternative bag skins" section for a list of all 400+ skins. Additionally, you can create your own skins and add them to the configuration. Some servers provide multiple themes at once, allowing players to use whichever style they prefer. To do this, you first need to define the alternative themes in the config. To add alternative themes, you can run the command boh.addtheme <theme>. Note: The fantasy_chevrons, leather_chevrons and tactical_chevrons themes are already included in the default config (as of v1.9.0), so you don't need to run this command if those are the only themes you care about, unless you are using a config from a prior version. Once the config is updated, you will then have to provide the alternative skins to your players somehow, such as via kits, vending machines, shop plugins, crafting plugins, loot plugins, etc. The boh.givebag command has an optional parameter to designate which skin to apply, which some servers use for integration with custom shops. In addition to changing bag skins, you may also want to change the skin displayed on the belt icon via UI settings -> Belt button -> Display skin ID in the configuration. For reference, the default generic.small bag skins are 2824115881 (fantasy), 2831029422 (leather), and 2828573095 (tactical). How it works How players obtain bags Bags are simply skinned large halloween loot bags (short name: halloween.lootbag.large, item ID: 479292118). Any plugin that can create skinned items can be used to make bags available on your server. For example, bags can be distributed via kits, vending machines (via Custom Vending Setup), shop plugins, crafting plugins, loot plugins (e.g., Alpha Loot), and more. The plugin also has native support for adding bags to loot containers, and provides the command boh.givebag <player> <profile> <amount> for use by admins or plugins. How players open bags Players can open bags multiple ways. "Open Bag" button: When a player clicks on a bag item, they will see the "Open Bag" button appear next to the "Drop" button. Clicking the "Open Bag" button will open the bag container on the right side of the inventory, the same as opening a storage container. Extra belt button: Players with a bag in their inventory will see a bag button next to their belt. Clicking that button will open the first bag in their inventory (via the bag.open command). Requires "UI settings" -> "Belt button" -> "Enabled": true in the config. This is enabled by default. Subsequent presses of that button will cycle through the remaining bags in the player's inventory. Custom key binds: Players may bind commands such as bag.open, bag.next, and bag.prev to keys for quick access. See the "Commands" section for a complete list of available commands and how they function. Tip: Players can also move items into a bag without even opening it, by simply dragging and dropping items directly onto the bag. Bag limits As a balancing mechanism, you can limit how many bags a given player or container can use at once. Empty bags can be placed almost anywhere, but bags with contents will count toward a limit. When that limit is reached, empty bags in the same container will become locked and unable to receive items. The default configuration of the plugin allows players to use up to 3 bags at a time in their inventory, with 0 bags in their backpack (Backpacks plugin on uMod), and 0 bags in storage containers. To configure bag limits for player inventories, see Player bag limits in the config. To configure bag limits for Backpacks, see Backpack bag limits in the config. To configure bag limits for storage containers, see Default container bag limits and Container bag limits by prefab in the config. If desired, you can assign bag limits according to player permission. Bag upgrades Each bag profile may define an upgrade target, dictating which bag profile it can be upgraded to. While a player is looting a bag, if they have permission to upgrade that bag, they will see an "Upgrade" button. Clicking that button will display the cost, as well as what the bag will be upgraded to, allowing the player to confirm the purchase if they have sufficient funds. Tip: One immersive upgrade technique is to set the upgrade cost to another instance of the same bag, to make it so players have to combine bags together to produce a better bag. Bag recycling Each bag profile may define a set of ingredients that it will recycle into when processed by a recycler. Each bag can recycle into as many ingredients as you want, each with an optional skin ID. Tip: One immersive recycling technique is to configure larger bags to recycle into smaller bags (possibly multiple). This technique can be used to allow players to effectively reverse bag upgrades, as well as to split larger bags into smaller bags that the player can then upgrade independently. Wearable bags To free up main inventory space, you can enable players to carry bags in their wearable inventory slots. To enable, see Wearable bags in the config. Note: Wearing a bag will only display the visual backpack if the visual backpack is also enabled. Visual backpack To increase immersion, you can display a visual backpack while a player is wearing a bag. To enable, see Visual backpack in the config. Gather mode To optimize player looting, players can enable gather mode for each bag. While gather mode is enabled, any item that gets added to the bag's parent container will automatically be moved into the bag if possible. For example, if you have a Food & Medical bag in your inventory, and that bag is in gather mode, picking up a food or medical item (or moving such an item from a container to your inventory) will automatically move that item into the bag if there is space. Notes: Gather mode can be enabled by setting Gather mode -> Enabled to true in the config Bags which have gather mode enabled will display a flame icon to easily identify them Throwing a bag onto the ground will automatically toggle off gather mode Gather mode only moves newly added item stacks, so existing item stacks will be ignored, even when replenished When multiple bags are in gather mode, the plugin will attempt to add items to bags according to their order in the container When nesting bags and enabling gather mode at multiple levels, new items will recursively be moved to child bags until they cannot be moved further Kit bags A kit bag is a type of bag that only allows players to remove items from the bag, but not add items. Kit bags are intended to be used as a mechanism to give players multiple items at once, without requiring that the player initially have the inventory space to hold all the items, since the player only needs to be able to hold the bag itself. Also, for convenience, once a kit bag has been emptied, the bag will automatically delete itself since it is no longer useful at that point (since players cannot place items in it). How to redeem a kit as a bag: If you have already created a kit via the Rust Kits plugin on uMod, you can give that kit to a player as a bag. That means the player will receive a bag item that is filled with the contents of that kit. To give a player a kit as a bag, simply run the command boh.givekitbag <player> kitbag.red.locked <kit>, where <player> should be replaced with a player name or steam ID, and <kit> should be replaced with the name of the kit. You may replace kitbag.red.locked with the name of a different locked kit bag if you want. Note: If running this command as a player (as opposed to in the server console or via another plugin), ensure you first have the bagofholding.givekitbag permission (caution: only grant that permission to trusted administrators). Tip: If you want to allow players to store items in a bag that is redeemed this way, then simply use a bag profile which has the "Allow player item input" config option set to true. How to add a kit bag to a kit: The Rust Kits plugin on uMod supports bags with items in them. If you want to allow players to redeem kits that contain bags with items in them, simply create a bag, add the items you want, then create a kit from your inventory. Note: Players will not be able to see the contents of the bag from the Kits UI, so it will be a mystery to the player until they have redeemed the kit, though the Kits plugin might be updated in the future to allow inspecting bag contents. If you want to add a bag to a kit, but don't want to allow players to use the bag as storage, follow the below steps create a kit bag. Give yourself an unlocked kit bag with the command boh.givebag <player> kitbag.red.unlocked, where <player> should be replaced with your user name or steam ID. Place items in the bag. Ensure you have the bagofholding.upgrade.kitbag.red.unlocked permission. Note: If you gave yourself a different color bag, the permission you must grant will be different. Caution: Only grant that permission to administrators who will be creating kits. Use the "Upgrade" feature to transform the bag into a kitbag.red.locked bag, which makes it so players can no longer add items to the bag. Use the Kits plugin to create or update the kit from your inventory. If you want to edit the bag contents, but don't want to do it from scratch, follow the below steps. Redeem the kit. Ensure you have the bagofholding.upgrade.kitbag.red.locked permission. Note: If this is a different color bag, the permission you must grant will be different. Caution: Only grant that permission to administrators who will be creating kits. Use the "Upgrade" feature to transform the bag into a kitbag.red.unlocked bag. Update the items in the bag. Use the "Upgrade" feature to transform the bag back into a kitbag.red.locked bag, which makes it so players can no longer add items to the bag. Use the Kits plugin to update the kit from your inventory. Permissions Admin permissions bagofholding.manageloot -- Allows running the commands boh.spawnloot and boh.clearloot. bagofholding.stats -- Allows running the command boh.stats. bagofholding.listbags -- Allows running the command boh.listbags. bagofholding.listcontainers -- Allows running the command boh.listcontainers. bagofholding.config -- Allows running the commands boh.setskins, boh.addskins, boh.settheme and boh.addtheme. bagofholding.givebag -- Allows running the command boh.givebag <player> <bag profile> <amount>. bagofholding.givekitbag -- Allows running the command boh.givekitbag <player> <bag profile> <kit name>. Limit permissions Depending on how you have configured the plugin, there will be additional permissions following the pattern bagofholding.limit.<type>.<suffix>, one for each limit permission profile. The plugin comes with the following limit profiles by default. bagofholding.limit.player.unlimited -- Allows the player to store unlimited bags in their inventory. bagofholding.limit.wearable.unlimited -- Allows the player to wear unlimited bags. This permission, and other bagofholding.limit.wearable.* permissions won't exist unless you enable Player wearable bag limits in the config. Otherwise, the wearable container will share bag limits with the rest of the player inventory. bagofholding.limit.backpack.unlimited -- Allows the player to store unlimited bags in their backpack (Backpacks plugin on uMod). bagofholding.limit.container.unlimited -- Allows the player to store unlimited bags in storage containers that they deploy. You can define additional limit profiles in the Player bag limits, Player wearable bag limits, Backpack bag limits, Default container bag limits and Container bag limits by prefab sections of the config. Note: When adding container bag limits by prefab, the permission will look like bagofholding.limit.container.<short_prefab_name>.<suffix>. Upgrade permissions Each bag profile that is configured with a valid upgrade target will generate a permission following the pattern bagofholding.upgrade.<profile>. Granting that permission allows players to upgrade that type of bag. For example, the bagofholding.upgrade.generic.small permission allows players to upgrade generic.small bags to generic.medium bags. We suggest using a permissions manager UI plugin to discover and grant bag upgrade permissions. Commands This plugin provides both chat and console commands using the same syntax. When using a command in chat, prefix it with a forward slash: /. Admin / server commands boh.spawnloot -- Spawns loot in loot containers throughout the map. Intended for first-time setup, since enabling loot spawns in the config will only add bags to loot containers that spawn while the plugin is loaded. boh.clearloot -- Removes bags from all loot containers. Intended for first-time setup in conjunction with the boh.spawnloot command. boh.stats -- Prints an overview of how many bags are present on the server. Note: Some bags may not show up in the results if another plugin has deleted them and backed up their data on disk (for example, bags inside player Backpacks if the player is not connected or has not opened their Backpack during this play session). boh.listbags <filter> -- Prints a table view in console, showing all of the bag profiles defined in the config, matching the keyword filter if provided. Requires the bagofholding.listbags permission. boh.listcontainers -- Prints all container prefabs in the game. Requires the bagofholding.listcontainers permission. boh.setskins <category> <skin1> <skin2> <skin3> <skin4> <skin5> <skin6> <skin7> -- Updates the primary skin of all bag profiles in the specified category. The exact number of skins you supply must match the number of bags in the specified category. For example, if there are 7 bag profiles in the generic category (one for each size), then you can use this command with 7 distinct skins to update the config for all of those bag profiles at once. The first bag profile will be given the first skin, the second bag profile will be given the second skin, and so on. In addition to updating the config for you, this will change all the currently known bags on the server, which have the affected bag profiles, to use the specified skins, saving you the trouble of having to recreate the bags. This command will ensure that the specified skins are made the primary skins of the affected bag profiles. boh.addskins <category> <skin1> <skin2> <skin3> <skin4> <skin5> <skin6> <skin7> -- Adds the specified skins as secondary skins to all bag profiles in the specified category. The first bag profile will be given the first skin, the second profile will be given the second skin, and so on. Similar to the boh.setskins command, this will update the config, but will not update the skins of existing bags on your server. boh.settheme <theme> -- Updates the primary skin of the preset bag categories (bagofholding, generic, armor_clothing, food_medical, items_construction, resources_components, weapons_tools) to the specified theme. Valid themes: fantasy_chevrons, fantasy_circles,leather_chevrons,leather_circles, tactical_chevrons, tactical_circles. Note: If the config has significantly changed (i.e., if any of the preset bag categories no longer have exactly 7 bag profiles), this command will not work, but you can alternatively use boh.setskins or manually update the config. boh.addtheme -- Like boh.settheme, but instead of changing the primary skin of the affected bag profiles, this will only add the specified theme as secondary skins. boh.givebag <player> <bag profile> <amount> <skin index> -- Creates a stack of bags and gives it to the specified player. Requires the bagofholding.givebag permission. If the bag has multiple skins defined, you can specify which one via the skin-index argument. For example, boh.givebag Somebody generic.small 1 3 to give one bag with the 3rd skin applied. The amount and skin index parameters are optional, both defaulting to 1. boh.givekitbag <player> <bag profile> <kit name> -- Creates a bag, populates it with the specified kit (from the Kits plugin on uMod), then gives it to the specified player. Requires the bagofholding.givekitbag permission. Player commands bag.open -- Depending on the context, this command will either open the first unlocked bag in your inventory, open the next bag in your inventory, or close your inventory if no more bags are found. bag.next -- Like bag.open, but will continuously cycle bags rather than closing your inventory when no more bags are found. bag.prev -- Like bag.next, but will start at the end of your inventory, and will cycle bags in reverse order. Configuration The settings and options can be configured in the BagOfHolding file under the config directory. The use of an editor and validator is recommended to avoid formatting issues and syntax errors. General settings Wearable bags -- Determines whether players can place bags in their wearable inventory slots. Disabled by default. Enabling this will incur a very minor performance cost. Allow wearing bags in the backpack slot (true or false) -- Determines whether players can wear bags in the backpack/parachute slot. Default: false. Allow wearing bags in non-backpack slots (true or false) -- Determines whether players can wear bags in non-backpack slots. Default: false. Visual backpack -- Determines whether the visual backpack will be displayed on players while wearing a bag. Enabling this will incur a minor performance cost. Display while a bag is worn in the backpack slot (true or false) -- Determines whether the visual backpack will be enabled while the player is wearing a bag in their backpack slot. Default: false. You should set Wearable bags -> Allow wearing bags in the backpack slot to the same value that you set here. Display while a bag is worn in a non-backpack slot (true or false) -- Determines whether the visual backpack will be enabled while the player is wearing a bag in a non-backpack slot. Default: false. You should set Wearable bags -> Allow wearing bags in non-backpack slots to the same value that you set here. Gather mode Enabled (true or false) -- Determines whether players can toggle gather mode on bags. While gather mode is enabled for a given bag, any item that gets added to the bag's parent container will automatically be moved into the bag if possible. Default: false. Enable stack improvements (true or false) -- Determines whether the plugin will attempt to auto stack bags when dropping them onto each other in the player inventory (as long as the destination bag is not currently open). Default: true. Setting to false will improve performance. Note that dropping a bag with contents onto an empty bag will never stack them; the empty bag must be dropped onto the bag that has contents. Dropped bag item settings Dropped bag item settings -- Determines the behavior of dropped bag items. Enable dropped bag buoyancy (true or false) -- Determines whether dropped bag items will float in water. Default: true. Enable opening dropped bags while at bag limit (true or false) -- Determines whether attempting to pick up a bag will actually open the bag instead, if the player cannot carry the bag due to their current bag limits. Default: true. Auto equip dropped bags while at bag limit (true or false) -- Determines whether attempting to pick up a bag will attempt to equip it in a wearable slot instead, if the player cannot carry the bag in their main inventory due to their current bag limits. Default true. This feature only applies while bags are configured to be wearable. Minimum despawn time (seconds) -- Determines the minimum time (in seconds) before a dropped bag item will despawn. This option also affects the despawn time of dropped backpacks that contain bag items. Note: The despawn time of bags will also take into account the despawn time of items within them. Default: 1800 (30 minutes). UI settings UI settings Belt button -- Determines the display of the button next to the player's belt. By default, the button appears on the right side of the belt. The button will only appear if you have at least one bag in your inventory. Clicking the button will open the first bag in your inventory via the bag.open command. Enabled (true or false) -- Determines whether the belt button is displayed. Default: true. Only show while bags are worn (true or false) -- Determines whether bags must be worn in order to display the belt button. OffsetX -- Determines where the belt button is displayed, relative to the bottom center of the screen. Set to 185.0 to place the button on the right side of the belt. Set to -263.0 to place the button on the left side of the belt. Default: 185.0. Display skin ID -- Determines the skin ID displayed on the belt button. Default: 2824115881 (the fantasy style generic.small bag). Loot interface -- Determines the display of the loot panel while the player has a bag open. Enable back button (true or false) -- Determines whether a back button is displayed when the player is looting a bag that is inside another container. Clicking the back button will switch the loot interface to the bag's parent container. Default: true. Bag selector -- Determines the display of the bag selector. While looting a bag, the bag selector will display an icon for each lootable bag in the bag's parent container, allowing for 1-click access to other bags. The bag selector also displays a vertical progress bar to indicate how full each bag is. The bag selector automatically resizes depending on how many bags need to be displayed. The default settings allow a maximum of 10 bags to be displayed. Enabled (true or false) -- Determines whether the bag selector is displayed. Default: true. Max width -- Determines how much space the bag selector can use. By default, it can take up to 5 inventory slots worth of space, but that may cause the "LOOT" text to overlap the bag selector for players using non-English languages. If your players are seeing overlap, consider reducing this value. Default: 310.0. Min bag size -- Determines the minimum size (height and width) of each bag displayed in the bag selector. When many bags are displayed, each bag icon will be no smaller than this value. Default: 29.0. Max bag size -- Determines the maximum size (height and width) of each bag displayed in the bag selector. When few bags are displayed, each bag icon will be no larger than this value. Default: 58.0. Effects Effects Open effect -- Determines the effect played when a player opens a bag. Only the player that opens the bag will witness this effect, so it will not give away their location. Default: "assets/prefabs/deployable/small stash/effects/small-stash-deploy.prefab". Set to "" to disable the effect. Disabling effects will improve performance. Upgrade effect -- Determines the effect played when a player upgrades a bag. Only the player that upgrades the bag will witness this effect, so it will not give away their location. Default: "assets/prefabs/misc/halloween/lootbag/effects/silver_open.prefab". Set to "" to disable the effect. Disabling effects will improve performance. Loot spawns Loot spawns -- Determines which loot containers bags may spawn in. This feature is disabled by default. As an alternative to using this feature, you might want to use a dedicated loot plugin to spawn bags, by designating that the loot plugin should spawn a large halloween loot bag (short name: halloween.lootbag.large, item ID: 479292118) with an appropriate skin ID from the Bag profiles section of the config. Enabled (true or false) -- Determines whether this plugin will attempt to add bags to loot containers. Default: false. Bag spawn chance percent by prefab -- Determines the probability (0.0 to 100.0 percent) of bags spawning in loot containers, according to the prefab of the loot container. For each type of loot container, you may define the spawn chance for each bag profile. To see which container prefabs this can accept, run the command boh.listcontainers (requires the bagofholding.listcontainers permission). Bag limits Player bag limits -- Determines how many non-empty bags that players can hold in their inventory at once. This applies to the entire player inventory, including the wearable container, unless Player wearable bag limits is enabled, in which case limits for the wearable container is configured separately. Default limits -- These limits apply to all players, except those who have been granted a permission from Bag limits by permission. Max total bags -- See below. Max bags by category name -- See below. Bag limits by permission -- List of bag limits which override the defaults. Permission suffix -- Determines the permission generated, following the pattern bagofholding.limit.player.<suffix>. For example: bagofholding.limit.player.unlimited. You may define unlimited bag limit profiles, but at most one will be assigned to each player. Limit profiles toward the end of the list have highest priority. Max total bags -- See below. Max bags by category name -- See below. Player wearable bag limits -- Determines how many non-empty bags that players can wear. Enabled -- Determines whether wearable limits are separate from Player bag limits. While true, limits defined in this section apply to the wearable container, and limits defined in Player bag limits apply only to the rest of the player inventory. While false, limits defined in this section have no effect. Default limits -- These limits apply to all players, except those who have been granted a permission from Bag limits by permission. Max total bags -- See below. Max bags by category name -- See below. Bag limits by permission -- List of bag limits which override the defaults. Permission suffix -- Determines the permission generated, following the pattern bagofholding.limit.wearable.<suffix>. For example: bagofholding.limit.wearable.unlimited. You may define unlimited bag limit profiles, but at most one will be assigned to each player. Limit profiles toward the end of the list have highest priority. Max total bags -- See below. Max bags by category name -- See below. Vanilla backpack bag limits -- Determines how many non-empty bags that vanilla backpacks can hold (while equipped or while dropped on the ground). Enabled -- Determines whether vanilla backpack bag limits are determined by this section or by Default container bag limits -> Default limits. While true, limits defined in this section apply to vanilla backpacks. While false, limits defined in this section have no effect, and vanilla backpacks will follow the rules defined for default container limits. Default limits -- These limits apply to all backpacks. There is not currently a way to override this for players with permission. Max total bags -- See below. Max bags by category name -- See below. Backpack bag limits -- Determines how many non-empty bags that players can hold in their backpack at once (Backpacks plugin on uMod). Default limits -- These limits apply to all players, except those who have been granted a permission from Bag limits by permission. Max total bags -- See below. Max bags by category name -- See below. Bag limits by permission -- List of bag limits which override the defaults. Permission suffix -- Determines the permission generated, following the pattern bagofholding.limit.backpack.<suffix>. For example: bagofholding.limit.backpack.unlimited. You may define unlimited bag limit profiles, but at most one will be assigned to each player. Limit profiles toward the end of the list have highest priority. Max total bags -- See below. Max bags by category name -- See below. Default container bag limits -- Determines how many non-empty bags can be placed into storage containers. Can be overriden for specific container prefabs via Container bag limits by prefab. Default limits -- These limits apply to all storage containers, except those owned by players who have been granted a permission from Bag limits by permission. Max total bags -- See below. Max bags by category name -- See below. Bag limits by permission -- List of bag limits which override the defaults. Permission suffix -- Determines the permission generated, following the pattern bagofholding.limit.container.<suffix>. For example: bagofholding.limit.container.unlimited. You may define unlimited bag limit profiles, but at most one will be assigned to each player. Limit profiles toward the end of the list have highest priority. Max total bags -- See below. Max bags by category name -- See below. Container bag limits by prefab -- Determines how many non-empty bags can be placed into storage containers, by container prefab, superseding Default container bag limits. See below for an example. [full_prefab_path] -- For each prefab you want to define limits, you will need to define a new subsection with the full prefab path, then declare the bag limit definition under that section. Default limits -- These limits apply to all storage containers with this prefab, except for those owned by players who have been granted a permission from Bag limits by permission. Max total bags -- See below. Max bags by category name -- See below. Bag limits by permission -- List of bag limits which override the defaults for this prefab. Permission suffix -- Determines the permission generated, following the pattern bagofholding.limit.container.<short_prefab_name>.<suffix>. For example: bagofholding.limit.container.locker.deployed.unlimited. You may define unlimited bag limit profiles, but at most one will be assigned to each player. Limit profiles toward the end of the list have highest priority. Max total bags -- See below. Max bags by category name -- See below. Every bag limit profile has the following options. Max total bags -- Determines how many total non-empty bags (of any category) are allowed. Max bags by category name -- Determines how many non-empty bags of each category are allowed. This references the optional Category name property of each bag profile. For example, if you set this to { "resources_components": 2 }, players will be able to hold at most 2 Resources & Components bags. Example Container bag limits by prefab: "Container bag limits by prefab": { "assets/prefabs/deployable/locker/locker.deployed.prefab": { "Default limits": { "Max total bags": 0, "Max bags by category name": {} }, "Bag limits by permission": [ { "Permission suffix": "unlimited", "Max total bags": -1, "Max bags by category name": {} } ] } }, Bag content rulesets Bag content rulesets -- This section allows you to determine which items can be placed inside bags. It also allows you to define limits for bags inside bags. Each bag profile can refer to a content ruleset that you define in this section, to determine what is allowed in that type of bag. This design allows you to define a ruleset once, and reference it in many bag profiles. Name -- The name of the ruleset. Once you have defined this ruleset, you can assign it a specific bag profile by going to the Bag profiles section of the config and setting the Contents ruleset option to this ruleset name. Allowed item categories -- Determines which categories of items are allowed to be placed into bags that use this ruleset. Allowed values: All, Ammunition, Attire, Common, Component, Construction, Electrical, Favourite, Food, Fun, Items, Medical, Misc, Resources, Search, Tool, Traps, Weapon. Any item within allowed categories may be forcibly disallowed by specifying its short name in Disallowed item short names, or by specifying its skin ID in Disallowed skin IDs. Disallowed item categories -- Determines which categories of items are disallowed from being placed into bags that use this ruleset. This option is useful if you want to allow most categories, with explicit denial of specific categories. Note: For this option to work, you'll also need to set Allowed item categories to ["All"]. Any item disallowed this way can be forcibly allowed by specifying its short name in Allowed item short names, or by specifying its skin ID in Allowed skin IDs. Allowed item short names -- Determines which items are allowed to be placed into bags that use this ruleset, in addition to the categories specified in Allowed item categories. Any item allowed this way can be forcibly allowed by specifying its skin ID in Disallowed skin IDs. Disallowed item short names -- Determines which item short names are disallowed from being placed into bags that use this ruleset. Any item disallowed this way can be forcibly allowed if its skin ID is specified in Allowed skin IDs. Allowed skin IDs -- Determines which skin IDs are allowed to be placed into bags that use this ruleset. By default, all skin IDs are allowed, as long as the item is allowed via Allowed item categories or Allowed item short names. This option is useful for allowing specific skins of specific items that are not otherwise allowed. For example, if you want a specific bag to only be able to hold other bags (and no other items), simply set this option to the list of bag skin IDs, and leave all of the other options blank. Disallowed skin IDs -- Determines which skin IDs are disallowed from being placed into bags that use this ruleset. This option is useful for disallowing specific skins of specific items that are otherwise allowed via Allowed item categories or Allowed item short names. Bag limits -- Determines how many non-empty bags can fit inside this bag. Max total bags -- See the section on bag limits. Max bags by category name -- See the section on bag limits. Order of precedence: Disallowed skin IDs > Allowed skin IDs > Disallowed item short names > Allowed item short names > Disallowed item categories > Allowed item categories. Bag profiles Bag profiles -- This section defines every type of bag. For an item to function as a bag, it must be a large halloween loot bag (short name: halloween.lootbag.large, item ID: 479292118) with a skin ID from this section. Name -- The short name of the bag. This must be unique. The bag profile name is used by various features of the plugin, including bag limits, bag upgrades, upgrade permissions, loot spawns, the bagofholding.givebag command, developer hooks, and the developer API. Skin IDs -- Determines the skin IDs associated with this bag profile. Any halloween.lootbag.large item that has one of these skin IDs will be considered a bag controlled by this plugin and will use this profile. You can associate as many skin IDs per bag profile as you want. By default, most bag profiles will have three skins in the config, for fantasy, leather and tactical themes, in that order. Defining multiple skin IDs allows you to provide multiple themes of bags to players, letting them choose which they prefer, as long as you provide players with a means to get the alternative skins. The first skin ID is considered the primary skin ID, and will be used when creating a bag for loot spawns, when giving a bag via the boh.givebag command (unless the skin index parameter is supplied), and when other plugins create bags via API methods. When a bag is upgraded, if the target bag profile has multiple skin IDs defined, the new skin ID will be selected according to the order in the list of skin IDs. For example, if the bag's current profile lists three skin IDs, and the current skin is second, then the upgraded bag will use the second skin ID in the target profile. If there is no corresponding skin in the same position in the target profile (e.g., 3rd skin on current profile, but the target has only 2 skins), then the first skin will be selected. Capacity -- Determines how many container slots this bag will have. Maximum: 48. Display name -- Determines the display name of the bag item. This shows at the top of the screen when a bag item is selected in your inventory. Category name -- Determines the bag category. Other sections of the config will refer to this name to define bag limits. This should not be confused with item categories, which are used to define content rulesets. Contents ruleset -- Determines which items are allowed inside this bag. This must refer to the name of a ruleset defined in the Bag content rulesets section of the config. Allow player item input (true or false) -- Determines whether players can place items into this bag. Setting to false is useful if you want to provide a player with a bag full of items, as a sort of temporary container. This feature is intended primarily for "kit bags". Upgrade -- Determines which bag profile this bag can be upgraded to, as well as the items required to purchase the upgrade. To -- The name of the target bag profile. Cost -- The cost to purchase the upgrade. Item short name -- The short name of the currency item. Default: "scrap". Item skin ID -- The skin ID of the currency item. Set to 0 to accept any skin. Default: 0. Amount -- The amount of currency required to purchase the upgrade. Use Economics (true or false) -- Set to true to require Economics currency instead of item currency. Default: false. Use Server Rewards (true or false) -- Set to true to require Server Rewards currency instead of item currency. Default: false. Recyclable -- Determines whether the bag can be recycled, as well as which items it will recycle into. Enabled (true or false) -- Determines whether the bag can be recycled. Default: false. Setting to false for every bag will improve performance by disabling recycling hooks. Ingredients -- List of items that will be produced by recycling the bag. Item short name -- The short name of the ingredient item. Default: "scrap". Item skin ID -- The skin ID of the ingredient item. Default: 0. Amount -- The amount of the ingredient item to produce. Item display name -- The display name of the ingredient item. Localization The default messages are in the BagOfHolding file under the lang/en directory. To add support for another language, create a new language folder (e.g. de for German) if not already created, copy the default language file to the new folder and then customize the messages. Frequently asked questions (FAQ) Q: How do I configure this plugin with Alpha Loot? The built-in Loot spawns feature of this plugin is compatible with popular loot plugins such as Better Loot and Alpha Loot. Alpha Loot users also have the option of spawning bags directly via the Alpha Loot plugin. To do so, use the Alpha Loot Editor to add skinned large halloween loot bags to the loot table (short name: halloween.lootbag.large, item ID: 479292118). Tutorial: https://www.youtube.com/watch?v=54A77rQ0Ld8. Caution: Make sure that the bag skin IDs you configure to spawn via Alpha Loot are assigned to bag profiles in the Bag of Holding config. If you configure a particular skin ID in the loot table that does not correspond to a bag profile, then those bags will function as just normal halloween loot bags. Q: How do I make players spawn with bags? One way is via the Auto Kits feature of the Rust Kits plugin on uMod. Other plugins that allow you to manage default loadouts for players should also work, as long as they support skinned items. Q: Can bags be placed inside other bags? Yes, but by default, only the bagofholding bag profile can contain other bags, and it cannot contain other bagofholding bags. You can fine tune this behavior in the configuration. Q: Can this plugin replace Backpack plugins? Yes, for the majority of use cases. If you are using a Backpack plugin for the sole purpose of allowing players to carry more items (with backpacks dropping on death), then you can simply switch to using bags instead. The main difference is that Backpacks allow players to spawn with additional storage, which players cannot lose, whereas players must acquire bags to use additional storage, and players can lose or trade that storage capacity. If you are currently allowing players to keep their Backpack items on death, bags cannot replace that use case, but bags can enhance that use case since you can configure certain bags to be allowed in Backpacks to effectively increase the Backpack storage capacity. Q: Is this plugin compatible with Backpack plugins? Yes, this plugin has native support for the Backpacks plugin on uMod. By default, only empty bags can be placed inside Backpacks, but you can configure that behavior under the Backpack bag limits. Q: Can bags have more than 7 upgrade stages? Yes, you can have as many upgrade stages as you want. By default, each bag category has 7 stages (one for each row of capacity), but it's possible to have 48 bag stages per bag category (one for each slot of capacity). The simplest way to add more stages is to create additional bag profiles that reuse the existing skins but have different capacity. For example, you can define "Small Bag (13)" with 13 capacity and "Small Bag (14)" with 14 capacity, both with skin ID 2824115881. Q: How can I change bag icons? See the Default bags section below for instructions on changing the bag icons to other presets created by our development team. If you want to create your own bag icons, simply upload them to the Steam workshop as you would any Rust skin, then assign the corresponding workshop/skin ID to a bag profile in the Bag Profiles section of the config. Q: Can I configure bag upgrades to require multiple items? No. Currently, bag upgrades can only be configured to require a single type of item. Q: Where is this plugin's data file? This plugin doesn't use nor need a data file in its current design. This plugin utilizes a vanilla Rust capability to store items inside other items, similar to how attachments are placed inside weapons. Plugin compatibility / troubleshooting During initial development of this plugin, many plugin compatibility issues were identified and fixed. Some themes of compatibility issues were systematically eliminated, never to be seen again. However, some conflicts may remain undiscovered. If you encounter a new compatibility issue, please report it to the maintainers of both plugins so that we can work out a solution. This section also provides tips on how you can mitigate various plugin conflicts. Hook conflict with OnItemSplit The simplest way to mitigate this issue is by disabling stacking of the halloween.lootbag.large item. You can also avoid this issue by ensuring each bag profile uses a unique skin ID. Hook conflict with CanStackItem The simplest way to mitigate this issue is by disabling stacking of the halloween.lootbag.large item. Tips for maintainers of other plugins: Don't allow stacking when the item being moved is not empty Don't allow stacking two items whose containers have different capacity Hook conflict with CanCombineDroppedItem The simplest way to mitigate this issue is by disabling stacking of the halloween.lootbag.large item. Hook conflict with CanMoveItem This can happen in two possible situations: When quick-looting an item from a bag into your inventory. If this is when you see the conflict, you will have to contact us to troubleshoot further. When dropping a bag onto another bag. If this is when you see the conflict, the simplest way to mitigate this issue is by disabling stacking of the halloween.lootbag.large item. You can also mitigate this issue by setting Enable stack improvements to false in the config. Hook conflict with CanBeRecycled or OnItemRecycle The simplest way to mitigate this issue is by disabling recycling on all bag profiles. The belt icon overlaps with other plugin icons To mitigate this issue, you can either disable the belt icon or reposition it in the config. Opening a bag spawns loot There are two likely possibilities. The bag had a skin ID that is not configured in the plugin. One way this can happen is if you use another plugin to acquire bags, and the skin ID you configured in that plugin isn't assigned to any bag profiles in the Bag of Holding config. If this is the case, please reconfigure either plugin so that they refer to the same skin ID. You have a loot plugin which is using the OnItemAction hook to override the behavior of opening halloween.lootbag.large items. There is little that you can do to mitigate this. Please suggest to the maintainer of the loot plugin that they add a check to ignore halloween loot bags that are skinned. Opening a bag inside a special container just closes the container This probably means that the plugin that controls the special container immediately deleted the container when it was closed. In this case, the plugin that manages that container will need to implement changes to allow that container to persist after closed. Pressing the back button inside a bag just closes the bag This probably means that the bag has been placed inside a special container which the plugin doesn't know how to open. It could be due to a miss in this plugin, but more likely, that container is a special type of container controlled by another plugin (such as a Backpack or Bank). In this case, we will have to develop a solution to enable compatibility. Quick Sort UI overlaps bag selector UI The simplest way to mitigate this issue is by reducing the max bag size to 6 rows (36 slots). Alternatively, you can update the Quick Sort plugin's configuration to reposition or resize the UI. We are also planning to introduce an option to reposition the bag selector to the right side of the loot panel in a future update. Weapons/deployables placed in bags eventually become unusable This may happen if you are using an incompatible item cleaner or entity cleaner plugin. Most likely, the cleaner plugin doesn't know to account for situations where items are deeply nested. It should be easy for the cleaner plugin's maintainer to fix this issue. After attending an event, items inside bags are missing or changed This can happen if the plugin which manages the event temporarily replaces the player's items and restores the items when the player leaves the event. This issue usually manifests as items losing their skins and contents (e.g., weapons losing attachments, water jugs losing water). To resolve, the maintainer of the event plugin will need to update that plugin to recursively save items to infinite depth. If the developer needs help, they can look at the code of other plugins such as Backpacks, Kits, and Restore Upon Death. After placing a bag inside a special container, items inside the bag are missing or changed This may happen if the plugin which manages the special container tries to save the items in a custom way, such as via a data file. This issue usually manifests as items losing their skins and losing contents (e.g., weapons losing attachments, water jugs losing water). To resolve, the maintainer of the container plugin (e.g., Bank, Backpacks, Extra Pockets feature of Skill Tree) will need to update that plugin to recursively save items to infinite depth. If the developer needs help, they can look at the code of other plugins such as Backpacks, Kits, and Restore Upon Death. Default bags The default configuration provides many bag profiles, detailed below. See this workshop collection to find hundreds of bag skins created specifically for this plugin. Armor & Clothing Bags Name Skin ID Capacity Display Name Upgrades to Upgrade cost Recycle output armor_clothing.xxsmall 2824111863 6 XXSmall Armor & Clothing Bag armor_clothing.xsmall 100 Scrap 100 Scrap armor_clothing.xsmall 2824114542 12 XSmall Armor & Clothing Bag armor_clothing.small 200 Scrap 200 Scrap armor_clothing.small 2824116781 18 Small Armor & Clothing Bag armor_clothing.medium 300 Scrap 300 Scrap armor_clothing.medium 2824118678 24 Medium Armor & Clothing Bag armor_clothing.large 400 Scrap 400 Scrap armor_clothing.large 2824120619 30 Large Armor & Clothing Bag armor_clothing.xlarge 500 Scrap 500 Scrap armor_clothing.xlarge 2824122747 36 XLarge Armor & Clothing Bag armor_clothing.xxlarge 600 Scrap 600 Scrap armor_clothing.xxlarge 2824124690 42 XXLarge Armor & Clothing Bag generic.xxlarge 900 Scrap 900 Scrap Food & Medical Bags Name Skin ID Capacity Display Name Upgrades to Upgrade cost Recycle output food_medical.xxsmall 2824111462 6 XXSmall Food & Medical Bag food_medical.xsmall 100 Scrap 100 Scrap food_medical.xsmall 2824114220 12 XSmall Food & Medical Bag food_medical.small 200 Scrap 200 Scrap food_medical.small 2824116431 18 Small Food & Medical Bag food_medical.medium 300 Scrap 300 Scrap food_medical.medium 2824118433 24 Medium Food & Medical Bag food_medical.large 400 Scrap 400 Scrap food_medical.large 2824120423 30 Large Food & Medical Bag food_medical.xlarge 500 Scrap 500 Scrap food_medical.xlarge 2824122439 36 XLarge Food & Medical Bag food_medical.xxlarge 600 Scrap 600 Scrap food_medical.xxlarge 2824124459 42 XXLarge Food & Medical Bag generic.xxlarge 900 Scrap 900 Scrap Items & Construction Bags Name Skin ID Capacity Display Name Upgrades to Upgrade cost Recycle output items_construction.xxsmall 2824113019 6 XXSmall Items & Construction Bag items_construction.xsmall 100 Scrap 100 Scrap items_construction.xsmall 2824115483 12 XSmall Items & Construction Bag items_construction.small 200 Scrap 200 Scrap items_construction.small 2824117546 18 Small Items & Construction Bag items_construction.medium 300 Scrap 300 Scrap items_construction.medium 2824119338 24 Medium Items & Construction Bag items_construction.large 400 Scrap 400 Scrap items_construction.large 2824121607 30 Large Items & Construction Bag items_construction.xlarge 500 Scrap 500 Scrap items_construction.xlarge 2824123520 36 XLarge Items & Construction Bag items_construction.xxlarge 600 Scrap 600 Scrap items_construction.xxlarge 2824125425 42 XXLarge Items & Construction Bag generic.xxlarge 900 Scrap 900 Scrap Resources & Components Bags Name Skin ID Capacity Display Name Upgrades to Upgrade cost Recycle output resources_components.xxsmall 2824112139 6 XXSmall Resources & Components Bag resources_components.xsmall 100 Scrap 100 Scrap resources_components.xsmall 2824114807 12 XSmall Resources & Components Bag resources_components.small 200 Scrap 200 Scrap resources_components.small 2824117061 18 Small Resources & Components Bag resources_components.medium 300 Scrap 300 Scrap resources_components.medium 2824118878 24 Medium Resources & Components Bag resources_components.large 400 Scrap 400 Scrap resources_components.large 2824121055 30 Large Resources & Components Bag resources_components.xlarge 500 Scrap 500 Scrap resources_components.xlarge 2824123001 36 XLarge Resources & Components Bag resources_components.xxlarge 600 Scrap 600 Scrap resources_components.xxlarge 2824124960 42 XXLarge Resources & Components Bag generic.xxlarge 900 Scrap 900 Scrap Weapons & Tools Bags Name Skin ID Capacity Display Name Upgrades to Upgrade cost Recycle output weapons_tools.xxsmall 2824110902 6 XXSmall Weapons & Tools Bag weapons_tools.xsmall 100 Scrap 100 Scrap weapons_tools.xsmall 2824113791 12 XSmall Weapons & Tools Bag weapons_tools.small 200 Scrap 200 Scrap weapons_tools.small 2824116147 18 Small Weapons & Tools Bag weapons_tools.medium 300 Scrap 300 Scrap weapons_tools.medium 2824118115 24 Medium Weapons & Tools Bag weapons_tools.large 400 Scrap 400 Scrap weapons_tools.large 2824120210 30 Large Weapons & Tools Bag weapons_tools.xlarge 500 Scrap 500 Scrap weapons_tools.xlarge 2824122197 36 XLarge Weapons & Tools Bag weapons_tools.xxlarge 600 Scrap 600 Scrap weapons_tools.xxlarge 2824124162 42 XXLarge Weapons & Tools Bag generic.xxlarge 900 Scrap 900 Scrap Generic Bags Name Skin ID Capacity Display Name Upgrades to Upgrade cost Recycle output generic.xxsmall 2824110403 6 XXSmall Bag generic.xsmall 100 Scrap 100 Scrap generic.xsmall 2824113497 12 XSmall Bag generic.small 200 Scrap 200 Scrap generic.small 2824115881 18 Small Bag generic.medium 300 Scrap 300 Scrap generic.medium 2824117824 24 Medium Bag generic.large 400 Scrap 400 Scrap generic.large 2824119889 30 Large Bag generic.xlarge 500 Scrap 500 Scrap generic.xlarge 2824121905 36 XLarge Bag generic.xxlarge 600 Scrap 600 Scrap generic.xxlarge 2824123811 42 XXLarge Bag bagofholding 3000 Scrap 1500 Scrap Bag Of Holding The Bag of Holding is the ultimate bag. It can hold all items, including 6 other bags. Name Skin ID Capacity Display Name Recycle output bagofholding 2824136143 48 Bag of Holding 1500 Scrap Kit bags All kits bags accept all items and have 42 capacity. Kit bags also upgrade in a circular fashion, making it easy for admins to edit them. Name Skin ID Display Name Upgrades to kitbag.red.unlocked 2830974120 Kit Bag (Editable) kitbag.red.locked kitbag.red.locked 2830952942 Kit Bag kitbag.red.unlocked kitbag.orange.unlocked 2830974662 Kit Bag (Editable) kitbag.orange.locked kitbag.orange.locked 2830963984 Kit Bag kitbag.orange.unlocked kitbag.yellow.unlocked 2830975150 Kit Bag (Editable) kitbag.yellow.locked kitbag.yellow.locked 2830964495 Kit Bag kitbag.yellow.unlocked kitbag.green.unlocked 2830975690 Kit Bag (Editable) kitbag.green.locked kitbag.green.locked 2830965006 Kit Bag kitbag.green.unlocked kitbag.cyan.unlocked 2830976173 Kit Bag (Editable) kitbag.cyan.locked kitbag.cyan.locked 2830965451 Kit Bag kitbag.cyan.unlocked kitbag.blue.unlocked 2830976481 Kit Bag (Editable) kitbag.blue.locked kitbag.blue.locked 2830965789 Kit Bag kitbag.blue.unlocked Alternative bag skins By default, the bag profiles in the config use the fantasy style skins. If you want to change them to the leather or tactical style skins, you can use the boh.setskins command to edit the config in bulk. For example, to change the generic bag set to use tactical style skins, run the command boh.setskins generic 2828559961 2828562701 2828573095 2828576548 2828579661 2828582369 2828585532. Fantasy bag skins As of v1.9.0, you can apply the fantasy theme by running the command boh.settheme fantasy_chevrons. The old way is to run all of the following commands. boh.setskins bagofholding 2824136143 boh.setskins generic 2824110403 2824113497 2824115881 2824117824 2824119889 2824121905 2824123811 boh.setskins armor_clothing 2824111863 2824114542 2824116781 2824118678 2824120619 2824122747 2824124690 boh.setskins food_medical 2824111462 2824114220 2824116431 2824118433 2824120423 2824122439 2824124459 boh.setskins items_construction 2824113019 2824115483 2824117546 2824119338 2824121607 2824123520 2824125425 boh.setskins resources_components 2824112139 2824114807 2824117061 2824118878 2824121055 2824123001 2824124960 boh.setskins weapons_tools 2824110902 2824113791 2824116147 2824118115 2824120210 2824122197 2824124162 Additionally, you should set UI settings -> Belt button -> Display skin ID to one of the fantasy skins such as 2824115881. Here are all the fantasy skin sequences, in case you want to use other icons or colors. Fantasy plain: 2824110403 2824113497 2824115881 2824117824 2824119889 2824121905 2824123811 Fantasy gray chevrons: 2828128662 2828134240 2828137909 2828146246 2828148357 2828150051 2828152784 Fantasy white chevrons: 2828128323 2828133931 2828137681 2828146038 2828148160 2828149845 2828152530 Fantasy black chevrons: 2828128041 2828133673 2828137257 2828145823 2828148006 2828149681 2828152306 Fantasy red chevrons: 2828127703 2828133308 2828136874 2828145607 2828147808 2828149504 2828152062 Fantasy yellow chevrons: 2824113019 2824115483 2824117546 2824119338 2824121607 2824123520 2824125425 Fantasy pink chevrons: 2824112653 2824115134 2824117246 2824119088 2824121332 2824123291 2824125171 Fantasy orange chevrons: 2824112139 2824114807 2824117061 2824118878 2824121055 2824123001 2824124960 Fantasy light blue chevrons: 2824111863 2824114542 2824116781 2824118678 2824120619 2824122747 2824124690 Fantasy green chevrons: 2824111462 2824114220 2824116431 2824118433 2824120423 2824122439 2824124459 Fantasy blue chevrons: 2824110902 2824113791 2824116147 2824118115 2824120210 2824122197 2824124162 Fantasy gray circles: 2828493103 2828497364 2828501735 2828506499 2828509849 2828514060 2828517736 Fantasy white circles: 2828493673 2828498179 2828502089 2828506819 2828510161 2828514392 2828518167 Fantasy black circles: 2828494015 2828498546 2828502435 2828507169 2828510478 2828514709 2828518812 Fantasy red circles: 2828494496 2828498987 2828502735 2828507528 2828510830 2828515098 2828515098 Fantasy yellow circles: 2828494894 2828499337 2828503050 2828507851 2828511170 2828515395 2828519489 Fantasy pink circles: 2828495354 2828499673 2828503432 2828508323 2828511498 2828515725 2828519798 Fantasy orange circles: 2828495777 2828500070 2828503778 2828508555 2828511912 2828516131 2828520212 Fantasy light blue circles: 2828496161 2828500606 2828504060 2828508821 2828512403 2828516540 2828520492 Fantasy green circles: 2828496570 2828500962 2828504356 2828509103 2828512690 2828516933 2828520819 Fantasy blue circles: 2828496949 2828501318 2828504627 2828509404 2828513595 2828517346 2828521099 Leather bag skins As of v1.9.0, you can apply the leather theme by running the command boh.settheme leather_chevrons. The old way is to run all of the following commands. boh.setskins bagofholding 2860178102 boh.setskins generic 2831018252 2831025047 2831029422 2831036209 2831041769 2831047418 2831052354 boh.setskins armor_clothing 2831016990 2831023499 2831028259 2831032725 2831040190 2831046214 2831050372 boh.setskins food_medical 2831017392 2831023974 2831028588 2831033068 2831040759 2831046638 2831050826 boh.setskins items_construction 2831015836 2831021553 2831027189 2831031578 2831038734 2831044485 2831049142 boh.setskins resources_components 2831016651 2831023019 2831027874 2831032305 2831039657 2831045812 2831049942 boh.setskins weapons_tools 2831017759 2831024390 2831028922 2831033383 2831041231 2831047014 2831051442 Additionally, you should set UI settings -> Belt button -> Display skin ID to one of the leather skins such as 2831029422. Here are all the leather style skin sequences, in case you want to use other icons or colors. Leather plain: 2831018252 2831025047 2831029422 2831036209 2831041769 2831047418 2831052354 Leather gray chevrons: 2831013773 2831019060 2831025741 2831029969 2831036925 2831042295 2831047827 Leather white chevrons: 2831014482 2831019741 2831026169 2831030357 2831037360 2831042761 2831048137 Leather black chevrons: 2831015051 2831020041 2831026487 2831030777 2831037873 2831043219 2831048450 Leather red chevrons: 2831015444 2831020436 2831026854 2831031160 2831038330 2831043696 2831048702 Leather yellow chevrons: 2831015836 2831021553 2831027189 2831031578 2831038734 2831044485 2831049142 Leather pink chevrons: 2831016234 2831022032 2831027551 2831031924 2831039240 2831045338 2831049495 Leather orange chevrons: 2831016651 2831023019 2831027874 2831032305 2831039657 2831045812 2831049942 Leather light blue chevrons: 2831016990 2831023499 2831028259 2831032725 2831040190 2831046214 2831050372 Leather green chevrons: 2831017392 2831023974 2831028588 2831033068 2831040759 2831046638 2831050826 Leather blue chevrons: 2831017759 2831024390 2831028922 2831033383 2831041231 2831047014 2831051442 Leather gray circles: 2831053189 2831057140 2831060554 2831063925 2831066897 2831070017 2831082280 Leather white circles: 2831053670 2831057586 2831060848 2831064201 2831067178 2831071006 2831082963 Leather black circles: 2831054069 2831057911 2831061109 2831064444 2831067379 2831072147 2831084280 Leather red circles: 2831054490 2831058281 2831061382 2831064726 2831067561 2831073121 2831084887 Leather yellow circles: 2831054841 2831058559 2831061614 2831065014 2831067781 2831073592 2831085402 Leather pink circles: 2831055215 2831058892 2831061919 2831065349 2831068032 2831073925 2831085778 Leather orange circles: 2831055582 2831059194 2831062274 2831065681 2831068304 2831074420 2831087653 Leather light blue circles: 2831055919 2831059491 2831062555 2831066018 2831068615 2831076575 2831088591 Leather green circles: 2831056306 2831059795 2831062808 2831066320 2831068905 2831078713 2831088956 Leather blue circles: 2831056740 2831060200 2831063168 2831066588 2831069218 2831079950 2831089185 Tactical bag skins As of v1.9.0, you can apply the tactical theme by running the command boh.settheme tactical_chevrons. The old way is to run all of the following commands. boh.setskins bagofholding 2828612528 boh.setskins generic 2828559961 2828562701 2828573095 2828576548 2828579661 2828582369 2828585532 boh.setskins armor_clothing 2828558763 2828562098 2828571752 2828575986 2828579117 2828581616 2828584535 boh.setskins food_medical 2828559062 2828562247 2828572006 2828576133 2828579288 2828581907 2828584822 boh.setskins items_construction 2828557975 2828561492 2828570571 2828574809 2828578159 2828580887 2828583748 boh.setskins resources_components 2828558453 2828561930 2828571212 2828575734 2828578707 2828581409 2828584212 boh.setskins weapons_tools 2828559313 2828562454 2828572778 2828576369 2828579499 2828582142 2828585357 Additionally, you should set UI settings -> Belt button -> Display skin ID to one of the tactical skins such as 2828573095. Here are all the tactical style skin sequences, in case you want to use other icons or colors. Tactical plain: 2828559961 2828562701 2828573095 2828576548 2828579661 2828582369 2828585532 Tactical gray chevrons: 2828556434 2828560310 2828563014 2828573659 2828577253 2828580012 2828582671 Tactical white chevrons: 2828557125 2828560646 2828563283 2828573927 2828577583 2828580260 2828582975 Tactical black chevrons: 2828557433 2828560923 2828563544 2828574322 2828577810 2828580491 2828583268 Tactical red chevrons: 2828557692 2828561221 2828570104 2828574605 2828578000 2828580701 2828583514 Tactical yellow chevrons: 2828557975 2828561492 2828570571 2828574809 2828578159 2828580887 2828583748 Tactical pink chevrons: 2828558240 2828561757 2828570867 2828575078 2828578530 2828581157 2828583990 Tactical orange chevrons: 2828558453 2828561930 2828571212 2828575734 2828578707 2828581409 2828584212 Tactical light blue chevrons: 2828558763 2828562098 2828571752 2828575986 2828579117 2828581616 2828584535 Tactical green chevrons: 2828559062 2828562247 2828572006 2828576133 2828579288 2828581907 2828584822 Tactical blue chevrons: 2828559313 2828562454 2828572778 2828576369 2828579499 2828582142 2828585357 Tactical gray circles: 2828590059 2828592435 2828596053 2828598607 2828600574 2828602840 2828605402 Tactical white circles: 2828590364 2828592713 2828596309 2828598848 2828600805 2828603043 2828605787 Tactical black circles: 2828590658 2828592930 2828596615 2828599070 2828601043 2828603298 2828605999 Tactical red circles: 2828590870 2828593147 2828596818 2828599291 2828601240 2828603494 2828606193 Tactical yellow circles: 2828591083 2828593355 2828597034 2828599512 2828601444 2828603677 2828606367 Tactical pink circles: 2828591226 2828593626 2828597285 2828599643 2828601590 2828603900 2828606490 Tactical orange circles: 2828591389 2828594143 2828597493 2828599829 2828601859 2828604283 2828606662 Tactical light blue circles: 2828591603 2828594846 2828597739 2828600017 2828602079 2828604553 2828606893 Tactical green circles: 2828591817 2828595022 2828598019 2828600169 2828602304 2828604782 2828607054 Tactical blue circles: 2828592115 2828595430 2828598248 2828600324 2828602571 2828605041 2828607208 Developer API API_GetApi Dictionary<string, object> API_GetApi() Returns a dictionary where each key is a delegate for an API method. The purpose of this API is for high-performance scenarios where you don't want the overhead of calling the Bag of Holding via Oxide. Instead, your plugin should call Bag of Holding once (when Bag of Holding loads), cache the API, and invoke specific API methods via delegates whenever needed. Example: // Get the API. Ideally you should cache this. You should also re-cache this when Bag of Holding reloads. var api = BagOfHolding.Call("API_GetApi") as Dictionary<string, object>; // Get the API function you want. Ideally you should cache this too. The names are the same as documented below, but without the "API_" prefix. var isBagFunction = api["IsBag"] as Func<Item, bool>; // Call the API function. This call doesn't go through Oxide, so it saves CPU cycles, and allows you to avoid heap allocations when passing value types (e.g., when passing numbers). var isBag = isBagFunction(item); API_IsBag bool API_IsBag(Item item) Returns true if the item is a bag, else returns false. API_IsLootingBag bool API_IsLootingBag(BasePlayer player) Returns true if the player is looting a bag, else returns false. Note: If you call this immediately after the OnLootEntity Oxide hook is called, this will return false, because the plugin has to inspect the ItemContainers that the player is looting (basePlayer.inventory.loot.containers) which are populated after the OnLootEntity hook call has finished (that is where the Oxide hook is placed, and the plugin follows that pattern when explicitly calling OnLootEntity). Therefore, if you wish to detect whether a player has just opened a bag via the OnLootEntity hook, you should run your logic on the next frame (e.g., using NextTick). You may avoid calling this API entirely by simply verifying that the basePlayer.inventory.loot.containers list has only one container, and that it has a parentItem. If both of those criteria are met, the player is looting some sort of item, not necessary from this plugin, but that should be close enough. Note that this logic still needs to be in NextTick for the aforementioned reason. API_GetBagProfileName string API_GetBagProfileName(Item item) Returns the profile name of the bag (not the display name), else returns null if the item is not a bag. If you want the display name, simply read item.name. API_OpenBag bool API_OpenBag(BasePlayer player, Item item) Attempts to make the player open the bag Returns true if the item is a valid lootable bag (not a locked bag), and if not blocked by a plugin via the OnBagOpen hook Returns false if the item was not a valid lootable bag, or if blocked by a plugin via the OnBagOpen hook API_CreateBag Item API_CreateBag(string profileName, int amount = 1) Creates a bag using the specified profile name, with specified stack amount Returns the bag Item if successful Returns null if the specified profile name or stack amount is invalid Note: Bags can also be created using ItemManager.CreateByName("halloween.lootbag.large", amount, skinId) if the skin ID is known API_CreateKitBag Item API_CreateKitBag(string profileName, string kitName, BasePlayer initiator = null) Creates a bag using the specified profile name, and populates it with the specified kit Returns the bag Item if successful Returns null if the specified profile name or kit name is invalid If any kit items do not fit in the bag, they will be given to the BasePlayer initiator if provided, else deleted. API_ChangeBagProfile bool API_ChangeBagProfile(Item item, string profileName, BasePlayer initiator = null) Updates the bag item to the specified profile Returns true if the item is a valid bag, and if the specified profile name is valid Returns false if the item is not a valid bag, or if specified profile name is invalid If the target profile has less capacity than the current profile... Overflowing items will attempt to be compacted into the bag by moving them to earlier slots If compaction fails, the remaining items will be given to the BasePlayer initiator if provided If the BasePlayer initiator is not provided, the bag capacity will be increased to fit the overflowing items Caution: If the item is a stack of bags, it will change the profile for all of the bags in the stack Caution: Changing the profile of a bag that is already inside a container may cause the container to exceed configured bag limits API_UpgradeBag bool API_UpgradeBag(Item item, BasePlayer initiator = null) Updates the bag item to the profile designated as the upgrade target in the config Returns true if the item is a valid bag, and if the bag profile has a valid upgrade target in the config Returns false if the item is not a valid bag, or if the bag profile does not have a valid upgrade target in the config If the target profile has less capacity than the current profile... Overflowing items will attempt to be compacted into the bag by moving them to earlier slots If compaction fails, the remaining items will be given to the BasePlayer initiator if provided If the BasePlayer initiator is not provided, the bag capacity will be increased to fit the overflowing items Caution: If the item is a stack of bags, it will upgrade all of the bags in the stack Caution: Upgrading a bag that is already inside a container may cause the container to exceed configured bag limits Developer hooks OnBagOpen object OnBagOpen(Item item, BasePlayer player) Called when a player attempts to open a bag Returning false will prevent the bag from being opened Returning null will result in the default behavior OnBagOpened void OnBagOpened(Item item, BasePlayer player) Called after a player has started looting a bag No return behavior OnBagClosed void OnBagClosed(Item item, BasePlayer player) Called after a player has stopped looting a bag No return behavior OnBagUpgrade object OnBagUpgrade(Item item, string newProfileName, BasePlayer initiator) Called when a player or a plugin attempts to upgrade a bag Returning false will prevent the bag from being upgraded Returning null will result in the default behavior Note: The BasePlayer argument will be null if the upgrade was not initiated by a player. OnBagUpgraded void OnBagUpgraded(Item item, string newProfileName, BasePlayer initiator) Called after a bag has been upgraded to the profile designated in the config No return behavior Note: The BasePlayer argument will be null if the upgrade was not initiated by a player OnBagProfileChanged void OnBagProfileChanged(Item item, string newProfileName) Called after a bag's profile has been changed No return behavior$24.99 -
.thumb.gif.473157f6844989d096c05bd9f3c4501b.gif)
Version 1.0.9
423 downloads
The world has changed. The island in the ocean has become a haven for evil spirits, the surviving inhabitants call them the Walking Dead. Once the blooming and fragrant city of Atlanta was the center of this island, now it is a dead city with its inhabitants. There are very few people left who are opposed by the walking dead, but every day there are more and more of them, the dead people turn into zombies and there is no stopping it. I present to your attention my new map with incredible detail of monuments and their features, the plug-ins included will give even more atmosphere of the lost world of the zombie apocalypse. On the map you will find a large number of roads, railways, tunnels and rivers. You will also love the many unique places to build bases for your players. I tried very hard to create this map, I hope you like it, Thank you. Good luck surviving in Atlanta! Attention: The Train Home plugin shown in the video does not come with the map, it is sold separately Features: Prefab Count: ~71к prefabs Size: 4500 A lot of interesting locations to explore Marketplaces, Helicopter Salesman and recycler have been added to fishing villages Railway A large number of places for the construction of foundations in the form of unusual rocks, caves, landscape, underwater and icebergs Custom ways to overcome distances on boats and tugboat Custom plugin Event Prison Alert (by KpuctaJL) Custom plugin Map Skinner (by Adem) Custom plugin Npc Moving Control (by Adem) Realistic zombies on the map The atmosphere of the zombie apocalypse This map is constantly supported and updated for the current version of the game with all updates! How can I view the map? You can do this in our Discord server by submitting a request for an invitation to our servers. There you will be given the rights of an “administrator” and without any difficulties you will be able to fly around the map and fully familiarize yourself with it. Custom Monuments: Atlanta City Alexandria Woodbury Prison Police Department Harrison Hospital Railway Depot Herschel Farm Hilltop Strange Swamp Lonely Wandered Nomads Camp Gang of Survivors Convoy Desert Gas Station Ore Mine Farmers Camp Laundry Motel Old Cave Monument Train Home Custom point Zipline interesting places to build a base marked X Monument Facepunch: Launch Site Missile Silo Junkyard Harbor 1 and 2 Arctic Research Base Satellite Dish Airfield Bandit Camp Outpost Giant Excavator Pit Water Treatment Military Tunnel The Dome Ranch Fishing Village 1,2,3 (Modified version) Lighthouse Underwater Lab Railway HQM, Sulfur, Stone Quarry Roadside Monument$49.90 -

Version 1.1.6
96 downloads
Hello everyone, I present to your attention a new scary map. The map is suitable for all types of PVE, PVP servers. The set includes 2 map sizes, 4000k and 5000k. A lot of flat planes for your favorite plugins, as well as all Facepunch monuments are present on the maps, where you can also hold events, I took into account most of your desires and embodied them in this work. The style of this map will immerse you in an atmosphere of horror. The locations are made in the style of the most creepy horror films, these documents contain zombies wandering in the twilight and fog. Also, custom monuments are guarded by huge monsters, in some monsters you can build a small base. Also, at the request of the server owners, rivers and fresh lakes have been added, as well as custom places for building bases. Custom monuments: ☣Railway depot (Large Monument) ☣Fish Farm (Large Monument) ☣Old Sawmill (Large Monument) ☣Sinister Church (Large Monument) ☣Abandoned Mines (Large Monument) ☣Last Height (Medium Monument) ☣Old Gas Station (Small Monument) ☣Old Warehouse (Small Monument) ☣Mini Command Center (Small Monument on Barge) ☣Auto Barge (Small Monument on Barge) ☣Water Post (Small Monument on Barge) ☣Junk Camp (Small Monument on Barge) ☣Kvakazyabra (Big Monster) ☣Creeping Pumpkin (Big Monster) ☣Terrible Spider (Big Monster) ☣Skeleton of a giant (Build Base) ☣Gargoyle (Monster) ☣Lots of places to build bases, inside monsters, on the ground, under water Monuments of FP: – Outpost – Bandit Camp - Nuclear Silo - Ferry Terminal – Power Plant – Water Treatment Plant – Train Yard – Launch Site – Satellite Dish – Airfield – Big Excavator Pit – Harbor – The Dome – Oilrig – Underground tunnels – Lighthouse – Quarry – Fishing village – Underwater Laboratory$49.90- 14 comments
- 2 reviews
-
- 6
-
-
- #halloween
- #gruber
- (and 4 more)
-
-min.thumb.png.3e42e99afda25d83aa26d9af0644acba.png)
Version 1.0.4
753 downloads
I bring to you a new plugin that will add Pogo Sticks to your server! These Pogo Sticks will allow players to jump, somersault, and parkour in ways never seen before in the game. With default configuration, Pogo Sticks don't do as well on sand and snow, for obvious reasons right? But don't worry you can configure any of the pogo presets, such as the speed and height of jump for example. The Pogo Stick is an ordinary worn item with a skinID that can be given to the player by console command, or any of the other unique ways you might want to give them out in your servers. There are two activation modes for Pogo Sticks. With default configuration, the player has to put the item in a belt container. In this mode, the Pogo Stick is only used when it is selected as an active item. In the second mode, the Pogo Stick is activated when it is added to a clothing/armor container. In order to use the second mode, replace the shortnames of all Pogo Sticks with a clothing item. As an example "burlap.gloves.new" to replace a less noticable part of your wardrobe. In this second mode, players will be able to shoot and use items while on the Pogo Stick! The creativity is in your hands, have fun with it! Chat commands (only for administrators) /givepogo <pogoPresetName> - give the pogo stick to yourself Console commands (RCON only) givepogo <userID> <pogoPresetName> <amount> – give the pogo stick to player. Config plugin_en – example of plugin configuration in English plugin_ru – example of plugin configuration in Russian Dependencies (optional, not required) GUI Announcements Notify ZoneManager My Discord: Adem#9554 Join the Mad Mappers Discord here! Check out more of my work here!$9.99 -
Version 1.1.9
1,509 downloads
Take your players to new heights in the game of Rust, and get a few laughs watching people try to fly one for the first time! Introducing Jetpack! A plugin that allows your players to soar around like never before in the game of Rust. Grab this plugin and give your players something to talk about! Many functions have already been implemented like the ability to shoot while piloting a jetpack, and the plugin will continue to expand and grow with the community. You'll find the configuration covers almost anything you can think of, and you'll see a breakdown of the configuration file in the description below. By default you can simply press the middle mouse wheel to equip and remove the jetpack quickly, you can't run around once you've equipped it. You can customize loot crates the jetpack might appear in, and all of the stats from thrust to rotation and all of the other controls. Be sure to check the permission section and feel free to use the command creatively to give jetpacks as an award for completing other tasks on your server using the commands provided. Make sure you have some lowgrade handy, let's take to the skies! Сontrols Space bar - thrust W/S keys - pitch axis A/D keys - yaw axis Chat commands (check config for permissions) /jet - toggle jetpack on & off /givejetpack - give a jetpack to yourself Console commands (admin only) givejetpack - give a jetpack to yourself givejetpack SteamID - give a jetpack to player using their SteamID Plugin config en – example of plugin configuration in English ru – example of plugin configuration in Russian Check out the rest of my work: Adem's Codefling Library You can reach out to me in Discord: Adem's Discord Profile Thanks to Jbird for writing, translation, & support: Jbird's Discord Profile Join the Mad Mappers Discord!$19.99 -
Version 2.0.0
40 downloads
TheIceThrone "TheIceThrone" plugin bestows upon players sitting on the Ice Throne in the game Rust a complete restoration of their health, food, and water reserves. It's designed to provide an additional reward for players engaging with this special object, enhancing the gameplay experience by offering a unique interaction with the game world. Permissions theicethrone.use load, run, enjoy Join my Discord pick the Role -> Flash and find Free Plugins Support DiscordFree -

Version 1.0.8
963 downloads
Features : Set a maximum sleepingbag/bed limit per player with permissions Debug mode available through cfg settings Player commands for info/limitations Notifies the player he has reached the limit Support for sleepingbags/beachtowels (combined) Support for beds Settings for respawn cooldown Admin perm for bypass limits and cooldown ignore Set a Welcome message on sleeping bags and beds if placed Set Max rename to 1x and block others from renaming a sleepingbag/bed Sleepingbag + Beachtowel share settings (subject to change) Beds have their own settings Various messaging on placement (restricted/info/remaining or when reached the limit) Can refund true/false if reached the limit Commands : /bag info : Shows Plugin info + commands list /bag mylimit : Replies with the settings for your permission and how many placements you have left Permisions : betterbeds.restrictdefault : Gives the limitations to default rank/player betterbeds.restrictvip : Gives the limitations to vip rank/player betterbeds.renameblock : Blocks renaming of bag is not yours betterbeds.chat : Grants chat command usage betterbeds.admin : Sets bypass for admins or assigned player betterbeds.nocd : Grants no cd on respawning on sleepingbags/beds betterbeds.denypickup : Blocks picking up any placed sleepingbags/beds Configuration : { "Settings Plugin": { "Debug": false, "Chat Steam64ID": 0, "Chat Prefix": "[<color=yellow>Better Beds</color>] " }, "Settings Global": { "Bag cooldown": 30.0, "Bed cooldown": 20.0, "Only 1x rename per placement": false, "NO bed/sleepingbag cooldown": false }, "Settings Bags": { "Refund Sleepingbags": true, "Max placements Default": 5, "Max placements Vip": 10 }, "Settings Beds": { "Refund Beds": true, "Max placements Default": 1, "Max placements Vip": 3 } } Language file : { "InvalidInput": "<color=red>Please enter a valid command!</color>", "BagText": "Welcome to our server", "Version": "Version : V", "LimitBags": "You have been limited to {0} sleepingbag(s)", "LimitBeds": "You have been limited to {0} bed(s)", "MaxLimitDefault": "You allready placed the limit of {0} for a player", "MaxLimitVip": "You allready placed the limit of {0} for Vips", "LimitHeader": "Your Restrictions and Placements :", "Info": "\n<color=green>Available Commands</color>\n<color=green>/bag info</color> : Shows info on version/author and commands", "InfoMyLimit": "\n<color=green>/bag mylimit</color> : Lists your restriction heights and placements", "InventoryFull": "<color=red>You had no inventory space no item refunded !</color> ", "InventoryNotFull": "<color=green>Your item has been refunded !</color> ", "NoPermission": "<color=green>You do not have permission to use that command!</color>", "RenameBlock": "<color=red>Renaming is blocked on this server</color>", "RenameBlock2nd": "<color=red>Max 1 rename allowed on this server </color>", "BagsUsed": "You placed {0}", "BagsLeft": "You have {0} placement(s) left" }Free- 32 comments
- 1 review
-
- 2
-
-
- #rust
- #sleepingbag
- (and 3 more)


.thumb.jpg.cd820ab870802b66e9b4930863d43ea3.jpg)