Search the Community
Showing results for tags 'admin'.
-

Version 1.0.4
174 downloads
Manage your Rust server easier and more efficiently with the AdminMenu plugin. Track players, interact with them, edit their data and permissions, as well as change server convars and manage plugins. Features: Menu retains its state after closing, you won't lose everything you did before. Ability to fully translate the menu into any language. Large range of permissions for each action, will allow you to flexibly customize the admin menu for each group of administrators. Quick menu that allows you to perform quick actions Full list of players with the ability to filter by online, offline, admins and moderators. Also has a frame of different colors depending on the level of authorization. Wide range of information and actions for the selected player. Editing convars with search. Has a complete list of editable convars with descriptions for some of them. Extensive issue menu by category, with easy management of name, skin and amount (manual, +1, +100, +1000, +10000). Plugin management menu. It is possible to reload, unload or load a plugin easily and quickly. Updates occur in real time. Ability to create your own custom buttons that execute several commands Quick Start: You install the plugin in the plugins folder. Give yourself the adminmenu.fullaccess permission. Commands, use one of your choice, one for the player and one for the admin group: o.grant user {name/steamid} adminmenu.fullaccess o.grant group admin adminmenu.fullaccess Press the X button (swap seat button) or type adminmenu in the console. Enjoy Useful stuff: You can quickly open a player in the admin menu. To do this, point at the player and press X. You don't have to hover over the player exactly, you will be able to open players within a certain radius of the place you are looking at. CUSTOM BUTTONS Custom buttons are buttons that when pressed will execute commands on behalf of the administrator, commands can be several, below will be the details. At the moment, custom buttons can be created in two places: in the quick menu and in the menu when selecting a player. These places are separated in the config. Button Fields: "Label" - Text that will be on the button, for each such inscription creates a field in the lang file, accordingly you can translate this text into several languages. "Commands" - Array of commands that will be executed on behalf of the administrator. Chat commands require a special entry, see examples. Available self-replaceable tags for commands targeting the player: {steamid}, {steamID}, {userID}, {STEAMID}, {USERID} - mean the same thing, namely the id of the selected player. {adminUID} - administrator's id. "Permission"- permission to display and use the button. You need to write the permission that will be after "adminmenu.". Example: if you enter the permission "test" the permission will be adminmenu.test "Position" - The location for the button, the first number is responsible for the row number, the second for the position within the row, starts from 0.There are limits of locations, if you have gone beyond the limit - the button will not be displayed. Example of commands: chat.say \"/{chat command}\" vanish ban {steamID} teleport {steamID} {adminUID} More information about the grant menu: The grant menu includes the full list of items including hidden items as well as custom items created by the CustomItemDefinitions library. The menu can be accessed from the navigation or from the menu of the selected player. When issuing itself has categories. Search works in any registry by any part of the name or short name. Has a page system at any stage. More information about the buttons in the Quick Menu: [Teleport to 0 0 0] - Teleport to coordinates 0 0 0. Requires adminmenu.quickmenu.teleportto000 permission [Teleport to Deathpoint] - Teleport to your deathpoint. Requires adminmenu.quickmenu.teleporttodeath permission [Teleport to Spawn point] - Teleport to a random spawn point. Requires adminmenu.quickmenu.teleporttospawnpoint permission [Kill Self] - Kill Self, kills even when immortal. Does not require permission. [Heal Self] - Fully heal yourself. Requires adminmenu.quickmenu.healself permission [Call Heli] - Call Helicopter to yourself (arrives in time). Requires adminmenu.quickmenu.helicall permission [Spawn Bradley] - Spawn bradley on yourself. Requires adminmenu.quickmenu.spawnbradley permission More information about the buttons in the menu of the selected player: [Teleport Self To] - Teleport yourself to the selected player. Requires adminmenu.userinfo.teleportselfto permission [Teleport To Self] - Teleport the selected player to yourself. Requires adminmenu.userinfo.teleporttoself permission [Teleport To Auth] - Teleportation to random authorization (TC). Requires adminmenu.userinfo.teleporttoauth permission [Teleport to Deathpoint] - Teleportation to a player's deathpoint. Requires adminmenu.userinfo.teleporttodeath permission [Heal] - Full healing, including metabolism. Requires adminmenu.userinfo.fullheal permission [Heal 50%] - Half healing. Requires adminmenu.userinfo.halfheal permission. [View Inventory] - View and edit player's inventory. Requires adminmenu.userinfo.viewinv permission [Strip Inventory] - Clear player's inventory. Requires adminmenu.userinfo.stripinventory permission [Unlock Blueprints] - Unlock all Blueprints. Requires adminmenu.userinfo.unlockblueprints permission [Revoke Blueprints] - Reset all Blueprints. Requires adminmenu.userinfo.revokeblueprints permission. [Kill] - Kill a player. Requires adminmenu.userinfo.kill permission [Kick] - Kick a player. Requires adminmenu.userinfo.kick permission [Ban] - Ban a player. Requires adminmenu.userinfo.ban permission More information about the buttons in the menu of the selected group: [Remove Group] - Remove group, has confirmation. Requires adminmenu.groupinfo.removegroup permission [Clone Group] - Clone group with the ability to copy users. Requires adminmenu.groupinfo.clonegroup permission Permissions: adminmenu.use - Ability to use admin menu with basic set. Open tab quick menu (each button has its own permission, without permissions is present only kill yourself button) and the list of players. adminmenu.fullaccess - Full access to all functions without the need for each permission, includes also adminmenu.use. It is recommended to give only to the main administrators. adminmenu.quickmenu.teleportto000 - Access to the button in the quick menu, teleportation to coordinates 0 0 0 0. adminmenu.quickmenu.teleporttodeath - Access to the button in the quick menu, teleportation to the point of your death. adminmenu.quickmenu.teleporttospawnpoint - Access to the button in the quick menu, teleportation to a random spawn point. adminmenu.quickmenu.healself - Access button in quickmenu, heal yourself completely. adminmenu.quickmenu.helicall - Access to the button in the quick menu, call a helicopter to yourself (arrives in time). adminmenu.quickmenu.spawnbradley - Access button in quickmenu, spawn bradley. adminmenu.userinfo.teleportselfto - Access to the button in the menu of the selected player, teleportation to the selected player. adminmenu.userinfo.teleporttoself - Access to the button in the menu of the selected player, teleport the selected player to himself. adminmenu.userinfo.teleporttoauth - Access to the button in the menu of the selected player, teleportation to random authorization (TC). adminmenu.userinfo.teleporttodeath - Access to the button in the menu of the selected player, teleportation to the place of death of the player. adminmenu.userinfo.fullheal - Access to the button in the menu of the selected player, full healing, including metabolism. adminmenu.userinfo.halfheal - Access to the button in the menu of the selected player, half healing. adminmenu.userinfo.viewinv - Access to the button in the selected player's menu, view and edit the player's inventory. adminmenu.userinfo.stripinventory - Access to the button in the menu of the selected player, clear the player's inventory. adminmenu.userinfo.unlockblueprints - Access the button in the menu of the selected player, unlock all drafts. adminmenu.userinfo.revokeblueprints - Access to the button in the menu of the selected player, reset all drafts. adminmenu.userinfo.kill - Access the button in the selected player's menu to kill the player. adminmenu.userinfo.kick - Access the button in the selected player's menu to kick the player. adminmenu.userinfo.ban - Access to the button in the menu of the selected player, ban the player. adminmenu.groupinfo.removegroup - Access to the button in the menu of the selected group, the ability to remove the group. adminmenu.groupinfo.clonegroup - Access to the button in the menu of the selected group, the ability to clone the group. adminmenu.convars - View and edit convars. adminmenu.permissionmanager - View and edit permissions in groups, player groups, create, delete and clone groups (requires additional permissions from these buttons). adminmenu.pluginmanager - Access to plugin management, reloading, unloading, loading plugins. adminmenu.give - Access to give resources, as well as yourself and the selected player.$25.00 -
Version 1.4.3
290 downloads
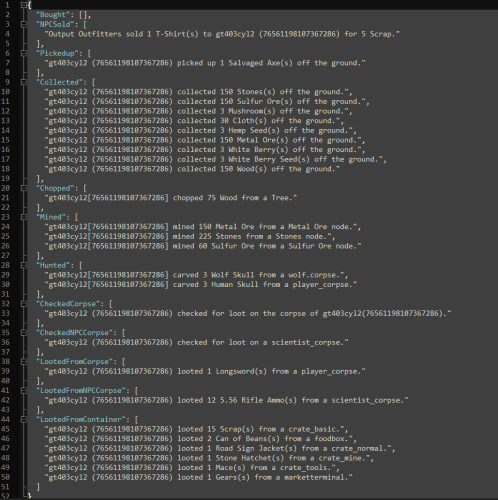
A plugin for Rust server owners or admin that can assist in determining if a player is cheating to gain loot. Loot Audit is used by granting the permission "uselog" to the specific player they suspect is cheating and the plugin will categorically log what the loot is and where it was looted from. Discord integration is quickly setup by creating a webhook in discord and adding it to the Discord Webhook line in the config. If you do not wish to use the Discord logging feature then leave that line as is in the config. NOTE: *** Use permissions can be toggled on/off (true/false) in the config, it is highly recommended to leave it true (set by default) as the logs will add up fairly quickly and can impact server performance. *** Permissions: lootaudit.admin - Allows admin to clear the logs from the data file. lootaudit.uselog - Allows the players loot to be logged. Commands: - /clrla - Clears the data file. - /tiadmin - Toggles Ignore admin - /lahelp - Lists the current set commands to the admin in chat. -/cdebug - Toggles debug to console. Features: * Ignore admin, regardless of permissions. * Detailed logs sorted by category. * Easily configurable. * Logs items even when stacked. Default Config: { "Chat Prefix": "<color=#32CD32>Loot Audit</color>: ", "Discord WebHook": "https://support.discord.com/hc/en-us/articles/228383668-Intro-to-Webhooks", "Command to see commands list": "lahelp", "Command to toggle console debug": "cdebug", "Command to clear Loot Audit data file": "clrla", "Command to toggle Ignore Admin": "tiadmin", "Use data file to log (true / false)": true, "Clear data file on wipe (true / false)": false, "Ignore Admin (true / false)": false, "Use Debug (true / false)": true, "Use Permissions (true (recommended)/ false)": true, "Log Vending Machines (true / false)": true, "Log Item Pickups (true / false)": true, "Log Collectible Pickups (true / false)": true, "Log Checking Corpses (true / false)": true, "Log Player Corpse Looting (true / false)": true, "Log NPC Corpse Looting (true / false)": true, "Log Looting From Containers (true / false)": true, "Log Dispensers (true / false)": true, "Log Growables (true / false)": true, "Log Looting of Players (true / false)": true } Default Data File: { "Bought": [], "NPCSold": [], "Pickedup": [], "Collected": [], "Chopped": [], "Mined": [], "Hunted": [], "Farmed": [], "CheckedCorpse": [], "CheckedSleeper": [], "CheckedNPCCorpse": [], "LootedFromCorpse": [], "LootedFromNPCCorpse": [], "LootedFromPlayerInventory": [], "LootedFromContainer": [], "LootedFromPlayerDropBag": [] } Default Lang File: { "perms": "You don't have permission to use this command.", "clrla": "Loot Audit Data has been cleared.", "iadmin": "Ignore admin now set.", "iadminf": "Ignore admin now disabled.", "databought": "{0} ({1}) bought {2} {3}(s) from {4} for {5} {6} from {7} ({8}) {9} UTC time.", "databoughtnpc": "{0} sold {1} {2}(s) to {3} ({4}) for {5} {6} {7} UTC time.", "databoughtnpcd": "{0} sold {1} {2}(s) to {3} ({4}) {5} UTC time.", "datalootpickup": "{0} ({1}) picked up {2} {3}(s) off the ground {4} UTC time.", "datachopped": "{0} chopped {1} {2} from a {3} {4} UTC time.", "datamined": "{0} mined {1} {2} from a {3} node {4} UTC time.", "datamined2": "{0} ({1}) mined {2} {3} from a Metal Ore node {4} UTC time.", "datahunted": "{0} carved {1} {2} from a {3} {4} UTC time.", "datafarmed": "{0} ({1}) harvested {2} {3} {4} UTC time.", "datalootcollect": "{0} ({1}) collected {2} {3}(s) off the ground {4} UTC time.", "datacheckcorpse": "{0} ({1}) checked for loot on the corpse of {2} ({3}) {4} UTC time.", "datachecksleeper": "{0} ({1}) checked for loot on sleeping body of {2} ({3}) {4} UTC time.", "datachecknpccorpse": "{0} ({1}) checked for loot on a {2} {3} UTC time.", "datalootfromcorpse": "{0} ({1}) looted {2} {3}(s) from the dead body of {4} ({5}) {6} UTC time.", "datalootfromnpccorpse": "{0} ({1}) looted {2} {3}(s) from a {4} {5} UTC time.", "datalootfromplayerinventory": "{0} ({1}) looted {2} {3}(s) from a {4} owned by {5} {6} UTC time.", "datalootfromcontainer": "{0} ({1}) looted {2} {3}(s) from a {4} {5} UTC time.", "datalootfromdropbag": "{0} ({1}) looted {2} {3}(s) from a drop bag {4} UTC time." } Other information: Comments, suggestions or for support message me here or on Discord: gt403cyl2$9.99 -

Version 0.1.1
13 downloads
What is it? Reporter is a administration plugin to make sure your playerbase is happy. Usage? If anything bad is going on, make sure that your players can report it to you via nice UI menu and that admins can check that. Permissions: reporter.use - Basic permission to allow open menu and create New report. reporter.admin - Admin permission to allow view to Live Reports and ability to see/manage pop-up report reporter.sadmin - SuperAdmin permission to allow view to Reports history and see stats of your staff team Commands: /report - Opens the UI menu /report.tp {id} - Teleports you to the creator of specified report /report.claim {id} - Claims specified report /report.finish {id} - Finishes specified report /report.clearall - ! Requires SAdmin permissions and will wipe your data folder - causing to delete all reports and staff's statistics ! Discord logging: Enable/disable and set webhookURL for report claim/create/finish/tp Data file: Data of all reports and staff's statistics are being saved into a data file. Path: Your_Server\oxide\data\Reporter\Reporter.json Config file: You can set here settings for discord notification F.e. Enable/Disable, embed color of the notification, WebhookURL Path: Your_Server\oxide\config\Reporter.json Localization: ["Syntax"] = "Commands:\n/report (Opens Reporter GUI)", ["SyntaxConsole"] = "Can't open GUI in console", ["claimMsg"] = "You have claimed a report\nID: {0}\nBy: {1}", ["finishMsg"] = "You have finished a report with ID: {0}", ["statusUnclaimed"] = "Unclaimed", ["statusClaimed"] = "Claimed", ["statusFinished"] = "Finished", ["reported"] = "Successfully reported", ["fillField"] = "<color=#c93232><--Fill this field</color>", ["noReports"] = "There are not any reports yet", ["noStaff"] = "There are not any staff stats yet", ["playerNotFound"] = "Couldn't find player", ["alreadyClaimed"] = "Report is already claimed", ["labelPAGES"] = "Page {0}/{1}", ["alreadyFinished"] = "This report is already finished", ["CUI newReport"] = "New report", ["CUI liveReport"] = "Live reports", ["CUI historyReport"] = "Reports history", ["CUI staffStats"] = "Staff stats", ["CUI close"] = "Close", ["CUI claim"] = "Claim", ["CUI finish"] = "Finish", ["CUI claimed"] = "Claimed", ["CUI tp"] = "TP", ["CUI next"] = "Next", ["CUI previous"] = "Previous", ["CUI newPopReport"] = "New Report -- ID: {0}", ["CUI reportBy"] = "Reported by <color=#4ccf49>{0}</color>", ["CUI reportedPlayer"] = "Reported player <color=#e00a0a>{0}</color>", ["CUI subject"] = "Subject of report: <color=#e0a00a>{0}</color>", ["CUI liveReportClaimed"] = "<color=#e0a00a>{0}</color> Report: {1}", ["CUI liveReportUnClaimed"] = "<color=#1bc2d1>{0}</color> Report: {1}", ["CUI historyReportFinished"] = "<color=#4ccf49>{0}</color> Report: {1}", ["CUI liveReportClaimedBy"] = "<color=#e0a00a>--Claimed by {0}</color>", ["CUI finishedBy"] = "<color=#4ccf49>--Finished by--\n{0}</color>", ["staffName"] = "Staff's Name", ["staffID"] = "Staff's ID", ["staffFinished"] = "Finished reports", ["Category"] = "Category", ["Message"] = "Message", ["dcCreate"] = "{0} has created report: {1}", ["dcClaim"] = "{0} has claimed report {1} by - {2}", ["dcFinish"] = "{0} has finished report {1} by - {2}", ["dcTp"] = "{0} has teleported to report {1} by - {2}", ["dcCatCreate"] = "Report Create", ["dcCatClaim"] = "Report Claim", ["dcCatFinish"] = "Report Finish", ["dcCatTp"] = "Report TP", Configuration: { "Claim report - discord": { "WebhookURL": "", "Enabled?": true, "Embed Color:": "16538684" }, "Finish report - discord": { "WebhookURL": "", "Enabled?": true, "Embed Color:": "16538684" }, "Create report - discord": { "WebhookURL": "", "Enabled?": true, "Embed Color:": "16538684" }, "TP to report - discord": { "WebhookURL": "", "Enabled?": true, "Embed Color:": "16538684" } }$9.99- 3 comments
- 1 review
-
- 1
-

-
- #reporting
- #report system
- (and 12 more)
-

Version 0.1.2
9 downloads
What is it? A nice user-friendly warning system Usage When someone is breaking rules or trolling others just warn them, you can also set a command that will be executed through server console that will get executed upon reachin certain amount of warnings (can be configured in cfg) Permissions warnmenu.use -- Gives you full control to operate the WarnMenu Chat command /warn -- Opens the WarnMenu /warn "Name/SteamID" "Warning reason" -- Warns the specified player with your reason /warnmenu.save -- Force the plugin to write the data from memory to the data file Data files All Data files can be located at: \oxide\data\WarnMenu\warns There you can find all the warnings for each player Features WarnMenu features * Online Tab - In this tab you can easily select any online player that you want to warn * Search All Tab - Once you open this tab, there you can see all the players and browse in them * Find player Tab - When you click on the button you will be able to search for a specific player using his Name or SteamID Warn Types * CUI-Based - A CUI warning message will pop-up on player's screen when he gets warned * Chat-Based - A chat message will pop-up in player's chat when he gets warned Executable commands * On reaching certain amount of warnings, you can make the server execute a command on a player(configurable in cfg) F.e.: "1": "say {0} just reached 1 warning! SHAME on him!", "3": "kick {0} Kicked for reaching 3 warnings", Localization { "Syntax": "Commands:\n/report (Opens Reporter GUI)", "CUI Online": "Online Players", "CUI Player": "Player: {0}", "CUI SteamID": "SteamID64: {0}", "CUI Warnings": "Warnings: <color=#8f1919>{0}</color>", "CUI NewWarn": "New\nWarning", "CUI WarningID": "Warning ID: {0}", "CUI WarnedBy": "Warned by: {0}", "CUI Date": "Date: {0}", "CUI Reason": "Reason: \n{0}", "CUI Remove": "Remove", "CUI Close": "close", "CUI Warn": "Warn", "CUI WarnAddMenuPlayer": "Warning for\n<color=#d43939>{0}</color>", "CUI SearchAll": "Search All", "CUI SelectPlayer": "Select a player to warn:", "CUI Find": "Find player", "CUI Find2": "Select", "CUI Find3": "Find player:\n(steamID/Name)", "CUI CantFindPlayer": "Couldn't find the player\nsearching argument: {0}", "CUI FoundPlayer": "Found player: {0}", "CUI Refresh": "Refresh", "CantFindPlayer": "Couldn't find that player", "WarnMessage": "Warned: <color=#8f1919>{0}</color>\nReason: {1}", "JoinMessage": "{0} has joined with <color=#8f1919>{1}</color> warnings", "WarnReceive": "You have received a <color=#8f1919>warning</color>\nBy: {0}\nReason: {1}", "CUI WarnReceive": "<color=#8f1919>Warning</color>\nreceived", "CUI WarnReceive2": "By: {0}\nReason: {1}" } Configuration { "Announce on join with warnings?(to admins)": true, "Execute commands on reaching count:": { "Enabled?": true, "(Format: 5 : mute {0}) where 5 is number of warns and {0} is player's id": { "5": "say {0} just reached 5 warnings! SHAME on him!", "7": "example.command {0}", "10": "example.command {0}" } }, "Warn message settings": { "Text-based warn message?": true, "CUI-based warn message?": true, "How long until CUI message gets removed (secs)": 5.0 } }$9.99 -
Version 1.3.0
304 downloads
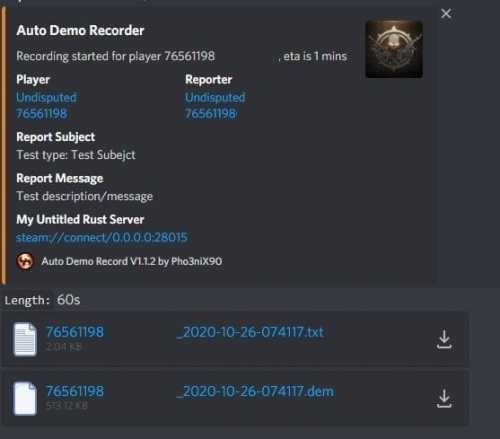
Records players automatically that have been reported X amount of times, with the ability to automatically upload the combat logs & Demo files to a discord webhook. Disk usage whilst recording: +- 1MB per 1 minute. Discord has an 8mb upload limit and 100mb for nitro. Chat Commands: /record - Chat: This will initiate a self-recording. Console Commands autodemorecord.record [steam64id] [minutes] - Console: Usefull to record a player on demand, or a schedule from another plugin. autodemorecord.blacklist add [steam64id] [recordingMinutes] [intervalMinutes] - Console: Add a player to the blacklist, which will record them for [recordingMinutes] every [intervalMinutes] autodemorecord.blacklist remove [steam64id] - Console: Removes a player from the blacklist. Permissions: Permission autodemorecord.record is required for a player to initiate a recording of themselves. Useful for streamers, to provide them with footage at wipe end, or tournaments. The recording length will be "Auto record for X minutes" Config explanations: "Auto record after X reports": Will start recording the player when these many reports have been received. "Only record when reports within X seconds": Only record when the number of reports above, are received in this timeframe. 0 to record always when the above value is reached. "Save/Load reports to datafile on reload": Useful when you aren't using the above config, if you do it might not be necessary to save data overhead. "Auto record for X minutes": the number of minutes the player should be recorded for. "Discord MSG Color": Color for the embed message, see here https://gist.github.com/thomasbnt/b6f455e2c7d743b796917fa3c205f812 "Discord Webhook": You discord webhook all information should be sent to. "Discord: Notify if recording is started": Should a message be sent to the discord webhook when the recording starts? "Discord: Include report with start message?": Should the player's report be added to the recording start message? "Discord: Notify if recording is stopped": Should a message be sent to the discord webhook when the recording ends? "Discord: Include report with end message?": Should the player's report be added to the recording end message? "Upload Combat Log to discord webhook?": Should the player's combat log be upload to the above discord webhook as a txt file? "Upload DEMO file to discord webhook?": Should the player's demo file be uploaded to the above discord webhook? "Split DEMO files for non nitro discord (8mb chunks)?": This will split files and upload multiple files to discord for non-nitro discord servers. If you have nitro with an upload limit of 100mb, then you can turn this off. "Discord Webhook - Self Record" All self-initiated recordings will post to this webhook, if not set it will go to the main one. "Record if FlyHacked in last X seconds" This will initiate a recording when a player rejoins the server after kicked for flyhacking. "Save recording to server?" If set to false, it will not save to the HDD, to save space. Make sure you have a webhook setup, otherwise it will still save as to not lose any demos. API: If you want to trigger a recording from your plugin, you can do the following: AutoDemoRecord.Call("API_StartRecording", BasePlayer player, string Reason, int LengthInMin); All suggestions welcomed!$19.99 -

Version 0.2.4
145 downloads
Introducing the AutoBan plugin for Rust servers - a powerful and efficient tool for managing and controlling player behavior on your server. This plugin is designed to help server owners and administrators keep their servers running smoothly and free from rule-breaking players. AutoBan's key feature is its ability to automatically ban players based on reports made by other players. If a player exceeds a certain number of reports (configurable by the server owner), they will be automatically banned with a customizable reason message. In addition, the plugin includes a variety of tools for server administrators to manage and view reports and bans, including console commands, chat commands, and a broadcast feature that notifies administrators of new bans. Here is a list of features included in the AutoBan plugin: Automatic banning of players based on the number of reports they have received Customizable reason messages for bans Valid report reasons that can be set by the server owner Option to broadcast ban messages to the chat Ignored players list that allows certain players to be excluded from automatic banning Timer for broadcasting bans to administrators and console Chat commands and console commands for managing reports and bans Permissions system for controlling who can access the plugin's features Detailed logging of all bans and reports Discord Alerts Option to send reports to a url Timed bans Usage: CHAT COMMANDS: /AB.report <username> reason> /AB.viewreports /AB.ban <user> <reason> /AB.unban user /AB.showbans /AB.resetreports <userid> CONSOLE COMMANDS: AB.getreports AB.getbans AB.resetreportsConsole <userid> AB.ban <userid> <reason> AB.unban <userid> <reason> OXIDE PERMISSIONS: AutoBan.report AutoBan.chatreport AutoBan.viewreports AutoBan.ignore AutoBan.ban AutoBan.unban AutoBan.viewbans CONFIG: { "Max reports till user gets banned": 5, "Reason given to banned user": "You have been reported too many times, and have been banned for precautionary measures, an admin will review this suspension soon.", "Valid reasons *searches subject title and message of the report* ( To make sure report is scanned, add different variations of reason; like cheat, cheater, cheating, cheats, etc. )": [ "cheating", "cheats", "hacks", "aimbot", "hacking", "esp", "teaming", "racism", "griefing", "walling", "doorcamping", "spawn killing" ], "Valid report types": [ "cheat", "abusive", "name", "spam" ], "Scan type of F7 reports": true, "Broadcast ban to chat": true, "Ignored Players *Steam ID's Only*": { "76561198000000000": "Admin" }, "Timer for broadcasting bans to admins and console": 820, "Send bans to users with the AutoBan.viewbans permission based on timer ( In-Game )": false, "Send reports to URL": false, "URL to send reports to": "http://example.com", "Send reports to Discord": false, "Send bans to Discord": false, "Discord Reports Webhook URL": "http://example.com", "Discord Bans Webhook URL": "http://example.com", "Ban Timer ( In hours or 'permanent' )": "72" } This plugin is a must-have for any server owner looking to keep their servers running smoothly and efficiently. With its powerful features and easy-to-use interface, AutoBan makes it easy to manage and control player behavior on your server. ROADMAP: Currently adding protection for mass reporting as a team$24.99 -

Version 1.7.3
319 downloads
Better Vanish allows server admins or users with permission to go fully invisible to spectate/watch players. It is based on the free public version on uMod by Wulf and has been in development since 2017. However, this version was written from scratch with performance, security and optimization in mind. Key features: Vanished administrators cannot be seen by any other players or cheaters. ¹ Optimization with performance in mind. No garbage allocations. Smaller size, lightweight with only most necessary functions for being invisible. Auto-hide / Auto-noclip after joining. ² Can be used by non-admins with certain restrictions. Auto teleportation under the map or to a safe spot (if you crash or disconnect). ³ Vanished state persists between disconnects or server restarts (configurable). Invisible to the world, environment, AI, traps and so on. ⁴ Custom & Lightweight trigger subsystem. Vanished player is only enters the most important world triggers at zero overhead. Can hide and unhide other players via command. The inventory spy function will let you see and edit player's or NPC's inventories. Sound effects when entering and leaving invisibility (other players can't hear it). Supports original Vanish API & Hooks. Explanations: You must behave accurately if you don't want to get attention from potential cheaters. Do not play, shoot, or touch your inventory and outfit. Auto-noclip is valid only for admins. Non-admins cannot be teleported underground. Please use the safe points. You still may provoke AI to follow you or shoot at you if you cause damage to them. Configuration The settings and options for this plugin can be configured in the BetterVanish.json file under the oxide/config directory. The use of a JSON editor or validation site such as jsonlint.com is recommended to avoid formatting issues and syntax errors. { "Show visual indicator (true/false)": true, "Visual indicator image address": "https://i.imgur.com/dOvX4uA.png", "Visual indicator anchor min": "0.1 0.001", "Visual indicator anchor max": "0.17 0.10", "Visual indicator color": "0.7 0 0 1", "Depth of an underground teleport (upon disconnection)": 15.0, "Block all incoming damage while vanished (true/false)": true, "Block all outgoing damage while vanished (true/false)": true, "Auto vanish on connect (true/false)": true, "Auto noclip on connect (true/false)": true, "Auto noclip on vanish (true/false)": true, "Turn off noclip on reappear (true/false)": true, "Persist vanish (don't unhide upon leave & restore after restart)": true, "Use sound effects (true/false)": true, "Enable safepoints (true/false)": true, "Remove all safepoints after wipe (true/false)": true, "Config revision (do not edit)": 4 } Localization The localization for this plugin can be configured in the BetterVanish.json file under the oxide/lang/en directory. The use of a JSON editor or validation site such as jsonlint.com is recommended to avoid formatting issues and syntax errors. { "CommandVanish": "vanish", "CommandSetVanish": "setvanish", "CommandUnvanishAll": "unvanishall", "CommandInvSpy": "invspy", "VanishDisabled": "<color=#FF686B>Vanish disabled</color>", "VanishEnabled": "<color=#91D6FF>Vanish enabled</color>", "VanishDisabledOther": "<color=#FF686B>You disabled vanish on {0}</color>", "VanishEnabledOther": "<color=#91D6FF>You enabled vanish on {0}</color>", "UnvanishedPlayers": "<color=#FF686B>You unvanished {0} players!</color>", "SetVanishHelp": "Syntax: /setvanish PlayerName", "SafePointNotSet": "You haven't set your <color=#F7B267>Safe Point</color>\nType <color=#FF686B>/vanish safepoint</color> to save your current position.\nYou will be automatically teleported there upon disconnection.", "SafePointSaved": "Your current position is saved as a Safe Point!", "MultiplePlayers": "Multiple players found!\nRefine your search or use Steam ID.", "NothingInSight": "No players in sight", "NoSuchPlayer": "No such player found ({0})", "InvSpyLooting": "Looting: {0} ({1})." } Permissions This plugin uses Oxide's permission system. To assign a permission, use oxide.grant <user or group> <name or steam id> <permission>. To remove a permission, use oxide.revoke <user or group> <name or steam id> <permission>. bettervanish.allowed - allows non-admin players to use vanish and become invisible. bettervanish.allowedother - allows non-admin players to vanish other players by their name. bettervanish.perma – the bearer will be vanished automatically and won’t be able to turn off vanish himself. bettervanish.unvanish - allows non-admin players to unvanish everyone at once. bettervanish.invspy - allows non-admin players to use inventory spy to loot players and NPCs remotely. bettervanish.skiplocks - allows non-admin players to have access to locked entities (boxes, doors). Commands This plugin provides universal chat and console commands. When using a command in the chat, prefix it with a forward slash: /. vanish - Toggles vanish state. vanish safepoint - Save a Safepoint, where get teleported on disconnect (your current position). setvanish <PlayerName> - Toggles vanish state of specified player. unvanishall - Unvanish everyone at once (both online & sleepers). invspy - Let you see and edit players or Npcs inventories, <name/steamID64> or look at the target and use then "invspy " Plugin Data This plugin can store 2 data files under oxide/data: BetterVanish-SafePoints.json - Player safepoints storage. BetterVanish-PersistPlr.json - Players with persisted vanish state. Developer API bool _IsInvisible(BasePlayer player) bool _IsInsivible(IPlayer player) void _Disappear(BasePlayer) void _Reappear(BasePlayer)$19.99- 20 comments
- 1 review
-
- 1
-
-
- #better vanish
- #admin
- (and 1 more)
-
Version 1.1.0
1 download
Adds re-spawnable items with command. With this plugin, you can: • Define spawn points for different items anywhere in your server's world. • Set custom intervals for spawning items, allowing you to control the frequency of loot respawns. • Specify random quantity ranges for items, adding an element of unpredictability to your server's loot economy. Whether you're looking to create themed loot areas, simulate dynamic item distribution, or simply enhance the gameplay experience on your Rust server, this plugin gives you the flexibility and control to do so with ease. Commands (ONLY ADMIN); • /addspawn <name> <x> <y> <z> <item> <quantity> <interval> ► You can create a spawn point with static time and item count. • /addspawnq <name> <x> <y> <z> <item> <randomMin> <randomMax> <interval> ► You can create a spawn point that only includes random item count. • /addspawnr <name> <x> <y> <z> <item> <intervalMin> <intervalMax> <quantity> ► You can create a spawn point that only includes random time. • /addspawnqr <name> <x> <y> <z> <item> <randomMin> <randomMax> <intervalMin> <intervalMax> ► You can create a spawn point that includes both random time and item count. • /deletespawn <name> ► You can delete spawn points with this command. • /showspawns ► Prints out spawn points in f1 console. ➡ "<name>" This defines your spawn points name which you can use in /deletespawn. ➡ "<x> <y> <z>" This is positions for items to be spawned you can use console command "client.printpos" to see where you're standing at. ➡ "<item>" You need to use the short name for the item you want to be spawned, you can find the short names here. ➡ "<quantity>" This defines the item count. ➡ "<interval>" This defines the respawn time in seconds. ➡ "<randomMin>", "<randomMax>" you can adjust those values for how many items will be spawned for random item count. Ex; 1 10, Spawned item count will be in between 1 and 10. ➡ "<intervalMin>", "<intervalMax>" you can adjust those values for how much time later the item will be respawned for random time. Ex; 1 10, Item will respawn every 1 to 10 seconds. This is how the default config looks like. (I don't reccomend you to use config file if it is not necessary) { "Spawn1": { "Interval": 5.0, "IntRandom": true, "IntMax": 5.0, "IntMin": 1.0, "Position": { "x": 100.0, "y": 10.0, "z": 50.0 }, "ItemName": "ammo.rifle", "Quantity": 16, "Random": false, "RandomMin": 0, "RandomMax": 0 }, "Spawn2": { "Interval": 10.0, "IntRandom": false, "IntMax": 0.0, "IntMin": 0.0, "Position": { "x": 100.0, "y": 10.0, "z": 50.0 }, "ItemName": "scrap", "Quantity": 0, "Random": true, "RandomMin": 10, "RandomMax": 30 } }$9.99 -

Version 1.0.1
4 downloads
EasyVoteDataConverter is the plugin that will make your heart race if you're still using the old free version of Umod that hasn't been updated for years! Perhaps you've decided to purchase the paid version, EasyVotePro, from developer BippyMiester. Or maybe you're still using the EasyVoteLite version. But then you encounter the problem: How do you transfer the cherished votes from the old EasyVote.json of Umod of your players into the new format for EasyVotePro or EasyVoteLite? We faced the exact same problem, which is why we developed this converter! Using the command "/evliteconvert" will convert the old EasyVote.json into the correct format for EasyVoteLite.json. Using the command "/evproconvert" will convert the old EasyVote.json into the correct format for EasyVotePro.json. In this guide, we'll explain how to best utilize this plugin! But before you dive into executing commands, make sure to confirm which version you're actually using. We recommend EasyVotePro since support for EasyVoteLite will end on April 4, 2024! Here's a step-by-step guide: Unload the EasyVotePro or EasyVoteLite plugin in the directory oxide/plugins/ or Carbon/plugins. Navigate to the "Data" folder and locate EasyVotePro.json or EasyVoteLite.json. Rename or delete them if you no longer need them. Place the EasyVoteDataConverter plugin in the plugins folder. Join your server and ensure you're assigned to the admin group. Without this, you won't be able to execute the command! Enter the appropriate command to convert the old EasyVote.json for the desired plugin. After entering the command, the file EasyVotePro.json or EasyVoteLite.json will be created, depending on which command you executed. We recommend restarting the server once. Once the server is offline, you can delete the "EasyVoteDataConverter" plugin from the plugin folder and then reinsert your EasyVotePro or EasyVoteLite plugin. Restart the Server and check for any errors that may occur. Why the server restart? In our tests, we found that the EasyVotePro.json data was reset by the EasyVotePro.cs plugin. Hence, we recommend a restart so that the new .json file is accepted by the plugin! Why should I rename my EasyVotePro.json / EasyVotePro.json? This serves as a backup in case you already have votes. You'll then need to manually add the players. Make sure not to add duplicate players. If you need to make such a setting change, it's best to take the server offline! P.S.: Always make a backup, as it allows you to revert everything in case of mistakes. The old format EasyVote.json on Umod. { "Players": { "765611980931000": { "voted": 715, "lastTime_Voted": "2024-03-10T06:46:00.2425923Z" } } } The new format EasyVotePro.json or EasyVoteLIte.json on Codefling. { "765611980931000": 715 } We've tested this plugin on Oxide & Carbon, and it works perfectly! If you have any questions or suggestions, feel free to PM me or submit a support ticket.$1.99-
- 1
-

-
- #easyvote
- #converter
- (and 4 more)
-

Version 1.0.2
14 downloads
Enables administrators to perform administrative actions anonymously, hiding their profile when they use in-game chat as well as within the game environment, displaying 'ADMIN' instead of their nickname above their character. Commands /aa - Admin Anon Enable /aa - Admin Anon Disable Permissions adminanon.use - Enables anonymity in the game. Configuration { "Stay Anonymous After Reconnecting": false, "Stay Anonymous In Team Chat": true, "Properties": [ { "Name": "ADMIN", "Better Chat Group": "admin", "Required Permission": "adminanon.use" } ] } Data (example) { "PlayerData": { "76561198196941415": { "Groups": [ "admin", "default" ], "Name": "ADMIN", "Better Chat Group": "admin", "Required Permission": "adminanon.use" } } } Language (EN) { "No Permission": "<size=12>You don't have permission to use this command</size>", "No Profile Permission": "<size=12>You don't have permission to use this profile</size>", "Admin Anon Enabled": "<size=12>Admin Anon has been <color=#00fa9a>ENABLED</color></size>", "Admin Anon Disabled": "<size=12>Admin Anon has been <color=#00fa9a>DISABLED</color></size>", "Admin Anon Changed": "<size=12>Fake identity has changed to <color=#00fa9a>{0}</color></size>", "Requested Fake Identify Not Found": "<size=12>Requested fake identity is not found</size>", "No Fake Identities Available": "<size=12>No fake identities available</size></size>", "Fake Identify Not Found": "<size=12>Fake identity is not found</size>", "Data Corrupted Up": "<size=12>Data is corrupt</size>" }$3.00 -

Version 1.1.0
1 download
Adds re-spawnable vehicles with command. About Vehicle Spawnper Plus With this plugin, you can: • Define spawn points for different vehicles anywhere in your server's world. • Set custom intervals for spawning vehicles, allowing you to control the frequency of vehicle respawns. • Specify random interval for spawning vehicles, adding an element of unpredictability to your server's spawnpoints. Whether you're looking to establish vehicle spawn zones, simulate dynamic vehicle distribution, or simply enhance the gameplay experience on your Rust server, this plugin gives you the flexibility and control to do so with ease. Commands (ONLY ADMIN); • /addvehiclespawn <name> <x> <y> <z> <vehicleName> <interval> ► You can create a spawn point with static time and vehicle. • /addvehiclespawnr <name> <x> <y> <z> <vehicleName> <intervalMin> <intervalMax> ► You can create a spawn point with random interval. • /deletevehiclespawn <name> ► You can delete spawn points with this command. • /showvehiclespawns ► Prints out spawn points in f1 console. ➡ "<name>" This defines your spawn points name which you can use in /deletevehiclespawn. ➡ "<x> <y> <z>" This is positions for vehicles to be spawned you can use console command "client.printpos" to see where you're standing at. ➡ "<vehicleName>" You need to use the short name for the item you want to be spawned, available vehicles are "minicopter", "scraptransport", "tugboat", "rowboat", "rhib", "sub1" and "sub2". ➡ "<interval>" This defines the respawn time in seconds. ➡ "<intervalMin>", "<intervalMax>" you can adjust those values for how much time later the item will be respawned for random time. Ex; 1 10, Item will respawn every 1 to 10 seconds. Here is the default config file; { "Spawn1": { "Interval": 5.0, "Position": { "x": 100.0, "y": 10.0, "z": 50.0 }, "VehicleName": "minicopter" }, "Spawn2": { "Interval": 10.0, "Position": { "x": 100.0, "y": 10.0, "z": 50.0 }, "VehicleName": "scraptransport" } }$4.99 -

Version 2.0.9
62,348 downloads
Convenient GUI manager for player and group permissions. Allows assignment of player permissions. (online or sleeping) Allows assignment of group permissions. Allows one-click removal of all players from a group. (group page - "Remove All") Allows adding/removing a player from groups. Supports unlimited plugins/permissions/groups Up to 60 plugins per-page. Up to 40 permissions per-page. Up to 40 user groups per-page Allows for local and sql backup and recall of all permissions or groups. Permissions. permissionsmanager.allowed - Allows players to use GUI. Plugin can be used with this permission, or by any Admin : Auth Level 2. Chat commands. /perms data - Backup and restore permissions and/or groups - local data file and/or SQL. ** /perms OR /perms player - Opens GUI player list, allowing a player to be chosen. /perms group - Opens GUI group list, allowing a group to be chosen. /perms player <playername> - Opens permissions GUI for the specified player. /perms group <groupname> - Opens permissions GUI for the specified group. Console commands. EmptyGroup <groupname> - Removes all players from the specified group. Configuration. Global. Chat - Title colour Chat - Message colour GUI - Label colour GUI - On colour GUI - Off colour GUI - AllPerPage - Sets All/None option to per-page, or per plugin. Options - GUI Transparency 0-1 Options - Plugin BlockList - ex. "playerranks,botspawn" Block list must be lower case, comma separated, no spaces, and no final comma, as above. Useful tool for picking CUI colours - RGB Decimal - Take the RGB Normalized decimal output, and remove all commas. ** Please note that with data backups : SQL saving is accumulative - Saving adds current permissions/group data to whatever was already saved. Local data file saving is not accumulative. It overwrites any existing backup with the current server permissions/groups. FAQ. Q: I'm trying to revoke permission(Y) for a player, but it says "Inherited". A: The player is in a group(X) which is also granted permission(Y). Solution: Revoke permission (Y) from group(X) or remove the player from group(X). Q: I removed a player from group(X), but they still have permission(Y). A: This is the opposite of the above. This player must have been independently granted permission(Y) at some time. Solution: Revoke permission(Y) from the player.Free- 169 comments
- 32 reviews
-
- 34
-
-
-
- #permissions
- #admin
- (and 7 more)
-

Version 1.0.1
22 downloads
Introduction SeekerOnSteroids is a strong, powerful missile plugin. The features are as follows: It allows you to change/add custom targets to the Homing Missile Launcher, providing you with the ability to add more targets, making the launcher more flexible. Players can purchase a missile attack, for example, 1000 scrap and 4 homing missiles, to eliminate a player. This feature is balanced to prevent it from being overpowered. It includes several commands/operations to use the homing missiles. Command overview: /gseek => Spawns 4 missiles on each corner of the map and targets the specified player. /seek => Spawns a specified number of missiles to attack the player. /cseek => Spawns a specified number of missiles above a player (missile cloud). After a while, they descend and target the specified player. /godstrike => Every time you fire a shot, a strong, fast homing missile targets the object wherever you are currently looking. Permissions: seekeronsteroids.admin => Master permission. Don't give this normal players. seekeronsteroids.gridseek => This is for the grid seek attack (payed attack) Configuration: { "PluginPicture": 76561198838421574, "PluginChatPrefix": "<color=#191A28>[</color><color=#CC3B28>SeekerOnSteroids</color><color=#191A28>]</color> ", "CustomSeekerTargets": [ { "PrefabName": "assets/rust.ai/agents/wolf/wolf.prefab", "Enabled": true, "Strength of missles (LOW, MEDIUM, HIGH, HIGHEST)": "LOW" } ], "Missle behavior of grid-seek command": { "Amount of scrap a player needs to start the attack.": 1000, "SeekerMissleConfiguration": { "Min amount of time until missle explods": 100.0, "Max amount of time until missle explods": 100.0, "ExplosionRadiusMultiplier": 1.0, "DamageScaleMultiplier": 1.0, "Handling-smoothness of the missle": 6.0, "Strength of missles (LOW, MEDIUM, HIGH, HIGHEST)": "LOW", "MissleSpeedMultiplier": 1.2 } }, "Missle behavior of godstrike command": { "Missle offset (spawn distance between player and missles)": { "x": 0.0, "y": 10.0, "z": 0.0 }, "SeekerMissleConfiguration": { "Min amount of time until missle explods": 10.0, "Max amount of time until missle explods": 10.0, "ExplosionRadiusMultiplier": 10.0, "DamageScaleMultiplier": 10.0, "Handling-smoothness of the missle": 4.0, "Strength of missles (LOW, MEDIUM, HIGH, HIGHEST)": "LOW", "MissleSpeedMultiplier": 3.0 } }, "Missle behavior of cloud-seek command": { "Time until missles attack in milliseconds": 10000.0, "Missle offset (spawn distance between player and missles)": { "x": 0.0, "y": 100.0, "z": 0.0 }, "SeekerMissleConfiguration": { "Min amount of time until missle explods": 100.0, "Max amount of time until missle explods": 100.0, "ExplosionRadiusMultiplier": 1.0, "DamageScaleMultiplier": 1.0, "Handling-smoothness of the missle": 6.0, "Strength of missles (LOW, MEDIUM, HIGH, HIGHEST)": "LOW", "MissleSpeedMultiplier": 1.0 } }, "Missle behavior of seek command": { "Min amount of time until missle explods": 100.0, "Max amount of time until missle explods": 100.0, "ExplosionRadiusMultiplier": 1.0, "DamageScaleMultiplier": 1.0, "Handling-smoothness of the missle": 4.0, "Strength of missles (LOW, MEDIUM, HIGH, HIGHEST)": "LOW", "MissleSpeedMultiplier": 1.0 } }$4.99 -
Version 1.4.8
344 downloads
Assists in finding ESPers that unearth stashes, it also allows admins to make placing bait stashes easy and simple, by automatically filling predefined items in random, and disables the ability for admins to accidentally unearth stashes whilst enabled. It will also automatically delete all contents of an admin stash when unearthed, which assists in admin abuse and/or exploitation of hackers. Supports Auto Demo Recorder (ADR) Supports Better Ban System Supports Server Armour Features: Notifies to discord when stashes are found which doesn't belong to players (or clan if using the clan plugin) Records the number of stashes found in a certain, configurable timeframe. Sends discord notifications when the above happens Admins can place "server" stashes, and they will be auto-filled with the /stash command. When a player unearths said stash, the contents will be automatically removed. Stashes can also be autogenerated and placed automatically. And can be replaced as they are found in another random location. It auto bans based on condition. Example: If a player finds 5 stashes that don't belong to them within 1 hour, they are auto-banned with a preset reason. It works with ADR as well and can trigger demo recordings based on conditions It works with ServerArmour to handle bans, else native bans. Battlemetrics will soon be supported. Permissions: stashwarning.admin - allows admins to use the stash placement system. Chat Commands: /stash - Enables manual stash placement tool. Stashes cannot be unearthed when enabled and stashes will be automatically given. /stashshow- Toggles On/Off - Will show admin the location of all plugin related stashes. /stashdestroyall - This will destroy all server stashes create by, or with this plugin. /genstashes- This will force generate all stashes that are missing. /regenstashes- This will remove, and then replace all stashes from this plugin. Config explanations: "API: ADR reason" The reason that will be given to ADR, and is sent to discord along with the recording. "API: ADR recording length in mins" How long the recording should be in minutes. "API: ADR Trigger recording when stashes found/triggered more than" When the recording should trigger, Example: If set to 1, the recording will trigger when the player has triggered/unearthed 2 stashes. "Discord: Color" Color for the embed message, see here https://gist.github.com/thomasbnt/b6f455e2c7d743b796917fa3c205f812 "Discord: Embed Title" The title of the embed inside discord. "Discord: Send Stash Toggle Msgs" If notifications should be sent to discord when an admin toggles the stash command. "Discord: Webhook Server Name" The server where the notification is sent from, useful for when you have multiple servers. "Discord: Webhook URL" https://support.discordapp.com/hc/en-us/articles/228383668-Intro-to-Webhooks "SteamID for in-game chat icon." This will be used to assign against placed stashes for tracking. Do not change this to a user on the server, leave as is if you don't have another steamid. "Embed count buckets in hours" This should be a string, comma-separated. This will be the bucket embeds in discord, to show the count of stashes found for the user, inside the hour brackets. Example: 0, 24, 1 = would give you a count for all stashes, stashes in the last hour, and stashes in the last 24hours. See below "Stash Items" The items that you would like to be automatically filled when a stash is placed. The number would be the max quantity, this will be randomized when placing in a stash to remove predictability. "Stash Item Slots To Fill: Max" The maximum amount of slots to fill "Stash Item Slots To Fill: Min" The minimum amount of slots to fill A random value will be chosen between the above two values. "Auto Ban False Positive Distance" Default: 5 - Stashes found in this distance will be considered false positives. (Useful where multiple stashes are unearthed in one spot.) "Auto Ban False Positive - Include in count?" If the above false positives should be counted in the triggers. This affects auto bans as well. "Ignore Admins" If admins should be ignored when unearthing stashes not belonging to them. "Auto Ban Delay In Min" Delays auto bans by X minutes. "Delete found server stash after X seconds (0 = Disables)" Will automatically delete server stashes that were found, after X seconds.$9.99 -

Version 0.0.1
87 downloads
This is a free version of the AITranslation plugin. It enables you to translate all the language files of your plugins into any desired language with a simple command. Limited Features in Free Version In this version, features are limited, and you only have access to file translations. Visit the AITranslation Pro page if you wish to obtain the version without limitations. Commands: ait.translateplugin <plugin name> <lang>: If the plugin has a default language file (in English), a translated version in the desired language will be created. (For lang, use the ISO639-1 format) The PRO version allows translating into multiple languages with a single command and translating ALL your plugins with one command. AITranslation PRO Version:Free -

Version 1.1.2
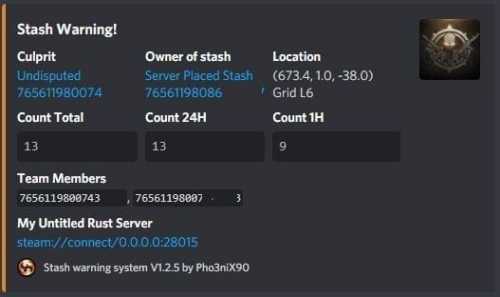
257 downloads
This is a simple tool to help you catch ESPer's. Unlike methods in the past requiring cheaters to fall for traps, this one will be watching without having to give them any bait! This plugin is still in "beta" and is offered at a reduced price for a limited time. Since 1.0.12, the embed now includes a radar image to show violations (red line): The above embed shows the culprit, with quick links to Steam, Battlemetrics, and ServerArmour. Along with each violation that caused the trigger, the consist of the violation id, the time it happened, and steamid and distance from the culprit. It is highly recommended to use along with ADR, although not required, but can easily eliminate false positives by having the option to watch the player from the demo. Commands /testesp - this will send a test embed to your configured webhook. Permissions espdetection.ignore Ignores specific players who are granted this permission. Config options explanation General Max distance to check The maximum to check if the player is ESPing. (default 150 outside, 100 inside) Check Interval How often should a player be checked (default 1 second) Ignore Players Idle Ignore players that haven't changed position (default 15 seconds) Only track players with active weapons Track players that have equipped weapons only. (default true) Auto Demo Record (only applicable if Auto Demo Record is installed) Record Length How long should the triggered recording be (default 10 minutes) Discord Webhook Where the logs & ADR recordings should be sent to Webhook Title Title of the embed Violations Probability % Which % probability should trigger a Discord embed and ADR recording. (default 40%) Samples How many samples should be kept in memory, to calculate the probability (default 20) Weapon Specific Configs These change characteristics of weapons Weapon Shortname Max distance to check This overrides the general setting for the weapon only Track if set to false, a player will be ignored if he has this weapon equipped. (default true) Attachment Specific Configs These change characteristics of attachments Attachment Shortname Add distance while aiming As the name suggests, it adds extra distance to the previous configs, useful for when aiming with an 8x or 16x Track if set to false, a player will be ignored if he has this weapon equipped. (default true) NOTE: if you are using ADR, a good command to use when reviewing the demos are `debug.culling 1`$25.00 -
Version 1.3.4
710 downloads
Admin Map is an innovative plugin for the game of Rust, designed to make server administration easier and improve the quality of the gaming experience. Focused on optimization and functionality, this plugin provides admins with the tools to effectively control players, minimizing the negative impact on the server and other participants. Main features: Interactive map with players: Admin Map provides server admins with a detailed and user-friendly map showing the positions of all players. This allows admins to easily monitor player activity and movements, and quickly detect suspicious activity. Large variety of different admin maps: - Marker player map, - Text player map, - Sleepersmap, - Cupboard map, - Stash map, - Sleeping bag map Quick Commands on Players: The plugin allows admins to perform quick actions on players directly from the map. Send messages, punish or help players in real time, minimizing reaction time and increasing interaction efficiency. Minimal server load: One of the key features of Admin Map is its low server load. All processing takes place solely on the client side, which means that the plugin will not slow down the server or create additional delays for players. This makes it an ideal choice even for servers with high traffic. Ease of use: The plugin's intuitive user interface provides admins with easy access to functionality. Navigating the map, sending commands and monitoring players is done with minimal effort, making server administration easy. Customization: Admin Map provides admins with the option to customize the functionality to suit their needs. Scanning area, available commands, buttons, permissions and other options. Admin Map is an innovative solution that combines convenience, functionality and optimization. It provides administrators with tools to effectively manage players without negatively impacting gameplay and other server participants. The Admin Map plugin is an essential asset for any Rust server administrator looking to create a comfortable and safe gaming environment. Permissions: adminmap.allow - for use adminmap.<button perm> - any permissions specified in the button settings adminmap.playermarkers - map with markers for players, useful for pve server adminmap.playermarkers.wl - map with markers for players, useful for pve server, without nicknames adminmap.invis - hide player from the player map Commands: /amap - toggle admin map (also to enable marker map) /amap t - enable text admin map /amap s - enable sleepers admin map /amap с - enable cupboards admin map /amap stash - switch to stash admin map /amap d - switch to marker admin map /amap ss <part of nickname/steamid> - search query to maps (some maps only accept steamid) /amap ss - clear search queary /amap off - disable admin map with panel instantly Color designations on the cupboards map: Default Config: { "Scan Area Settings": { "Radius": 2.0, "Color": "0 0.7 0 0.6" }, "Text Map Settings": { "Font size": 16, "Use color generation for teams?": true, "Color for searches": "00ffff", "Color for teams": "ffaf4d", "Color for solo players": "9bd92f", "Color for sleepers": "404040" }, "Command Buttons": [ { "Permission (adminmap.<perm>)": "", "Label": "TP", "Command": "teleport {steamid}", "Color": "1 1 1 1" }, { "Permission (adminmap.<perm>)": "", "Label": "TP2ME", "Command": "teleport2me {steamid}", "Color": "1 1 1 1" }, { "Permission (adminmap.<perm>)": "", "Label": "INV", "Command": "/viewinv {username}", "Color": "1 1 1 1" }, { "Permission (adminmap.<perm>)": "", "Label": "SPECTATE", "Command": "spectate {steamid}", "Color": "1 1 1 1" }, { "Permission (adminmap.<perm>)": "", "Label": "KILL", "Command": "kill {steamid}", "Color": "1 0 0 1" }, { "Permission (adminmap.<perm>)": "", "Label": "KICK", "Command": "kick {steamid}", "Color": "1 0 0 1" } ] } Button Library: Give item to player for AdminMenu by k1lly0u | Minimum required version 1.0.1 { "Permission (adminmap.<perm>)": "", "Label": "GIVE", "Command": "adminmenu.callback {steamid}.4;adminmenu.callback {steamid}.4", "Color": "1 1 1 1" } Permanent ban { "Permission (adminmap.<perm>)": "", "Label": "BAN", "Command": "ban {steamid}", "Color": "1 0 0 1" } View backpack (for Backpack Pro) { "Permission (adminmap.<perm>)": "", "Label": "Backpack", "Command": "/b {steamid}", "Color": "1 1 1 1" } View backpack (for Backpacks plugin from uMod) { "Permission (adminmap.<perm>)": "", "Label": "Backpack", "Command": "viewbackpack {steamid}", "Color": "1 1 1 1" } Spectate { "Permission (adminmap.<perm>)": "", "Label": "SPECTATE", "Command": "spectate {steamid}", "Color": "1 1 1 1" } If you want to add buttons here, message me on my discord server$20.00 -

Version 1.0.4
12 downloads
Features: First Join and Command triggered multi commands executor with delayed start and duration for any commands needed. RUN INDIVIDUAL COMMANDS Option 1: When a player joins and spawns in, if you have a set command with isNewPlayer set to true, it will run after the set delay time (Seconds). If there is a set command for endCommand (OPTIONAL) it will then run that command and theDuration to run the command the amount of time after the initial command. Option 2: You can set commands from other plugins to be run by staff/players using the "runcmd <commandName> <player/id>" if <player/id> is omitted will run on self. this avoids the need to give players individual permissions for other plugins. For example you can use "/runcmd god" and if you have the GODMODE plugin the player would be set to GODMODE, if you have a duration of 30.0 set the endCommand set to "god player", it would automatically be run after 30 seconds. You as the server owner can set any commands that can be run through console and configure durations of the commands for you staff/players. Sky is the limit for this. RUN ALL COMMANDS ONPLAYERSPAWN Option 3: Example isNewPlayer set to true: Player joins/spawns, command set to "say hi {player}" theDelay set to 10 with a endCommand set to "good bye {player}" and theDuration set to 15. "SERVER hi CupsOhJoe" would run 10 seconds after player joins then waits 15 seconds to run the "SERVER good bye CupsOhJoe". If there are more commands it will run until all are completed. (TIP: Add theDelay + theDuration to get the time needed for the next Command unless you want to run multiple commands at once) Example Config: { "exists": true, "TheCommands": [ { "commandName": "Command1", //Commnad Identifier "enabled": true, //Should this command be run "isNewPlayer": false, //is this command to be run only on a new player join "singleCast": true, //Will be able to be run using the /runcmd <command> format "theCommand": "this command run at 5 seconds", //First Command to run after a certain delay "endCommand": "this command runs 10 after the above command", //Command to be run after a certain duration (OPTIONAL) "theDelay": 0.0, //Will run instantly when using /runcmd <commandName> "theDuration": 5.0 //amount of time to run before the end command is run }, { "commandName": "Command2", "enabled": true, "isNewPlayer": false, "singleCast": true, //Will be able to be run using the /runcmd <command> format "theCommand": "this command runs at 10 seconds as well", "endCommand": "", //Will not run if empty "theDelay": 10.0, "theDuration": 5.0 }, { "commandName": "Command3", "enabled": true, "isNewPlayer": true, //Will execute onPlayerSpawn "singleCast": false, //Will not be run using the /runcmd <command> format "theCommand": "this command runs at 15 seconds as for new players only", "endCommand": "This command runs 5 seconds after the above command", "theDelay": 15.0, "theDuration": 5.0 } ] } Commands: runcmd <commandName> "optional" <player/id>- Execute commandName from config, with optional endCommand if set Permissions: FirstCommand.use - Allows the ability to run the individual commands (Only one command at a time) FirstCommand.admin - Allows the ability to run all commands in sequence (At Once) FirstCommand.multi - Same as above but will allow to run all commands set with isNewPlayer = true only Planned features: Placeholder API support$2.50 -

Version 0.1.1
13 downloads
The plugin is designed for collecting and sending information to the database for subsequent display on the website through direct MySQL queries or API(post query). The plugin has the capability to work with the database through an API. This is implemented in case the database and game server are located on different hosts, and the database host restricts queries beyond localhost. Currently, the data is only sent to the database, but in the future, the capability to retrieve information from the database will be added. P.S. This plugin works only with the MySQL type. Collecting: Server information; Player information; Team information; Clan information(in future); Report(F7) information. Sending data through: direct MySQL; via API(POST query) to MySQL. { "Time in seconds for updating data in the database(0 to disable)": 300.0, "Enable Database Logs": true, "Data loading method(true for API, false for MySQL)": true, "API Service URL(Specify the address of your website)": "https://site.com/ExtendedStats/index.php", "API Service Key(Generate your own API key)": "GlBRw-elM6v-gjko3-cxSDk-Tsy7B", "MySQL - Host": "localhost", "MySQL - Port": 3306, "MySQL - Database name": "db_playrust", "MySQL - Username": "root", "MySQL - Password": "root", "Current Server ID": 0, "List of deployed names": {}, "Version": { "Major": 0, "Minor": 1, "Patch": 0 } }$14.99 -

Version 1.0.1
3 downloads
Our Ticket System can be hard to setup at first, with all the added integration and features, you may find setting up things difficult, if this is the case check the tutorials folder for text based tutorials, or visit our Discord server for videos, we will also provide full support through our ticket system. Key Features Modal ticket questions for responses, allows for passive ticket creation and management. Maximum of 10 different ticket types, with custom styles and options, for a wide variety of support. Fully compatible with ‘Simple Link‘ Discord and Steam linking systems. (More coming in future updates!) Staff statistics, check up on your staff’s performance. Advanced ticket information, expressing any delays or issues with performance. A ‘pending’ channel so that you do not need to open tickets or be worried about ticket spam, you can accept or deny any ticket. Echo integration, a top leading cheater detection tool, fully integrated API for ease of use. Ability to ban/blacklist specific users from making tickets. Proper responses to all messages with clear customizable instructions. Organized ticket structure, offers different embed colors as well as functions that allow for easier visual scanning, with the ability for staff to talk within tickets without users knowing. Customizable ticket permissions, allowing different ticket types to be available to different staff. HTML based and query based transcript system, usable in discord allowing for easy viewing and organized tickets based on closing information. Snippets, allowing staff members with snippet management permissions to create and delete custom snippets saving time on your responses. BattleMetrics and Steam integration, sending information on player bans notes and other features from battlemetrics with server information, know what server the user is on for quicker support. (Access to ‘combatLog’ and ‘clans info’ triggers to easily access this information within the ticket!) Application Commands integration, /m for replying to the use with a custom message, /attachment for sending files and other attachments without needing links. Useful ticket closing feature allowing you to click a button from a message pinned to easily close the ticket, with automated responses and logged reasons. Security measures, specific file types will be sent as links to prevent malware from accidently being opened. Full and detailed error logging to discord, allowing for you to manage and report to your developers or us if you need support. Fully logged infrastructure, easy to read and debug. (Log files + Console logging + Discord logging) Lang file to customize a selection of auto responses and messages. Constant Rate-Limit checking, ensuring you wont be spammed and brought down by either Discord or Cloudflare. (Level of requests have been logged!) Easy to read and customize code structure, free support for developers 24/7 on our Discord server. Coming Soon Staff Statistics (Keep up to date with your staff) Want more features, make sure to post a suggestion on our Discord server! Advanced BattleMetrics Features Ability to have a players combatLog posted inside of the ticket, allows for easy access to information. Also the ability to add BattleMetrics Notes and Clan Info within the ticket too. Further information on server status, showing the players currently logged into server as well as their active hours/statistics. Database Ability to find collection within the MongoDB database right from Discord using the /mongodb find command. Ability to drop/delete collections and documents within collections. Snippets Ability to get information on different snippets using the /snippets get {identifier} application command. Snippets offer an easier way of communicating with users, faster interactions and quicker response times. Delete snippets you no longer want using the /snippets delete {identifier} application command. You will not be able to delete default snippets within the ‘snippets.json’ file. Create snippets, you can create new snippets using the /snippets create {identifier} {output} application command, improves customization abilities. Ability to create default snippets and customize the output from the snippets.json file. (Many free snippet configurations have been provided!) How to Install Make sure that you follow the steps precisely, if you have any issues with the steps, most notably issues with your specific version of either Linux, Mac or Windows please contact us. Requirements Discord Bot Host (Local or Remote) for Node.js 18.18+ (Full Support for Pterodactyl Panels working with OVHcloud VPS) Node.js 18.18+ installed on your OS (Required) A Discord Bot Token (Required) JSON knowledge for config file editing (Required) A BattleMetrics Token for account information (Optional) A Steam API Token for steam account information (VAC Ban checking) (Optional) A Linking System for user information compatibility (Simple Link) (Required) Windows Download the zip and unpack it to your desired location. Edit the following config files to your specifications. (config.json, tickets.json, snippets.json) Run the ‘start.bat’ file to automatically install all npm modules and start the bot. (Built-in error restart handling) Linux (UNIX Mac, No support for ARM based CPUs) Download the zip and unpack it to your desired location. Run the ‘start.sh’ file by using the command ‘sh start.sh’, or do the following below. Install the npm modules by navigating to your ticket bot directory using ‘cd’ and running the “npm i” command. This will create a node_modules folder with all the npm modules. Staying in the ticket bot directory, install PM2 by typing the following command, ‘npm i pm2’ then run ‘pm2 start .’ Setting up the Bot After you have created your bot application on the Discord Developer Portal, make sure you have enabled all of the Privileged Intents in the bot section on the sidebar. You’ll need to invite it to your discord with the correct permissions! https://discord.com/api/oauth2/authorize?client_id={APPLICATION_ID}&permissions=2147871824&scope=bot applications.commands Replace the {APPLICATION_ID} with your Bot Application ID found on the Discord Developer Portal under your bots General Information section in the sidebar. Then using this link you can invite the bot. FAQ Can I edit the ‘create-a-ticket’ embed message and divider? Yes you can, navigate to the ‘events/bot/ready.js’ file, go to lines 30-41 and edit appropriately. Contributors Barkodr (Lead Developer) RustNite (Bot Idea)$80.00 -
Version 1.3.1
79 downloads
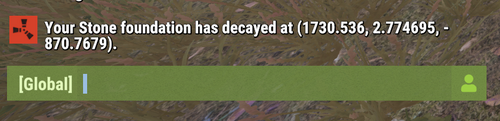
For Admin who want to stay on top of decayed entities, to settle disputes or dismiss accusations, or many other uses. Effortlessly keep track of player-owned decayed entities. This plugin logs the essential details and notifies players when their entities decay. ****Note: Twig is always ignored. Features and Benefits: Detailed Logging: Captures essential information about decayed entities, including the owner's SteamID, display name, entity type, grade, location and decay timestamp. Player Notifications: Enable player notifications to keep your community informed about their decaying entities. Whenever a structure owned by a player decays, Decay Logger automatically sends them a notification, ensuring they're aware of what happened. Discord Integration: Seamlessly integrate Decay Logger with your Discord server to request logs containing a player's decayed entities. Whenever a request is made from console or from in-game chat, the plugin can send the logs for a specified player to your designated Discord channel, allowing you and your team to quickly find the logs you want to examine. Easy Configuration: Minimal configuration, define your desired chat and Discord prefixes, set a Discord webhook, adjust time zone settings, and enable or disable player notifications. Efficient Logging: Optimized data storage through an efficient caching system. Stores logs in memory and seamlessly writes them to disk in JSON format when the plugin unloads or the predetermined cache limit is reached. This intelligent approach guarantees minimal performance impact, allowing you to maintain a comprehensive record of decayed entities, regardless of whether your server has 5 players or 500. Permission: decaylogger.admin - Allows the log request to be made in chat. ***Note: Permission is automatically granted to those with Auth 2 and Auth 1 when they join, no need to grant it manually unless you are in-game when you load the plugin for the first time.*** Chat Commands: /dlog <playersteamid> - Requests the logs for the specified player to Discord. /cleardlog - Clears logs manually in chat. Console Commands: dlog <playersteamid> - Requests the logs for the specified player to Discord. cleardlog - Clears logs manually in console. Default Config: { "Chat Prefix": "<color=#32CD32>Decay Logger</color>: ", "Discord Prefix": "Decay Logger: ", "Discord WebHook": "https://support.discord.com/hc/en-us/articles/228383668-Intro-to-Webhooks", "Your time zone hours from UTC (eg: -4 or 4)": -4, "Log optional entities.": true, "Send player notifications when their entity decays.": true, "Clear Logs on wipe.": true }$11.99 -

Version 2.5.8-beta4
260 downloads
SmartWarnings simplifies and streamlines your server moderation by providing means to consistently Warn your players for misconduct. Gone are the times when you leave manual notes at sleeping players, for this plugin creates a smooth but intimidating pop-up window displaying clearly to the player what they've done wrong and how to learn from it. From version v2.5.0 you can now extend highly customizable actions to trigger based on your custom warnings. The imagination is the limit! Rule enforcement has never been easier before. Features Easily dispatch warnings to players and clans with a simple chat command /warn cookiemonster "leave the jar alone you bastard" Booom done! /warn clan "C00KiEZ" "no cookiemonsters allowed in the jar!!" Maybe their collective brain power is needed to understand! Announces Warnings in public Global Chat (Enabled by default, can be toggled in config) Give your Players a sense of transparent justice by displaying the dispatched warning to everyone in public. This is beneficial as players will learn what not to do from other's mistakes! Offline Players can receive warnings, no problem! Displays a pop-up window with the warning IMMEDIATELY if they are online, or as soon as the player wakes up from sleep upon connecting. Create custom presets for common violations. Presets can be made for example to reflect the server rules, it can be configured so that your admins can type /warn joe rule1 and it will spell out the entire rule 1 in the warning. Presets can have an Expiration date which will remove the warning, allowing non-repeating offenders to be cleared if they're well behaving in the long term. Presets can have a Warning Point weight which will give them different severity that can influence when to trigger an Automatic Ban (if enabled). Automatically Ban players with X amount of Warnings or Warning Points (Disabled by default, can be toggled in config) With this feature Enabled a player will be Automatically Banned when reaching the configured Warning amount or Warning Points. For example, configure 3 warnings to be max and enable auto ban will ban a player when the third warning has been dispatched. Supports Temporary Autobans (Disabled by default, can be toggled in config) If you're the kind of type that believes in second chances, when configured it bans the player lets them know when they're welcome back! Optional feature: Clear the player's warning when autobanned (True by default), This can conveniently be set to False if you want the player to be instantly auto banned next time a warning is dispatched. Extensive Logging both File based and Discord! Every move is logged in the oxide/logs/SmartWarnings folder so that you can have full traceability. Optional feature: Configure Discord Webhook links to log Warnings and/or Autobans to Discord. Persist Warnings across wipes, when you don't want to be forgiving! Set "Clear all warnings on wipe" to false and warnings will not be cleared when a new wipe is detected. NOTE: This requires that you exclude/do not remove the oxide/data/SmartWarnings_Playerdata.json file, if you're using tools to auto wipe and it gets deleted, so will the warnings. Customizable Branding Set your Server Name and custom Warning Pop-up Icon to make this plugin match your server's style! (NEW in v2.5.0) Transparency of the pop-up window can now be customized in the config! (NEW in v2.5.0) VANILLA SAFE mode: Warning display in Chat instead of GUI pop-up Warnings will be dispatched through chat and freeze the player until they acknowledge the warning. No use of GUI allows it to be vanilla safe! Acknowledge notification is fully customizable! (NEW in v2.5.0) AUTOMOD: Fully customizable command actions on X warning points Define any custom command to be executed at X warning point. This allows you to integrate with any other plugin for example mute, jails or whatever really. For example: set to mute on 2 warning points, kick on 4 warning points, teleport to jail on 6 warning points. NOTE: AutoMod actions are triggered incrementally by total warning points added to the player. This means if you configure Mute on 1 point and Kick on 3 points and give the player a warning worth 4 points, the player will be both kicked and muted. AutoMod feature can conveniently be configured together with AutoBan feature, but keep in mind to set the point/warning thresholds to line up properly. I.e. automod actions should not be on higher point level than autoban, because then player will be banned already before any actions are executed. (NEW in v2.5.5) Battlemetrics Bans & Warnings integration AutoBans will sync with Battlemetrics, duration, reason and note will be added to give context to what banned the player. Warnings will add note to the player in Battlemetrics, so you can easily track their warning history even through the BM console! Warnings will add a flag to the player in Battlemetrics, so you can easily differentiate players in the list who have warnings and not through the BM console! Click here for guide how to set up Battlemetrics integration. (NEW in v2.5.8) MySQL Database Support (allows Multi Server Warning Sync) You can now configure the plugin to use a MySQL Database as its data source. This will allow Warnings to be synced across multiple Rust servers if they are configured towards the same MySQL database. Planned future features Your ideas & feedback? Commands /warn <player name or id> "reason OR preset" Dispatches a warning with a custom reason or preset Requires permission: smartwarnings.admin /warn info <player name or id, leave blank to see yourself> Shows the amount of warnings, warning points and the individual warning details in chat. Requires permission: smartwarnings.admin to see other players. Default permission can only see their own warnings. /warn clear <player name or id> <id or ALL> Clear a specific warning ID by specifying the warning number, or specify ALL to clear all player warnings. (NEW in v2.5.0) Requires elevated permission: smartwarnings.admin.canclear /warn clan <clan tag> "reason OR preset" Dispatches a warning with a custom reason or preset to an entire clan (Requires Clans plugin) Requires permission: smartwarnings.admin /warn unfreezeall Unfreezes all players who are currently frozen due to not acknowledging any warnings, really only needs to be used in any emergency scenario where the player would not be unfrozen normally (Please report these scenarios, this command is purely proactive and will be removed when its not needed anymore) Requires permission: smartwarnings.admin Configuration { "Warning Presets": { "spam": { "Reason": "§1 - Spamming", "Points": 1, "ExpirationDays": 3.0 }, "toxic": { "Reason": "§2 - Toxic behaviour", "Points": 2, "ExpirationDays": 7.0 }, "sign": { "Reason": "§3 - Inappropriate signage", "Points": 2, "ExpirationDays": 7.0 }, "grief": { "Reason": "§4 - Griefing", "Points": 4, "ExpirationDays": 7.0 }, "group": { "Reason": "§5 - Group Limit violation", "Points": 5, "ExpirationDays": 7.0 } }, "System Settings": { "Max Warnings": 5, "Default Warning Expiration time (Days)": 7, "Announce Warnings in Global Chat": true, "Show players who issued the warning": true, "Server Name": "MyRustServer", "Clear all Warnings on Server Wipe": true, "Use MySQL database": false, "Warning Popup - GUI Enable - Set to false to use only chat (SAFE FOR VANILLA SERVER)": false, "Warning Popup - GUI Icon": "https://i.imgur.com/oImKq4X.png", "Warning Popup - GUI Opacity": 0.85, "Optional: Send anonymous analytics data about plugin usage": true, "Config Version": { "Major": 2, "Minor": 5, "Patch": 8 } }, "MySQL Database Settings": { "MySQL Host": "", "Port": 3306, "Database": "", "Username": "", "Password": "" }, "Battlemetrics Settings": { "API Token": "", "Organization ID": "", "Server ID": "", "Banlist ID": "" }, "Autoban Settings": { "How many points until automatic ban (Set 0 for Disable)": 0, "How many warnings until automatic ban (Set 0 for Disable, Recommended: Same as Max Warnings)": 0, "How long to ban in minutes (Set 0 for Permanent)": 2880, "Clear the players Warnings on AutoBan (Default: True)": true }, "Discord Settings": { "Webhook URL - Post Warnings to Discord (Leave blank to Disable)": "", "Webhook URL - Post Autobans to Discord (Leave blank to Disable)": "" }, "AutoMod Settings": { "Mute on 2 warning points": { "PointTrigger": 2, "ExecuteCommand": "mute {0} {1}", "ClearPointsOnTrigger": false }, "Kick on 4 warning points": { "PointTrigger": 4, "ExecuteCommand": "kick {0} {1}", "ClearPointsOnTrigger": true } } } Language Configuration The plugin allows a comprehensive customization of all text output for your needs. Edit the oxide/lang/en/SmartWarnings.json { "NO_PERM": "You don't have permission to use this command.", "NO_MATCH": "Could not find a match for player name or steamid", "GUI_BUTTON_ACKNOWLEDGE_WARNING": "I ACKNOWLEDGE THIS WARNING AND WILL FOLLOW THE RULES", "GUI_HEADER": "You have received a warning", "GUI_ISSUEDBY": "<color=#FFFFFF>Warning issued by {0} at {1}</color>", "GUI_ISSUEDAT": "<color=#FFFFFF>Warning issued at {0}</color>", "GUI_WARNING_TEXT": "<color=#cc0000>Repeated violations may lead to temporary or permanent banishment from this server.</color>\n\n<color=#d9d9d9>You should review the server rules immediately by typing /info in chat and clicking on the RULES tab.\nTo remove this pop-up, acknowledge this warning by clicking the button below.\nIf you feel this was an incorrect warning please reach out to our Staff via Discord.</color>", "CHAT_ACKNOWLEDGE_TEXT": "<color=#00FF00><size=12>Warning Acknowledged: You're now unfrozen and free to go.\n</size></color><size=9>Please review the server rules by typing /info in chat to avoid getting warned in the future.</color>\n\nIf you feel this was an incorrect warning please reach out to our Staff via Discord.</size>", "ANNOUNCE_WARNING_TEXT": "<color=#DC143C>{0} has been warned!\nFurther violations will lead to disciplinary action.</color>\n<color=#A9A9A9>Reason: {1}", "ANNOUNCE_WARNING_ISSUEDBY": "\n\n<size=10>Warning Issued by: {0}</size></color>", "REASON": "REASON", "AUTOBAN_PERMANENT_MESSAGE": "AutoBanned: You were permanently banned due to reaching max warnings.", "AUTOBAN_TEMPORARY_MESSAGE": "AutoBanned: You are banned until {0} due to reaching max warnings." } For example to change is the detailed warning text: You can edit the GUI_WARNING_TEXT row in the language file. Dependencies & Integrations Requires: DiscordMessages for Discord webhook functionality. Integrates with EnhancedBanSystem, autoban feature will detect if the plugin is installed and issue a ban with it, if not it will use the native Rust ban functionality. OPTIONAL: Plugin Usage Analytics The plugin optionally sends analytics about your server (Oxide version, Plugin version, Plugin configuration, Server Name, OwnerID and ModeratorID) to gauge usage of the plugin and to improve support. You can toggle this feature in the configuration.$16.99 -

Version 1.3.2
78 downloads
Advanced graphical plugin manager to easily manage plugins. Features Load/Unload plugins Unloaded plugins are unloaded permanently (not reloading after restarts) Convenient error lookup for not loading plugins Intuitive and super responsive UI (no lag for small UI changes and no mouse reset) Search/Filter function Back button for quick navigation No plugin dependencies Commands (Chat and Console) gplugins - Opens/Closes the UI gplugins.load <pluginname> - Loads the given plugin and removes it from the disabled plugins list gplugins.unload <pluginname> - Unloads the given plugin and adds it to the disabled plugins list Permissions Administrators don't need any permission Players can be given access with the permission 'gplugins.use' (for UI and commands) Hints Clicking the exclamation mark icon will show the error message at the bottom The disablement of plugins after restarts will not work if gplugins is not loaded Loading a plugin in any way other then gplugins when it is disabled in gplugins will not work Configuration uicolor.primary (rgba) - The primary accent color uicolor.disabled (rgba) - The disabled buttons color$11.99 -

Version 1.1.1
165 downloads
SAVE 13% WHEN BUYING THE BUNDLE This plugin will allow you to run console commands at any given schedule. The syntax was inspired on the Unix's crontab format but ported to json for easy of use. Below you'll find some examples.. but sky is the limit. ┌───────────── minute (0 - 59) │ ┌───────────── hour (0 - 23) │ │ ┌───────────── day of the month (1 - 31) │ │ │ ┌───────────── month (1 - 12) │ │ │ │ ┌───────────── day of the week (0 - 6) (Sunday to Saturday); │ │ │ │ │ │ │ │ │ │ │ │ │ │ │ * * * * * <command to execute> { "Minute": "*", "Hour": "*", "Day": "*", "Month": "*", "DoW": "*", "Command": "ai.sleepwakestats" } New features "@forced" and "!forced" to be used on the Command field as conditionals: /* * > minute = 15, hour = 19, DoW = 4, command = @forced restart 60 * > minute = 15, hour = 12, DoW = 4, command = !forced restart 900 * > The special keys "@forced" and "!forced" will allow you to execute commands * > only of forced wipe days or only on non forced wipe days. This example will * > restart the server every thursday at 12:15 except forced wipe days were it * > will only execute at 19:15. */ New features "@wipe" and "!wipe" to be used on the Command field as conditionals: /* * > minute = @restart, command = @wipe my_command * > minute = @restart, command = !wipe my_other_command * > The special keys "@wipe" and "!wipe" will allow you to execute commands * > only if the map was wiped. This example will execute my_command on server * > restart if the map was wiped otherwise will execute my_other_command. */ Execute the command "ai.sleepwakestats" every 3m: { "Minute": "*/3", "Hour": "*", "Day": "*", "Month": "*", "DoW": "*", "Command": "ai.sleepwakestats" }, Execute the command "status" at 15m of every hour: { "Minute": "15", "Hour": "*", "Day": "*", "Month": "*", "DoW": "*", "Command": "status" }, Restart the server every day at 6:45: { "Minute": "45", "Hour": "6", "Day": "*", "Month": "*", "DoW": "4", "Command": "restart 60" }, Have a specific plugin running only during the weekends: { "Minute": "0", "Hour": "0", "Day": "*", "Month": "*", "DoW": "6", "Command": "oxide.load MyWeekEndPlugin" }, { "Minute": "0", "Hour": "0", "Day": "*", "Month": "*", "DoW": "1", "Command": "oxide.unload MyWeekEndPlugin" } Execute the command "oxide.version" every Tuesday between 10:15 to 10:25: { "Minute": "15-25", "Hour": "10", "Day": "*", "Month": "*", "DoW": "3", "Command": "oxide.version" } Sets the fps limit to 30 at every server restart: { "Minute": "@restart", "Hour": "*", "Day": "*", "Month": "*", "DoW": "*", "Command": "fps.limit 30" } Keeps the plugin MyWeekEndPlugin unloaded during weekend restarts: { "Minute": "@restart", "Hour": "*", "Day": "*", "Month": "*", "DoW": "1", "Command": "oxide.unload MyWeekEndPlugin" }, { "Minute": "@restart", "Hour": "*", "Day": "*", "Month": "*", "DoW": "6", "Command": "oxide.unload MyWeekEndPlugin" }$4.99 -
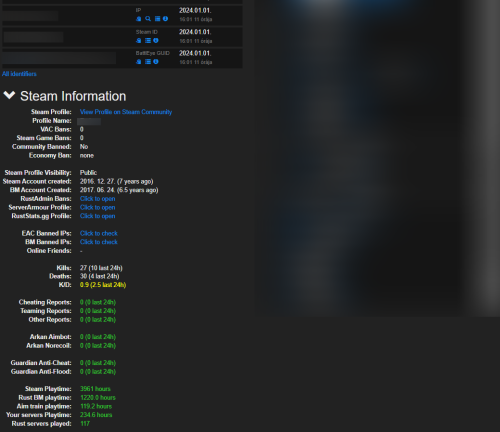
Version 2.0.0
874 downloads
Features: This chrome extension collects and shows additional information about players in battlemetrics rcon. Such as: Steam profile, Battlemetrics profile creation date EAC Ban, EAC Banned Friends, EAC Banned Identifiers (IPs), BM Banned Identifiers (IPs) (if player with an ip can be found on your ban list) Temp ban counts Kills, Deaths, KD Reports, Arkan and Guardian violations (optional) Rust servers played, playtime on: rust servers, aim train servers, your servers Global rust stats (optional) Steam profile picture and the current server's name in battlemetrics Link for ServerArmour, RustAdmin and RustBanned profile (optional) What you receive: By purchasing the product you receive: The source code of this extension Lifetime access Detailed setup guide Support If you need help or If you have any issues or suggestions you can contact me by joining my discord server: https://discord.gg/efVKDG6z6F or by adding me on discord: Farkas#6006$9.90- 11 comments
- 5 reviews
-
- 9
-
-
-
- #battlemetrics
- #bm
- (and 15 more)