Search the Community
Showing results for tags 'tool'.
-
Version 1.0.6
26 downloads
This website tool, is a way for you to be able to have an organized list of bans and manage them from here. You can also manage online players, plugins and monitor a live console. I plan on expanding this product to make it more of a centralized hub for your server admins. Dependencies: .NET 6.0 Enhanced Ban System Setup with MySQL (Optional) IMPORTANT NOTE: The price of this tool will go higher as the tool gets more features. Not to an enormous amount, but still worth saying now. Features: Centralized ban management via enhanced ban system. Unban from web page Live player counts Live RCON console to monitor your server RCON command sender to manage your server like banning, muting, kicking, oxide commands, etc.. Online Player Management (Still very basic) Future Ideas: Scheduled commands More statistics Manage online players using the web UI instead of the console view Added. Reports based on a certain period of time Authentication (Maybe) How to setup: (Optional) Setup https://umod.org/plugins/enhanced-ban-system#configuration correctly and note down the username, password, database name and server IP, as they will be used in the following steps. For Windows: Edit appsettings.json and add the proper values for the DefaultConnection, under ConnectionStrings and add your MySQL server ip, database, user and password Still in the appsettings.json, set your RustServerIP, RCONPort and RCONPassword accordingly If you want to change the default ports and hosts the website can run on, edit the launchSettings.json file To run the website, you have 2 options. The simpler one, being to run the RustBanManager.exe executable and connect to the website using your browser of choice The more complex one is setting up IIS on your windows server using this guide: https://learn.microsoft.com/en-us/aspnet/core/host-and-deploy/?view=aspnetcore-6.0 For Linux: Edit appsettings.json and add the proper values for the DefaultConnection, under ConnectionStrings and add your MySQL server ip, database, user and password Still in the appsettings.json, set your RustServerIP, RCONPort and RCONPassword accordingly If you want to change the default ports and hosts the website can run on, edit the launchSettings.json file To run the website, you will need to set it up manually, since you cannot just a .exe directly. Set it up with the following: https://learn.microsoft.com/en-us/aspnet/core/blazor/host-and-deploy/server?view=aspnetcore-3.1#linux-with-apache Example Enhancedbansystem config with equivalent appsettings.json file information below: "DataType - MySQL - Database": "rust", "DataType - MySQL - Host": "127.0.0.1", "DataType - MySQL - Pass": "password", "DataType - MySQL - Port": 3306, "DataType - MySQL - use": true, "DataType - MySQL - User": "user", For example, if this is your data in the ban system config, your configuration for the plugin implementation section would be the following: "PluginImplementations": { "EnhancedBanSystem": { "use": "false", "server": "127.0.0.1", "database": "rust", "user": "rustuser", "password": "password" } } It is arguably way easier to simply run the tool locally on your windows computer, and probably safer, as there is no authentication for the website.$25.00 -

Version 1.0.4
164 downloads
Manage your Rust server easier and more efficiently with the AdminMenu plugin. Track players, interact with them, edit their data and permissions, as well as change server convars and manage plugins. Features: Menu retains its state after closing, you won't lose everything you did before. Ability to fully translate the menu into any language. Large range of permissions for each action, will allow you to flexibly customize the admin menu for each group of administrators. Quick menu that allows you to perform quick actions Full list of players with the ability to filter by online, offline, admins and moderators. Also has a frame of different colors depending on the level of authorization. Wide range of information and actions for the selected player. Editing convars with search. Has a complete list of editable convars with descriptions for some of them. Extensive issue menu by category, with easy management of name, skin and amount (manual, +1, +100, +1000, +10000). Plugin management menu. It is possible to reload, unload or load a plugin easily and quickly. Updates occur in real time. Ability to create your own custom buttons that execute several commands Quick Start: You install the plugin in the plugins folder. Give yourself the adminmenu.fullaccess permission. Commands, use one of your choice, one for the player and one for the admin group: o.grant user {name/steamid} adminmenu.fullaccess o.grant group admin adminmenu.fullaccess Press the X button (swap seat button) or type adminmenu in the console. Enjoy Useful stuff: You can quickly open a player in the admin menu. To do this, point at the player and press X. You don't have to hover over the player exactly, you will be able to open players within a certain radius of the place you are looking at. CUSTOM BUTTONS Custom buttons are buttons that when pressed will execute commands on behalf of the administrator, commands can be several, below will be the details. At the moment, custom buttons can be created in two places: in the quick menu and in the menu when selecting a player. These places are separated in the config. Button Fields: "Label" - Text that will be on the button, for each such inscription creates a field in the lang file, accordingly you can translate this text into several languages. "Commands" - Array of commands that will be executed on behalf of the administrator. Chat commands require a special entry, see examples. Available self-replaceable tags for commands targeting the player: {steamid}, {steamID}, {userID}, {STEAMID}, {USERID} - mean the same thing, namely the id of the selected player. {adminUID} - administrator's id. "Permission"- permission to display and use the button. You need to write the permission that will be after "adminmenu.". Example: if you enter the permission "test" the permission will be adminmenu.test "Position" - The location for the button, the first number is responsible for the row number, the second for the position within the row, starts from 0.There are limits of locations, if you have gone beyond the limit - the button will not be displayed. Example of commands: chat.say \"/{chat command}\" vanish ban {steamID} teleport {steamID} {adminUID} More information about the grant menu: The grant menu includes the full list of items including hidden items as well as custom items created by the CustomItemDefinitions library. The menu can be accessed from the navigation or from the menu of the selected player. When issuing itself has categories. Search works in any registry by any part of the name or short name. Has a page system at any stage. More information about the buttons in the Quick Menu: [Teleport to 0 0 0] - Teleport to coordinates 0 0 0. Requires adminmenu.quickmenu.teleportto000 permission [Teleport to Deathpoint] - Teleport to your deathpoint. Requires adminmenu.quickmenu.teleporttodeath permission [Teleport to Spawn point] - Teleport to a random spawn point. Requires adminmenu.quickmenu.teleporttospawnpoint permission [Kill Self] - Kill Self, kills even when immortal. Does not require permission. [Heal Self] - Fully heal yourself. Requires adminmenu.quickmenu.healself permission [Call Heli] - Call Helicopter to yourself (arrives in time). Requires adminmenu.quickmenu.helicall permission [Spawn Bradley] - Spawn bradley on yourself. Requires adminmenu.quickmenu.spawnbradley permission More information about the buttons in the menu of the selected player: [Teleport Self To] - Teleport yourself to the selected player. Requires adminmenu.userinfo.teleportselfto permission [Teleport To Self] - Teleport the selected player to yourself. Requires adminmenu.userinfo.teleporttoself permission [Teleport To Auth] - Teleportation to random authorization (TC). Requires adminmenu.userinfo.teleporttoauth permission [Teleport to Deathpoint] - Teleportation to a player's deathpoint. Requires adminmenu.userinfo.teleporttodeath permission [Heal] - Full healing, including metabolism. Requires adminmenu.userinfo.fullheal permission [Heal 50%] - Half healing. Requires adminmenu.userinfo.halfheal permission. [View Inventory] - View and edit player's inventory. Requires adminmenu.userinfo.viewinv permission [Strip Inventory] - Clear player's inventory. Requires adminmenu.userinfo.stripinventory permission [Unlock Blueprints] - Unlock all Blueprints. Requires adminmenu.userinfo.unlockblueprints permission [Revoke Blueprints] - Reset all Blueprints. Requires adminmenu.userinfo.revokeblueprints permission. [Kill] - Kill a player. Requires adminmenu.userinfo.kill permission [Kick] - Kick a player. Requires adminmenu.userinfo.kick permission [Ban] - Ban a player. Requires adminmenu.userinfo.ban permission More information about the buttons in the menu of the selected group: [Remove Group] - Remove group, has confirmation. Requires adminmenu.groupinfo.removegroup permission [Clone Group] - Clone group with the ability to copy users. Requires adminmenu.groupinfo.clonegroup permission Permissions: adminmenu.use - Ability to use admin menu with basic set. Open tab quick menu (each button has its own permission, without permissions is present only kill yourself button) and the list of players. adminmenu.fullaccess - Full access to all functions without the need for each permission, includes also adminmenu.use. It is recommended to give only to the main administrators. adminmenu.quickmenu.teleportto000 - Access to the button in the quick menu, teleportation to coordinates 0 0 0 0. adminmenu.quickmenu.teleporttodeath - Access to the button in the quick menu, teleportation to the point of your death. adminmenu.quickmenu.teleporttospawnpoint - Access to the button in the quick menu, teleportation to a random spawn point. adminmenu.quickmenu.healself - Access button in quickmenu, heal yourself completely. adminmenu.quickmenu.helicall - Access to the button in the quick menu, call a helicopter to yourself (arrives in time). adminmenu.quickmenu.spawnbradley - Access button in quickmenu, spawn bradley. adminmenu.userinfo.teleportselfto - Access to the button in the menu of the selected player, teleportation to the selected player. adminmenu.userinfo.teleporttoself - Access to the button in the menu of the selected player, teleport the selected player to himself. adminmenu.userinfo.teleporttoauth - Access to the button in the menu of the selected player, teleportation to random authorization (TC). adminmenu.userinfo.teleporttodeath - Access to the button in the menu of the selected player, teleportation to the place of death of the player. adminmenu.userinfo.fullheal - Access to the button in the menu of the selected player, full healing, including metabolism. adminmenu.userinfo.halfheal - Access to the button in the menu of the selected player, half healing. adminmenu.userinfo.viewinv - Access to the button in the selected player's menu, view and edit the player's inventory. adminmenu.userinfo.stripinventory - Access to the button in the menu of the selected player, clear the player's inventory. adminmenu.userinfo.unlockblueprints - Access the button in the menu of the selected player, unlock all drafts. adminmenu.userinfo.revokeblueprints - Access to the button in the menu of the selected player, reset all drafts. adminmenu.userinfo.kill - Access the button in the selected player's menu to kill the player. adminmenu.userinfo.kick - Access the button in the selected player's menu to kick the player. adminmenu.userinfo.ban - Access to the button in the menu of the selected player, ban the player. adminmenu.groupinfo.removegroup - Access to the button in the menu of the selected group, the ability to remove the group. adminmenu.groupinfo.clonegroup - Access to the button in the menu of the selected group, the ability to clone the group. adminmenu.convars - View and edit convars. adminmenu.permissionmanager - View and edit permissions in groups, player groups, create, delete and clone groups (requires additional permissions from these buttons). adminmenu.pluginmanager - Access to plugin management, reloading, unloading, loading plugins. adminmenu.give - Access to give resources, as well as yourself and the selected player.$25.00 -

Version 1.7.3
318 downloads
Better Vanish allows server admins or users with permission to go fully invisible to spectate/watch players. It is based on the free public version on uMod by Wulf and has been in development since 2017. However, this version was written from scratch with performance, security and optimization in mind. Key features: Vanished administrators cannot be seen by any other players or cheaters. ¹ Optimization with performance in mind. No garbage allocations. Smaller size, lightweight with only most necessary functions for being invisible. Auto-hide / Auto-noclip after joining. ² Can be used by non-admins with certain restrictions. Auto teleportation under the map or to a safe spot (if you crash or disconnect). ³ Vanished state persists between disconnects or server restarts (configurable). Invisible to the world, environment, AI, traps and so on. ⁴ Custom & Lightweight trigger subsystem. Vanished player is only enters the most important world triggers at zero overhead. Can hide and unhide other players via command. The inventory spy function will let you see and edit player's or NPC's inventories. Sound effects when entering and leaving invisibility (other players can't hear it). Supports original Vanish API & Hooks. Explanations: You must behave accurately if you don't want to get attention from potential cheaters. Do not play, shoot, or touch your inventory and outfit. Auto-noclip is valid only for admins. Non-admins cannot be teleported underground. Please use the safe points. You still may provoke AI to follow you or shoot at you if you cause damage to them. Configuration The settings and options for this plugin can be configured in the BetterVanish.json file under the oxide/config directory. The use of a JSON editor or validation site such as jsonlint.com is recommended to avoid formatting issues and syntax errors. { "Show visual indicator (true/false)": true, "Visual indicator image address": "https://i.imgur.com/dOvX4uA.png", "Visual indicator anchor min": "0.1 0.001", "Visual indicator anchor max": "0.17 0.10", "Visual indicator color": "0.7 0 0 1", "Depth of an underground teleport (upon disconnection)": 15.0, "Block all incoming damage while vanished (true/false)": true, "Block all outgoing damage while vanished (true/false)": true, "Auto vanish on connect (true/false)": true, "Auto noclip on connect (true/false)": true, "Auto noclip on vanish (true/false)": true, "Turn off noclip on reappear (true/false)": true, "Persist vanish (don't unhide upon leave & restore after restart)": true, "Use sound effects (true/false)": true, "Enable safepoints (true/false)": true, "Remove all safepoints after wipe (true/false)": true, "Config revision (do not edit)": 4 } Localization The localization for this plugin can be configured in the BetterVanish.json file under the oxide/lang/en directory. The use of a JSON editor or validation site such as jsonlint.com is recommended to avoid formatting issues and syntax errors. { "CommandVanish": "vanish", "CommandSetVanish": "setvanish", "CommandUnvanishAll": "unvanishall", "CommandInvSpy": "invspy", "VanishDisabled": "<color=#FF686B>Vanish disabled</color>", "VanishEnabled": "<color=#91D6FF>Vanish enabled</color>", "VanishDisabledOther": "<color=#FF686B>You disabled vanish on {0}</color>", "VanishEnabledOther": "<color=#91D6FF>You enabled vanish on {0}</color>", "UnvanishedPlayers": "<color=#FF686B>You unvanished {0} players!</color>", "SetVanishHelp": "Syntax: /setvanish PlayerName", "SafePointNotSet": "You haven't set your <color=#F7B267>Safe Point</color>\nType <color=#FF686B>/vanish safepoint</color> to save your current position.\nYou will be automatically teleported there upon disconnection.", "SafePointSaved": "Your current position is saved as a Safe Point!", "MultiplePlayers": "Multiple players found!\nRefine your search or use Steam ID.", "NothingInSight": "No players in sight", "NoSuchPlayer": "No such player found ({0})", "InvSpyLooting": "Looting: {0} ({1})." } Permissions This plugin uses Oxide's permission system. To assign a permission, use oxide.grant <user or group> <name or steam id> <permission>. To remove a permission, use oxide.revoke <user or group> <name or steam id> <permission>. bettervanish.allowed - allows non-admin players to use vanish and become invisible. bettervanish.allowedother - allows non-admin players to vanish other players by their name. bettervanish.perma – the bearer will be vanished automatically and won’t be able to turn off vanish himself. bettervanish.unvanish - allows non-admin players to unvanish everyone at once. bettervanish.invspy - allows non-admin players to use inventory spy to loot players and NPCs remotely. bettervanish.skiplocks - allows non-admin players to have access to locked entities (boxes, doors). Commands This plugin provides universal chat and console commands. When using a command in the chat, prefix it with a forward slash: /. vanish - Toggles vanish state. vanish safepoint - Save a Safepoint, where get teleported on disconnect (your current position). setvanish <PlayerName> - Toggles vanish state of specified player. unvanishall - Unvanish everyone at once (both online & sleepers). invspy - Let you see and edit players or Npcs inventories, <name/steamID64> or look at the target and use then "invspy " Plugin Data This plugin can store 2 data files under oxide/data: BetterVanish-SafePoints.json - Player safepoints storage. BetterVanish-PersistPlr.json - Players with persisted vanish state. Developer API bool _IsInvisible(BasePlayer player) bool _IsInsivible(IPlayer player) void _Disappear(BasePlayer) void _Reappear(BasePlayer)$19.99- 20 comments
- 1 review
-
- 1
-

-
- #better vanish
- #admin
- (and 1 more)
-

Version 1.0.2
14 downloads
Enables administrators to perform administrative actions anonymously, hiding their profile when they use in-game chat as well as within the game environment, displaying 'ADMIN' instead of their nickname above their character. Commands /aa - Admin Anon Enable /aa - Admin Anon Disable Permissions adminanon.use - Enables anonymity in the game. Configuration { "Stay Anonymous After Reconnecting": false, "Stay Anonymous In Team Chat": true, "Properties": [ { "Name": "ADMIN", "Better Chat Group": "admin", "Required Permission": "adminanon.use" } ] } Data (example) { "PlayerData": { "76561198196941415": { "Groups": [ "admin", "default" ], "Name": "ADMIN", "Better Chat Group": "admin", "Required Permission": "adminanon.use" } } } Language (EN) { "No Permission": "<size=12>You don't have permission to use this command</size>", "No Profile Permission": "<size=12>You don't have permission to use this profile</size>", "Admin Anon Enabled": "<size=12>Admin Anon has been <color=#00fa9a>ENABLED</color></size>", "Admin Anon Disabled": "<size=12>Admin Anon has been <color=#00fa9a>DISABLED</color></size>", "Admin Anon Changed": "<size=12>Fake identity has changed to <color=#00fa9a>{0}</color></size>", "Requested Fake Identify Not Found": "<size=12>Requested fake identity is not found</size>", "No Fake Identities Available": "<size=12>No fake identities available</size></size>", "Fake Identify Not Found": "<size=12>Fake identity is not found</size>", "Data Corrupted Up": "<size=12>Data is corrupt</size>" }$3.00 -
Version 1.1.4
217 downloads
This is a tool I made as I found CUI to be very difficult when beginning to make Rust Plugins. This tool allows you to make any type of UI in unity, and export it to Rust Format, using this tool allows you to go back and make any minor adjustments needed as everything is saved in the project file. Never leave your self guessing on how far you can go with UI, this tool will allow you to make super sleek looking UI in just minutes! Features Create Panels, Images, Labels, Buttons, and Input Fields Pick one of the four fonts and get a preview live Use any sprite from rust, and directory auto set by exporter UI Materials, be able to test UI with materials live Auto Custom Image Uploader, exporter will upload your image to imgur and the exporter will put the link in the proper section Export UI from Unity to Rust Automatic Offset/Anchor Support, no longer need to fight with numbers in your head Automatic conversion for Font Size, Text Alignment, etc Installation Download Unity 2021.1.5f1 Extract the zip file to a spot you would like to keep the tool Find the ImgurToken.txt in the same folder as the UI scene, follow instructions in the file. Open the project file in the folder that you extracted, and navigate to the top find Rust -> Download Sprites and follow the instructions After that you are all done, now its time to get creative and make some killer UI Notes for those who purchase: - When using custom images, please put them in a custom folder in the assets folder. - Make sure you set your game tab to 1920x1080 otherwise your scene view will look all wonky - Make sure that you are on the right unity version, and if you are showing unity errors google them before contacting me. - Rust CUI Input Fields do not have a background or placeholder text, to add a background use a panel. View an example, and if that's not enough check out the video below! Advanced UI made in minutes$45.00 -
Version 1.3.0
301 downloads
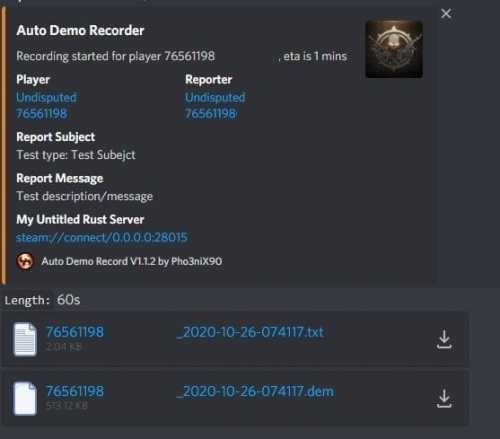
Records players automatically that have been reported X amount of times, with the ability to automatically upload the combat logs & Demo files to a discord webhook. Disk usage whilst recording: +- 1MB per 1 minute. Discord has an 8mb upload limit and 100mb for nitro. Chat Commands: /record - Chat: This will initiate a self-recording. Console Commands autodemorecord.record [steam64id] [minutes] - Console: Usefull to record a player on demand, or a schedule from another plugin. autodemorecord.blacklist add [steam64id] [recordingMinutes] [intervalMinutes] - Console: Add a player to the blacklist, which will record them for [recordingMinutes] every [intervalMinutes] autodemorecord.blacklist remove [steam64id] - Console: Removes a player from the blacklist. Permissions: Permission autodemorecord.record is required for a player to initiate a recording of themselves. Useful for streamers, to provide them with footage at wipe end, or tournaments. The recording length will be "Auto record for X minutes" Config explanations: "Auto record after X reports": Will start recording the player when these many reports have been received. "Only record when reports within X seconds": Only record when the number of reports above, are received in this timeframe. 0 to record always when the above value is reached. "Save/Load reports to datafile on reload": Useful when you aren't using the above config, if you do it might not be necessary to save data overhead. "Auto record for X minutes": the number of minutes the player should be recorded for. "Discord MSG Color": Color for the embed message, see here https://gist.github.com/thomasbnt/b6f455e2c7d743b796917fa3c205f812 "Discord Webhook": You discord webhook all information should be sent to. "Discord: Notify if recording is started": Should a message be sent to the discord webhook when the recording starts? "Discord: Include report with start message?": Should the player's report be added to the recording start message? "Discord: Notify if recording is stopped": Should a message be sent to the discord webhook when the recording ends? "Discord: Include report with end message?": Should the player's report be added to the recording end message? "Upload Combat Log to discord webhook?": Should the player's combat log be upload to the above discord webhook as a txt file? "Upload DEMO file to discord webhook?": Should the player's demo file be uploaded to the above discord webhook? "Split DEMO files for non nitro discord (8mb chunks)?": This will split files and upload multiple files to discord for non-nitro discord servers. If you have nitro with an upload limit of 100mb, then you can turn this off. "Discord Webhook - Self Record" All self-initiated recordings will post to this webhook, if not set it will go to the main one. "Record if FlyHacked in last X seconds" This will initiate a recording when a player rejoins the server after kicked for flyhacking. "Save recording to server?" If set to false, it will not save to the HDD, to save space. Make sure you have a webhook setup, otherwise it will still save as to not lose any demos. API: If you want to trigger a recording from your plugin, you can do the following: AutoDemoRecord.Call("API_StartRecording", BasePlayer player, string Reason, int LengthInMin); All suggestions welcomed!$19.99 -

Version 2.0.9
62,161 downloads
Convenient GUI manager for player and group permissions. Allows assignment of player permissions. (online or sleeping) Allows assignment of group permissions. Allows one-click removal of all players from a group. (group page - "Remove All") Allows adding/removing a player from groups. Supports unlimited plugins/permissions/groups Up to 60 plugins per-page. Up to 40 permissions per-page. Up to 40 user groups per-page Allows for local and sql backup and recall of all permissions or groups. Permissions. permissionsmanager.allowed - Allows players to use GUI. Plugin can be used with this permission, or by any Admin : Auth Level 2. Chat commands. /perms data - Backup and restore permissions and/or groups - local data file and/or SQL. ** /perms OR /perms player - Opens GUI player list, allowing a player to be chosen. /perms group - Opens GUI group list, allowing a group to be chosen. /perms player <playername> - Opens permissions GUI for the specified player. /perms group <groupname> - Opens permissions GUI for the specified group. Console commands. EmptyGroup <groupname> - Removes all players from the specified group. Configuration. Global. Chat - Title colour Chat - Message colour GUI - Label colour GUI - On colour GUI - Off colour GUI - AllPerPage - Sets All/None option to per-page, or per plugin. Options - GUI Transparency 0-1 Options - Plugin BlockList - ex. "playerranks,botspawn" Block list must be lower case, comma separated, no spaces, and no final comma, as above. Useful tool for picking CUI colours - RGB Decimal - Take the RGB Normalized decimal output, and remove all commas. ** Please note that with data backups : SQL saving is accumulative - Saving adds current permissions/group data to whatever was already saved. Local data file saving is not accumulative. It overwrites any existing backup with the current server permissions/groups. FAQ. Q: I'm trying to revoke permission(Y) for a player, but it says "Inherited". A: The player is in a group(X) which is also granted permission(Y). Solution: Revoke permission (Y) from group(X) or remove the player from group(X). Q: I removed a player from group(X), but they still have permission(Y). A: This is the opposite of the above. This player must have been independently granted permission(Y) at some time. Solution: Revoke permission(Y) from the player.Free- 169 comments
- 32 reviews
-
- 34
-

-
-
- #permissions
- #admin
- (and 7 more)
-
![More information about "Build Tools [grade/remove/skins]"](https://codefling.com/uploads/monthly_2024_02/v4final.thumb.gif.47c01c6bcae439a1dad6cea581e5ec41.gif)
Version 1.5.33
2,674 downloads
Introducing a feature-rich plugin that will take your in-game building experience to new heights - Build Tools! This plugin is not just a tool, it is the key to creating incredible builds and will make the processes of upgrading, removing and even downgrading buildings easy and fun! !ATTENTION! After the last update of the game, the additional slot does not work ️ Features Beautiful user interface: Our plugin has a lovely and easy-to-use interface that makes building tasks smooth and functional; Bar progress display: Keep track of your building progress with a clear progress bar, so you can see your upgrades easily; Upgrade of the entire building at once: You can make them stronger and more secure quickly; Interface customization: Personalize the user interface to match your preferences and workflow. Returning an item to remove: Don't worry about losing items when removing structures; our plugin ensures you get them back; Returning items with condition as in the game: Items are returned to the same condition as in the game, with the option to set their condition as a percentage; Blocked list items for remove: You can specify which items should not be removed for precise construction control. Ability to use icons both from the game and your own Work with Clans/Friends/NoEscape Building Skins (+ automatic parsing command) Downgrade: Make structure downgrades simple and adapt your base to changing needs with just a few clicks Edit config via in-game interface (no JSON editing required) Commands /up [1-4] - enable upgrading mode /up all - allows you to upgrade the entire building at once /remove - enable removing mode /remove all - allows you to remove the building at once /down - enable downgrading mode /down all - allows you to downgrade building at once buildtools.parse.skins – allows parsing new building skins from the game + images to them /bskin – open settings menu Permissions buildtools.all – allows you to upgrade/remove the entire building at once buildtools.free – allows you to upgrade buildings for free buildtools.edit – allows you to enable edit mode buildtools.vision – allows you to toggle the remove mode on in the vision mode Video Hooks object canDowngrade(BasePlayer player, BaseEntity entity) object canRemove(BasePlayer player, BaseEntity entity) object CanBuildToolsGiveRefund(BasePlayer player, BaseEntity entity) FAQ Q: Where can I see an example of a config? A: Config$21.95- 255 comments
- 12 reviews
-
- 6
-
-
-
- #building
- #foundation
- (and 22 more)
-
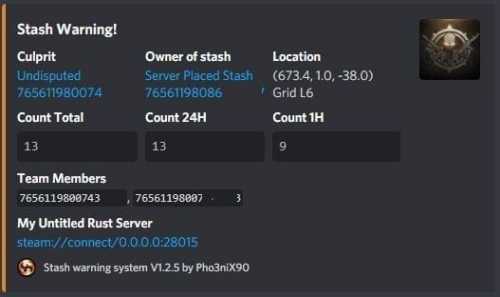
Version 1.4.8
344 downloads
Assists in finding ESPers that unearth stashes, it also allows admins to make placing bait stashes easy and simple, by automatically filling predefined items in random, and disables the ability for admins to accidentally unearth stashes whilst enabled. It will also automatically delete all contents of an admin stash when unearthed, which assists in admin abuse and/or exploitation of hackers. Supports Auto Demo Recorder (ADR) Supports Better Ban System Supports Server Armour Features: Notifies to discord when stashes are found which doesn't belong to players (or clan if using the clan plugin) Records the number of stashes found in a certain, configurable timeframe. Sends discord notifications when the above happens Admins can place "server" stashes, and they will be auto-filled with the /stash command. When a player unearths said stash, the contents will be automatically removed. Stashes can also be autogenerated and placed automatically. And can be replaced as they are found in another random location. It auto bans based on condition. Example: If a player finds 5 stashes that don't belong to them within 1 hour, they are auto-banned with a preset reason. It works with ADR as well and can trigger demo recordings based on conditions It works with ServerArmour to handle bans, else native bans. Battlemetrics will soon be supported. Permissions: stashwarning.admin - allows admins to use the stash placement system. Chat Commands: /stash - Enables manual stash placement tool. Stashes cannot be unearthed when enabled and stashes will be automatically given. /stashshow- Toggles On/Off - Will show admin the location of all plugin related stashes. /stashdestroyall - This will destroy all server stashes create by, or with this plugin. /genstashes- This will force generate all stashes that are missing. /regenstashes- This will remove, and then replace all stashes from this plugin. Config explanations: "API: ADR reason" The reason that will be given to ADR, and is sent to discord along with the recording. "API: ADR recording length in mins" How long the recording should be in minutes. "API: ADR Trigger recording when stashes found/triggered more than" When the recording should trigger, Example: If set to 1, the recording will trigger when the player has triggered/unearthed 2 stashes. "Discord: Color" Color for the embed message, see here https://gist.github.com/thomasbnt/b6f455e2c7d743b796917fa3c205f812 "Discord: Embed Title" The title of the embed inside discord. "Discord: Send Stash Toggle Msgs" If notifications should be sent to discord when an admin toggles the stash command. "Discord: Webhook Server Name" The server where the notification is sent from, useful for when you have multiple servers. "Discord: Webhook URL" https://support.discordapp.com/hc/en-us/articles/228383668-Intro-to-Webhooks "SteamID for in-game chat icon." This will be used to assign against placed stashes for tracking. Do not change this to a user on the server, leave as is if you don't have another steamid. "Embed count buckets in hours" This should be a string, comma-separated. This will be the bucket embeds in discord, to show the count of stashes found for the user, inside the hour brackets. Example: 0, 24, 1 = would give you a count for all stashes, stashes in the last hour, and stashes in the last 24hours. See below "Stash Items" The items that you would like to be automatically filled when a stash is placed. The number would be the max quantity, this will be randomized when placing in a stash to remove predictability. "Stash Item Slots To Fill: Max" The maximum amount of slots to fill "Stash Item Slots To Fill: Min" The minimum amount of slots to fill A random value will be chosen between the above two values. "Auto Ban False Positive Distance" Default: 5 - Stashes found in this distance will be considered false positives. (Useful where multiple stashes are unearthed in one spot.) "Auto Ban False Positive - Include in count?" If the above false positives should be counted in the triggers. This affects auto bans as well. "Ignore Admins" If admins should be ignored when unearthing stashes not belonging to them. "Auto Ban Delay In Min" Delays auto bans by X minutes. "Delete found server stash after X seconds (0 = Disables)" Will automatically delete server stashes that were found, after X seconds.$9.99 -

Version 1.1.2
257 downloads
This is a simple tool to help you catch ESPer's. Unlike methods in the past requiring cheaters to fall for traps, this one will be watching without having to give them any bait! This plugin is still in "beta" and is offered at a reduced price for a limited time. Since 1.0.12, the embed now includes a radar image to show violations (red line): The above embed shows the culprit, with quick links to Steam, Battlemetrics, and ServerArmour. Along with each violation that caused the trigger, the consist of the violation id, the time it happened, and steamid and distance from the culprit. It is highly recommended to use along with ADR, although not required, but can easily eliminate false positives by having the option to watch the player from the demo. Commands /testesp - this will send a test embed to your configured webhook. Permissions espdetection.ignore Ignores specific players who are granted this permission. Config options explanation General Max distance to check The maximum to check if the player is ESPing. (default 150 outside, 100 inside) Check Interval How often should a player be checked (default 1 second) Ignore Players Idle Ignore players that haven't changed position (default 15 seconds) Only track players with active weapons Track players that have equipped weapons only. (default true) Auto Demo Record (only applicable if Auto Demo Record is installed) Record Length How long should the triggered recording be (default 10 minutes) Discord Webhook Where the logs & ADR recordings should be sent to Webhook Title Title of the embed Violations Probability % Which % probability should trigger a Discord embed and ADR recording. (default 40%) Samples How many samples should be kept in memory, to calculate the probability (default 20) Weapon Specific Configs These change characteristics of weapons Weapon Shortname Max distance to check This overrides the general setting for the weapon only Track if set to false, a player will be ignored if he has this weapon equipped. (default true) Attachment Specific Configs These change characteristics of attachments Attachment Shortname Add distance while aiming As the name suggests, it adds extra distance to the previous configs, useful for when aiming with an 8x or 16x Track if set to false, a player will be ignored if he has this weapon equipped. (default true) NOTE: if you are using ADR, a good command to use when reviewing the demos are `debug.culling 1`$25.00 -

Version 0.1.1
13 downloads
The plugin is designed for collecting and sending information to the database for subsequent display on the website through direct MySQL queries or API(post query). The plugin has the capability to work with the database through an API. This is implemented in case the database and game server are located on different hosts, and the database host restricts queries beyond localhost. Currently, the data is only sent to the database, but in the future, the capability to retrieve information from the database will be added. P.S. This plugin works only with the MySQL type. Collecting: Server information; Player information; Team information; Clan information(in future); Report(F7) information. Sending data through: direct MySQL; via API(POST query) to MySQL. { "Time in seconds for updating data in the database(0 to disable)": 300.0, "Enable Database Logs": true, "Data loading method(true for API, false for MySQL)": true, "API Service URL(Specify the address of your website)": "https://site.com/ExtendedStats/index.php", "API Service Key(Generate your own API key)": "GlBRw-elM6v-gjko3-cxSDk-Tsy7B", "MySQL - Host": "localhost", "MySQL - Port": 3306, "MySQL - Database name": "db_playrust", "MySQL - Username": "root", "MySQL - Password": "root", "Current Server ID": 0, "List of deployed names": {}, "Version": { "Major": 0, "Minor": 1, "Patch": 0 } }$14.99 -

Version 1.3.2
77 downloads
Advanced graphical plugin manager to easily manage plugins. Features Load/Unload plugins Unloaded plugins are unloaded permanently (not reloading after restarts) Convenient error lookup for not loading plugins Intuitive and super responsive UI (no lag for small UI changes and no mouse reset) Search/Filter function Back button for quick navigation No plugin dependencies Commands (Chat and Console) gplugins - Opens/Closes the UI gplugins.load <pluginname> - Loads the given plugin and removes it from the disabled plugins list gplugins.unload <pluginname> - Unloads the given plugin and adds it to the disabled plugins list Permissions Administrators don't need any permission Players can be given access with the permission 'gplugins.use' (for UI and commands) Hints Clicking the exclamation mark icon will show the error message at the bottom The disablement of plugins after restarts will not work if gplugins is not loaded Loading a plugin in any way other then gplugins when it is disabled in gplugins will not work Configuration uicolor.primary (rgba) - The primary accent color uicolor.disabled (rgba) - The disabled buttons color$11.99 -

Version 0.1.2
9 downloads
What is it? A nice user-friendly warning system Usage When someone is breaking rules or trolling others just warn them, you can also set a command that will be executed through server console that will get executed upon reachin certain amount of warnings (can be configured in cfg) Permissions warnmenu.use -- Gives you full control to operate the WarnMenu Chat command /warn -- Opens the WarnMenu /warn "Name/SteamID" "Warning reason" -- Warns the specified player with your reason /warnmenu.save -- Force the plugin to write the data from memory to the data file Data files All Data files can be located at: \oxide\data\WarnMenu\warns There you can find all the warnings for each player Features WarnMenu features * Online Tab - In this tab you can easily select any online player that you want to warn * Search All Tab - Once you open this tab, there you can see all the players and browse in them * Find player Tab - When you click on the button you will be able to search for a specific player using his Name or SteamID Warn Types * CUI-Based - A CUI warning message will pop-up on player's screen when he gets warned * Chat-Based - A chat message will pop-up in player's chat when he gets warned Executable commands * On reaching certain amount of warnings, you can make the server execute a command on a player(configurable in cfg) F.e.: "1": "say {0} just reached 1 warning! SHAME on him!", "3": "kick {0} Kicked for reaching 3 warnings", Localization { "Syntax": "Commands:\n/report (Opens Reporter GUI)", "CUI Online": "Online Players", "CUI Player": "Player: {0}", "CUI SteamID": "SteamID64: {0}", "CUI Warnings": "Warnings: <color=#8f1919>{0}</color>", "CUI NewWarn": "New\nWarning", "CUI WarningID": "Warning ID: {0}", "CUI WarnedBy": "Warned by: {0}", "CUI Date": "Date: {0}", "CUI Reason": "Reason: \n{0}", "CUI Remove": "Remove", "CUI Close": "close", "CUI Warn": "Warn", "CUI WarnAddMenuPlayer": "Warning for\n<color=#d43939>{0}</color>", "CUI SearchAll": "Search All", "CUI SelectPlayer": "Select a player to warn:", "CUI Find": "Find player", "CUI Find2": "Select", "CUI Find3": "Find player:\n(steamID/Name)", "CUI CantFindPlayer": "Couldn't find the player\nsearching argument: {0}", "CUI FoundPlayer": "Found player: {0}", "CUI Refresh": "Refresh", "CantFindPlayer": "Couldn't find that player", "WarnMessage": "Warned: <color=#8f1919>{0}</color>\nReason: {1}", "JoinMessage": "{0} has joined with <color=#8f1919>{1}</color> warnings", "WarnReceive": "You have received a <color=#8f1919>warning</color>\nBy: {0}\nReason: {1}", "CUI WarnReceive": "<color=#8f1919>Warning</color>\nreceived", "CUI WarnReceive2": "By: {0}\nReason: {1}" } Configuration { "Announce on join with warnings?(to admins)": true, "Execute commands on reaching count:": { "Enabled?": true, "(Format: 5 : mute {0}) where 5 is number of warns and {0} is player's id": { "5": "say {0} just reached 5 warnings! SHAME on him!", "7": "example.command {0}", "10": "example.command {0}" } }, "Warn message settings": { "Text-based warn message?": true, "CUI-based warn message?": true, "How long until CUI message gets removed (secs)": 5.0 } }$9.99 -
Version 2.0.0
871 downloads
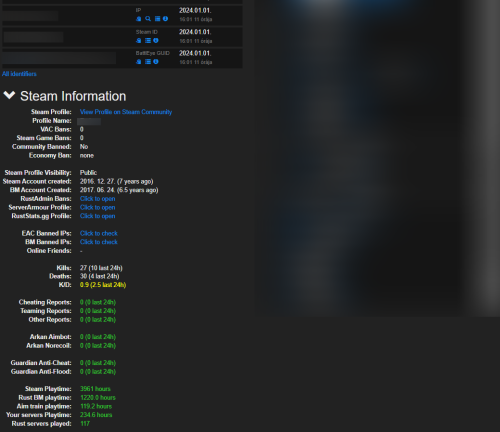
Features: This chrome extension collects and shows additional information about players in battlemetrics rcon. Such as: Steam profile, Battlemetrics profile creation date EAC Ban, EAC Banned Friends, EAC Banned Identifiers (IPs), BM Banned Identifiers (IPs) (if player with an ip can be found on your ban list) Temp ban counts Kills, Deaths, KD Reports, Arkan and Guardian violations (optional) Rust servers played, playtime on: rust servers, aim train servers, your servers Global rust stats (optional) Steam profile picture and the current server's name in battlemetrics Link for ServerArmour, RustAdmin and RustBanned profile (optional) What you receive: By purchasing the product you receive: The source code of this extension Lifetime access Detailed setup guide Support If you need help or If you have any issues or suggestions you can contact me by joining my discord server: https://discord.gg/efVKDG6z6F or by adding me on discord: Farkas#6006$9.90- 11 comments
- 5 reviews
-
- 9
-
-
-
- #battlemetrics
- #bm
- (and 15 more)
-
Version 1.0.4
106 downloads
Features Be a template for your own plugin Store the last connection time of a player Store the number of death of a player Permissions myplugin.admin - Allows player to use the /myplugin command Commands myplugin help - Displays some help Configuration Default configuration: { "Default Chat Avatar (steamId)": 0 } Localization Default English localization: { "PluginMissing": "The plugin \"SomePlugin\" was not found. Check on UMod: https://umod.org/plugins/someplugin", "NoPermission": "You are not allowed to run this command!", "HelpMessage": "Some useful help!", "UnknownCommand": "Unknown command!" } Hooks DateTime? GetLastConnectionTime(ulong userId) // Return the last connection time (DateTime?) of a player or null if the player is not found int? GetNumberOfDeath(ulong userId) // Return the number (int?) of death of a player or null if the player is not found Credits YourName - AuthorFree -

Version 1.1.3
38 downloads
The "MyVehicle" plugin introduces a vehicle management system that allows admins/players to spawn, de-spawn, and manage a variety of vehicles directly within the game. Leveraging a user-friendly interface, players can access this feature through permissions-based commands, ensuring control and customization. The plugin supports configuration for different vehicles, including aspects like spawn distance, fuel amount, and unique permissions for each vehicle type. It also incorporates a cool-down system to regulate vehicle spawning frequency, enhancing game-play balance. Additionally, the plugin tracks and saves data on player-spawned vehicles, ensuring a seamless gaming experience even across server restarts. The plugin is light weighted with a clean and user friendly graphical user interface (GUI). Command: /myvehicle - Opens graphical user interface (GUI) of the vehicle spawner. Permissions: MyVehicle Use - Permission to use/open the GUI. MyVehicle Despawn - If you already have a vehicle spawned and you want to spawn another one of the same type, the previous will disappear. You can set which vehicles are affected by this permission in the config. MyVehicle cooldown.1m - 1 minute cool-down between spawning vehicles of the same type. MyVehicle cooldown.1h - 1 hour cool-down between spawning vehicles of the same type. MyVehicle cooldown.1d - 1 day cool-down between spawning vehicles of the same type. MyVehicle cooldown.30d - 30 day cool-down between spawning vehicles of the same type. myvehicle minicopter - Allow spawning Mini(s). myvehicle attackhelicopter - Allow spawning Attack Heli(s). myvehicle scrapheli - Allow spawning Scrap Heli(s). myvehicle baloon - Allow spawning Balloon(s). myvehicle rhib - Allow spawning RHIB(s). myvehicle horse - Allow spawning Horse(s). myvehicle tugboat - Allow spawning Tugboat(s). myvehicle subsolo - Allow spawning Solo Sub(s). myvehicle subduo - Allow spawning Duo Sub(s). myvehicle rowboat - Allow spawning Rowboat(s). myvehicle kayak - Allow spawning Kayak(s). myvehicle snowmobile - Allow spawning Snowmobile(s) and Tomaha(s). myvehicle sedan - Allow spawning Sedan(s) and Sedan Rail(s). myvehicle car2modules - Allow spawning Car(s) with 2 modules. myvehicle car3modules - Allow spawning Car(s) with 3 modules. myvehicle car4modules - Allow spawning Car(s) with 4 modules. myvehicle train - Allow spawning Locomotive(s), Workcart(s) and Caboose(s). myvehicle magnetcrane - Allow spawning Magnetcrane(s). myvehicle chinook - Allow spawning Chinook(s). myvehicle patrolheli - Allow calling in the Patrol Heli. myvehicle bradley - Allow spawning Bradley(s). The "Despawn Last" button will remove all spawned vehicles one by one from last to first! !!! Magnetcrane, Patrol Heli and Bradley should only be used by admins !!! Magnetcrane will explode if spawned outside Junkyard! Patrol Heli will spawn in a random location outside the map and will fly in. Bradley will open fire at player as soon as it is spawned! These vehicles ( if spawned with MyVehicle ) can also be despawned with the "Despawn Last" button from the GUI. Cars can be customized through the config. The identifiers for the modules can be obtained on https://rustlabs.com or https://www.corrosionhour.com Cockpit With Engine Vehicle Module: 170758448 Cockpit Vehicle Module: -1501451746 Armored Cockpit Vehicle Module: 1874610722 Engine Vehicle Module: 1559779253 Camper Vehicle Module: -1040518150 Fuel Tank Vehicle Module: 1186655046 Storage Vehicle Module: 268565518 Flatbed Vehicle Module: -1880231361 Large Flatbed Vehicle Module: -1693832478 Taxi Vehicle Module: -626174997 Rear Seats Vehicle Module: 1376065505 Passenger Vehicle Module: 895374329 Armored Passenger Vehicle Module: -1615281216 The tier of the engine parts can be set in the config. Use 1 for low, 2 for medium or 3 for high quality parts. I want to thank M&B-Studios for assisting me in putting this plugin together. I appreciate his help and recommend his work and services! Config: { "Vehicles": { "assets/content/vehicles/minicopter/minicopter.entity.prefab": { "Despawn": true, "DisplayName": "Mini Copter", "Permission": "myvehicle.minicopter", "ButtonColor": "vlgreen", "FuelAmount": 100, "SpawnDistance": 5.0, "ModuleIDs": null, "EnginePartsTier": 0 }, "assets/content/vehicles/attackhelicopter/attackhelicopter.entity.prefab": { "Despawn": true, "DisplayName": "Attack Heli", "Permission": "myvehicle.attackhelicopter", "ButtonColor": "vlgreen", "FuelAmount": 100, "SpawnDistance": 5.0, "ModuleIDs": null, "EnginePartsTier": 0 }, "assets/content/vehicles/scrap heli carrier/scraptransporthelicopter.prefab": { "Despawn": true, "DisplayName": "Scrap Heli", "Permission": "myvehicle.scrapheli", "ButtonColor": "vlgreen", "FuelAmount": 100, "SpawnDistance": 5.0, "ModuleIDs": null, "EnginePartsTier": 0 }, "assets/rust.ai/nextai/testridablehorse.prefab": { "Despawn": false, "DisplayName": "Horse", "Permission": "myvehicle.horse", "ButtonColor": "vlgreen", "FuelAmount": 0, "SpawnDistance": 5.0, "ModuleIDs": null, "EnginePartsTier": 0 }, "assets/content/vehicles/boats/rhib/rhib.prefab": { "Despawn": true, "DisplayName": "RHIB", "Permission": "myvehicle.rhib", "ButtonColor": "vlgreen", "FuelAmount": 100, "SpawnDistance": 5.0, "ModuleIDs": null, "EnginePartsTier": 0 }, "assets/content/vehicles/boats/tugboat/tugboat.prefab": { "Despawn": true, "DisplayName": "Tugboat", "Permission": "myvehicle.tugboat", "ButtonColor": "vlgreen", "FuelAmount": 100, "SpawnDistance": 15.0, "ModuleIDs": null, "EnginePartsTier": 0 }, "assets/content/vehicles/submarine/submarinesolo.entity.prefab": { "Despawn": true, "DisplayName": "Solo Sub", "Permission": "myvehicle.subsolo", "ButtonColor": "vlgreen", "FuelAmount": 100, "SpawnDistance": 5.0, "ModuleIDs": null, "EnginePartsTier": 0 }, "assets/content/vehicles/submarine/submarineduo.entity.prefab": { "Despawn": true, "DisplayName": "Duo Sub", "Permission": "myvehicle.subduo", "ButtonColor": "vlgreen", "FuelAmount": 100, "SpawnDistance": 5.0, "ModuleIDs": null, "EnginePartsTier": 0 }, "assets/content/vehicles/boats/rowboat/rowboat.prefab": { "Despawn": true, "DisplayName": "Rowboat", "Permission": "myvehicle.rowboat", "ButtonColor": "vlgreen", "FuelAmount": 100, "SpawnDistance": 5.0, "ModuleIDs": null, "EnginePartsTier": 0 }, "assets/content/vehicles/boats/kayak/kayak.prefab": { "Despawn": true, "DisplayName": "Kayak", "Permission": "myvehicle.kayak", "ButtonColor": "vlgreen", "FuelAmount": 0, "SpawnDistance": 5.0, "ModuleIDs": null, "EnginePartsTier": 0 }, "assets/content/vehicles/snowmobiles/snowmobile.prefab": { "Despawn": true, "DisplayName": "Snowmobile", "Permission": "myvehicle.snowmobile", "ButtonColor": "vlgreen", "FuelAmount": 100, "SpawnDistance": 5.0, "ModuleIDs": null, "EnginePartsTier": 0 }, "assets/content/vehicles/snowmobiles/tomahasnowmobile.prefab": { "Despawn": true, "DisplayName": "Tomaha", "Permission": "myvehicle.snowmobile", "ButtonColor": "vlgreen", "FuelAmount": 100, "SpawnDistance": 5.0, "ModuleIDs": null, "EnginePartsTier": 0 }, "assets/prefabs/deployable/hot air balloon/hotairballoon.prefab": { "Despawn": true, "DisplayName": "Balloon", "Permission": "myvehicle.baloon", "ButtonColor": "vlgreen", "FuelAmount": 100, "SpawnDistance": 5.0, "ModuleIDs": null, "EnginePartsTier": 0 }, "assets/content/vehicles/sedan_a/sedantest.entity.prefab": { "Despawn": true, "DisplayName": "Sedan", "Permission": "myvehicle.sedan", "ButtonColor": "vlgreen", "FuelAmount": 0, "SpawnDistance": 5.0, "ModuleIDs": null, "EnginePartsTier": 0 }, "assets/content/vehicles/sedan_a/sedanrail.entity.prefab": { "Despawn": true, "DisplayName": "Sedan Rail", "Permission": "myvehicle.sedan", "ButtonColor": "vlgreen", "FuelAmount": 100, "SpawnDistance": 5.0, "ModuleIDs": null, "EnginePartsTier": 0 }, "assets/content/vehicles/modularcar/car_chassis_2module.entity.prefab": { "Despawn": true, "DisplayName": "Car 2", "Permission": "myvehicle.car2modules", "ButtonColor": "vlgreen", "FuelAmount": 100, "SpawnDistance": 5.0, "ModuleIDs": [ 170758448, 268565518 ], "EnginePartsTier": 1 }, "assets/content/vehicles/modularcar/car_chassis_3module.entity.prefab": { "Despawn": true, "DisplayName": "Car 3", "Permission": "myvehicle.car3modules", "ButtonColor": "vlgreen", "FuelAmount": 100, "SpawnDistance": 5.0, "ModuleIDs": [ 170758448, -1040518150 ], "EnginePartsTier": 2 }, "assets/content/vehicles/modularcar/car_chassis_4module.entity.prefab": { "Despawn": true, "DisplayName": "Car 4", "Permission": "myvehicle.car4modules", "ButtonColor": "vlgreen", "FuelAmount": 100, "SpawnDistance": 5.0, "ModuleIDs": [ 1559779253, 170758448, 268565518, 268565518 ], "EnginePartsTier": 3 }, "assets/content/vehicles/trains/locomotive/locomotive.entity.prefab": { "Despawn": true, "DisplayName": "Locomotive", "Permission": "myvehicle.train", "ButtonColor": "vlgreen", "FuelAmount": 100, "SpawnDistance": 15.0, "ModuleIDs": null, "EnginePartsTier": 0 }, "assets/content/vehicles/trains/workcart/workcart.entity.prefab": { "Despawn": true, "DisplayName": "Workcart", "Permission": "myvehicle.train", "ButtonColor": "vlgreen", "FuelAmount": 100, "SpawnDistance": 15.0, "ModuleIDs": null, "EnginePartsTier": 0 }, "assets/content/vehicles/trains/workcart/workcart_aboveground2.entity.prefab": { "Despawn": true, "DisplayName": "Workcart 2", "Permission": "myvehicle.train", "ButtonColor": "vlgreen", "FuelAmount": 100, "SpawnDistance": 15.0, "ModuleIDs": null, "EnginePartsTier": 0 }, "assets/content/vehicles/trains/workcart/workcart_aboveground.entity.prefab": { "Despawn": true, "DisplayName": "Workcart 3", "Permission": "myvehicle.train", "ButtonColor": "vlgreen", "FuelAmount": 100, "SpawnDistance": 15.0, "ModuleIDs": null, "EnginePartsTier": 0 }, "assets/content/vehicles/trains/caboose/traincaboose.entity.prefab": { "Despawn": true, "DisplayName": "Caboose", "Permission": "myvehicle.train", "ButtonColor": "vlgreen", "FuelAmount": 0, "SpawnDistance": 15.0, "ModuleIDs": null, "EnginePartsTier": 0 }, "assets/content/vehicles/crane_magnet/magnetcrane.entity.prefab": { "Despawn": true, "DisplayName": "Magnetcrane", "Permission": "myvehicle.magnetcrane", "ButtonColor": "vlgreen", "FuelAmount": 100, "SpawnDistance": 5.0, "ModuleIDs": null, "EnginePartsTier": 0 }, "assets/prefabs/npc/ch47/ch47.entity.prefab": { "Despawn": true, "DisplayName": "Chinook", "Permission": "myvehicle.chinook", "ButtonColor": "vlblue", "FuelAmount": 0, "SpawnDistance": 15.0, "ModuleIDs": null, "EnginePartsTier": 0 }, "assets/prefabs/npc/patrol helicopter/patrolhelicopter.prefab": { "Despawn": true, "DisplayName": "Patrol Heli", "Permission": "myvehicle.patrolheli", "ButtonColor": "vlred", "FuelAmount": 0, "SpawnDistance": 15.0, "ModuleIDs": null, "EnginePartsTier": 0 }, "assets/prefabs/npc/m2bradley/bradleyapc.prefab": { "Despawn": true, "DisplayName": "Bradley", "Permission": "myvehicle.bradley", "ButtonColor": "vlred", "FuelAmount": 0, "SpawnDistance": 15.0, "ModuleIDs": null, "EnginePartsTier": 0 } }, "DefaultButtonColor": "vlgreen", "DespawnButtonColor": "vlorange", "CloseButtonColor": "vlred", "UIChatCommand": "myvehicle", "SpawnEffect": "assets/prefabs/missions/portal/proceduraldungeon/effects/appear.prefab", "DespawnEffect": "assets/prefabs/missions/portal/proceduraldungeon/effects/disappear.prefab", "ChatPrefix": "<color=green>[MyVehicle]</color>", "UITitle": "Vehicle Spawner" } Language EN: { "NoPermission": "You don't have permission to use this command.", "NoVehicles": "You have no spawned vehicles to despawn.", "Despawned": "Your last spawned vehicle has been despawned.", "CantFind": "Could not find your last spawned vehicle.", "NotFound": "Vehicle not found.", "Spawn": "Spawning {0}.", "WaterVehicle": "This vehicle can only be spawned in water.", "Usage": "Usage: /spawn <vehicleType>", "NoType": "Vehicle type '{0}' not found.", "NoPermissionToSpawn": "You don't have permission to spawn '{0}'.", "Cooldown": "You need to wait for {0} seconds to spawn your vehicle.", "AlreadyDestroyed": "Previously destroyed vehicle has been removed from your data." }$4.99- 13 comments
- 2 reviews
-
- 3
-
-
- #myvehicle
- #vehicle
- (and 4 more)
-

Version 1.3.0
71 downloads
Advanced graphical permissions manager to easily manage player and group permissions. Features Assign/Revoke player permissions Assign/Revoke player groups Assign/Revoke group permissions Create, rename, clear and delete groups Convenient overview of given permissions per plugin Hierarchical wildcard permissions Back button for quick navigation Search/Filter function Intuitive UI No plugin dependencies Commands (Chat and Console) gperms - Opens/Closes the UI Permissions Administrators don't need any permission Players can be given access with the provided permissions: 'gperms.use' - Open the GUI (readonly, but needed for any action in GPerms) 'gperms.players' - Grant/Revoke player permissions 'gperms.playergroups' - Assign/Remove players from groups 'gperms.groups' - Grant/Revoke group permissions 'gperms.modifygroups' - Create, edit and delete groups Hints Directly granted permissions will be checked as green Inherited group permissions will be checked as blue To revoke all permissions of a plugin click the 1 level wildcard permission twice (grant all -> revoke all) Configuration perms.hidepluginprefix (true/false) - if set to false, the full permission names will be shown plugins.showwithoutpermissions (true/false) - If set to false, plugins without permissions wil be hidden players.showoriginalnames (true/false) - If set to true, the original playername will also be shown uicolor.primary (rgba) - The primary accent color uicolor.disabled (rgba) - The disabled buttons color uicolor.activetab (rgba) - The active tab color$11.99- 2 comments
- 3 reviews
-
- 7
-

-
-
-
- #permissions
- #admin
- (and 13 more)
-
.thumb.png.6bd94973fb47c8cccfc0c3cc4d626f8a.png)
Version 0.5.4
15 downloads
ABOUT UPGRADER : Allows players to upgrade various item categories, including weapons, armor, and tools, each with unique upgrade options. Extensive configuration options for server admins to adjust : What items will be upgradable (Only items what you chose to put in config will have upgrades ) What upgrades will item have ( you dont need to put all upgrades on item ,only what upgrades you chose for a item) Upgrade costs (you can put what ever custom/default item,and amount for cost) Levels (you can choose how much upgrade will have levels) Values of upgrades (you can choose value of each upgrade ,example "damage" Lv1 2% damage, Lv2 5%) There is Inspection button where you can see stats of upgraded item in inventory. UPGRADES : Each category have their own upgrades : Wepons : Armor : Tools : Damage, Defense, GatherYield, MagazineSize, Durability, Durability, Durability, RadiationProtection, Deforestation, LifeSteal, ResurrectionChance InstantMine, CritChance, Smelting InstaReload Each category have RenameName of a item . HOW TO USE : Simple put Upgrader.cs to your plugin folder . Add/remove items from config . Chose upgrades for items (levels,cost,values) . In Game : Add permissions. When player put item in Repair Bench he will see Upgrade button . UI will open with upgrades. Inspection button is below belt inventory ,when player click on it it will open inspection mode ,so he will be able to see item upgrades in small UI. INFOPANEL : Admins can change text in config file for a ServerName and Info . For more explanations to player or what ever text you need . DIAMONDS : 4 custom items (diamonds) .They can be used for cost of upgrades. You can chose stacksize ,where they will spawn(lootboxes),chance to spawn in boxes ,and amount. You can change theirs DisplayName , SkinId . You can use them or not ,its a option . PERMISSION SYSTEM/COMMANDS : upgrader.button - allow to see button in repair bench for upgrade upgrader.weapon - allow weapon upgrades upgrader.armor - allow armor upgrades upgrader.tool - allow tool upgrades upgrader.bypasscost - free upgrades upgrader.diamondgive - allow to use command /givediamond "name" "amount" CONFIG EXAMPLE : Upgrader.json DATA : There is data file what stores upgrades of items,only for info. You can delete data items with command in console (this will just remove items from data file,items will still have upgrades! ) Console Command - wipeupgradedata$15.00 -
![More information about "TC Item Block [Tool Cupboard]"](https://codefling.com/uploads/monthly_2023_11/tcitemblock.thumb.png.4070e5ce67915446cbc99ce0b878a064.png)
Version 1.0.0
13 downloads
TC Item Block prevents players from storing certain items inside the Tool Cupboard.$99.99 -

Version 1.3.0
201 downloads
Simple Radar is an advanced, performance-optimized plugin for Rust, designed to enhance server administration and gameplay experience. This plugin provides real-time information about players, stashes, and tool cupboards, making it an essential tool for admins. Key Features Enhanced Player Tracking: Displays players' names, distances, and health status, along with a unique team color indicator for easy differentiation. Stash and Tool Cupboard ESP: Identify the locations and distances of stashes and tool cupboards effortlessly. Voice Transmission Indicator: A new feature that signals when players are transmitting voice, adding a strategic layer to gameplay. Player Vision Arrows: Visual arrows show the direction in which players are looking, offering tactical insights for admins. Configurable Settings: Tailor the radar with adjustable refresh rates, visibility distance, and more through an easy-to-use configuration file. Efficient and Performant: Built with performance in mind, ensuring smooth gameplay even on busy servers. Commands /radar: Activates radar for players with a default 1-second refresh rate and 250m range. /radar <refresh rate>: Sets a custom refresh rate for player radar. /radar <refresh rate> <distance>: Customizes both refresh rate and distance for the radar. /radar <refresh rate> <distance> <players/stashes/all>: Extends radar functionality to include players, stashes, or all entities. Config { "Make players with moderatorid not see players with ownerid": true, "Enable player vision arrows": false, "Add a voice indicator for players who are tansmitting voice": true, "Show voice indicator for x seconds after speaking": 2.0, "Minimum allowed radar refresh rate": 1.0, "Maximum radar distance": 250.0 } Why Choose Simple Radar? Simple Radar was built with performance in mind! No Permissions Required: Simple and straightforward to use without complex permission setups. Support Join our Discord for support and community interaction: https://discord.gg/YnbYaugRMh VIDEO SHOWCASE (OLD):$9.99 -
.thumb.png.83d8696d18d1b53f057800209b62c5fb.png)
Version 1.0.3
48 downloads
About Limit FPS LimitFPS is a plugin with almost no performance impact meant for administration (and maybe trolling). It has 2 very powerful features You can limit the FPS of other players You can see the FPS and RAM usage of other players Demo Requirement LimitFPS uses Harmony so you need to disable the Oxide sandbox [see how to do it] Permissions There are 2 oxide permissions that LimitFPS uses limitfps.limit.use - Allows the use of /limitfps command limitfps.fps.use - Allows the use of /playerfps command Add the permissions with the console command: oxide.grant <group|user> <name|id> <permission> Commands There are 2 commands that LimitFPS has /limitfps <playername or steamid> <target fps> - Limit the FPS of a player, set target fps to 0 to remove the limit /playerfps <playername or steamid> - See the player's FPS and RAM usage All of these 2 commands can be used from the server console (or RCON) and they work exactly the same just without the forward slash. If you are an admin in the server you can use them from the Rust console too. Config FPS Query interval - How often will the plugin check the player's FPS in order to adjust it PD Controller P value - How fast to jump to the target FPS, if this is too high it can overshoot PD Controller D value - How much to respect the error difference from the FPS measurement, if higher it can overshoot the target FPS Non linear control - If set to true it will be more responsive (reaching target FPS faster) at low FPS values (30 and below) FPS Limit dampening - If set to true it will stop adjusting the player's FPS once it reaches the target, if this is false, when the player presses ESCAPE or ALT+TAB's and then come back their FPS will be way lower/higher than the target FPS Limit dampening range - When the FPS is within this value to the target FPS it will stop adjusting the FPS I recommend leaving everything to default except maybe FPS Query interval, if you want to get the user's FPS faster/slower. For developers LimitFPS exposes everything you need to control other player's performance with hooks & API calls I strongly recommend if you want to use the API or the Hooks see the demo plugin that uses all of them, its extremely detailed and everything is within 1 file, you can find it here: Hooks: object OnFPSQueryStart(BasePlayer command_initiatior, BasePlayer target, int request_id) { return null; // allow the query } void OnFPSQueryTimeout(BasePlayer command_initiatior, BasePlayer target, int request_id) { } void OnFPSQueryFinished(BasePlayer command_initiatior, BasePlayer target, ClientPerformanceReport report) { } object OnLimitFPSStart(BasePlayer command_initiatior, BasePlayer target, float targetFps) { return null; // allow the limitting } object OnLimitFPSTick(BasePlayer command_initiatior, BasePlayer target, float targetFps, ClientPerformanceReport report) { return null; // allow the tick } API: Interface.Oxide.CallHook("API_PlayerFPSCommand", ulong_steamid); Interface.Oxide.CallHook("API_LimitFPSCommand", ulong_steamid, float_targetFps); Contact If you have any suggestions, want to report a bug or need help, you can contact me on Discord: turner#7777$12.69 -
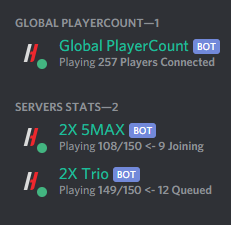
Version 2022.03
217 downloads
Discord Pop Bot+ is the ultimate population display tool for Rust, CS;GO, ARK, and Minecraft servers. Multiple bots, one instance Launch your fleet of bots together with a single command Performance Critical Minimal server impact* by leveraging existing connections Flexible Structure With totals, conditions, and more, make something that truly feels like your own bot *When using information provided by BattleMetrics. Data Collection Methods BattleMetrics Public API - Find your server's public entry, and show your population hassle free BattleMetrics RCON API - Directly query your gameserver using a BattleMetrics RCON Subscription and game-specific command. Steam A2S Queries - Use a commonly-implemented Steam protocol to fetch population data from just an IP + Port. Supported by games such as CS;GO, ARK:SE, CS1.6, TF2 Global Bot - Combine the output of other bots into a single total, with all the same display features. Documentation / Support / More Information Help & Information are available in the support server - https://discord.gg/ZWAr5UuGnx You may need Administrator privileges on the system to setup & run this script depending on your server's setup. Discord Pop Bot+ is not affiliated with or endorsed by BattleMetrics. Legacy Market Purchases If you previously purchased this application through another site, please get in touch with support to have a purchase generated on CodeFling free of charge. CodeFling is the only place you can purchase Discord Pop Bot+.$5.00 -

Version 1.0.2
75 downloads
Suggestions Bot - Made by Murder#0845 Bot Features ➤ No commands to send suggestions - Simply send a message in the suggestions channel and the bot will do the rest! ➤ Context menu - Commands which can be run through right clicking and hovering over apps, then selecting the preferred command (See lower down for tutorial) ➤ Slash commands - Slash commands to approve and deny suggestions! ➤ Approval reason - Able to add a reason of why a suggestion is being approved! ➤ Deny reason - Able to add a reason of why a suggestion is being denied! ➤ Modals for approve and deny - Modal (form) will pop up when approving or denying a suggestion, just a nice QOL thing when adding a reason. ➤ [OPTIONAL] New suggestion logging - Logging to show when a new suggestion has been sent! Note: This is optional, see below on how to disable. ➤ [OPTIONAL] Suggestion approved logging - Logging to show when a suggestion has been approved! Note: This is optional, see below on how to disable. ➤ [OPTIONAL] Suggestion denied logging - Logging to show when a suggestion has been denied sent! Note: This is optional, see below on how to disable. ➤ Create threads through context menu - Create threads through the context menu command: Generate Thread. This command works on any message but is especially useful when creating a thread about a specific suggestion to discuss it with fellow players/server members, another thing that is just for QOL. Context menu How to use: To use context menu commands, simply right click on the message which will bring up a menu. From there navigate to the "Apps" option and hover over it. Once completed, the following buttons should come up: Approve Suggestion Deny Suggestion Generate Thread From there, select the command you want to run and simply click it! Slash Commands To use slash commands simply type / and a list of all slash commands in your guild/server will appear. From there, select the command you want to run! If you have lots of slash commands in your server, you can click the profile picture of your bot on the left side and all slash commands for your bot will appear! Config { "Bot Token": "", "Staff Role ID": "", "Suggestions Channel": "", "Log Channel ID": "", "Guild ID": "" } Most of these are self explanatory. If your having trouble finding your bots token, go to Discord Applications and click "New Application", then input the name you want the bot to be. Then head over to Bot tab on the left side menu. In the bot tab, click "Reset Token" and follow the instructions. Once reset, copy the token which will appear and paste it into the "Bot Token" field in the config.json file! If your having trouble copying ID's to put in the config, visit this link which will show you how! Setup This bot is super simple to set up, simply follow these steps: ➤ Upload all files in "Murder Ticket System.zip" to your bots hosting. ➤ Fill out details in the config,json file. ➤ Turn the bot on (If your using online hosting, press "Start") ➤ Enjoy the bot For the simplicity of setting it up on your end, ensure you have all Privileged Gateway Intents which can be toggled at the Discord Developers Portal Simply click the toggle on the right-hand side for the bottom three options on that page, i would recommend un-toggling the first option, "Public Bot" as this will allow anyone to add your bot to there server, and this bot is a server specific bot. Support Notice If you need support I more than welcome you to reach out to me on discord. My discord is: Murder#0845 and I am open for any questions or inquiries! Alternatively, join my development discord where you can find support for all my files along with like minded server owners and people! Thank you for reading this description and I hope that you enjoy! Note: I will always be constantly updating and developing this bot, if you find any bugs or have any feature requests, feel free to DM me on discord (Murder#0845). - Murder$2.99- 6 comments
- 3 reviews
-
- 2
-

-
-
- #discord
- #discordbot
- (and 4 more)
-

Version 2.0.1
85 downloads
Version 2 update! Bot Features ➤ Fully customisable / Extensive customisation options for all ticket subjects ➤ Custom Bot Status ➤ Logging ➤ Transcript generations ➤ Custom Panel Message (title, description, footer, image, thumbnail) ➤ Dropdown menu ➤ Claiming System for staff members Config Preview { "Bot Token": "", "Bot Prefix": "", "MongoDB Connection URL": "mongodb+srv://therestofyourconnectionURL", "MongoDB Database Name": "Tickets", "Guild ID": 0, "Embed Colour": "#ffffff", "Channels": { "Log ChannelID": 0, "Transcript ChannelID": 0 }, "Roles": { "Default Staff Roles": [0] }, "Ticket Panel Embed": { "Title": "Tickets", "Description": "Welcome to the Ticket System. To get started please select a ticket category using the dropdown menu below and staff will be with you as soon as possible.", "Color": "#ffffff", "Footer": "", "Footer Image": "", "Thumbnail URL": "", "Image URL": "" }, "Ticket Categories": [ { "Category Name": "Other", "Category Description": "Un-categorised issues", "Emoji": "<:questionmark_2753:1125122637648117831>", "Category ID": 0, "Accessible Roles": [], "Embed": { "Title": "Other", "Description": "", "Color": "#ffffff", "Footer": "", "Footer Image": "", "Thumbnail": "" }, "Questions": [ { "Question": "Whats your SteamID?", "Type (short/long)": "short", "Placeholder": "SteamID", "Min Characters": 6, "Max Characters": 20, "Required": true }, { "Question": "Whats your question?", "Type (short/long)": "long", "Placeholder": "Issue/Question", "Min Characters": 10, "Max Characters": 100, "Required": true } ] } ] } Setup Fill out the config.json file and make sure your hosting is configured to run python, make sure your bot has all Discord intents enabled on the developers panel (Which is how you can create your Discord Bot). Use the OAuth Section and the URL Generator to create a link to invite your discord bot to your server, make sure that it has applications.commands and bot enabled, and that the permissions are set to Administrator. Take note that when configuring the emojis, you must use Discord Custom emojis which you can add by uploading them to your discord server. To get the <name:ID:> format needed for the bot you can type a backslash (\) followed directly by the emoji. Support Notice If you need support I more than welcome you to reach out to me on discord: murderdev. Thank you for reading this description and I hope that you enjoy! Note: I will always be constantly updating and developing this bot, if you find any bugs or have any feature requests.$14.99 -
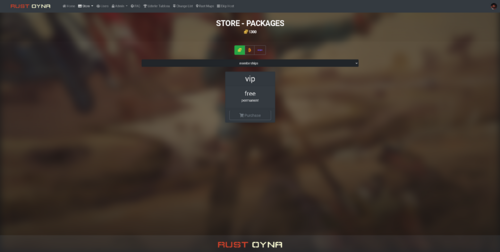
Version 1.0.0
25 downloads
This addon adds category support to your Ember Shop. Ember does not support categories on shop currently and with this module, you can add categories for each package of each server you have. This is not a module, this is an addon. Installation is different than module installation. It is easy. You will be able to add categories to your Ember store packages. You can select store package category from: site.com/admin/packages/packagenumber Under site.com.com/admin/servers you can add categories to your servers. Multiple server supported. Dependencies Ember (Required) https://www.gmodstore.com/market/view/5620 Installation 1: Upload the BetterStore.zip to your host. 2: Unzip the Better Store zip file to Ember Installation Folder (Main Directory). 3: Go to this link (edit it with your website name before using it!!!) = https://site.com/api/betterStoreSetup Installation is done. If you need further help, just send me a message.$25.00