Search the Community
Showing results for tags 'automatic'.
Found 13 results
-

Version 0.3.8
61 downloads
Hey! Here is RustHandler, a script allowing the automatic management of Rust. (Linux Debian based distros : Debian, Ubuntu Desktop & Server (64 bit)) Introducing the NEW RUSTHANDLER CLIENT/SERVER! No, you're not in the wrong place, this is all about hosting a RustDedicated Linux server, and managing it with a simple, pleasant Winform panel, making server management a breeze with just a few clicks. Installation : On the server side: -Put RustHandler.sh in your user's root directory (/home/YourUser/*here), where it must remain for RustHandler to function properly. -Do : chmod +x RustHandler.sh sudo ./RustHandler.sh -install if you're running Debian : chmod +x RustHandler.sh su root ./RustHandler.sh -install And that's it! That's all there is to it! PC side : Now run RustHandler Client.exe on your PC, log in with your normal user (not root). Log in, apply your settings in "Server Settings", save, wipe, update, launch! THAT'S IT. Optional: Install the Rust typography in the archive so that it's correctly interpreted in your software. Don't forget to take a look at the "Rust server running" checkbox, to see if your server is running. In any case, you can't run it twice, or wipe/update while the server is running. The features listed below are obviously still valid, and others will be optimized/added in the future. LEGACY METHODE v0.2.0 : With RustHandler, you can: -Wipe your server in one command, the script will ask you for the seed of the next map, the date of the next wipe, will enter the dates of the wipe you have just done and the one to come in the server description. It will also display the date of the wipe you just did automatically in the title. Are you tired of panicking every time you wipe? -You can change the description and server parameters before wipe in RustHandler.sh, line 33 to 42, just don't touch the variables ({$Variables}), they change the dates automatically. RustHandler.sh therefore, during your next wipe will only ask you for the seed of the desired map and boom! Server wiped! Server will be updated automatically (+Oxide) just after. -NEW: Functionality for full wipe, or wipe while keeping your BP! Just toggle fullwipe or savebp. -NEW: CPU Affinity : If you wish to allocate certain cores, cores range, line 21 : For example "0-3" for your first 4 cores. affinite_cpus=$"0-3" -NEW: Custom Path : Lines 25 and 28, you can now choose custom paths for your server installation, and for the RustHandler folder. Read the description in the script carefully. ServerPath=$"/home/seb/Games/Rust" RustHandlerPath=$"/home/seb/Games/Rust" -You can change, before launching the "wipe" command, the convars (launch commands), and therefore, change the parameters of your server before the next wipe! For example, if in a week, you want your server to go from 4 to 5 players, modify the appropriate line in RustHandler (notepad++, VSCode). Just edit RustHandler.sh before launching. Line 55 to 98 to edit your convars. During your next wipe, the server.cfg will modify itself. You can also prepare the server description of your next wipe beforehand, very useful! server.maxplayers 200 server.hostname "[FR] RUSTinPEACE ! - [DEV] - Wipe '$LastWipe'" server.worldsize 4500 server.globalchat 1 server.secure 1 decay.scale 1 maxteamsize 4 server.saveinterval 600 you have about 40 of the most useful convars. You can add/remove as many as you want. -Disable some plugins at startup, once your wipe is done. And even automatically delete some Data.json files, before restarting the server. Like for example, deleting data from Kits, to start clean during your Wipe. And you can leave these settings in place, the deactivation of plugin and deletion of Data files will only be done when you enter the command "wipe". # Deletes monthly data files. Remove sharp symboles and edit as required : # Will delete ImageLibrary folder with useless cache : rm -rf $HOME/server/oxide/data/ImageLibrary # a Sharp symbole will disable this rules : #rm -rf $HOME/server/oxide/data/Jail #rm -rf $HOME/server/oxide/data/SpawnsDatabase # Will delete useless data files from old wipe : rm $HOME/server/oxide/data/Kits_Data.json rm $HOME/server/oxide/data/Godmode.json rm $HOME/server/oxide/data/SpawnsDatabase/prison2021.json # Deactivates plugins that need to be modified on the new version, or on the new map procgen. Go to Oxide/Plugins to remove the .off from the "Plugin.cs.off" plugin will reactivate it, once you've made your adjustments. mv $HOME/server/oxide/plugins/ZoneManager.cs $HOME/server/oxide/plugins/ZoneManager.cs.off mv $HOME/server/oxide/plugins/MarkerManager.cs $HOME/server/oxide/plugins/MarkerManager.cs.off #mv $HOME/server/oxide/plugins/ZoneManager.cs $HOME/server/oxide/plugins/ZoneManager.cs.off &> /dev/null #mv $HOME/server/oxide/plugins/BotSpawn.cs $HOME/server/oxide/plugins/BotSpawn.cs.off &> /dev/null (Put a "#" Before a line disable deletion, or deactivation.) -Make automated backups of your Rust+Oxide server. Just edit line 104 to 121. You can also configure automatic sending of your backups to FTP/SFTP. For example : # Enable or disable automatic backups, only run when the Rust server is running. enableBackup=true # Enable or disable sending backups by FTP/SFTP. enableRemoteBackup=true # Choose the frequency of automatic backups, in hours. cooldownInHours=6 # Delete backups older than: (in days). deleteOldBakInDays=15 # IP address of your FTP/SFTP server. IP=102.109.223.031 # User of your FTP/SFTP server. user=rustuser # Your FTP/SFTP server password. password=myhoneybirthday # Target directory of your backups on your FTP/SFTP server. pathToSend=/home/BakRust # FTP mod, if you want autobackup to send backups to another machine on Linux, no package allows scripting the sending, so you have to use scp. # If you want to send your saves via scp, just put scp instead of ftp, just below. PS= OVH and other FTP backups are simple FTP, not SFTP. ftpMod=ftp If for example, only local backups interest you, you also have a function above to auto delete backups that are older than 15 days. Local backups will automatically be stored in: /home/YourUser/RustHandler/backup You can change the backup settings at any time, the script will take them in real time, including if the Rust server is running. Simply, if you set previously a save cycle of 6 hours, the parameters will change in 6 hours. -If RustHandler is launched as a root user, it blocks the launch of the server and gives you a warning message (start a server as root is a security breach), and on top of that offers you to install the script's dependencies. It also installs the plugin dependencies: "SignArtist.cs". You will just have to restart your dedicated server afterwards, because Libgdiplus needs it (SignArtist dependency). -RustHandler automatically restarts your server, if for example you use the “TimedExecute.cs” plugin, if you program the command, every day at noon “restart 300”, the server will restart automatically, and if you activate the “Auto_Update” mod, it will update each time it restarts! -RustHandler logs all restarts of your Rust server, whether accidental or not. If for example your server becomes unstable, and you suspect it to restart randomly, consult: /home/YourUser/RustHandler/restarter.log You will have a detailed list of reboots your machine has done. Server restart on 2022-04-07 19:59:05 Server restart on 2022-04-08 12:00:58 Server restart on 2022-04-09 12:01:25 Server restart on 2022-04-10 12:00:54 Server restart on 2022-04-11 12:01:18 Server restart on 2022-04-12 12:00:55 -RustHandler also has a “protection”, which prevents launching a Rust server several times (otherwise data corruption), so in case of error, do not panic, check your running processes, you will see that RustHandler has kick process the old. BUT, RustHandler, will only do this for Rust processes launched ON THIS user, so you can have several Rust servers, on the same dedicated machine, which are completely independent of each other. Magic! RustHandler automatically creates logs (raw logs) of your server, including EVERYTHING, so also the start of the server, which does not normally appear on an RCON protocol. Each time your server restarts, RustHandler creates a new log file. Installation/Use : -Edit the script as required, as explained above (line 21 to 152). -Just drop the script at the root of your User, for example: /home/seb/RustHandler.sh -make RustHandler.sh executable : chmod +x RustHandler.sh -start RustHandler.sh : ./RustHandler.sh RustHandler will create a "server" folder where all your server files will be present: /home/YOURUSER/server As well as a RustHandler folder, where the backups, logs and others will be present I recommend that if you need to modify him afterwards, you do so via the "right-click > EDIT" function on Filezilla, which allows you to modify text files without having to systematically Download > modify > re-upload files. Just remember to make him executable again if necessary. For Linux beginners : Remember NEVER to use root/sudo to modify server files/folders. If you modify files with root/sudo, your normal user will no longer be able to modify them! Upcoming updates: -Unfortunately, I haven't had time to translate everything yet, but it will happen very soon! (Baguette !) Added : English version since 0.0.3 -A Wipe mod (without BP)/ FullWipe : Done : in 0.0.4 version -A presentation in video -A clicable interface throught ssh instead of word commands -Scheduled Wipe -A command or clickable menu to easily import a backup. In case you have a corrupt save. -Your suggestions? Tell me about ! Apologies for the bad english !$25.00 -

Version 1.0.0
132 downloads
Sentry Tech The Israeli military deployed this Sentry Tech system, dubbed as the Roeh-Yoreh (Sees-Fires) by the IDF along the Gaza border fence with pillboxes placed at intervals of some hundreds of meters. The 4-million USD (3.35 million Euro) system was completed in late spring of 2008. The weapon system mounts a .50BMG automated M2 Browning machine gun and a SPIKE guided missile in each pillbox[3] covered by an opaque protective shield. The weapon is operated by one soldier and fed information from cameras, long range electro-optical sensors, ground sensors, crewed aircraft, and overhead drones, as well as radar. Connected via fiber optics to a remote operator station and a command-and-control center, each machine gun-mounted station serves as a type of robotic sniper, capable of enforcing a nearly 1,500-meter-deep area of denial. The gun is based on the Samson Remote Controlled Weapon Station. The weapon is capable of acquiring targets and maintaining a firing solution independently, but still requires human input to fire or release ordnance. A prefab for the battlefield or role play server. The Sentry Tech comes in 2 different versions. Check out the Humvee's, they go well with it! Please note: Download the prefab files and place them in RustEdit/CustomPrefabs directory of RustEdit. The prefabs can be accessed in the custom section of prefab browser. To use sinlge letters, the prefab has to be broken by selecting it (once placed) and using the "break prefab" function. Please note: Download the prefab files and place them in your C:\RustEdit\CustomPrefabs directory Questions and suggestions: Help is needed? Do you have a question or suggestion? Join my Discord to get in touch: https://discord.gg/FyNEXv6bxWFree -

Version 1.1.9
92 downloads
AgileZones will create and remove ZoneManager zones around Player Bases as well as moving points of interest like CargoShip, Supply Drops, Bradley, Tugboats, and Heli-Crash sites. Great care has been taken to ensure the plugin does not impact server performance and that Zones are consistent even after server-crashes. It's your choice to use TruePVE (default) or NextGenPVE to tailor what happens inside and outside of the zones. Add the ZoneManagerAutoZones plugin to generate ZoneManager zones around monuments and you've got a server-enforced hybrid PVP/PVE world. Add the ZoneDomes plugin for optional visible domes. Demo You should be able to find a demo server by searching modded servers for "AgileZones". Be sure to "Show Empty" servers. Default Configuration { "Enable TruePVE": true, "Enable NextGenPVE": false, "Enable ZoneDomes": true, "Enable ZoneDomes For TCs": false, "Enable ZoneDomes For SupplyDrops": true, "Enable ZoneDomes For Cargo": true, "Enable ZoneDomes For HeliCrash": true, "Enable ZoneDomes For BradleyAPC": true, "Enable ZoneDomes For Tugboats": false, "Visible Domes for Moving Zones Darkness (Default 1)": 1, "Delay creating a zone after placing a TC in seconds": 600.0, "Delay removing a zone after a TC is destroyed": 900.0, "TC Zone Radius in meters - set zero to disable": 50, "TC RuleSet": "exclude", "TC Zone Flags": null, "CargoShip Zone Radius in meters - set zero to disable": 125, "Cargo RuleSet": "exclude", "Cargo Zone Flags": null, "SupplyDrop Zone Radius in meters - set zero to disable": 50, "SupplyDrop RuleSet": "exclude", "Supply Drop Zone Flags": null, "Apc Zone Radius in meters - set zero to disable": 50, "Apc RuleSet": "exclude", "Apc Zone Flags": null, "HeliCrash Zone Radius in meters - set zero to disable": 50, "Heli RuleSet": "exclude", "Heli Zone Flags": null, "Tugboats Zone Radius in meters - set zero to disable": 50, "Tugboats RuleSet": "exclude", "Tugboats Zone Flags": null, "Entering Zone Message": "WARNING: You are now entering a PVP Zone", "Leaving Zone Message": "Leaving a PVP Zone" } I recommend changing ZoneDomes Darkness to 1 (down from 5 by default) as well. Installation: Just Drop the .cs file into the oxide/plugins directory/folder. AgileZones can be installed on existing servers as easily as a fresh wipe, at any time. Existing Bases, SupplyDrops, CargoShips, Bradley, even Heli Crashsites will be handled and have zones created, no restart required. A config file will be generated in oxide/config where you can modify the default configuration. There is a caveat regarding config: Zones for bases (that have already been built) will not be reinitialized to account for your config changes. New TCs placed after the change will reflect your change. This means that if you drop the plugin onto a server for the first time, it will be loaded, create the default configuration .json file, and build zones for all of the existing bases using those default settings. If you wanted a different zone radius, or to enable the ZoneDome visualization (which is disabled by default so that player bases are less visible), you would need to have the configuration file in-place first. For now, if you plan to install AgileZones onto an existing wipe and you don't want to use the default configuration, Copy the above config, and make an 'AgileZones.json' file in oxide/config, make sure it's there before you install the plugin itself. Alternatively you can delete the zone_data.json, zonedomes_data.json, and restart the server, or reload the zone-related plugins, and everything will be rebuilt using your new parameters. Future: This started as a 2 hour proof of concept for player-added PVP zones around TCs and ended up featuring-creeping it's way into weeks of work. There are still some things I'd like to add, but I wanted to get it out there, I hope this is a huge improvement for hybrid PVP servers. TODO: For now, you must modify the oxide/config/AgileZones.json file and reload the plugin. RCON Command: oxide.reload AgileZones ZoneManager doesn't handle overlapping zones very well; you'll receive a notification for each zone you leave which might be confusing when you are still inside a PVP zone. I'd like to improve on this and some other issues with ZoneManager. I didn't realize the ZoneManager license allowed for branching; I wouldn't have jumped through some of the hoops had I known.$15.00 -

Version 1.0.5
38 downloads
RUST AUTO WIPER Rust auto wiper is an advanced but simple-to-set-up Discord bot that makes your server wipes 100% automated! Features: 100% automates the server wipe process. Start map votes for the next wipe automatically. Manage wipes of as many servers as you need. Dynamically update server details on the wipe. (ex: server title, description) Deletes a selection of files and folders on the wipe. (ex: plugin data files) Sends wipe announcements. Updates server on the wipe. Set up wipe reminders. Information: This advanced server wipe system covers 100% of the wipe cycles on all your servers. The real power of this tool is that it's running separately from the server, this makes managing server files much easier when the server is offline. with this tool, you don't need batch files or other crap to get your server(s) wiped. This tool also uses cron intervals to determine the exact wipe dates and times. *Note: This tool must be run on a Windows VPS/Server* Configuration: (This example shows 1 server, but you can set up as many servers as you want) module.exports = { token: '', // Your Discord bot token rustMapsApiKey: '', // the rustmaps.io api key guildId: '984577959648174121', // the id of the discord server you want to use the bot in logChannelId: '1102195648683585616', // the id of the channel where the bot should log all actions dbdAccountId: '', // your dbd account id (get this by typing /license display in the support server) debugMode: true, // if true, the bot will log all actions to the console servers: [ // in this list your can add as many servers as you need { server_identifier: 'server1', // the unique identifier of the server. (used for internal purposes) server_name: 'Test Server', // the name of the server server_ip: '', // the ip of the server server_port: 28015, // the port of the server server_queryPort: 28017, // the query port of the server server_rconPort: 28016, // the rcon port of the server server_rconPassword: '', // the rcon password of the server server_modded: true, // if the server is modded or not (if plugins are used) wipe_Interval: '0 20 19 1/1 * ? *', // the interval of the wipe. (generate interval at http://www.cronmaker.com/) wipe_bpWipe: false, // if the wipe is a bp wipe or not files_serverRootPath: 'C:\\Users\\user\\Desktop\\rsmtesting', // the path to the main server folder. (where your start.bat is located) files_savesFolderPath: 'C:\\Users\\user\\Desktop\\rsmtesting\\server\\rsm', // the path to the saves folder. (where your map file is located) files_serverCfgPath: 'C:\\Users\\user\\Desktop\\rsmtesting\\server\\rsm\\cfg\\server.cfg', // the path to the server.cfg file files_startFilePath: 'C:\\Users\\user\\Desktop\\rsmtesting\\start.bat', // the path to the start.bat file files_oxideFolderPath: 'C:\\Users\\user\\Desktop\\rsmtesting\\oxide', // the path to the oxide folder files_excludeSafeFiles: ['logs', 'cfg', 'Log.EAC.txt'], // save files that should not be deleted on wipe. (always exclude cfg) files_deletables: [ // file paths that should be deleted on wipe. (use absolute paths) 'C:\\Users\\user\\Desktop\\rsmtesting\\oxide\\data\\Shop.json', 'C:\\Users\\user\\Desktop\\rsmtesting\\oxide\\data\\Referrals.json', 'C:\\Users\\user\\Desktop\\rsmtesting\\oxide\\data\\StaticLootables_data.json', 'C:\\Users\\user\\Desktop\\rsmtesting\\oxide\\data\\VanishPlayers.json', 'C:\\Users\\user\\Desktop\\rsmtesting\\oxide\\data\\Kits', ], vote_autoStart: true, // if the vote should start automatically vote_channelId: '1098325670687416331', // the id of the channel where the vote should be posted vote_StartAt: '0 0 19 1/1 * ? *', // the interval when the vote should start. (generate interval at http://www.cronmaker.com/) vote_endAt: '0 10 19 1/1 * ? *', // the interval when the vote should end. (generate interval at http://www.cronmaker.com/) vote_maps: ['1000_1', '1000_50000', '1000_1000'], // the maps that should be voted for. (always format the map name like this: 'mapSize_mapSeed') vote_mapCount: 3, // the amount of maps that should be voted for. the maps from the list will be randomly selected vote_multiple: true, // if players can vote for multiple maps update_dynamicTitle: true, // if the title should be updated dynamically update_serverTitle: 'Test Server wiped on {wipeDate} test1', // the title of the server. placeholders: {wipeDate} update_dynamicDescription: true, // if the description should be updated dynamically update_serverDescription: 'Test Server wiped on {wipeDate} test1', // the description of the server. placeholders: {wipeDate} // embed placeholders: {serverName} {mapSeed} {mapSize} {mapImage} {mapUrl} {wipeDate} {nextWipeDate} {nextBpWipeDate} {nextVoteDate} announcement_autoAnnounce: true, // if the announcement should be posted automatically after a wipe announcement_channelId: '1098325694930497607', // the id of the channel where the announcement should be posted announcement_content: '@ ping roles', // the content of the announcement. (can be used to ping roles) announcement_embedTitle: '{serverName} just wiped!', // the title of the embed announcement_embedDescription: '**Join Server:**\nSteam: steam://connect/{serverIp}:{serverPort}\nF1: `client.connect {serverIp}:{serverPort}`\n\n**Planned:**\nNext wipe: {nextWipeDate}\nNext BP wipe: {nextBpWipeDate}\nNext vote: {nextVoteDate}\n\n**Map:** [rustmaps.com]({mapUrl})', // the description of the embed announcement_embedColor: '#038CB5', // the color of the embed. (must be a hex color) announcement_embedImage: '{mapImage}', // the image of the embed announcement_embedFooterText: 'Server just wiped!', // the footer text of the embed announcement_embedFooterIcon: '', // the footer icon of the embed announcement_embedThumbnail: '', // the thumbnail of the embed announcement_embedAuthorName: '', // the author name of the embed announcement_embedAuthorIcon: '', // the author icon of the embed announcement_embedUrl: '', // the url of the embed reminder_autoRemind: true, // if the reminder should be posted automatically before a wipe reminder_Interval: '0 15 19 1/1 * ? *', // the interval when the reminder should be posted. (generate interval at http://www.cronmaker.com/) reminder_channelId: '1098325694930497607', // the id of the channel where the reminder should be posted reminder_content: '@ ping roles', // the content of the reminder. (can be used to ping roles) reminder_embedTitle: '{serverName} is about to wipe!', // the title of the embed reminder_embedDescription: 'Make sure to vote for the next map!', // the description of the embed reminder_embedColor: '#038CB5', // the color of the embed. (must be a hex color) reminder_embedImage: '', // the image of the embed reminder_embedFooterText: 'Server is about to wipe!', // the footer text of the embed reminder_embedFooterIcon: '', // the footer icon of the embed reminder_embedThumbnail: '', // the thumbnail of the embed reminder_embedAuthorName: '', // the author name of the embed reminder_embedAuthorIcon: '', // the author icon of the embed reminder_embedUrl: '', // the url of the embed }, ], }; Support: You can get support at my Discord server by clicking HERE!$30.00 -

Version 2.2.2
423 downloads
permission for use UI - setupfurnaces.use Commands: /fsetup - open UI /fadd - you can add new furnace /fremove - you can remove added furnace FEATURES: Reoganize button in UI Work without fuel Output multiplier Melting speed { "Auto reload [If you change the config and save the file the plugin will reload itself]": true, "Oven setup for players": { "setupfurnaces.default": { "furnace": { "Quick smelt multiplier": 1, "Output multiplier": 1, "Reorganize items": false, "Cook without fuel": true }, "furnace.large": { "Quick smelt multiplier": 1, "Output multiplier": 1, "Reorganize items": true, "Cook without fuel": true }, "electricfurnace.deployed": { "Quick smelt multiplier": 2, "Output multiplier": 5, "Reorganize items": true, "Cook without fuel": true }, "refinery_small_deployed": { "Quick smelt multiplier": 1, "Output multiplier": 1, "Reorganize items": true, "Cook without fuel": true }, "campfire": { "Quick smelt multiplier": 1, "Output multiplier": 1, "Reorganize items": true, "Cook without fuel": true }, "bbq.deployed": { "Quick smelt multiplier": 1, "Output multiplier": 1, "Reorganize items": true, "Cook without fuel": true } }, "setupfurnaces.vip": { "furnace": { "Quick smelt multiplier": 1, "Output multiplier": 1, "Reorganize items": true, "Cook without fuel": true }, "furnace.large": { "Quick smelt multiplier": 1, "Output multiplier": 1, "Reorganize items": true, "Cook without fuel": true }, "electricfurnace.deployed": { "Quick smelt multiplier": 1, "Output multiplier": 1, "Reorganize items": true, "Cook without fuel": true }, "refinery_small_deployed": { "Quick smelt multiplier": 1, "Output multiplier": 1, "Reorganize items": true, "Cook without fuel": true }, "campfire": { "Quick smelt multiplier": 1, "Output multiplier": 1, "Reorganize items": true, "Cook without fuel": true }, "bbq.deployed": { "Quick smelt multiplier": 1, "Output multiplier": 1, "Reorganize items": true, "Cook without fuel": true } } } }$14.99 -

Version 2023.10.12.0810
166 downloads
SAVE 13% WHEN BUYING THE BUNDLE NOW SUPPORTING PROCGEN AND CUSTOM URL BASED MAPS ! This plugin will allow you to setup automatic server wipes without requiring external scripts. This plugin is very useful for any server owner but I'm positive that it will be really useful for those hosting providers running panel based game instances where you do not have full access to customize the server or the provided wipe tool is very limited. You should have a look at the suggested plugins for Oxidation's Scheduler which is a perfect fit for a fully in-game automatic wipe process. The plugin also allows you to set a list of seeds that will be used at server wipe to select the new map seed. You can define as many different wipe types as you'd like on the config file like so: This example is for a "forced" wipe. In order to execute the wipe type on the rcon console "wipe forced". "Forced": { "Restart": 120, "Message": "A server wipe is being executed, we'll be back shortly", "Game": { "Blueprints": true, "Logs": true, "Map": true, "PlayerDeaths": true, "PlayerIdentities": true, "PlayerStates": true, "PlayerTokens": true }, "Plugins": { "Convalence": true, "Data": true, "Groups": true, "Language": true, "Logs": true, "Users": true }, "Files": [ "my/custom/path/this_file_will_be_deleted.json" ], "Blacklist": [ "carbon/data/this_file_will_never_be_deleted.json" ] } This example is for a "weekly" wipe. In order to execute the wipe type on the rcon console "wipe weekly". "Weekly": { "Restart": 120, "Message": "A server wipe is being executed, we'll be back shortly", "Game": { "Blueprints": false, "Logs": true, "Map": true, "PlayerDeaths": true, "PlayerIdentities": false, "PlayerStates": true, "PlayerTokens": false }, "Plugins": { "Convalence": false, "Data": true, "Groups": false, "Language": true, "Logs": true, "Users": false }, "Files": [ "my/custom/path/this_file_will_be_deleted.json" ], "Blacklist": [ "carbon/data/this_file_will_never_be_deleted.json" ] } This is a standalone Harmony patch, Oxide installation is optional. Copy the Oxidation.Wiper.X.dll file into your HarmonyMods folder and restart your server. At the first server start after installing the patch a new configuration file Oxidation.Wiper.json will be created at the HarmonyMods folder. What is Harmony ? Harmony is a library for patching .NET code during runtime, it directly manipulates game code (CIL) without any additional abstraction layer such as Oxide. The direct patching of the game's byte code allows more performant modding as developers no longer need to rely on third party code, events or hooks to build custom functionality.$4.99 -
Version 1.0.1
29 downloads
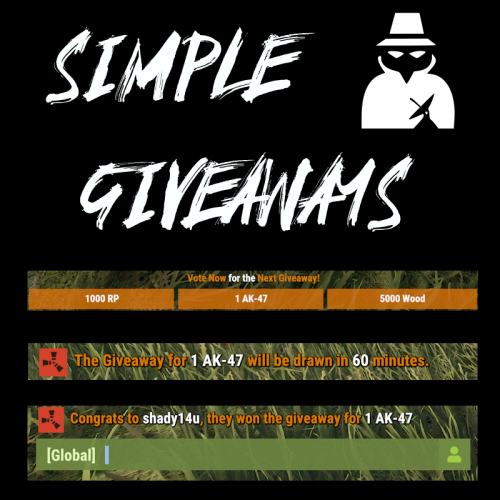
Create "Automated" Giveaways, Items based on Votes At the Set Interval, a small popup voting UI is shown to players. Based on the players online, this list is randomized, and players vote on the giveaway they want. After the end of the voting, UIs close and the item with the most votes is locked in. At the end of the giveaway, a random online user is given the prize. Awards can be any command you can run in game, (give items, give kits, Give RP, Give Economics, etc.) Permissions "simplegiveaways.use" : Ability to start or restart a giveaway. Chat Commands /giveaway.start : Stops the current giveaway and starts a new one. Config https://pastebin.com/fU2EZBtv Discord: Shady14u https://discord.gg/8mvvBrrw4Y$10.50 -

Version 1.6.1
102 downloads
About XP System The XP System is an XP and Rewards based system. Designed to keep players to keep playing on your servers. I have been running this for years now on my servers and I must say it is great, Players are always on trying to get the MOST XP and to remain as the leader at the top of the list and hold the title. Has a Prestige Leveling system with it as well, so every time a player hits 100 XP, they Prestige and it is announced to the server. At that point the rewards are all now double (see screenshots below) if they Prestige a 3rd time then the rewards are triple and so forth, The most I have personally seen a player Prestige was 6 times in a single wipe. Of course the longer the wipe schedule the more a player can earn. Time for leveling is set to every 30 Minutes of being on the server, with a warning to all players a few mins before that XP is about to be issued and to make sure they have space in their inventory. The leader with the most XP, Also is broadcasted to everyone. The leader also receives each time they hold the title A random amount of Scrap as well as a Large Present. NOTE: The leader will hold the title whether they are online or offline until another players takes over. IF the leader is offline they will NOT gain more XP, they must be online in order to gain XP. However they will still gain the Leader Rewards if they are still the leader and offline until another players gains the most XP beating them. Features Custom Rewards Items (this doesn't need to be changed as it is setup pretty damn good as is and none of my players have ever complained about any of the items. (recommend just leaving it as is) Auto Wipe Feature when server is wipe to reset all player data Apply extra rewards for Top XP Leader Set min and max amounts of Scrap Rewards for TOP XP Leader Level Settings are already setup (highly recommended that you DO NOT CHANGE ANY OF IT) Top XP Leader broadcasted to all players when rewards are issued so everyone knows who the XP Leader is. Encourages players to stay on your servers so they can try and be the leader - I cannot tell you how funny it is to see players jump on right after a wipe just so they can try and be the TOP XP Leader and try and hold the Title Features and API XP Call that I personally use for DeathNotes (requires a customized DeathNotes to work, if you want a copy please DM me with your Order Number and I will send you a custom DeathNotes Plugin to use with the XP System, What this does is when a Death Note is used, it shows the Current XP Level for the Player who killed anything and also the Victims XP Level if they are a victim) Unique Prestige Leveling System just like in COD every 100 XP earned the Player hits a Prestige Level and the rewards are doubled or tripled and so forth see screenshots Broadcasts to Console when the XP Rewards are issued as well as who is the current Top XP Holder and if they are online or offline Option to disable giving of Gifts to Highest XP Holder if offline (enabled by default) Option to disable Admin Players from receiving XP and Gifts (enabled by default) NOTE: Pretty much this is a plug and play drop in plugin that instantly works with absolutely NO NEED to change anything in the config file. It has been tried and tested for over 4 years running on all my servers. OF course you can still change the settings it is HIGHLY RECOMMENDED TO LEAVE IT AS IS! Commands /xp - (public for all players) shows the current XP Level /xp list (public for all players) shows the current XP, Prestige Level and ZP Rewards List Console Commands xp.give - gives a player XP. Example: xp.give FastBurst 100 = FastBurst will receive 100 XP xp.reset - resets a players XP. Example: xp.reset FastBurst = FastBurst XP is not reset to 0 xp.resetall - manually resets the XP Data File Permissions permissions are only set if you set them as part of one of the rewards API Call private int GetXP(ulong player) { // returns the int value of the players XP Level } Configuration { "General Settings": { "Wipe data on new map": true, "Gametip announcement duration (seconds, 0 to disable)": 0.0, "Start level": 0, "Enable Scrap and Presents for Highest XP": true, "Minimum amount of Scrap to give for Highest XP if enabled": 25, "Maximum amount of Scrap to give for Highest XP if enabled": 125, "Enable giving of XP and Gifts to Admin players (default true)": true, "Enable giving of Scrap and Presents to Highest XP if offline (default true)": true }, "Time Settings": { "Experience for playtime": 1, "Time between give experience for playtime (seconds)": 1800, "Popup Announcement time before XP (seconds)": 1620 }, "Reward Item Settings": [ { "Level": 1, "Items": [ { "Command": "", "Shortname": "chicken.cooked", "Amount": 25, "Skin": 0, "Display name": "Cooked Chicken", "Blueprint": false, "Permission": "" } ] }, { "Level": 2, "Items": [ { "Command": "", "Shortname": "wood", "Amount": 2500, "Skin": 0, "Display name": "Wood", "Blueprint": false, "Permission": "" } ] }, { "Level": 3, "Items": [ { "Command": "", "Shortname": "xmas.present.medium", "Amount": 1, "Skin": 0, "Display name": "Medium Present", "Blueprint": false, "Permission": "" } ] }, { "Level": 4, "Items": [ { "Command": "", "Shortname": "stones", "Amount": 1000, "Skin": 0, "Display name": "Stones", "Blueprint": false, "Permission": "" } ] }, { "Level": 5, "Items": [ { "Command": "", "Shortname": "xmas.present.large", "Amount": 1, "Skin": 0, "Display name": "Large Present", "Blueprint": false, "Permission": "" } ] }, { "Level": 6, "Items": [ { "Command": "", "Shortname": "metal.fragments", "Amount": 250, "Skin": 0, "Display name": "Metal Fragments", "Blueprint": false, "Permission": "" } ] }, { "Level": 7, "Items": [ { "Command": "", "Shortname": "ammo.pistol", "Amount": 50, "Skin": 0, "Display name": "Pistol Ammo", "Blueprint": false, "Permission": "" } ] }, { "Level": 8, "Items": [ { "Command": "", "Shortname": "chainsaw", "Amount": 1, "Skin": 0, "Display name": "Chainsaw", "Blueprint": false, "Permission": "" } ] }, { "Level": 9, "Items": [ { "Command": "", "Shortname": "jackhammer", "Amount": 1, "Skin": 0, "Display name": "Jackhammer", "Blueprint": false, "Permission": "" } ] }, { "Level": 10, "Items": [ { "Command": "", "Shortname": "metal.refined", "Amount": 250, "Skin": 0, "Display name": "High Quality Metal", "Blueprint": false, "Permission": "" } ] }, { "Level": 20, "Items": [ { "Command": "", "Shortname": "metal.fragments", "Amount": 500, "Skin": 0, "Display name": "Metal Fragments", "Blueprint": false, "Permission": "" } ] }, { "Level": 30, "Items": [ { "Command": "", "Shortname": "scrap", "Amount": 500, "Skin": 0, "Display name": "Scrap", "Blueprint": false, "Permission": "" } ] }, { "Level": 40, "Items": [ { "Command": "", "Shortname": "hq.metal.ore", "Amount": 150, "Skin": 0, "Display name": "High Quality Metal Ore", "Blueprint": false, "Permission": "" } ] }, { "Level": 50, "Items": [ { "Command": "", "Shortname": "metal.ore", "Amount": 2000, "Skin": 0, "Display name": "Metal Ore", "Blueprint": false, "Permission": "" } ] }, { "Level": 60, "Items": [ { "Command": "", "Shortname": "ammo.rifle", "Amount": 250, "Skin": 0, "Display name": "5.56 Rifle Ammo", "Blueprint": false, "Permission": "" } ] }, { "Level": 70, "Items": [ { "Command": "", "Shortname": "sulfur.ore", "Amount": 2000, "Skin": 0, "Display name": "Sulfur Ore", "Blueprint": false, "Permission": "" } ] }, { "Level": 80, "Items": [ { "Command": "", "Shortname": "supply.signal", "Amount": 1, "Skin": 0, "Display name": "Supply Signal", "Blueprint": false, "Permission": "" } ] }, { "Level": 90, "Items": [ { "Command": "", "Shortname": "gunpowder", "Amount": 1000, "Skin": 0, "Display name": "Gun Powder", "Blueprint": false, "Permission": "" } ] }, { "Level": 100, "Items": [ { "Command": "", "Shortname": "lmg.m249", "Amount": 1, "Skin": 0, "Display name": "M249", "Blueprint": false, "Permission": "" } ] } ], "Levels Settings": [ { "Level": 1, "Experience to get level": 1.0 }, { "Level": 2, "Experience to get level": 1.0 }, { "Level": 3, "Experience to get level": 1.0 }, { "Level": 4, "Experience to get level": 1.0 }, { "Level": 5, "Experience to get level": 1.0 }, { "Level": 6, "Experience to get level": 1.0 }, { "Level": 7, "Experience to get level": 1.0 }, { "Level": 8, "Experience to get level": 1.0 }, { "Level": 9, "Experience to get level": 1.0 }, { "Level": 10, "Experience to get level": 1.0 }, { "Level": 11, "Experience to get level": 1.0 }, { "Level": 12, "Experience to get level": 1.0 }, { "Level": 13, "Experience to get level": 1.0 }, { "Level": 14, "Experience to get level": 1.0 }, { "Level": 15, "Experience to get level": 1.0 }, { "Level": 16, "Experience to get level": 1.0 }, { "Level": 17, "Experience to get level": 1.0 }, { "Level": 18, "Experience to get level": 1.0 }, { "Level": 19, "Experience to get level": 1.0 }, { "Level": 20, "Experience to get level": 1.0 }, { "Level": 21, "Experience to get level": 1.0 }, { "Level": 22, "Experience to get level": 1.0 }, { "Level": 23, "Experience to get level": 1.0 }, { "Level": 24, "Experience to get level": 1.0 }, { "Level": 25, "Experience to get level": 1.0 }, { "Level": 26, "Experience to get level": 1.0 }, { "Level": 27, "Experience to get level": 1.0 }, { "Level": 28, "Experience to get level": 1.0 }, { "Level": 29, "Experience to get level": 1.0 }, { "Level": 30, "Experience to get level": 1.0 }, { "Level": 31, "Experience to get level": 1.0 }, { "Level": 32, "Experience to get level": 1.0 }, { "Level": 33, "Experience to get level": 1.0 }, { "Level": 34, "Experience to get level": 1.0 }, { "Level": 35, "Experience to get level": 1.0 }, { "Level": 36, "Experience to get level": 1.0 }, { "Level": 37, "Experience to get level": 1.0 }, { "Level": 38, "Experience to get level": 1.0 }, { "Level": 39, "Experience to get level": 1.0 }, { "Level": 40, "Experience to get level": 1.0 }, { "Level": 41, "Experience to get level": 1.0 }, { "Level": 42, "Experience to get level": 1.0 }, { "Level": 43, "Experience to get level": 1.0 }, { "Level": 44, "Experience to get level": 1.0 }, { "Level": 45, "Experience to get level": 1.0 }, { "Level": 46, "Experience to get level": 1.0 }, { "Level": 47, "Experience to get level": 1.0 }, { "Level": 48, "Experience to get level": 1.0 }, { "Level": 49, "Experience to get level": 1.0 }, { "Level": 50, "Experience to get level": 1.0 }, { "Level": 51, "Experience to get level": 1.0 }, { "Level": 52, "Experience to get level": 1.0 }, { "Level": 53, "Experience to get level": 1.0 }, { "Level": 54, "Experience to get level": 1.0 }, { "Level": 55, "Experience to get level": 1.0 }, { "Level": 56, "Experience to get level": 1.0 }, { "Level": 57, "Experience to get level": 1.0 }, { "Level": 58, "Experience to get level": 1.0 }, { "Level": 59, "Experience to get level": 1.0 }, { "Level": 60, "Experience to get level": 1.0 }, { "Level": 61, "Experience to get level": 1.0 }, { "Level": 62, "Experience to get level": 1.0 }, { "Level": 63, "Experience to get level": 1.0 }, { "Level": 64, "Experience to get level": 1.0 }, { "Level": 65, "Experience to get level": 1.0 }, { "Level": 66, "Experience to get level": 1.0 }, { "Level": 67, "Experience to get level": 1.0 }, { "Level": 68, "Experience to get level": 1.0 }, { "Level": 69, "Experience to get level": 1.0 }, { "Level": 70, "Experience to get level": 1.0 }, { "Level": 71, "Experience to get level": 1.0 }, { "Level": 72, "Experience to get level": 1.0 }, { "Level": 73, "Experience to get level": 1.0 }, { "Level": 74, "Experience to get level": 1.0 }, { "Level": 75, "Experience to get level": 1.0 }, { "Level": 76, "Experience to get level": 1.0 }, { "Level": 77, "Experience to get level": 1.0 }, { "Level": 78, "Experience to get level": 1.0 }, { "Level": 79, "Experience to get level": 1.0 }, { "Level": 80, "Experience to get level": 1.0 }, { "Level": 81, "Experience to get level": 1.0 }, { "Level": 82, "Experience to get level": 1.0 }, { "Level": 83, "Experience to get level": 1.0 }, { "Level": 84, "Experience to get level": 1.0 }, { "Level": 85, "Experience to get level": 1.0 }, { "Level": 86, "Experience to get level": 1.0 }, { "Level": 87, "Experience to get level": 1.0 }, { "Level": 88, "Experience to get level": 1.0 }, { "Level": 89, "Experience to get level": 1.0 }, { "Level": 90, "Experience to get level": 1.0 }, { "Level": 91, "Experience to get level": 1.0 }, { "Level": 92, "Experience to get level": 1.0 }, { "Level": 93, "Experience to get level": 1.0 }, { "Level": 94, "Experience to get level": 1.0 }, { "Level": 95, "Experience to get level": 1.0 }, { "Level": 96, "Experience to get level": 1.0 }, { "Level": 97, "Experience to get level": 1.0 }, { "Level": 98, "Experience to get level": 1.0 }, { "Level": 99, "Experience to get level": 1.0 }, { "Level": 100, "Experience to get level": 1.0 } ], "Version": { "Major": 1, "Minor": 6, "Patch": 0 } } Localization { "XP Added Chat": "<color=green>You earned {0} XP</color>", "XP Added Gametip": "<color=white>You earned {0} XP</color>", "New Level": "<color=green>You now have {0} XP, for the reward list type /xp list.</color>", "Level1": "<color=green>You have {0} XP, Prestige {1}.</color>", "Level2": "<color=green>You level up 1 XP every 30 minutes.</color>", "Level3": "<color=green>For the XP reward list type /xp list.</color>", "New Prestige": "<size=16><color=orange>CONGRATULATIONS!</color> {0} has just reach Prestige Level {1}!</size>", "Highest XP": "{0} has the most XP in this server, {1}. {2}", "HighXP Items": "Receives {0} in Scrap and 1 Large Present!", "XPInfo": "<color=green><size=13>XP is gained by playing on the server, it rewards you with items, type /xp for more information.</size></color>", "Reward Received": "<color=green>You have been rewarded with {1} for your XP.</color>" }$25.00 -

Version 1.0.7
900 downloads
Nice and Simple.. Clears the fuel tank on Minicopter and Scrap Transport Heli and AttackHelicopter spawns at the Bandit Camp and replaces it with the amount set in the config. No need to change your stack size to counteract the new air wolf fuel give away. Load this, set the amount and be happy Configuration { "Amount of fuel to spawn with PlayerHelicopters": 100, "Amount of fuel to spawn with Scrap Helicopters": 100, "Amount of fuel to spawn with Attack Helicopters": 100 } No Perms No Commands Just Load, Set, Reload! If you have any questions or problems, join my discord https://discord.gg/D2zTWCEnrNFree- 7 comments
- 3 reviews
-
- 1
-

-
- #rust
- #helicopter
- (and 8 more)
-

Version 1.1.3
464 downloads
This is a dead simple light controller with little performance impact, no configuration required. All player deployed lights will get turned on at sunset and turned off at sunrise. Lights will require one unit of fuel to be powered but they will have no consumption. Currently supported entities: chineselantern.deployed jackolantern.angry jackolantern.happy lantern.deployed tunalight.deployedFree-
- 1
-
-
- #lighting
- #light control
- (and 5 more)
-

Version 1.0.1
341 downloads
This plugin will allow players to open and close doors and gates by honking their horn. If the door is locked, players must have authorization on the lock in order for the door to be opened. IE if the player does not have the code entered into a codelock, or did not place the keylock on the door they are attempting to open, it won't open. Commands togglehorn - toggles the ability for the horn to open doors. Permissions horndoors.use - required to use this plugin horndoors.off - this permission is assigned when the players disable horn doors access with the toggle horn commandFree -
.thumb.png.0cbb1686d57f37a63dd5cb315afe4e98.png)
Version 1.0.2
21 downloads
NO LONGER FOR SALE ! Need help with watching other players? Automatically? On demand? Hello, I present you Watchdog. What is Watchdog ? A plugin/mod for your server, whose whole purpose is to record players on demand An essential tool for server admins Why to use Watchdog ? > One of the main problem with Rust and any game in general is always those pesky cheaters > But catching cheaters requires constant watching and making sure that the person being reported is indeed cheating > Watchdog solves this problem! > You as an admin may never even join the server if you wanted, and yet, you still can find and ban the cheaters, almost entirely from Discord! Features of Watchdog 24/7 Demo recording Very customizable triggers for starting a recording & managing that recording Very customizable combatlog saving Notifications of triggers & events entirely in Discord Compression! Watchdog can compress the demo files and save on avarage 70% of your machine's disk space Memory usage control Disk usage control (with Hard Limit for when your VPS/VM is limited) How to use Watchdog ? > After a recording of a player is saved > Just get the .dem file and place it in your 'demos' folder which is located in Rust's game folder > Go in game and type in the console 'demo.browser' > Thats it, you can now watch the demo Section 1: Hardware Recommended server/VPS/VM hardware: - The more RAM, the more demos can be recorded simultaneously without triggering the memory control, also better performance when compressing demos. - At least 4 virtual cores are recommended. Rust's server is well known to not utilize multithreading technologies, Watchdog is heavily optimized for multithreading. - Disk space. I really mean it, A LOT is needed, the more the better! Watchdog is able to produce over 20gb/hour of data for 300 player server (even with compression turned on). The more disk space you have the more demos can be stored on your server. Of course Watchdog is optimized for limited systems as well, so it has a Hard Limit option which will limit the data production with demos. - Fairly powerful CPU. While this may not be needed for non-compressed demos, the compression of demos is pretty computationally intensive, as the algorithm used for compressing is aggressive (LZMA) All of the recommendations are based on the testing I've done on my machine, you need to do your own testing to see what you need. The recommended hardware is just that, recommendation. My recommendations might even be incorrect. Section 2: Software Because of the insane capabilities of Watchdog, it can generate a really big amounts of data. So for this reason Watchdog should be used with other custom software for ease of use. This is not required, but recommended. This includes: - A discord bot that can read the combatlog file format and the compressed demos. This can be found here: https://codefling.com/discord-bots/watchdog-discord-bot Section 3: Installation This is a Harmony mod, its not an oxide plugin. Watchdog works with full-vanilla servers and with Oxide servers! On Windows: - To install Watchdog you need to place the 'Watchdog.dll' file in your HarmonyMods folder, and either restart the server or type 'harmony.load Watchdog' which will dynamically load Watchdog while the server is running. On Linux: - To install Watchdog you first need to set your terminal emulator to 'xterm', this is done with the following linux command: 'export TERM=xterm'. IMPORTANT: If the terminal emulator is not xterm Watchdog WILL FAIL to load, this is because of a bug with Mono - After that place the 'Watchdog.dll' file in your HarmonyMods folder, and either restart the server or type 'harmony.load Watchdog' (NOTE: On linux this name is case-sensitive) which will dynamically load Watchdog while the server is running. After watchdog runs for the first time a folder with the name 'Watchdog' will be created in the root folder of the server. Inside this folder there will be 2 folders and 1 file named 'config.json', don't forget to change the default config to your taste, and if you want you can change the localization file with your custom messages More on this in sections 4 and 5 ... Section 4: Configuration Before we start with the configuration, remember that if you change the config file, in order to see the changes you need to either reload Watchdog with: 'harmony.load Watchdog' or restart the server. NOTE: There is a bug with the Harmony loader in Rust's Dedicated Server and sometimes (unpredictable) when you load Watchdog it will not be loaded fully and might have strange bugs, this is fixed with a server restart. If you are familiar with JSON every setting is a string. (even if its a number) If you are not familiar with JSON, just dont delete the quotes ("") at the most right & left of the setting and type only in between them, always! Everything is non case-sensitive, except webhook URLs in the Feedback settings. The configuration file is split up into sections for easier presentation, these sections are the following: - General - Main settings of Watchdog - Specific - Settings that are specific to what main setting was chosen - Optimization - Settings for optimization - Limit - Limiters for Memory and Disk usage - Privacy - Privacy related settings - Feedback - Watchdog feedback info, mostly discord information In general settings section: - recording_mode When and how to record players, you might want to record players 24/7 or only when they kill something, this is the setting you use for that This setting should be a number and can be one or combination of the follwing: 0 : Always - Players will be recorded 24/7 while they are in the server 1 : On Kill - Players will be recorded only when they have killed X amount of players/scientist. If this setting is selected, 'include_scientists' and 'kill_threshold' options from specific settings will be used 2 : On Report - Players will be recorded only when they have been reported X amount of times. If this setting is selected, 'report_threshold' setting from specific settings will be used 4 : On HitArea - Players will be recorded only when they have hit a player/scientist in X area of their body, X amount of times. If this setting is selected, 'include_scientists', 'hit_areas' and 'hit_count_threshold' options from specific settings will be used 8 : On Stash - Players will be recorded only when they have uncovered X amount of stashes. If this setting is selected, 'stashes_threshold' and 'remember_stash_owner' options from specific settings will be used You can use these triggers individually or combine them, if you want to combine them you just add the numbers together. For example if you want to record OnKill and OnReport you will add them up, 1 + 2 = 3, so you type 3 in the config. If you want to record on every trigger its all of them added up, which is 15 - recording_timout When to stop the recording after being triggered, this is applicable only when 'recording_mode' is not Always This setting should be a time, this is in the format <number>s<number>m<number>h, set to 0 to be infinite (until user disconnects) Examples: If you want to record someone for 30 minutes on recording trigger "recording_timout": "30m" If you want to record someone for 90 minutes on recording trigger "recording_timout": "1h30m" or "recording_timout": "90m" If you want to record someone for 2 hours, 30 minutes and 20 seconds on recording trigger "recording_timout": "2h30m20s" the order can also be different "recording_timout": "30m20s2h" If you want to record someone until they disconnect on recording trigger "recording_timout": "0" - combatlog_saving If you want to save the combatlog of players This setting can be one of the following: - never : This setting is off and will not save anything to disk - on_humanoid_combat - Saves combatlog of any combat to a player or scientist - on_player_combat - Saves combatlog of any combat to a player - on_humanoid_kill - Saves combatlog of killing a player or scientist - on_player_kill - Saves combatlog of killing a player - always - Saves every combatlog of every player to disk, this includes someone hitting a stone wall for example When any of the kill settings are set, the setting 'combatlog_history' from specific settings will be used to determine how many logs (including body hits) in the past are to be saved when someone kills a target This is for example if 'combatlog_history' is set to "10" and 'combatlog_saving' is set to "on_humanoid_kill", when a player kills a scientist or a player, the combatlog of that entire fight will be saved with up to 10 older hits, so the last 9 combat logs (anything, including stone wall hits) and the last kill hit log In specific settings section: - include_scientists Should scientists be included in the trigger filter, this is applicable to 'recording_mode' setting with OnKill and OnHitArea This should be a yes/no answer For example: "include_scientists": "yes" You can use a short form of 'y','n' or '+','-' or 'true','false' or 't','f' and there is more - kill_threshold How many kills to make to trigger a recording This should be a number For example: "kill_threshold": "5" - report_threshold How many reports to receive to trigger a recording This should be a number For example: "report_threshold": "2" - hit_areas Which HitAreas to watch for. This is applicable to 'recording_mode' setting with OnHitArea This should be a number and can be a combination 1 : Head 2 : Chest 4 : Stomach 8 : Arms 16 : Hands 32 : Legs 64 : Feet To select multiple again as in recording_mode setting you just add up the numbers For example if you want to watch for headshots, chest and stomach hits you will do: 1 + 2 + 4 = 7 - hit_count_threshold How many times a player needs to hit someone in 'hit_areas' areas in order to trigger a recording This should be a number For example: "hit_count_threshold": "2" So with this example and the one before if someone hits a player/scientist (depends on setting) in the head,chest or stomach 2 times or more they will start being recorded - stashes_threshold How many stashes should a player uncover to trigger a recording This should be a number For example: "stashes_threshold": "2" - remember_stash_owner If a player uncovers their own potentially forgotten stash, should they trigger a recording This should be a yes/no answer For example: "remember_stash_owner": "yes" I recommend setting this to 'yes' always - combatlog_history How many combat logs to save when a kill event is triggered in 'combatlog_saving' setting This should be a number For example: "combatlog_history": "10" For example: Player A kills Player B, but in the process of their fight, Player A hits another player behind Player B, you can see it, with this setting you can see up to X amount of combatlog hits before their fight finished In optimization settings section: - compress_recorded_demos Should the saved demos be compressed. Compression is saving ~70% of space but uses more CPU & RAM This should be a yes/no answer For example: "compress_recorded_demos": "yes" - compress_recorded_demos_thread_model If 'compress_recorded_demos' is turned on, should the demo be compressed on the main server thread or on a separate thread This should be one of the following values - threaded - default For example: "compress_recorded_demos": "threaded" I recommend setting to threaded if the machine hosting the server has spare CPU cores. Be careful with fewer core machines, the compression operation can take up to 200ms per demo (maybe even more on larger demos) - stop_demo_for_afk_players Should the demo recording be paused if a player goes AFK This should be a yes/no answer For example: "stop_demo_for_afk_players": "yes" I recommend setting this to yes as it will save you disk space on players who are AFK and being recorded. A small lagspike for the player might occur when they come back from being afk (for example move their mouse), the demo might be choppy at the start if its a transition between AFK and non AFK - afk_time_threshold Should the demo recording be paused if a player goes AFK This should be time, this is in the format <number>s<number>m<number>h (this is the same format as in setting 'recording_timout') For example, at 1 minute AFK user's recording will get paused: "afk_time_threshold": "1m" - suppress_console_demo_messages When a player is being recorded or their recording is stopped you get a message in the console, this setting will remove that message if turned on This should be a yes/no answer For example: "suppress_console_demo_messages": "no" - combatlog_buffer_size_threshold When this RAM threshold is reached the buffer of the global combatlog will be saved to disk This should be a size (in B, KB, MB or GB) For example: "combatlog_buffer_size_threshold": "10MB" I recommend leaving this to default if you are not experiencing issues. Might need to be increased with more player activity for optimal performance - combatlog_buffer_time_threshold When this time threshold is reached the buffer of the global combatlog will be saved to disk. This should be a time, this is in the format <number>s<number>m<number>h (this is the same format as in setting 'recording_timout') For example: "combatlog_buffer_size_threshold": "10s" I recommend leaving this to default if you are not experiencing issues. Might need to be increased with more player activity for optimal performance NOTE: If both combatlog_buffer_thresholds are set to 0, the combatlog will be only saved to disk when Watchdog is unloaded (aka on server restart/stop). If one of them is 0 only the other one is active, if both are not 0 then whichever threshold first gets reached In limit settings section: - max_total_gb_ram Memory limit for all currently recording demos, if this limit is reached all of them are stopped This should be a size (in B, KB, MB or GB) For example: "max_total_gb_ram": "4GB" - max_total_gb_disk_hardlimit Disk limit for all saved demos and combatlog file. When this limit is reached no further demos/combatlogs will be saved. This hardlimit is useful if your VPS/Machine has limited storage or you pay for every GB. IMPORTANT: Do not set the limit to the exact size of your disk size or free space, leave some wiggle room This should be a size (in B, KB, MB or GB) For example: "max_total_gb_disk_hardlimit": "300GB" In privacy settings section: - notify_users_when_recording Should the user get notified in chat & their console that they are being currently recorded This should be a yes/no answer For example: "notify_users_when_recording": "no" - notify_users_when_joining Should the user get notified in chat & their console that the server is using Watchdog This should be a yes/no answer For example: "notify_users_when_joining": "yes" - send_diagnostics_information Should Watchdog send diagnostic information that will be used to further optimize and improve watchdog This should be a yes/no answer For example: "send_diagnostics_information": "yes" I recommend leaving this turned on because it will greatly help me to see what needs to get optimized and/or changed The data being collected is the following: - Internal performance & error data - Server identity (server ip, port, player count, server uptime, server average fps) - Plugins/Mods being used - send_diagnostics_interval How often to send the diagnostics information This should be a time. this is in the format <number>s<number>m<number>h (this is the same format as in setting 'recording_timout') For example: "send_diagnostics_interval": "5m" I recommend leaving this on the default. Increase if you notice more than comfortable network usage. The higher this interval is the higher the network impact will be when the data is being uploaded as its being uploaded as a big chunk In privacy settings section: - notify_recording_triggered_webhook Discord Webhook that will be used to send messages to when a recording is started This should be a URL, leave empty to disable For example: "notify_recording_triggered_webhook": "https://discord.com/api/webhooks/1095317841874187282/LHjjksahd_tokengoeshere_d182u9182" - player_reported_webhook Discord Webhook that will be used to send messages to when a player is F7 reported This should be a URL, leave empty to disable For example: "player_reported_webhook": "https://discord.com/api/webhooks/1095317841874187282/LHjjksahd_tokengoeshere_d182u9182" - recording_about_to_finish_webhook Discord Webhook that will be used to send messages to when a recording is about to finish This should be a URL, leave empty to disable For example: "recording_about_to_finish_webhook": "https://discord.com/api/webhooks/1095317841874187282/LHjjksahd_tokengoeshere_d182u9182" - recording_about_to_finish_threshold When the recording time hits this percentage threshold a message will be sent in discord informing you that the recording is about to finish This should be a percentage For example: "recording_about_to_finish_threshold": "90%" If this is set to 100% you will get a message when the recording stopped (roughly, timing is not exact millisecond precision) NOTE: You can always see what the default generated config is by deleting or renaming the file 'config.json', if you want to use it as a reference Ingame config settings: These settings are built-in ConVars and can be changed via the console like any other ConVar - demo.splitmegabytes : When a demo reaches this amount of megabytes in size it gets stopped and another is started, this is to split them - demo.splitseconds : When a demo reaches this amount of time recording it gets stopped and another is started, this is to split them - demo.recordlist : Add player steamids in here to record them automatically on join - demo.recordlistmode : 0 for whitelist, 1 for blacklist. Whitelist means all players in 'demo.recordlist' will be recorded on server join, blacklist means all player NOT in 'demo.recordlist' will be recorded on server join Section 5: Localization Watchdog supports localization (although currently only 1 type of language is supported) To edit the localization, go to the 'Watchdog' folder which is at the root of your server folder, from there go into the directory 'localization', a file 'english.txt' will contain the localization strings Just open that file with any text editor and edit the messages to your liking The format of the localization file is "some locale = some text" After the equals sign is the message, you edit that, do not touch the text that is at the left of the equals sign Whenever you see a percentage in front and back of some text that means this is a variable and is replaced with the actual value when that event happens For example %steamid% means the steamid64 of the person who initiated this message Here are the meanings of all the variables: %steamid% - steamid64 of player %username% - in-game name of player %recording_trigger% - what triggered the recording, this can tell you for example if it was someone uncovering a stash or killing a player or any other thing %reported_times% - how many times this person was reported since the last recording %progress% - current recording progress at the time of sending this message Section 6: Commands Watchdog has some built-in commands and modifies another, the commands are: - watchdog.version - Prints the version of Watchdog - watchdog.webhooktest - Sends test messages to all enabled webhooks. This is used if you want to see if the link you provided is working - demo.record - Starts a manual demo recording, this will not stop automatically until you stop with manually again, even if the user disconnects, this is useful if you want to record someone 24/7 - demo.stop - Stops a manual demo recording, if a demo is started with 'demo.record' this is the only way to stop that demo Section 7: Contact If you have any questions, suggestions or want to report a bug you can contact me on discord: turner#7777$999,999.00 -
Version 1.0.1
23 downloads
THIS SYSTEM IS NOT WORKING DUE TO RUST SYSTEM Automatically sends information about the server to the discord channel. How to use this bot? 1. install the higher node.js 2. download the bot files 3. file extraction 4. open the console 5. "npm i" <- type in console 6. open to config.js module.exports = { ip: "0.0.0.0", // server ip (domain) port: 0, // server port channel_id: "0", // discord channel id color: "#7289da", // embed color token: "TYPE YOUR TOKEN", // insert your bot token here! updateInterval: 20, // it is seconds and an integer must be entered. watcher: true // you can hide to your server ip and port } 7. edit to config.js 8. "node index.js" <- type in console 9. check to console!$9.99- 2 comments
-
- 1
-

-
- #discord bot
- #tool
- (and 7 more)


.thumb.jpg.7b7118ca6f13ed2752b37b38bf188582.jpg)