Search the Community
Showing results for tags 'pterodactyl panel'.
Found 3 results
-

Version 1.0.6
163 downloads
This Pterodactyl Panel egg is a custom made upgraded version of the standard Rust egg that comes with Pterodactyl Panel. Features Allow more control over what your users can edit in their server information tab. This egg doesn't allow the user to edit the max players, or any of the ports associated with the server installation. Fixes a known bug with Pterodactyl Panel that doesn't allow a Rust Server to connect to the Rust+ App Server run by Facepunch which results in a C# error. Removes the need to specify any start up variables inside of the /server/myrustserver/cfg/server.cfg file. It handles all the variables through Pterodactyl Panel. The end user can specify additional start up variables in the Additional Arguments field in their Startup tab on their server dashboard. (Optional) Downloads and installs the RustEdit DLL file for custom map use during the server installation process automatically (Optional) Downloads and installs the Discord Extention DLL from uMod to allow Discord Webhooks and Plugins to connect via this extension. (Optional) Downloads and installs the Chaos Code Extension for use with K1llY0u's plugins from Chaos Code Server Variables Server Name Oxide Installation Level Server Description Website URL World Size World Seed Max Players Server Header Image RCON Port RCON Password Save Interval Additional Arguments Rust+ App Port Server Logo Custom Map URL Server Identity Gamemode Selection Rust+ Public IP (Should be set to your node's public IP address) Server Tags Installation Support For support or help installing this egg, you can reach out to me via Discord, or by using the Support tab on this page. Once you purchase this egg, you will have support relating to the egg and its installation and functionality for the lifetime of this product. Installation Instructions can be found in the download, or by visiting this GitHub Gist: https://gist.github.com/JDsWebService/70cbdfffb625f388c450318292b3e381 Security Notice Security Note: This egg uses the standard Rust docker image that ships with Pterodactyl Panel. This will prevent any security issues from arising due to custom docker containers. Whenever you run a custom docker container, unless you decompile the container itself and look at what its installing, you can never really be sure about the security of it. So stay clear of any Pterodactyl eggs that use custom docker containers. Optional Addons Ideally you should be pairing this egg with a Rust Auto Wipe Pterodactyl Panel specific addon. I would suggest using this addon made by UndercoverNL. I have personally bought and used this addon, and this guys Customer Service is amazing! Very easy to use instructions to set up the addon as well. https://builtbybit.com/resources/pterodactyl-v1-addon-rust-server-wiper.25458/$4.99 -
Version 1.0.0
32 downloads
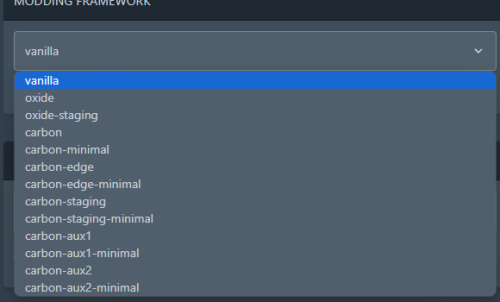
The main functionality of this egg is to have the ability to switch seamlessly between all Carbon builds, Oxide, and Vanilla. If you launch the egg with an Oxide build, you can then switch right on over to Carbon, and it will handle all of the removal and clean up of all of the Oxide files for you. If you switch to Vanilla from either Carbon or Oxide, it will make sure those files are cleaned up as well. You also have the ability to set a "Modding Root" folder. This folder is very important, as it allows you to have different plugins, configs, and data for different wipes or maps. Say you are running a proc gen map, and you are running a set of plugins that makes sense to have on a proc gen map, then you decide on wipe day to switch to a spooky, Halloween themed map. Obviously you'll probably want to have some different plugins running on that custom Halloween themed map. You can make that switch easily by just specifying the "Modding Root" folder that you want to use, instead of having to delete files, configs, etc. This guide assumes that you have already installed Pterodactyl panel, and are familiar with how to set up servers. You should also already have a location, a node, and ports already allocated on that node. If you don't know how to do any of this, or you missed a step, please refer to the Pterodactyl Panel installation instructions below. A link to their Discord server is also below for you to get support during installation. They however do not support Carbon specific questions, only questions relating to Pterodactyl panel itself. Just keep that in mind. Pterodactyl Installation Instructions Pterodactyl Discord Check Out The Carbon Docs This egg is now officially on the Carbon documentation page! That documentation can be found here: https://docs.carbonmod.gg/docs/server-hosting/pterodactyl Difference Between Carbon Builds The difference between the Production, Preview, and Edge builds of Carbon are: Production - The most stable version of Carbon. Updated once every few weeks. Preview - Updated frequently, contains future features for testing, and you will run into a few bugs here and there. Edge - Like living on the edge? This is the most current version of Carbon, and it used mainly by developers and server owners to test brand new features of Carbon that are still in the Beta development stage. Expect some bugs. One other thing is the difference between the Minimal and Standard versions of Carbon. The minimal version of Carbon does not contain the Admin Module, CarbonAuto, or the Zip Dev Script Processor. Its basically a lightweight version of carbon, stripping away the QoL features and focuses only on plugin execution. Its not like minimal is faster then the Standard build, it just has less "clutter". Adding The Egg To The Nest First we need to add the egg to the Rust nest. Here are the steps. Login to the admin dashboard of your Pterodactyl panel installation. Click on the "Nests" link in the side bar on the left. Since there is already a "Rust" nest, we don't have to create a new one. Lets just go ahead and add the egg to the nest. Click on the green "Import Egg" button on the right. Select the Custom Carbon Egg that you just downloaded by clicking browse, then navigate to the location you saved the egg to, and double click the file. Next we need to select the "Rust" nest under the "Associated Nest" field. Now all we have to do is click on "Import". Installing the Server This server installation guide is very similar to the Custom Rust Egg by MikeHawk, with some key differences. Some of the steps for installation might be the same. Please make sure to read these installation instructions throughly. Log into your admin dashboard of your panel. Navigate to your Servers by clicking on "Servers" on the side bar. Click the "Create New" button on the right Configure your server details in the "Core Details" section For your port allocations you are going to need 1 main port, and 3 additional allocations. These allocations are for the Query Port, RCON Port, and App Port. Configure your "Application Feature Limits" and "Resource Management" sections to your liking Under "Nest Configuration", select the "Rust" Nest Then if your "Egg" field does not already say "Rust Carbon", change it to "Rust - All Carbon Builds". The "Docker Configuration" section can be skipped. Next is the big part. The "Startup Configuration" section. In this section, you can fill out everything pretty much to your liking. However there are a few new options here that are not apart of the Default Rust Egg. Under the "Modding Framework" variable, you can choose different options for either Carbon, Oxide, or Vanilla. This is a combined version of the "Carbon Build" and "Minimal" variables from the other Custom Rust Egg by MikeHawk. The key difference here is this egg is also set up for the staging branch of Rust as well. See the "Difference Between Carbon Builds" section at the top of this page for more information. Lastly, the major difference between the Default Rust egg, and the Carbon Rust egg, is that you can set an IP address for your Rust+ App. This is critical in ensuring that your Rust+ connection is able to connect to the Rust+ API. Set this value to the public IP address of your server. Additionally, you can configure different Carbon/Oxide root directories. This is good if you want to run a certain set of plugins on one map, but don't want to go through the hassle of copying and pasting over different configs for that map. All you have to do is just change your Carbon directory, and it will automatically switch over to those plugins, configs, and data files. An important thing to note is that the "Modding Root" variable should be set appropriately. If you're running a build of Carbon, your "Modding Root" should have the word "carbon" in it. Same thing for Oxide. If you're running Oxide, your "Modding Root" variable should have the word "oxide" in it. The vanilla option does not need to have the variable set. Do not forget to set your RCON, Query, and App ports to the appropriate ports that you assigned under the "Core Details" section. These ports should be equal to one of the three ports you assigned under your "Additional Ports" section. Start your server by clicking the green "Create Server" button at the bottom of the page. And that's it! You now have a Rust server installed and ready to use! Credits to @BippyMiester for helping me create the egg Want to help contribute to the project? Visit our GitHub Pages! https://github.com/SturdyStubs/pterodactyl-images/ https://github.com/SturdyStubs/AIO.EggFree-
- 1
-

-
- #pterodactyl
- #pterodactyl panel
- (and 7 more)
-
Version 2023.10.12.0810
166 downloads
SAVE 13% WHEN BUYING THE BUNDLE NOW SUPPORTING PROCGEN AND CUSTOM URL BASED MAPS ! This plugin will allow you to setup automatic server wipes without requiring external scripts. This plugin is very useful for any server owner but I'm positive that it will be really useful for those hosting providers running panel based game instances where you do not have full access to customize the server or the provided wipe tool is very limited. You should have a look at the suggested plugins for Oxidation's Scheduler which is a perfect fit for a fully in-game automatic wipe process. The plugin also allows you to set a list of seeds that will be used at server wipe to select the new map seed. You can define as many different wipe types as you'd like on the config file like so: This example is for a "forced" wipe. In order to execute the wipe type on the rcon console "wipe forced". "Forced": { "Restart": 120, "Message": "A server wipe is being executed, we'll be back shortly", "Game": { "Blueprints": true, "Logs": true, "Map": true, "PlayerDeaths": true, "PlayerIdentities": true, "PlayerStates": true, "PlayerTokens": true }, "Plugins": { "Convalence": true, "Data": true, "Groups": true, "Language": true, "Logs": true, "Users": true }, "Files": [ "my/custom/path/this_file_will_be_deleted.json" ], "Blacklist": [ "carbon/data/this_file_will_never_be_deleted.json" ] } This example is for a "weekly" wipe. In order to execute the wipe type on the rcon console "wipe weekly". "Weekly": { "Restart": 120, "Message": "A server wipe is being executed, we'll be back shortly", "Game": { "Blueprints": false, "Logs": true, "Map": true, "PlayerDeaths": true, "PlayerIdentities": false, "PlayerStates": true, "PlayerTokens": false }, "Plugins": { "Convalence": false, "Data": true, "Groups": false, "Language": true, "Logs": true, "Users": false }, "Files": [ "my/custom/path/this_file_will_be_deleted.json" ], "Blacklist": [ "carbon/data/this_file_will_never_be_deleted.json" ] } This is a standalone Harmony patch, Oxide installation is optional. Copy the Oxidation.Wiper.X.dll file into your HarmonyMods folder and restart your server. At the first server start after installing the patch a new configuration file Oxidation.Wiper.json will be created at the HarmonyMods folder. What is Harmony ? Harmony is a library for patching .NET code during runtime, it directly manipulates game code (CIL) without any additional abstraction layer such as Oxide. The direct patching of the game's byte code allows more performant modding as developers no longer need to rely on third party code, events or hooks to build custom functionality.$4.99