

SturdyStubs
-
Posts
73 -
Joined
-
Last visited
Content Type
Profiles
Warranty Claims
Downloads
Forums
Store
Services
Downloads Plus Support
DOWNLOADS EXTRA
Everything posted by SturdyStubs
-
 Since some of the mainstream servers came out with features like this, I've been searching for a skin removal plugin for a while. There was another plugin prior to this release that disabled skins however it both enabled the admin flag which I didn't like and it also disabled your own skins and box skins. This is such a game changer in how players will look at your servers especially if they dislike pay to win skins.
 -
I enjoy the family gatherings and smells that are tied to Christmas!
-
 I've been searching for something like this for ages. The ability to track which players might be violating team limits on my servers with an easy to follow layout is the best thing to come to this platform. I have already caught many teams violating my team limit and was able to swiftly take action.
- 22 comments
-
- 1
-

-
- #teamalerts
- #team
- (and 28 more)
-
Yeah it installs every time. If it doesn't happen to update please let me know so I can fix it.
-
Changed Status from Pending to Not a Bug
-
 Apologies for that, I probably forgot to update the semantic version to 3.0. The latest downloadable version is with the latest updates for the 3.0 update.
 -
Changed Status from Pending to No Response
-
Changed Status from Pending to Not a Bug
-
Changed Status from Pending to No Response
-
1. Download the new egg from here 2. Upload the new egg to the Nests section on your Pterodactyl panel into the Rust category 3. Go to your server and enter the administrative side 4. Change the egg to the new egg 5. Go to the startup tab, double click and copy the greyed out Default Service Start Command, highlight everything in the Startup Command section and paste. 6. Save Modifications and change any configurations you need.
-
This typically means that you have a custom map problem. I would open up RustEdit and see where the problem lies.
-
 I have been using this plugin for a few months now after switching over from the "original" SkinBox plugin. The performance improvements alone were enough of a reason to switch over however this plugin has so much more going for it. The ease of use to set certain skins as default, the ability to allow players to skin everything in their inventory all at once or even their base, and best of all you can separate just about everything into permissions so certain groups can use more or less than others.
 -
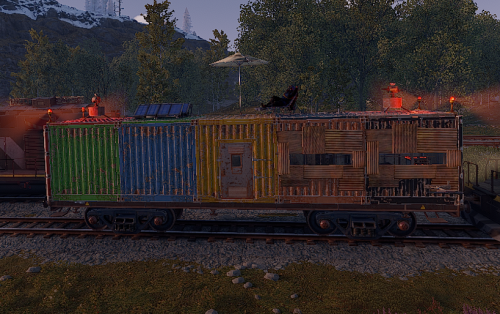 This train plugin was exactly what I was looking for, I am amazed at how well it works. My players are enjoying it a lot!
- 84 comments
-
- 1
-
-
- #trainserver
- #train
- (and 11 more)
-
I just discovered an issue after doing some testing on the Pelican panel that for some reason wasn't an issue on Pterodactyl, I guess the way they parsed the startup params was different. Try using this startup command and see if it works: ./RustDedicated -batchmode $( [ "${FRAMEWORK}" == "oxide" ] && echo +oxide.directory {{MODDING_ROOT}} || [ "${FRAMEWORK}" == "vanilla" ] && echo "" || echo -carbon.rootdir {{MODDING_ROOT}} ) +server.port {{SERVER_PORT}} +server.queryport {{QUERY_PORT}} +server.identity \"{{SERVER_IDENTITY}}\" +server.gamemode \"{{GAMEMODE}}\" +rcon.port {{RCON_PORT}} +rcon.web true +server.hostname \"{{HOSTNAME}}\" +server.level \"{{LEVEL}}\" +server.description \"{{DESCRIPTION}}\" +server.url \"{{SERVER_URL}}\" +server.headerimage \"{{SERVER_IMG}}\" +server.logoimage \"{{SERVER_LOGO}}\" +server.maxplayers {{MAX_PLAYERS}} +rcon.password \"{{RCON_PASS}}\" +server.saveinterval {{SAVEINTERVAL}} +app.port {{APP_PORT}} $( [ -z ${MAP_URL} ] && printf %s "+server.worldsize \"{{WORLD_SIZE}}\" +server.seed \"{{WORLD_SEED}}\"" || printf %s "+server.levelurl {{MAP_URL}}" ) $( [ -n "{{APP_PUBLIC_IP}}" ] && echo "+app.publicip \"{{APP_PUBLIC_IP}}\"" ) $( [ -n "{{SERVER_TAGS}}" ] && echo "+server.tags \"{{SERVER_TAGS}}\"" ) $( [ -n "{{LOG_FILE}}" ] && echo "-logfile \"{{LOG_FILE}}\"" ) {{ADDITIONAL_ARGS}}
-
Am aware of a parsing issue on Pelican panels. Will work on moving framework related things to the image. Update should be coming in a week or two with depotdownloader option, map generation logs, & pelican fix.
- 32 comments
-
- 2
-

-
- #pterodactyl
- #pterodactyl panel
- (and 7 more)
-
 Getting: Calling kill - but already IsDestroyed!? cratemarker My testing points to this plugin even though in my config it is enabled to show it: internal const bool BlockMapMarkers = false; internal const bool BlockTeamChat = false; // Below are toggles if using the BlockMarkers option internal const bool ShowPlayerMarkers = true; internal const bool ShowExplosionMarkers = true; internal const bool ShowVendingMachines = true; internal const bool ShowCH47 = true; internal const bool ShowCargoShip = true; internal const bool ShowCrates = true; internal const bool ShowPatrolHelicopter = true; internal const bool ShowGenericRadius = true;
 -
Version 1.3
368 downloads
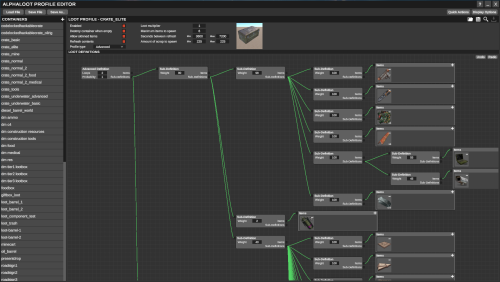
You can now view a visualized version of your loot tables at https://sturdystubs.github.io/probability-webview/ Calculates the probability of your AlphaLoot tables How to Use 1. Drop your AlphaLoot table such as default_loottable.json into the project directory 2. Open the config and adjust the loot_files to include all loot tables you've inserted 3. Run by using `py main.py` Default config: { "loot_files": [ "default_loottable.json", "default_heli_loottable.json", "default_bradley_loottable.json" ], "output_min_max_condition": true, "output_min_max_amount": true, "include_scrap": true, "round_percentages": true, "aggregated_probability": true } output_min_max_condition - Outputs the min/max conditions of any items that have a condition applied output_min_max_amount - Outputs the min/max amount of the item include_scrap - Includes scrap amount and percentage in containers with scrap included Aggregated Probability The complete total probablity for an item without factoring in additional subdefinitions and multiple items "rope": 22 Regular Probability The probability of items with separation of subdefinitions "rope,sewing kits": 11 "rope,metal pipes": 11 Rounding Percentages round_percentages flag set to true will run through the output file before completing its cycle and round to the nearest .5 13.71 > 13.5 13.76 > 14Free -
Hey sorry for the delay here. I just tested this and didn't have a problem. It could be a machine issue.
-
 Helps prevent abusive players attempting to lag or crash the server without preventing a max amount of items from being in the world at once. Very clever solution to a big problem.
- 17 comments
-
- 1
-
-
- #dropbags
- #drop bags
- (and 26 more)
-
Changed Status from Pending to Closed
-
I didn't get this issue, did you make sure to update the server parameters on the admin side? Admin > Servers > [your server] > Startup Where it says Default Service Start Command, copy the whole section by double clicking it and select the full Startup Command line using ctrl+a and paste. This should ensure your server is running the proper commands on startup.
-
Hey there, sorry for the delayed response I was celebrating a birthday. I am looking into this right now.
-
I can look into it for sure although the impacts will be negligent.
- 32 comments
-
- 1
-
-
- #pterodactyl
- #pterodactyl panel
- (and 7 more)
-
Changed Status from Work in Progress to Closed Changed Fixed In to 2.0.0
-
The docker image is the backend for the egg. It allows the egg to pull updates from websites or conduct different sections of code such as deleting oxide files and downloading carbon files. Our stable egg build is ghcr.io/sturdystubs/aioegg:production which is shipped with the 2.0 version of the egg. It automatically updates every time there is server restart if there is an update on github.
- 32 comments
-
- 1
-
-
- #pterodactyl
- #pterodactyl panel
- (and 7 more)
