Search the Community
Showing results for tags 'egg'.
Found 2 results
-
Version 1.0.0
39 downloads
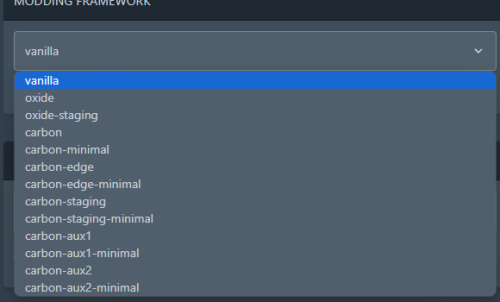
The main functionality of this egg is to have the ability to switch seamlessly between all Carbon builds, Oxide, and Vanilla. If you launch the egg with an Oxide build, you can then switch right on over to Carbon, and it will handle all of the removal and clean up of all of the Oxide files for you. If you switch to Vanilla from either Carbon or Oxide, it will make sure those files are cleaned up as well. You also have the ability to set a "Modding Root" folder. This folder is very important, as it allows you to have different plugins, configs, and data for different wipes or maps. Say you are running a proc gen map, and you are running a set of plugins that makes sense to have on a proc gen map, then you decide on wipe day to switch to a spooky, Halloween themed map. Obviously you'll probably want to have some different plugins running on that custom Halloween themed map. You can make that switch easily by just specifying the "Modding Root" folder that you want to use, instead of having to delete files, configs, etc. This guide assumes that you have already installed Pterodactyl panel, and are familiar with how to set up servers. You should also already have a location, a node, and ports already allocated on that node. If you don't know how to do any of this, or you missed a step, please refer to the Pterodactyl Panel installation instructions below. A link to their Discord server is also below for you to get support during installation. They however do not support Carbon specific questions, only questions relating to Pterodactyl panel itself. Just keep that in mind. Pterodactyl Installation Instructions Pterodactyl Discord Check Out The Carbon Docs This egg is now officially on the Carbon documentation page! That documentation can be found here: https://docs.carbonmod.gg/docs/server-hosting/pterodactyl Difference Between Carbon Builds The difference between the Production, Preview, and Edge builds of Carbon are: Production - The most stable version of Carbon. Updated once every few weeks. Preview - Updated frequently, contains future features for testing, and you will run into a few bugs here and there. Edge - Like living on the edge? This is the most current version of Carbon, and it used mainly by developers and server owners to test brand new features of Carbon that are still in the Beta development stage. Expect some bugs. One other thing is the difference between the Minimal and Standard versions of Carbon. The minimal version of Carbon does not contain the Admin Module, CarbonAuto, or the Zip Dev Script Processor. Its basically a lightweight version of carbon, stripping away the QoL features and focuses only on plugin execution. Its not like minimal is faster then the Standard build, it just has less "clutter". Adding The Egg To The Nest First we need to add the egg to the Rust nest. Here are the steps. Login to the admin dashboard of your Pterodactyl panel installation. Click on the "Nests" link in the side bar on the left. Since there is already a "Rust" nest, we don't have to create a new one. Lets just go ahead and add the egg to the nest. Click on the green "Import Egg" button on the right. Select the Custom Carbon Egg that you just downloaded by clicking browse, then navigate to the location you saved the egg to, and double click the file. Next we need to select the "Rust" nest under the "Associated Nest" field. Now all we have to do is click on "Import". Installing the Server This server installation guide is very similar to the Custom Rust Egg by MikeHawk, with some key differences. Some of the steps for installation might be the same. Please make sure to read these installation instructions throughly. Log into your admin dashboard of your panel. Navigate to your Servers by clicking on "Servers" on the side bar. Click the "Create New" button on the right Configure your server details in the "Core Details" section For your port allocations you are going to need 1 main port, and 3 additional allocations. These allocations are for the Query Port, RCON Port, and App Port. Configure your "Application Feature Limits" and "Resource Management" sections to your liking Under "Nest Configuration", select the "Rust" Nest Then if your "Egg" field does not already say "Rust Carbon", change it to "Rust - All Carbon Builds". The "Docker Configuration" section can be skipped. Next is the big part. The "Startup Configuration" section. In this section, you can fill out everything pretty much to your liking. However there are a few new options here that are not apart of the Default Rust Egg. Under the "Modding Framework" variable, you can choose different options for either Carbon, Oxide, or Vanilla. This is a combined version of the "Carbon Build" and "Minimal" variables from the other Custom Rust Egg by MikeHawk. The key difference here is this egg is also set up for the staging branch of Rust as well. See the "Difference Between Carbon Builds" section at the top of this page for more information. Lastly, the major difference between the Default Rust egg, and the Carbon Rust egg, is that you can set an IP address for your Rust+ App. This is critical in ensuring that your Rust+ connection is able to connect to the Rust+ API. Set this value to the public IP address of your server. Additionally, you can configure different Carbon/Oxide root directories. This is good if you want to run a certain set of plugins on one map, but don't want to go through the hassle of copying and pasting over different configs for that map. All you have to do is just change your Carbon directory, and it will automatically switch over to those plugins, configs, and data files. An important thing to note is that the "Modding Root" variable should be set appropriately. If you're running a build of Carbon, your "Modding Root" should have the word "carbon" in it. Same thing for Oxide. If you're running Oxide, your "Modding Root" variable should have the word "oxide" in it. The vanilla option does not need to have the variable set. Do not forget to set your RCON, Query, and App ports to the appropriate ports that you assigned under the "Core Details" section. These ports should be equal to one of the three ports you assigned under your "Additional Ports" section. Start your server by clicking the green "Create Server" button at the bottom of the page. And that's it! You now have a Rust server installed and ready to use! Credits to @BippyMiester for helping me create the egg Want to help contribute to the project? Visit our GitHub Pages! https://github.com/SturdyStubs/pterodactyl-images/ https://github.com/SturdyStubs/AIO.EggFree-
- 1
-

-
- #pterodactyl
- #pterodactyl panel
- (and 7 more)
-

Version 1.9.21
189 downloads
Generates a special item in random crates that gives optional health/gather buffs when carrying it, or can generate other items (scrap etc) when placed in a box. However it's location is permanently marked on the map, making the owner a target. How it works: The majority of the following is configurable, but out of the box here's how it works. Each time a player opens a crate (Locked, Elite, Military or Normal), the egg has a chance to spawn. Once found, the player will receive a UI message with instructions (see screenshot), and a server wide chat message will be broadcast alerting other players. 60 seconds after the egg is found, the players position will be marked on the map for all to see. If the player makes it home, or another player gets home with the egg, it can then be placed in a box and will start generating resources every hour. By default this is scrap, but if another resource is placed in the box with the egg (by default this is hqm, metal frags, or low grade fuel) the egg will instead generate that resource. The egg will only generate one resource at a time, but which resource is up to you. Optionally Sulfur Ore or Cooked Sulfur can be enabled, along with up to three custom items (for example, supply signals, red keycards, 5.56 ammo, etc etc). While in a box, the egg will be permanently marked on the map, making the player a target. The marker is a broad circle, so it will give the general position, but not down to the exact room or box. There is however an optional command for this. Introduced in 1.7.0 are roam buffs, which optionally increase health, pickup and gather rates whilst holding the egg, This helps incentivize players to take the egg out of their base, and can make for some really fun encounters. If at any point the player wishes to remove the marker and get rid of the egg, they can choose to crack it open, which will award the player with one of the following by default: 5 Incendiary and 3 HV Rockets MP5 + Ammo LR300 Rifle M39 + Ammo Multiple Grenade Launcher M249 + Ammo Alternatively, you can use the config option Use custom item list when cracking open the egg and instead add your own list of rewards. The plugin will choose one item at random from your list, and will fallback to the default list above if there are any issues (spelling mistakes etc). You can use the following link to grab the shortnames of the items you want: https://www.corrosionhour.com/rust-item-list/ Once cracked open, or otherwise destroyed/lost, the egg can again be found in crates. There will only ever be one egg available at a time. The plugin will also keep track of the amount of time a player has held the egg (either in their inventory or in a box), along with their team, and an overall team total. In 1.8.2 there's a new custom event included that will drop a configurable amount of crates at a moment which can only be hacked with the egg in your inventory. See the update notes for 1.8.2 for more detail. Features: Highly configurable Server wide message when the egg is found or destroyed Optional webhook to discord when the egg is found or destroyed A "spam check" so players can't just open and close crates really quickly to increase their odds While the egg can be hidden in stashes, it will not generate resources Optional vending marker as well as the circle marker (the vending marker can have a custom name) Data logging for amount of time holding the egg Clear or retain player data on map wipe Leaderboard for the top 5 players Command to place the top player (and team) in an oxide group temporarily (requires Timed Permissions) Option to block cracking open the egg during a raid Option to kill the egg after a certain amount of time Option to stop adding time when the player is in a safe zone / the egg is in a stash / the egg is in a building / between certain hours / under a minimum pop Change the item name, skin and CUI image to your liking Dynamic command name option TruePVE support (see release notes for 1.6.2) Roam Buffs to increase health, pickup and gather rates whilst holding the egg (see 1.7.0 release notes) Custom chinook crate event included Option to blacklist certain commands (eg Teleport, Trade etc) Option to destroy the egg after x seconds in a safe zone or building blocked zone Notes: Default values: The spawn chances look low, but after a lot of testing these values are still hit but pretty rarely, making the egg more valuable when finally found. Increase them to suit if you prefer though. The player marker refresh time of 25 seconds is just about enough time for the player to stay out of the marker at a full sprint, but only just. I found that to be a good value but again, adjust as you see fit. Item Skins: If the item appears but the skin doesn't load, that means that it's an issue at your client end (not the plugin). It may be related to Steam issues, your download speeds or Rust issues. Also, rarely, some skins are just broken in which case they'll never load. The game doesn't give any meaningful feedback on this (occasionally a red unity error on screen), so just try another skin ID (you may need to quit and restart Steam in these cases). To find a skin you want to use, grab the number from the end of the URL on it's workshop page, eg https://steamcommunity.com/sharedfiles/filedetails/?id=2674986096. Approved skins will load faster in game than non-approved. TruePVE: For servers running TruePVE, a new config option allows damage to bases and players if they have the egg in their possession. If the egg is inside a base, the plugin will check for both TC auth and proximity before allowing damage. If the egg is on a player, damage will be allowed within a radius of that player. Roam Buffs: Pickups include items out in the world, but not items grown yourself in a planter. Chinook Event: I'd recommend using this - https://github.com/WheteThunger/BetterChinookPatrol - to properly randomise the monuments that the chinooks visit, rather than have it just pick one and stick to it all wipe. Available Commands (the command name is customisable in the config): /egg find - Will pinpoint the exact position of the egg once found. Requires permissions (thegoldenegg.use) /egg list - Will show the available resource generation options, along with their generation times (dynamic based on your config) /egg time - Will show the remaining time before the next resource generation /egg leader - Will show the top 5 players who have had possession of the egg (and their team total) /egg help - Will show a series of help messages and info /egg kill - Will destroy the egg instantly (admins only) /egg expire - For use along with the "Destroy the egg after x minutes" option. This will print the time remaining until the egg is destroyed. /egg event - To manually kick off the chinook event (admins only) /egg winner – Will place the person who has held the egg the longest (and their team if they have one) in the oxide group you specify for the time you specify (requires Timed Permissions) /egg purge – Will destroy the egg and wipe the data file Default Config: { "Egg spawn chance for Locked Crates (0 to 100)": 0.04, "Egg spawn chance for Elite Crates": 0.04, "Egg spawn chance for Military Crates": 0.03, "Egg spawn chance for Normal Crates": 0.02, "Marker Settings": { "Show map marker when the egg is in a box": true, "Show map marker when the egg is on a player": true, "Player marker refresh time (seconds)": 15, "Box marker refresh time (seconds)": 30, "Initial marker delay when the egg is found": 60, "Marker Radius": 0.7, "Marker Transparency": 0.7, "Marker Color (hex)": "#fa030a", "Marker Border Color (hex)": "#000000", "Add a Vending marker": false, "Vending Marker Name": "The Golden Egg" }, "Resource Settings": { "Resource Spawn Time (seconds)": 3600, "Scrap Spawn Amount (0 to disable)": 50, "HQM Spawn Amount": 25, "Low Grade Spawn Amount": 100, "Metal Frags Spawn Amount": 1000, "Allow Sulfur Ore": false, "Sulfur Ore Spawn Amount": 600, "Allow Cooked Sulfur": false, "Cooked Sulfur Spawn Amount": 400, "Custom Item 1 (use item shortname, eg ammo.rifle, gears, green.berry)": "", "Custom Item 1 Amount": 1, "Custom Item 1 Spawn Time (seconds)": 14400, "Custom Item 2": "", "Custom Item 2 Amount": 1, "Custom Item 2 Spawn Time (seconds)": 10800, "Custom Item 3": "", "Custom Item 3 Amount": 1, "Custom Item 3 Spawn Time (seconds)": 7200 }, "Item Customisation": { "Item Name": "The Golden Egg", "Item Skin ID": 0, "Item Found Image in Game (use an image 1000x400)": "https://i.imgur.com/3Yf5iaD.png", "Chat command": "egg", "Item Found Image for the Discord Webhook": "https://i.imgur.com/Knn0X37.png", "Item Lost Image for the Discord Webhook": "https://i.imgur.com/GxlVNSa.png" }, "Roam Settings": { "Increase health whilst holding the egg": true, "Total health": 150, "Increase ore/wood gather rate whilst holding the egg": true, "Gather multipler": 2.0, "Increase pickup amount whilst holding the egg (hemp/food etc)": true, "Pickup multipler": 2.0, "Don't allow roam bonus while server pop is below (leave at 0 to disable)": 0, "Don't allow roam bonus between certain hours": true, "Start of time period": "1AM", "End of time period": "7AM", "Broadcast a chat message when someone starts roaming": true }, "Event Settings": { "Run the chinook event": true, "Number of crates to drop": 2, "Crate unlock time": 600, "Maximum additional items to add to the crate(s)": 15, "Run the event once, between a certain time": true, "Start of time period": "8PM", "End of time period": "10PM", "Run the event on repeat": false, "Minimum time between events (seconds)": 3600.0, "Maximum time between events (seconds)": 7200.0, "Don't run the event if server pop is below (leave at 0 to disable)": 0, "Show map marker": true, "Marker Radius": 0.5, "Marker Transparency": 0.4, "Marker Color (hex)": "#ecf97f", "Marker Border Color (hex)": "#000000" }, "Let players with permission pinpoint the egg on screen (use /egg find)": true, "Send a webhook when the egg is found/destroyed": "https://support.discordapp.com/hc/en-us/articles/228383668-Intro-to-Webhooks", "Don't add time while the player is in a safe zone": true, "Don't add time while the egg is in a stash": true, "Don't add time while the egg is in a building": false, "Don't add time while server pop is below (leave at 0 to disable)": 0, "Don't add time between certain hours": false, "Start of time period": "1AM", "End of time period": "6AM", "Destroy the egg if in a safe zone for longer than (seconds, leave at 0 to disable)": 0.0, "Destroy the egg if in a building blocked zone for longer than (seconds, leave at 0 to disable)": 0.0, "Destroy the egg if in a Raidable Base zone for longer than (seconds, leave at 0 to disable)": 0.0, "Name of permission group to grant with /egg winner (requires Timed Permissions plugin)": "", "Duration to grant access to group (requires Timed Permissions plugin). Format: 1d12h30m": "28d", "Destroy the egg after x minutes (leave at 0 to disable)": 0, "Block player from cracking open the egg while being raided": true, "Raid block timer": 300, "Data save interval": 300, "Clear data on map wipe": true, "Use custom item list when cracking open the egg": false, "Custom item list (use item shortname, eg rifle.m39, explosive.timed, etc": [ "item.one", "item.two", "etc" ], "Blacklist commands whilst holding the egg": false, "Blacklisted commands": [ "/tp", "/trade", "/shop", "/rw", "/bank", "/home", "/remove" ], "TruePVE Only": { "Enable damage to players and bases if they have the egg": false, "Max distance between players for damage to register": 100.0 } }$15.99