
igraes's Wishlist
-
.thumb.gif.734e2c05d0583fba3ca2be9e58bda3a9.gif)
$19.99$9.00Military Checkpoints
By Code Brothers in Plugins
Establish dynamic military control points across your Rust server with tactical checkpoint deployments. Military Checkpoints delivers armed guard forces and defensive infrastructure to strategic locations, creating high-stakes combat zones that challenge players to breach fortified positions.
Watch as military forces establish a defensive perimeter complete with armed scientists and protective barriers. Players must eliminate all defending forces to claim access to the checkpoint's secured loot and resources.
Features
Spawn checkpoints on raods
Armed Scientists with defensive AI behavior
Configurable deployment radius and guard count
Automated checkpoint spawning with time intervals
Randomt selection
Automatic cleanup and despawn system
Performance-optimized spawn validation
Admin commands for manual control
Fully customizable configuration values
Chat Commands (Admin Only)
/checkpoints - Manually spawn a Military Checkpoint at a random location
Permissions
militarycheckpoints.admin - Required to manually spawn checkpoints and access admin commands
Configuration
{ "Plugin Enabled": true, "Checkpoint Settings": { "Cleanup Delay After Clear (seconds)": 300.0, "Barricade Prefabs": [ "assets/prefabs/deployable/barricades/barricade.concrete.prefab", "assets/prefabs/deployable/barricades/barricade.sandbags.prefab" ], "Min Barricades Per Checkpoint": 6, "Max Barricades Per Checkpoint": 8 }, "Scientist Settings": { "Min Scientists": 3, "Max Scientists": 6, "Scientist Health": 100.0, "Scientist Prefab": "assets/rust.ai/agents/npcplayer/humannpc/scientist/scientistnpc_roam.prefab", "Scientist Sense Range": 50.0, "Scientist Target Lost Range": 60.0, "Scientist Attack Range Multiplier": 1.5, "Scientist Max Roam Distance": 50.0 }, "Loot Settings": { "Min Regular Crates": 2, "Max Regular Crates": 4, "Locked Crate Chance (0.0 - 1.0)": 0.25, "Military Crate Prefab": "assets/prefabs/deployable/chinooklockedcrate/codelockedhackablecrate.prefab" }, "Spawn Settings": { "Max Active Checkpoints": 5, "Spawn Interval (seconds)": 600.0, "Min Distance Between Checkpoints": 200.0, "Road Detection Radius": 10.0 }, "UI Settings": { "Main Color (RGBA)": "0.1 0.1 0.1 0.95", "Panel Color (RGBA)": "0.15 0.15 0.15 0.9", "Button Color (RGBA)": "0.25 0.45 0.25 1", "Button Hover Color (RGBA)": "0.35 0.55 0.35 1", "Text Color (RGBA)": "0.9 0.9 0.9 1", "Success Color (RGBA)": "0.3 0.7 0.3 1", "Danger Color (RGBA)": "0.7 0.3 0.3 1" } } Default values are balanced for tactical gameplay and server performance.
Notes
This plugin creates authentic military checkpoint encounters that blend seamlessly with Rust's combat mechanics. Perfect for servers seeking territorial PvP hotspots and contested loot zones.
Feedback, suggestions, and feature requests are always welcome.
Created by CodeBrothers
Check out our other work on Codefling
-

$35.00
Ferry Terminal Event
Want to spice up the Ferry Terminal location on your map? Look no further! Captors have taken hostages and are going to execute them if they cannot enslave them. Liberate the hostages while waves of backup arrive Johnny Blaze style on their motorcycles. They will be relentless and merciless. It's recommended that you bring a friend or two for this one!
Description
The event will begin with a notification that captors have taken hostages and will be trying to take them away to enslave them from the Ferry Terminal monument.
First you will want to dispatch as many of the enemies on site as possible without alerting them of your intent or presence. Once you are ready though, alarms will be sounded and they will attempt to call for backup.
Once the backup begins coming on motorcycle they will continue to send units to keep you from liberating the hostages, or execute them as opposed to letting you get them to freedom!
Each hostage will have a small radius and a configurable countdown will begin as you work on releasing them from their shackles. Once freed you will still need to escort them to a ferry nearby, and they will thank you by opening a hackable crate for you.
There are indicators that help highlight important event items such as the hostages. The configuration file gives plenty of options to customize the event, from NPCs, timers, rewards, and plenty of other options like integration with plugins you already own, in game UI, and more!
Dependencies (optional, not required)
True PVE Pve Mode GUI Announcements Notify Discord Messages Alpha Loot Custom Loot NTeleportation Economics Server Rewards IQEconomic XPerience Kits Better Npc Monument Owner
Chat commands (only for administrators)
/ftstart - start the event
/ftstop - end the event
/ftpos - determining the position coordinates for changing the location of NPCs and crates. It should write in the configuration (Attention! The event must be started, the current position of the administrator in relation to the monument is read)
Console commands (RCON only)
ftstart - start the event
ftstop - end the event
Plugin Config
en - example of plugin configuration in English ru - example of plugin configuration in Russian
Hooks
void OnFerryTerminalEventStart(Vector3 pos, float radius) – called when the event starts
void OnFerryTerminalEventEnd() – called when the event ends
void OnFerryTerminalEventWinner(ulong winnerId) – called at the end of the event, where the winnerId is the player who did more actions to complete the event
My Discord: kpuctajl
Join the Mad Mappers Discord here!
Check out more of my work here!
- #ferry terminal
- #ch47
- (and 25 more)
-
$12.99
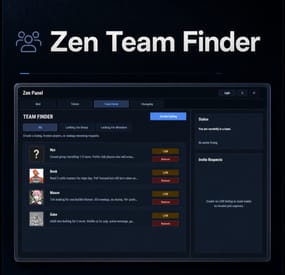
Zen Team FInder
Zen Team Finder adds a clean, in-game Looking For Group / Looking For Members system to your Rust server.
Players can post LFG listings when they’re solo, and team leaders can post LFM listings to recruit. Everything runs through an intuitive UI: browse listings, open player request details, invite, request to join, and manage incoming requests, all without needing repetitive lfg chat spam.
Zen Team Finder run on the free dependency Zen Panel
Key Features
LFG + LFM Listings
LFG (Looking for Group): solo players post a listing with a description. These listings are public and team leaders can easily invite players. LFM (Looking for Members): team leaders post a listing tied to their current team. Solo players can submit an invite request along with a short description. Simple UI Workflow
Full UI with a main listings panel + side panel for invite request management. Filters: All / LFG / LFM Click a listing to view: Player name + avatar Listing type tag (LFG/LFM) Full description Invite & Request System
LFG listings: team leaders can directly send a team invite. LFM listings: solo players can request an invite to join that team. Optional request note (short message) included with join requests. Built-In Safety Rules / Cleanups
Players can’t request invites if they’re already in a team. Players can’t be invited/request if they already have a pending Rust team invite. If a player joins a team, their other pending join requests are cleaned up automatically Invalid LFM listings (disbanded teams) are auto-removed when detected. When team leader changes, the listing ownership is moved to new leader. Reminders & Notifications
Audible invites reminders for: Players with pending team invites Leaders with pending join requests Configurable reminder interval. Chat message when a LFG/LFM request is posted. Editable UI
customize theme via the ZenPanel config. Localization All UI content neatly arranged in the lang file, allowing for easy translation. ________________________________________________________________
Permissions
zenteamfinder.admin - Required to run clear commands and remove other player's listings.
Chat Commands
/lfg - Opens the Party Finder. This command can be changed, and multiple commands added within the config file.
/lfg.clear - Admin command to clear ALL LFG listings
/lfm.clear - Admin command to clear ALL LFMlistings
________________________________________________________________
Default config is created and should meet the needs of most servers.
-
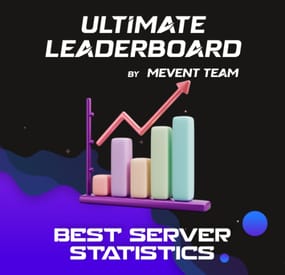
$45.00$41.95Ultimate Leaderboard (+WEB Editor)
Introducing UltimateLeaderboard, the most advanced and comprehensive leaderboard system designed for Rust servers! Elevate your server competitive spirit by tracking an extensive range of player statistics—everything from kills and deaths to resources gathered, items crafted, structures built, and more. Featuring a sleek, customizable user interface and seamless integration with popular plugins, UltimateLeaderboard is the perfect addition to engage your players and showcase their achievements.
⭐ Features of Ultimate Leaderboard
Track a wide variety of player statistics, including kills, deaths, resources gathered, items crafted, structures built, and more. Fully customizable leaderboard—choose which stats to display and tailor it to your server unique style. Intuitive and visually appealing user interface for players to view their stats and compare rankings. Seamless integration with plugins like ServerPanel for enhanced displays, and Notify/UINotify for in-game alerts. Flexible data storage options: choose between JSON, SQLite, or MySQL to suit your server needs. Two reward systems: post-wipe awards that give actual items, kits, and money to top players when they connect, plus an optional companion plugin UltimateLeaderboardTop for real-time privilege management based on current rankings. Custom Titles system that automatically displays achievement-based chat titles for top performers (requires BetterChat plugin). Optimized for high performance, ensuring smooth operation even with large player bases and extensive data. Configurable templates. Optional real-time database updates for integrations (e.g., Discord Bot).
🖼️ Showcase
Fullscreen Template
ServerPanel V1 (V1.1)
ServerPanel V2
📨 Video Overview
🎮 Commands
/leaderboard or /stats - Opens the leaderboard interface for players to view stats and rankings. /leaderboard <steamid> - Opens another player's profile (requires ultimateleaderboard.profile permission). /leaderboard.hide - Allows players to hide themselves from the leaderboard (requires ultimateleaderboard.hide.self permission). leaderboard.manage hide <steamid> - Console command to hide a player from the leaderboard (server console only). leaderboard.wipe - Console command to reset all leaderboard data (server console only). leaderboard.migrate <migration_id> - Console command to perform database migrations (server console only). Available:
— leaderboard.migrate 1 adds HiddenFromLeaderboard column to PlayerStats table (upgrade from v1.1.7 to v1.1.8)
— leaderboard.migrate 2 migrates BodyHits data to the new format (upgrade to v1.5.10) leaderboard.find.short.prefab <search_term> - Console command to search for prefabs containing the specified search term (server console only). Useful for finding correct prefab names for configuration. leaderboard.manage - Console command to manage player statistics (server console only). Use leaderboard.manage help for detailed usage information.
🛡️ Permissions
ultimateleaderboard.use - grants players access to leaderboard commands and interface. ultimateleaderboard.profile - allows players to view other players' profiles using the leaderboard command. ultimateleaderboard.hide.self - allows players to hide themselves from the leaderboard using the /leaderboard.hide command.
⚙️ Web Config Editor
Easily manage your UltimateLeaderboard settings with our web-based configuration editor. This tool allows you to adjust plugin configurations through a user-friendly interface, eliminating the need to manually edit files on your server.
P.S. To access the web config editor, you must be part of the "UltimateLeaderboard" group in our Discord server. Join us at https://discord.gg/mevent and request the group to get started.
📚 FAQ
Q: How do I install UltimateLeaderboard?
A: Download the UltimateLeaderboard.cs file, place it in your oxide/plugins directory, and restart your server or reload the plugin using the Oxide command oxide.reload UltimateLeaderboard.
Q: Can I choose which statistics to track and display?
A: Yes! The plugin allows you to customize tracked statistics and leaderboard displays via the configuration file. You can enable or disable specific stats like kills, resources, or events to suit your server.
Q: What data storage options are available?
A: UltimateLeaderboard supports JSON, SQLite, and MySQL. You can select your preferred storage method in the config file, offering flexibility for small or large servers.
Q: How do I set up the awards system?
A: In the configuration file, define award categories (e.g., most kills, top gatherer) and their criteria. The plugin will automatically track and assign awards to top players based on your settings.
Q: Where can I configure the UI?
A: UI is now template-driven. Use configurable templates stored at oxide/data/UltimateLeaderboard/Templates.
Q: What happens to the data on a server wipe?
A: By default, data wipes with a new save file, but you can disable this in the config (Wipe data on new save) to persist stats across wipes if desired.
Q: How do I add UltimateLeaderboard to the ServerPanel menu?
A: Follow these simple steps:
1. Open ServerPanel menu in-game and click "+ADD CATEGORY" button
2. Set these exact parameters:
Type: Plugin Plugin Name: UltimateLeaderboard Plugin Hook: API_OpenPlugin 3. Click "SAVE" button to create the category
Q: I see black images with Rust logo or get error 429 when loading images. What should I do?
A: These issues occur when there are problems downloading images from the internet. The UltimateLeaderboard plugin sends images to ImageLibrary but is not responsible for the downloading process itself. Error 429 typically occurs due to rate limits imposed by image hosting services like Imgur (see HTTP 429 documentation for more details). To fix this, enable Offline Image Mode which will use local images instead:
Enable the mode in config: Open "oxide/config/UltimateLeaderboard.json" (or "carbon/config/UltimateLeaderboard.json" for Carbon) Set "Enable Offline Image Mode": true Set up the images: Create folder "TheMevent" in "oxide/data" (or "carbon/data" for Carbon) Download PluginsStorage (click "CODE" → "Download ZIP") Extract the ZIP and copy all contents to the "TheMevent" folder Reload the plugin: Type o.reload UltimateLeaderboard (Oxide) or c.reload UltimateLeaderboard (Carbon) Note: If you want to add your own custom images, place them in the "TheMevent" folder and reference them with the "TheMevent/" prefix. For example: "TheMevent/Icon1.png", "TheMevent/MyCustomIcon.jpg", etc.
Q: What's the difference between UltimateLeaderboard awards and UltimateLeaderboardTop?
A: UltimateLeaderboardTop is a companion plugin that automatically manages player privileges based on leaderboard positions.
Main Plugin Awards: Gives actual rewards (kits, money, commands) to top players after wipe - rewards are given once when player connects. UltimateLeaderboardTop: Continuously manages privileges (VIP groups, permissions) as players enter/exit top positions in real-time. To display awards in UI while using UltimateLeaderboardTop:
Configure awards in UltimateLeaderboard config Configure awards in UltimateLeaderboardTop config Set "Automatically give rewards after the wipe": false Q: Can UltimateLeaderboardTop give items/kits to players?
A: No, UltimateLeaderboardTop is designed only for reversible actions (permissions, groups, etc.). Since items can't be taken back from players when they leave top positions, item rewards are not supported. Use the main plugin's awards system for item rewards instead.
Q: How do I configure rewards for top players?
A: There are two reward systems available:
UltimateLeaderboard Awards (Post-Wipe Rewards):
Configure in the main plugin's config file under "Awards Settings":
Set award categories (e.g., "Most Kills", "Top Gatherer") Define criteria: loot type, prefab, and minimum amount required Set rewards: commands to execute (give items, kits, money, etc.) Awards are given once when top players connect after a wipe UltimateLeaderboardTop (Real-time Privileges):
Configure in UltimateLeaderboardTop.json:
Set leaderboard types to monitor (kills, points, playtime, etc.) Define top positions (1st, 2nd, 3rd, etc.) Configure "Enter place commands" (given when player reaches position) Configure "Exit place commands" (executed when player loses position) Use for permissions, groups, temporary privileges Example UltimateLeaderboardTop configuration:
{ "Loot type": "Kill", "Prefab": "kills", "Places settings": { "1": { "Enter place commands": ["o.usergroup add %steamid% vip"], "Exit place commands": ["o.usergroup remove %steamid% vip"] } } } Q: What are Custom Titles and how do they work?
A: Custom Titles automatically display achievement-based titles in chat for top players. For example, top killers get "[Killer]" title, top builders get "[Builder]" title, etc. Requires BetterChat plugin to work. Titles are updated automatically based on leaderboard positions and can be configured with priority system and limits.
Q: Why don't I see my statistics updated immediately on the leaderboard?
A: The leaderboard is cached and refreshes periodically (configurable interval) to minimize server load and ensure optimal performance. This means statistics may take a few minutes to appear on the leaderboard after the action is performed. The caching system helps maintain smooth server operation even with large player bases and extensive statistics tracking.
Q: How can I track multiple similar items or entities with one statistic?
A: You can combine multiple prefabs using the pipe symbol | in the prefab field. For example, to track all types of scientists as one "NPC Kills" statistic, use: npc_tunneldweller|npc_underwaterdweller|scientistnpc_arena|scientistnpc_bradley. This is useful for grouping similar items, resources, or entities into a single tracked category.
Q: How do I find the correct prefab names for items, entities, or events?
A: There are several ways to find prefab names:
In-game console command: Use leaderboard.find.short.prefab <search_term> in the server console to search for prefabs containing your search term. For example: leaderboard.find.short.prefab scientist will show all prefabs containing "scientist". F1 console spawn command: In-game, open F1 console and use the spawn command to see available entity prefabs. Type spawn followed by part of the name to see matching options. Item shortnames: For items, use their shortname (e.g., "stones", "metal.ore", "wood"). You can find these by examining items in your inventory or using item-related commands. Plugin documentation: Check the "Custom Prefabs" and "Available Loot Types" sections in this plugin's description for comprehensive lists of supported prefabs and loot types. Q: How can I output the sum of all values by type of statistics (for example, all kills, all loot collected)?
A: Use the prefab total_sum for the desired LootType. For example, to show the total number of all player kills, specify the LootType Kill and the prefab total_sum in the column or block settings. It works for any type: Kill, Gather, Craft, Event, and others.
Q: How does the leaderboard scoring system work?
A: The leaderboard uses a points-based scoring system. Points are earned from in-game actions, and each action has:
Loot Type - The category of action (e.g., Kill, Gather, Construction, Craft, Event) Prefab/Short Name - The specific item or entity (e.g., "kills", "stones", "helicopter", "supply_drop") Score Value - The points awarded for this action (configured in Loot Settings) When a player performs an action:
The plugin looks up the score for that action type + prefab combination Multiplies the score by the action value (usually 1 per action) Adds it to the player's total Points Example scores (from config):
Player kills: +1.0 point per kill Deaths: -1.0 point per death Gathering stone: +0.1 point per stone Supply drop looted: +3.0 points Bradley crate: +5.0 points Helicopter kill: +15.0 points Bradley kill: +10.0 points How to become top player:
Perform actions that have scores configured in Loot Settings Accumulate the most total Points The leaderboard ranks players by their Points value (or other tracked stats) Q: What award types are available and how do I configure them?
A: UltimateLeaderboard supports 8 award types:
Command - Execute console commands. Supports %steamid% placeholder. Use | to separate multiple commands.
Example: "Command (%steamid%)": "inventory.giveto %steamid% rifle.ak 1|oxide.usergroup add %steamid% vip" Kit - Give kits from Kits plugin. Requires Kits plugin to be loaded.
Example: "Type": "Kit", "Kit Name": "vip_starter" ServerRewards - Add reward points. Requires ServerRewards plugin.
Example: "Type": "ServerRewards", "Amount": 1000 Economics - Deposit money via Economics plugin.
Example: "Type": "Economics", "Amount": 5000 BankSystem - Deposit money to player's bank account.
Example: "Type": "BankSystem", "Amount": 2500 GameStores - Add balance via GameStoresRUST plugin.
Example: "Type": "GameStores", "Amount": 100 MoscowOVH - Add balance via RustStore plugin (Moscow OVH integration).
Example: "Type": "MoscowOVH", "Amount": 50
💻 Custom Prefabs
UltimateLeaderboard supports advanced custom prefabs for granular statistics tracking and display:
total_play_time - Total playtime (in seconds) current_playtime - Current session duration kdr - Kill/Death ratio points - Internal points system longest_kill_distance - Longest kill distance record total_hits - Total player hits total_resources - Total resources gathered total_items_crafted - Items crafted events_won - Event victories structures_built - Structures built upgrades_performed - Building upgrades name/nickname - Player display name formatted_total_playtime - Human-readable playtime (Xd Xh Xm) kd - K/D formatted as "Kills/Deaths" favorite_resource - Most gathered resource favorite_crafted_item - Most crafted item favorite_event - Most won event favorite_building_material - Preferred building material favorite_weapon - Most used weapon total_quests_completed - Total completed quests total_sum - Sum of all values for the selected LootType. For example, using total_sum with LootType Kill will show the total number of all kills for the player (across all kill categories). Works for any LootType: Kill, Gather, Craft, Event, etc.
📊 Available Loot Types
None Construction Medical Event
Available prefabs: Convoy Sputnik Caravan GasStationEvent AirEvent SatDishEvent Triangulation WaterEvent HarborEvent FerryTerminalEvent ArcticBaseEvent JunkyardEvent SupermarketEvent PowerPlantEvent ArmoredTrainEvent SurvivalArena KillBoss PaintballTeam PaintballFFA GunGame ZombieInfection TugboatPirates SpaceEvent AbandonedBase DungeonEvent FlyingCargoEvent AirfieldEvent Gather Kill
Available custom prefabs: helisignals_{skin} - Tracks helicopter kills from HeliSignals (e.g., "helisignals_2920175997") bradleydrops_{skin} - Tracks bradley kills from BradleyDrops (e.g., "bradleydrops_2905355269") roadbradley_{profile} - Tracks bradley kills from RoadBradley (e.g., "roadbradley_easy") helicopter - Tracks helicopter kills Custom NPC support: horde_npc - For NPCs from ZombieHorde plugin raidbase_npc - For NPCs from Raidable Bases plugin For NPCs from NpcSpawn use NPC name as key (BossMonster, BetterNpc, NPCs from events, etc.) Other entity prefabs can be found in-game by using the "spawn" command in the F1 console Consume Raid Death
Available custom prefabs: Custom NPC support: horde_npc - For NPCs from ZombieHorde plugin raidbase_npc - For NPCs from Raidable Bases plugin For NPCs from NpcSpawn use NPC name as key (BossMonster, BetterNpc, NPCs from events, etc.) Craft Crate LootItems Fishing Puzzle
Available prefabs: keycard_1 keycard_2 keycard_3 Custom Upgrade ShotFired ExplosiveUsed RecycleItem BodyHits WeaponUsed RaidableBases
Available prefabs: easy medium hard expert nightmare Economy
Available prefabs: ShoppyStock Economics IQEconomic Quest EconomyBalance
Available prefabs: Economics ServerRewards BankSystem IQEconomic Gambling
Available prefabs: BlackjackDeposit BlackjackWon SlotDeposit SlotWon PockerDeposit PockerWon WheelDeposit WheelWon SkillTree
Available prefabs: xp - Experience points earned level - Skill tree level reached Trivia MixingTable
📡 API for Developers
UltimateLeaderboard provides a comprehensive API for developers to integrate with other plugins and extend functionality:
📊 Methods
JArray API_GetUltimateLeaderboardUsers(int offset, int limit, int? columnIndex = null) - Get leaderboard users with pagination float API_GetPlayerStat(ulong playerId, string lootType, string shortname) - Get specific player statistic bool API_IsHiddenFromLeaderboard(ulong playerId) - Check if player is hidden from leaderboard void API_OnItemGather(ulong player, string shortname, int amount) - Add gather statistics for a player void API_OnEventWin(ulong userID, string eventName, int amount = 1) - Record event wins for a player 🎣 Hooks
void OnUltimateLeaderboardContent(BasePlayer player, string categoryType, CuiElementContainer container) - Called when displaying custom category content void OnUltimateLeaderboardCached() - Called when leaderboard data is cached and ready- #ultimateleaderboard
- #leaderboard
- (and 20 more)
-
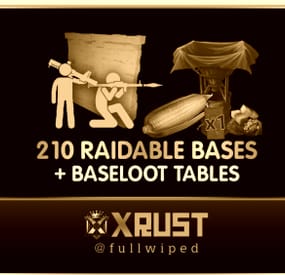
$79.99$69.99Raidable Bases Mega Pack & Loot Tables (Easy to Nightmare 210 Bases)
This is a custom package designed by us, featuring 210 unique bases and a specialized loot setup for five different difficulty levels, ranging from Easy to Nightmare.
Note: The building skins in the package showcase images may differ from the spawned bases or use the default building skin.
This MEGA PACK is an upgraded version of the FullWiped-110 Bases + Loot Pack we previously offered. If you've already purchased the FullWiped-110 Bases + Loot Pack, you only need to buy the expansion pack, which includes 100 new bases ranging from Easy to Hard. Get it here: https://codefling.com/bases/raidable-bases-pack-100-bases-expanded-package-from-easy-to-hard
Warning: The Raidable Bases plugin requires the Copy Paste plugin to function. You must install both for this bases pack to work.
🔗Raidable Bases (Paid): https://codefling.com/plugins/raidable-bases
🔗Copy Paste (Free): https://umod.org/plugins/copy-paste
This Raidable Bases Pack & Loot Tables package includes:
🏡70 Easy Bases +🗡️Base_Loot Tables (Easy "Vanilla" and "Enhanced" tables included)
🏡60 Medium Bases +🗡️Base_Loot Tables (Medium "Vanilla" and "Enhanced" tables included)
🏡60 Hard Bases +🗡️Base_Loot Tables (Hard "Vanilla" and "Enhanced" tables included)
🏡10 Expert Bases +🗡️Base_Loot Tables (Expert "Vanilla" and "Enhanced" tables included)
🏡10 Nightmare Bases +🗡️Base_Loot Tables (Nightmare "Vanilla" and "Enhanced" tables included)
Beware: Our loot table package includes only the 5-tier loot tables within the Base_loot folder, ranging from easy to nightmare.
It does not include the loot tables from the Difficulty_Loot or Weekday_Loot folders.
VANILLA AND ENHANCED LOOT TABLES FOR RAIDABLE BASES
This package includes 10 different base loot table files, ensuring a well-structured and advanced configuration for every difficulty level, from Easy to Nightmare.
- 5 loot files for the Vanilla setup (Easy, Medium, Hard, Expert, Nightmare), offering a balanced loot experience with some junk items, staying close to a 1x rate.
- 5 loot files for the Enhanced setup (Easy, Medium, Hard, Expert, Nightmare), designed for modded servers with 2x, 3x, or higher gather rates, featuring cleaner loot tables with minimal junk and more valuable rewards.
📁Installation Path:
All loot table files are intended for the 📁/oxide/data/RaidableBases/Base_Loot directory.
⚠️Setup Requirement: You must choose and install only one loot table setup at a time—either Vanilla or Enhanced. If you want to switch, you can replace the current files with the other set, but both cannot be active simultaneously.
For those exclusively seeking the loot table, we offer it as a standalone product: https://codefling.com/customizations/raidable-bases-loot-tables-pack
(Note: If you've purchased our Raidable Bases Mega Pack & Loot Tables (210 Bases) package, there is no need to buy this separately.)
WARNING: TWO DIFFERENT INSTALLATION METHODS
(PLEASE READ BOTH AND APPLY ONLY THE ONE THAT FITS YOUR NEEDS)
⚙️INSTALLATION GUIDE 1:
(If you do not have a custom configuration and are not a professional in server configurations, choose this option. However, if you already have your own configuration and profile settings and do not wish to use the optional configs we provide—in other words, if you only need the bases and loot tables—use the second installation guide instead.)
▶ Step 1: Place the Config File
From the extracted ZIP files, locate the config folder and find the RaidableBases.json file. Move it to the following directory:
📁/serverfiles/oxide/config
▶ Step 2: Place the Bases
From the extracted ZIP files, locate the copypaste folder and move it to the following directory:
📁/serverfiles/oxide/data
▶ Step 3: Place the Base_Loot Tables
From the extracted ZIP files, locate the Base_Loot folder and move it to the following directory:
📁/serverfiles/oxide/data/RaidableBases
Important: If there are any existing JSON files inside this folder that are not part of our loot tables, delete them to ensure proper functionality.
Choose between Vanilla or Enhanced loot tables based on your preference.
If the folder is named "Base_Loot (Enhanced loot)", remove the text in parentheses so that the correct folder name is simply: "Base_Loot" (Otherwise, the loot tables will not work properly.)
▶ Step 4: Place the Profiles Folder
From the extracted ZIP files, locate the profiles folder and move it to the following directory:
📁/serverfiles/oxide/data/RaidableBases
Why Are Profiles Important?
The profiles folder contains crucial settings that allow you to:
✔️ Enable/disable the dome
✔️ Enable/disable NPCs
✔️ Adjust the number of lootable items
These are just a few examples—there are dozens of important settings that directly affect how raid bases function. The config file alone is not enough—these files play a major role in customizing your raid bases.
⚡ I strongly recommend reviewing each difficulty setting (Easy to Nightmare) inside the profiles folder and adjusting them based on your needs.
▶ Step 5: Restart the plugin via RCON:
o.reload RaidableBases
⚙️INSTALLATION GUIDE 2:
(Use this installation method if you do not want to use our configurations and instead prefer to use your own config files and your own 📁/oxide/data/RaidableBases/Profiles configurations.)
In this case, you only need to add the bases. To do this, use the following commands in RCON:
▶ Step 1:
You can add bases one by one or in bulk.
After executing the commands in RCON, the bases will be registered inside the Profiles configuration.
If you do not want to deal with these adjustments, it is recommended to use Installation Guide 1 instead.
A- Example RCON commands:
rb.config add "Easy Bases" fullwipedeasy1 rb.config add "Hard Bases" fullwipedhard1 B- Commands to Integrate Raid Bases in Bulk via RCON:
rb.config add "Easy Bases" fullwipedeasy1 fullwipedeasy2 fullwipedeasy3 fullwipedeasy4 fullwipedeasy5 fullwipedeasy6 fullwipedeasy7 fullwipedeasy8 fullwipedeasy9 fullwipedeasy10 fullwipedeasy11 fullwipedeasy12 fullwipedeasy13 fullwipedeasy14 fullwipedeasy15 fullwipedeasy16 fullwipedeasy17 fullwipedeasy18 fullwipedeasy19 fullwipedeasy20 fullwipedeasy21 fullwipedeasy22 fullwipedeasy23 fullwipedeasy24 fullwipedeasy25 fullwipedeasy26 fullwipedeasy27 fullwipedeasy28 fullwipedeasy29 fullwipedeasy30 fullwipedeasy31 fullwipedeasy32 fullwipedeasy33 fullwipedeasy34 fullwipedeasy35 fullwipedeasy36 fullwipedeasy37 fullwipedeasy38 fullwipedeasy39 fullwipedeasy40 fullwipedeasy41 fullwipedeasy42 fullwipedeasy43 fullwipedeasy44 fullwipedeasy45 fullwipedeasy46 fullwipedeasy47 fullwipedeasy48 fullwipedeasy49 fullwipedeasy50 fullwipedeasy51 fullwipedeasy52 fullwipedeasy53 fullwipedeasy54 fullwipedeasy55 fullwipedeasy56 fullwipedeasy57 fullwipedeasy58 fullwipedeasy59 fullwipedeasy60 fullwipedeasy61 fullwipedeasy62 fullwipedeasy63 fullwipedeasy64 fullwipedeasy65 fullwipedeasy66 fullwipedeasy67 fullwipedeasy68 fullwipedeasy69 fullwipedeasy70 rb.config add "Medium Bases" fullwipedmed1 fullwipedmed2 fullwipedmed3 fullwipedmed4 fullwipedmed5 fullwipedmed6 fullwipedmed7 fullwipedmed8 fullwipedmed9 fullwipedmed10 fullwipedmed11 fullwipedmed12 fullwipedmed13 fullwipedmed14 fullwipedmed15 fullwipedmed16 fullwipedmed17 fullwipedmed18 fullwipedmed19 fullwipedmed20 fullwipedmed21 fullwipedmed22 fullwipedmed23 fullwipedmed24 fullwipedmed25 fullwipedmed26 fullwipedmed27 fullwipedmed28 fullwipedmed29 fullwipedmed30 fullwipedmed31 fullwipedmed32 fullwipedmed33 fullwipedmed34 fullwipedmed35 fullwipedmed36 fullwipedmed37 fullwipedmed38 fullwipedmed39 fullwipedmed40 fullwipedmed41 fullwipedmed42 fullwipedmed43 fullwipedmed44 fullwipedmed45 fullwipedmed46 fullwipedmed47 fullwipedmed48 fullwipedmed49 fullwipedmed50 fullwipedmed51 fullwipedmed52 fullwipedmed53 fullwipedmed54 fullwipedmed55 fullwipedmed56 fullwipedmed57 fullwipedmed58 fullwipedmed59 fullwipedmed60 rb.config add "Hard Bases" fullwipedhard1 fullwipedhard2 fullwipedhard3 fullwipedhard4 fullwipedhard5 fullwipedhard6 fullwipedhard7 fullwipedhard8 fullwipedhard9 fullwipedhard10 fullwipedhard11 fullwipedhard12 fullwipedhard13 fullwipedhard14 fullwipedhard15 fullwipedhard16 fullwipedhard17 fullwipedhard18 fullwipedhard19 fullwipedhard20 fullwipedhard21 fullwipedhard22 fullwipedhard23 fullwipedhard24 fullwipedhard25 fullwipedhard26 fullwipedhard27 fullwipedhard28 fullwipedhard29 fullwipedhard30 fullwipedhard31 fullwipedhard32 fullwipedhard33 fullwipedhard34 fullwipedhard35 fullwipedhard36 fullwipedhard37 fullwipedhard38 fullwipedhard39 fullwipedhard40 fullwipedhard41 fullwipedhard42 fullwipedhard43 fullwipedhard44 fullwipedhard45 fullwipedhard46 fullwipedhard47 fullwipedhard48 fullwipedhard49 fullwipedhard50 fullwipedhard51 fullwipedhard52 fullwipedhard53 fullwipedhard54 fullwipedhard55 fullwipedhard56 fullwipedhard57 fullwipedhard58 fullwipedhard59 fullwipedhard60 rb.config add "Expert Bases" fullwipedexp1 fullwipedexp2 fullwipedexp3 fullwipedexp4 fullwipedexp5 fullwipedexp6 fullwipedexp7 fullwipedexp8 fullwipedexp9 fullwipedexp10 rb.config add "Nightmare Bases" fullwipednight1 fullwipednight2 fullwipednight3 fullwipednight4 fullwipednight5 fullwipednight6 fullwipednight7 fullwipednight8 fullwipednight9 fullwipednight10 ▶ Step 2: Place the Base_Loot Tables
From the extracted ZIP files, locate the Base_Loot folder and move it to the following directory:
📁/serverfiles/oxide/data/RaidableBases
Important: If there are any existing JSON files inside this folder that are not part of our loot tables, delete them to ensure proper functionality.
Choose between Vanilla or Enhanced loot tables based on your preference.
If the folder is named "Base_Loot (Enhanced loot)", remove the text in parentheses so that the correct folder name is simply: "Base_Loot" (Otherwise, the loot tables will not work properly.)
▶ Step 3: Restart the plugin via RCON:
o.reload RaidableBases
EXTRA IMPORTANT INFORMATIONS:
We do not use a dome, NPCs, or arena walls around raid bases on our servers, and in the ZIP file we provided, these features are also disabled by default. If you want to enable them, you will need to adjust the settings accordingly.
For example, to enable the dome, follow the steps below:
Navigate to:
📁/oxide/data/RaidableBases/Profiles
Open the files inside the Profiles folder with a text editor.
Locate the following settings:
(This is already set to false because it is required for markers to appear on the map.)
"Spawn Silently (No Notification, No Dome, No Map Marker)": false,
"Create Dome Around Event Using Spheres (0 = disabled, recommended = 5)": 0,
Change the value from 0 to 5 as shown below:
"Create Dome Around Event Using Spheres (0 = disabled, recommended = 5)": 5,
Additionally, the loot amount for bases varies depending on the difficulty level (easy, medium, hard, expert, and nightmare). You can adjust this setting in the same Profiles location according to your needs:
"Amount Of Items To Spawn": 210, For example, in medium bases, this value is set to 210, which determines the total number of items that will appear in crates, furnaces, and the cupboard.
Our current configuration is specifically adjusted to prevent players from feeling overwhelmed by massive buildings right after a wipe. We have configured Maintained Events accordingly to ensure a balanced experience.
In our setup:
- Timed events and purchasable events are disabled.
- After a wipe, easy bases will start spawning 30 minutes later.
- Nightmare bases will begin spawning 48 hours (2 days) later.
Imagine starting the game with just a torch in hand and immediately encountering a nightmare base on the shore.
You’d likely quit the game right away—this setting is crucial for us to avoid such scenarios.
Configuration Example: 📁/serverfiles/oxide/config
"Maintained Events": {
"Always Maintain Max Events": true,
"Max Maintained Events": 30,
"Enable X Hours After Wipe (0 = immediately)": {
"Easy": 0.5,
"Medium": 1.0,
"Hard": 3.0,
"Expert": 24.0,
"Nightmare": 48.0
All of our bases from Easy to Nightmare are equipped with turret protection.
If you do not want turrets to spawn in your raidable bases on your server, you can use the following method.
Go to the file path /data/RaidableBases/Profiles, open the JSON files inside with a text editor, and apply the following:
"Kill These Prefabs After Paste": [ "assets/prefabs/npc/autoturret/autoturret_deployed.prefab", "autoturret_deployed" ],
If you are satisfied with this package, you can support us by leaving a 5-star review on the site where you purchased it. Your feedback motivates us to continue improving and providing even better configurations for dedicated server owners like you.
Thank you! ❤️