
GangstaPichu's Wishlist
-
$14.90
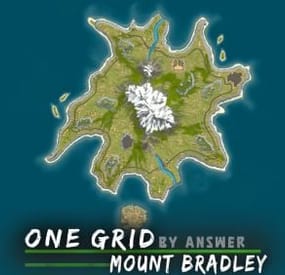
Mount Bradley: ONE GRiD
A 'one grid' custom map designed for high performance. The mountain in the middle provides unique landscape, while also containing 2 entrances that lead to the bradley APC.
This map is constantly supported and updated for the current version of the game with all updates!
NOTES
– If you need support, join my brand new discord server @ discord.gg/TJxwpKT2Ge
– The password for the editor is included with the map. (you're allowed to edit the map for your own use)
- Prefabs: 2803 (high performance)
HIGHLIGHTED FEATURES
> Detailed terrain work – This map was made entirely manual.
> 4 islands that players can build on.
> 2 custom barges that players can build on, marked with X on the map.
CUSTOM MONUMENTS
> Cobalt Bunker - Blue Keycard Puzzle (contains the bradley apc, has 2 entrances in the mountain)
> Military Settlement - MLRS, scientists, blue keycard puzzle
> Improvised Hangar - Green Keycard Puzzle
> Tugboat Docks - contains Tugboat spawns
> Bandit Fishing Village - Safe zone
CUSTOM PREFABS
> 2 bridges over the rivers.
> 2 buildable barges on the water marked with X.
> Waterfalls
FACEPUNCH MONUMENTS
> Nuclear Missile Silo
> Sunken HQM Quarry
> Lighthouse
> Oxum's Gas Station (motorbikes will spawn here)
> Underwater Lab
> Small and Large Oil Rig
-
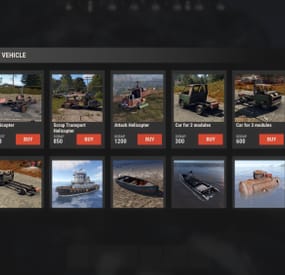
$15.95$11.95Vehicle Buy
Immerse yourself in the world of Rust with the VehicleBuy plugin! This powerful tool allows authorized players to easily access the /vehiclebuy command, which opens an intuitive interface for purchasing a variety of vehicles. With multiple payment options, including Items, Economics, and Server Rewards, you can enjoy a smooth gaming experience. Additionally, the Buy Cooldown feature helps maintain balance in the game.
Upon purchasing a vehicle, players receive a unique gift: a skinned crate for land vehicles or a lifebuoy for water vehicles, which can be conveniently stored in their inventory.
🌟 Features of VehicleBuy
User-Friendly Interface: Access vehicle purchases through an easy-to-navigate GUI. Flexible Payment Methods: Choose from various payment options to suit your preferences. Customizable Settings: Administrators can adjust prices and fees as needed. Convenient Vehicle Recall: Use the /callback command to quickly retrieve your vehicle. Easy Re-packaging: Re-package vehicles using the /pickup command or by hitting them with a hammer.
🎮 Commands
/vehiclebuy: Open the vehicle purchase interface (for players) /callback "VehicleName": Retrieve your purchased vehicle /pickup: Re-package your vehicle or hit it three times with a hammer Admin Command: (VehicleName.add SteamID): Spawn vehicles directly into players' inventories vehiclebuy.template [fullscreen/inmenu]: Customize your UI templates with options for fullscreen or in-menu displays (only server console)
🛡️ Permissions
vehiclebuy.use: Allows players to use the /vehiclebuy command and access the vehicle purchase interface. vehiclebuy.free: Grants players the ability to acquire vehicles for free, bypassing the payment requirements. vehiclebuy.pickup: Permits players to use the /pickup command to re-package their vehicles. vehiclebuy.recall: Allows players to use the /callback command to retrieve their vehicles.
📨 Video Overview
old overview:
🧪 Test Server
Join our test server to experience all our unique features firsthand!
Copy the IP address below to start playing!
connect 194.147.90.239:28015
📚 FAQ
Q: Where can I see an example of a config?
A: Config
Q: How do I add VehicleBuy to the ServerPanel menu?
A: Follow these simple steps:
1. Open ServerPanel menu in-game and click "+ADD CATEGORY" button
2. Set these exact parameters:
Type: Plugin Plugin Name: VehicleBuy Plugin Hook: API_OpenPlugin 3. Click "SAVE" button to create the category
Note: If VehicleBuy doesn't appear in ServerPanel menu, make sure both plugins are loaded and you typed the parameters exactly as shown above.
Q: I'm using the KazuraVehicles plugin and VehicleBuy doesn't work / throws errors. What should I do?
A: IMPORTANT: if you're using KazuraVehicles, you MUST enable a special dependency inside VehicleBuy, otherwise it simply will NOT work.
1) Open the plugin file Plugins/VehicleBuy/VehicleBuy.cs (or oxide/plugins/VehicleBuy.cs on your server).
2) At the very top of the file, find this line:
// #Requires: KaruzaVehiclesCommon 3) Change it EXACTLY to this (just remove the # after //😞
// Requires: KaruzaVehiclesCommon 4) Save the file and reload the plugin with o.reload VehicleBuy (Oxide) or c.reload VehicleBuy (Carbon).
If you skip ANY of these 4 steps, VehicleBuy + KazuraVehicles will NOT work correctly. Do all 4.
-
$2.00
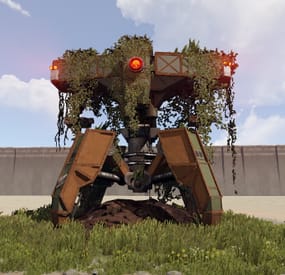
The Caretaker
Introducing "The Cobolt Caretaker"
An immersive addition to your rust server pulled from the depths of concept limbo. Approach with caution as the sleeping giant will awaken and rain hell fire upon any who dare draw agro within its vision. Patient players will be rewarded with a lootable crate ontop of the caretaker.
The Sentries can be removed if you'd like it just as a static monument for players to interact with.
For any issues please Reach out to me on Discord: potato_sheep
- #caretaker
- #prefab
- (and 4 more)
-

$8.99
XDFriends
Friends Plugin for Rust Server
"Friends" is a robust and flexible plugin designed to enhance the in-game friends system in Rust.
It will help streamline the interaction between friends, simplify the process of authorization,
and access to important game elements, and manage damage between friends.
Key Features:
Damage Control: An integrated feature of damage blocking among friends helps prevent accidental damage.
This feature can be easily enabled or disabled by command.
Enhanced Friends Authorization System: The plugin allows activating friends' authorization for a wide range of elements, including:
Turrets SAM site Code locks Key locks Cupboards Upon removal from the friends' list, the player will automatically be deauthorized from all the listed elements.
Remote Friend Invitation: With a special command, you can invite a player to be friends, even from afar.
Authorization Settings Flexibility: Choose between two authorization methods for code locks - guest authorization ("guestPlayers") or full authorization ("whitelistPlayers").
Compatibility and Optimization: The "Friends" plugin is optimized for maximum performance and is compatible with many other plugins.
Extensive API: The plugin offers a comprehensive API for developers, providing flexibility and the possibility of further customization.
Detailed Logging System: "Friends" includes a logging system, providing transparency and control over activities.
Optimize your gameplay with the "Friends" plugin for Rust server.
It will help improve your gaming experience, simplify interactions with friends, and make your server safer and more manageable.
Commands:
/team - Additional info /team invite/add <Nickname> /team ff - Friendly fire
Default Configuration:
{ "Chat commands": [ "team", "ff", "friend" ], "Maximum number of friends": 3, "Time to accept team invite (in seconds)": 20.0, "Enable friend authorization for turrets?": true, "Enable friend authorization for SAM sites?": true, "Enable friend authorization for code locks?": true, "Enable friend authorization for key locks?": true, "Enable friend authorization for cupboards?": true, "Authorization method for code locks (guestPlayers - guest authorization, whitelistPlayers - full authorization)": "guestPlayers", "Enable logging system ?": false, "Chat prefix (IQChat)": "<color=#5cd6skykey>[Friends]</color>\n" }
API for Developers
HasFriend(ulong playerId, ulong friendId) //Checks if the specified user is a friend of the player. HasFriends(string playerS, string friendS) //Checks if the player has friends by their string identifiers. IsFriend(ulong playerId, ulong friendId) //Checks if the specified user is a friend of the player. AreFriends(ulong playerId, ulong friendId) //Checks if the specified players are friends. AreFriends(string playerS, string friendS) //Checks if the specified players are friends by their string identifiers. IsFriends(string playerS, string friendS) //Checks if the player has friends by their string identifiers. GetFriends(ulong playerId) //Returns the player's friends list. GetFriendList(string playerS) //Returns the player's friends list by the string identifier. GetFriends(string playerS) //Returns the player's friends list by the string identifier. IsFriendOf(ulong playerId) //Returns a list of players who are friends of the specified player. IsFriendOf(string playerS) //Returns a list of players who are friends of the specified player by the string identifier. GetFriendList(ulong playerId) //Returns the friends list of the specified player.
-
.thumb.gif.aeeae3aca353f7d6065b09265eba856b.gif)
$21.95$15.95HUD Info Panel System
Enhance your Rust server with the HUD Info Panel System, a highly customizable HUD interface that empowers players to tailor their gaming experience. Display critical server stats and ongoing events with a sleek, user-friendly design, and enjoy seamless integration with other plugins via a robust API. With extensive customization options, this plugin adapts to any play style!
⭐ Features of HUD Info Panel System
Fully customizable HUD panels with drag-and-drop positioning Real-time tracking of 24+ server events and entities Built-in economics display (supports Economics/ServerRewards) Custom button system with image/command binding Dynamic event icons with color customization Multi-anchor positioning (UpperLeft/UpperRight) Automatic panel hiding system Optimized for performance
🎥 Showcase
🎮 Commands
/panel hide - hide panel /panel show - show panel
🛡️ Permissions
The plugin registers various permissions for different features and settings. Ensure players have the necessary permissions to access specific customization options.
⚓ Panel Anchors
UpperLeft UpperRight
💡 API
The plugin provides an API method to notify it of custom event statuses. Here's an example of how to use it in another plugin:
public class EmptyPlugin : RustPlugin { [PluginReference] private Plugin PanelSystem; private void OnServerInitialized() { EventChangeStatus("UserNotify", true); } private void Unload() { EventChangeStatus("UserNotify", false); } private void EventChangeStatus(string key, bool spawned) { PanelSystem.Call("OnEventChangeStatus", key, spawned); } } And the corresponding configuration in PanelSystem:
{ "Enabled": true, "Image": "https://i.imgur.com/asflpJe.png", "Permission": "", "Type": 7, "Panel Settings": { "Enabled": true, "Permission": "", "Switch": true, "Color": true, "Size": true }, "Size Settings": { "Sizes": [ { "Size": 25.0, "Lang Key": "sizeBig", "Permission": "" }, { "Size": 20.0, "Lang Key": "sizeMedium", "Permission": "" }, { "Size": 15.0, "Lang Key": "sizeSmall", "Permission": "" } ], "Default Size (index)": 0 }, "Color Settings": { "Default Active Color ID": 0, "Default Inactive Color ID": 2 }, "Key (MUST BE UNIQUE)": "UserNotify" }
🗂️ Available Panel Types
The HUD Info Panel System supports a diverse set of panel types to display various server stats and events:
Online Sleepers Time CH47 Helicopter Bradley Airdrop Economics Custom CargoShip Button WipeBlock Convoy ArmoredTrain Sputnik SpaceEvent AirEvent ArcticBaseEvent GasStationEvent ShipwreckEvent HarborEvent JunkyardEvent SatDishEvent WaterEvent PowerPlantEvent KillBoss TravellingVendor Caravan DungeonEvents
📚 FAQ
Q: How do I make the buttons hide when I click on the logo?
A: In the logo settings, specify the command to hide the buttons (panelsystem.buttons). Example: https://pastebin.com/Ksggh718