About Custom Rewards
Introduction
CustomRewards is a turnkey solution to reward player engagement. This plugin allows you to give a player any type of reward based on conditions you'll be able to configure. Whether you're a server admin aiming to boost player engagement or a developer creating complex reward systems, CustomRewards is your go-to solution.
Main Features:
- Diversity of Rewards: Set up a huge variety of rewards for your players, ranging from items to special permissions, including server command execution.
- Reward Templates: Create different reward models for various events or scenarios, providing maximum flexibility to meet your server's needs.
- Award Conditions: Ensure only eligible players receive certain rewards by setting conditions based on groups, permissions, and more.
Integration with Other Plugins:
CustomRewards isn't just a standalone, it can also be seamlessly integrated with other externals plugins such as VoteSystem or PlaytimeTracker :
- Vote System : By using Custom Reward with VoteSystem, your players will be able to obtain rewards by voting.
- PlayTime Reward (free) : By using CustomRewards with PlaytimeTracker, your players will be able to obtain rewards based on their playtime.
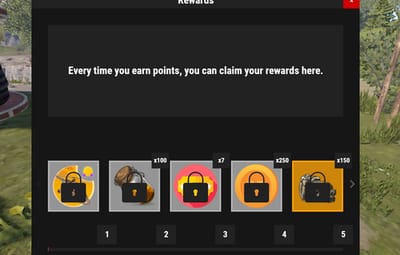
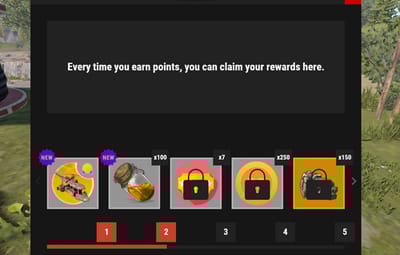
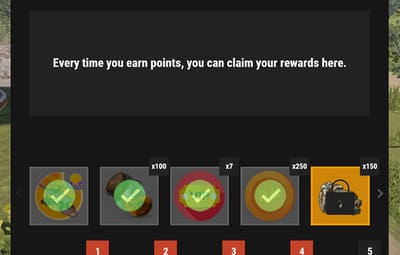
Interface Customization
Provide your players with an appealing visual experience with a fully customizable user interface, custom reward images, and colorful themes.
Expandability for Developers
For those looking to delve deeper, CustomRewards offers a robust API, allowing you to integrate your own point system or even other plugins !
Plugin's Future:
We always listen to the community! If you have a specific plugin you'd like to see integrated with CustomRewards, please let us know. Our goal is to make CustomRewards as versatile and useful as possible for all users.
Support :
I am very often available and will respond as quickly as possible to all your questions, here or on my Discord: https://discord.gg/JJnxFgP27G.
Full Documentation :
Feel free to check out the complete documentation here.
Commands (chat) :
- /CustomRewards_Give <type> <player name or id> <quantity> : available only for administrators or with permission CustomRewards.Admin
- The commands to show the UI need to be implemented in the configuration.
Permissions :
- CustomRewards.Admin : enable admin commands if not administrator
- CustomRewards.<Type>.Use : Permission linked to the type (rewards template), users without the permission will not be able to use the command to display the UI. Therefore, it's important to add the permission to your groups once the template is created!
How To use API :
private void Give_API(string rewardType, ulong playerId, int quantity) // Add quantity points for player (for referenced rewardType)
private int Get_API(string rewardType, ulong playerId) // Get quantity points for player (for referenced rewardType)
CustomRewards Configuration Tutorial
-
Step 1: Initial Setup :
- Ensure the CustomRewards_rewards folder is present in Oxide/Data. If not, the plugin will attempt to create it automatically, but it's good to check.
- Ensure
- For each reward type you want to configure, create a .json file in the CustomRewards_rewards folder. For instance, for a reward type called "VIP", you might have a VIP.json file.
-
Step 2: Basic Configuration In your .json file:
- "Enabled": Set this value to true to activate this reward type.
- "Commands for show UI": List of commands that will display the user interface for this reward type. For example: ["rewards_vip", "vip_rewards"].
-
Step 3: User Interface Configuration Under "UI Settings":
- Configure the appearance and layout of the user interface with properties like "Max Reward By Page", "Window Rect", etc.
- Set the theme colors under "Theme" using properties like "Colors". Each color is defined by an RGBA value.
- Configure rarity colors under "Rarity Colors".
- To modify the window title or description (above the rewards), go through the lang files (Oxide/Lang/<lang>/CustomRewards_<type>).
Example Lang file :{ "Messages": { "Title": "Rewards", "Description": "Every time you earn points, you can claim your rewards here." } }
-
Step 4: Reward Configuration Under "Rewards Settings":
- "Rewards List": Here, you'll define each individual reward for this type.
- "Rarity (Common - Rare - Epic - Legendary)": Set the reward's rarity.
- "Quantity": If the reward is an item, set the quantity here.
- "Item Shortname (optional)": If the reward is an item, set its short name here.
- "Custom image URL (optional)": For a custom image for the reward.
- "Server command (optional)": Commands to execute when this reward is claimed.
- "Grant Permissions ": Permissions to grant when this reward is claimed.
- "Grant Groups": Groups to grant when this reward is claimed.
- "Nedded Permissions": Permissions needed to claim this reward.
- "Nedded Group ": Groups needed to claim this reward.
-
Step 5: Plugin Extensions Under PluginExtensions, you can configure integration with other plugins:
- For PlaytimeTracker, use properties under "PlayTimeTracker" like "Count Afk Time?", "Added points", and "Add point every (in seconds)".
- Step 6: Save and Reload After completing your configuration, save the .json file and reload the plugin on your server.
Here's a sample configuration file to help you get started:

.thumb.gif.ab067f88fcfbfb310085ab8fd62983d6.gif)
.thumb.gif.719eacf214a8acc817bfbaa9f8192f08.gif)

.thumb.gif.be4d7c48ffb8b6bd133b250f73404356.gif)