
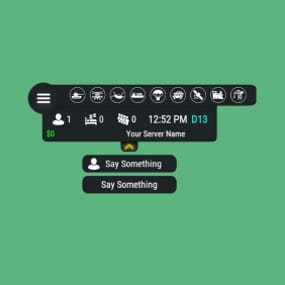
ServerPanel adds a player information menu to your server, where you can both share important and useful information with your players and integrate your plugins into it!
🌟 Features
User-Friendly Interface: Intuitive GUI for easy navigation and interaction.
Economy Integration: Supports various economy plugins for seamless financial management.
Dynamic Menu Categories: Organize functionalities into customizable categories for better user experience.
Extensive Configuration Options: Almost every aspect of the plugin can be customized, including messages, colors, sizes, fonts, tion.
Auto-Open Menu: Automatically displays the menu upon player connection, configurable per server settings.
Block Settings: Control access to the menu during building, raiding, or combat situations to enhance gameplay balance.
Multiple Economy Head Fields: Display various economic metrics such as balance, server rewards, and bank information.
Permission Management: Fine-tune permissions for different user roles to control access to features.
Localization Support: Easily translate and customize all messages for different languages.
Performance Optimized: Designed to minimize server lag while providing rich functionality.
Customizable Hooks: Integrate with existing economy systems using customizable hooks for adding, removing, and displaying balances.
Editor Position Change: Admins can now change editor positions with a simple click, choosing between left, center, or right alignments.
Command Enhancements: Commands are now processed with multiple arguments separated by "|", enabling bulk command processing.
🎮 Commands
/info – open menu
/sp.install (or) /welcome.install – open installer menu
sp.migrations – console command for updating plugin data structure when upgrading to new versions. Automatically creates backups before making changes.
sp.migrations list – shows available migrations and whether they need to run
sp.migrations run <version> – runs specific migration (e.g., "1.3.0")
sp.migrations run <version> force – forces migration even if not detected as needed
🛡️ Permissions
serverpanel.edit – allows players to edit the plugin settings and open the edit menu
serverpanelinstaller.admin - required to access the plugin installation functions
🎥 Video
🖼️ Showcase
Templates
Template V1
Template V2
Template V3
Template V5
Editor
Installer
🧪 TEST SERVER
Join our test server to view and experience all our unique features yourself!
Copy the IP Address below to start playing!
connect 194.147.90.239:28015
📊 Update Fields
ServerPanel supports dynamic update fields that can be used in your templates to display real-time information. These fields are automatically updated and can be used in text components, headers, and other interface elements.
Player Information
{online_players} – Number of currently online players
{sleeping_players} – Number of sleeping players
{all_players} – Total number of players (online + sleeping)
{max_players} – Maximum server capacity
{player_kills} – Player's kill count (requires KillRecords, Statistics, or UltimateLeaderboard)
{player_deaths} – Player's death count (requires KillRecords, Statistics, or UltimateLeaderboard)
{player_username} – Player's display name
{player_avatar} – Player's Steam ID for avatar display
Economy
{economy_economics} – Economics plugin balance
{economy_server_rewards} – ServerRewards points
{economy_bank_system} – BankSystem balance
Note: Economy fields are fully customizable in "oxide/config/ServerPanel.json" under "Economy Header Fields". You can add support for any economy plugin by configuring the appropriate hooks (Add, Balance, Remove). Custom keys can be created and used in templates just like the default ones.
Server Information
{server_name} – Server hostname
{server_description} – Server description
{server_url} – Server website URL
{server_headerimage} – Server header image URL
{server_fps} – Current server FPS
{server_entities} – Number of entities on server
{seed} – World seed
{worldsize} – World size
{ip} – Server IP address
{port} – Server port
{server_time} – Current server time (YYYY-MM-DD HH:MM:SS)
{tod_time} – Time of day (24-hour format)
{realtime} – Server uptime in seconds
{map_size} – Map size in meters
{map_url} – Custom map URL
{save_interval} – Auto-save interval
{pve} – PvE mode status (true/false)
Player Stats
{player_health} – Current health
{player_maxhealth} – Maximum health
{player_calories} – Calorie level
{player_hydration} – Hydration level
{player_radiation} – Radiation poisoning level
{player_comfort} – Comfort level
{player_bleeding} – Bleeding amount
{player_temperature} – Body temperature
{player_wetness} – Wetness level
{player_oxygen} – Oxygen level
{player_poison} – Poison level
{player_heartrate} – Heart rate
Player Position
{player_position_x} – X coordinate
{player_position_y} – Y coordinate (height)
{player_position_z} – Z coordinate
{player_rotation} – Player rotation (degrees)
Player Connection
{player_ping} – Connection time in seconds
{player_ip} – Player's IP address
{player_auth_level} – Authorization level (0=Player, 1=Moderator, 2=Admin)
{player_steam_id} – Steam ID
{player_connected_time} – Connection start time
{player_idle_time} – Idle time (HH:MM:SS)
Player States
{player_sleeping} – Is sleeping (true/false)
{player_wounded} – Is wounded (true/false)
{player_dead} – Is dead (true/false)
{player_building_blocked} – Is building blocked (true/false)
{player_safe_zone} – Is in safe zone (true/false)
{player_swimming} – Is swimming (true/false)
{player_on_ground} – Is on ground (true/false)
{player_flying} – Is flying (true/false)
{player_admin} – Is admin (true/false)
{player_developer} – Is developer (true/false)
Network & Performance
{network_in} – Network input (currently shows 0)
{network_out} – Network output (currently shows 0)
{fps} – Server FPS
{memory} – Memory allocations
{collections} – Garbage collections count
Usage Example:
You can use these fields in any text component like: "Welcome {player_username}! Server has {online_players}/{max_players} players online."
🔧 API Documentation for Developers
ServerPanel provides an API for plugin developers to integrate their plugins into the menu system.
Required Methods
API_OpenPlugin(BasePlayer player) - Main integration method that returns CuiElementContainer
OnServerPanelClosed(BasePlayer player) - Called when panel closes (cleanup)
OnServerPanelCategoryPage(BasePlayer player, int category, int page) - Called when category changes (cleanup)
OnReceiveCategoryInfo(int categoryID) - Receives your category ID
Integration Example
[PluginReference]
private Plugin ServerPanel;
private int _serverPanelCategoryID = -1;
private void OnServerInitialized()
{
ServerPanel?.Call("API_OnServerPanelProcessCategory", Name);
}
private void OnReceiveCategoryInfo(int categoryID)
{
_serverPanelCategoryID = categoryID;
}
private void OnServerPanelCategoryPage(BasePlayer player, int category, int page)
{
// Cleanup when player switches categories
}
private CuiElementContainer API_OpenPlugin(BasePlayer player)
{
var container = new CuiElementContainer();
// Create base panels (required structure)
container.Add(new CuiPanel()
{
RectTransform = {AnchorMin = "0 0", AnchorMax = "1 1"},
Image = {Color = "0 0 0 0"}
}, "UI.Server.Panel.Content", "UI.Server.Panel.Content.Plugin", "UI.Server.Panel.Content.Plugin");
container.Add(new CuiPanel()
{
RectTransform = {AnchorMin = "0 0", AnchorMax = "1 1"},
Image = {Color = "0 0 0 0"}
}, "UI.Server.Panel.Content.Plugin", "YourPlugin.Background", "YourPlugin.Background");
// Add your plugin's UI elements here
container.Add(new CuiLabel
{
RectTransform = {AnchorMin = "0.1 0.8", AnchorMax = "0.9 0.9"},
Text = {Text = "Your Plugin Interface", FontSize = 16, Align = TextAnchor.MiddleCenter, Color = "1 1 1 1"}
}, "YourPlugin.Background", "YourPlugin.Title");
// Add buttons, panels, etc. using "YourPlugin.Background" as parent
return container;
}
private void OnServerPanelClosed(BasePlayer player)
{
// Cleanup when panel closes
}
Header Update Fields
API_OnServerPanelAddHeaderUpdateField(Plugin plugin, string updateKey, Func<BasePlayer, string> updateFunction) - Registers a per-player string provider for a header placeholder. Returns true on success.
API_OnServerPanelRemoveHeaderUpdateField(Plugin plugin, string updateKey = null) - Unregisters a specific updateKey for your plugin, or all keys for your plugin when updateKey is null. Returns true on success.
Usage Example
[PluginReference]
private Plugin ServerPanel;
private void OnServerInitialized()
{
// Register a dynamic header field for each player
ServerPanel?.Call("API_OnServerPanelAddHeaderUpdateField", this, "{player_kdr}", (Func<BasePlayer, string>)(player => GetKdr(player)));
}
private string GetKdr(BasePlayer player)
{
// Compute and return the value to display in the header for this player
return "1.23";
}
Using in UI: Place your key (e.g., {player_kdr}) directly in Header Field texts. The value will be updated per player using your function.
📚 FAQ
Q: Why can't I open the menu?
A: Make sure that the plugin is installed and activated on your server. If the problem persists, contact the server administrator.
Q: How do I enable Expert Mode? (disables automatic template updates)
A: In the data file "Template.json", turn on the "Use an expert mod?" option:
"Use an expert mod?": true,
P.S. "Template.json” is located in the "oxide/data/ServerPanel" directory (if you use Oxide) or in the "carbon/data/ServerPanel" directory (if you use Carbon)
Q: I see black images with Rust logo or get error 429 when loading images. What should I do?
A: These issues occur when there are problems downloading images from the internet. To fix this, enable Offline Image Mode which will use local images instead:
Enable the mode in config:
Open "oxide/config/ServerPanel.json" (or "carbon/config/ServerPanel.json" for Carbon)
Set "Enable Offline Image Mode": true
Set up the images:
Create folder "TheMevent" in "oxide/data" (or "carbon/data" for Carbon)
Download PluginsStorage (click "CODE" → "Download ZIP")
Extract the ZIP and copy all contents to the "TheMevent" folder
Reload the plugin:
Type o.reload ServerPanel (Oxide) or c.reload ServerPanel (Carbon)
Note: If using a hosting service, you may need to use their file manager or FTP to upload the files.
Q: Does ServerPanel work only with Mevent's plugins?
A: Currently, ServerPanel integrates seamlessly with Mevent's plugins (Shop, Kits, Daily Rewards, etc.). However, other developers can use the provided API to integrate their plugins into the menu system. The plugin system is designed to be extensible for third-party integrations.
Q: Why do integrated plugins (Shop, Kits) have different window sizes?
A: Different plugins may use different templates for integration. Make sure all your integrated plugins use the same template version (V1, V2, etc.) that matches your ServerPanel template. Update the template in each plugin to ensure consistent sizing.
Q: The panel displays differently for different players. How can I make it show the same on everyone's screen?
A: This issue occurs when players have different UI scale settings. To fix this and ensure consistent display for all players:
Open the "Template.json" file located in "oxide/data/ServerPanel" (or "carbon/data/ServerPanel" for Carbon)
Find the "Parent (Overlay/Hud)" setting in the "Background" section
Change the value from "Overlay" to "OverlayNonScaled"
Save the file and restart your server or reload the plugin
Q: How can I change the video displayed in the ServerPanel interface to my own custom video?
A: Yes, you can replace the default video with your own! You need to find and modify the command:
serverpanel_broadcastvideo [your_video_url]
Replace [your_video_url] with the direct link to your video. For best compatibility, we recommend hosting your video on imgur.com.
Q: My custom images are not loading or show as blank/question marks. What image hosting should I use?
A: For custom images, we recommend using imgbb.com for image hosting. Avoid Imgur and services without direct access to the image. For the most reliable experience, use Offline Image Mode with local images instead.
Q: How can I make plugin UIs open outside of the ServerPanel menu instead of inside categories?
A: You can configure buttons to execute chat commands that open plugin UIs independently. To do this:
In your button configuration, set "Chat Button": true
Set the "Commands" field to "chat.say /command" (replace "command" with the actual plugin command)
Example: To open the Cases plugin outside the menu:
"Chat Button": true
"Commands": "chat.say /cases"
This will execute the command as if the player typed it in chat, opening the plugin's interface independently rather than within the ServerPanel menu.
Q: Text in V4 template is shifting or sliding out of place. How can I fix this?
A: This issue occurs when text width isn't properly configured. ServerPanel provides "TITLE LOCALIZATION" settings to control text width for categories and pages:
Open the ServerPanel editor (click the "ADMIN MODE" button to open the edit menu)
Select the category or page you want to edit (click to "EDIT CATEGORY" or "EDIT PAGE" button)
In the editor, find the "TITLE LOCALIZATION" section
For each language (en, ru, etc.), you'll see three columns:
LANGUAGE - The language code
TEXT - The localized text content
WIDTH (px) - The width setting in pixels
Adjust the "WIDTH (px)" value to match your text length. Longer text requires larger width values
Save your changes and test in-game
Tip: Start with a width value around 100-150 pixels for short text, and increase it for longer titles. You can adjust this value until the text displays correctly without shifting.


.thumb.png.fdca67acbe8b7d3bf2f136b3742964e5.png)

Highest Rated
Top-rated picks trusted and loved by the community.
-
 $16.99
By David
-
sale
$40.00$30.00By nivex
-
 $24.99
By LosGranada
-
 $29.99
By imthenewguy
-
sale

$40.00$31.95By Mevent
-
 $24.99
By Whispers88
-
-
-
 $14.99
By AhigaO
-
 Free
FreeBy Steenamaroo
-
sale

$19.99$15.99By Fruster
-
 $14.99
By David
-
 $45.99
By Monster
-
 $19.99
By Fruster
Trending Files
Popular picks members are downloading the most right now.
-
 Free
FreeBy tofurahie
-
-
sale
$40.00$31.95By Mevent
-
$29.99
By imthenewguy
-
-
-
 $40.00
By Steenamaroo
-
.thumb.png.ceba89717ce72b32fcd6b6aed73fdd80.png) $29.99
$29.99By Adem
-

By 0xF
-
sale
$40.00$30.00By nivex
-
 $49.99
By Adem
-
Free
By Steenamaroo
-
By realedwin
-
$14.99
By AhigaO
Great Deals
Discounted picks, limited-time deals, and sale items worth grabbing now.
-
sale
$19.95$15.95By Mevent
-
sale
$14.99$9.99By SlayersRust
-
sale

$14.99$9.99By SlayersRust
-
sale

$24.99$19.99By SlayersRust
-
sale
By Shemov
-
sale
$15.00$5.00By Stormo
-
sale
$5.00$2.99By QVQ
-
sale
$12.30$10.45By Shemov
-
sale
$15.95$11.95By Mevent
-
sale
$8.30$7.05By Shemov
-
sale
$49.90$42.41By Shemov
-
sale
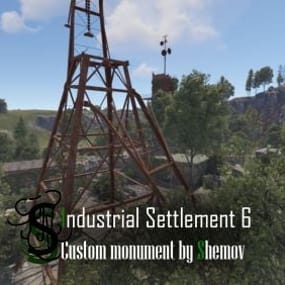
By Shemov
-
sale
$3.99$2.99By Rainey
-
sale

$21.99$17.59By Meowhuh


.thumb.png.20dd904bced65044f9a4c258301ffeb2.png)
Latest Reviews
See what customers are saying about their experience with files.

Its a very very good admin panel, are very complete, and simple to set.
Good job codeboy 🙂

simple and a high quality mod. lay out is love and install was easy. simple to use for my players and perms are easy to grant.
a huge plus is, it does not have a lot of drag on the server. money well spent and thank you!!!
healthy mod for a healthy server!!

Good map with good potential however significant patching required, military tunnels was floating 50 metres in the air and every single river had to be fixed as the water was clipping through the surrounding areas

This paired with Custom Item Definitions is next level

sick, made my upgrade to 5x painless. appreciate all the help!

Great plugin and excellent customer service; they solve any problems you have right away. 10/10 Highly recommended

LuffyRust 1000x PvP had an incredible experience running Battle Planet. Our players thoroughly enjoyed the map, and many now ask for it by name whenever we discuss future wipes.
The map is beautifully designed, performs extremely well, and provides plenty of exciting areas for players to explore, build, fight, and create memorable wipe experiences.
We can confidently recommend Nomad and his work. The quality, creativity, and attention to detail are outstanding. You will not be disappoi

Each base feels methodically designed. The easier bases start out approachable, while the higher difficulty levels are designed to lure players into a false sense of security, only for them to instantly regret their decision when they’re sent back to the respawn button.
This provides a challenge that requires them to pay attention and think, keeping them engaged with your content, and helping with player retention long term.

This is an excellent map. My players had alot of fun and were engaged the entire time. The map has a great selection of monuments that encourages high-stakes PvP while providing plenty of build space. My players and I also did not have any kind of issues at all in regards to terrain glitches or anything else that could possibly go wrong with a custom map. Furthermore, the creator was very quick to answer any questions I had even after purchase.

Very good developer. I was initially skeptical and honestly didn't think this project would last, but I've been proven completely wrong. The developer consistently updates, maintains, and improves the plugin, and it's clear they genuinely care about its quality.
The plugin works like a charm—it's intuitive, well optimized, and incredibly easy to use. I ended up replacing the old Player Administration plugin from uMod with this one, and the difference is night and day. This plugin offers a m