
BigBroGamerUK's Wishlist
-
$29.95$21.95Bank System
Bank System adds a bank to your server. Players get a card and a balance, transfer money to each other and use ATMs that other players own and profit from. Every deposit, withdrawal and transfer lands in a history the player opens from the bank window. The interface ships in seven templates, so it works as a fullscreen menu or inside any ServerPanel version, and the balance can be the plugin's own or come from Economics, ServerRewards or another economy plugin.
💰 Features
Bank card with balance, transaction history and gather history in one window. Cards can be created automatically on first open and expire after a set number of days. Transfers between players: pick someone from the list or type a card number. The list can show everyone or only players who are online. Player-owned ATMs. A player buys an ATM, places it and earns the deposit and withdrawal fees other players pay at it. ATMs break during operations and are repaired with items you choose, priced per 1% of condition. A permission can lower the breakage chance for a group. Two fee modes: take the fee out of the amount the player entered, or charge it on top. ATMs at monuments through the built-in spawn settings or MonumentAddons. Pay players for gathering, picking up collectibles, looting crates and kills. Set a price per shortname or prefab; the money goes to the balance or into the player's hands as banknotes. Banknotes as an item, with a configurable drop from crates. Seven UI templates: fullscreen Old Style and New Rust, ServerPanel V1, V2 and V4, and both ATM styles. Each template is a JSON file in the data folder, so the look is editable without touching the code. Your own balance or a third-party one: Economics, ServerRewards and any plugin with add, remove and show hooks. Balances convert from Economics and ServerRewards with one command. Works with HumanNPC, Notify/UINotify and LangAPI. Offline image mode for when image hosts rate-limit you. Auto wipe for players, logs and ATMs, each on its own switch.
🎮 Commands
bank: open the bank. The command names come from Commands in the config. ATM command: opens the ATM window from chat. The list Commands to open ATM menu is empty by default; add a name such as atm to enable it. Permission to open ATM menu via command gates it. bank.givenote [targetId] [amount]: give banknotes to a player. bank.giveatm [targetId] [amount]: give ATMs to a player. bank.setbalance [targetId] [amount]: set a player's balance. bank.deposit [targetId] [amount]: add money to a player's balance. bank.withdraw [targetId] [amount]: take money from a player's balance. bank.transfer [playerId] [targetId] [amount]: move money from one player to another. bank.wipe: remove every ATM from the plugin data. Wiping players and logs on a new save is set in Wipe Settings. bank.convert.economics: import balances from Economics. bank.convert.serverrewards: import balances from ServerRewards. bank.template <interface_type> <template>: switch the UI template. Server console only. Without arguments it prints the list below. The choice is saved to the config (Fullscreen style (OldStyle/NewRust) and Template) and applied at once.
Parameters: <interface_type>: fullscreen for the standalone window, inmenu for the ServerPanel page. <template> for fullscreen: old or new. <template> for inmenu: v1, v2, v4 or auto. With auto the plugin reads the template version from the ServerPanel category it is placed in. Examples: bank.template fullscreen old: sets the fullscreen UI to the old style template. bank.template fullscreen new: sets the fullscreen UI to the new Rust template. bank.template inmenu v1: sets the in-menu UI to the ServerPanel V1 template. bank.template inmenu v2: sets the in-menu UI to the ServerPanel V2 template. bank.template inmenu v4: sets the in-menu UI to the ServerPanel V4 template. bank.template inmenu auto: picks the in-menu template from the ServerPanel category. The admin commands above (bank.givenote through bank.convert.serverrewards) run from the server console or from a player with admin rights.
🛡️ Permissions
banksystem.use: access to the bank. The name is whatever you put in Permission (example: banksystem.use); leave it empty and the bank is open to everyone. ATM command permission: the value of Permission to open ATM menu via command. Players without it can still use a placed ATM; only the chat command is gated. Breakage permissions: Breakage percentage during operation maps a permission to a breakage percent. Give a group its own permission and a lower percent to make their ATMs break less often.
🖼️ Showcase
Fullscreen templates
Template OLD STYLE
Template NEW RUST
In-menu templates (ServerPanel)
Template V1
Template V2
Template V4
ATM
Template OLD STYLE
Template NEW RUST
The ATM follows the fullscreen style: Fullscreen style (OldStyle/NewRust) in the config picks both the bank window and the ATM look.
🧪 TEST SERVER
Join our test server and try the features yourself.
Copy the IP address below to connect.
connect 155.103.86.38:28015
⚙️ Web Config Editor
Manage the BankSystem settings in our web config editor. You change the config in a browser form instead of editing files on the server by hand.
P.S. The web config editor is open to members of the "BankSystem" group in our Discord server. Join at https://discord.gg/mevent and ask for the group.
📚 FAQ
Q: Where can I see an example of a config?
A: Config
Q: How do I switch the template?
A: From the server console: bank.template fullscreen old, bank.template fullscreen new, bank.template inmenu v1, v2, v4 or auto. Run bank.template with no arguments to print the list. The Showcase above shows what each one looks like.
Q: Where are the templates and how do I change the look?
A: Each template is a JSON file in oxide/data/BankSystem/Templates/ (carbon/data/BankSystem/Templates/ on Carbon): OldStyle.json, NewRust.json, V1.json, V2.json, V4.json, AtmOldStyle.json and AtmNewRust.json. Edit colors, sizes, fonts and positions there and reload the plugin. Delete a file and the plugin writes the default one back on the next load.
Q: I updated from 1.4.x. Where did my interface settings go?
A: Version 2.0.0 moved every interface setting out of the config and into the template files above. Your old config is saved to data/BankSystem/Backups/; open it next to the new template file and carry your colors and sizes over by hand.
Q: How do I add Bank System to ServerPanel?
A: Create a new category in ServerPanel with these settings:
"Type": "Plugin", "Plugin Name": "BankSystem", "Plugin Hook": "API_OpenPlugin" Then run bank.template inmenu auto and the bank page takes the template version of that category.
Q: How do ATM fees work?
A: ATM Settings sets the minimum, maximum, default and step for the deposit and withdrawal fees; the ATM owner picks the exact percent with a slider in the Manage screen. Deduct the fee from the entered amount? chooses between two modes: with true a player who enters 100 gets 100 minus the fee, with false the player pays 100 plus the fee.
Q: How do I use Economics or ServerRewards as the balance?
A: In Economy Settings set Use own economic system? to false and fill in the plugin name and its hooks. Economics:
"Economy Settings": { "Use own economic system?": false, "Plugin name": "Economics", "Balance add hook": "Deposit", "Balance remove hook": "Withdraw", "Balance show hook": "Balance" } ServerRewards:
"Economy Settings": { "Use own economic system?": false, "Plugin name": "ServerRewards", "Balance add hook": "AddPoints", "Balance remove hook": "TakePoints", "Balance show hook": "CheckPoints" } Q: How do I spawn an ATM at a monument using BankSystem and MonumentAddons?
A: Follow these steps to auto-spawn an ATM at your monuments:
Go to a Monument:
Position yourself at a monument where you want the ATM to appear (e.g., near a vending machine location). Spawn a Vending Machine:
Run the following command to spawn a vending machine using MonumentAddons:
/maspawn vendingmachine.deployed Convert It to an ATM:
Immediately change the vending machine's skin to the ATM design by running:
/maskin 2551771822
Confirm that 2551771822 matches the ATM skin ID configured in your BankSystem settings. Your ATM is now installed at the monument and will automatically respawn during wipes or map changes.
Q: I see black images with Rust logo or get error 429 when loading images. What should I do?
A: These issues come from failed image downloads. The plugin passes images to ImageLibrary but does not download them itself. Error 429 usually means an image host such as Imgur is rate-limiting you (see HTTP 429 documentation for details). To fix it, enable Offline Image Mode, which uses local images instead:
Enable the mode in config: Open "oxide/config/BankSystem.json" (or "carbon/config/BankSystem.json" for Carbon) Set "Enable Offline Image Mode": true Set up the images: Create folder "TheMevent" in "oxide/data" (or "carbon/data" for Carbon) Download PluginsStorage (click "CODE" → "Download ZIP") Extract the ZIP and copy all contents to the "TheMevent" folder Reload the plugin: Type o.reload BankSystem (Oxide) or c.reload BankSystem (Carbon) Note: If you want to add your own custom images, place them in the "TheMevent" folder and reference them with the "TheMevent/" prefix. For example: "TheMevent/Icon1.png", "TheMevent/MyCustomIcon.jpg", etc.
Q: How do I fix RUSTNote stack splitting issues?
A: Find "Enable item split control? (if there are errors with stack plugins - it is worth turning off)" in the config and set it to false.
📑 Hooks and API
Hooks:
private object CanPlayerCreateCard(BasePlayer player) private void OnPlayerCreatedCard(BasePlayer player) private void OnBalanceChanged(ulong member, int amount) API methods:
private string API_OpenPlugin(BasePlayer player) private bool HasCard(BasePlayer player) private bool HasCard(ulong member) private int Balance(BasePlayer player) private int Balance(string member) private int Balance(ulong member) private bool Deposit(BasePlayer player, int amount) private bool Deposit(string member, int amount) private bool Deposit(ulong member, int amount) private bool Withdraw(BasePlayer player, int amount) private bool Withdraw(string member, int amount) private bool Withdraw(ulong member, int amount) private bool Transfer(BasePlayer member, BasePlayer target, int amount) private bool Transfer(string member, string target, int amount) private bool Transfer(ulong member, ulong target, int amount) private int API_BankSystemBalance(BasePlayer player) private int API_BankSystemBalance(string member) private int API_BankSystemBalance(ulong member) private bool API_BankSystemDeposit(BasePlayer player, int amount) private bool API_BankSystemDeposit(string member, int amount) private bool API_BankSystemDeposit(ulong member, int amount) private bool API_BankSystemWithdraw(BasePlayer player, int amount) private bool API_BankSystemWithdraw(string member, int amount) private bool API_BankSystemWithdraw(ulong member, int amount) private bool API_BankSystemTransfer(BasePlayer member, BasePlayer target, int amount) private bool API_BankSystemTransfer(string member, string target, int amount) private bool API_BankSystemTransfer(ulong member, ulong target, int amount) -
$30.00$20.00Abandoned Bases
Allows bases to become raidable when all players in a base become inactive.
Compatible with TruePVE and NextGenPVE servers. This plugin is not compatible with servers that have server.pve set true. It is possible to implement this, but I see no reason to do so as TruePVE provides the same protection and more.
Abandoned Bases checks each building on the server in order to determine which bases are inactive. Bases become inactive when all players authorized on the tool cupboard have been offline for the configured amount of days. When a base becomes inactive there are one of two outcomes.
1.) It will be immediately destroyed if it does not meet the configured minimum requirements.
2) It will become raidable for a configurable period of time, and when the time expires the base will be destroyed.
Each zone has a map marker, allows PVP and is surrounded by a dome that protects it from being attacked from the outside. Players who zone hop will be flagged with a PVP delay where they can still be attacked for a configurable amount of time.
Command /sar - requires abandonedbases.convert permission and converts a base into an abandoned base - this can be used on any base that you are authorized to and will cause the base to be destroyed when the timer expires
Command /sab - starts a manual check for each building on the server in order to determine which bases are inactive (requires abandonedbases.admin permission)
Command /sar radius - requires abandonedbases.convert permission and converts a base into an abandoned base and uses the specified radius for the dome / zone radius. Min and max radius are configurable.
Command /sar cancel - requires abandonedbases.convert and abandonedbases.convert.cancel permissions - completely cancels an event (destroys map marker and dome, disables PVP and prevents base from being despawned) effectively allowing the base to be taken over
Command /sar claim - requires abandonedbases.convert and abandonedbases.convert.claim permissions and converts a finished abandoned base into a claimed base that can be taken over by players
"Loot Required (SAR)"
"Foundations Required (SAR)"
"Walls Required (SAR)"
These options should be set realistically so that players cannot exploit the /sar command. I recommend Loot Required 100, Foundations Required 10, Walls Required 10 at minimum Command /sar purge - converts all bases on the server into abandoned bases for purge day (requires abandonedbases.convert, abandonedbases.admin and abandonedbases.purgeday permissions)
This is a two part command that requires you type /sab afterwards to begin. Requires abandonedbases.purgeday, abandonedbases.convert, and abandonedbases.admin permissions. Announcements are muted during purge to prevent spam. Time To Wait Between Spawns (15) will delay how quickly every base is converted Permissions (ADMINS REQUIRE PERMISSIONS TOO)
abandonedbases.convert - required to use /sar command
abandonedbases.convert.free - converting is free for users that have this permission
abandonedbases.convert.claim - required to use /sar claim command
abandonedbases.purgeday - required to use /sar purge command
abandonedbases.admin - required to use /sab and purge commands
abandonedbases.notices - users with this command can see event-opened notices from the plugin
abandonedbases.attack - lets players hunt bases and convert them by attacking if they're abandoned
abandonedbases.attack.time - shows players how much time is left before a base becomes abandoned when they attack it
abandonedbases.attack.lastseen - required to see the last time the player was online when attacking a base
Auto-add abandonedbases.immune to configuration if one does not exist already (lifetime set to "none")
- abandonedbases.immune will not be automatically added if the configuration contains a different immunity permission already
- abandonedbases.immune will give the user immunity to any base they've built at or are authed at from becoming abandoned
- abandonedbases.exclude does not provide immunity and is explicitly intended for the plugin to ignore the player only
- abandonedbases.exclude is intended for admins, mods, staff or helpers to be able to freely make repairs or auth at bases without interfering with the abandoned timer
abandonedbases.exclude:
excludes the user from being checked as an authorized user to a TC this permission should not be used to exempt users - exempt users with immunity by assigning them a permission from a role that has the lifetime set to "none" example roles that includes permission abandonedbases.immune and lifetime set to "none" to properly exempt a user or group by granting abandonedbases.immune to a user or group:
"Purge Settings": [ { "Permission": "abandonedbases.immune", "Lifetime (Days)": "none" }, { "Permission": "abandonedbases.vip", "Lifetime (Days)": "7" }, { "Permission": "abandonedbases.veteran", "Lifetime (Days)": "5" }, { "Permission": "abandonedbases.basic", "Lifetime (Days)": "3" } ], Purge Settings
Permission - The permission to use with this setting Lifetime (Days) - The amount of time in days before a base is considered abandoned. Set to none to not consider players with this permission as inactive. Conversions Before Destroying Base (1) - The amount of times a base can become abandoned before it is finally destroyed when the Despawn Timer expires. Comes with 3 configured permissions and lifetime days by default Abandoned Settings
Blacklisted Commands (command1, command2, command3) - Commands players are not allowed using at a raid or marked with PVP delay Marker Name (Minutes) (Abandoned Player Base [{time}m]) - Text shown on map marker for minutes Marker Name (Seconds) (Abandoned Player Base [{time}s]) - Text shown on map marker for seconds Foundations Required (4) - Minimum amount of foundations required to become raidable Walls Required (3) - Minimum amount of walls required to become raidable Sphere Amount (10) - Increase to darken the dome, or decrease to brighten it Sphere Radius (50) - How big the dome is in meters Use Dynamic Sphere Radius (false) - Allow the dome to detect the best dome size Max Dynamic Radius (75.0) - How maximum size of the dynamic radius Min Custom Sphere Radius - The minimum radius allowed when using /sar <radius> Max Custom Sphere Radius - The maximum radius allowed when using /sar <radius> PVP Delay (15.0) - The amount of time in seconds that players can take damage after leaving the dome Despawn Timer (1800.0) - The amount of time in seconds that players have to finish the raid Reset Despawn Timer When Base Is Attacked (true) - When enabled this will reset the above despawn timer back to 1800 seconds by default Do Not Destroy Base When Despawn Timer Expires (false) - Use this to override and prevent a base from being destroyed when Despawn Timer expires Backpacks Can Be Opened (true) - When enabled players will be allowed to open their backpacks while inside of the dome Backpacks Can Be Looted By Anyone (false) - Bypass PreventLooting plugin and allow backpacks to be lootable if enabled Corpses Can Be Looted By Anyone (true) - Bypass PreventLooting plugin and allow backpacks to be lootable if enabled Allow PVP (true) - Allows PVP while inside of the dome, and when flagged with a PVP delay Seconds Until Despawn After Looting (600) Seconds Until Despawn After Looting Resets When Damaged (true) Cancel Automated Events If Abandoned Owner Comes Online (false) Message Raiders When Event Ends During Automated Cancellation (true) Change Marker Color On First Entity Destroyed (true) Cooldown Between Conversions (3600) - Time required between each manual conversion of a base using /sar Cooldown Between Events (3600) - Time between each event - prevents looting, damage and using /sar claim Cooldown Between Cancel (3600) - Time the player must wait to use /sar cancel Cooldown Between Conversions Ignored During Purge (true) Cooldown Between Cancel Ignored During Purge (true) Cooldown Between Events Ignored During Purge (true) Prevent Hogging Ignored During Purge (false) Run Once On Server Startup (false) - Check for abandoned bases immediately after server startup is complete Run Every X Seconds (0.0) - The time in seconds to check for each building on the server in order to determine which bases are inactive Kill Inactive Sleepers (false) - When enabled players with a permission from purge settings will be executed when they are offline for the configured amount of lifetime days Let Players Kill Abandoned Sleepers (false) - Allows players to kill anyone sleeping inside of an abandoned base rather than the server killing them automatically Economics/ServerRewards Cost To Manually Convert (0 = disabled) - Used with /sar command to convert any base into an abandoned base Use Map Marker (true) Require Event Be Finished Before It Can Be Canceled (true) Various auto turret settings
Hooks (implemented in 2.1.4, updated in 2.2.5)
participants - anyone that has actively participated (excludes admin if configured, and those in noclip or vanish) - this should not contain null elements
participantIds - contains the userid of all participants - this list is better as anyone offline and dead will be included in this but not in the participants list because they would be null!
intruders - anyone currently inside of the event (does not exclude anyone) - this should not contain null elements
intruderIds - contains the userid of everyone inside of the event (does not exclude anyone) - this list is better as anyone offline and dead will be included in the list but not in the intruders list because they would be null!
void OnBaseSkipped(Vector3 v, ulong userid, HashSet<ulong> owners, string reason, BuildingManager.Building building) { } void OnTugboatSkipped(Vector3 v, ulong userid, HashSet<ulong> owners, string reason, BaseEntity entity) { } void OnShelterSkipped(Vector3 v, ulong userid, HashSet<ulong> owners, string reason, BaseEntity entity) { } void OnAbandonedBaseStarted(Vector3 center, float radius, bool AllowPVP, List<BasePlayer> intruders, List<ulong> intruderIds, List<BaseEntity> entities, List<BuildingPrivlidge> privs, bool canDropBackpack, bool automatedEvent, bool attackEvent, Guid guid) { } void OnAbandonedBaseEnded(Vector3 center, float radius, bool AllowPVP, List<BasePlayer> participants, List<ulong> participantIds, List<BaseEntity> entities, List<BuildingPrivlidge> privs, bool canDropBackpack, bool automatedEvent, bool attackEvent, Guid guid) { } void OnAbandonedBaseTurretsInitialized(List<AutoTurret> turrets,Vector3 center, float radius, bool AllowPVP, ulong raiderId, bool CanDropBackpack, List<BaseEntity> entities, List<BuildingPrivlidge> privs, bool canDropBackpack, bool automatedEvent, bool attackEvent, Guid guid) { } void OnRaidableDespawnUpdate(Vector3 center, float radius, bool AllowPVP, ulong raiderId, DateTime DespawnDateTime, List<BasePlayer> intruders, List<ulong> intruderIds, List<BaseEntity> entities, List<BuildingPrivlidge> privs, bool canDropBackpack, bool automatedEvent, bool attackEvent, Guid guid) { } void OnPlayerEnteredAbandonedBase(BasePlayer player, Vector3 center, float radius, bool AllowPVP, List<BasePlayer> intruders, List<ulong> intruderIds, List<BaseEntity> entities, List<BuildingPrivlidge> privs, bool canDropBackpack, bool automatedEvent, bool attackEvent, Guid guid) { } void OnPlayerExitAbandonedBase(BasePlayer player, Vector3 center, float radius, bool AllowPVP, List<BasePlayer> intruders, List<ulong> intruderIds, List<BaseEntity> entities, List<BuildingPrivlidge> privs, bool canDropBackpack, bool automatedEvent, bool attackEvent, Guid guid) { } void OnAbandonedBaseCompleted(Vector3 center, float radius, bool AllowPVP, List<BasePlayer> intruders, List<ulong> intruderIds, List<BaseEntity> entities, List<BuildingPrivlidge> privs, bool canDropBackpack, bool automatedEvent, bool attackEvent, Guid guid) { } void OnAbandonedBaseClaimed(BasePlayer player, Vector3 center, float radius, bool AllowPVP, List<BasePlayer> participants, List<ulong> participantIds, List<BaseEntity> entities, List<BuildingPrivlidge> privs, bool canDropBackpack, bool automatedEvent, bool attackEvent, Guid guid) { } void OnAbandonedBaseClaimFailed(BasePlayer player, Vector3 center, float radius, bool AllowPVP, List<BasePlayer> participants, List<ulong> participantIds, List<BaseEntity> entities, List<BuildingPrivlidge> privs, bool canDropBackpack, bool automatedEvent, bool attackEvent, Guid guid) { } object OnBlockRaidableBasesTeleport(BasePlayer player, Vector3 to) => null; // return true to allow the blocked teleport, return a string to block with your message instead void OnAbandonedBasePrivilegeDestroyed(Vector3 center, float radius, bool AllowPVP, List<BasePlayer> intruders, List<ulong> intruderIds, List<BaseEntity> entities, List<BuildingPrivlidge> privs, bool canDropBackpack, bool automatedEvent, bool attackEvent, BuildingPrivlidge priv, bool areCupboardsTaken, Guid guid) { } void OnPlayerPvpDelayStart(BasePlayer player, ulong userid, Vector3 eventPos, float radius, List<BasePlayer> intruders, List<ulong> intruderIds, List<BaseEntity> entities, List<BuildingPrivlidge> privs, bool canDropBackpack, bool automatedEvent, bool attackEvent, Guid guid) { } void OnPlayerPvpDelayExpiredII(BasePlayer player, ulong userid, Vector3 eventPos, float radius, List<BasePlayer> intruders, List<ulong> intruderIds, List<BaseEntity> entities, List<BuildingPrivlidge> privs, bool canDropBackpack, bool automatedEvent, bool attackEvent, Guid guid) { } void OnPlayerPvpDelayReset(BasePlayer player, ulong userid, Vector3 eventPos, float radius, List<BasePlayer> intruders, List<ulong> intruderIds, List<BaseEntity> entities, List<BuildingPrivlidge> privs, bool canDropBackpack, bool automatedEvent, bool attackEvent, Guid guid) { } void OnAbandonedBaseDespawned(Vector3 eventPos, float radius, bool allowPVP, List<BasePlayer> intruders, List<ulong> intruderIds, List<BaseEntity> entities, Guid guid) { } object OnProcessPlayerEntity(BaseEntity entity, HitInfo info) => null; // cancel to prevent the plugin from handling this entity, though it can still be an event entity already in some cases void OnAbandonedBaseDespawn(List<BaseEntity> entities) { } // only called when a base is not eligible to convert void OnAbandonedBaseDespawn(Vector3 center, float radius, bool AllowPVP, List<BasePlayer> intruders, List<ulong> intruderIds, List<BaseEntity> entities, List<BuildingPrivlidge> privs, bool canDropBackpack, bool automatedEvent, bool attackEvent, Guid guid) { } void OnAbandonedBaseStart(Vector3 center, float radius, bool allowPVP, List<BasePlayer> intruders, List<ulong> intruders, List<ulong> intruderIds, List<BaseEntity> entities, bool canDropBackpack, bool automatedEvent, bool attackEvent, Guid guid) Added OnEntityEnteredAbandonedBase(BaseEntity entity, Vector3 center, float radius, bool allowPVP, List<BasePlayer> intruders, List<ulong> intruderIds, List<BaseEntity> entities, List<BuildingPrivlidge> privs, bool canDropBackpack, bool automatedEvent, Guid guid) Convert Bases and/or Claim Bases
Credits:
misticos for giving permission to use some of his code 🙂- #rust
- #rust plugin
- (and 6 more)
-

$49.90
ThemePark Island
By Silent Creations in Maps
Welcome to ThemePark Island
An expansive and meticulously crafted custom map for Rust, brought to you by the combined efforts of Silent Creations and Explosive Shart.
This map blends high-octane thrill-seeking with gritty, urban survival. Whether you’re riding a functional coaster or navigating the trap-filled halls of a medical center, ThemePark Island offers a fresh gameplay loop for PVP and PVE servers alike.
🎡 Featured Custom Monuments
The Theme Park
The crown jewel of the island. This isn't just a static monument—it features a fully functional, custom-coded rollercoaster. Scale the heights for a view of the island before diving into the chaos below.
Loot: High-density loot spawns throughout the park.
Puzzles: Includes both Green and Blue keycard puzzle rooms.
The 2 Gorges Dam
A massive, custom-built architectural marvel. The dam dominates the landscape, offering scenic vistas and deep, dark secrets.
Underground Puzzles: Navigate multiple puzzle rooms hidden deep within the structure.
Tactical Depth: Perfect for long-range engagements or sneaky subterranean looting.
Black Rock City
A sprawling urban center that feels like a lived-in wasteland.
Black Rock Medical Center: Enter at your own risk. This landmark is rigged with traps, multiple puzzles, and enough loot to supply an entire clan.
Lazarus Automotive: A unique urban addition for those looking to secure high-tier parts.
Pine Bluff
A smaller, dense city center for quick skirmishes and essential supplies.
Interiors: Explore a replica McDonald’s and a completely custom Supermarket.
Puzzles: Features multiple puzzles and heavy loot concentrations.
Mills Trailer Park
An eerie, abandoned residential area.
Puzzles: Features 2x Green Card puzzles and 1x Blue Card puzzle, making it a high-value stop for progression.
Additional Points of Interest
7-Eleven: That’s right—a faithful replica of the iconic convenience store for all your raiding snack needs.
Fuel Depot: An abandoned facility located in the snow biome, featuring a working Pumpjack and a Green Card puzzle.
Rose Hill Development: An unfinished construction site offering unique verticality and parkour opportunities.
Green Houses: Small botanical structures perfect for picking up plants and quick loot.
Map Size
4500
Prefab Count
#38450
🏛️ Facepunch Monuments
Launch Site
Arctic Research
Large Oil Rig
Small Oil Rig
Military Tunnel
Giant Excavator
Airfield
Trainyard
Artic Research
Ferry Terminal
RadTown
Jungle Ziggurat
Large Harbor
Small Harbor
Bandit Camp
Outpost
The Dome
Sewer Brach
LightHouse
Oxum's Gas Station x3
Mining Outpost x3
Ranch
Abandoned SuperMarket x2
large Barn
Fishing Village x2
Large Fishing Village
Stone, Sulfer, & HqM Quarries
Water Wells x3
Abandoned Cabins
Custom Monuments
Theme Park Island
Black Rock
Pine Bluff
Fuel Depot
2 Gorges Dam
7-11
Sewage Treament Plant
Fort Sentinel
Heli Tower V2
Large Mod/Staff Room
Mills Trailer Park
Rose Hill Development
Outpost Addition
The 2 Cities Black Rock and Pine Bluff Include these monuments as a part of them
Black Rock Medical
Silents SuperMarket
McDonalds
Lazarus Automotive
🙏 Acknowledgements
A massive thank you to those who helped bring this project to life:
Substrata: For the incredible work on the custom rollercoaster plugin.
Milky: For the stellar work on the promotional video.
MrLiquid & the Luffy Map Testing Team: For their dedication to polishing and balancing the map.
For any Assistance or questions Please contact me on Discord @ https://discord.gg/THf6dGN8eW
- #rollercoaster
- #rust
- (and 11 more)
-

$49.90
Extraction
In Extraction, players will not feel alone on your server, despite its size of 3500. In Extraction, players will find all the official Rust Monuments.
Extraction contains more than 300 construction zones, which are distributed across all the exits available on the map. In addition, these gigantic construction zones are equipped with electricity and water for each player.
When an exit is activated, an alarm sounds to alert other players that a player is about to leave the surface to access an area designed for better player safety.
- OFFER YOUR PLAYERS A BETTER PVP EXPERIENCE (Optional)
Extraction includes a prefab “Extraction-NoBuild” to block construction on the map surface and force players to build in areas located inside the exits. Follow these steps to block construction on the surface:
1- Include “Extraction-NoBuild.prefab” in the RustEdit “CustomPrefabs” folder.
2- Open the map in RustEdit.
3- In the list of prefabs, find and include “Extraction-NoBuild” in the map.
4- Place “Extraction-NoBuild” at the coordinates: X:0,000 - Y:390,431 - Z:0,000
5- Save the changes you have made.
- FEATURES
Size: 3500. Objects: 81002. Map protection plugin included. Editable map: Yes Profile Better Npc: Yes.
- CONTAINS ALL OFFICIAL MONUMENTS
Apartment complex • Ziggurat temple • Jungle ruins • Radtown • Ferry Terminal • Nuclear missile silo • Large oil platform • Small oil platform • Submarine laboratories • Harbor • Large fishing villages • Fishing villages • Launch site • Satellite dish • The Dome • HQM Quarry • Stone quarry • Sulfur quarry • Arctic Research Base • Sewer Branch • Train yard • Junkyard • Abandoned military bases • Military tunnel • Caves • Large barns • Ranch • Bandit camp • Power plant • Swamp • Airfield • Giant excavation • Outpost • Lighthouse
- CUSTOM MONUMENTS
Five giant islands surround the map to support the Raidable Bases plugin.
Over 300 construction areas equipped with electricity and water.
Bunkers: Three types of mini-bunkers scattered throughout the map. Use grenades or explosives to open the door. Each bunker has its own color light to indicate its difficulty: green, blue, and red.
Trees with safe zones: These trees are scattered throughout the jungle area. Climb the stairs and access these safe zones to recycle, shop, and more.
Ammunition Tower: A giant tower where you will find ammunition and other resources inside.
C4 Tower: A giant tower where you will find C4 explosives and other resources inside.
Medical Tower: A giant tower where you will find medicine and other resources inside.
The Arecibo Observatory: Also known as the National Astronomy and Ionosphere Center (NAIC) and formerly known as the Arecibo Ionosphere Observatory, is an observatory located in Barrio Esperanza, Arecibo, Puerto Rico, owned by the US National Science Foundation (NSF).
Communications Center: Four giant towers where you will find all kinds of resources inside. Access from one tower to another via zip lines.
Helicopter Tower: A classic but modern tower for shooting combat helicopters. This tower is equipped to meet all your needs.
Train Stations: With a waiting room, loot, and NPCs, with secondary respawn on the railroad.
Crocodile Lakes: Do you like crocodiles? Visit these locations to see them, but don't disturb the crocodiles.
Green Exit: Access this exit using a button located in a booth.
The waiting time at this exit is 5 minutes. After 5 minutes, the player will be able to access the construction area.
Blue Exit: Access this exit using a blue card.
The waiting time at this exit is 3 minutes. After 3 minutes, the player can access the construction area.
Red Exit: Access to this exit is immediate and the player can access the construction area immediately.
- TIPS
Remove the “Extraction-NoBuild” prefab to allow players to build on the map surface. Have fun 🙂
- SUPPORT: https://discord.gg/ASxJynGndj
- #extraction
- #extraction game
- (and 52 more)
-
$14.99
TC Upgrades
By Iftebinjan in Plugins
TC Upgrades
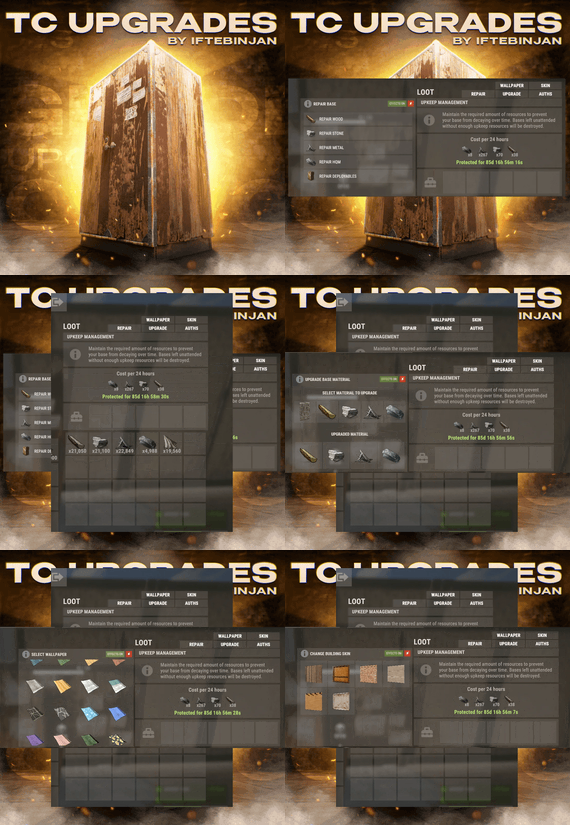
Manage your whole base from the Tool Cupboard. Upgrade every block, repair the base, change building skins, put up wallpapers, skin every door and manage who's authorized. It all runs from buttons right on the TC, with costs shown before you pay.
No more running around with a hammer for 20 minutes. Open the cupboard, click once, done.
Warning
Requires ImageLibrary. TC Upgrades unloads itself if ImageLibrary isn't installed.
Video Showcase
Features
⬆️ Upgrade
Upgrade the whole base to Wood, Stone, Metal or HQM in one click. Paid from the TC. Resources come from the cupboard's inventory. You see the full cost before starting. Remembers your skin. With auto-upgrade on, hammer upgrades automatically use the building skin you picked in the TC. 🔧 Repair
Repair by material. Wood, Stone, Metal, HQM, or all deployables (doors, boxes, turrets…). Cost shown up front for each repair. Fair. Blocks damaged in the last 30 seconds can't be repaired, the same as in vanilla. 🎨 Skins
Building skins. Reskin every block in the base at once, including the newest skins (Crypt stone, Jungle and more). Metal gets random colours. Tool Cupboard skins. Change the look of the TC itself. External wall and gate skins. Legacy wood and adobe high walls and gates. Door skins. Pick a skin once and it goes on every matching door in the building: wood, metal, armored (single and double) and garage doors. 🖼️ Wallpapers
Walls, floors and ceilings. Both sides at once (permission). Wallpaper the inside and outside of a wall in one go. Custom wallpapers. Add any Workshop wallpaper ID in the config. A big set comes ready. Costs cloth, shown before you apply it. 👥 Auth list
See everyone authorized on the cupboard. Remove players with one click (optionally owner only). ⚙️ For server owners
Multi-TC support. Bases with several cupboards work correctly. Permission for every feature, grade and skin type. Sell them as VIP perks. VIP speed and discounts. Each permission can get a faster process and lower costs. Free-use permissions for upgrades, repairs, reskins and wallpapers. DLC respected. Players only see the DLC skins and wallpapers they own (with PlayerDLCAPI support for newer packs). Raid and combat block. NoEscape and BetterNoEscape support. Cancel anytime. A cancel button stops a running process. Effects and sides toggles on the TC. Move the buttons in game with /tcuadmin. No guessing offsets in the config. Notifications by chat, GameTip, Toastify or Notify. Every UI text is in the lang file. How it works
Open your Tool Cupboard. New buttons appear: AUTHS · UPGRADE · REPAIR · SKIN · WALLPAPER. Pick what you want, for example UPGRADE → Stone. Check the required materials, then confirm. The base updates block by block, paid from the TC. Press CANCEL at any time to stop. Tip
Players only see the buttons they have permission for, so you can give everyone Repair and keep Skins and Wallpapers for VIPs.
Permissions
Feature buttons
Permission Shows tcupgrades.authlist AUTHS button (authorization list) tcupgrades.upgrade UPGRADE button tcupgrades.repair REPAIR button tcupgrades.skin SKIN button tcupgrades.wallpaper WALLPAPER button Grades
Permission Allows tcupgrades.default All of the below at once (Wood, Stone, Metal, HQM and deployables) tcupgrades.wood Wood tcupgrades.stone Stone tcupgrades.metal Metal tcupgrades.hqm High Quality Metal tcupgrades.deploy Repairing deployables Skins and wallpapers
Permission Allows tcupgrades.tcskin Tool Cupboard skins tcupgrades.wallandgates External high wall and gate skins tcupgrades.doorskins Door skins tcupgrades.wallpaper_bothsides Wallpapering both sides of a wall at once Free use
Permission No resources needed for tcupgrades.upgrade.nocost Upgrading tcupgrades.repair.nocost Repairing tcupgrades.reskin.nocost Reskinning tcupgrades.wallpaper.nocost Wallpapers VIP and admin
Permission Allows tcupgrades.vip / tcupgrades.mvp Faster processing and cheaper costs (set in the config, and you can add your own) tcupgrades.admin /tcuadmin button editor and /tcaddskin Note
"Give default permission to all default user on Load" is on by default. On every load it gives the default group every button, every grade, and Tool Cupboard, wall and door skins. That's great for a quick start, but turn it off before setting up your own permissions, or permissions you revoke come back on the next reload.
Commands
Command Permission Description /tcuadmin tcupgrades.admin Turn the button editor on or off. Open a TC to move the buttons, and positions save to the config /tcaddskin <door shortname> <skin id> tcupgrades.admin Add a Workshop skin to a door type's list, for example /tcaddskin door.hinged.metal 3741220976 VIP speed and discounts
Every feature (upgrade, skin, wallpaper, repair) has its own speed and cost settings:
Setting Default Example VIP Example MVP Seconds per block 1.5 1.0 0.5 Cost modifier 1.0 (full price) 0.5 (half price) 0.2 (80% off) A cost modifier of 1.5 means 50% more expensive. Add as many permission tiers as you like. Each one is registered automatically.
Hosting partner
Installation
Install ImageLibrary. Upload TCUpgrades.cs to oxide/plugins. Choose how to hand out permissions: Quick start: leave "Give default permission…" on, and everyone gets every feature. Custom: turn that option off, reload, and grant per group, for example: oxide.grant group default tcupgrades.repair oxide.grant group default tcupgrades.default oxide.grant group vip tcupgrades.skin oxide.grant group vip tcupgrades.wallpaper Open a Tool Cupboard. The new buttons are on the TC screen. (Optional) Type /tcuadmin to move the buttons where you like. Warning
Keep "USE DLC SKINS AND WALLPAPERS" set to false on live servers. With it true, every DLC skin is unlocked for everyone, which is only meant for testing.
Configuration
Key settings explained
Setting What it does USE DLC SKINS AND WALLPAPERS true unlocks all DLC for everyone (testing only). Keep false live Only owner can use features of TC Only the TC's owner can use the buttons, not everyone authorized Use Automatic Upgrades on build Hammer upgrades use the skin each player picked in the TC Give default permission… On every load, gives the default group every feature button, grade and skin type. Turn it off to manage permissions yourself Only owner can see the Remove BTN? Only the owner can remove players from the auth list Custom … wallpapers Workshop wallpaper IDs offered in the wallpaper menu (0 = no wallpaper) Custom Door Skins Workshop skin IDs per door type (or add them in game with /tcaddskin) Plugins
Plugin Required? Used for ImageLibrary Yes Icons and skin previews in the UI PlayerDLCAPI Optional DLC ownership checks for newer skin and wallpaper packs NoEscape / BetterNoEscape Optional Blocks the features during raid block or combat block Toastify / Notify Optional Pop-up notifications instead of chat FAQ
Where do the resources come from?
From the Tool Cupboard's inventory. The cost is shown before you start. If the TC doesn't have enough, nothing happens.
Can players use DLC skins they don't own?
No. Players only see DLC skins and wallpapers they own. "USE DLC SKINS AND WALLPAPERS" unlocks everything, so only turn it on for testing.
How do I add my own wallpapers?
Add the Workshop wallpaper IDs to Custom Wall wallpapers, Custom Floor wallpapers or Custom Ceiling wallpapers in the config, then reload.
How do I add more door skins?
Use /tcaddskin <door shortname> <skin id> in game, or add the IDs under Custom Door Skins in the config.
Why can't some blocks be repaired?
Blocks damaged in the last 30 seconds can't be repaired, the same as in vanilla. Wait a moment and try again.
Can I stop an upgrade halfway?
Yes. Press CANCEL on the TC.
The buttons overlap another plugin's UI.
Type /tcuadmin, open a TC and move the buttons. Their positions save to the config.
Can raided players use it to repair mid-raid?
Not if you use NoEscape or BetterNoEscape. The features are blocked during raid or combat block.
Does it work with several TCs in one base?
Yes. Multi-TC bases are supported.
Support
Need help or found a bug? Open a support ticket on this page.
Check out my other plugins
- #upgrade
- #toolcupboard
- (and 7 more)