VinniTV's Wishlist
-

$40.00$31.95Server Panel
ServerPanel adds a player information menu to your server, where you can both share important and useful information with your players and integrate your plugins into it!
🌟 Features
User-Friendly Interface: Intuitive GUI for easy navigation and interaction. Economy Integration: Supports various economy plugins for seamless financial management. Dynamic Menu Categories: Organize functionalities into customizable categories for better user experience. Extensive Configuration Options: Almost every aspect of the plugin can be customized, including messages, colors, sizes, fonts, tion. Auto-Open Menu: Automatically displays the menu upon player connection, configurable per server settings. Block Settings: Control access to the menu during building, raiding, or combat situations to enhance gameplay balance. Multiple Economy Head Fields: Display various economic metrics such as balance, server rewards, and bank information. Permission Management: Fine-tune permissions for different user roles to control access to features. Localization Support: Easily translate and customize all messages for different languages. Performance Optimized: Designed to minimize server lag while providing rich functionality. Customizable Hooks: Integrate with existing economy systems using customizable hooks for adding, removing, and displaying balances. Editor Position Change: Admins can now change editor positions with a simple click, choosing between left, center, or right alignments. Command Enhancements: Commands are now processed with multiple arguments separated by "|", enabling bulk command processing.
🎮 Commands
/info – open menu /sp.install (or) /welcome.install – open installer menu sp.migrations – console command for updating plugin data structure when upgrading to new versions. Automatically creates backups before making changes. sp.migrations list – shows available migrations and whether they need to run sp.migrations run <version> – runs specific migration (e.g., "1.3.0") sp.migrations run <version> force – forces migration even if not detected as needed
🛡️ Permissions
serverpanel.edit – allows players to edit the plugin settings and open the edit menu serverpanelinstaller.admin - required to access the plugin installation functions
🎥 Video
🖼️ Showcase
Templates
Template V1
Template V2
Template V3
Template V5
Editor
Installer
🧪 TEST SERVER
Join our test server to view and experience all our unique features yourself!
Copy the IP Address below to start playing!
connect 194.147.90.239:28015
📊 Update Fields
ServerPanel supports dynamic update fields that can be used in your templates to display real-time information. These fields are automatically updated and can be used in text components, headers, and other interface elements.
Player Information
{online_players} – Number of currently online players {sleeping_players} – Number of sleeping players {all_players} – Total number of players (online + sleeping) {max_players} – Maximum server capacity {player_kills} – Player's kill count (requires KillRecords, Statistics, or UltimateLeaderboard) {player_deaths} – Player's death count (requires KillRecords, Statistics, or UltimateLeaderboard) {player_username} – Player's display name {player_avatar} – Player's Steam ID for avatar display Economy
{economy_economics} – Economics plugin balance {economy_server_rewards} – ServerRewards points {economy_bank_system} – BankSystem balance Note: Economy fields are fully customizable in "oxide/config/ServerPanel.json" under "Economy Header Fields". You can add support for any economy plugin by configuring the appropriate hooks (Add, Balance, Remove). Custom keys can be created and used in templates just like the default ones.
Server Information
{server_name} – Server hostname {server_description} – Server description {server_url} – Server website URL {server_headerimage} – Server header image URL {server_fps} – Current server FPS {server_entities} – Number of entities on server {seed} – World seed {worldsize} – World size {ip} – Server IP address {port} – Server port {server_time} – Current server time (YYYY-MM-DD HH:MM:SS) {tod_time} – Time of day (24-hour format) {realtime} – Server uptime in seconds {map_size} – Map size in meters {map_url} – Custom map URL {save_interval} – Auto-save interval {pve} – PvE mode status (true/false) Player Stats
{player_health} – Current health {player_maxhealth} – Maximum health {player_calories} – Calorie level {player_hydration} – Hydration level {player_radiation} – Radiation poisoning level {player_comfort} – Comfort level {player_bleeding} – Bleeding amount {player_temperature} – Body temperature {player_wetness} – Wetness level {player_oxygen} – Oxygen level {player_poison} – Poison level {player_heartrate} – Heart rate Player Position
{player_position_x} – X coordinate {player_position_y} – Y coordinate (height) {player_position_z} – Z coordinate {player_rotation} – Player rotation (degrees) Player Connection
{player_ping} – Connection time in seconds {player_ip} – Player's IP address {player_auth_level} – Authorization level (0=Player, 1=Moderator, 2=Admin) {player_steam_id} – Steam ID {player_connected_time} – Connection start time {player_idle_time} – Idle time (HH:MM:SS) Player States
{player_sleeping} – Is sleeping (true/false) {player_wounded} – Is wounded (true/false) {player_dead} – Is dead (true/false) {player_building_blocked} – Is building blocked (true/false) {player_safe_zone} – Is in safe zone (true/false) {player_swimming} – Is swimming (true/false) {player_on_ground} – Is on ground (true/false) {player_flying} – Is flying (true/false) {player_admin} – Is admin (true/false) {player_developer} – Is developer (true/false) Network & Performance
{network_in} – Network input (currently shows 0) {network_out} – Network output (currently shows 0) {fps} – Server FPS {memory} – Memory allocations {collections} – Garbage collections count Usage Example:
You can use these fields in any text component like: "Welcome {player_username}! Server has {online_players}/{max_players} players online."
🔧 API Documentation for Developers
ServerPanel provides an API for plugin developers to integrate their plugins into the menu system.
Required Methods
API_OpenPlugin(BasePlayer player) - Main integration method that returns CuiElementContainer OnServerPanelClosed(BasePlayer player) - Called when panel closes (cleanup) OnServerPanelCategoryPage(BasePlayer player, int category, int page) - Called when category changes (cleanup) OnReceiveCategoryInfo(int categoryID) - Receives your category ID Integration Example
[PluginReference] private Plugin ServerPanel; private int _serverPanelCategoryID = -1; private void OnServerInitialized() { ServerPanel?.Call("API_OnServerPanelProcessCategory", Name); } private void OnReceiveCategoryInfo(int categoryID) { _serverPanelCategoryID = categoryID; } private void OnServerPanelCategoryPage(BasePlayer player, int category, int page) { // Cleanup when player switches categories } private CuiElementContainer API_OpenPlugin(BasePlayer player) { var container = new CuiElementContainer(); // Create base panels (required structure) container.Add(new CuiPanel() { RectTransform = {AnchorMin = "0 0", AnchorMax = "1 1"}, Image = {Color = "0 0 0 0"} }, "UI.Server.Panel.Content", "UI.Server.Panel.Content.Plugin", "UI.Server.Panel.Content.Plugin"); container.Add(new CuiPanel() { RectTransform = {AnchorMin = "0 0", AnchorMax = "1 1"}, Image = {Color = "0 0 0 0"} }, "UI.Server.Panel.Content.Plugin", "YourPlugin.Background", "YourPlugin.Background"); // Add your plugin's UI elements here container.Add(new CuiLabel { RectTransform = {AnchorMin = "0.1 0.8", AnchorMax = "0.9 0.9"}, Text = {Text = "Your Plugin Interface", FontSize = 16, Align = TextAnchor.MiddleCenter, Color = "1 1 1 1"} }, "YourPlugin.Background", "YourPlugin.Title"); // Add buttons, panels, etc. using "YourPlugin.Background" as parent return container; } private void OnServerPanelClosed(BasePlayer player) { // Cleanup when panel closes } Header Update Fields
API_OnServerPanelAddHeaderUpdateField(Plugin plugin, string updateKey, Func<BasePlayer, string> updateFunction) - Registers a per-player string provider for a header placeholder. Returns true on success. API_OnServerPanelRemoveHeaderUpdateField(Plugin plugin, string updateKey = null) - Unregisters a specific updateKey for your plugin, or all keys for your plugin when updateKey is null. Returns true on success. Usage Example
[PluginReference] private Plugin ServerPanel; private void OnServerInitialized() { // Register a dynamic header field for each player ServerPanel?.Call("API_OnServerPanelAddHeaderUpdateField", this, "{player_kdr}", (Func<BasePlayer, string>)(player => GetKdr(player))); } private string GetKdr(BasePlayer player) { // Compute and return the value to display in the header for this player return "1.23"; } Using in UI: Place your key (e.g., {player_kdr}) directly in Header Field texts. The value will be updated per player using your function.
📚 FAQ
Q: Why can't I open the menu?
A: Make sure that the plugin is installed and activated on your server. If the problem persists, contact the server administrator.
Q: How do I enable Expert Mode? (disables automatic template updates)
A: In the data file "Template.json", turn on the "Use an expert mod?" option:
"Use an expert mod?": true, P.S. "Template.json” is located in the "oxide/data/ServerPanel" directory (if you use Oxide) or in the "carbon/data/ServerPanel" directory (if you use Carbon)
Q: I see black images with Rust logo or get error 429 when loading images. What should I do?
A: These issues occur when there are problems downloading images from the internet. To fix this, enable Offline Image Mode which will use local images instead:
Enable the mode in config: Open "oxide/config/ServerPanel.json" (or "carbon/config/ServerPanel.json" for Carbon) Set "Enable Offline Image Mode": true Set up the images: Create folder "TheMevent" in "oxide/data" (or "carbon/data" for Carbon) Download PluginsStorage (click "CODE" → "Download ZIP") Extract the ZIP and copy all contents to the "TheMevent" folder Reload the plugin: Type o.reload ServerPanel (Oxide) or c.reload ServerPanel (Carbon) Note: If using a hosting service, you may need to use their file manager or FTP to upload the files.
Q: Does ServerPanel work only with Mevent's plugins?
A: Currently, ServerPanel integrates seamlessly with Mevent's plugins (Shop, Kits, Daily Rewards, etc.). However, other developers can use the provided API to integrate their plugins into the menu system. The plugin system is designed to be extensible for third-party integrations.
Q: Why do integrated plugins (Shop, Kits) have different window sizes?
A: Different plugins may use different templates for integration. Make sure all your integrated plugins use the same template version (V1, V2, etc.) that matches your ServerPanel template. Update the template in each plugin to ensure consistent sizing.
Q: The panel displays differently for different players. How can I make it show the same on everyone's screen?
A: This issue occurs when players have different UI scale settings. To fix this and ensure consistent display for all players:
Open the "Template.json" file located in "oxide/data/ServerPanel" (or "carbon/data/ServerPanel" for Carbon) Find the "Parent (Overlay/Hud)" setting in the "Background" section Change the value from "Overlay" to "OverlayNonScaled" Save the file and restart your server or reload the plugin Q: How can I change the video displayed in the ServerPanel interface to my own custom video?
A: Yes, you can replace the default video with your own! You need to find and modify the command:
serverpanel_broadcastvideo [your_video_url] Replace [your_video_url] with the direct link to your video. For best compatibility, we recommend hosting your video on imgur.com.
Q: My custom images are not loading or show as blank/question marks. What image hosting should I use?
A: For custom images, we recommend using imgbb.com for image hosting. Avoid Imgur and services without direct access to the image. For the most reliable experience, use Offline Image Mode with local images instead.
Q: How can I make plugin UIs open outside of the ServerPanel menu instead of inside categories?
A: You can configure buttons to execute chat commands that open plugin UIs independently. To do this:
In your button configuration, set "Chat Button": true Set the "Commands" field to "chat.say /command" (replace "command" with the actual plugin command) Example: To open the Cases plugin outside the menu:
"Chat Button": true "Commands": "chat.say /cases" This will execute the command as if the player typed it in chat, opening the plugin's interface independently rather than within the ServerPanel menu.
- #serverpanel
- #info
- (and 32 more)
-
.thumb.gif.affbf8f10ece5421cc4932922a2b35fb.gif)
$34.95$21.95Kits
Unique kit system with the highest possible functionality and beautiful design. This will please you (no need to sit in the config every time and try to fill in some incomprehensible values, etc.), and your players (convenient, clear and informative interface). You just start editing items directly in the game) and your players (comfortable, clear, informative interface)!
🌟 Features of Kits
Beautiful User Interface: Experience a visually appealing and user-friendly design. High Performance: Optimized for fast, reliable performance. Automatic Kit Conversion (uMod): Easily convert your existing kits. In-Game Kit and Item Setup: Configure kits directly in the game. Auto Kits & Wipes (Optional): Automate kit distribution and server wipes. Custom Items & Commands: Assign unique items and commands to kits. Advanced Item Settings: Fine-tune every aspect of your items. CopyPaste Integration: Seamlessly work with CopyPaste. Optional Features: Delays after wipes, set blocking in Building Block, logging, and item chances. Skills & ServerPanel Support: Enhance player experience with integrated support.
🎮 Commands
kit – open the kit interface kit help – get help with kits kit autokit – enable or disable automatic kit.
Requires the "kits.changeautokit" permission. You can set this permission up in the plugin configuration under "Permission to enable/disable autokit". kit list – display all available kits kit [name] – redeem a specific kit kits.resetkits – delete all kits kits.give [name/steamid] [kitname] – grant a kit to player kits.convert – convert from uMod Kits kits.wipe – clear players data kits.reset – resets the player data or kits in the kits system. kits.reset data [<targetID>/all] – resets the data of a player or all players.
Parameters:
<targetID>: The ID of the player whose data is to be reset. If you specify all, the data of all players will be reset. kits.reset kits – resets all kits in the data kits.template <interface_type> <interface_style> <template> [template_version] – allows the administrator to customize the appearance of the bundles interface by choosing between fullscreen and inmenu mode. Different styles and templates are available for each interface type. The old style (old) is only available for fullscreen mode, while the new Rust style (rust) is available for both interface types. When using the Rust style, you must specify a specific template such as normal, content, categories or content_categories. For inmenu rust templates, you can also specify the ServerPanel template version (1 or 2).
Parameters: <interface_type>: The type of interface template. Valid values: fullscreen: Fullscreen interface template. inmenu: Menu interface template. <interface_style>: The style of the interface. Valid values: old: The old interface style (fullscreen only). rust: New Rust interface style (for fullscreen and inmenu). <template>: The name of the target template. Valid values depend on the interface style: normal, content, categories, content_categories. [template_version]: (Optional, only for inmenu rust) ServerPanel template version. Valid values: 1 or 2. Specifies the template version to be used with the selected inmenu rust template. Examples: kits.template fullscreen old - Sets the fullscreen interface to the old style. kits.template fullscreen rust normal - Sets the fullscreen interface to the Rust style with the normal template. kits.template fullscreen rust content - Sets the fullscreen interface to the Rust style with the content template. kits.template fullscreen rust categories - Sets the fullscreen interface to the Rust style with the categories template. kits.template fullscreen rust content_categories - Sets the fullscreen interface to the Rust style with the content_categories template. kits.template inmenu rust normal 1 - Sets the menu interface to the Rust style with the normal template for ServerPanel version 1. kits.template inmenu rust content 2 - Sets the menu interface to the Rust style with the content template for ServerPanel version 2. kits.template inmenu rust categories 1 - Sets the menu interface to Rust style with the categories template for ServerPanel version 1. kits.template inmenu rust content_categories 1 - Sets the menu interface to the Rust style with the content_categories template for ServerPanel version 1.
🎥 Video
P.S. Video of the old version, video for the V2+ version is now in development
🖼️ Showcase
Full screen Templates
Template OLD STYLE
Template NEW RUST
Default:
Content:
Categories:
Content & Categories:
In-Menu Templates
Template V1 (V1.1)
Default:
Content:
Categories:
Content & Categories:
Template V2
Default:
Content:
Categories:
Content & Categories:
Editor
🧪 TEST SERVER
Join our test server to view and experience all our unique features yourself!
Copy the IP Address below to start playing!
connect 194.147.90.239:28015
📚 FAQ
Q: Where can I see an example of a config?
A: Config
Q: Where can I see an example of a data?
A: Data
Q: How do I add Kits to ServerPanel?
A: To add Kits to your ServerPanel, create a new category in your ServerPanel configuration with these settings:
"Type": "Plugin", "Plugin Name": "Kits", "Plugin Hook": "API_OpenPlugin". Q: Does the Kits plugin support other plugins?
A: Yes, this Kits plugin has an API similar to other popular kits plugins. If the plugin works with Kits - it works with this plugin too.
Q: How do I enable the sale of kits?
A: You need to configure the plugin economy (which plugin, its hooks, etc.), enable "Enable sale" in the Kits data (oxide/data/Kits/Kits.json or carbon/data/Kits/Kits.json) and set the price to "Selling price"
"Enable sale": true, "Selling price": 100, Q: How do I use Economics to pay for kits?
A: Example configuration settings:
"Economy": { "Type (Plugin/Item)": "Plugin", "Plugin name": "Economics", "Balance add hook": "Deposit", "Balance remove hook": "Withdraw", "Balance show hook": "Balance", "ShortName": "", "Display Name (empty - default)": "", "Skin": 0 }, Q: How do I use ServerRewards to pay for kits?
A: Example configuration settings:
"Economy": { "Type (Plugin/Item)": "Plugin", "Plugin name": "ServerRewards", "Balance add hook": "AddPoints", "Balance remove hook": "TakePoints", "Balance show hook": "CheckPoints", "ShortName": "", "Display Name (empty - default)": "", "Skin": 0 }, Q: How do I use scrap to pay for kits?
A: Example configuration settings:
"Economy": { "Type (Plugin/Item)": "Item", "Plugin name": "", "Balance add hook": "", "Balance remove hook": "", "Balance show hook": "", "ShortName": "scrap", "Display Name (empty - default)": "", "Skin": 0 }, Q: How do I resize the kit image?
A: You can do this in the config, here's an example of the image setup (-32 and 32 are width, and -75 and -11 are height😞
"Kit Image": { "AnchorMin": "0.5 1", "AnchorMax": "0.5 1", "OffsetMin": "-32 -75", "OffsetMax": "32 -11" }, Q: How can I remove the numbers on the kits ("#1", "#2", etc.)?
A: You need to turn off "Show Number?" in the config:
"Show Number?": false, Q: How do I make it so that others can see kits with different permissions without being able to claim them?
A: You need to turn off "Show All Kits?" in the config:
"Show All Kits?": true, Q: Where can I edit the names in the plugin or add my own language?
A: You can edit lang files that are located (for example) at "oxide/lang/en/Kits.json" or "carbon/lang/en/Kits.json".
Q: Players get "The plugin does not work correctly, contact the administrator!" message. How to fix?
A: This error occurs when the ImageLibrary plugin is not working properly. Solutions:
Install the ImageLibrary plugin if it's not installed. Make sure ImageLibrary is loaded and running properly (check with o.plugins command). Restart the server after installing ImageLibrary. Check server console for ImageLibrary errors and fix them. Q: I see black images with Rust logo or get error 429 when loading images. What should I do?
A: These issues occur when there are problems downloading images from the internet. The Kits plugin sends images to ImageLibrary but is not responsible for the downloading process itself. Error 429 typically occurs due to rate limits imposed by image hosting services like Imgur (see HTTP 429 documentation for more details). To fix this, enable Offline Image Mode which will use local images instead:
Enable the mode in config: Open "oxide/config/Kits.json" (or "carbon/config/Kits.json" for Carbon) Set "Enable Offline Image Mode": true Set up the images: Create folder "TheMevent" in "oxide/data" (or "carbon/data" for Carbon) Download PluginsStorage (click "CODE" → "Download ZIP") Extract the ZIP and copy all contents to the "TheMevent" folder Reload the plugin: Type o.reload Kits (Oxide) or c.reload Kits (Carbon) Note: If you want to add your own custom images, place them in the "TheMevent" folder and reference them with the "TheMevent/" prefix. For example: "TheMevent/Icon1.png", "TheMevent/MyCustomIcon.jpg", etc.
Q: What placeholders are available for commands and what do they do?
A: You can use these placeholders in kit commands and they will be automatically replaced:
%steamid% - Replaced with the player's Steam ID (e.g., "76561198000000000") %username% - Replaced with the player's display name (e.g., "PlayerName") %player.x% - Replaced with the player's X coordinate position %player.y% - Replaced with the player's Y coordinate position %player.z% - Replaced with the player's Z coordinate position Example usage in kit commands:
"Commands on receiving (via '|')": "say Welcome %username%!|teleport %steamid% %player.x% %player.y% %player.z%" Note: Multiple commands can be separated by the "|" character, and they will be executed in sequence when the kit is redeemed.
🛠️ HOOKS
private string[] canRedeemKit(BasePlayer player) private void OnKitRedeemed(BasePlayer player, string kitName) private double OnKitCooldown(BasePlayer player, double cooldown)
🧩 API
private bool TryClaimKit(BasePlayer player, string name, bool usingUI) private string[] GetAllKits() private object GetKitInfo(string kitname) private string[] GetKitContents(string kitname) private double GetKitCooldown(string kitname) private double PlayerKitCooldown(ulong ID, string kitname) private int KitMax(string kitname) private double PlayerKitMax(ulong ID, string kitname) private string KitImage(string kitname) private bool IsKit(string kitname) private bool isKit(string kitname) private void GetKitNames(List<string> list) private double GetPlayerKitCooldown(ulong userId, string name) private double GetPlayerKitCooldown(string userId, string name) private void SetPlayerCooldown(ulong userId, string name, int amount) private int GetPlayerKitUses(ulong userId, string name) private int GetPlayerKitUses(string userId, string name) private void SetPlayerKitUses(ulong userId, string name, int amount) private JObject GetKitObject(string name) private int GetKitMaxUses(string name) private string GetKitDescription(string name) private string GetKitImage(string name) private bool GiveKit(BasePlayer player, string name, bool usingUI) private bool HasKitAccess(string userId, string name) private int GetPlayerKitAmount(string userId, string name) -
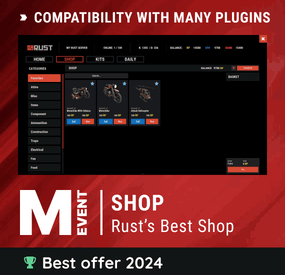
$29.95$21.95Shop
Enjoy a highly customizable Shop that can be configured in game! Use NPCs as shopkeepers, and set up a shop with ease using the game interface to add, edit, or remove items on the fly!
⭐ Features of Shop
Beautiful user interface Discount system (by permissions) Automatic shop filling (+ the plugin has support for the ItemCostCalculator plugin) Selling items (players can sell items to the store and receive money for it) Performance Adding/editing/removing items IN GAME Supports NPC Supports Custom Vending Machines Supports NoEscape Convert from ServerRewards Favorite items By default, the plugin has English, Russian and Chinese translations Transfer money between players directly in the plugin! Shop allows you to use multiple economy plugins at once (players can choose what they want to pay with) For each item, you can choose which payment methods are available and how much they will cost, based on the selected method
🎮 Commands
shop - open shop interface shop.install – starts the shop installation process shop.refill <recovery_rate> - refill shop again
recoveryRate: A value between 0 and 1 that determines the multiplier for the cost of selling items. For example, shop.refill 0.5 means that items will have a sale cost of 50% of their purchase cost. shop.convert.sr [clear] - convert items from ServerRewards to Shop. The option clear means clearing Shop items before convert shop.setvm [categories: cat1 cat2 ...] - add custom VM in config shop.setnpc [categories: cat1 cat2 ...] - add NPC in config shop.remove all - a console command to remove all items and categories from the plugin shop.remove item [category name/all] - a console command to remove an item (or all items) shop.remove category [category name/all] - a console command to remove a category (or all categories) shop.fill.icc [all/buy/sell] - a console command for updating prices of items in the store using ItemCostCalculator. all - updates both Price and SellPrice, buy - updates Price, sell - updates SellPrice shop.convert.from.1.2.26 – command to convert Shop plugin version 1.2.26 to version 1.3.0+ shop.reset – resets store data, including templates, configurations, and items. shop.reset template – resets the store interface template data. shop.reset config – resets store configuration data. shop.reset items – resets store items data. shop.reset full – completely resets all store data (templates, configurations and items). shop.manage – used to manage the Shop plugin. shop.manage economy list – displays a list of all available economic systems in the plugin. shop.manage economy set <economy_ID> <name> – ыets the selected economic system by plugin ID and name. The command updates the corresponding economic system on the server and saves the changes in the configuration. FOR EXAMPLE:
shop.manage economy set 0 Economics – sets the main economy plugin to "Economics”.
shop.manage economy set 1 ServerRewards – sets the additional economy system with ID 1 to "ServerRewards”.
🛡️ Permissions
shop.setvm - for command "shop.setvm" shop.setnpc - for command "shop.setnpc" shop.free - for free item purchases shop.admin - admin permission shop.bypass.dlc - allows bypassing Facepunch ToS item restrictions (WARNING: your server may be banned for this)
⚖️ Sort Types
None Name Amount PriceDecrease PriceIncrease
🧬 Category Types
None – normal category for items Favorite – category for favorite items Hided – hidden category, available only in NPC stores or Vending Machines
🎥 Video
P.S. Video of the old version, video for the V2+ version is now in development
🖼️ Showcase
Full screen Templates
Template OLD STYLE
Template NEW RUST
In-Menu Templates
Template V1 (V1.1)
Template V1 (V1.1) with BASKET
Template V2
Template V2 with BASKET
Installer
Editor
🧪 TEST SERVER
Join our test server to view and experience all our unique features yourself!
Copy the IP Address below to start playing!
connect 194.147.90.239:28015
📚 FAQ
Q: I get the message "The plugin does not work correctly, contact the administrator!”. What should I do?
A: This means that your plugin is not installed. To install the plugin, use the command "/shop.install”. You need to have "shop.admin” permission to access this command.
Q: Where can I see an example of a config?
A: Config
Q: How to use BankSystem to store the economy
A:
"Economy": { "Type (Plugin/Item)": "Plugin", "Plugin name": "BankSystem", "Balance add hook": "Deposit", "Balance remove hook": "Withdraw", "Balance show hook": "Balance", "ShortName": "", "Display Name (empty - default)": "", "Skin": 0, "Lang Key (for Title)": "LangTitle", "Lang Key (for Balance)": "BalanceTitle" }, Q: How to use ServerRewards to store the economy
A:
"Economy": { "Type (Plugin/Item)": "Plugin", "Plugin name": "ServerRewards", "Balance add hook": "AddPoints", "Balance remove hook": "TakePoints", "Balance show hook": "CheckPoints", "ShortName": "", "Display Name (empty - default)": "", "Skin": 0, "Lang Key (for Title)": "LangTitle", "Lang Key (for Balance)": "BalanceTitle" }, Q: How to use Economics to store the economy
A:
"Economy": { "Type (Plugin/Item)": "Plugin", "Plugin name": "Economics", "Balance add hook": "Deposit", "Balance remove hook": "Withdraw", "Balance show hook": "Balance", "ShortName": "", "Display Name (empty - default)": "", "Skin": 0, "Lang Key (for Title)": "LangTitle", "Lang Key (for Balance)": "BalanceTitle" }, Q: How to use IQEconomic to store the economy
A:
"Economy": { "Type (Plugin/Item)": "Plugin", "Plugin name": "IQEconomic", "Balance add hook": "API_SET_BALANCE", "Balance remove hook": "API_GET_BALANCE", "Balance show hook": "API_REMOVE_BALANCE", "ShortName": "", "Display Name (empty - default)": "", "Skin": 0, "Lang Key (for Title)": "LangTitle", "Lang Key (for Balance)": "BalanceTitle" }, Q: How to use scrap to pay for items
A:
"Economy": { "Type (Plugin/Item)": "Item", "Plugin name": "", "Balance add hook": "", "Balance remove hook": "", "Balance show hook": "", "ShortName": "scrap", "Display Name (empty - default)": "", "Skin": 0, "Lang Key (for Title)": "LangTitle", "Lang Key (for Balance)": "BalanceTitle" }, Q: How to add KIT as shop item
A: https://pastebin.com/4szBQCgz
Q: How to add Command as shop item
A: https://pastebin.com/bcCkzBEL
Q: How do I make a weapon spawn with ammo in it?
A: You need to configure the "Weapon" section in the item config:
"Weapon": { "Enabled": true, "Ammo Type": "ammo.rifle.explosive", "Ammo Amount": 128 } Q: How do I make items spawn some content (liquid, weapon modifications)?
A: You need to configure the "Content" section in the item config:
"Content": { "Enabled": true, "Contents": [ { "ShortName": "weapon.mod.lasersight", "Condition": 100.0, "Amount": 1, "Position": -1 } ] }, Q: How to turn off the sell feature?
A: You need to turn off "Enable item selling” in the config, or do it in the item setting in the game.
"Enable item selling?": false,
Q: How to use the ItemCostCalculator with Shop?
A: You need to use command "shop.refill" (command to refill the Shop)
Q: What should be the size of images for item icons?
A: Typically, the image dimensions for item icons are 512x512 pixels, but any square image can suffice.
Q: I get the error "UI is unavailable for player. Reason: Menu UI is not initialized". How to fix it?
A: This error occurs when the interface template is not installed or configured. Follow these steps:
1. Reset the template using the command: shop.reset template (use only template to avoid data loss).
2. Install the interface via shop.install in the game (to visually select a template) or through the console.
Note: Ensure you have the shop.admin permission to execute these commands.
Q: How do I add Shop to the ServerPanel menu?
A: Follow these simple steps:
1. Open ServerPanel menu in-game and click "+ADD CATEGORY" button
2. Set these exact parameters:
Type: Plugin Plugin Name: Shop Plugin Hook: API_OpenPlugin 3. Click "SAVE" button to create the category
4. Reset Shop template and install it:
Type in console: shop.reset template (IMPORTANT: use only "template"!) Then type: shop.install Note: If Shop doesn't appear in ServerPanel menu, make sure both plugins are loaded and you typed the parameters exactly as shown above.
Q: I see black images with Rust logo or get error 429 when loading images. What should I do?
A: These issues occur when there are problems downloading images from the internet. The Shop plugin sends images to ImageLibrary but is not responsible for the downloading process itself. Error 429 typically occurs due to rate limits imposed by image hosting services like Imgur (see HTTP 429 documentation for more details). To fix this, enable Offline Image Mode which will use local images instead:
Enable the mode in config: Open "oxide/config/Shop.json" (or "carbon/config/Shop.json" for Carbon) Set "Enable Offline Image Mode": true Set up the images: Create folder "TheMevent" in "oxide/data" (or "carbon/data" for Carbon) Download PluginsStorage (click "CODE" → "Download ZIP") Extract the ZIP and copy all contents to the "TheMevent" folder Reload the plugin: Type o.reload Shop (Oxide) or c.reload Shop (Carbon) Note: If you want to add your own custom images, place them in the "TheMevent" folder and reference them with the "TheMevent/" prefix. For example: "TheMevent/Icon1.png", "TheMevent/MyCustomIcon.jpg", etc.
Q: What placeholders are available for commands and what do they do?
A: You can use these placeholders in shop commands and they will be automatically replaced when a player purchases a command item:
%steamid% - Replaced with the player's Steam ID (e.g., "76561198000000000") %username% - Replaced with the player's display name (e.g., "PlayerName") %player.x% - Replaced with the player's X coordinate position %player.y% - Replaced with the player's Y coordinate position %player.z% - Replaced with the player's Z coordinate position Example usage in shop commands:
"Command (%steamid%)": "say Welcome %username%!|teleport %steamid% %player.x% %player.y% %player.z%" Note: Multiple commands can be separated by the "|" character, and they will be executed in sequence when the item is purchased.
Q: How to set different prices for different currencies (RP and balance)?
A: You can configure separate currency prices for each item. Edit the file oxide/data/Shop/Shops/Default.json and find the item you want to modify. In the "Currencies" section, set different prices for each economy:
"Currencies": { "Enabled": true, "Currencies": { "0": {"Price": 1000}, "1": {"Price": 500} } } This means players pay 1000 from their main balance (Economics) or 500 RP from their ServerRewards balance. Economy ID 0 = main economy, ID 1 = ServerRewards.
Q: How to create a shop using HumanNPC plugin and set specific categories?
A: To create a shop with HumanNPC, follow these steps:
Create an NPC using HumanNPC plugin Get the NPC ID (you can find it in the HumanNPC config or use the command humannpc.list) Use the Shop command to add the NPC: shop.setnpc [categories: cat1 cat2 ...] Example:
shop.setnpc categories: Weapon Ammunition Tools - adds the NPC with Weapon, Ammunition, and Tools categories
shop.setnpc categories: * - adds the NPC with all available categories
Note: You need the shop.setnpc permission to use this command. Make sure both HumanNPC and Shop plugins are loaded on your server.
Q: How to add Custom Vending Machines to Shop plugin?
A: To add Custom Vending Machines to Shop, follow these steps:
Place a Custom Vending Machine in your world Look at the vending machine and use the command: shop.setvm [categories: cat1 cat2 ...] Example:
shop.setvm categories: Weapon Ammunition - adds the vending machine with Weapon and Ammunition categories
shop.setvm categories: * - adds the vending machine with all available categories
Note: You need the shop.setvm permission to use this command. The vending machine will be automatically added to the Shop configuration.
-

$10.00
WarnMenu
What is it?
A nice user-friendly warning system
Usage
When someone is breaking rules or trolling others just warn them, you can also set a command that will be executed through server console that will get executed upon reachin certain amount of warnings (can be configured in cfg)
Permissions
warnmenu.use -- Gives you full control to operate the WarnMenu
Chat command
/warn -- Opens the WarnMenu /warn "Name/SteamID" "Warning reason" -- Warns the specified player with your reason /warnmenu.save -- Force the plugin to write the data from memory to the data file /wmessage <NameOrID | * > <message> - Shows a gametip message (Doesn't count as a warning) to specific player or to all players when you put * instead of the name
Data files
All Data files can be located at: \oxide\data\WarnMenu\warns
There you can find all the warnings for each player
Features
WarnMenu features
* Online Tab - In this tab you can easily select any online player that you want to warn
* Search All Tab - Once you open this tab, there you can see all the players and browse in them
* Find player Tab - When you click on the button you will be able to search for a specific player using his Name or SteamID
Warn Types
* CUI-Based - A CUI warning message will pop-up on player's screen when he gets warned
* Chat-Based - A chat message will pop-up in player's chat when he gets warned
Executable commands
* On reaching certain amount of warnings, you can make the server execute a command on a player(configurable in cfg)
F.e.: "1": "say {0} just reached 1 warning! SHAME on him!", "3": "kick {0} Kicked for reaching 3 warnings",
Localization
{ "Syntax": "Commands:\n/report (Opens Reporter GUI)", "CUI Online": "Online Players", "CUI Player": "Player: {0}", "CUI SteamID": "SteamID64: {0}", "CUI Warnings": "Warnings: <color=#8f1919>{0}</color>", "CUI NewWarn": "New\nWarning", "CUI WarningID": "Warning ID: {0}", "CUI WarnedBy": "Warned by: {0}", "CUI Date": "Date: {0}", "CUI Reason": "Reason: \n{0}", "CUI Remove": "Remove", "CUI Close": "close", "CUI Warn": "Warn", "CUI WarnAddMenuPlayer": "Warning for\n<color=#d43939>{0}</color>", "CUI SearchAll": "Search All", "CUI SelectPlayer": "Select a player to warn:", "CUI Find": "Find player", "CUI Find2": "Select", "CUI Find3": "Find player:\n(steamID/Name)", "CUI CantFindPlayer": "Couldn't find the player\nsearching argument: {0}", "CUI FoundPlayer": "Found player: {0}", "CUI Refresh": "Refresh", "CantFindPlayer": "Couldn't find that player", "WarnMessage": "Warned: <color=#8f1919>{0}</color>\nReason: {1}", "JoinMessage": "{0} has joined with <color=#8f1919>{1}</color> warnings", "WarnReceive": "You have received a <color=#8f1919>warning</color>\nBy: {0}\nReason: {1}", "CUI WarnReceive": "<color=#8f1919>Warning</color>\nreceived", "CUI WarnReceive2": "By: {0}\nReason: {1}" }
Configuration
{ "Announce on join with warnings?(to admins)": true, "Execute commands on reaching count:": { "Enabled?": true, "(Format: 5 : mute {0}) where 5 is number of warns and {0} is player's id": { "5": "say {0} just reached 5 warnings! SHAME on him!", "7": "example.command {0}", "10": "example.command {0}" } }, "Warn message settings": { "Text-based warn message?": true, "CUI-based warn message?": true, "How long until CUI message gets removed (secs)": 5.0 } }
-
$10.99
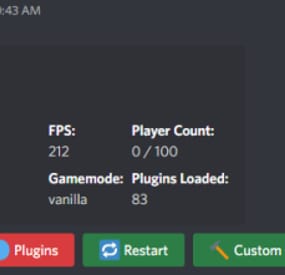
Discord Server Panel
By AimonMurasaki in Plugins
This plugin adds server related commands usable in a specific discord channel with a specific discord role,
that gives access to a server panel to do specific commands on the server.
Features :
Gives access to a permission manager on discord
Gives access to a plugin manager on discord
Gives access to a restart panel on discord
Able to make custom commands from config
Gives access to a wipe panel on discord (Only works with DSPWipe or WipeServer loaded)
Discord Commands:
/server : Shows a list of usable commands for the server
/plugins : Gives a plugin list on discord to manage plugins
Discord Interactions:
When using /server, a list of server commands to manage your server as interactive buttons.
Once you use one of the buttons, It will give you more interactive buttons to use different commands and manage your server.
Permissions Command shows entity then the command then the permission/group to use the command on after clicking on it :
Restart Command shows delay of restart and reasons to use the command after clicking on it :
Plugins Command shows the list of plugins you can interact with then shows the command that you can use on it :
Custom Command shows the list of commands in the configuration :
Configuration :
{ "LogFileName": "DiscordServerPanel", "Bot token": "", "Ignore Roles": false, "Discord Channel ID where the command can be used": [ "1234567891234567890" ], "Embed's color": "#ff0000", "Show Server FPS (Server command)": true, "Show Gamemode (Server command)": true, "Show Plugins Loaded (Server command)": true, "Custom": { "Use Custom (true/false)": false, "Use Confirmation (true/false)": false, "Custom Commands ('command name' 'command to send on console')": { "Restart": "restart 300 Maintenance", "SkipNight": "env.time 12" }, "Discord Role ID (Can be left empty to use the first role id)": [] }, "Restart": { "Use Restart (true/false)": true, "Restart Reasons (One Word)": [ "Maintenance", "Update", "Wipe", "None" ], "Time for command (Use 'h' for hours, 'm' for minutes)": [ "5m", "10m", "30m", "1h" ], "Discord Role ID (Can be left empty to use the first role id)": [] }, "Plugins": { "Use Plugins (true/false)": true, "Use Confirmation (true/false)": true, "Discord Role ID (Can be left empty to use the first role id)": [] }, "Permissions": { "Use Permissions (true/false)": true, "Discord Role ID (Can be left empty to use the first role id)": [] }, "Wipe": { "Use Wipe (true/false)": false, "Generate Random Seeds (How many options to choose from)": 4, "Map Size": 3500, "Backup Map Files (Backup in identity folder)": true, "Time for command (Use 'h' for hours, 'm' for minutes)": [ "5m", "10m", "30m", "1h" ], "Discord Role ID (Can be left empty to use the first role id)": [] }, "logs": { "Log to console (true/false)": true, "Log to discord (true/false)": false, "Discord Extension Log Level (Verbose/Debug/Info/Warning/Error/Exception/Off)": "Info", "Delete message after command": true, "Delete message after interaction": true, "Log Discord Channel ID": "" }, "Discord Guild ID (optional if the bot is in one guild)": "", "Discord Role ID": [ "1234567891234567890" ] } Configure :
Set Bot Token, ChannelID and RoleID in config.
Reload Plugin.
(Optional) To use the wipe functionality :
Load DSPWipe.
Enable Wipe function in DiscordServerPanel config.
You can suggest new functionalities or plugin ideas on discord : Aimon#9899 .
- #discord
- #discordbot
- (and 3 more)