Search the Community
Showing results for tags 'custom items'.
Found 5 results
-
Version 1.3.6
4,817 downloads
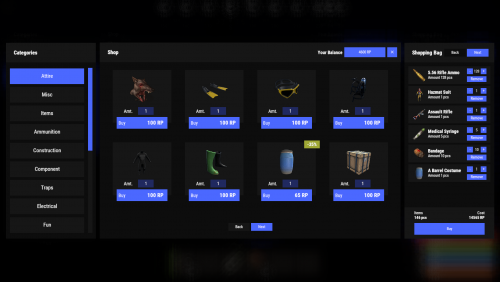
Enjoy a highly customizable Shop that can be configured in game! Use NPCs as shopkeepers, and set up a shop with ease using the game interface to add, edit, or remove items on the fly! ️ Features Beautiful user interface Discount system (by permissions) Automatic shop filling (+ the plugin has support for the ItemCostCalculator plugin) Selling items (players can sell items to the store and receive money for it) Performance Adding/editing/removing items IN GAME Supports NPC Supports Custom Vending Machines Supports NoEscape Convert from ServerRewards Favorite items By default, the plugin has English, Russian and Chinese translations Transfer money between players directly in the plugin! Shop allows you to use multiple economy plugins at once (players can choose what they want to pay with) Commands shop - open shop interface shop.refill - refill shop again shop.convert.sr [clear] - convert items from ServerRewards to Shop. The option clear means clearing Shop items before convert shop.setvm [categories: cat1 cat2 ...] - add custom VM in config shop.setnpc [categories: cat1 cat2 ...] - add NPC in config shop.remove all - a console command to remove all items and categories from the plugin shop.remove item [category name/all] - a console command to remove an item (or all items) shop.remove category [category name/all] - a console command to remove a category (or all categories) shop.fill.icc [all/buy/sell] - a console command for updating prices of items in the store using ItemCostCalculator. all - updates both Price and SellPrice, buy - updates Price, sell - updates SellPrice shop.convert.from.1.2.26 – command to convert Shop plugin version 1.2.26 to version 1.3.0+ Permissions shop.setvm - for command "shop.setvm" shop.setnpc - for command "shop.setnpc" shop.free - for free item purchases shop.admin - admin permission Sort Types None Name Amount PriceDecrease PriceIncrease Category Types None – normal category for items Favorite – category for favorite items Hided – hidden category, available only in NPC stores or Vending Machines Video FAQ Q: Where can I see an example of a config? A: Config Q: How to use BankSystem to store the economy A: "Economy": { "Type (Plugin/Item)": "Plugin", "Plugin name": "BankSystem", "Balance add hook": "Deposit", "Balance remove hook": "Withdraw", "Balance show hook": "Balance", "ShortName": "scrap", "Display Name (empty - default)": "", "Skin": 0, "Lang Key (for Title)": "LangTitle", "Lang Key (for Balance)": "BalanceTitle" }, Q: How to use ServerRewards to store the economy A: "Economy": { "Type (Plugin/Item)": "Plugin", "Plugin name": "ServerRewards", "Balance add hook": "AddPoints", "Balance remove hook": "TakePoints", "Balance show hook": "CheckPoints", "ShortName": "scrap", "Display Name (empty - default)": "", "Skin": 0, "Lang Key (for Title)": "LangTitle", "Lang Key (for Balance)": "BalanceTitle" }, Q: How to use Economics to store the economy A: "Economy": { "Type (Plugin/Item)": "Plugin", "Plugin name": "Economics", "Balance add hook": "Deposit", "Balance remove hook": "Withdraw", "Balance show hook": "Balance", "ShortName": "scrap", "Display Name (empty - default)": "", "Skin": 0, "Lang Key (for Title)": "LangTitle", "Lang Key (for Balance)": "BalanceTitle" }, Q: How to use scrap to pay for items A: "Economy": { "Type (Plugin/Item)": "Item", "Plugin name": "", "Balance add hook": "", "Balance remove hook": "", "Balance show hook": "", "ShortName": "scrap", "Display Name (empty - default)": "", "Skin": 0, "Lang Key (for Title)": "LangTitle", "Lang Key (for Balance)": "BalanceTitle" }, Q: How to add KIT as shop item A: https://pastebin.com/4szBQCgz Q: How to add Command as shop item A: https://pastebin.com/bcCkzBEL Q: How do I make a weapon spawn with ammo in it? A: You need to configure the "Weapon" section in the item config: "Weapon": { "Enabled": true, "Ammo Type": "ammo.rifle.explosive", "Ammo Amount": 128 } Q: How do I make items spawn some content (liquid, weapon modifications)? A: You need to configure the "Content" section in the item config: "Content": { "Enabled": true, "Contents": [ { "ShortName": "weapon.mod.lasersight", "Condition": 100.0, "Amount": 1, "Position": -1 } ] }, Q: How to turn off the sell feature? A: You need to turn off “Enable item selling” in the config, or do it in the item setting in the game. "Enable item selling?": false, Q: How to use the ItemCostCalculator with Shop? A: You need to use command "shop.refill" (command to refill the Shop) Q: What should be the size of images for item icons? A: Typically, the image dimensions for item icons are 512x512 pixels, but any square image can suffice.$29.95 -
(1).thumb.png.808a3fccbcd4a28de5d7f511832a1442.png)
Version 4.2.5
691 downloads
Rust's first in-game social-media network. See what's up, chat with friends, share your experiences and make connections. Ruster.NET brings you a whole new system of communication! CHAT — SHARE — REACT WARNING: As stated in the License section of the plugin, you may NOT modify the plugin in any way. If you wish to modify the logos, you may only do so using Ruster.NET Pro. Not conforming to the license, will cause your server(s) to be permanently blacklisted. [ ! ] PLEASE KEEP IN MIND THAT CERTAIN SERVER HOSTS DO NOT ALLOW YOU [ ! ] [ ! ] TO IMPORT FILES/DLLS, WHICH THIS PLUGIN REQUIRES YOU TO [ ! ] INCLUDED DLL EXTENSIONS REQUIRED FEATURES Make friends, share moments and pictures you've made in the world. Like, dislike or comment to your friends' posts and photos. Use the Marketplace to make a quick buck. Build your own marketplace and use the mass-restock feature. Block users and limit toxicity. Auto-moderation for obnoxious posts & censorship. Pay for advertisements which last from one day to a whole week. Rust+ integration. ServerRewards & Economics integration. Localisation integration -> if anything's wrong with any of the translations, let me know or help me translate. Ruster.FM, audio player. Cassette uploads (posts & DMs) -> Watch demo. Voice recordings (posts & DMs) - only available for Verified users. Submit your own snippets (upload 15 seconds - of your OGGs or YouTube links), only available for Verified users. Photographs (DMs) -> Watch demo. Sell art (Photographs & Cassettes) on the Marketplace or share them in posts. Browser sounds are only heard by you -> beeps, notifications, splash sounds. Hashtags used for filtering post content, the Marketplace can be sorted by sold items. Feed filtering / searching. Like & dislike previewer. SQL integration. Blackmarket & Red-Rooms. Stories. Cross-server support (view other servers' activities). Privacy mode (hide real names & Steam64 IDs) when streaming. Custom commands. Nicknames. Moderation tools. Pinning posts on top of feeds. Ruster.NET Internet. Groups. Stocks. Auto-locale updater. User & administration customisation. Custom colors. Color picker. Auto-language phrase updater. Reporting system. Track transactions & sales. Create coupons and sell items with discounts by sharing the coupon code. GIF playback. Flipbook system & custom items. Transaction lists (purchases & sales). User profile store for avatars, frames and banners. Trading system lists (only between friends). Gift Cards (50, 100, 250 and 500 in value) to share with your friends or turn it into Wallet money. Payment methods (wallet and server currency). Gift baskets and gift sending (pick a friend in User Settings, then buy marketplace listings, the items will go in their basket). ROADMAP Ruster.Addons is a tool and API system for Ruster.NET which allows you to run or create your own addons. Per-user customization. Full-screen picture viewer. Discount codes. SQL INTEGRATION MIGRATION To successfully migrate from JSON to the SQL database, please follow the following steps: Run the save command in your console / webrcon. Update Ruster.NET to the latest in your server. Make sure your SQL database connection is alive and working. Save the server once again, for the configuration file to generate the new properties. Open the configuration file up and scroll down to the Sql section, fill it up accordingly. "Sql": { "Port": 3306, "Hostname": "localhost", "Database": "RusterNET_db", "Username": "root", "Password": "", "Table": "RusterNETData" } After that is done, make sure you saved the configuration file, then run the o.reload RusterNET console / rcon command. While you're having the RusterNET.admin permission, run the /migratetosql chat command. The DataType property will switch to SQL and the SQL database will initialize, launch the connection and save the database on your SQL server. Notice: You don't have to create the table or data fields as it's all automatically generated. On each save, the whole table in being wiped and the data's being recreated. FRIEND REQUESTS Sending friend requests will immediately notify the other user about it. Once you're friends, you may both write posts on eachothers' feeds, rather than within the Marketplace &/or Global Feed. Cutting ties with a friend or blocking them, will ensure mutual communication blockage. PHOTOGRAPHS If you're a server administrator, here's how you set the photograph uploads up: Open up the RusterNET.json (config) file; Go to the Imgur Application Registration form and log-in if you haven't yet; Fill it up accordingly, but make sure the Authorization type is for Anonymous usage; The redirecting URL may be https://imgur.com. After all has been done, copy the ClientID and paste it in the RusterNET.json file config: PhotographUpload -> ImgurClientId To manage your Imgur Applications, go here. GIFS With the addition of GIFs, you may share your favourite animated image stacks in your server! PROFILE CUSTOMS Users can customize their profiles in more interesting ways with predefined avatars, profile banners and avatar frames! AVATARS By default, Ruster.NET comes with a variety of predefined avatars (15 in total), 8 being free and the rest are exclusively found in the Profile Store. FRAMES Ruster.NET comes with a variety of exclusive avatar frames (13 in total) that can be found in the Profile Store. BANNERS Ruster.NET comes with a variety of exclusive avatar frames (13 in total) that can be found in the Profile Store. PROFILE STORE Use the Profile Store to purchase all the exclusive items for your profile. All the prices or even the avatars, frames or banners can be reconfigured (or add more or less of them). I highly recommend to use the existent ones as a template so it blends in better. FLIPBOOKS Ruster.NET Short Flipbook Ruster.NET Medium Flipbook Ruster.NET Long Flipbook Frames: 20 Frames: 40 Frames: 180 Costs: 50 x Scrap Costs: 85 x Scrap Costs: 150 x Scrap Skin: 2741149446 Skin: 2741150219 Skin: 2741150823 Flipbooks are designed to allow your players to get creative by creating short films using the Instant Camera. They're cheap, get one, snap the thumbnail picture, take loads of pictures, each time moving slightly, and see your art come to life like people in the '60s did. You may reset the Flipbook with a fee by using the Repair Bench. The fee is 25 Scrap by default. The actual fee is scaled based on the type of Flipbook and how many frames have been consumed. TRADING You may send trade requests to your friends that live farther than where you are. This feature requires the RusterNET.trade permission to be able to see the blue Trade button under your friends' profile. STORIES As you probably know, Stories on other social medias are pretty much posts that last for 24 hours. Same thing in Ruster.NET. You may add a message to your Photographs so they're also included with the Story you're willing to post. Users can upload up to 5 stories at once, so use your space wisely. Once the stories run out, you'll be notified of how many views it has gained, in the notification list & push. For users to be allowed to use Stories, an administrator must give specified users or groups permission: RusterNET.story. Configuration { "LogLevel": -1, "DataType": 0, "UniqueId (Must not be null/empty)": "defaultid", "Ads": { "AdvertPrice24h": 5000, "AdvertPriceMultiplier1w": 6.5 }, "Tax": { "Amount": 0.9 }, "Marketplace": { "MaximumStackSizeEachItem (-1 = Default stacksize for the item)": -1, "MaximumStackSizeWholeStack (-1 = Default stacksize for the item)": 100000, "MinimumPrice": 0, "MaximumPrice": 2500, "BlacklistedItems": [ "photo" ] }, "Look": { "AdminNameColor": "#de3535", "ModeratorNameColor": "#a3de35" }, "DMs": { "MustBeFriendsToDM": true, "DeleteOwnMessagesCooldown": 1800.0 }, "Notifications": { "VerticalOffset": 0.0 }, "Sounds": { "FFMPEGPath": "", "PlayStartup": true, "PlayBeeps": true, "PlayLikes": true, "PlayDislikes": true }, "PhotographUpload": { "ImgurClientId": "my_client_id" }, "Cooldown": { "ButtonPress": 0.5, "BusinessCardCreation": 60.0, "RustPlusNotifications": 4.0 }, "Currency": { "ItemShortname": "scrap", "ItemSkinId": 0, "Currency Type (0 = Item, 1 = ServerRewards, 2 = Economics": 0 }, "Profanity": { "BannedWords": [ "bad word", ], "BannedWordReplacements": [ "good word", ] }, "Sql": { "Port": 3306, "Hostname": "localhost", "Database": "RusterNET", "Username": "root", "Password": null, "Table": "RusterNET" }, "Localisation": { "DefaultLanguage": "en-GB", "Languages": [] } } SELL ITEMS — GIVE FEEDBACK — KEEP IN TOUCH. The Ruster.NET Marketplace is a place for you to sell items you don't use anymore or want to sell it for triple the price. How It Works The way the marketplace works is quite simple. Keep reading to understand how it all works. INTRODUCTION Marketplace posts are like regular posts, except that you may set up your items you want to sell and the price you want to receive once a player purchased them. These posts you only find when you're in the marketplace panel. On the purchase, if the marketplace listing becomes out-of-stock, it's only visible for the creator of the post until the post owner is refilling the listing. RESTOCKING When you have more than one listing or a whole lot of post listings, you may mass restock using the "RESTOCK" button (next to the "WITHDRAW" button), hold a hammer and hit an unlocked storage container filled with items for those listings to automatically take out and restock. You may also individually restock your listings when you're the owner and have opened the post in full-screen. Drag and drop the item in the stash slot when it shows up. If you changed your mind from restocking, press [USE] to return to Ruster.NET. ADMIN LIMITS The owner of the server may configure the currency, and minimum / maximum price amounts players can set for their listings. ADVERTS Adverts can be modified in the Marketplace panel. Your active (or inactive) adverts will show up first. If any an advert that an user has posted is not stocked or needs restocking, they'll not be used by the algorithm which shows them on various feeds in different occasions. Items To create adverts, you may purchase two different kinds from the Marketplace. The 24h one allows you to post and sell items within 24 real-time hours. The 1w one lasts for a whole week. Ruster.NET 24h Advert Ruster.NET 1w Advert Costs: 5,000 x Scrap Costs: 35,000 x Scrap Skin: 2501319446 Skin: 2501320266 HASHTAGS They work like real social media hashtags, add them to your posts and they'll be seen above the feed you're in. The more posts with the same hashtags, they'll be trending and be available for other users to filter their feeds with. You may use the mignifying glass icon to search by content - which is found in any of the feeds you can surf through. Marketplaces' hashtags will automatically filter the frequently sold items which will allow you to easily see the best prices which fit your needs. BUSINESS CARDS Create business cards to allow strangers to send you a friend request and connect with you. Ruster.NET Business Card Skin: 2505386906 DIRECT MESSAGING Send private messages to friends, share your location on the map and react to their messages! Ruster.FM is Ruster.NET's audio player which you can play YouTube or direct URL snippet audio clips in your browser. Make sure you're doing the following for your server to successfully upload the clips for your players. To note: only Verified Ruster.NET users may use the Upload Audio feature. Download FFMPEG from here. Open up the ZIP file and in the bin folder, extract ffmpeg.exe into your server at an ideal location (recommended oxide/temp). After that is done, you may now click on the Upload Song when you're in the New Post panel. Fill up the fields, and when ready, press Upload. After the upload's complete, make sure you're publishing it. Then, you're good to go! rickroll.zip The URL can be a YouTube URL or a direct-link MP3/audio file. Only allow trusted players to use it (with the RusterNET.verified permission). The limit for the audio clips is 15 seconds. As of now, the way Rust allows me to store audio files, limits me like that. Will revisit some other time, and then for sure will implement a longer duration. REPORTING Players in your servers can now report any posts for various reasons. If you're a moderator and/or an administrator, you'll be able to see the Reports DM group which only the two types of users can access. COMMANDS CHAT /getruster: Will give you the Ruster.NET item which when held, it'll bring up the browser. (needs RusterNET.getruster permission) /launchruster: It'll bring up the browser. (needs RusterNET.launch permission) /get24hadvert: Will give you the Ruster.NET 24 hour Advert item which when held, you'll be able to create an advert for an item to sell. (needs RusterNET.get24hadvert permission) /get1wadvert: Will give you the Ruster.NET 1 week Advert item which when held, you'll be able to create an advert for an item to sell. (needs RusterNET.get1wadvert permission) /ruster [player name/id]: Will pull up the browser of someone and preview it as you'd be them. (needs RusterNET.admin permission) /rusteran [true/false/none (toggle)]: Toggles or sets all notifications (Rust+ ready). /rusterrp [true/false/none (toggle)]: Toggles or sets Rust+ notifications (Rust+ ready). /rusterpn [true/false/none (toggle)]: Toggles or sets push notifications (Rust+ ready). /rusterfn [true/false/none (toggle)]: Toggles or sets friends notifications (Rust+ ready). /rustercn [true/false/none (toggle)]: Toggles or sets chat notifications (Rust+ ready). /rusterpm [true/false/none (toggle)]: Toggles or sets Privacy Mode (Rust+ ready). /rusterratio [16]: Sets the aspect ratio for Ruster.NET. Should help ultra-wide screen users. /pinrusterfm [true/false/none (toggle)]: Toggles or sets Ruster.FM pinning (Rust+ ready). /migratetosql: Migrates local JSON database to SQL. (needs RusterNET.admin permission) CONSOLE launchruster: It'll bring up the browser. (needs RusterNET.launch permission) closeruster: Forcefully closes Ruster.NET - helpful in cases it gets stuck. Please report if it ever does. DEBUG clearrustertc: Wipes all Team conversations from Ruster.NET. (needs RusterNET.admin permission) Permissions RusterNET.admin: Will allow administrators to run all admin-only commands stated above -> Having this permission will allow you to: purchase free-of-charge Marketplace listings / adverts for testing and administrative purposes. purchase your own Marketplace listings / adverts. delete ANY Marketplace listings, adverts &/or posts. RusterNET.moderator: Will allow moderators to delete posts/adverts of other users -> Having this permission will allow you to: delete ANY Marketplace listings, adverts &/or posts. RusterNET.use: Will allow anyone open up the Ruster.NET browser and any other Ruster.NET-related items -> Having this permission will allow you to: view the Ruster.NET browser in any way. RusterNET.launch: Will allow anyone open up the Ruster.NET browser -> Having this permission will allow you to: can run the /launchruster (chat) and launchruster (console) commands. RusterNET.verified: Anyone that has this will be marked as verified -> Having this permission will allow you to: you'll get the blue tick as you're verified, it's just a marker, can be used to your own benefit through add-ons. RusterNET.getruster: Will allow anyone to run the /getruster command -> Having this permission will allow you to: can run /getruster to get the Ruster.NET browser item, which when earned, put it in your hotbar and click the according button to pull it up. RusterNET.get24hadvert: Will allow anyone to run the /get24hadvert command. RusterNET.get1wadvert: Will allow anyone to run the /get1wadvert command. RusterNET.story: Will allow anyone to upload Ruster.NET Stories. RusterNET.internet: Will allow anyone to access the Internet. Will enable to find the "View Servers" button. RusterNET.poll: Will allow anyone to add polls to their posts. Will enable to find the "Polls" button. RusterNET.trade: Will allow anyone to send Trade requests to friends. Will enable to find the "Trade" button on friends' profiles. (c) Raul-Sorin Sorban — 2022 All rights reserved$35.90 -
Version 1.1.5
227 downloads
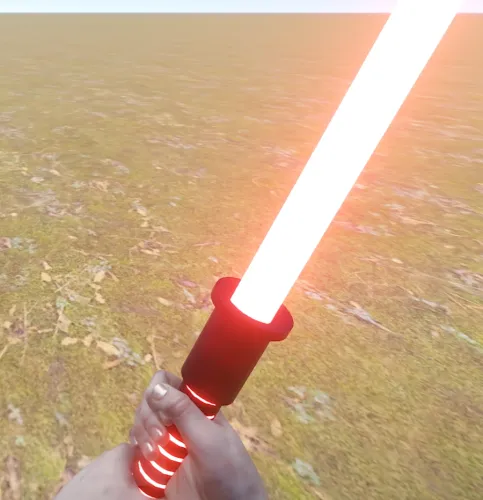
This library allows developers to create their own ItemDefinitions, which will allow them to create custom items with their own unique values. What is an ItemDefinition created with the library? It is a full-fledged ItemDefinition just like the other ones created by Rust developers, a new item definition is created based on an existing one with modified settings. It has its own shortname and itemid, and can also have its own itemMods created by the developer, which is very convenient. You can use the give command, item.info.[anything], and any other way you want. A simple example of item creation: // Requires: CustomItemDefinitions using static Oxide.Plugins.CustomItemDefinitions; namespace Oxide.Plugins { [Info("LightsaberItem", "0xF", "1.0.0")] public class LightsaberItem : RustPlugin { public static LightsaberItem PluginInstance; ItemDefinition PARENT_DEFINITION = ItemManager.FindItemDefinition("longsword"); void Init() { PluginInstance = this; CustomItemDefinitions.RegisterPluginItemDefinition(new CustomItemDefinition { shortname = "lightsaber", parentItemId = PARENT_DEFINITION.itemid, maxStackSize = 1, category = ItemCategory.Weapon, defaultName = "Lightsaber", defaultSkinId = 3035762342, itemMods = new ItemMod[] { PARENT_DEFINITION.GetComponentInChildren<ItemModEntity>(), new ItemModLightsaberCreatedNotice() { exampleField_message = "Item with name \"{0}\" just created! Yay!" } } }, this); } public class ItemModLightsaberCreatedNotice : ItemMod { public string exampleField_message; public override void OnItemCreated(Item item) { base.OnItemCreated(item); if (exampleField_message != null) PluginInstance.Puts(string.Format(exampleField_message, item.name)); } } } } What are some things to keep in mind? Always register new item definitions in the Init hook! This is important! You must take care to register unique shortnames and item ids. ItemId should never be changed in your plugin, as items created with an old itemId will break if they don't have their definition. After your plugin is unloaded, all items created with your item definitions will lose interaction, as all ItemMods will be removed. This is done for safety, don't worry, after loading the plugin back in, all items will work again as before. CustomItemDefinition class structure: public class CustomItemDefinition { public int parentItemId; public string shortname; public int? itemId; // optional public string defaultName; public string defaultDescription; // For use by other plugins, this will not be displayed on the client side when selecting an item public ulong defaultSkinId; public int? maxStackSize; public ItemCategory? category; public ItemDefinition.Flag flags; public ItemMod[] itemMods; } ItemMods details: ItemMods are overwritten, this means the new item definition will not include the itemMods of the parent. If you need to import an item mod from the parent, you can use PARENT_DEFINITION.GetComponent<ItemModYouNeed>() if you need to import everything ItemMods new List<ItemMod>(PARENT_DEFINITION.itemMods).ToArray() Custom itemMods are added using the method of creating a new class, i.e. new YourItemMod() Here you can also specify the fields you want, example: new YourItemMod() { field: value } Quick answers to questions: Items have become coal, what does that mean? This is a fallback ItemDefinition in case the plugin providing this item is no longer available. The items will be restored if the plugin is returned.Free -
Version 2.0.6
1,389 downloads
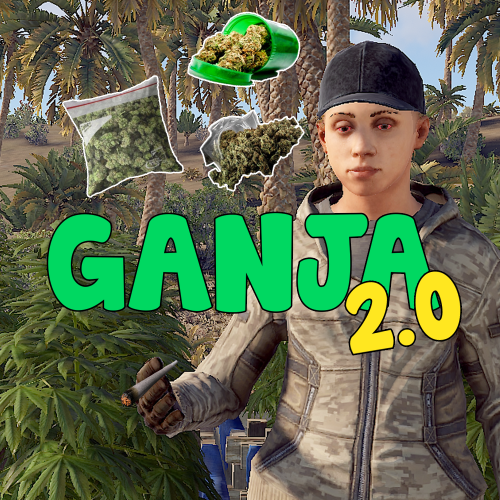
This plugin allows players to gather weed from hemp plants and craft joints using a mixing table. There are different types of weed where each type can be found in a different biome. Joints can be crafted at a mixing table and will give the player configurable buffs and healing with each tier having different effects. Features: Fully customizable Different types of weed Configurable effects for each type Custom crafting UI integrates in the mixing table UI Configurable recipes for mixing table Yield amount and chance configurable for each type Ideal for Roleplay Servers New in v2.0.0: Fully configurable crafting: With Version 2.0.0 the crafting system has been integrated in the mixing table. Joints can now be crafted by using the right ingredients in the right slot. The crafting recipes are fully configurable. New recipes can also be added. New in v1.0.8: Loot Table integration: This plugin now supports the custom item api of Loot Table and Stack Size GUI, so you can easily add weed to the loot table. When both plugins are installed on the server, the weed items will show up in the custom items tab of Loottable (right image): Different tiers: Depending on the biome, you will receive different tiers of weed, the biomes can also be changed in the config. By default, tier2 weed can be gathered in the snow biome, tier1 in the desert and tier0 everywhere else. Names, droprates, and boosts can also be configured individually for each tier. Controls: With a joint selected in the hot bar: Right click to ignite / extinguish a joint When joint is bruning: left click to use a joint Permissions: Permissions can be disabled in the config, making gathering and crafting accessible to everyone regardless of permissions. ganja.craft - Required to craft joints ganja.gather - Required to obtain weed Biome masks: The biome mask is a simple 4-bit number that determines where a certain tier of weed can be found. Each biome has its own number; add these numbers together to select multiple biomes. The numbers for each biome are as follows: 1 - Arid 2 - Temperate 4 - Tundra 8 - Arctic For example: Low Quality Weed has the biome mask 6 by default (see configuration below). That means it can be found in the Temperate and the Tundra biome. Configuration: { "Weed configuration": [ { "Drop chance when harvesting (1 = 100%)": 0.4, "Drop amount when harvesting": { "min": 1, "max": 3 }, "Biome mask (see description for details)": 6, "Custom item name (null = default name)": "Low Quality Weed", "Item short name": "sticks", "Item skin id": 2661029427 }, { "Drop chance when harvesting (1 = 100%)": 0.3, "Drop amount when harvesting": { "min": 1, "max": 3 }, "Biome mask (see description for details)": 1, "Custom item name (null = default name)": "Medium Quality Weed", "Item short name": "sticks", "Item skin id": 2661031542 }, { "Drop chance when harvesting (1 = 100%)": 0.1, "Drop amount when harvesting": { "min": 1, "max": 2 }, "Biome mask (see description for details)": 8, "Custom item name (null = default name)": "High Quality Weed", "Item short name": "sticks", "Item skin id": 2660588149 } ], "Crafting Recipes": [ { "Ingredient Slots": { "0": { "Amount": 1, "Item short name": "note", "Item skin id": 0 }, "1": { "Amount": 1, "Item short name": "sticks", "Item skin id": 2661029427 }, "2": { "Amount": 1, "Item short name": "sticks", "Item skin id": 2661029427 } }, "Produced Item": { "Custom item name (null = default name)": "Low Quality Joint", "Item short name": "horse.shoes.basic", "Item skin id": 2894101592 }, "Is joint": true, "Boosts (only works for joints)": { "Wood boost percentage (1 = 100%)": 0.4, "Wood boost duration (seconds)": 20.0, "Ore boost percentage (1 = 100%)": 0.0, "Ore boost duration (seconds)": 0.0, "Scrap boost percentage (1 = 100%)": 0.0, "Scrap boost duration (seconds)": 0.0, "Max Health percentage (1 = 100%)": 0.0, "Max Health duration (seconds)": 0.0, "Healing per use": 1.0 } }, { "Ingredient Slots": { "0": { "Amount": 1, "Item short name": "note", "Item skin id": 0 }, "1": { "Amount": 1, "Item short name": "sticks", "Item skin id": 2661031542 }, "2": { "Amount": 1, "Item short name": "sticks", "Item skin id": 2661031542 } }, "Produced Item": { "Custom item name (null = default name)": "Medium Quality Joint", "Item short name": "horse.shoes.basic", "Item skin id": 2894101290 }, "Is joint": true, "Boosts (only works for joints)": { "Wood boost percentage (1 = 100%)": 0.0, "Wood boost duration (seconds)": 0.0, "Ore boost percentage (1 = 100%)": 0.8, "Ore boost duration (seconds)": 20.0, "Scrap boost percentage (1 = 100%)": 0.0, "Scrap boost duration (seconds)": 0.0, "Max Health percentage (1 = 100%)": 0.0, "Max Health duration (seconds)": 0.0, "Healing per use": 4.0 } }, { "Ingredient Slots": { "0": { "Amount": 1, "Item short name": "note", "Item skin id": 0 }, "1": { "Amount": 1, "Item short name": "sticks", "Item skin id": 2660588149 }, "2": { "Amount": 1, "Item short name": "sticks", "Item skin id": 2660588149 } }, "Produced Item": { "Custom item name (null = default name)": "High Quality Joint", "Item short name": "horse.shoes.basic", "Item skin id": 2893700325 }, "Is joint": true, "Boosts (only works for joints)": { "Wood boost percentage (1 = 100%)": 0.0, "Wood boost duration (seconds)": 0.0, "Ore boost percentage (1 = 100%)": 0.0, "Ore boost duration (seconds)": 0.0, "Scrap boost percentage (1 = 100%)": 1.0, "Scrap boost duration (seconds)": 30.0, "Max Health percentage (1 = 100%)": 0.3, "Max Health duration (seconds)": 30.0, "Healing per use": 8.0 } } ], "Require permission for crafting": true, "Require permission for gathering": true, "Disable built-in stack fix (set to true if you have problems with item stacking/splitting)": false }$16.00 -
Version 1.0.3
46 downloads
This plugin provides a beautiful and convenient crafting panel for your server. Its design and mechanics are as similar as possible to the in-game Rust crafting panel. Add crafting of any custom items, commands, permissions and anything else you like. Features The design is ~90% similar to the design of Rust's in-game crafting panel. Support for any custom items and commands. The plugin only registers permissions for items that you have specified to it. Thus, preventing the creation of a large number of permissions. Customizable sound effects, notifications in the status bar on the right, and text notifications in popular plugins. The plugin can take and give out items from inventory, backpack and Backpacks plugin, depending on the fullness of any of them. Ability to add item variations (just look at the screenshots). Working with economy plugins. The player can choose whether to craft or buy an item. Add items to favorites, built-in search, fully functional queue and more. Permissions The plugin has immutable and generated permissions. The immutable ones include: craftingpanel._use – is responsible for opening the panel. If there is no permission, the panel will not open. craftingpanel._admin – give this permission only to administrators. It adds an additional "Give yourself" button to get items from the panel for free. This permission is also needed to use the givecraft command (about it below). craftingpanel._instant – all player crafts will be instant. craftingpanel._death – crafting queue will not be reset when the player dies. craftingpanel._disconnect – when a player leaves the server, the craft queue will not be reset. craftingpanel._economics – allows you to purchase items for the currency of the selected economy plugin. If the player does not have permission, the cost panel will still be displayed, but the player will not be able to make a purchase. The generated permissions are created by the plugin itself, here's how it works: craftingpanel.section.vehicles- this is permission for the "vehicles" section. craftingpanel.vehicles.minicopter - this is permission for the item "minicopter" in the "vehicles" section. craftingpanel.vehicles.snowmobile.tomaha - this is permission for the item "snowmobile" in the "vehicles" section and in "tomaha" variation. Commands Only one command is present in the plugin: givecraft steamid/nickname section item 5 skin steamid/nickname – steamid or nickname of your choice. section – section name from the Section permission [required] field. item – item name from the Item permission [required] field. 5 – how much of the current item to give out (craft multiplier). skin - name of the item from the Ingredients section, Item permission [required] fields. All arguments of this command are required. If your item has an empty "Variations" section or you want a default item, specify "default" in place of skin. General settings Allow taking resources from the Backpack? – plugin can take resources for crafting from an additional backpack (Backpacks by WhiteThunder). Delete player data from the Data file if they have not logged into the server for so many days – this setting is added to prevent the plugin from keeping in memory the settings of all players who have ever visited your server. Effect at the start/end/canceling – game effects that will be played at the start of crafting/completion of crafting/cancellation of crafting (effects list, plugin for playing effects). Specify a plugin to work with the economy – specify one plugin from the list or leave the field empty to disable work with economy. Notification settings Notification type (Chat, GameTips, Notify, GUIAnnouncements) – if this section is enabled, you must specify the type/plugin to notify the player of different warnings. Chat – notification to regular chat. GameTips – notification in the in-game Rust tooltips (blue or red at the bottom of the screen). Notify – notification in the Notify plugin by Mevent. GUIAnnouncements – notification in the GUIAnnouncements plugin by JoeSheep. Just below that are the customization fields for the specific type of notification. Game Status Settings Game status is a notification that is shown at the bottom right of the screen (like in-game crafting). The plugin can show 3 types of game status: Current craft – it's the blue panel with the gear. It is displayed while the crafting process is in progress. Giving item – it's the green panel with the down arrow. It is displayed when a player is given a craft item. Dropping item – it's the red panel with the cross. It is displayed when the items given by the plugin do not fit in the inventory and drop out near the player. Crafting Panel working with Rust's in-game status and two plugins (SimpleStatus, AdvancedStatus) that have slightly advanced features. Rust – is the in-game status built into the game. It does not require any additional plugins, but it cannot show the Current craft (blue panel with a gear). SimpleStatus – this plugin displays customizable statuses. It can show Current craft and Giving item. But cannot display Dropping item due to limitations in its operation. AdvancedStatus - this plugin displays customizable statuses. It works with all of the above status types. Section settings Section name – the displayed section name on the menu button. Section permission [required] – be sure to fill in these fields and make sure they are all unique. Because it is by this field that the plugin understands which section it is currently working with. If you specify "favorite" here, the plugin will use this section to display the player's favorite items (don't add items to it, the plugin will delete them anyway). Register this permission? – if enabled, the plugin will register a permission with the above name. In this case this section will be shown only to those players who have this permission. Section item settings Item name [required] – required field. The name of the item is displayed only in this plugin. If you need to create an item with the same name, you will find this setting below. Item permission [required] – required field. Make sure that each item in the section has a unique field. Because by this field the plugin understands which item in the current section it is currently working with. Register this permission? - if enabled, the plugin will register permission with the above name. Keep in mind that the current item will still be shown to all players, but they will not be able to craft it (this is also notified by the icon on the top left of the information section). Item description – item description, is not passed to the item when crafting, only displayed in the panel of this plugin. Item properties – if the item has some characteristics (e.g., damage, radiation protection, etc.) you can specify them here. This data is displayed in a separate panel in the information section of the item. Item shortname – if you are using the command as a craft result, leave this field empty. Create an item with the default name (true) or the above name (false)? – if true, the plugin will create an item with the default game name (which refers to the current shortname), otherwise it will set the name from the Item name field. Item skinId – if the item is custom, specify the required skinId, otherwise set it to 0. Item image [optional] – if as a result of craft, you have to execute some command, you can specify a link to a picture related to this command. Console commands executed after crafting (%steamid%, %username%, %amount%) [optional] – if you need to execute some commands as a result of crafting, you can list them with commas in this field. In the command you can specify %steamid% and %username%, the plugin will replace them with the data of the current player. The plugin can also replace %amount% with the amount per craft (next setting). If the command gives some custom game item and you know its shortname and skinid you can specify them in the fields above. This way you don't need to additionally save the image of this item to the hosting and specify its link. Amount per craft – number of items given out per craft. Max craft multiplier - maximum allowable craft multiplier. The craft multiplier (selected by the player in the Ingredients section) is how many times an item will be dispensed or how many times commands will be executed. If Amount per craft = 3, and the player chose multiplier = 2, he will receive 2 * 3 = 6 items. Crafting time [sec] – time to craft the item. It can be set to 0, then the item will be crafted instantly. Show notification in game status (if they are enabled)? – if a command from another plugin is used to give a custom item and that plugin displays game status, duplication of game statuses may occur. Therefore, it is possible to disable the display of game status for a particular item. Keep in mind that this only disables the Giving item status. Crafting cost in the economy plugin [0 - disable] – the value of the current item in your economy server currency. The customization works if you specified one of the supported economy plugins at the beginning. Item Variation settings In the in-game Rust crafting panel this section is called Skins, here it is called Variations. This is done because here it can include not only skins, but any items or commands related to the parent item. For example, you have several modular car presets, with different types of modules, but they are all related to modular cars. Therefore, you can specify them in one item - "Modular car". The settings in this section are similar to the parent item, except for the crafting ingredients. They will be the same as the parent item. Item Ingredient settings Resource name [required] – required field. Is used to display the name of the ingredient in the plugin panel (it is not taken into account when taking ingredients from the player). When canceling the craft, the plugin can set this ingredient to the specified name, you will find this setting below. Use this resource in ingredients? – enables or disables this resource for use in ingredients. Resource shortname [required] – required field. Shortname of the item that the plugin will look for from the player for crafting. Resource skinId – if it's a custom item, give its skinId, otherwise set it to 0. Return an item with the default name (true) or the above name (false)? – when the craft is canceled, if true, the plugin will create an ingredient with the default game name (which refers to the current shortname), otherwise it will set the name from the Resource name field. Plugin Config Example of plugin configuration in English: Example of plugin configuration in Russian. If you need Russian config, open it (CraftingPanel.cs) before loading the plugin, and at the top set the variable "isRus = true". Then save and upload this file to your server.$30.00- 34 comments
- 1 review
-
- 6
-

-

-
- #craft
- #craft menu
- (and 14 more)