
Vinni_TV_'s Wishlist
-
$10.99
Discord Server Panel
This plugin adds server related commands usable in a specific discord channel with a specific discord role,
that gives access to a server panel to do specific commands on the server.
Features :
Gives access to a permission manager on discord
Gives access to a plugin manager on discord
Gives access to a restart panel on discord
Able to make custom commands from config
Gives access to a wipe panel on discord (Only works with DSPWipe or WipeServer loaded)
Discord Commands:
/server : Shows a list of usable commands for the server
/plugins : Gives a plugin list on discord to manage plugins
Discord Interactions:
When using /server, a list of server commands to manage your server as interactive buttons.
Once you use one of the buttons, It will give you more interactive buttons to use different commands and manage your server.
Permissions Command shows entity then the command then the permission/group to use the command on after clicking on it :
Restart Command shows delay of restart and reasons to use the command after clicking on it :
Plugins Command shows the list of plugins you can interact with then shows the command that you can use on it :
Custom Command shows the list of commands in the configuration :
Console command sends console command to the server:
Configuration :
{ "LogFileName": "DiscordServerPanel", "Bot token": "", "Ignore Roles": false, "Discord Channel ID where the command can be used": [ "1234567891234567890" ], "Embed's color": "#ff0000", "Show Server FPS (Server command)": true, "Show Gamemode (Server command)": true, "Show Plugins Loaded (Server command)": true, "Custom": { "Use Custom (true/false)": false, "Use Confirmation (true/false)": false, "Custom Commands ('command name' 'command to send on console')": { "Restart": "restart 300 Maintenance", "SkipNight": "env.time 12" }, "Discord Role ID (Can be left empty to use the first role id)": [] }, "Console": { "Use Console (true/false)": false, "Use Confirmation (true/false)": true, "Discord Role ID (Can be left empty to use the first role id)": [] }, "MapVoter": { "Use MapVoter (true/false)": false, "Use Confirmation (true/false)": true, "Discord Role ID (Can be left empty to use the first role id)": [] }, "Restart": { "Use Restart (true/false)": true, "Use Modal For Reasons (true/false)": true, "Restart Reasons (One Word)": [ "Maintenance", "Update", "Wipe", "None" ], "Time for command (Use 'h' for hours, 'm' for minutes)": [ "5m", "10m", "30m", "1h" ], "Discord Role ID (Can be left empty to use the first role id)": [] }, "Plugins": { "Use Plugins (true/false)": true, "Use Confirmation (true/false)": true, "Discord Role ID (Can be left empty to use the first role id)": [] }, "Permissions": { "Use Permissions (true/false)": true, "Discord Role ID (Can be left empty to use the first role id)": [] }, "Wipe": { "Use Wipe (true/false)": false, "Generate Random Seeds (How many options to choose from)": 4, "Map Size": 3500, "Backup Map Files (Backup in identity folder)": true, "Time for command (Use 'h' for hours, 'm' for minutes)": [ "5m", "10m", "30m", "1h" ], "Discord Role ID (Can be left empty to use the first role id)": [] }, "logs": { "Log to console (true/false)": true, "Log to discord (true/false)": false, "Discord Extension Log Level (Verbose/Debug/Info/Warning/Error/Exception/Off)": "Info", "Delete message after command": true, "Delete message after interaction": true, "Log Discord Channel ID": "" }, "Discord Guild ID (optional if the bot is in one guild)": "", "Discord Role ID": [ "1234567891234567890" ] } Configure :
Set Bot Token, ChannelID and RoleID in config.
Reload Plugin.
(Optional) To use the wipe functionality :
Load DSPWipe.
Enable Wipe function in DiscordServerPanel config.
You can suggest new functionalities or plugin ideas on discord : aimon_ .
- #discord
- #discordbot
- (and 3 more)
-
$14.99
Discord Admin Panel
This plugin adds extra useful commands usable in a specific discord channel with a specific discord role,
that gives access to an admin panel to do specific commands on players inside the server.
Features :
Gives access to a players list with a search interaction embedded in the buttons
Gives a list of certain commands that you can use on each player (Kick, Ban, Mute, Unban, Unmute)
Configurable to add each command's reason of command (If you're kicking a player you can put Toxicity or Warning as a reason for it)
With each command that allows timed punishments like ban and mute, you are given access to 5 durations depending on the command.
Adds a /auth command to DiscordCore that redirects to /dc join.
Gives access to a search command in-game that shows different information about players.
Optional :
Gives access to buttons like Economics and Timed Permissions (configurable)
Gives access to customizable buttons for commands on players (configurable)
Permissions:
DiscordAdminPanel.emberban allows player to use the /ember.ban command (Only functional with Ignore Ember set to false and Ember loaded)
DiscordAdminPanel.emberunban allows player to use the /ember.ban command (Only functional with Ignore Ember set to false and Ember loaded)
DiscordAdminPanel.search allows admins to search for players details (SteamID and DiscordID)
In-Game Commands:
/search <steamID/DiscordID> : Searches for player details like SteamID, DiscordID, and his discord name.
Discord Commands:
/dap players : Shows a list of online players on the server
/search <steamID/SteamName/DiscordID> : Gives an extended search on players details
Discord Interactions:
When using !players, a list of online players will show up as interaction buttons.
Once you use one of the buttons, an extensive search will show up and will give you more interaction buttons to use different commands on the searched player.
Kick Command shows reasons after clicking on it :
Similarly Ban Command and Mute Command shows periods then reason : (Reasons are configurable)
Timed Permissions shows the roles then the period of time: (Both configurable)
Economics shows the available commands then the amount : (amount is configurable)
Configuration :
{ "LogFileName": "DiscordAdminPanel", "Bot token": "BOTTOKEN", "Ignore Roles": false, "Discord Channel ID where the command can be used": [ "1234567891234567890" ], "Embed's color": "#ff0000", "Show Clan Tag (Make sure clans is loaded)": false, "Show Oxide Groups": false, "Show Server Armour Profile (search)": false, "Show Team Info (search)": false, "Show Last Names (search) (PlayerInformations plugin required)": false, "Timed Permissions": { "Use Timed Permissions (true/false)": false, "Oxide Groups to give": [ "VIP", "Admin" ], "Time to give (Use 'd' for days, 'h' for hours, 'm' for minutes, 'wipe' for using wipe period)": [ "24h", "7d", "30d", "Wipe" ], "Discord Role ID (Can be left empty to use the first role id)": [] }, "Economics": { "Use Economics (true/false)": false, "Economy Amount (Use '.' for decimal)": [ "1500.5", "3000.3" ], "Discord Role ID (Can be left empty to use the first role id)": [] }, "Ban": { "Use Modal For Reasons (true/false)": true, "Time to give (Use 'd' for days, 'h' for hours, 'm' for minutes, 'wipe' for using wipe period)": [ "24h", "7d", "30d", "Wipe" ], "Ban Reasons (Careful not to use \" or ')": [ "Cheat", "Script", "Over Toxicity", "Abuse" ], "Ignore Ember": true, "Ember Global (Only usable if ember is loaded)": false, "Discord Role ID (Can be left empty to use the first role id)": [] }, "Mute": { "Use Modal For Reasons (true/false)": true, "Time to give (Use 'd' for days,'h' for hours, 'm' for minutes, 'wipe' for using wipe period)": [ "1h", "24h", "30d", "Wipe" ], "Mute Reasons (Careful not to use \" or ')": [ "Toxicity", "Racism" ], "Discord Role ID (Can be left empty to use the first role id)": [] }, "Kick": { "Use Modal For Reasons (true/false)": true, "Kick Reasons (Careful not to use \" or ')": [ "Toxicity", "Warning" ], "Discord Role ID (Can be left empty to use the first role id)": [] }, "Custom": { "Use Custom (true/false)": false, "Use Confirmation (true/false)": false, "Custom Commands (Use '{player}' for player id, 'command name' 'command to send on console')": { "dogdoo": "dog {player}", "pacifism": "pf {player}" }, "Discord Role ID (Can be left empty to use the first role id)": [] }, "Link Commands": [ "link" ], "Auth Commands": [ "auth", "authenticate" ], "Deauth Commands": [ "dapdeauth", "deauthenticate" ], "Search Commands": [ "search", "look" ], "logs": { "Log to console (true/false)": true, "Log to discord (true/false)": false, "Log Data Type (Embed/Simple)": "Embed", "Discord Extension Log Level (Verbose/Debug/Info/Warning/Error/Exception/Off)": "Info", "Delete message after command": true, "Delete message after interaction": true, "Log Discord Channel ID": "" }, "Discord Guild ID (optional if the bot is in one guild)": "", "Discord Role ID": [ "1234567891234567890" ] } How to install
You can load the plugin directly with discord extension installed.
Configure :
Set Bot Token, ChannelID and RoleID in config.
Reload Plugin.
To Do List :
Change the action flow of each command to work under a modal entirely (one action instead of many actions, Requires Discord Extension update)
You can suggest new functionalities or plugin ideas on discord : aimon_ .
-
$21.99
Rust - Discord Automated Wipe Countdown Bot
By AlexDev101 in Discord Bots
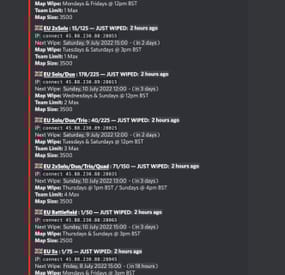
Simply the bot uses the integration of discord unix/epoch timestamps to count down your server(s) wipes in your discord automatically generating new timestamps as your server wipes, currently the bot allows monthly - (wiping at force) weekly, biweekly - (every 2 weeks) & Custom - (Multiple times a week) - as well as the full customisation of the embed in which the server info is held in (see above for example), the system is 100% automated once you create your servers/wipes.
Countdown bot is coded in python utilising discord.py along with mongodb to store information
Feature List :
Create & Delete Wipes Fully customisable embed (Title, Description, Thumbnail, Footer, Embed Colour) Edit server information ie wipe-times or server descriptions Fully automated countdowns - autogenerates the next wipes Display server pop in the embed & last wipe Works alongside Force wipe, currently offering Monthly (force), Biweekly and Weekly wipe aswell as Custom - multiple wipes a week eg 2 Commands : (All showcased in pictures)
!wipe - displays all servers and wipes to users !list - displays all embeds & serverids !create - allows you to make a new server / embed - followed by a number of questions !delete <server/embed> <id> allows you to delete servers & embeds !editeembed <id> - allows you to edit the embed id eg : thumbnail, description etc !editserver <id> - allows you to edit server information eg : wipe time, name, info
Config:
{ "Misc":{ "Bot_Prefix":"!", "Bot_Token":"", "Server_Name":"Server Name Here", "Embed_Hex_Color":"#FFFFFF" }, "Mongo_Config":{ "MONGO_URL": "" }, "Discord_Config":{ "Guild_ID":0, "StaffRole_ID":0 } } Requirements
Server with python 3.7 or above Pip packages listed - discord.py, aiohttp, motor,d nspython, python-dateutil, arrow, requests Suggested bot host 0.99$ -> https://serverstarter.host/
For any problems please msg me on discord : Skizzy#0037
-
$6.99
Twigs Decay
This plugin is designed for the forced decay of Building Blocks with Twigs grade. This plugin will be especially useful for PvE servers.
The ability to enable and disable forced decay of Building Blocks with Twigs grade; The ability to specify the type of building block that will decay; The ability to adjust the interval of decay damage; The ability to specify the amount of decay damage; The ability to prevent players and the tool cupboard from repairing Building Blocks with a grade of Twigs; The ability to show warnings when placing/repairing Building Blocks with Twigs grade; The ability to specify the style type for GameTips; The ability to personally enable or disable warnings; The ability to automatically grade Building Blocks from Twig grade to Wood grade upon plugin initialization, if the owner player is offline. This helps to avoid the complete decay of buildings for those players who are offline and unable to upgrade right now; The ability to upgrade only undamaged building blocks during forced upgrades.
{ "Chat command": "twigs", "Is it worth enabling GameTips for messages?": true, "GameTips message style type - Blue_Normal(0), Red_Normal(1), Blue_Long(2), Blue_Short(3), Server_Event(4), Error(5).": 5, "Is it worth using Notify plugins for messages instead of the vanilla UI?": false, "Specify the message type for Notify": 1, "List of language keys for creating language files": [ "en" ], "Is it worth upgrading Building Blocks from Twigs grade to Wood grade during plugin initialization if the players are offline?": false, "Is it worth forcing the upgrade to apply only to undamaged blocks? This is an addition to the setting above.": true, "Is it worth disallowing the repair of Building Blocks with Twigs grade?": true, "The interval, in seconds, at which damage is inflicted on the building.": 60.0, "The periodic damage inflicted. Ranges from 0 to 10. Set to 0 to disable.": 1.0, "Is it worth enabling the tracking list? If it's disabled, it will track all types of building blocks without needing to check the list each time.": false, "List of tracked building block types. Leave empty or null to return the default list.": [ "foundation", "foundation.triangle", "foundation.steps", "ramp", "floor", "floor.triangle", "floor.frame", "floor.triangle.frame", "wall", "wall.doorway", "wall.window", "wall.frame", "wall.half", "wall.low", "block.stair.ushape", "block.stair.lshape", "block.stair.spiral", "block.stair.spiral.triangle", "roof", "roof.triangle" ], "Version": { "Major": 0, "Minor": 1, "Patch": 8 } }
EN: { "MsgWarningEnabled": "Forced decay warnings are enabled!", "MsgWarningDisabled": "Forced decay warnings are disabled!", "MsgOnTwigsPlace": "On this server, forced decay of Building Blocks with Twigs grade is enabled!\n<size=12><color=#9A9A9A>To toggle notifications, use </color><color=#BBBBBB>/{0} warn</color></size>", "MsgOnTwigsRepair": "Repairing of Building Blocks with Twigs grade is prohibited!\n<size=12><color=#9A9A9A>To toggle notifications, use </color><color=#BBBBBB>/{0} warn</color></size>" } RU: { "MsgWarningEnabled": "Предупреждения принудительного гниения включены!", "MsgWarningDisabled": "Предупреждения принудительного гниения выключены!", "MsgOnTwigsPlace": "На данном сервере включено принудительное гниение построек из соломы!\n<size=12><color=#9A9A9A>Чтобы включить или выключить уведомления, введите </color><color=#BBBBBB>/{0} warn</color></size>", "MsgOnTwigsRepair": "Ремонт построек из соломы запрещен!\n<size=12><color=#9A9A9A>Чтобы включить или выключить уведомления, введите </color><color=#BBBBBB>/{0} warn</color></size>" }
warn - Enabling and disabling personal warning. Example:
/twigs warn -

$3.99
Activity Rewards
Plugin rewarding players for their in-game activity.
P.S. Don't forget to assign the permission to players, otherwise rewards won't be granted.
o.grant group default activityrewards.default
The ability to receive rewards for a prefix or suffix in the username; The ability to receive rewards for gathering resources; The ability to receive rewards for: killing players and NPCs; destroying barrels, road signs and dead logs; The ability to receive rewards for the researching blueprints; The ability to receive rewards for the first opening of loot crates; The ability to receive rewards for collecting resources; The ability to receive rewards for planting plants; The ability to receive rewards for catching fishes; The ability to receive rewards for the first daily visit to monuments; The ability to grant permissions for the duration of a player's stay inside monuments; The ability to reward with in-game items; The ability to set reward multiplier for each permission; The ability to add a night reward multiplier on top of the base multiplier; The ability to use AdvancedStatus to display a status bar with highly flexible settings.
{ "List of language keys for creating language files": [ "en" ], "Is it worth using the AdvancedStatus plugin?": true, "Advanced Status display method: 0 - single bar, 1 - single cumulative bar, 2 - new bar for each": 2, "Is it worth enabling the Gather Rewards?": true, "Is it worth enabling the Kill Rewards?": true, "Is it worth enabling the Research Rewards?": true, "Is it worth enabling the Loot Open Rewards?": true, "Is it worth enabling the Pickup Rewards?": true, "Is it worth enabling the Planting Rewards?": true, "Is it worth enabling the Fishing Rewards?": true, "Is it worth enabling the Monument Rewards?": true, "A prefix or suffix required in the player's nickname to receive the permission reward. An empty string disables the reward": "#RealPVE", "List of permissions granted when the player's nickname contains the required prefix or suffix": [ "kits.loyalty" ], "List of reward multipliers for each permission": { "activityrewards.default": 1.0, "realpve.default": 1.0, "realpve.vip": 1.1 }, "Night bonus multiplier. Will be added to the base reward multiplier. A value of 0 disables this": 0.1, "The list of economy plugins for rewards": { "Economics": { "Is it worth enabling the plugin for rewards?": true, "Reward Type: true - int, false - double": false, "Language key for the text": "MsgEconomics", "API method name for deposit": "Deposit", "API method name for withdraw": "Withdraw", "BarSettings": { "Order": 40, "Height": 26, "Main_Color(Hex or RGBA)": "#84AB49", "Main_Transparency": 0.8, "Main_Material(empty to disable)": "", "Image_Url": "https://i.imgur.com/k8jq7yY.png", "Image_Local(Leave empty to use Image_Url)": "ActivityRewards_Default", "Image_Sprite(Leave empty to use Image_Local or Image_Url)": "", "Image_IsRawImage": false, "Image_Color(Hex or RGBA)": "#B9D134", "Image_Transparency": 1.0, "Is it worth enabling an outline for the image?": false, "Image_Outline_Color(Hex or RGBA)": "0.1 0.3 0.8 0.9", "Image_Outline_Transparency": 1.0, "Image_Outline_Distance": "0.75 0.75", "Text_Size": 12, "Text_Color(Hex or RGBA)": "#DAEBAD", "Text_Font(https://umod.org/guides/rust/basic-concepts-of-gui#fonts)": "RobotoCondensed-Bold.ttf", "Text_Offset_Horizontal": 0, "Is it worth enabling an outline for the text?": false, "Text_Outline_Color(Hex or RGBA)": "#000000", "Text_Outline_Transparency": 1.0, "Text_Outline_Distance": "0.75 0.75", "SubText_Size": 12, "SubText_Color(Hex or RGBA)": "#DAEBAD", "SubText_Font": "RobotoCondensed-Bold.ttf", "Is it worth enabling an outline for the sub text?": false, "SubText_Outline_Color(Hex or RGBA)": "0.5 0.6 0.7 0.5", "SubText_Outline_Transparency": 1.0, "SubText_Outline_Distance": "0.75 0.75" } }, "ServerRewards": { "Is it worth enabling the plugin for rewards?": true, "Reward Type: true - int, false - double": true, "Language key for the text": "MsgServerRewards", "API method name for deposit": "AddPoints", "API method name for withdraw": "TakePoints", "BarSettings": { "Order": 40, "Height": 26, "Main_Color(Hex or RGBA)": "#84AB49", "Main_Transparency": 0.8, "Main_Material(empty to disable)": "", "Image_Url": "https://i.imgur.com/k8jq7yY.png", "Image_Local(Leave empty to use Image_Url)": "ActivityRewards_Default", "Image_Sprite(Leave empty to use Image_Local or Image_Url)": "", "Image_IsRawImage": false, "Image_Color(Hex or RGBA)": "#B9D134", "Image_Transparency": 1.0, "Is it worth enabling an outline for the image?": false, "Image_Outline_Color(Hex or RGBA)": "0.1 0.3 0.8 0.9", "Image_Outline_Transparency": 1.0, "Image_Outline_Distance": "0.75 0.75", "Text_Size": 12, "Text_Color(Hex or RGBA)": "#DAEBAD", "Text_Font(https://umod.org/guides/rust/basic-concepts-of-gui#fonts)": "RobotoCondensed-Bold.ttf", "Text_Offset_Horizontal": 0, "Is it worth enabling an outline for the text?": false, "Text_Outline_Color(Hex or RGBA)": "#000000", "Text_Outline_Transparency": 1.0, "Text_Outline_Distance": "0.75 0.75", "SubText_Size": 12, "SubText_Color(Hex or RGBA)": "#DAEBAD", "SubText_Font": "RobotoCondensed-Bold.ttf", "Is it worth enabling an outline for the sub text?": false, "SubText_Outline_Color(Hex or RGBA)": "0.5 0.6 0.7 0.5", "SubText_Outline_Transparency": 1.0, "SubText_Outline_Distance": "0.75 0.75" } }, "BankSystem": { "Is it worth enabling the plugin for rewards?": true, "Reward Type: true - int, false - double": true, "Language key for the text": "MsgBankSystem", "API method name for deposit": "Deposit", "API method name for withdraw": "Withdraw", "BarSettings": { "Order": 40, "Height": 26, "Main_Color(Hex or RGBA)": "#84AB49", "Main_Transparency": 0.8, "Main_Material(empty to disable)": "", "Image_Url": "https://i.imgur.com/k8jq7yY.png", "Image_Local(Leave empty to use Image_Url)": "ActivityRewards_Default", "Image_Sprite(Leave empty to use Image_Local or Image_Url)": "", "Image_IsRawImage": false, "Image_Color(Hex or RGBA)": "#B9D134", "Image_Transparency": 1.0, "Is it worth enabling an outline for the image?": false, "Image_Outline_Color(Hex or RGBA)": "0.1 0.3 0.8 0.9", "Image_Outline_Transparency": 1.0, "Image_Outline_Distance": "0.75 0.75", "Text_Size": 12, "Text_Color(Hex or RGBA)": "#DAEBAD", "Text_Font(https://umod.org/guides/rust/basic-concepts-of-gui#fonts)": "RobotoCondensed-Bold.ttf", "Text_Offset_Horizontal": 0, "Is it worth enabling an outline for the text?": false, "Text_Outline_Color(Hex or RGBA)": "#000000", "Text_Outline_Transparency": 1.0, "Text_Outline_Distance": "0.75 0.75", "SubText_Size": 12, "SubText_Color(Hex or RGBA)": "#DAEBAD", "SubText_Font": "RobotoCondensed-Bold.ttf", "Is it worth enabling an outline for the sub text?": false, "SubText_Outline_Color(Hex or RGBA)": "0.5 0.6 0.7 0.5", "SubText_Outline_Transparency": 1.0, "SubText_Outline_Distance": "0.75 0.75" } }, "IQEconomic": { "Is it worth enabling the plugin for rewards?": true, "Reward Type: true - int, false - double": true, "Language key for the text": "MsgIQEconomic", "API method name for deposit": "API_SET_BALANCE", "API method name for withdraw": "API_REMOVE_BALANCE", "BarSettings": { "Order": 40, "Height": 26, "Main_Color(Hex or RGBA)": "#84AB49", "Main_Transparency": 0.8, "Main_Material(empty to disable)": "", "Image_Url": "https://i.imgur.com/k8jq7yY.png", "Image_Local(Leave empty to use Image_Url)": "ActivityRewards_Default", "Image_Sprite(Leave empty to use Image_Local or Image_Url)": "", "Image_IsRawImage": false, "Image_Color(Hex or RGBA)": "#B9D134", "Image_Transparency": 1.0, "Is it worth enabling an outline for the image?": false, "Image_Outline_Color(Hex or RGBA)": "0.1 0.3 0.8 0.9", "Image_Outline_Transparency": 1.0, "Image_Outline_Distance": "0.75 0.75", "Text_Size": 12, "Text_Color(Hex or RGBA)": "#DAEBAD", "Text_Font(https://umod.org/guides/rust/basic-concepts-of-gui#fonts)": "RobotoCondensed-Bold.ttf", "Text_Offset_Horizontal": 0, "Is it worth enabling an outline for the text?": false, "Text_Outline_Color(Hex or RGBA)": "#000000", "Text_Outline_Transparency": 1.0, "Text_Outline_Distance": "0.75 0.75", "SubText_Size": 12, "SubText_Color(Hex or RGBA)": "#DAEBAD", "SubText_Font": "RobotoCondensed-Bold.ttf", "Is it worth enabling an outline for the sub text?": false, "SubText_Outline_Color(Hex or RGBA)": "0.5 0.6 0.7 0.5", "SubText_Outline_Transparency": 1.0, "SubText_Outline_Distance": "0.75 0.75" } } }, "LastClearDay": 9, "Version": { "Major": 0, "Minor": 1, "Patch": 8 } }
Setting up rewards for each action occurs in the respective files within this folder *SERVER*\oxide\data\ActivityRewards
PluginInt for: BankSystem and ServerRewards; PluginDouble for: Economics. You can also set the reward to 0 to disable the reward.
"fish.smallshark": { "PluginInt": 50, "PluginDouble": 5.0, "ItemsList": [ { "ShortName": "scrap", "Amount": 10, "SkinId": 0 } ] }
EN: { "MsgEconomics": "Bonus", "MsgServerRewards": "Bonus", "MsgBankSystem": "Bonus", "MsgIQEconomic": "Bonus" } RU: { "MsgEconomics": "Бонус", "MsgServerRewards": "Бонус", "MsgBankSystem": "Бонус", "MsgIQEconomic": "Бонус" }