venda_vole's Wishlist
-
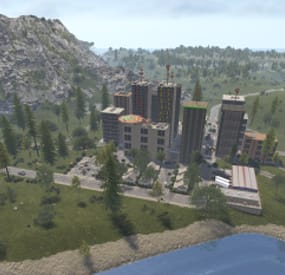
$32.99$28.99Metropolis
By Silent Creations in Maps
🌃 Metropolis: Where Concrete Meets Carnage
Dive into Metropolis, a densely packed, abandoned city map where danger lurks on every street corner and the highest loot awaits the bold. This 4700-sized environment transforms the survival sandbox into an intense urban battleground, perfect for players craving high-stakes PVP and intricate exploration.
The heart of the map is the vast Metropolis itself—an urban labyrinth heavily patrolled by two formidable Bradleys and overseen by airborne Scientists. Navigate the city's depths to find multiple puzzle rooms (2 Red, 1 Blue, 2 Green) and unlock the abundant loot scattered throughout its concrete canyons.
Custom Safe Zone: New Haven Outpost
This once-abandoned locale has been meticulously re-energized by a team of Cobalt scientists, providing the starting population with an abundance of supplies and services. This monument retains all the essential features of the original Outpost—and delivers much more:
Striking Architecture: The central compound is now secured by large, custom glass walls, creating a visually stunning and unique aesthetic. Custom Water Features: A tranquil, custom-built lake and an elegant fountain enhance the environment. Functional water catchers are installed, providing players with a reliable source of hydration. Expanded Services: A custom Air Wolf vendor has been integrated for convenient helicopter purchases. High-Stakes Casino: An all-new, dedicated casino allows players to safely gamble their riches, adding a fun and high-risk activity to the safe zone. Ample Safe Loot: Players can safely gather a generous amount of loot scattered throughout the outpost.
Thrills and Exploration
Experience the map's unique flair with a custom-built, fully working rollercoaster that is plug-in controlled to spawn a vehicle for your player with the press of a button! Explore intricate infrastructure including underground train tunnels, underground roads, and custom bridges, as well as two Heli Towers offering verticality to the fight.
💧 Water Treatment & Sewer Branch Reimagined
Welcome to the New Sewer Treatment Plant, a monument that takes the best features of both Water Treatment Plant and Sewer Branch to create one incredible, high-value loot location. This massive, abandoned facility is loaded with features and rewards.
Cobalt's Control: Don't be fooled by the ruin; Cobalt Scientists still maintain control over the facility's sewer drains. Underground Puzzles: Navigate two new, exclusive puzzles deep within the piping, featuring a dedicated Blue and Green keycard room. Lurking Danger: Keep your guard up—a scientist or two may still be lurking in the shadows, guarding their subterranean assets.
Map Prefabs Count: 25249 | Map Size: 4700
Monument List
Custom Monuments and Prefabs
Metropolis New Haven Outpost Murder Farm The Roller Coaster Sewage Treatment Plant 19 custom build locations Underground Train Tunnels Underground Roads Custom Bridges 2x Heli Towers Mod Room For Staff Facepunch Monuments
Bandit Camp Launch Site Artic Research Stone, Hqm, & Sulfer Quarry Rad Town Power Plant Airfield Trainyard Jungle Ziggurat 2x Mining Outpost Large Harbor Small Harbor 3x Oxums gas Station 2x lighthouse Supermarket Large Barn Ranch Military Tunnel Ferry Terminal Giant Excavator Abandoned Cabins Large Fishing Village 2x Small Fishing Village Large Oil Rig Small Oil Rig 2x WaterWell For any Assistance or questions Please contact me on Discord @silent_creations
Acknowledgements
Shoutout to Substrata for helping with making the plugin for the rollercoaster.
Shoutout to MrLiquid and the Luffy Map Testing team for their help polishing this map.
Shoutout to Milky for help with making the video.
- #rust
- #rust edit
- (and 13 more)
-

$29.90
The World Beyond The Ice Wall
🌍 THE WORLD BEYOND THE ICE WALL
Step into The World Beyond the Ice Wall, a massive vanilla Rust map (size 5000) crafted for the upcoming Naval Update of November 2025. This world pushes survival to the edge, blending land, sea, and ice into one breathtaking battleground.
At its core lies a vast central region, encircled by towering frozen rings — the legendary Ice Wall. From this mysterious heartland, players can venture outward using a network of powerline ziplines, offering thrilling high-speed escapes and daring infiltration routes.
A fully connected railway system winds through the islands, linking to the underground metro via two major entrances, allowing fast travel and tactical movement across every biome.
Iconic monuments like Launch Site, Military Tunnel, The Dome, Power Plant, and Oil Rigs are strategically scattered across the islands, while Fishing Villages and Underwater Labs fill the ocean with opportunities for trade, exploration, and naval warfare.
Designed with balance, immersion, and next-gen naval gameplay in mind, The World Beyond the Ice Wall offers a true endgame experience — where icy horizons hide danger, mystery, and the promise of dominance for those bold enough to cross the wall.
General Information:
Map Size: 5000
Approx. Prefabs: 14442
Optimized For: Naval Update (November 2025)
Key Features: Functional ziplines, connected rail & metro network, massive ice rings, and extensive ocean zones
Monuments:
Airfield
Power Plant
Arctic Research Base
Missile Silo
Water Tractament
Desert Military Base
Launch Site
Train Yard
Military Tunel
Giant Excavator
Ferry Terminal
Harbor 1
Harbor 2
Junkyard
Lighthouse
Large and Small Oil Rig
Satellite Dish
Gas Station
Supermarket
Warehouse
Swamp
Quarrys
Ice Lake
Underwater Labs
Caves
Compound
Bandit Town
Fishing Villages
oilrigs 3
If you need to contact me send me a private message or write me on Discord. j4v1rust
-
$41.95$31.95Ultimate Cases
Welcome to UltimateCases - the most exciting case opening experience for Rust servers! Give your players the thrill of unboxing rare items with beautiful roulette animations, create unlimited custom cases with unique rewards, and build a thriving economy through our advanced key exchange system. Whether you want to reward active players with free cases or monetize your server with premium loot boxes, UltimateCases has everything you need to keep players engaged and coming back for more!
⭐️ Why Choose UltimateCases?
Beautiful Unboxing Experience - Watch your players' excitement as they spin the roulette and discover their rewards! Customizable animations, rarity backgrounds, and sound effects create an unforgettable opening experience. Easy Case Creation - No coding required! Use our in-game visual editor to create cases, add items, set prices, and configure everything you need. Edit cases on the fly without touching configuration files. Monetize Your Server - Turn your server into a profitable venture with our key exchange system. Players can buy keys using any currency (Economics, ServerRewards, scrap, etc.) and you control the economy. Reward Active Players - Keep players engaged with free cases! Set playtime requirements and cooldowns to reward your most dedicated community members. Protect Your Economy - Advanced limits and restrictions prevent abuse. Set daily limits, lifetime limits, minimum playtime requirements, and block case opening during combat or raids. Store Rewards Safely - Built-in inventory system stores all case rewards securely. Players can retrieve items when they're ready, with options to persist items across wipes. Share the Excitement - Announce rare wins in chat and Discord! Customizable logging and webhook integration lets your community celebrate big wins together. NPC Traders at Monuments - Spawn NPCs at monuments where players can exchange keys for currency. Perfect for creating trading hubs and encouraging exploration! VIP Benefits - Reward your supporters with exclusive discounts on case opening and key exchange. Multiple VIP tiers with customizable benefits. Works Everywhere - Seamlessly integrates with ServerPanel, supports all major economy plugins, and works with ImageLibrary for perfect image management.
💰 Key Exchange System
Turn any currency into case keys! Our flexible exchange system supports:
Multiple Currencies - Use Economics, ServerRewards, BankSystem, IQEconomic, or any item (scrap, sulfur, etc.) as currency for key exchange. Bulk Discounts - Reward players who exchange more keys! Automatic discounts: 5% off for 10+ keys, 10% off for 25+ keys, 15% off for 50+ keys, 20% off for 100+ keys. VIP Discounts - Give your supporters extra savings! Configure permission-based discounts (5%, 10%, 15%, 20%) with custom daily limits. Daily Limits - Prevent abuse by limiting how many keys players can exchange per day. Perfect for controlling your server economy. Monument NPCs - Spawn traders at monuments! Players can visit NPCs at lighthouse, outpost, or any monument to exchange keys. Fully customizable appearance and rates.
📦 Smart Inventory System
Never lose a reward again! Our inventory system stores all case rewards safely:
Secure Storage - All case rewards are automatically stored in your personal inventory, accessible anytime through the UI. Wipe Protection - Choose whether items persist across server wipes or are cleared automatically. Perfect for seasonal rewards! Safe Retrieval - Items can only be retrieved when it's safe - no retrieving during combat, raids, or building blocked situations. Post-Wipe Cooldown - Optional cooldown after wipe before items can be retrieved, helping maintain server balance.
📬 Video Overview
🖼️ Showcase
Templates
Fullscreen Template
ServerPanel V1 Template
ServerPanel V2 Template
ServerPanel V4 Template
In-Game Editor
Monument Trader
How to get Keys?
🎮 Commands
/opencases or /cases - Opens the cases interface for players /cases.trader - Chat command for managing Monument Traders (requires ultimatecases.edit permission) /cases.trader create [currencyID] [defaultKeys] [prefab] - Create a new trader bot /cases.trader start <botIndex> - Enter edit mode for a trader /cases.trader move - Update trader position (requires edit mode) /cases.trader rotate <angle> - Set trader rotation (requires edit mode) /cases.trader save - Save and reload trader (requires edit mode) /cases.trader cancel/stop - Cancel edit mode /cases.trader list - Show all configured trader bots /cases.trader teleport <botIndex> - Teleport to a trader bot location /cases.trader help - Show help for trader commands cases.give - Console/Rcon command for giving keys or cases to players (admin only) cases.give <player> keys <amount> - Give keys to a player cases.give <player> case <caseID> [amount] - Give case(s) to a player Examples: cases.give PlayerName keys 100 or cases.give 76561198000000000 case 0 5 cases.convert - Console command for converting cases from old Cases plugin (requires UltimateCasesConverter plugin, admin only) cases.convert - Convert all cases and add them to existing UltimateCases data cases.convert true - Clear existing UltimateCases data before converting (fresh start)
🛡️ Permissions
ultimatecases.edit - Permission to edit cases, items, and modals using the in-game editor. Required to access all editor functions and manage Monument Traders. ultimatecases.discount1 - 5% discount on case opening ultimatecases.discount2 - 10% discount on case opening ultimatecases.discount3 - 15% discount on case opening ultimatecases.vip1 - 5% discount on key exchange, with optional custom daily limit ultimatecases.vip2 - 10% discount on key exchange, with optional custom daily limit ultimatecases.vip3 - 15% discount on key exchange, with optional custom daily limit ultimatecases.vip4 - 20% discount on key exchange, with optional custom daily limit Note: Additional permissions can be configured in the config file for demo mode and quick unbox mode. These are optional and can be left empty to disable the features.
📚 FAQ
Q: How do I open the Case Editor?
A: To open the Case Editor:
Make sure you have the ultimatecases.edit permission Open the cases menu using /opencases or /cases Look for the "EDIT" button in the header of the interface (usually in the top-right area) Click the "EDIT" button to open the Case Editor From here you can create new cases, edit existing cases, add items, configure prices, permissions, and all case settings
Q: How do I open the Item Editor?
A: To open the Item Editor:
First, open the Case Editor (see instructions above) Select a case from the list or create a new case In the case editor, you'll see a section for items Click "ADD ITEM" or click on an existing item to edit it The Item Editor will open where you can configure item type, chance, image, title, description, permissions, and all item-specific settings (weapons, contents, genes, etc.)
Q: How do I open the Modal Editor?
A: To open the Modal Editor:
Make sure you have the ultimatecases.edit permission Open the cases menu and navigate to any modal window (like the keys exchange modal) Look for the "EDIT" button that appears on modal windows when you have edit permission Click the "EDIT" button to open the Modal Editor From here you can edit modal content, text elements, images, buttons, and all modal settings
Q: How do I create a case?
A: It's super easy! Open the cases menu in-game, click the "EDIT" button in the header, then click "ADD CASE" in the Case Editor. Configure the case title, image, price, permission, and add items. No file editing needed!
Q: Can players get free cases?
A: Yes! Enable Free Case Settings for any case. Set minimum playtime (e.g., 2 hours) and cooldown (e.g., 24 hours). Players meeting requirements can open the case for free once per cooldown period.
Q: How do I set up key exchange?
A: Go to Exchange Settings in the config. Add currencies (Economics, ServerRewards, scrap, etc.), set exchange rates, configure discounts, and you're done! Players can exchange currency for keys instantly.
Q: What can I put in cases?
A: Almost anything! Add items (weapons with attachments, containers with contents, blueprints, plant seeds with genes), or execute commands when cases are opened. Full customization for every reward type.
Q: How do Monument Traders work?
A: Configure NPCs in Exchange Settings to spawn at monuments. Players can visit these NPCs to exchange keys for currency. Set the monument (lighthouse, outpost, etc.), NPC appearance, position, and exchange rate.
Q: Can I limit how many cases players can open?
A: Absolutely! Set daily limits (e.g., 5 cases per day), total lifetime limits (e.g., 50 cases total), minimum playtime requirements, and block opening for a period after server wipe.
Q: How does the inventory system work?
A: When players open cases, rewards go to their inventory automatically. Players can access inventory through the UI and retrieve items when ready. Configure whether items persist across wipes.
Q: Can I announce rare wins?
A: Yes! Enable chat announcements and Discord webhooks. Set rarity threshold (e.g., only announce items with 5% or lower chance), customize message format, and share the excitement with your community!
Q: How do I add UltimateCases to ServerPanel?
A: In ServerPanel, create a new category with Type: "Plugin", Plugin Name: "UltimateCases", Plugin Hook: "API_OpenPlugin". The plugin integrates seamlessly!
Q: Can I give VIP players discounts?
A: Yes! Configure permission-based discounts in Case Opening Discounts and Exchange Privilege Settings. Set different discount percentages for different VIP tiers.
Q: How do I configure the plugin config file?
A: The config file is located at oxide/config/UltimateCases.json (or carbon/config/UltimateCases.json for Carbon). Here's how to configure key settings:
Template Selection: Set "Template" to "Fullscreen", "V1", "V2", or "V4" Commands: Modify "Open UI Commands" array to add custom command aliases Key Exchange: Configure "Exchange Settings" → "Currencies" to add currencies (Economics, ServerRewards, items, etc.) Roulette Duration: Set "Roulette Settings" → "Default Duration" (seconds) and "Quick Mode Duration" Sound Effects: Enable/disable sounds in "Sound Effects" section and set effect prefab paths Logging: Configure console, file, chat, and Discord logging in "Logging Settings" Restrictions: Enable/disable case opening restrictions in "Restrictions Settings" Inventory: Configure inventory settings in "Inventory settings" section After editing, reload the plugin: o.reload UltimateCases (Oxide) or c.reload UltimateCases (Carbon).
Q: How do I set up LangAPI for multi-language support?
A: To enable LangAPI support:
Make sure LangAPI plugin is installed and loaded on your server In UltimateCases config, set "Work with LangAPI?" to true Create language files in oxide/lang/UltimateCases/ (or carbon/lang/UltimateCases/ for Carbon) Create files like en.json, ru.json, etc. with translation keys Use LangAPI's translation system to translate all plugin messages Reload the plugin to apply changes Example translation key structure:
{ "UI_Header_Title": "Ultimate Cases", "UI_Content_ButtonOpen": "OPEN CASE", "UI_Content_ButtonOpenFREE": "FREE", ... }
Q: How do I set up Monument Traders using commands?
A: To create and configure Monument Traders:
Make sure you have ultimatecases.edit permission Go to the monument where you want to spawn a trader (e.g., lighthouse, outpost) In server console, use: cases.trader create [currencyID] [defaultKeys] [prefab] currencyID - ID of the currency from Exchange Settings (0, 1, 2, etc.) defaultKeys - Default number of keys per exchange (e.g., 1) prefab - NPC prefab path (e.g., "assets/prefabs/npc/bandit/missionproviders/missionprovider_outpost_b.prefab") Enter edit mode: cases.trader start <botIndex> (use cases.trader list to see bot indices) Position yourself where you want the NPC to spawn Update position: cases.trader move Set rotation: cases.trader rotate <angle> (0-360 degrees) Save: cases.trader save The NPC will spawn automatically at the configured monument
Q: How do I configure custom economy plugins?
A: To use a custom economy plugin:
In config, find "Custom Economy Settings" Set "Use Custom Economy" to true Set "Type" to "Plugin" Enter "Plugin Name" (exact name as it appears in plugins list) Configure hooks: "Plugin Hook Add" - Hook name for adding balance (e.g., "AddPoints", "Deposit") "Plugin Hook Remove" - Hook name for removing balance (e.g., "TakePoints", "Withdraw") "Plugin Hook Balance" - Hook name for checking balance (e.g., "CheckPoints", "Balance") Test the hooks work correctly by checking plugin documentation Reload the plugin
Q: How do I configure rarity backgrounds?
A: To set up rarity backgrounds:
In config, find "Rarity Settings" → "Rarity Backgrounds" Add entries with chance ranges and images: "Min" - Minimum chance percentage (e.g., 0) "Max" - Maximum chance percentage (e.g., 1) "Image" - Background image URL for case display "Roulette Item Background Image" - Background image URL for roulette item display Example: Legendary (0-1%), Epic (1-5%), Rare (5-15%), Uncommon (15-50%), Common (50-100%) Items with drop chances within each range will display the corresponding background
Q: How do I configure Discord webhook logging?
A: To set up Discord webhook logging:
Create a Discord webhook in your Discord server (Server Settings → Integrations → Webhooks → New Webhook) Copy the webhook URL In config, find "Logging Settings" → "Discord" Set "Enabled" to true Paste webhook URL in "Webhook URL" Configure options: "Rare Threshold" - Only log items with chance ≤ X% (0 = log all items) "Embed Color" - Decimal color code (e.g., 15844367 for gold) "Title" - Embed title "Show Player Avatar" - Display player avatar in embed "Show Item Icons" - Display item icons in embed "Group Items" - Group multiple items in single message "Include Statistics" - Add statistics to embed Reload the plugin
Q: How do I configure item rewards with weapons and attachments?
A: In the Item Editor:
Set "Type" to "Item" Enter the weapon "ShortName" (e.g., "rifle.ak") In "Weapon" section, set "Enabled" to true Set "Ammo Type" (e.g., "ammo.rifle.explosive") Set "Ammo Amount" (e.g., 128) In "Content" section, set "Enabled" to true Add attachments in "Contents" array: "ShortName" - Mod shortname (e.g., "weapon.mod.lasersight") "Condition" - Item condition (0-100) "Amount" - Usually 1 for mods "Position" - Slot index (-1 for auto-assignment) Save the item
Q: How do I configure command rewards in cases?
A: To add command rewards:
In Item Editor, set "Type" to "Command" In "Command (%steamid%)" field, enter your command Use placeholders: %steamid% - Player's Steam ID %username% - Player's display name %player.x% - Player's X coordinate %player.y% - Player's Y coordinate %player.z% - Player's Z coordinate Multiple commands can be separated by | or line breaks Example: "inventory.giveto %steamid% rifle.ak 1|oxide.usergroup add %steamid% vip"
Q: How do I enable Offline Image Mode?
A: To use local images instead of downloading from internet:
In config, set "Enable Offline Image Mode" to true Create folder "TheMevent" in oxide/data (or carbon/data for Carbon) Download PluginsStorage (click "CODE" → "Download ZIP") Extract the ZIP and copy all contents to the "TheMevent" folder Reload the plugin: o.reload UltimateCases (Oxide) or c.reload UltimateCases (Carbon) Note: For custom images, place them in the "TheMevent" folder and reference them with the "TheMevent/" prefix (e.g., "TheMevent/MyImage.png").
Q: How do I configure demo mode and quick unbox mode?
A: Demo mode allows testing cases without spending keys, and quick unbox mode speeds up animations:
In config, find "Roulette Settings" For demo mode: Set "Demo Mode Permission" to a permission name (e.g., "ultimatecases.demo") or leave empty to disable For quick unbox: Set "Quick Unbox Permission" to a permission name (e.g., "ultimatecases.quick") or leave empty to disable Set "Quick Mode Duration" (seconds) - how long the quick animation should last Grant the permissions to players who should have access Reload the plugin
Q: How do I configure case opening restrictions?
A: To prevent case opening in certain situations:
In config, find "Restrictions Settings" Set "Enabled" to true Enable/disable specific restrictions: "Block During Combat" - Requires NoEscape plugin "Block During Raid" - Requires NoEscape plugin "Block in Building Blocked" - Blocks when player can't build "Block While Swimming" - Blocks when player is swimming "Block When Player is Wounded" - Blocks when player is wounded "Block During Duel" - Requires Duel/Duelist plugin "Block During Helicopter Flight" - Blocks when in helicopter "Block When Player is Sleeping" - Blocks when player is sleeping Reload the plugin
🧪 TEST SERVER
Join our test server to experience UltimateCases yourself!
Copy the IP Address below to start playing!
connect 194.147.90.147:28015
Ready to create the ultimate case opening experience? UltimateCases gives you all the tools you need to build excitement, reward players, and monetize your server. Start creating your first case today!
-

$40.00$31.95Server Panel
ServerPanel adds a player information menu to your server, where you can both share important and useful information with your players and integrate your plugins into it!
🌟 Features
User-Friendly Interface: Intuitive GUI for easy navigation and interaction. Economy Integration: Supports various economy plugins for seamless financial management. Dynamic Menu Categories: Organize functionalities into customizable categories for better user experience. Extensive Configuration Options: Almost every aspect of the plugin can be customized, including messages, colors, sizes, fonts, tion. Auto-Open Menu: Automatically displays the menu upon player connection, configurable per server settings. Block Settings: Control access to the menu during building, raiding, or combat situations to enhance gameplay balance. Multiple Economy Head Fields: Display various economic metrics such as balance, server rewards, and bank information. Permission Management: Fine-tune permissions for different user roles to control access to features. Localization Support: Easily translate and customize all messages for different languages. Performance Optimized: Designed to minimize server lag while providing rich functionality. Customizable Hooks: Integrate with existing economy systems using customizable hooks for adding, removing, and displaying balances. Editor Position Change: Admins can now change editor positions with a simple click, choosing between left, center, or right alignments. Command Enhancements: Commands are now processed with multiple arguments separated by "|", enabling bulk command processing.
🎮 Commands
/info – open menu /sp.install (or) /welcome.install – open installer menu sp.migrations – console command for updating plugin data structure when upgrading to new versions. Automatically creates backups before making changes. sp.migrations list – shows available migrations and whether they need to run sp.migrations run <version> – runs specific migration (e.g., "1.3.0") sp.migrations run <version> force – forces migration even if not detected as needed
🛡️ Permissions
serverpanel.edit – allows players to edit the plugin settings and open the edit menu serverpanelinstaller.admin - required to access the plugin installation functions
🎥 Video
🖼️ Showcase
Templates
Template V1
Template V2
Template V3
Template V5
Editor
Installer
🧪 TEST SERVER
Join our test server to view and experience all our unique features yourself!
Copy the IP Address below to start playing!
connect 194.147.90.239:28015
📊 Update Fields
ServerPanel supports dynamic update fields that can be used in your templates to display real-time information. These fields are automatically updated and can be used in text components, headers, and other interface elements.
Player Information
{online_players} – Number of currently online players {sleeping_players} – Number of sleeping players {all_players} – Total number of players (online + sleeping) {max_players} – Maximum server capacity {player_kills} – Player's kill count (requires KillRecords, Statistics, or UltimateLeaderboard) {player_deaths} – Player's death count (requires KillRecords, Statistics, or UltimateLeaderboard) {player_username} – Player's display name {player_avatar} – Player's Steam ID for avatar display Economy
{economy_economics} – Economics plugin balance {economy_server_rewards} – ServerRewards points {economy_bank_system} – BankSystem balance Note: Economy fields are fully customizable in "oxide/config/ServerPanel.json" under "Economy Header Fields". You can add support for any economy plugin by configuring the appropriate hooks (Add, Balance, Remove). Custom keys can be created and used in templates just like the default ones.
Server Information
{server_name} – Server hostname {server_description} – Server description {server_url} – Server website URL {server_headerimage} – Server header image URL {server_fps} – Current server FPS {server_entities} – Number of entities on server {seed} – World seed {worldsize} – World size {ip} – Server IP address {port} – Server port {server_time} – Current server time (YYYY-MM-DD HH:MM:SS) {tod_time} – Time of day (24-hour format) {realtime} – Server uptime in seconds {map_size} – Map size in meters {map_url} – Custom map URL {save_interval} – Auto-save interval {pve} – PvE mode status (true/false) Player Stats
{player_health} – Current health {player_maxhealth} – Maximum health {player_calories} – Calorie level {player_hydration} – Hydration level {player_radiation} – Radiation poisoning level {player_comfort} – Comfort level {player_bleeding} – Bleeding amount {player_temperature} – Body temperature {player_wetness} – Wetness level {player_oxygen} – Oxygen level {player_poison} – Poison level {player_heartrate} – Heart rate Player Position
{player_position_x} – X coordinate {player_position_y} – Y coordinate (height) {player_position_z} – Z coordinate {player_rotation} – Player rotation (degrees) Player Connection
{player_ping} – Connection time in seconds {player_ip} – Player's IP address {player_auth_level} – Authorization level (0=Player, 1=Moderator, 2=Admin) {player_steam_id} – Steam ID {player_connected_time} – Connection start time {player_idle_time} – Idle time (HH:MM:SS) Player States
{player_sleeping} – Is sleeping (true/false) {player_wounded} – Is wounded (true/false) {player_dead} – Is dead (true/false) {player_building_blocked} – Is building blocked (true/false) {player_safe_zone} – Is in safe zone (true/false) {player_swimming} – Is swimming (true/false) {player_on_ground} – Is on ground (true/false) {player_flying} – Is flying (true/false) {player_admin} – Is admin (true/false) {player_developer} – Is developer (true/false) Network & Performance
{network_in} – Network input (currently shows 0) {network_out} – Network output (currently shows 0) {fps} – Server FPS {memory} – Memory allocations {collections} – Garbage collections count Usage Example:
You can use these fields in any text component like: "Welcome {player_username}! Server has {online_players}/{max_players} players online."
🔧 API Documentation for Developers
ServerPanel provides an API for plugin developers to integrate their plugins into the menu system.
Required Methods
API_OpenPlugin(BasePlayer player) - Main integration method that returns CuiElementContainer OnServerPanelClosed(BasePlayer player) - Called when panel closes (cleanup) OnServerPanelCategoryPage(BasePlayer player, int category, int page) - Called when category changes (cleanup) OnReceiveCategoryInfo(int categoryID) - Receives your category ID Integration Example
[PluginReference] private Plugin ServerPanel; private int _serverPanelCategoryID = -1; private void OnServerInitialized() { ServerPanel?.Call("API_OnServerPanelProcessCategory", Name); } private void OnReceiveCategoryInfo(int categoryID) { _serverPanelCategoryID = categoryID; } private void OnServerPanelCategoryPage(BasePlayer player, int category, int page) { // Cleanup when player switches categories } private CuiElementContainer API_OpenPlugin(BasePlayer player) { var container = new CuiElementContainer(); // Create base panels (required structure) container.Add(new CuiPanel() { RectTransform = {AnchorMin = "0 0", AnchorMax = "1 1"}, Image = {Color = "0 0 0 0"} }, "UI.Server.Panel.Content", "UI.Server.Panel.Content.Plugin", "UI.Server.Panel.Content.Plugin"); container.Add(new CuiPanel() { RectTransform = {AnchorMin = "0 0", AnchorMax = "1 1"}, Image = {Color = "0 0 0 0"} }, "UI.Server.Panel.Content.Plugin", "YourPlugin.Background", "YourPlugin.Background"); // Add your plugin's UI elements here container.Add(new CuiLabel { RectTransform = {AnchorMin = "0.1 0.8", AnchorMax = "0.9 0.9"}, Text = {Text = "Your Plugin Interface", FontSize = 16, Align = TextAnchor.MiddleCenter, Color = "1 1 1 1"} }, "YourPlugin.Background", "YourPlugin.Title"); // Add buttons, panels, etc. using "YourPlugin.Background" as parent return container; } private void OnServerPanelClosed(BasePlayer player) { // Cleanup when panel closes } Header Update Fields
API_OnServerPanelAddHeaderUpdateField(Plugin plugin, string updateKey, Func<BasePlayer, string> updateFunction) - Registers a per-player string provider for a header placeholder. Returns true on success. API_OnServerPanelRemoveHeaderUpdateField(Plugin plugin, string updateKey = null) - Unregisters a specific updateKey for your plugin, or all keys for your plugin when updateKey is null. Returns true on success. Usage Example
[PluginReference] private Plugin ServerPanel; private void OnServerInitialized() { // Register a dynamic header field for each player ServerPanel?.Call("API_OnServerPanelAddHeaderUpdateField", this, "{player_kdr}", (Func<BasePlayer, string>)(player => GetKdr(player))); } private string GetKdr(BasePlayer player) { // Compute and return the value to display in the header for this player return "1.23"; } Using in UI: Place your key (e.g., {player_kdr}) directly in Header Field texts. The value will be updated per player using your function.
📚 FAQ
Q: Why can't I open the menu?
A: Make sure that the plugin is installed and activated on your server. If the problem persists, contact the server administrator.
Q: How do I enable Expert Mode? (disables automatic template updates)
A: In the data file "Template.json", turn on the "Use an expert mod?" option:
"Use an expert mod?": true, P.S. "Template.json” is located in the "oxide/data/ServerPanel" directory (if you use Oxide) or in the "carbon/data/ServerPanel" directory (if you use Carbon)
Q: I see black images with Rust logo or get error 429 when loading images. What should I do?
A: These issues occur when there are problems downloading images from the internet. To fix this, enable Offline Image Mode which will use local images instead:
Enable the mode in config: Open "oxide/config/ServerPanel.json" (or "carbon/config/ServerPanel.json" for Carbon) Set "Enable Offline Image Mode": true Set up the images: Create folder "TheMevent" in "oxide/data" (or "carbon/data" for Carbon) Download PluginsStorage (click "CODE" → "Download ZIP") Extract the ZIP and copy all contents to the "TheMevent" folder Reload the plugin: Type o.reload ServerPanel (Oxide) or c.reload ServerPanel (Carbon) Note: If using a hosting service, you may need to use their file manager or FTP to upload the files.
Q: Does ServerPanel work only with Mevent's plugins?
A: Currently, ServerPanel integrates seamlessly with Mevent's plugins (Shop, Kits, Daily Rewards, etc.). However, other developers can use the provided API to integrate their plugins into the menu system. The plugin system is designed to be extensible for third-party integrations.
Q: Why do integrated plugins (Shop, Kits) have different window sizes?
A: Different plugins may use different templates for integration. Make sure all your integrated plugins use the same template version (V1, V2, etc.) that matches your ServerPanel template. Update the template in each plugin to ensure consistent sizing.
Q: The panel displays differently for different players. How can I make it show the same on everyone's screen?
A: This issue occurs when players have different UI scale settings. To fix this and ensure consistent display for all players:
Open the "Template.json" file located in "oxide/data/ServerPanel" (or "carbon/data/ServerPanel" for Carbon) Find the "Parent (Overlay/Hud)" setting in the "Background" section Change the value from "Overlay" to "OverlayNonScaled" Save the file and restart your server or reload the plugin Q: How can I change the video displayed in the ServerPanel interface to my own custom video?
A: Yes, you can replace the default video with your own! You need to find and modify the command:
serverpanel_broadcastvideo [your_video_url] Replace [your_video_url] with the direct link to your video. For best compatibility, we recommend hosting your video on imgur.com.
Q: My custom images are not loading or show as blank/question marks. What image hosting should I use?
A: For custom images, we recommend using imgbb.com for image hosting. Avoid Imgur and services without direct access to the image. For the most reliable experience, use Offline Image Mode with local images instead.
Q: How can I make plugin UIs open outside of the ServerPanel menu instead of inside categories?
A: You can configure buttons to execute chat commands that open plugin UIs independently. To do this:
In your button configuration, set "Chat Button": true Set the "Commands" field to "chat.say /command" (replace "command" with the actual plugin command) Example: To open the Cases plugin outside the menu:
"Chat Button": true "Commands": "chat.say /cases" This will execute the command as if the player typed it in chat, opening the plugin's interface independently rather than within the ServerPanel menu.
Q: Text in V4 template is shifting or sliding out of place. How can I fix this?
A: This issue occurs when text width isn't properly configured. ServerPanel provides "TITLE LOCALIZATION" settings to control text width for categories and pages:
Open the ServerPanel editor (click the "ADMIN MODE" button to open the edit menu) Select the category or page you want to edit (click to "EDIT CATEGORY" or "EDIT PAGE" button) In the editor, find the "TITLE LOCALIZATION" section For each language (en, ru, etc.), you'll see three columns: LANGUAGE - The language code TEXT - The localized text content WIDTH (px) - The width setting in pixels Adjust the "WIDTH (px)" value to match your text length. Longer text requires larger width values Save your changes and test in-game Tip: Start with a width value around 100-150 pixels for short text, and increase it for longer titles. You can adjust this value until the text displays correctly without shifting.
- #serverpanel
- #info
- (and 32 more)
-
$29.95$21.95Shop
Enjoy a highly customizable Shop that can be configured in game! Use NPCs as shopkeepers, and set up a shop with ease using the game interface to add, edit, or remove items on the fly!
⭐ Features of Shop
Beautiful user interface with multiple templates (Fullscreen, In-Menu V1/V2/V4) Shopping Basket - add multiple items to cart and purchase them all at once Search functionality - search for items by name across all categories Pagination - efficient item browsing with page-by-page navigation Discount system (by permissions) with per-item custom discounts Automatic shop filling (+ the plugin has support for the ItemCostCalculator plugin) Selling items (players can sell items to the store and receive money for it) Sell containers configuration - choose which containers (main, belt) players can sell from Blocked skins - prevent selling of specific item skins High performance with optimized item loading Adding/editing/removing items IN GAME with visual editor Supports NPC shops (HumanNPC integration) Supports Custom Vending Machines Supports NoEscape plugin integration Supports Duel/Duelist - blocks shop access during duels Convert from ServerRewards Favorite items system - players can mark items as favorites Buy Again feature - quick repurchase of previously bought items By default, the plugin has English, Russian and Chinese translations LangAPI integration for custom translations Transfer money between players directly in the plugin (including offline players option) Shop allows you to use multiple economy plugins at once (players can choose what they want to pay with) For each item, you can choose which payment methods are available and how much they will cost, based on the selected method Cooldown system - per-item buy/sell cooldowns with per-permission overrides Wipe cooldown - block items for purchase/sale after server wipe Respawn cooldown - prevent shop access immediately after respawn Buy/Sell limits - lifetime and daily limits per permission Max buy/sell amount - limit items per transaction Force buy - fast purchase without confirmation dialogs Plant genes configuration for plant items Weapon configuration - spawn weapons with ammo and attachments Content system - configure container contents (liquid, weapon mods, etc.) Customizable UI - full color customization and formatting options Offline Image Mode - use local images instead of downloading from internet Image loading on login - preload images when players connect Console and file logging - comprehensive logging system ServerPanel integration - add Shop to ServerPanel menu Notify/UINotify integration for notifications Auto-wipe settings - automatically reset cooldowns, limits, and player data on wipe Discord Logging - Track all purchases, sales, and transfers directly in your Discord server via webhooks with customizable embeds API methods for other plugins to interact with Shop
🎮 Commands
shop - open shop interface shop.install – starts the shop installation process shop.refill <recovery_rate> - refill shop again
recoveryRate: A value between 0 and 1 that determines the multiplier for the cost of selling items. For example, shop.refill 0.5 means that items will have a sale cost of 50% of their purchase cost. shop.convert.sr [clear] - convert items from ServerRewards to Shop. The option clear means clearing Shop items before converting shop.setvm [categories: cat1 cat2 ...] - add custom VM in config shop.setnpc [categories: cat1 cat2 ...] - add NPC in config shop.remove all - a console command to remove all items and categories from the plugin shop.remove item [category name/all] - a console command to remove an item (or all items) shop.remove category [category name/all] - a console command to remove a category (or all categories) shop.fill.icc [all/buy/sell] - a console command for updating prices of items in the store using ItemCostCalculator. all - updates both Price and SellPrice, buy - updates Price, sell - updates SellPrice shop.convert.from.1.2.26 – command to convert Shop plugin version 1.2.26 to version 1.3.0+ shop.reset – resets store data, including templates, configurations, and items. shop.reset template – resets the store interface template data. shop.reset config – resets store configuration data. shop.reset items – resets store items data. shop.reset full – completely resets all store data (templates, configurations and items). shop.manage – used to manage the Shop plugin. shop.manage economy list – displays a list of all available economic systems in the plugin. shop.manage economy set <economy_ID> <name> – sets the selected economic system by plugin ID and name. The command updates the corresponding economic system on the server and saves the changes in the configuration. FOR EXAMPLE:
shop.manage economy set 0 Economics – sets the main economy plugin to "Economics".
shop.manage economy set 1 ServerRewards – sets the additional economy system with ID 1 to "ServerRewards". shop.wipe – manually trigger wipe (resets cooldowns, limits, and player data) shop.change – change item category (used in editor) shop.item – console command for item actions
🛡️ Permissions
shop.setvm - for command "shop.setvm" shop.setnpc - for command "shop.setnpc" shop.free - for free item purchases shop.admin - admin permission shop.bypass.dlc - allows bypassing Facepunch ToS item restrictions (WARNING: your server may be banned for this)
📈 API Methods
The Shop plugin provides API methods for other plugins to interact with it:
API_OpenPlugin(BasePlayer player) – opens the shop UI for a player. Returns empty string if failed, or UI data if successful. API_GetShopPlayerSelectedEconomy(ulong playerID) – returns the economy ID (0 = main, 1+ = additional) that the player has selected for shopping. Note: Other plugins can call these methods using Shop.Call("API_MethodName", ...) syntax.
⚖️ Sort Types
None Name Amount PriceDecrease PriceIncrease
🧬 Category Types
None – normal category for items Favorite – category for favorite items Hidden – hidden category, available only in NPC stores or Vending Machines
🎥 Video
P.S. Video of the old version, video for the V2+ version is now in development
🖼️ Showcase
Full screen Templates
Template OLD STYLE
Template NEW RUST
In-Menu Templates
Template V1 (V1.1)
Template V1 (V1.1) with BASKET
Template V2
Template V2 with BASKET
Template V4
Template V4 with BASKET
Installer
Editor
📢 Discord Logging
Track all shop activity via Discord webhooks: purchases, sales, and money transfers.
🧪 TEST SERVER
Join our test server to view and experience all our unique features yourself!
Copy the IP Address below to start playing!
connect 194.147.90.239:28015
📚 FAQ
Q: I get the message "The plugin does not work correctly, contact the administrator!”. What should I do?
A: This means that your plugin is not installed. To install the plugin, use the command "/shop.install”. You need to have "shop.admin” permission to access this command.
Q: Where can I see an example of a config?
A: Config
Q: How to use BankSystem to store the economy
A:
"Economy": { "Type (Plugin/Item)": "Plugin", "Plugin name": "BankSystem", "Balance add hook": "Deposit", "Balance remove hook": "Withdraw", "Balance show hook": "Balance", "ShortName": "", "Display Name (empty - default)": "", "Skin": 0, "Lang Key (for Title)": "LangTitle", "Lang Key (for Balance)": "BalanceTitle" }, Q: How to use ServerRewards to store the economy
A:
"Economy": { "Type (Plugin/Item)": "Plugin", "Plugin name": "ServerRewards", "Balance add hook": "AddPoints", "Balance remove hook": "TakePoints", "Balance show hook": "CheckPoints", "ShortName": "", "Display Name (empty - default)": "", "Skin": 0, "Lang Key (for Title)": "LangTitle", "Lang Key (for Balance)": "BalanceTitle" }, Q: How to use Economics to store the economy
A:
"Economy": { "Type (Plugin/Item)": "Plugin", "Plugin name": "Economics", "Balance add hook": "Deposit", "Balance remove hook": "Withdraw", "Balance show hook": "Balance", "ShortName": "", "Display Name (empty - default)": "", "Skin": 0, "Lang Key (for Title)": "LangTitle", "Lang Key (for Balance)": "BalanceTitle" }, Q: How to use IQEconomic to store the economy
A:
"Economy": { "Type (Plugin/Item)": "Plugin", "Plugin name": "IQEconomic", "Balance add hook": "API_SET_BALANCE", "Balance remove hook": "API_GET_BALANCE", "Balance show hook": "API_REMOVE_BALANCE", "ShortName": "", "Display Name (empty - default)": "", "Skin": 0, "Lang Key (for Title)": "LangTitle", "Lang Key (for Balance)": "BalanceTitle" }, Q: How to use scrap to pay for items
A:
"Economy": { "Type (Plugin/Item)": "Item", "Plugin name": "", "Balance add hook": "", "Balance remove hook": "", "Balance show hook": "", "ShortName": "scrap", "Display Name (empty - default)": "", "Skin": 0, "Lang Key (for Title)": "LangTitle", "Lang Key (for Balance)": "BalanceTitle" }, Q: How to add KIT as shop item
A: https://pastebin.com/4szBQCgz
Q: How to add Command as shop item
A: https://pastebin.com/bcCkzBEL
Q: How do I make a weapon spawn with ammo in it?
A: You need to configure the "Weapon" section in the item config:
"Weapon": { "Enabled": true, "Ammo Type": "ammo.rifle.explosive", "Ammo Amount": 128 } Q: How do I make items spawn some content (liquid, weapon modifications)?
A: You need to configure the "Content" section in the item config:
"Content": { "Enabled": true, "Contents": [ { "ShortName": "weapon.mod.lasersight", "Condition": 100.0, "Amount": 1, "Position": -1 } ] }, Q: How to turn off the sell feature?
A: You need to turn off "Enable item selling” in the config, or do it in the item setting in the game.
"Enable item selling?": false,
Q: How to use the ItemCostCalculator with Shop?
A: You need to use command "shop.refill" (command to refill the Shop)
Q: What should be the size of images for item icons?
A: Typically, the image dimensions for item icons are 512x512 pixels, but any square image can suffice.
Q: I get the error "UI is unavailable for player. Reason: Menu UI is not initialized". How to fix it?
A: This error occurs when the interface template is not installed or configured. Follow these steps:
1. Reset the template using the command: shop.reset template (use only template to avoid data loss).
2. Install the interface via shop.install in the game (to visually select a template) or through the console.
Note: Ensure you have the shop.admin permission to execute these commands.
Q: How do I add Shop to the ServerPanel menu?
A: Follow these simple steps:
1. Open ServerPanel menu in-game and click "+ADD CATEGORY" button
2. Set these exact parameters:
Type: Plugin Plugin Name: Shop Plugin Hook: API_OpenPlugin 3. Click "SAVE" button to create the category
4. Reset Shop template and install it:
Type in console: shop.reset template (IMPORTANT: use only "template"!) Then type: shop.install Note: If Shop doesn't appear in ServerPanel menu, make sure both plugins are loaded and you typed the parameters exactly as shown above.
Q: I see black images with Rust logo or get error 429 when loading images. What should I do?
A: These issues occur when there are problems downloading images from the internet. The Shop plugin sends images to ImageLibrary but is not responsible for the downloading process itself. Error 429 typically occurs due to rate limits imposed by image hosting services like Imgur (see HTTP 429 documentation for more details). To fix this, enable Offline Image Mode which will use local images instead:
Enable the mode in config: Open "oxide/config/Shop.json" (or "carbon/config/Shop.json" for Carbon) Set "Enable Offline Image Mode": true Set up the images: Create folder "TheMevent" in "oxide/data" (or "carbon/data" for Carbon) Download PluginsStorage (click "CODE" → "Download ZIP") Extract the ZIP and copy all contents to the "TheMevent" folder Reload the plugin: Type o.reload Shop (Oxide) or c.reload Shop (Carbon) Note: If you want to add your own custom images, place them in the "TheMevent" folder and reference them with the "TheMevent/" prefix. For example: "TheMevent/Icon1.png", "TheMevent/MyCustomIcon.jpg", etc.
Q: What placeholders are available for commands and what do they do?
A: You can use these placeholders in shop commands and they will be automatically replaced when a player purchases a command item:
%steamid% - Replaced with the player's Steam ID (e.g., "76561198000000000") %username% - Replaced with the player's display name (e.g., "PlayerName") %player.x% - Replaced with the player's X coordinate position %player.y% - Replaced with the player's Y coordinate position %player.z% - Replaced with the player's Z coordinate position Example usage in shop commands:
"Command (%steamid%)": "say Welcome %username%!|teleport %steamid% %player.x% %player.y% %player.z%" Note: Multiple commands can be separated by the "|" character, and they will be executed in sequence when the item is purchased.
Q: How to set different prices for different currencies (RP and balance)?
A: You can configure separate currency prices for each item. Edit the file oxide/data/Shop/Shops/Default.json and find the item you want to modify. In the "Currencies" section, set different prices for each economy:
"Currencies": { "Enabled": true, "Currencies": { "0": {"Price": 1000}, "1": {"Price": 500} } } This means players pay 1000 from their main balance (Economics) or 500 RP from their ServerRewards balance. Economy ID 0 = main economy, ID 1 = ServerRewards.
Q: How to create a shop using HumanNPC plugin and set specific categories?
A: To create a shop with HumanNPC, follow these steps:
Create an NPC using HumanNPC plugin Get the NPC ID (you can find it in the HumanNPC config or use the command humannpc.list) Use the Shop command to add the NPC: shop.setnpc [categories: cat1 cat2 ...] Example:
shop.setnpc categories: Weapon Ammunition Tools - adds the NPC with Weapon, Ammunition, and Tools categories
shop.setnpc categories: * - adds the NPC with all available categories
Note: You need the shop.setnpc permission to use this command. Make sure both HumanNPC and Shop plugins are loaded on your server.
Q: How to add Custom Vending Machines to Shop plugin?
A: To add Custom Vending Machines to Shop, follow these steps:
Place a Custom Vending Machine in your world Look at the vending machine and use the command: shop.setvm [categories: cat1 cat2 ...] Example:
shop.setvm categories: Weapon Ammunition - adds the vending machine with Weapon and Ammunition categories
shop.setvm categories: * - adds the vending machine with all available categories
Note: You need the shop.setvm permission to use this command. The vending machine will be automatically added to the Shop configuration.
Q: How does the Shopping Basket feature work?
A: The Shopping Basket allows players to add multiple items to a cart before purchasing. Players can add items to the basket, review their selection, and purchase everything at once. The basket shows the total cost and allows players to remove items before checkout. This feature must be enabled in the template settings.
Q: How does the Search functionality work?
A: The Search feature allows players to search for items by name across all categories. Simply type in the search box and the shop will filter items matching your query. Search works across all enabled categories and respects permission settings. The search feature can be enabled/disabled in the template configuration.
Q: What are Wipe Cooldown and Respawn Cooldown?
A: These are time-based restrictions:
Wipe Cooldown: Blocks items from being bought/sold for a specified time after a server wipe. This is useful for preventing powerful items from being purchased immediately after wipe. Configure in config: "Wipe Cooldown": true and "Wipe Cooldown Timer": 3600 (seconds). Respawn Cooldown: Prevents players from opening the shop immediately after respawning. Helps prevent abuse. Configure in config: "Respawn Cooldown": true and "Respawn Cooldown Timer": 60 (seconds). Q: How do Daily and Lifetime Limits work?
A: Limits control how many times players can buy/sell items:
Lifetime Limits: Total number of times a player can buy/sell an item across their entire account. Set to 0 for unlimited. Daily Limits: Maximum number of times per day a player can buy/sell an item. Resets daily. Set to 0 for unlimited. Limits are per-permission, so you can set different limits for VIP players, regular players, etc. The plugin uses the highest limit among all permissions the player has. Q: What is the "Buy Again" feature?
A: Buy Again allows players to quickly repurchase items they have bought before. This feature shows a history button in the shop UI (if enabled) and requires a permission. To enable, set "Buy Again Settings": {"Enabled": true, "Permission": "shop.buyagain"} in the config.
Q: How do I configure blocked skins for selling?
A: You can prevent players from selling specific item skins. In the config, add entries to "Blocked skins for sell":
"Blocked skins for sell": { "rifle.ak": [52, 25], "pistol.m92": [100, 200] } Q: How do I configure which containers players can sell from?
A: In the config, set "Settings available containers for selling item":
"Settings available containers for selling item": { "Enabled": true, "Containers": ["main", "belt"] } Available container names: "main" (inventory), "belt" (hotbar), "wear" (clothing), etc.
Q: What are Auto-Wipe Settings?
A: Auto-Wipe Settings automatically reset certain data when you run the shop.wipe command. Configure in config:
"Auto-Wipe Settings": { "Cooldown": true, "Players": true, "Limits": true } Cooldown: Resets all item cooldowns Players: Resets all player data (favorites, economy selection, etc.) Limits: Resets all buy/sell limits Q: How do I customize price formatting?
A: In the config, set "Formatting Settings" to control how prices are displayed:
"Formatting Settings": { "Buy Price Format": "G", "Sell Price Format": "G", "Shopping Bag Cost Format": "G", "Balance Format": "G" } Format options: "G" (general), "N" (number with separators), "C" (currency), "F" (fixed-point), etc. See .NET number formatting for all options.
Q: How do I enable transfers to offline players?
A: In the config, set "Allow money transfers to offline players?": true. By default, this is disabled for security reasons.
Q: How do I configure Duel/Duelist integration?
A: To block shop access during duels, set "Blocking the opening in duels?": true in the config. Make sure you have the Duel or Duelist plugin loaded.
Q: What do all shop item settings mean and how should I configure them?
A: Below is a short explanation of the most important item fields and how they affect the plugin.
Type – what this entry does: Item (gives an in-game item), Command (runs server commands), Plugin (calls another plugin hook), Kit (gives a kit). ID – unique numeric ID of the item inside Shop. Used internally (for logs, favorites, editor); normally you don’t change it manually. Image – custom UI icon key. If empty, Shop will try to use the item icon found by ShortName. Permission – Oxide/Carbon permission required to see and use this item. Leave empty to make the item available to everyone, or set e.g. shop.vip for VIP‑only items. Title – custom title shown in the UI. If empty, the plugin will try to use DisplayName, then the in‑game display name of the item, or fall back to an empty string. Description – additional text shown in the item window. Optional, purely visual. Command (%steamid%) – used when Type = Command. The plugin will execute this command on the server. You can use placeholders like %steamid%, %username%, %player.x%, %player.y%, %player.z%. Each purchase can run multiple commands (split internally by |). Kit – kit name for Type = Kit. The plugin will give a kit with this name when the player buys the item. Plugin – used for Type = Plugin. Contains plugin name, hook name and amount. When the item is purchased, the specified hook will be called in the target plugin. DisplayName (empty – default) – overrides the in‑game item name shown to the player (for Type = Item). If empty, the plugin uses the original item display name (optionally via Lang API). ShortName – shortname of the item (e.g. rifle.ak). This is required for Type = Item; it is used to find ItemDefinition, icon, stack size, etc. Skin – workshop skin ID for the item. Only used when Type = Item. Is Blueprint – if enabled, Shop will give the item as a blueprint instead of the regular item. Amount – how many items are given/sold per one purchase. For blueprints this is how many separate blueprint items are created. Enable item buying? (CanBuy) – if disabled, the item cannot be bought (only sold, if selling is enabled). Price – default purchase price. Can be overridden per‑economy in Currencies – if a currency is configured for buying, its price will be used instead of this value. Enable item selling? (CanSell) – if disabled, players cannot sell this item back to the shop. Sell Price – default sell price. Can also be overridden in Currencies for selling. Buy Cooldown / Sell Cooldown – base cooldown in seconds between purchases/sales of this item. Can be overridden by per‑permission cooldowns below. Buy Cooldowns / Sell Cooldowns – per‑permission cooldowns. Keys are permission names (e.g. shop.vip), values are cooldown seconds. The plugin uses the lowest cooldown among permissions that the player has. Use custom discount? – if enabled, the item will use its own Discount map instead of the global discount configuration. Discount (%) – per‑permission discount percentages for this item (only if custom discount is enabled). The highest discount from permissions that the player has will be applied. Sell Limits / Buy Limits – global lifetime limits per permission. A value of 0 means “no limit”. The plugin selects the highest limit among permissions the player has. Daily Buy Limits / Daily Sell Limits – per‑day limits (reset by the plugin’s daily logic). 0 means “no daily limit”. Max Buy Amount / Max Sell Amount – maximum number of items that can be bought/sold in a single transaction (0 disables this limit). Force Buy – if enabled, the item will use fast purchase flow (without extra confirmation windows, depending on UI settings). Prohibit splitting item into stacks? – if enabled, the plugin will try to give the item in a single stack instead of splitting it into multiple stacks, when possible. Purchase/Sale block duration after wipe – time (in seconds) after a wipe during which this item cannot be bought/sold. Useful for limiting powerful items early in the wipe. Localization – per‑language messages for the item title. If enabled and a translation exists for the player’s language, it will override the normal title. Content – configuration of contents for containers (e.g. boxes, weapons with attachments, etc.). You can add inner items (shortname, amount, condition, position). Weapon – additional settings for weapons (ammo type, ammo amount, etc.). Applied when the item is created. Genes – plant gene configuration. If enabled, the plugin will set specified genes on the created item. Currencies – per‑economy price configuration. You can set different prices for each enabled economy plugin (by economy ID) for both buying and selling. If a currency is configured and enabled for the player’s selected economy, its price takes priority over the default Price/Sell Price. Q: What do shop category settings mean and how should I configure them?
A: Categories group your shop items and control how they are shown, sorted and filtered for players.
Enabled – turns this category on or off. If disabled, the category and all its items will not appear in the shop UI at all. Category Type – controls special behavior of the category: None – a normal category that shows the items you added to Items. Favorite – a virtual category that shows each player’s favorite items (based on their own favorites list). Items here are taken from other categories the player marked as favorite. Hidden – a hidden category. It is stored in data and can be used for management, but is not shown in the normal category list in UI. Title – the name of the category displayed in the UI. If Localization is enabled and contains a translation for the player’s language, that localized text will be shown instead of this value. Permission – permission required to see and use this category. If you leave it empty, all players can see the category (subject to item‑level rules). If you set e.g. shop.category.vip, only players with that permission will see this category in the shop. Sort Type – how items inside the category are sorted: None – items are shown in the order they are stored/edited. Name – items are sorted alphabetically by their PublicTitle (what the player sees). Amount – items are sorted by Amount (stack size) in ascending order. PriceIncrease – items are sorted by price from cheaper to more expensive. PriceDecrease – items are sorted by price from more expensive to cheaper. Sorting is applied every time the category items are requested. Items – the list of ShopItem entries that belong to this category. For normal categories (Type = None/Hidden) this is what will be displayed in the item grid. For Favorite categories this list is not used for display – the plugin uses the player’s favorites instead. Localization – optional localized title for the category. When enabled, the plugin will try to show a translated title based on the player’s language. If no translation is found, it falls back to the Title field. How visibility and filtering work – when the shop builds a category: For normal categories, only items that are available for the player (permission, currencies, buy/sell rules, etc.) are included. Skip/take pagination is applied on top of that filtered list to show items page by page. For favorite categories, the plugin takes the player’s favorite items, applies sorting, and displays them in this special category. Reordering categories and items – categories and items can be moved up/down (or left/right) in the in‑game editor. This changes the order in which categories are shown in the UI and the default order of items when Sort Type = None. Q: How do I enable and use ADMIN MODE?
A: ADMIN MODE is a visual in-game editor that allows you to manage your shop without editing files manually.
Step 1: Enable ADMIN MODE
Ensure you have the shop.admin permission Open shop with /shop command Click the "ADMIN MODE" button in the header (shows "■" when active) Step 2: Create/Edit Categories
To create a new category:
With ADMIN MODE enabled, click the "+" button in categories list Fill in category details (Title, Enabled, Type, Permission, Sort Type) Click "SAVE" To edit an existing category:
Click the "Edit" button (pencil icon) next to the category Modify settings Click "SAVE" or "CANCEL" Step 3: Create/Edit Items
To create a new item:
Open the target category Click "+ADD ITEM" button Select item from the selection panel Configure all item properties (price, amount, permissions, etc.) Click "SAVE" To edit an existing item:
Click the "Edit" button on the item Modify properties Click "SAVE" or "CANCEL" Additional ADMIN MODE Features:
Use ↑↓ arrows to reorder categories Use ←→ arrows to reorder items within categories Use "DELETE" button in editor to remove categories/items All changes save automatically - no manual file editing needed Q: Where are shop files stored and what do they contain?
A: Shop plugin data is organized in the following structure:
📁 Configuration (oxide/config/Shop.json or carbon/config/Shop.json)
Plugin settings (permissions, commands, economy configuration) Notification settings Discord logging configuration Global plugin options 📁 Shop Data (oxide/data/Shop/Shops/Default.json or carbon/data/Shop/Shops/Default.json)
This is the main shop inventory file All categories and their settings All items with prices, permissions, cooldowns, limits Item configurations (weapons, content, currencies, etc.) Edited through ADMIN MODE or manually 📁 UI Template (oxide/data/Shop/UI.json or carbon/data/Shop/UI.json)
Interface template configuration Colors, sizes, positions Display settings Reset with: shop.reset template then shop.install 📁 Player Data (oxide/data/Shop/Players/ or carbon/data/Shop/Players/)
Individual player files (one per player)