KD Gaming 5x's Wishlist
-
$31.00
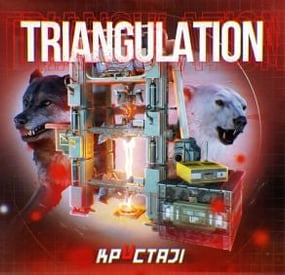
Triangulation
Welcome to a new arctic event where players will need to brave the arctic biome to deal with packs of aggressive feral animals!
Description
The event begins with a chat warning explaining that scientists studying the arctic area of the island have been attacked by vicious animals and need to quickly be evacuated. Since leaving in such a hurry, they left their drilling rig behind, which extracts a lot of profitable resources, currently the location of the rig is not known. Players are able to find and use this rig, since it is left unguarded, but first they have to find it's location. The team left behind three signal receivers at different locations on the island. The player needs to scan each of them sequentially. This won't be as easy as it sounds, utilizing the signal receivers seems to be a big part of what is aggravating the packs of animals nearby that led to the attack. The animals seem so crazed by the signal receivers running that they will attack and try to destroy them when the players use them to triangulate the location of the drilling rig. Players should protect the receivers if they have any hopes to retrieve the location of the rig, they will need to use all three receivers to find it. The rig will need quite a few batteries to run, players should loot these after running each scan. To incentivize keeping these scanners running, loot is provided with each successful scan of the area. The more health each scanner has upon completing the scan the more batteries will be received as a reward. The more batteries are in the rig, the longer it will run and the richer the reward will be in the end.
In the plugin configuration you can change almost anything you can think of, the loot in each location, the signal receivers and drillig rig parameters, timers, attack waves, animal configuration, and almost any customization you can think of will be found in the config file. Put on some warm clothing and head out to meet the new challenge!
Dependencies Required
AnimalSpawn
Dependencies (optional, not required)
TruePVE GUI Announcements Notify Discord Messages NTeleportation Economics Server Rewards IQEconomic XPerience
Chat commands (only for administrators)
/tstart - start the event
/tstop - end the event
Console commands (RCON only)
tstart - start the event
tstop - end the event
Plugin Config
en - example of plugin configuration in English ru - example of plugin configuration in Russian
Hooks
void OnTriangulationStart() – called when the event starts
void OnTriangulationEnd() – called when the event ends
void OnTriangulationWinner(ulong winnerId) – called at the end of the event, where the winnerId is the player who did more actions to complete the event
void OnTriangulationReceiverSpawn(Vector3 pos, float radius) - called when the signal receiver spawn on the map
void OnTriangulationDrillSpawn(Vector3 pos, float radius) - called when the drilling rig spawn on the map
My Discord: kpuctajl
Join the Mad Mappers Discord here!
Check out more of my work here!
- #event
- #facepunch
- (and 17 more)
-
$23.99
MyRustServer
By LosGranada in Tools
MyRustServer is a Rust Server Tool that allows you to create and manage your own Rust Server in just a few clicks.
The tool brings many possibilities and options that simplify your life as a server admin.
No unnecessary creation of batch files, easy installation of the server and extensions, easy updating of your plugins, wipe your server with one click and manage your players.
Join the discord for better and faster support
❤️ Big thanks to everyone who supports the project and helped me ❤️
It is a standalone program, with which you can host your own server, connecting to other server host service providers is not possible.
❤️You can run MyRustServer on up to 4 different systems.❤️
❤️You can create as many servers on one system as your hardware allows.❤️
Or buy at https://myrustserver.mysellix.io/shop where the key is sent automatically immediately after purchase.
The dashboard shows you all relevant information about your server. Here you control your server. Auto Restart Server Auto Update Server Auto Update Oxide Only Updates on Startup Force Restart Set Game Mode (Vanilla, Softcore, Survival and Hardcore) Set CPU Affinity Set Process Priority Stop Server Restart Server Kill Server
With the installer you can easily install and update your server. No batch files are used. Install or Update Server (Master, BETA, AUX01 and AUX02) Verify Server Files Install Discord Extension Install RustEdit
Under Settings you give your server your personal touch. Here you can set everything for your server. Name Logo URL Web URL App Logo URL Description Tags Max Players Add Users (Admins, Mods) RCON Password Add Ports to Windows Firewall Server Port Server IP RCON Port RCON IP Query Port App Port Add Custom Maps Server Map (Procedural, Custom, Barren, Hapis, Craggy, Savas) Map Size Map Seed - Advanced Settings Add Start Configs (convars) Backups (MRS Folder, Oxide Folder, Server Folder) Start Rust Server on MyRustServer Startup Repair MyRustServer
In Plugins you can easily manage your plugins. No annoying manual reload after editing. - Editor Edit (Auto Reload Plugin on Save, create a backup) Reload Update View Website Enable/Disable Delete - Update Check Plugins for Update (Supported sites for checking are: umod, codefling, chaoscode, lone.design, rustplugins and myvector) Update Plguins (Only plguins from uMod can be installed automatically after checking) Paid Plugins (here you set your purchased plugins) Blacklist Plugins Update All Plugins Auto Update Plugins - Plugin Installer Install Plugins from uMod
Auto Wipe Shedule Custom Map Custom Seed Custom Folder/File Full Wipe Blueprints Map Oxide Data Backpacks Logs Player Deaths Player Identities Player Stats Player Tokens New Map Seed on Wipe
Install or Update Oxide and Carbon Uninstall Oxide or Carbon Show Server in Modded or Community Choose your build (Production, Staging or Development) Permissions Manager
View Server Console Send Commands to your Server Add Quick Commands
Open Steam profile Copy SteamID Copy Name Check IP Kick Player Ban Player Teleport to Me to Player Teleport Player to Me Set/Remove Admin/Mod
Send Server Messages (Restart, Updates and Wipe) Send Custom Messages Send Custom Commands Sets for each Message a Time
Connect your server to your Discord to use as remote control or status information. Start Bot on MyRustServer Startup Send Server Status (Online, Offline, Restart) Send new Updates (Server, Client and Oxide) Send Wipe Notification - Send Commands Start Server Stop Server Restart Server Kill Server Update Server Update Oxide Update Carbon
!No Support for OneDrive Drives!
!No Support for Cracked Servers!
Windows Only
- #rust server tool
- #rust server management
- (and 28 more)
-

$10.00
WarnMenu
What is it?
A nice user-friendly warning system
Usage
When someone is breaking rules or trolling others just warn them, you can also set a command that will be executed through server console that will get executed upon reachin certain amount of warnings (can be configured in cfg)
Permissions
warnmenu.use -- Gives you full control to operate the WarnMenu
Chat command
/warn -- Opens the WarnMenu /warn "Name/SteamID" "Warning reason" -- Warns the specified player with your reason /warnmenu.save -- Force the plugin to write the data from memory to the data file
Data files
All Data files can be located at: \oxide\data\WarnMenu\warns
There you can find all the warnings for each player
Features
WarnMenu features
* Online Tab - In this tab you can easily select any online player that you want to warn
* Search All Tab - Once you open this tab, there you can see all the players and browse in them
* Find player Tab - When you click on the button you will be able to search for a specific player using his Name or SteamID
Warn Types
* CUI-Based - A CUI warning message will pop-up on player's screen when he gets warned
* Chat-Based - A chat message will pop-up in player's chat when he gets warned
Executable commands
* On reaching certain amount of warnings, you can make the server execute a command on a player(configurable in cfg)
F.e.: "1": "say {0} just reached 1 warning! SHAME on him!", "3": "kick {0} Kicked for reaching 3 warnings",
Localization
{ "Syntax": "Commands:\n/report (Opens Reporter GUI)", "CUI Online": "Online Players", "CUI Player": "Player: {0}", "CUI SteamID": "SteamID64: {0}", "CUI Warnings": "Warnings: <color=#8f1919>{0}</color>", "CUI NewWarn": "New\nWarning", "CUI WarningID": "Warning ID: {0}", "CUI WarnedBy": "Warned by: {0}", "CUI Date": "Date: {0}", "CUI Reason": "Reason: \n{0}", "CUI Remove": "Remove", "CUI Close": "close", "CUI Warn": "Warn", "CUI WarnAddMenuPlayer": "Warning for\n<color=#d43939>{0}</color>", "CUI SearchAll": "Search All", "CUI SelectPlayer": "Select a player to warn:", "CUI Find": "Find player", "CUI Find2": "Select", "CUI Find3": "Find player:\n(steamID/Name)", "CUI CantFindPlayer": "Couldn't find the player\nsearching argument: {0}", "CUI FoundPlayer": "Found player: {0}", "CUI Refresh": "Refresh", "CantFindPlayer": "Couldn't find that player", "WarnMessage": "Warned: <color=#8f1919>{0}</color>\nReason: {1}", "JoinMessage": "{0} has joined with <color=#8f1919>{1}</color> warnings", "WarnReceive": "You have received a <color=#8f1919>warning</color>\nBy: {0}\nReason: {1}", "CUI WarnReceive": "<color=#8f1919>Warning</color>\nreceived", "CUI WarnReceive2": "By: {0}\nReason: {1}" }
Configuration
{ "Announce on join with warnings?(to admins)": true, "Execute commands on reaching count:": { "Enabled?": true, "(Format: 5 : mute {0}) where 5 is number of warns and {0} is player's id": { "5": "say {0} just reached 5 warnings! SHAME on him!", "7": "example.command {0}", "10": "example.command {0}" } }, "Warn message settings": { "Text-based warn message?": true, "CUI-based warn message?": true, "How long until CUI message gets removed (secs)": 5.0 } }
-

$11.00
Custom Magazine
This plugin will add multiple extended magazines to your server
Description
Facepunch just released the extended magazine into the game, which adds 25% to the capacity of ammo that it can originally hold
With Custom Magazine's, you can now add several types of extended magazines! By default, you can now also add 50%, 75%, and even 100% capacity increases! At 100%, this will double any weapons capacity! You can change those capacity increase percentages in the configuration, remove them, or even add your own! You can configure spawning of these items in standard Rust crates!
Console commands (RCON only)
givemagazine {skinid} {steamid} - This is the console command to give an extended magazine from the plugin configuration with a Steam Workshop SkinID ({skinid}) to a player using their SteamID ({steamid})
Plugin Config
en - example of plugin configuration in English
ru - example of plugin configuration in Russian
My Discord: KpucTaJl#8923
Join the Mad Mappers Discord here!
Check out more of my work here!
-

$24.00
NpcRaiders
They will raid your base tell they find the tc or the time set in the config runs out or you kill all npc waves.
Only People authorized on the tc they are going after can kill the npc and only the npc can attack them.
You can use kits plugin from umod to kit them with clothing and guns See config example below.
Perms are set in config per raid type.
Permissions
npcraiders.use - Needed to use /raidme chat command.
npcraiders.admin - Needed to use /raidme reload chat command.
npcraiders.nocooldown - Disable the setting of your cooldown.
npcraiders.nocost - Disable the being charged.
Chat Command
/raidme - Will show raid help menu.
/raidme buy - Will show raid buy help menu and costs.
/raidme buy <type> - To start raid of the type.
/raidme reload player <playerName> = Will cancel there raid event.
/raidme reload all - Will cancel all events.
/raidme terrain - Get Terrain name your standing on.
/raidme loot - Generate a loot profile with all the items in your inventory
Loot Profiles
/raidme loot add <profileName> - Create or add more items to a profile
/raidme loot clear <profileName> - Clear all information from a profile
When you create a loot profile you will need to edit its datafile and set the min and max amount of items to give.. There you can change other min/max for item ammounts default is 1 to Amount when created
Config BuyType
ByTypes can be "Itemid" , "ServerRewards", or "Economics"
Default is scrap "-932201673"
Config.RewardType
RewardType can be "Itemid" , "ServerRewards", "Economics" , or "kit"
Config.AutoTurretDamage
"AutoTurretDamage": 0.0 - Disable targeting the npc.
"AutoTurretDamage": 1.0 - Full damage to the npc / Range is 0.0 to 1.0.