
Brasiliannut's Wishlist
-

$19.99
Helicopter Records
Show all Active and past Patrol Helicopter records that track all attacks by players with detailed statistics for each helicopter and player.
Features:
✯ Detailed Statistics for Helicopters, Players, Weapons
✯ Easy to use UI to show all statistics
✯ 5 Theme colors that each player can choose from
✯ Top players for helicopter attacks, total damage, total hits
✯ Search attacker history for players
✯ Quick Helicopter spawn button for admins in the UI
✯ Helicopter Tiers - Create custom tiers to make patrol helicopters easier/harder
Recorded Data:
[Patrol Helicopters]
✯ Status (active/inactive)
✯ Health (current/max)
✯ Start Time
✯ End Time
✯ List of Attackers
[Attackers]
✯ Total Helicopters Attacked
✯ Total Damage (all helicopters / per helicopter)
✯ Total Hits (all helicopters / per helicopter)
✯ List of every Attack
[Attacks]
✯ Weapon
✯ Damage
✯ Type
✯ Distance
✯ Time
[Weapons]
✯ Total Damage (all helicopters / per helicopter)
✯ Total Hits (all helicopters / per helicopter)
✯ List of every Attack with weapon
[Top Players]
✯ Helicopters Attacked
✯ Total Damage
✯ Total Hits
Default Chat Command:
/hr - Opens UI panels (can be changed in admin settings)
NOTES:
* Report all issues or bugs in our discord
Language:
{ "menu_lable": "Menu", "menu_001": "Main", "menu_002": "Active Patrols", "menu_003": "Patrol Records", "menu_004": "Top Players", "menu_005": "Search", "menu_006": "My Stats", "menu_007": "Close", "menu_008": "Admin", "hr_001": "Helicopter Records", "hr_002": "Global Statistics", "hr_003": "Total Helicopters", "hr_004": "Total Hits", "hr_005": "Total Attackers", "hr_006": "Active Patrol Helicopters", "hr_007": "Last Patrol Helicopters", "hr_008": "Helicopter ID", "hr_009": "Patrol Helicopter [#{0}]", "hr_010": "Health", "hr_011": "Started", "hr_012": "Ended", "hr_013": "Status", "hr_014": "Active", "hr_015": "InActive", "hr_016": "Escaped", "hr_017": "Attackers", "hr_018": "︽ Pevious", "hr_019": "Next ︾", "hr_020": "Player", "hr_021": "Damage", "hr_022": "No Attackers", "hr_023": "No Active Patrol Helicopters", "hr_024": "No Inactive Patrol Helicopters", "hr_025": "Helicopters Attacked", "hr_026": "Total Damage", "hr_027": "Attack Record", "hr_028": "Total Attacks", "hr_029": "Timestamp", "hr_030": "Distance", "hr_031": "Type", "hr_032": "Weapon", "hr_033": "Page: {0}", "hr_034": "Total Damage Amount", "hr_035": "Total Damage Percentage", "hr_036": "Top Attackers", "hr_037": "Search Attackers", "hr_038": "..enter player name..", "hr_039": "Search Results", "hr_040": "Total Weapons", "hr_041": "Most Used", "hr_042": "All Weapons", "hr_043": "Total Hits", "hr_044": "Helicopters Hit", "hradmin_001": "Settings", "hradmin_002": "Open UI Panel", "hradmin_003": "Save Settings", "hradmin_004": "Use Local Path", "hradmin_005": "Oxide Folder Path", "hradmin_006": "Reload Images & ImageLibrary", "hradmin_007": "Delete Records", "hradmin_008": "Delete", "hradmin_009": "This will delete all records for this helicopter including attackers and hits. \nAre you sure you want to remove all records for Patrol Helicopter [#{0}]", "hradmin_010": "Spawn New Helicopter" }
Discord
Join our community discord for fast support and future updates. We have several channels where you can get help, offer suggestions, see what's coming in future updates, and more. Our discord is the fastest way to get the help and info you need! http://discord.rustlevels.com/
-

$21.95$15.95WipeBlock
Introducing WipeBlock, the essential Rust server management plugin that allows you to control which items players can access at different stages after a server wipe! Create a balanced progression system that prevents early access to powerful weapons, explosives, and high-tier gear, ensuring a fair and enjoyable experience for all players during the critical early-game phase.
⭐️ Features of WipeBlock
Elegantly prevents access to high-tier items for configurable time periods after a server wipe Customizable categories for Weapons, Explosives, and Attire with independent timers Beautiful user interface showing players which items are currently blocked and when they will unlock Visual gradient system to indicate how much time remains until an item becomes available Seamless integration with ServerPanel for easy access Compatible with Notify plugin for player notifications when items are blocked On-screen indicator showing when blocked items are about to unlock Permission system to allow VIPs or admins to bypass item restrictions Notification system for players when items become available Handles all item interactions - equipping, moving, reloading weapons, etc. Automatic monitoring of player inventories to enforce restrictions Multiple UI templates (Fullscreen, ServerPanel V1, ServerPanel V2)
🎮 Commands
/block or /wipeblock - Open the WipeBlock menu to view blocked items and timers wb.indent [seconds] - Admin command to adjust the time indent from the wipe date
🛡️ Permissions
WipeBlock.ignore - Allows players to bypass the WipeBlock restrictions WipeBlock.unlocknotify - Players with this permission receive notifications when items unlock
🖼️ Showcase
Fullscreen Template
ServerPanel V1 Template
ServerPanel V2 Template
On-Screen Indicator
🧪 TEST SERVER
Join our test server to experience WipeBlock and our other plugins in action!
Copy the IP Address below to start playing!
connect 194.147.90.239:28015
💻 Developer API
WipeBlock provides a developer-friendly API for integration with other plugins:
bool AnyBlocked() - Checks if any items are currently blocked int SecondsFromWipe() - Returns the number of seconds since the wipe (adjusted by time indent) bool IsBlocked(ItemDefinition def) - Checks if a specific item definition is blocked bool IsBlocked(string shortName, ulong skin = 0) - Checks if an item with the specified shortname and skin is blocked int LeftTime(string shortName, ulong skin = 0) - Returns the remaining time in seconds until the specified item unlocks
🔗 Hooks
WipeBlock provides the following hooks that other plugins can subscribe to:
void OnWipeBlockEnded() - Called when all items have been unblocked Example usage in your plugin:
private void OnWipeBlockEnded() { // Execute code when all WipeBlock items are unlocked Puts("All items have been unblocked!"); // Perhaps enable your PVP plugin or other game-changing features }
📚 FAQ
Q: How do I configure which items are blocked and for how long?
A: In the WipeBlock.json configuration file, you can define categories (Weapons, Explosives, Attire, etc.) and set time periods in seconds for each item. For example, setting "3600" means the item will be blocked for 1 hour after wipe.
Q: Can players still find these items in-game during the block period?
A: Yes, players can still find or loot these items, but they cannot equip, use, or place them in their hotbar until the block period expires. The items will automatically move to their main inventory.
Q: Does this plugin affect all players equally?
A: By default, yes. However, you can grant the "WipeBlock.ignore" permission to specific players or groups to allow them to bypass the restrictions.
Q: How will players know which items are blocked?
A: Players will see notifications when they try to use blocked items. Additionally, they can use the /block command to view a complete list of blocked items and their remaining time until unlocking.
Q: Can I adjust the timers during a running wipe?
A: Yes, administrators can use the /wb.indent command to adjust the time indent, effectively changing when items will unlock.
Q: Does WipeBlock work with modded or custom items?
A: Yes, you can add any item to the configuration using its shortname and skin ID.
Q: How do I add WipeBlock to the ServerPanel menu?
A: Follow these simple steps:
1. Open ServerPanel menu in-game and click "+ADD CATEGORY" button
2. Set these exact parameters:
Type: Plugin Plugin Name: WipeBlock Plugin Hook: API_OpenPlugin 3. Click "SAVE" button to create the category
- #wipeblock
- #auto wipe
- (and 7 more)
-
$8.99
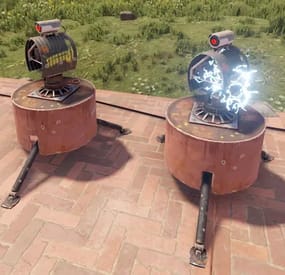
Auto Turret Interference & Settings
Auto Turret Interference & Settings
Auto Turret Interference allows you or your CLAN/TEAM to change the limit of turrets allowed for different players, based on your configurations and assigned roles. You can also make sure that the server or event turrets do not have interference, for example Raidable Base.
In addition, it offers commands to see the statistics on the auto turrets, the possibility of turning the turrets ON and OFF via command, automatic switching ON and OFF of the auto turrets and much more.
It also allows you to modify some automatic turret configurations, for example:
Customize rotation angle, Viewing angle and target scanning, Infinite Ammo: In the next release Health, Range, Bullet Speed, Aim Cone, Damage Scale
Oxide/Carbon compatibility
Basically, 4 groups are configured: Default, VIP1, VIP2, VIP3, in this way you can decide the limit of turrets in a given radius based on the group assigned to the user or the group they belong to
Permissions:
autoturretinterference.admin -- Allows you to execute some commands reserved for administrators autoturretinterference.show.allowed -- Allows you to use the /ati show command, to display text above the auto turrets with the status they are in.
---------------------------------------- autoturretinterference.default -- Assign configurations: Default autoturretinterference.vip1 -- Assign configurations: VIP1 autoturretinterference.vip2 -- Assign configurations: VIP2 autoturretinterference.vip3 -- Assign configurations: VIP3
These are the groups that are created by default, but you can add and/or edit groups as you wish.
For example, if you change the group vip1 to vip_elite, the permission autoturretinterference.vip_elite will be created
If you create a new group, for example vipvanilla, the permission autoturretinterference.vipvanilla will be created.
COMMANDS
Commands can be typed in chat (by putting the / character in front of the command), or from console.
/ati status or /ati st -- This command allows the player to see his auto turret statistics and limits /ati status <steamID> or /ati st <steamID> -- This command allows the administrator to see another players auto turret and limit statistics. To use this command you must have permission: autoturretinterference.admin
/ati start or /ati stop -- This command allows the player to turn on or off the single auto turret you are looking at. To use this command, you must enable the AllowCommandsToStartAndStop = true property in your configuration or have permission: autoturretinterference.admin NB: If you have autoturretinterference.admin permission, you can turn on or off the auto turret you are watching of any player.
/ati startall or /ati stopall -- This command allows the player to turn all of your auto turrets ON or OFF. To use this command, you must enable the AllowCommandsToStartAndStop = true property in your configuration or have permission: autoturretinterference.admin NB: If the player is part of a clan/team, all turrets of all members of the clan/team will be turned ON or OFF. /ati startall <steamID> or /ati stopall <steamID> -- This command allows you to turn ON or OFF all turrets of a player based on its SteamID. To use this command you must have permission: autoturretinterference.admin NB: If the player is part of a clan/team, all turrets of all members of the clan/team will be turned ON or OFF.
/ati show or /ati sh -- Command to display text above the auto turret with the status they are in.
Useful for finding turrets that are having problems.
To use this command you must have permission: autoturretinterference.show.allowed
You can pass one of these parameters: /ati show 0: Show all player auto turrets in all states. /ati show 1: Show text on all player active auto turrets /ati show 2: Show text on all player turned off auto turrets /ati show 3: Display text on all player auto turrets not connected to power /ati show 4: Display text on all player auto turrets with interference /ati show 5: Display text on all player auto turrets with information on the name of the weapon and the ammunition present in the auto turrets /ati show 6: Display text on all player auto turrets without a weapon /ati show 7: Display text on all player auto turrets without ammunition
/ati show <numbr> <steamID> or /ati sh <numbr> <steamID> -- Command to display text above the auto turret with the state it is in based on the players SteamID.
To use this command you must have permission: autoturretinterference.admin Commands can be added or modified in the configuration file: /oxide/config/AutoTurretInterference.json
Command output example (/ati status or /ati st) :
Command output example (/ati show or /ati sh) :
CLAN/TEAM
If you are part of a clan/team and there are 1 more members who have the VIP/ROLE, then all members of the clan/team will benefit.
Example: a clan/team member has the VIP/ROLE to be able to place 40 turrets, in this case all clan/team members will be able to place 40 turrets, but this does not mean that the total number of turrets you can place are added, the limit in in this case there are still 40 turrets, but they can be positioned by all members of the clan/team, rather than just the player who has the VIP/ROLE (in this case we assumed that the VIP/ROLE limited to 40 turrets).
You can enable this setting from the configuration file: "Share Group With Clan/Team members. Default FALSE": false": true
Configuration
The settings and options can be configured in the AutoTurretInterference under the config directory. The use of an editor and validator is recommended to avoid formatting issues and syntax errors.
{ "Remove interference for server auto turrets: default true (Useful for Raidable Bases or events)": true, "Share Group With Clan/Team members. Default FALSE": false, "PlayerShowTurretCountInfoMessage (Show the player, when he places a turret, a message with the number of turrets that are placed in the radius he is in. Default true.)": true, "AllowCommandsToStartAndStop (If set to TRUE, enables commands to allow the player or clan/team to turn their all auto turrets ON or OFF. Default FALSE)": false, "EnableAutomaticsStartAndStop (If set to TRUE, the player's turrets will be turned OFF when they go offline and ON when they come back online. For the clan/team, the entire clan must be offline to turn OFF the turrets automatically, but if at least one member of the clan comes back online, all the auto turrets will turn ON. Default FALSE)": false, "EnableMessageInfo (If set to TRUE, it shows a message info to the player, when he takes hold of an auto turret, of the commands that the plugin makes available to him)": true, "Auto Turret Draw Time (seconds). Default 60s": 60, "Auto Turret Draw Font Size (px). Default 16 pixel": 16, "Enable SentryTurrets plugin integration. If set to true, avoid conflicts with turret interference, interference will be handled by the AutoTurretInterference plugin. Default true": true, "Chat Command": [ "ati", "autoturretinterference" ], "RolePermission": { "vip1": { "Priority. (lower = higher priority)": 1, "Force the maximum number of Auto Turrets for player or entire clan/team (-1 no limit). Default -1": -1, "Player Auto Turrets without interference limit": 40, "Radius within which the system checks for other turrets (lower = more turrets)": 40, "Rotate Auto Turrets 180° degrees instead 90°. Default false": false, "Rotate Auto Turrets 270° degrees instead 90°. Default false": false, "Rotate Auto Turrets 360° degrees instead 90°. Default false": false, "Auto Turret Viewing angle and target scanning. Default 180° Degrees": 180, "Enable Auto Turrets custom settings": false, "Health (Default 1000)": 1000.0, "Range (Default 30)": 30.0, "Bullet Speed (Default 200)": 200.0, "Aim Cone (Default 4)": 4.0, "Damage Scale (Default 1.0)": 1.0 }, "vip2": { "Priority. (lower = higher priority)": 2, "Force the maximum number of Auto Turrets for player or entire clan/team (-1 no limit). Default -1": -1, "Player Auto Turrets without interference limit": 30, "Radius within which the system checks for other turrets (lower = more turrets)": 40, "Rotate Auto Turrets 180° degrees instead 90°. Default false": false, "Rotate Auto Turrets 270° degrees instead 90°. Default false": false, "Rotate Auto Turrets 360° degrees instead 90°. Default false": false, "Auto Turret Viewing angle and target scanning. Default 180° Degrees": 180, "Enable Auto Turrets custom settings": false, "Health (Default 1000)": 1000.0, "Range (Default 30)": 30.0, "Bullet Speed (Default 200)": 200.0, "Aim Cone (Default 4)": 4.0, "Damage Scale (Default 1.0)": 1.0 }, "vip3": { "Priority. (lower = higher priority)": 3, "Force the maximum number of Auto Turrets for player or entire clan/team (-1 no limit). Default -1": -1, "Player Auto Turrets without interference limit": 20, "Radius within which the system checks for other turrets (lower = more turrets)": 40, "Rotate Auto Turrets 180° degrees instead 90°. Default false": false, "Rotate Auto Turrets 270° degrees instead 90°. Default false": false, "Rotate Auto Turrets 360° degrees instead 90°. Default false": false, "Auto Turret Viewing angle and target scanning. Default 180° Degrees": 180, "Enable Auto Turrets custom settings": false, "Health (Default 1000)": 1000.0, "Range (Default 30)": 30.0, "Bullet Speed (Default 200)": 200.0, "Aim Cone (Default 4)": 4.0, "Damage Scale (Default 1.0)": 1.0 }, "default": { "Priority. (lower = higher priority)": 100, "Force the maximum number of Auto Turrets for player or entire clan/team (-1 no limit). Default -1": -1, "Player Auto Turrets without interference limit": 12, "Radius within which the system checks for other turrets (lower = more turrets)": 40, "Rotate Auto Turrets 180° degrees instead 90°. Default false": false, "Rotate Auto Turrets 270° degrees instead 90°. Default false": false, "Rotate Auto Turrets 360° degrees instead 90°. Default false": false, "Auto Turret Viewing angle and target scanning. Default 180° Degrees": 180, "Enable Auto Turrets custom settings": false, "Health (Default 1000)": 1000.0, "Range (Default 30)": 30.0, "Bullet Speed (Default 200)": 200.0, "Aim Cone (Default 4)": 4.0, "Damage Scale (Default 1.0)": 1.0 } }, "VersionNumber": { "Major": 1, "Minor": 3, "Patch": 1 } }
Remove interference for server auto turrets: default true (Useful for Raidable Bases or events): Whether or not to enable interference for server auto turrets. By default it is true, in this way the server's automatic turrets will not have interference, useful for events for example: Raidable Base. Share Group With Clan/Team members: If set to TRUE, the group assigned to a player is shared with all members of the clan/team. The group with the lowest priority is shared, then all members of the clan/team will benefit. Default FALSE PlayerShowTurretCountInfoMessage: Show the player, when he places a turret, a message with the number of turrets that are placed in the radius he is in. Default: TRUE. AllowCommandsToStartAndStop: If set to TRUE, enables commands to allow the player or clan/team to turn their all auto turrets ON or OFF. Default FALSE. EnableAutomaticsStartAndStop: If set to TRUE, the player's turrets will be turned OFF when they go offline and ON when they come back online. For the clan/team, the entire clan must be offline to turn OFF the turrets automatically, but if at least one member of the clan comes back online, all the auto turrets will turn ON. Default FALSE. EnableMessageInfo: If set to TRUE, it shows a message info to the player, when he takes hold of an auto turret, of the commands that the plugin makes available to him. Default: TRUE. Auto Turret Draw Time (seconds). Default 60s: Duration of display of text above the auto turret. Default 60 seconds. Auto Turret Draw Font Size (px). Default 16 pixel: Size of text above auto turret. Default 16 pixel Enable SentryTurrets plugin integration. If set to true, avoid conflicts with turret interference, interference will be handled by the AutoTurretInterference plugin: Enables integration with the SentryTurrets plugin to avoid conflicts with auto turrets interference management. If set to true, auto turrets interference will be handled by the AutoTurretInterference plugin. Default true
Chat Command: Here you can add, edit or delete Commands can be typed in chat (by putting the / character in front of the command), or from console.
Priority. (lower = higher priority) -- Each group has its own property, the lower this number is, the more important the group is.
This is useful in the case where a player has more roles assigned. In this case, the group with the lowest priority will be assigned, the most important group.
Negative numbers are also allowed. Player Auto Turrets without interference limit: How many automatic turrets can a player place within the radius within which the system controls the other turrets, without them interfering. For example, basic rust allows 12 turrets in a radius of 40 meters, you can set for example 30 turrets instead of 12. Radius within which the system checks for other turrets (lower = more turrets) Force the maximum number of Auto Turrets for player or entire clan/team (-1 no limit).
Maximum total number of auto turrets that can be active for player or entire clan/team.
When Auto Turrets are placed, only a certain number in a certain radius, configured in the configuration file, can be active at a given time.
However, this does not prevent you from being able to place unlimited Auto Turrets.
For example, you have set a limit of 20 Auto Turrets in a 40 meter radius, this means that in a 40 meter radius there can be a maximum of 20 Auto Turrets. But if you place another 20 Auto Turrets more than 40 meters away from the first ones, then you can place another 20 active Auto Turrets, and so on.
With this option you can establish the maximum number of Auto Turrets that can be active regardless of the radius, in order to avoid unlimited Auto Turrets.
It is always recommended to use this configuration together with the others.
For example you can decide that the forced maximum Auto Turrets limit is 5 times the number of active Auto Turrets in a given radius, it's up to you to decide. Default -1.
Auto Turrets rotation angle: Allows you to change the rotation angle of the turret. Targets will be acquired as usual, if they are in front of the turret which however can move to a larger angle. Rotate Auto Turrets 180° degrees instead 90°: If set to TRUE, the auto turrets will rotate 180° instead of the default 90° (degrees). Default False Rotate Auto Turrets 270° degrees instead 90°: If set to TRUE, the auto turrets will rotate 270° instead of the default 90° (degrees). Default False Rotate Auto Turrets 360° degrees instead 90°: If set to TRUE, the auto turrets will rotate 360° instead of the default 90° (degrees). Default False
Auto Turret Viewing angle and target scanning: This is a very powerful setting, it allows the auto turrets to see and acquire targets instantly based on the set angle, regardless of whether the target is in front of the auto turrets or not.
For example if set to 200°, the auto turrets will acquire targets instantly within 200°.
Or if set to 360°, the auto turrets will acquire targets instantly in all directions. You can choose the angle you prefer by entering a number between 1° and 360° (degrees). Default 180° Degrees.
Enable Auto Turrets custom settings: If set to TRUE, it allows you to change some Auto turret settings. Default FALSE Health (Default 1000): Auto Turrets maximum health.
Range (Default 30): Distance from which the weapon can see.
Bullet Speed (Default 200): Speed of bullets fired.
Aim Cone (Default 4): The weapon's aiming cone.
Damage Scale (Default 1.0): allows you to increase the damage of Auto turrets. A higher value indicates greater damage.
PlayerShowTurretCountInfoMessage EXAMPLE:
EnableMessageInfo EXAMPLE:
Localization
The plugin, therefore the automatic messages and statistics, are translated into the following languages:
English Italian Spanish French German Dutch Turkish Russian Ukrainian Translation files are located in the /oxide/lang folder, here is an example of a /oxide/lang/en/AutoTurretInterference.json translation file.
You can add translations for other languages by adding them to the folder: /oxide/lang
- #auto turret interference
- #auto turret
- (and 22 more)
-
$30.00
Crafting Panel
This plugin provides a beautiful and convenient crafting panel for your server. Its design and mechanics are as similar as possible to the in-game Rust crafting panel. Add crafting of any custom items, commands, permissions and anything else you like.
Features
The design is ~90% similar to the design of Rust's in-game crafting panel. Support for any custom items and commands. Ability to unlock all DLC items in the in-game crafting menu. The plugin only registers permissions for items that you have specified to it. Thus, preventing the creation of a large number of permissions. Customizable sound effects, notifications in the status bar on the right, and text notifications in popular plugins. The plugin can take and give out items from inventory, game backpack and Backpacks plugin, depending on the fullness of any of them. Ability to add item variations (just look at the screenshots). Supports work with skill plugins. Supports work with economy plugins. The player can choose whether to craft or buy an item. Add items to favorites, built-in search, fully functional queue and more. Scrollbar support. Ability to use item crafting cooldown.
*All the sections and items shown in the screenshots are an example of configuring the plugin. You will need to create sections yourself and add items there.
Supported plugins:
SkillTree - allows you to use bonuses such as: Craft_Speed, Craft_Refund, Craft_Duplicate. Also allows you to give bonuses when crafting and take away when crafting is canceled. Backpacks - plugin can take and give items in an additional backpack. ItemRetriever - plugin can take crafting ingredients from all containers that are connected to the player (including inventory, game backpack, Backpacks plugin, and any other plugin that uses ItemRetriever as Suppliers). Player DLC API - plugin allows you to check whether an item or skin belongs to a specific player. ZLevelsRemastered - allows you to use the craft speed bonus. Economics, ServerRewards, IQEconomic - these plugins are used to purchase items with the currency of these plugins. Notify, GUIAnnouncements, NCP - these plugins are used to display notifications. SimpleStatus, AdvancedStatus - these plugins are used to display notifications in the status bar at the bottom right of the screen.
Permissions
The plugin has immutable and generated permissions.
The immutable ones include:
craftingpanel._use – is responsible for opening the panel. If there is no permission, the panel will not open. craftingpanel._admin – give this permission only to administrators. It adds an additional "Give yourself" button to get items from the panel for free. This permission is also needed to use the givecraft command (about it below). craftingpanel._instant – all player crafts will be instant. craftingpanel._death – crafting queue will not be reset when the player dies. craftingpanel._disconnect – when a player leaves the server, the craft queue will not be reset. craftingpanel._economics – allows you to purchase items for the currency of the selected economy plugin. If the player does not have permission, the cost panel will still be displayed, but the player will not be able to make a purchase. craftingpanel._workbench - allows you to reduce crafting time by having a workbench of a higher level than necessary for crafting. craftingpanel._bonuses – allows the player to access the crafting bonuses from the "Crafting bonuses" section. craftingpanel._unlockdlc - if a player has this permission, he can craft all DLC items in the in-game crafting menu. If you revoke this permission, all DLC items will become unavailable again. craftingpanel._nocooldown - allows you to disable the cooldown of all items. The generated permissions are created by the plugin itself, here's how it works:
craftingpanel.section.vehicles- this is permission for the "vehicles" section. craftingpanel.vehicles.minicopter - this is permission for the item "minicopter" in the "vehicles" section. craftingpanel.vehicles.snowmobile.tomaha - this is permission for the item "snowmobile" in the "vehicles" section and in "tomaha" variation.
Commands
givecraft steamid/nickname section item 5 skin
steamid/nickname – steamid or nickname of your choice. section – section name from the Section permission [required] field. item – item name from the Item permission [required] field. 5 – how much of the current item to give out (craft multiplier). skin - name of the item from the Ingredients section, Item permission [required] fields. All arguments of this command are required. If your item has an empty "Variations" section or you want a default item, specify "default" in place of skin.
resetcooldowns steamid/nickname section item - resets the cooldown of a specific item from a specific player.
resetcooldowns steamid/nickname - resets the cooldown of all items from a specific player.
resetcooldowns all section item - resets the cooldown of a specific item for all players
resetcooldowns all - resets the cooldown of all items from all players
steamid/nickname – steamid or nickname of your choice. section – section name from the Section permission [required] field. item – item name from the Item permission [required] field.
General settings
Allow panel scaling when the interface is scaled? - if this setting is enabled, the craft panel will be resized depending on the game interface scale (setting "user interface scale"). If the setting is disabled, the panel will always be the same size, regardless of the player interface scale.
Remember the last selected section and item? - plugin will remember the last selected section, item and variation the next time the panel is opened by the player.
Enable multilingual mode? – if your server has players from different countries, this mode allows you to customize translation for other languages. When you enable this mode, the plugin will write all the data that needs to be translated to the lang - file. These include: section names, item names, item descriptions, item properties, item variation names, and ingredient names. The lang - file consists of a pair: key - value. The key is a unique name, with the help of which the plugin understands what phrase to use.
Section translation:
section.*section permission* – key template for section name translation. For example: "section.favorite": "Favorite" – Favorite section.
Translation of item information:
*section permission*.*item permission*.name – key template for item name translation. For example: "sunburn.innertube.name": "Inner Tube" – item name.
*section permission*.*item permission*.description – key template for item description translation. For example: "sunburn.innertube.description": " Inflatable lap for water fun." – item description.
*section permission*.*item permission*.properties – key template for item properties translation. For example: "sunburn.innertube.properties ": "Any properties ..." – item properties.
*section permission*.*item permission*.variations.*variation permission* – key template for variation name translation. For example: "sunburn.innertube.variations.zebra": "ZEBRA" – variation name.
Translation of ingredient names:
*ingredient shortname *.*ingredient skinId* - key template for ingredient name translation. For example: "wood.0": "Wood" – ingredient name.
Use the PlayerDLCAPI plugin to check whether items and skins belong to the player? – The plugin will check each item and skin in the panel for belonging to the player (i.e. whether they are in his Steam inventory).
Allow work with the Backpacks plugin? – plugin can take and give items in an additional backpack (Backpacks by WhiteThunder).
Allow work with the ItemRetriever plugin? – this plugin provides advanced functionality for interacting with player containers:
If the ItemRetriever plugin is enabled, the CraftingPanel will take crafting ingredients from all containers that are connected to the player (including inventory, game backpack, Backpacks plugin, and any other plugin that uses ItemRetriever as Suppliers).
If the ItemRetriever plugin is disabled, the CraftingPanel will take items with the next priority (if the item is not found, it goes to the next container): Backpacks plugin (if enabled) -> game backpack -> inventory.
The CraftingPanel plugin is fully in charge of giving out items (since ItemRetriever only allows you to take items from the player), it gives out items with the next priority (if the container is full, it moves on to the next one): inventory -> game backpack -> Backpacks plugin (if enabled) -> drop item.
Reset cooldown on crafting items for all players during the wipe? - the plugin will reset all cooldowns when the server is wiped.
Delete player data from the Data file if they have not logged into the server for so many days – this setting is added to prevent the plugin from keeping in memory the settings of all players who have ever visited your server.
Effect at the start/end/canceling – game effects that will be played at the start of crafting/completion of crafting/cancellation of crafting (effects list, plugin for playing effects).
Specify a plugin to work with the economy – specify one plugin from the list or leave the field empty to disable work with economy.
Crafting bonuses
This section allows you to customize crafting bonuses when using one of the supported plugins. Each of these plugins has its own settings.
Amount of experience will depend on crafting time? – if this setting is disabled, then the given/taken experience will be the same (which are specified in the settings above). If this setting is enabled, the experience will be calculated using the following formula: calculated experience = crafting time * experience from the settings above. It should be taken into account that to calculate the experience for a crafted item, the full crafting time is taken (which is specified in the item's setting), and to calculate the experience for crafting cancellation, the time left to create the item is taken.
The ZLevelsRemastered plugin does not have a full-fledged api for interaction with crafting bonuses, so the work with it is not fully implemented (no rewards are given in economy plugins, permission of this plugin is not taken into account, etc.).
Notification settings
Notification type (Chat, GameTips, Notify, GUIAnnouncements) – if this section is enabled, you must specify the type/plugin to notify the player of different warnings.
Chat – notification to regular chat. GameTips – notification in the in-game Rust tooltips (blue or red at the bottom of the screen). Notify – notification in the Notify plugin by Mevent. GUIAnnouncements – notification in the GUIAnnouncements plugin by JoeSheep. Just below that are the customization fields for the specific type of notification.
Game Status Settings
Game status is a notification that is shown at the bottom right of the screen (like in-game crafting). The plugin can show 3 types of game status:
Current craft – it's the blue panel with the gear. It is displayed while the crafting process is in progress. Giving item – it's the green panel with the down arrow. It is displayed when a player is given a craft item. Dropping item – it's the red panel with the cross. It is displayed when the items given by the plugin do not fit in the inventory and drop out near the player. Crafting Panel working with Rust's in-game status and two plugins (SimpleStatus, AdvancedStatus) that have slightly advanced features.
Rust – is the in-game status built into the game. It does not require any additional plugins, but it cannot show the Current craft (blue panel with a gear). SimpleStatus – this plugin displays customizable statuses. It can show Current craft and Giving item. But cannot display Dropping item due to limitations in its operation. AdvancedStatus - this plugin displays customizable statuses. It works with all of the above status types.
Section settings
Section name – the displayed section name on the menu button.
Section permission [required] – be sure to fill in these fields and make sure they are all unique. Because it is by this field that the plugin understands which section it is currently working with. If you specify "favorite" here, the plugin will use this section to display the player's favorite items (don't add items to it, the plugin will delete them anyway).
Register this permission? – if enabled, the plugin will register a permission with the above name. In this case this section will be shown only to those players who have this permission.
Section item settings
Item name [required] – required field. The name of the item is displayed only in this plugin. If you need to create an item with the same name, you will find this setting below.
Item permission [required] – required field. Make sure that each item in the section has a unique field. Because by this field the plugin understands which item in the current section it is currently working with.
Register this permission? - if enabled, the plugin will register permission with the above name. Keep in mind that the current item will still be shown to all players, but they will not be able to craft it (this is also notified by the icon on the top left of the information section).
Item description – item description, is not passed to the item when crafting, only displayed in the panel of this plugin.
Item properties – if the item has some characteristics (e.g., damage, radiation protection, etc.) you can specify them here. This data is displayed in a separate panel in the information section of the item.
Item shortname – if you are using the command as a craft result, leave this field empty.
Check this item with the PlayerDLCAPI plugin? - this setting disables the verification of the item by the Player DLC API plugin.
Create an item with the default name (true) or the above name (false)? – if true, the plugin will create an item with the default game name (which refers to the current shortname), otherwise it will set the name from the Item name field.
Item skinId – if the item is custom, specify the required skinId, otherwise set it to 0.
Item image [optional] – if as a result of craft, you have to execute some command, you can specify a link to a picture related to this command.
Console commands executed after crafting (%steamid%, %username%, %amount%) [optional] – if you need to execute some commands as a result of crafting, you can list them with commas in this field. In the command you can specify %steamid% and %username%, the plugin will replace them with the data of the current player. The plugin can also replace %amount% with the amount per craft (next setting). If the command gives some custom game item and you know its shortname and skinid you can specify them in the fields above. This way you don't need to additionally save the image of this item to the hosting and specify its link.
Amount per craft – number of items given out per craft.
Max craft multiplier - maximum allowable craft multiplier. The craft multiplier (selected by the player in the Ingredients section) is how many times an item will be dispensed or how many times commands will be executed. If Amount per craft = 3, and the player chose multiplier = 2, he will receive 2 * 3 = 6 items.
Crafting time [sec] – time to craft the item. It can be set to 0, then the item will be crafted instantly.
Show notification in game status (if they are enabled)? – if a command from another plugin is used to give a custom item and that plugin displays game status, duplication of game statuses may occur. Therefore, it is possible to disable the display of game status for a particular item. Keep in mind that this only disables the Giving item status.
Apply craft bonuses (if they are enabled)? – allows you to apply craft bonuses (from the "Crafting bonuses" section) to this item.
Crafting cost in the economy plugin [0 - disable] – the value of the current item in your economy server currency. The customization works if you specified one of the supported economy plugins at the beginning.
Item Variation settings
In the in-game Rust crafting panel this section is called Skins, here it is called Variations. This is done because here it can include not only skins, but any items or commands related to the parent item. For example, you have several modular car presets, with different types of modules, but they are all related to modular cars. Therefore, you can specify them in one item - "Modular car". The settings in this section are similar to the parent item, except for the crafting ingredients. They will be the same as the parent item.
Item Ingredient settings
Resource name [required] – required field. Is used to display the name of the ingredient in the plugin panel (it is not taken into account when taking ingredients from the player). When canceling the craft, the plugin can set this ingredient to the specified name, you will find this setting below.
Use this resource in ingredients? – enables or disables this resource for use in ingredients.
Resource shortname [required] – required field. Shortname of the item that the plugin will look for from the player for crafting.
Resource skinId – if it's a custom item, give its skinId, otherwise set it to 0.
Return an item with the default name (true) or the above name (false)? – when the craft is canceled, if true, the plugin will create an ingredient with the default game name (which refers to the current shortname), otherwise it will set the name from the Resource name field.
Plugin Config
Example of plugin configuration in English:
Example of plugin configuration in Russian.
If you need Russian config, open it (CraftingPanel.cs) before loading the plugin, and at the top set the variable "isRus = true". Then save and upload this file to your server
- #craft
- #craft menu
- (and 17 more)
-
$9.11
CombatBlock
CombatBlock is a classic plugin that serves as a great addition to the RaidBlock (NoEscape) plugin.
This plugin features extensive settings and several types of modern design.
It has a cohesive style and pairs excellently with the RaidBlock plugin.
Provide your players with an optimized and stylish plugin that will operate quickly and seamlessly.
List of features:
UI Interface Variations:
Perfectly complements the RaidBlock plugin.
0 option
1 option
2 option
Configuration of Additional Triggers:
You set the triggers for the plugin yourself.
Attacking an NPC Receiving damage from an NPC Inflicting damage on a sleeping player Deactivating combat-block upon death
Configuration of Restrictions During Combat-Block:
Blocking teleportation Blocking trade Blocking the use of kits Blocking commands (Supports chat and console commands)
Permissions:
combatblock.ignore - with this permission, the player will have immunity to combat blocking.
Api:
Object CanCombatBlocked(BasePlayer player) Object CanCombatBlock(BasePlayer player) void OnCombatBlockStarted(BasePlayer player) void OnCombatBlockStopped(BasePlayer player)
Configuration:
An excellent addition to this plugin:
- #combat
- #combat block
- (and 5 more)