FeniexGaming's Wishlist
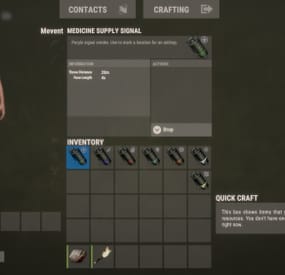
-
Raidable Bases
Create fully automated raidable bases with NPCs in Rust
NOT compatible with server.pve when set to true. Use a PVE plugin like TruePVE if you want PVE protection.
This is the premium version of Raidable Bases. The differences between this and the free version are too many to list. A few key differences are: five (5) difficulties and associated loot table functionality instead of one (1), buyable events, lockouts for players.
Requires latest version of CopyPaste or bases to work. It also requires that you have copypaste files already made. Raidable bases will be spawned using the CopyPaste plugin. This plugin does NOT come with any bases. Packages are sold separately that include bases.
Check out my packages for this plugin for tier1, tier2, and tier3 which contain everything you need to get the plugin working in minutes with all bases and loot already configured for you! Packages are sold separately.
📄RBE DEBUG
This command exists to aid with issues regarding your configuration, profiles and/or map by displaying information, both good and bad, related to finding spawn points and spawning of bases. It is your responsibility to use this command before asking for help.
📄Loot Table Editor by @beee😎
https://codefling.com/tools/raidable-bases-loot-table-editor
📄There are just a few steps required to get bases spawn on your server within minutes.
👉 You must have the CopyPaste plugin installed. (Disclaimer: Configuring this to your servers specific needs will require a lot of time and effort) 👈
Step 1: Obtain Your Bases
You can get bases by:
Downloading them from Fortify Purchasing a tier package from me Buying a base package from third-party sellers (be wary that some sellers include items in their CopyPaste files!) Creating your own bases Step 2: Set Up Profiles
Profiles are located in:
oxide/data/RaidableBases/Profiles/ carbon/data/RaidableBases/Profiles/ There are five different profiles. You can add the filenames of your CopyPaste bases manually, or by using the command:
For example (You must use straight double quotes. Curly double quotes are not supported!):
Step 3: Edit the Configuration
The configuration file is located in:
oxide/config/RaidableBases.json carbon/configs/RaidableBases.json Make the following changes:
Always Maintain Max Events: Set this to true. Max Maintained Events: Set this to the number of bases you want to spawn. Minimum Required Players Online: If you want bases to spawn even when no players are online, set this to 0. Step 4: Save and Reload
After making your changes:
Save your files. Reload the plugin. The bases will now start spawning automatically. They will use the Default Loot table, located in:
oxide/data/RaidableBases/Default_Loot.json carbon/data/RaidableBases/Default_Loot.json Step 5: Customize Loot Tables
Refer to the documentation to learn how to set up your own custom loot tables.
Additional Information
If you want buyable events using the /buyraid command, you can set a cost under the Buyable Event Costs section. This includes:
Economics Buy Raid Costs ServerRewards Buy Raid Costs Custom Buy Raid Costs Tips for Customizing Your Setup
The plugin has many settings to customize. No guide can cover everything, so you will need to go through each setting and adjust it to meet your server’s needs.
Important:
Make backups as you configure the settings. Don’t rush—take it one step at a time. 📄Dynamic difficulties (added in 3.0.0):
Easily add or remove your own difficulties.
You should reload the plugin whenever you make changes!
Add a difficulty:
rb.difficulty add "Sky" This will create the profile "Sky Bases.json" and set the difficulty to "Sky" rb.config add "Sky Bases" sky1 sky2 sky3 sky4 sky5 Reload the plugin! This will create language messages in the EN and RU language files which you can copy to other language files. If your messages do not update after a reload then you must restart your Rust server to reset Oxide cache. This will create all relevant settings for "Sky" within the config file where you must set them all as desired You need your own copypaste files and loot tables using their new respective names. Base Loot folder - add a loot table with the filename "Sky Bases.json" to match the profile name. Difficulty Loot folder - add a loot table with the filename "Sky.json" to match the difficulty name. Remove a difficulty:
rb.difficulty remove "Sky" This will remove all settings for this difficulty from the config file - and disable the profile - only. No files are deleted! Edit or change a difficulty name:
This is not supported and will not be - some hosts restrict System.File.IO namespace Please avoid trying to do this unless you are an expert user - you must rename EVERYTHING yourself Configuration errors are shown in rcon when the plugin loads If you make a mistake, you can use the add command a second time which will re-add any missing settings. ❤️ ❤️❤️ If you feel overwhelmed or frustrated, take a break and return to it later. I am always here to answer your questions and help you (even if it takes some hours for me to respond). ❤️❤️❤️
📄Tutorial
This is not your run-of-the-mill plugin. DO NOT INSTALL WITHOUT READING THIS DOCUMENTATION FIRST. This plugin is extremely advanced and requires utmost attention to detail to configure properly. Jumping around in the configuration file or profiles will lead to more problems than it's worth. Take your time to understand each option before enabling or disabling its functionality.
Raidable Bases is an independent expansion of Dangerous Treasures. You may learn how to enable the expansion mode below. It does not require Dangerous Treasures for any other purpose.
Configuration
Loot Tables
The plugin comes with some very basic items (Default_Loot.json) that only serve as a demo loot list for you to either delete or expand upon. In order to make any use of the plugin (beyond demonstration) you will have to create your own loot lists instead.
It will take a very long time to configure your loot tables, and fine-tune each to your specific needs. To start, I recommend that you use the rb.populate all command. This creates files in the Editable_Lists folder for each difficulty that contain every item in the game. Edit each file and set the amounts for the items that you want to spawn, and remove those that you do not want to spawn. It may look intimidating editing a list of 660 items, but don't underestimate how easy it is to delete items from a list compared to adding each one manually.
Items that have their amount AND amountMin set to 0 will not spawn. So you may either delete these items from the list, or come back to them later. If you set amountMin to 0 then chance will determine if the item spawns or not, and another item will not replace it unless there are extra items available (as of 1.7.3).
You can set the item skin that you want to use, but I suggest using the Skins settings in the configuration file to use random skins, or none at all.
The rb.populate command which populates the Editable_Lists folder also includes items already inside of your Difficulty_Loot folder. This allows you to easily repopulate lists in order to re-evaluate which items spawn at a later date.
Files inside of the Editable_Lists folder must be copied into an existing loot file in order to use the loot table. As the name implies, it is for editing only.
- If you want to use Editable_Lists/Easy.json for your Easy bases then copy the contents of the file into the Difficulty_Loot/Easy.json file.
- If you want to use Editable_Lists/Expert.json for the Expert Bases.json profile, then you must copy the contents of the Expert.json file into the Bases_Loot/Expert Bases.json file
probability - the chance that the item can spawn. value must be between 0.0 and 1.0 where 1.0 is 100% chance
Loot Priority
Loot is pulled from all datafiles within the oxide/data/RaidableBases/ folder with the exception of the Profiles folder which is used to configure bases.
oxide/data/RaidableBases/Base Loot - If a loot table exists in this folder with the same name as a profile then all of the bases in that profile will use this loot table. If you want items in this loot table to always spawn then you must enable Always Spawn Base Loot Table in the respective profile.
oxide/data/RaidableBases/Difficulty Loot - Items will be chosen from these files based on the difficulty of each profile.
If Use Day Of Week Loot is enabled then it will choose the loot table for that specific day. Otherwise, it will pick from Default_Loot.json. This is the default list, and is only used when all other loot tables do not have a sufficient amount of loot to spawn based on the Amount Of Items To Spawn setting.
Loot Settings
Allow Duplicate Items - This is useful when you do not have enough items in your loot tables , and you want to spawn Amount Of Items To Spawn by using the same items more than once. Amount Of Items To Spawn - This is the number of items that you want to spawn. If you do not have enough items in your loot tables then it will only spawn the amount that you have available. It will not spawn items if the container does not have enough space. Drop Tool Cupboard Loot After Raid Is Completed (false) Divide Loot Into All Containers - This allows you to divide loot evenly from all of your loot lists into all containers when enabled. You MUST increase or decrease Amount Of Items To Spawn respective to how many items you want in each container. This includes large boxes, small boxes, coffins and storage barrels. Optional settings include (in order of priority) cupboard, bbq, oven, fridge and lockers. Allow Players To Pickup Deployables (false) - As name implies, overridden by Entities Not Allowed To Be Picked Up Allow Players To Deploy A Cupboard (true) - Block players from placing a TC after destroying the TC in the base. Drop Container Loot X Seconds After It Is Looted (false) - Prevent players from cherry picking items and leaving the rest, in order to despawn the raid quicker. Drop Container Loot Applies Only To Boxes And Cupboards (true) - As name implies Empty All Containers Before Spawning Loot (true) - Useful if using CopyPaste files that contain loot already - I suggest leaving this true as it can complicate how many items spawn if there are too few inventory slots remaining. Ignore Containers That Spawn With Loot Already (false) - Useful if you want specific loot to spawn from a copypaste file. Require Cupboard Access To Loot (false) - Prevent all players from looting until they reach the TC, or destroy it. Skip Treasure Loot And Use Loot In Base Only (false)" - Useful if you want all loot to spawn from a copypaste file - not recommended - will allow players to memorize which boxes to raid and ignore the rest. Always Spawn Base Loot Table (false) - Very useful if you want items in the Base_Loot file to always spawn (such as C4, rockets, ammo, etc)
Settings
Blacklisted Commands (none) - prevents players from using these commands inside of a raid base Automatically Teleport Admins To Their Map Marker Positions (true) - right-click map to teleport (requires raidablebases.mapteleport permission) Block Wizardry Plugin At Events (false) - Block players from using wands Chat Steam64ID (0) - The steam profile icon to show in chat messages Expansion Mode (Dangerous Treasures) (false) - Allow Dangerous Treasures to take over a random box for its event Remove Admins From Raiders List (false) - Allows admins to help players without receiving any rewards Show X Z Coordinates (false) - Show X Z coordinates alongside grid location Buy Raid Command (buyraid) - Opens the buyable UI to purchase raids for each difficulty Event Command (rbe) - Specify command name Hunter Command (rb) - Specify command name Server Console Command (rbevent) - Specify command name
Raid Management
Allow Teleport (false) - Allow/prevent players from teleporting Allow Cupboard Loot To Drop (true) - Allows loot to drop when TC is destroyed by a player Allow Players To Build (true) Allow Players To Use Ladders (true) Allow Players To Deploy Barricades (true) Allow Players To Upgrade Event Buildings (false) - Prevent players from upgrading buildings with no TC to prevent this otherwise Allow Player Bags To Be Lootable At PVP Bases (true) - Bypasses Prevent Looting plugin Allow Player Bags To Be Lootable At PVE Bases (true) - Bypasses Prevent Looting plugin Allow Traps To Drop Loot (false) - Allow traps such as guntraps and turrets to drop loot on death Allow Players To Loot Traps (false) - Allows players to loot traps such as guntrap and turrets with TC access Allow Raid Bases On Roads (true) Allow Raid Bases On Rivers (true) Allow Raid Bases On Building Topology (true) - Specifically added for custom map makers Allow Vending Machines To Broadcast (false) - Prevents vending machines from showing on the map Allow Bases To Float Above Water (false) - Keyword: FLOAT Allow Bases To Spawn On The Seabed (false) Prevent Bases From Floating Above Water By Also Checking Surrounding Area (false) - Keyword: FLOAT Maximum Water Depth Level Used For Float Above Water Option (1.0) - Keyword: FLOAT, but allows you to prevent on water if the value is low enough Backpacks Can Be Opened At PVE Bases (true) Backpacks Can Be Opened At PVP Bases (true) Backpacks Drop At PVE Bases (false) - Will drop a backpack on death, even if explicity disabled in Backpack configuration (requires Backpacks 3.4.0 ) Backpacks Drop At PVP Bases (false) Block Mounted Damage To Bases And Players (false) - Prevent players from dealing damage while on mini, scrap heli, etc Block RestoreUponDeath Plugin For PVP Bases (false) Block RestoreUponDeath Plugin For PVE Bases (false) Bypass Lock Treasure To First Attacker For PVE Bases (false) - Do not set an owner for PVE bases Bypass Lock Treasure To First Attacker For PVP Bases (false) - Do not set an owner for PVP bases Despawn Spawned Mounts (true) - Allows mounts such as mini or scrap heli to remain if not abandoned when raid despawns Do Not Destroy Player Built Deployables (true) - Loot is not lost if the plugin destroys a player's box with this option - it is dropped on the ground in a grey loot container just as if they destroyed the box themselves Do Not Destroy Player Built Structures (true) Divide Rewards Among All Raiders (true) Draw Corpse Time (Seconds) (300.0) - The amount of time the players corpse location is drawn on their screen Eject Sleepers Before Spawning Base (true) Extra Distance To Spawn From Monuments (0.0) Flame Turrets Ignore NPCs (false) - Can help with performance on some servers Maximum Land Level (2.5) - The allowed height of the surrounding terrain for spawning bases (this should never be changed) Move Cookables Into Ovens (true) Move Food Into BBQ Or Fridge (true) Move Resources Into Tool Cupboard (true) Move Items Into Lockers (true) Lock Treasure To First Attacker (true) - Sets the first attacker as the owner of a raid. You must set eject enemies settings in each profile if you do not want players entering private raids Lock Treasure Max Inactive Time (Minutes) (20.0) - Resets the raid as public after this time Assign Lockout When Lock Treasure Max Inactive Time Expires (false) - useful those who partially raid bases in order to avoid the lockout timer Lock Players To Raid Base After Entering Zone (false) - Forces players to be locked to a raid once they enter it, even on accident Only Award First Attacker and Allies (false) Minutes Until Despawn After Looting (min 1) (15) - The time until the base despawns after being raided Minutes Until Despawn After Inactive (0 = disabled) (45) - The time until the base despawns after being inactive Minutes Until Despawn After Inactive Resets When Damaged (true) - Resets the time until the base despawns when it is damaged by a player Mounts Can Take Damage From Players (false) Mounts Can Take Damage From SamSites (true) Player Cupboard Detection Radius (100.0) - Extra layer of protection to prevent raid bases from spawning too closely to player bases (this should never be under 100 and never too high either, 100-200 at most) Players With PVP Delay Can Damage Anything Inside Zone (false) - Applies specifically to PVP raid bases Players With PVP Delay Can Damage Other Players With PVP Delay Anywhere (false) PVP Delay Between Zone Hopping (10.0) - The amount of time players can take damage while on a PVE server after stepping outside of a PVP zone - prevents exploiting - recommended value: 120 Prevent Fire From Spreading (true) - Helps with server performance by preventing forest fires, err, fire from spreading after initial spawn Prevent Players From Hogging Raids (true) - Prevents players from tagging multiple raids at once Require Cupboard To Be Looted Before Despawning (false) Destroying The Cupboard Completes The Raid (false) Require All Bases To Spawn Before Respawning An Existing Base (false) - Rotate through all bases specific to each difficulty before reusing an existing base Turn Lights On At Night (true) Turn Lights On Indefinitely (false) Traps And Turrets Ignore Users Using NOCLIP (false) Use Random Codes On Code Locks (true) Wait To Start Despawn Timer When Base Takes Damage From Player (false) - Prevents the inactive despawn timer from starting until it is damaged by a player. Combos well when inactive resets is disabled by giving players a limited time to finish a raid once they start it Additional Containers To Include As Boxes (none) - example: vendingmachine
Eject Mounts
Boats (false) - Set any true to prevent them from entering a raid base Cars (Basic) (false) Cars (Modular) (false) Campers (true) Chinook (false) Flying Carpet (false) Horses (false) HotAirBalloon (true) MiniCopters (false) Pianos (true) Scrap Transport Helicopters (false) All Other Mounts (false) All Controlled Mounts (false) - Mounts controlled via another plugin Max Amount Of Players Allowed To Enter Each Difficulty (0 = infinite, -1 = none) (infinite)
Easy Difficulty => Amount (0) Medium Difficulty => Amount (0) Hard Difficulty => Amount (0) Expert Difficulty => Amount (0) Nightmare Difficulty => Amount (0)
Max Amount Allowed To Automatically Spawn Per Difficulty (0 = infinite) -1 = disabled)
Easy (0) - Specifies how many of each difficulty can be spawned at any given time Medium (0) Hard (0) Expert (0) Nightmare (0)
Player Lockouts (0 = ignore) - this is for PUBLIC raids where buyable events use the Buyable Cooldowns and these are not shared - players may still do 1 public and 1 buyable event if these are both enabled
Time Between Raids In Minutes (Easy) (0.0) - Set a cooldown before the player can enter another raid base Time Between Raids In Minutes (Medium) (0.0) Time Between Raids In Minutes (Hard) (0.0) Time Between Raids In Minutes (Expert) (0.0) Time Between Raids In Minutes (Nightmare) (0.0) Block Clans From Owning More Than One Raid (false) - Prevent clans from hogging multiple raid bases Block Friends From Owning More Than One Raid (false) Block Teams From Owning More Than One Raid (false)
Easy|Medium|Hard|Expert|Nightmare Raids Can Spawn On
Monday (true) Tuesday (true) Wednesday (true) Thursday (true) Friday (true) Saturday (true) Sunday (true)
Difficulty Colors (Border)
Easy (000000) Medium (000000) Hard (000000) Expert (000000) Nightmare (000000)
Difficulty Colors (Inner)
Easy (00FF00) Medium (FFEB04) Hard (FF0000) Expert (0000FF) Nightmare (000000)
Map Markers
Marker Name (Raidable Base Event) Radius (0.25) Use Vending Map Marker (true) Show Owners Name on Map Marker (true) Use Explosion Map Marker (false) Create Markers For Buyable Events (true) Create Markers For Maintained Events (true) Create Markers For Scheduled Events (true) Create Markers For Manual Events (true)
Buyable Events
Do Not Reward Buyable Events (false) Refunds > Refund Despawned Bases (false) Refunds > Refund Percentage (100.0) Refunds > Refund Resets Cooldown Timer (false) Refunds > Block Refund If Base Is Damaged (true) Cooldowns (0 = No Cooldown) VIP Permission (raidablebases.vipcooldown (300.0) Admin Permission (raidablebases.allow (0.0) Server Admins (0.0) Normal Users (600.0) Allow Players To Buy PVP Raids (false) - If all of your profiles have PVP enabled then players will NOT be able to buy any raids! Convert PVE To PVP (false) Convert PVP To PVE (false) Distance To Spawn Bought Raids From Player (500.0) Lock Raid To Buyer And Friends (true) Ignore Player Entities At Custom Spawn Locations (false) Ignore Safe Checks (false) - if enabled will prevent the plugin from checking the area for a TC, buildings, or deployables Max Buyable Events (1) Reset Purchased Owner After X Minutes Offline (10.0) Spawn Bases X Distance Apart (100.0) - most maps cannot support this being above 200 ! Spawns Database File (Optional) (none) - Useful if you want buyable raids to spawn in specific locations using spawn files from the Spawns Database plugin
Maintained Events
Always Maintain Max Events (false) - Spawn another raid soon after one despawns Ignore Player Entities At Custom Spawn Locations (false) - spawn regardless of what player entities are built in the area Chance To Randomly Spawn PVP Bases (0 = Ignore Setting) (0.0) - Overrides all PVP Allow profile settings for a chance to make the raid PVE or PVP Convert PVE To PVP (false) Convert PVP To PVE (false) Include PVE Bases (true) Include PVP Bases (true) Ignore Safe Checks (false) - Bypass checks that ensure no buildings or other objects are blocking the spawn Minimum Required Players Online (1) - Max Maintained Events (1) - How many bases you want available at any given time Spawn Bases X Distance Apart (100.0) - most maps cannot support this being above 200 ! Spawns Database File (Optional) (none) - Useful if you want maintained raids to spawn in specific locations using spawn files from the Spawns Database plugin Time To Wait Between Spawns (15.0) - Wait a specific time frame between each paste (can be set to 0)
Manual Events
Convert PVE To PVP (false) Convert PVP To PVE (false) Max Manual Events (1) Spawn Bases X Distance Apart (100.0) Spawns Database File (Optional) (none) - Useful if you want manually spawned raids to spawn in specific locations using spawn files from the Spawns Database plugin
Scheduled Events
Enabled (false) - Spawn raids on a timer specific to random amount of time between Every Min and Every Max Seconds Ignore Player Entities At Custom Spawn Locations (false) - spawn regardless of what player entities are built in the area Chance To Randomly Spawn PVP Bases (0 = Ignore Setting) (0.0) - Overrides all PVP Allow profile settings for a chance to make the raid PVE or PVP Convert PVE To PVP (false) Convert PVP To PVE (false) Every Min Seconds (3600.0) Every Max Seconds (7200.0) Include PVE Bases (true) Include PVP Bases (true) Ignore Safe Checks (false) - Bypass checks that ensure no buildings or other objects are blocking the spawn Max Scheduled Events (1) Max To Spawn At Once (0 = Use Max Scheduled Events Amount) (0) Minimum Required Players Online (1) Spawn Bases X Distance Apart (100.0) - most maps cannot support this being above 200 ! Spawns Database File (Optional) (none) - Useful if you want scheduled raids to spawn in specific locations using spawn files from the Spawns Database plugin Time To Wait Between Spawns (15.0) - Wait a specific time frame between each paste (can be set to 0)
Economics Buy Raid Costs (0 = disabled) - if you do not configure at least one cost for Buyable Events then players will not be able to buy any raids
Easy (0.0) - How much each raid costs, use the /buyraid command to see the UI Medium (0.0) Hard (0.0) Expert (0.0) Nightmare (0.0)
ServerRewards Buy Raid Costs (0 = disabled) - if you do not configure at least one cost for Buyable Events then players will not be able to buy any raids
Easy (0) - How much each raid costs, use the /buyraid command to see the UI Medium (0) Hard (0) Expert (0) Nightmare (0)
Custom Buy Raid Costs (false = disabled) - if you do not configure at least one cost for Buyable Events then players will not be able to buy any raids
Easy (50 scrap) - How much each raid costs, use the /buyraid command to see the UI Medium (100 scrap) Hard (150 scrap) Expert (200 scrap) Nightmare (250 scrap) All are disabled by default. All can require its own specific item.
Allowed Zone Manager Zones
List: pvp, 99999999 - the list of zones where raid bases may spawn at - Zone Manager is not required to use this plugin. Use Grid Locations In Allowed Zone Manager Zones Only - forces all spawns into zones by Zone Manager. Adding flags to your zones may conflict with this plugin. Use of Spawns Database plugin is advised instead
Event Messages
Notify Plugin (-1 = disabled) Notification Interval (1 second) Announce Raid Unlocked (false) Announce Buy Base Messages (false) Announce Thief Message (true) Announce PVE/PVP Enter/Exit Messages (true) Show Destroy Warning (true) Show Opened Message (true) Show Opened Message For Paid Bases (true) Show Prefix (true) Show Messages To Player (true) - set false if you do not want players to receive CHAT messages, other messages from notifications will still show GUIAnnouncements and Advanced Alerts plugins can be used instead of CHAT messages
Advanced Alerts
Enabled (true) Anchor Min and Max Time Shown (5) Panel Alpha (0.98) Background Color Title Background Color GUIAnnouncements
Enabled (false) Banner Tint Color (Grey) Maximum Distance (300.0) Text Color (White)
Lusty Map
Enabled (false) Icon File (http://i.imgur.com/XoEMTJj.png) Icon Name (rbevent) Icon Rotation (0.0)
Ranked Ladder (based on points system)
Award Top X Players On Wipe (3) - Set 0 to disable permissions and groups from being created. Every wipe the top 3 players are awarded the raidablebases.th permission and raidhunter group. Used with plugins that give titles based on permissions/groups, such as BetterChat Enabled (true) Difficulty Points (for each difficulty) Assign To Owner Of Raid Only (false) Assign Rank After X Completions
- Players that complete the required amount of completions will receive the relevant above permission and group automatically
- Set value above 0 to enable this feature for any given difficulty as it is disabled for all difficulties by default Permissions and groups are given to players for being top 3 in each difficulty at the end of a wipe
Set Award Top X Playrs On Wipe to 0 to disable these permissions and groups from being created.
permissions: raidablebases.ladder.easy, raidablebases.ladder.medium, raidablebases.ladder.hard, raidablebases.ladder.expert, raidablebases.ladder.nightmare, raidablebases.th groups: raideasy, raidmedium, raidhard, raidexpert, raidnightmare, raidhunter
Skins (Boxes, Loot Items, Npcs all have there own settings) (skin settings revamped in 2.7.4)
Use Identical Skins Include Workshop Skins (true) Use Random Skin (true) Use Imported Workshop Skins File (true) - copy existing Imported Workshop Skins section from Skinbox to the Imported Workshop Skins json file to apply. Boxes (including above Skins options)
Preset Skins - you can add any box skin here and it will randomly apply to any relevant box this skin can be used with Loot Items (including above Skins options)
Use Identical Skins For Stackable Items Use Identical Skins For Non-Stackable Items
Deployables (including above Skins options)
List: Partial Names (door, barricade, chair, fridge, furnace, locker, reactivetarget, rug, sleepingbag, table, vendingmachine, waterpurifier, skullspikes, skulltrophy, summer_dlc, sled) Skin Everything (true) - if true then the Partial Names list will not be used Preset Door Skins - you can add any door skin here and it will randomly apply to any relevant door this skin can be used with Ignore If Skinned Already (false)
Treasure
Resources Not Moved To Cupboards (skull.human, battery.small, bone.fragments, can.beans.empty, can.tuna.empty, water.salt, water, skull.wolf) Use Day Of Week Loot (false) Do Not Duplicate Base Loot (false) Do Not Duplicate Difficulty Loot (false) Do Not Duplicate Default Loot (false) Use Stack Size Limit For Spawning Items (false)
Status UI - Shows PVE/PVP, time left, amount of loot left and the status of owner
Details UI - Shows owner and active status
Delay UI - Shows UI for PVP delay
Buyable Cooldowns UI - Shows UI for the Buyable Cooldowns option
Buyable Events UI - Shows players a UI for buying events including the primary cost
Lockouts UI - Shows UI for the Player Lockouts option
Enabled Offset Min Offset Max Panel Alpha Font Size Background Color Title Background Color etc
Weapons
Fog Machine Allows Motion Toggle (true) Fog Machine Requires A Power Source (true) SamSite Repairs Every X Minutes (0.0 = disabled) (5.0) SamSite Range (350.0 = Rust default) (75.0) Test Generator Power (100.0) Tesla Coil settings in profiles
Infinite Ammo
AutoTurret (true) FlameTurret (true) FogMachine (true) GunTrap (true) SamSite (true)
Ammo
AutoTurret (256) FlameTurret (256) FogMachine (5) GunTrap (128) SamSite (24)
Tesla Coil (profiles)
Requires A Power Source (true) Max Discharge Self Damage Seconds (0 = None) 120 = Rust default) (0.0) Max Damage Output (35.0)
Profiles
Difficulty - very first setting. If your raids show as NORMAL then you're using the free plugin. If all bases show as EASY then this setting is not configured. Entities Not Allowed To Be Picked Up (List: generator.small, generator.static autoturret_deployed - overrides Allow Players To Pickup Deployables) Additional Bases For This Difficulty (default) - A list of bases to use within this profile Paste Options (default) - Paste options specific to the profiles filename if it is also a base Profile Enabled (true)- Useful for disabling a profile instead of deleting it Add Code Lock To Unlocked Or KeyLocked Doors (true) Add Code Lock To Boxes (false) Add Code Lock To Tool Cupboards (false) Close Open Doors With No Door Controller Installed (true) Allow Duplicate Items (false) - [Explained above] Allow Players To Pickup Deployables (false) - [Explained above] Allow Players To Deploy A Cupboard (true)- [Explained above] Allow PVP (true) Allow Friendly Fire (Teams) (true) Amount Of Items To Spawn (30) - [Explained above] Minimum Amount Of Items To Spawn (0 = Use Max Value) (0) Flame Turret Health (300.0) Block Plugins Which Prevent Item Durability Loss (false) - Force items to take condition losses Block Damage Outside Of The Dome To Players Inside (false) - Prevent damage from outside of the dome to players inside of the dome Block Damage Outside Of The Dome To Bases Inside (false) - Prevent damage from outside of the dome to the base inside Block Damage Inside From Npcs To Players Outside (false) Building Blocks Are Immune To Damage (false) Boxes Are Invulnerable (false) Spawn Silently (No Notifcation, No Dome, No Map Marker) (false) Divide Loot Into All Containers (true) - [Explained above] Drop Container Loot X Seconds After It Is Looted (0.0) - [Explained above] Drop Container Loot Applies Only To Boxes And Cupboards (true) - [Explained above] Create Dome Around Event Using Spheres (0 = disabled, recommended = 5) (5) - A visible dome for players to distinguish raid bases from player bases Empty All Containers Before Spawning Loot (true) - [Explained above] Eject Corpses From Enemy Raids (Advanced Users Only) (true) - Prevents corpses from remaining inside of a raid when it becomes private and prevents the user from looting it Eject Enemies From Purchased PVE Raids (true) - Useful when Lock Raid To Buyer And Friends is enabled Eject Enemies From Purchased PVP Raids (false) Eject Enemies From Locked PVE Raids (true) - Useful when Lock Treasure To First Attacker is enabled Eject Enemies From Locked PVP Raids (false) Explosion Damage Modifier (0-999) (100.0) - Modify the damage of all explosives Force All Boxes To Have Same Skin (true) Ignore Containers That Spawn With Loot Already (false) - [Explained above] Penalize Players On Death In PVE (ZLevels) (true) Penalize Players On Death In PVP (ZLevels) (true) Loot Amount Multiplier (1.0) - useful to scale loot amounts without having to adjust them all individually Protection Radius (50.0) - This options controls every single option and feature that relies explicity on distance or radius in one regard or another. Setting an incorrect value, either too low, or too high, will break the functionality of the plugin. It's best to leave it alone. Require Cupboard Access To Loot (false) - [Explained above] Minimum Respawn Npc X Seconds After Death (0.0) - Useful in simulating a real raid where players respawn Maximum Respawn Npc X Seconds After Death (0.0) Skip Treasure Loot And Use Loot In Base Only (false) - [Explained above] Always Spawn Base Loot Table (false) - [Explained above] -
Arena Walls
Enabled (true) Extra Stacks (1) - How many times you want walls to stack on top of one another Use Stone Walls (true) - set false to use wooden walls instead Use Iced Walls (false) - not advised to use this as it can cause client lag (not a plugin issue) Use Least Amount Of Walls (true) Use UFO Walls (false) - Walls spawn horizontally instead of vertically Radius (25.0)
NPC Levels
Level 2 - Final Death (false) - Respawns all npcs when raid is completed
NPCs
Enabled (true) Spawn Inside Bases (Options: Spawn On Floors, Spawn On Rugs, Spawn On Beds) Murderer Items Dropped On Death (none) Scientist Items Dropped On Death (none) Murderer (Items) (metal.facemask, metal.plate.torso, pants, tactical.gloves, boots.frog, tshirt, machete) Scientist (Items) (hazmatsuit_scientist, rifle.ak) Murderer Kits (murderer_kit_1, murderer_kit_2) - Kits have priority over these lists of items Scientist Kits (scientist_kit_1, scientist_kit_2) Random Names (none) - Spawn with a custom random name instead of a provided random name Amount To Spawn (3) Aggression Range (70.0) - Aggression range is increased by 250 meters when engaged Despawn Inventory On Death (true) Health For Murderers (100 min, 5000 max) (150.0) Health For Scientists (100 min, 5000 max) (150.0) Minimum Amount To Spawn (1) Use Dangerous Treasures NPCs (false) - Tells Dangerous Treasures to control and outfit the NPCs instead Spawn Murderers And Scientists (true) Scientist Weapon Accuracy (0 - 100) (30.0) - These bots are meant to be savages. 30% is average for highly skilled players, while the average player has 10-20% accuracy Spawn Murderers (false) Spawn Random Amount (false) Spawn Scientists Only (false)
Rewards
Economics Money (0.0) - How much is rewarded after a raid. Overridden by Divide Rewards Among All Raiders ServerRewards Points (0) Change Building Material Tier To
Wooden (false) - Useful for upgrading or downgrading buildings automatically Stone (false) Metal (false) HQM (false) Change Door Type To
Wooden (false) - Useful for upgrading or downgrading doors automatically Metal HQM Player Building Restrictions
Wooden (false) Stone (false) Metal (false) HQM (false) Auto Turrets
Aim Cone (5.0) - shots fired will spread into a cone pattern based on this radius. Lowering this value will group the shots closer together. Minimum Damage Modifier (1.0) Maximum Damage Modifier (1.0) Start Health (1000.0) Sight Range (30.0) Set Hostile (False = Do Not Set Any Mode) (true) Requires Power Source (false) Remove Equipped Weapon (false) Weapon To Equip When Unequipped (null = Do Not Equip) (rifle.ak)
Permissions
raidablebases.allow -- Allows player to use the available ADMIN commands. This is NOT recommended as players can use the commands 'buyraid' and 'rb' already. raidablebases.canbypass permission (or to be flying) to bypass dome restrictions (this previously worked for admins, but now requires the permission instead) raidablebases.blockbypass permission to bypass Owning More Than One Raid settings for Clans/Friends/Teams raidablebases.mapteleport Teleporting to map marker now simply requires this permission and to be enabled in config raidablebases.ddraw allows support for FauxAdmin users raidablebases.config allows use of the rb.config command in-game (server console does not require this permission) raidablebases.banned bans the user from entering any raids - DO NOT GIVE THIS TO THE DEFAULT GROUP LOL raidablebases.durabilitybypass to bypass `Block Plugins Which Prevent Item Durability Loss` raidablebases.notitle permission to exclude users from ranked title rewards See other permissions using Permissions Manager Players do not require any permissions by default.
Grid
This plugin creates it's own spawn points automatically, which cover the entirety of your server's map when the plugin is loaded. This is created one-time when the plugin loads. The grid maintains itself without requiring any input.
You may view the grid by typing /rb grid in-game to view detailed drawings of all locations on the grid.
X - green - possible spawn point
X - Red - currently in use
C - Cyan - construction detected nearby
TC - yellow - TC detected nearby
W - blue - water depth is too high - refreshes on ocean level change
Each location on the grid is checked a second time before spawning a base to insure it does not spawn the base on players or their buildings.
You can disable using the grid by providing a valid spawn file for each raid type (buyable, maintained, scheduled and manual).
Commands
buyraid - buys a raid, eg: buyraid easy, buyraid easy steamid, buyraid 0, buyraid 0 steamid. I suggest typing the command and using the UI to buy bases. rb - for players to see the ladder (also for admins to see the status of each raid going on, which includes showing the allies and owners of each raid) rb ui [lockouts|status] - COMMAND REMOVED rbe despawn - despawns a players purchased base if they have raidablebases.despawn.buyraid permission For admins, or players with the admin permission raidablebases.allow: rb.config stability true/false - sets stability in every profile rbe debug - toggles debug messages shown every second to server console for maintained and scheduled warning messages rb grid - see the grid and all monument names rb resettime - reset the time for the next scheduled event rb savefix - to cancel a server save that has become stuck - requires authlevel 2 rb prod - to gather information from a raid base entity for debugging purposes - requires admin or raidablebases.allow rbe - spawns a base at the position you are looking at. You cannot spawn a base on a player (including yourself) rbe draw - draw the raids radius rbe despawn - despawn a base near you (can be used by players with raidablebases.despawn.buyraid permission to despawn a base they purchased) rbe despawnall - despawn all bases rbe [basename] [difficulty] - spawn a raid at the location you are looking at rbe expire steamid|playername - removes a lockout for a specific player rbe expireall rbe active - shows status for each event rbevent [basename] [difficulty] - spawn a raid randomly on the map - and teleport to it if using the command in-game rb.reloadconfig - allows you to reload the config without needing to reload the plugin. Some changes are not applied immediately, and no changes are retroactive to bases that are already spawned. rb.config - allows you to edit the config by adding, removing, and listing bases. Requires the permission raidablebases.config when not being used from the server console. rb.toggle - toggles Maintained Events and Scheduled Events on/off, if enabled in the config, until plugin reloads rbe setowner name - Sets the player as the owner of the raid rbe clearowner - Clears the owner of the raid Additional Bases allows you to add additional files to an existing base so that all bases in that list share the same configuration as the primary base/profile. This is great for setting up a list of bases for easy, medium, hard, expert and nightmare.
Command rb.populate will populate specific loot tables with every item in the game (items are disabled by default as their amounts are set to 0)
Arguments: rb.populate easy medium hard expert nightmare loot all Arguments: rb.populate 0 1 2 3 4 loot all easy - Populates oxide/data/RaidableBases/Editable_Lists/Easy.json medium - Populates oxide/data/RaidableBases/Editable_Lists/Medium.json hard - Populates oxide/data/RaidableBases/Editable_Lists/Hard.json expert - Populates oxide/data/RaidableBases/Editable_Lists/Expert.json nightmare - Populates oxide/data/RaidableBases/Editable_Lists/Nightmare.json loot - Populates oxide/data/RaidableBases/Editable_Lists/Default_Loot.json all - Populates ALL above loot tables Configure the items to your liking then copy the files contents into a loot table that you would like to use (for example Difficulty Loot/Easy.json) You cannot use loot tables in the config file anymore. Use the data directory (oxide/data/RaidableBases)
API
No return behavior:
void OnRaidableBaseStarted(Vector3 raidPos, int mode, bool allowPVP) void OnRaidableBaseEnded(Vector3 raidPos, int mode, bool allowPVP) void OnPlayerEnteredRaidableBase(BasePlayer player, Vector3 raidPos, bool allowPVP, int mode) void OnPlayerExitedRaidableBase(BasePlayer player, Vector3 raidPos, bool allowPVP, int mode) OnRaidableBaseDespawn, OnRaidableBaseDespawned, OnRaidableBasePrivilegeDestroyed, OnRaidableBaseCompleted find more hooks and arguments by searching for CallHook in the plugin file
Tips
Players will be considered raiders after looting, killing an npc, using explosives, eco raiding, destroying a building block/high wall/door or dealing damage from INSIDE of the dome You must change easybase1, mediumbase2, expertbase3, etc to the name of your CopyPaste files, or vis-versa. This plugin doesn't create bases for you. You can use the rb.config command (rb.config add "easy bases" easybase1 easybase2 0) in the server console to make this process easier. You can rename all profiles or additional base filenames. When copying a base with CopyPaste, make certain that you copy the base from eye level of the CENTER foundation within the base, or slightly clipped into this foundation with noclip. Whichever provides better results for you. You must verify that the base pastes down correctly (with /paste command) after you've copied it. I would not change autoheight from false to true. height is the distance the base is spawned off of the ground. elevation determines how flat the surrounding terrain must be in order for bases to spawn on it Scheduled Events is how often you want a random base to spawn on the map. This is disabled by default. This randomness comes from Every Min Seconds and Every Max Seconds Maintain Events will always spawn the Max Events amount of bases on your map. This is disabled by default. When one despawns, another will take its place shortly after. Allow Teleport will prevent players from teleporting when disabled. Compatible with NTeleportation or any plugin that uses the CanTeleport hook. Help
This plugin does NOT use Zone Manager - it creates and manages everything on its own. If you are having issues with too few locations on the grid, or each attempt to spawn a base returns a manual spawn was already requested then it is likely because of how you have setup Zone Manager. You either have far too many zones, or you have zones which are far too large. Raidable Bases will not spawn in these zones unless the ZoneID is added to Allowed Zone Manager Zones in the config file. Do not put this plugin in your store/shop. It simply is not designed to work with it. There are far too many cooldowns to make this idea plausible, and the plugin cannot function properly without them. Using /buyraid will open a UI designed specifically for this issue. This plugin requires CopyPaste plugin to work. It also requires that you have copypaste files already made. Raidable bases will be spawned using the CopyPaste plugin. This plugin does NOT come with any bases. PvE server friendly with TruePVE and other plugins that support the hooks CanEntityTakeDamage, CanEntityBeTargeted, and CanEntityTrapTrigger. Bases can have 5 difficulty settings: 0 for easy, 1 for medium, 2 for hard, 3 for expert, and 4 for nightmare. This is configurable per profile. Bases can spawn on roads and other areas that do not allow building by Rust. Building ladders in these areas is allowed by the plugin. I will add support for building twig later. My bases often spawn in the same biome If you're having issues with spawn points being repeatedly used, or with a biome being favored consistently over other biomes then this is an elevation issue with the terrain on your map. You can fix this by increasing the Elevation in the configuration. For example, if your Elevation is 1.0 then set it to 1.5 and try again. This will also increase the height the base is allowed to spawn off of the ground. With certain maps you'll just have to make do with this issue. Corpses appear outside of the dome as backpacks This is intended, and it is optional. The location is drawn on the players screen to notify them that their corpse moved. This allows players to retrieve their backpack in the event that the raid becomes locked privately to another player, and prevents them from entering. Players do not drop their active item when they die. Bases Stop Spawning On Linux Machine
[Error] Exception while calling NextTick callback (DllNotFoundException: libgdiplus.so.0)
If you see this error after bases spawn then you need to install libgdiplus on your machine. This will mimic the below issue but it is NOT a bug like the below issue is.
A quick google search shows the install command is: sudo apt-get install -y libgdiplus
This happens when images in the CopyPaste file are being rendered by converting the byte array to bitmap.
-
Loot Table & Stacksize GUI
By The_Kiiiing in Plugins
Say goodbye to configuration and data files. This plugin lets yo edit the loot of (almost) every lootable object directly over a custom UI. It also includes a graphical stack size editor thus making it ideal for anyone who is not familiar with editing config files.
Do not use in combination with any other stack size controller or loot plugin.
NEW with version 2.1.7: Direct Loot Refresh
Players with the permission loottable.test can use a button to directly refresh the loot in the crate they are currently looting.
Features:
User friendly GUI - no need to edit config files Loot configuration for every prefab in the game Stack size controller supports individual stack sizes for every prefab Support for custom items Support for third party plugins Fully backwards compatible with version 1.x.x Default config included for every prefab Configuration for Smelting Speed, Recycler Speed and Efficiency Supply Drop configuration
Supported prefabs:
Crates, Barrels NPCs Trees, Ores, Animal corpses Excavator, Quarries Christmas Presents, Eggs, Loot Bags Collectables like Hemp, Corn, etc.
Additional Configuration:
Smelting Speed Supply Drop Recycler Speed / Efficiency
Commands:
loottable - Open the Loottable UI loottable reload - Manually refresh loot
Permission:
loottable.edit - Required to use the Loottable UI
Required Dependencies (Oxide only):
Image Library: https://umod.org/plugins/image-library
Translations:
This plugin fully supports translation. Out of the box only english is included. For item names to be translated, the plugin https://umod.org/plugins/rust-translation-api is required. English translations are located in /oxide/lang/en/Loottable.json
For Developers:
Loot Api:
Developers can use the Loot Api to register loot profiles for custom NPCs or other plugin related loot.
It is highly recommended to use the provided wrapper to access the API. Documentation is also included:
https://gist.github.com/TheKiiiing/53a37e8bbb48d8a24c8e8b21b9da37ac
Loot Api Example:
// This example uses the non-static version of the Loot Api private LoottableApi loottableApi; void OnServerInitialized() { loottableApi = new LoottableApi(this); timer.In(5f, () => { loottableApi.ClearPresets(); loottableApi.CreatePresetCategory("Crates"); loottableApi.CreatePreset("c_locked", "Locked Crate", "crate_hackable"); loottableApi.CreatePreset("c_elite", "Elite Crate", "crate_elite"); loottableApi.CreatePreset("c_military", "Military Crate", "crate_military"); loottableApi.CreatePreset("c_normal", "Normal Crate", "crate_normal"); loottableApi.CreatePresetCategory("NPCs"); loottableApi.CreatePreset(true, "npc_cargo", "Cargo Ship NPC", "npc_militunnel"); loottableApi.CreatePreset(true, "npc_control", "Control Center NPC", "npc_militunnel"); }); } void SpawnNpc() { // Spawn NPC here ScientistNPC npc; // Assign a loot preset to the NPC loottableApi.AssignPreset(scientist, "npc_control"); } void SpawnCrate() { // Spawn crate here LootContainer crate; // Assign a preset to the crate if (loottableApi.AssignPreset(container, "c_locked")) { // The container has been filled with loot return; } else { // The container is not handled by Loottable // Default loot logic goes here } } The resulting configuration page would look like this:
Custom Items API:
Developers can use the Custom Items Api to add a custom item to the Loottable item list. If an item is marked as persistent it will remain in the custom item list until it is removed by ClearCustomItems. All non-persistent items will be removed after the plugin that registered them has been unloaded.
(void) AddCustomItem(Plugin plugin, int itemId, ulong skinId) (void) AddCustomItem(Plugin plugin, int itemId, ulong skinId, bool persistent) //(v1.0.27 or higher) (void) AddCustomItem(Plugin plugin, int itemId, ulong skinId, string customName) (void) AddCustomItem(Plugin plugin, int itemId, ulong skinId, string customName, bool persistent) //(v1.0.27 or higher) (void) ClearCustomItems(Plugin plugin) //(v1.0.27 or higher)
Hooks:
(object) OnContainerPopulate(LootContainer container) This hook is called every time a loot container is about to be populated with loot. Returning a non-null value prevents the plugin from spawning loot into that crate.
(object) OnCorpsePopulate(LootableCorpse corpse) This hook is called every time an npc corpse is about to be populated with loot. Returning a non-null value prevents the plugin from spawning loot into that corpse.
(object) OnCustomAirdrop(SupplySignal signal) This hook is called every time a custom supply drop is about to be delivered. Returning a non-null value will cancel the custom supply drop.
Outdated documentation for Version 1:
New with version 1.0.27:
Custom Items can now be created and edited directly in the GUI. They can be created from any existing item and modified in the Item Select menu
You can now create and load backups of your configuration. Commands (F1 or Server Console):
loottable.backup load <name> - Load backup with the given name from the backups folder (will wipe your current configuration) loottable.backup create <name> - Create backup of everything with the given name Backups will be created in the data/Loottable/backups folder. To load a backup, the backup file needs to be present in that folder. When creating backups in the in-game console, the permission loottable.debug is required.
IMPORTANT: DO NOT LOAD BACKUPS FORM SOURCES YOU DO NOT TRUST, they might cause harm to your server
New with version 1.0.16:
Custom Items:
Now you can add custom items used by other plugins directly to your loot table. Other plugins can can register these items using the api (documentation below).
Screenshots:
Overview of crates and their current loot table
Stacksize Editor
Commands:
loottable - Open the editor loottable refresh - Manually refresh crate loot loottable flags - List available flags (explained below) loottable flags <name> <1|0> - Enable / disable a certain flag loottable reload_vanilla_profiles - Manually re-download vanilla loot profiles (only for debuging)
Permission:
loottable.edit - Required to use the editor
Flags:
There are flags to disable some limits in the editor. Only enable these flags if you really need to as they might cause unexpected behavior of the editor. There are currently 3 flags available:
Debug If enabled, the Debug flag provides more detailed information about errors and other actions in the editor. Don't enable this flag unless you want your console full of spam.
UnlockGatherMultiplier allows you to use gahter multipliers less than one and higher than 1000. Note that multipliers less than one might lead to unexpected results in some cases.
DisableItemLimit Probably the safest flag to use is DisableItemLimit as it simply lets you set stack sizes and every other item amount in the editor as high as 2,147,483,647 which is the biggest possible value of a 32-bit integer.
UnlockFurnaceMultiplier lets you use any value as the furnace speed multiplier. Don't enable this flag unless you know what you are doing, since the default value range from 0.1 to 100 should cover most use cases and larger values might impact server performance.
UnlockItemMultiplier unlocks the multiplier when multiplying a loot table.
DisableStackingHooks will disable all stacking related hooks. Enable if you encounter problems when stacking items.
RefreshLootOnExit controls if all crates get refreshed after closing the editor or when reloading the plugin. Enable this only for testing, there might be an increase in entities.
Refer to the Commands section for more information about enableing flags.
Vanilla Configurations:
Since version 1.0.7 there are vanilla loot profiles available for most crates and NPCs. These profiles can be loaded using the "Load default loot table" button at the top center of the editor.
DISCLAIMER:
The vanilla loot profiles in the editor might not exactly match the vanilla loot distribution of the game as it uses a completely different loot distribution system than Rust. These profiles rather serve as a reference point for custom loot profiles.
Important for Carbon users:
In order for this plugin to work with carbon, Harmony references need to be enabled. This can be done with the following command:
c.harmonyreference 1
Required Dependencies (Oxide only):
Image Library: https://umod.org/plugins/image-library
Custom Items API:
Add a custom item to the item list. If an item is marked as persistent it will remain in the custom item list until it is removed by ClearCustomItems. All non-persistent items will be removed after the plugin that registered them has been unloaded.
(void) AddCustomItem(Plugin plugin, int itemId, ulong skinId) (void) AddCustomItem(Plugin plugin, int itemId, ulong skinId, bool persistent) //(v1.0.27 or higher) (void) AddCustomItem(Plugin plugin, int itemId, ulong skinId, string customName) (void) AddCustomItem(Plugin plugin, int itemId, ulong skinId, string customName, bool persistent) //(v1.0.27 or higher) (void) ClearCustomItems(Plugin plugin) //(v1.0.27 or higher) Example:
Its recommended to delay the call a little bit to make sure Loottable is loaded
private void Init() { timer.In(1f, () => { Loottable?.Call("AddCustomItem", this, -946369541, 2664651800, "High Quality Fuel"); }); }
Hooks:
(object) OnContainerPopulate(LootContainer container) This hook is called every time a loot container is about to be populated with loot. Returning a non-null value prevents the plugin from spawning loot into that crate.
(object) OnCorpsePopulate(LootableCorpse corpse) This hook is called every time an npc corpse is about to be populated with loot. Returning a non-null value prevents the plugin from spawning loot into that corpse.
(object) OnCustomAirdrop(SupplySignal signal) This hook is called every time a custom supply drop is about to be delivered. Returning a non-null value will cancel the custom supply drop.
- #loot
- #customloot
- (and 13 more)
-
Helpful Supply
Adds to your server supply signals, which can be divided into categories of loot, such as: medicine, weapons, clothing, explosives, and others.
Features
Performance (algorithms are optimized, data are cached) Item customization (icons, display name, etc.) Loot customization (amount of items in the container, the chance of items, custom items) Drop customization (supply signal can spawn in barrels, containers, etc.) Fall customization (supply signal can fall at a different rate)
Commands
hsupply.give [name/steamid] [supply name] [amount] (give a player a supply signal)
Video
Config
{ "Supplies": [ { "Name": "heal", "Item Settings": { "Display Name": "Medicine Supply Signal", "ShortName": "supply.signal", "Skin": 2912968568 }, "Loot Settings": { "Speed": { "Enabled?": false, "Incoming Space Delivery Supply Drop velocity": 120.0, "Parachute deploy distance from ground": 120.0 }, "Amount": { "Minimal amount": 2, "Maximum amount": 12 }, "Items": [ { "Amount": { "Minimal amount": 2, "Maximum amount": 4 }, "Chance": 70.0, "Display Name": "", "ShortName": "antiradpills", "Skin": 0 }, { "Amount": { "Minimal amount": 5, "Maximum amount": 10 }, "Chance": 50.0, "Display Name": "", "ShortName": "bandage", "Skin": 0 }, { "Amount": { "Minimal amount": 1, "Maximum amount": 2 }, "Chance": 60.0, "Display Name": "", "ShortName": "largemedkit", "Skin": 0 }, { "Amount": { "Minimal amount": 1, "Maximum amount": 2 }, "Chance": 60.0, "Display Name": "", "ShortName": "syringe.medical", "Skin": 0 }, { "Amount": { "Minimal amount": 10, "Maximum amount": 15 }, "Chance": 20.0, "Display Name": "", "ShortName": "bandage", "Skin": 0 }, { "Amount": { "Minimal amount": 10, "Maximum amount": 12 }, "Chance": 5.0, "Display Name": "", "ShortName": "largemedkit", "Skin": 0 }, { "Amount": { "Minimal amount": 15, "Maximum amount": 25 }, "Chance": 10.0, "Display Name": "", "ShortName": "syringe.medical", "Skin": 0 } ] }, "Drop Settings": { "Enabled": false, "Containers": [ { "Prefab": "assets/bundled/prefabs/radtown/crate_normal.prefab", "Chance": 5.0, "Amount": { "Minimal amount": 1, "Maximum amount": 1 } }, { "Prefab": "assets/bundled/prefabs/radtown/loot_barrel_2.prefab", "Chance": 5.0, "Amount": { "Minimal amount": 1, "Maximum amount": 1 } }, { "Prefab": "assets/bundled/prefabs/radtown/loot_barrel_1.prefab", "Chance": 5.0, "Amount": { "Minimal amount": 1, "Maximum amount": 1 } } ] } }, { "Name": "guns", "Item Settings": { "Display Name": "Guns Supply Signal", "ShortName": "supply.signal", "Skin": 2912968440 }, "Loot Settings": { "Speed": { "Enabled?": false, "Incoming Space Delivery Supply Drop velocity": 120.0, "Parachute deploy distance from ground": 120.0 }, "Amount": { "Minimal amount": 2, "Maximum amount": 12 }, "Items": [ { "Amount": { "Minimal amount": 1, "Maximum amount": 1 }, "Chance": 15.0, "Display Name": "", "ShortName": "rifle.ak", "Skin": 0 }, { "Amount": { "Minimal amount": 1, "Maximum amount": 1 }, "Chance": 15.0, "Display Name": "", "ShortName": "rifle.lr300", "Skin": 0 }, { "Amount": { "Minimal amount": 1, "Maximum amount": 1 }, "Chance": 5.0, "Display Name": "", "ShortName": "rifle.l96", "Skin": 0 }, { "Amount": { "Minimal amount": 1, "Maximum amount": 1 }, "Chance": 10.0, "Display Name": "", "ShortName": "rifle.bolt", "Skin": 0 }, { "Amount": { "Minimal amount": 1, "Maximum amount": 1 }, "Chance": 15.0, "Display Name": "", "ShortName": "rifle.m39", "Skin": 0 }, { "Amount": { "Minimal amount": 1, "Maximum amount": 1 }, "Chance": 25.0, "Display Name": "", "ShortName": "rifle.semiauto", "Skin": 0 }, { "Amount": { "Minimal amount": 1, "Maximum amount": 1 }, "Chance": 20.0, "Display Name": "", "ShortName": "pistol.m92", "Skin": 0 }, { "Amount": { "Minimal amount": 1, "Maximum amount": 1 }, "Chance": 25.0, "Display Name": "", "ShortName": "pistol.python", "Skin": 0 }, { "Amount": { "Minimal amount": 1, "Maximum amount": 1 }, "Chance": 25.0, "Display Name": "", "ShortName": "pistol.revolver", "Skin": 0 }, { "Amount": { "Minimal amount": 1, "Maximum amount": 1 }, "Chance": 20.0, "Display Name": "", "ShortName": "pistol.semiauto", "Skin": 0 } ] }, "Drop Settings": { "Enabled": false, "Containers": [ { "Prefab": "assets/bundled/prefabs/radtown/crate_normal.prefab", "Chance": 5.0, "Amount": { "Minimal amount": 1, "Maximum amount": 1 } }, { "Prefab": "assets/bundled/prefabs/radtown/loot_barrel_2.prefab", "Chance": 5.0, "Amount": { "Minimal amount": 1, "Maximum amount": 1 } }, { "Prefab": "assets/bundled/prefabs/radtown/loot_barrel_1.prefab", "Chance": 5.0, "Amount": { "Minimal amount": 1, "Maximum amount": 1 } } ] } }, { "Name": "explosive", "Item Settings": { "Display Name": "Explosive Supply Signal", "ShortName": "supply.signal", "Skin": 2912968298 }, "Loot Settings": { "Speed": { "Enabled?": false, "Incoming Space Delivery Supply Drop velocity": 120.0, "Parachute deploy distance from ground": 120.0 }, "Amount": { "Minimal amount": 2, "Maximum amount": 6 }, "Items": [ { "Amount": { "Minimal amount": 1, "Maximum amount": 2 }, "Chance": 70.0, "Display Name": "", "ShortName": "explosive.satchel", "Skin": 0 }, { "Amount": { "Minimal amount": 8, "Maximum amount": 12 }, "Chance": 55.0, "Display Name": "", "ShortName": "explosive.satchel", "Skin": 0 }, { "Amount": { "Minimal amount": 20, "Maximum amount": 20 }, "Chance": 15.0, "Display Name": "", "ShortName": "explosive.satchel", "Skin": 0 }, { "Amount": { "Minimal amount": 1, "Maximum amount": 1 }, "Chance": 50.0, "Display Name": "", "ShortName": "explosive.timed", "Skin": 0 }, { "Amount": { "Minimal amount": 4, "Maximum amount": 8 }, "Chance": 15.0, "Display Name": "", "ShortName": "explosive.timed", "Skin": 0 }, { "Amount": { "Minimal amount": 4, "Maximum amount": 8 }, "Chance": 5.0, "Display Name": "", "ShortName": "explosive.timed", "Skin": 0 }, { "Amount": { "Minimal amount": 10, "Maximum amount": 20 }, "Chance": 60.0, "Display Name": "", "ShortName": "explosives", "Skin": 0 }, { "Amount": { "Minimal amount": 20, "Maximum amount": 30 }, "Chance": 10.0, "Display Name": "", "ShortName": "explosives", "Skin": 0 }, { "Amount": { "Minimal amount": 64, "Maximum amount": 128 }, "Chance": 75.0, "Display Name": "", "ShortName": "ammo.rifle.explosive", "Skin": 0 }, { "Amount": { "Minimal amount": 128, "Maximum amount": 256 }, "Chance": 40.0, "Display Name": "", "ShortName": "ammo.rifle.explosive", "Skin": 0 }, { "Amount": { "Minimal amount": 256, "Maximum amount": 512 }, "Chance": 10.0, "Display Name": "", "ShortName": "ammo.rifle.explosive", "Skin": 0 }, { "Amount": { "Minimal amount": 1, "Maximum amount": 4 }, "Chance": 40.0, "Display Name": "", "ShortName": "ammo.rocket.basic", "Skin": 0 }, { "Amount": { "Minimal amount": 10, "Maximum amount": 20 }, "Chance": 10.0, "Display Name": "", "ShortName": "ammo.rocket.basic", "Skin": 0 }, { "Amount": { "Minimal amount": 1, "Maximum amount": 1 }, "Chance": 45.0, "Display Name": "", "ShortName": "rocket.launcher", "Skin": 0 }, { "Amount": { "Minimal amount": 4, "Maximum amount": 12 }, "Chance": 55.0, "Display Name": "", "ShortName": "ammo.grenadelauncher.he", "Skin": 0 }, { "Amount": { "Minimal amount": 4, "Maximum amount": 16 }, "Chance": 60.0, "Display Name": "", "ShortName": "grenade.beancan", "Skin": 0 }, { "Amount": { "Minimal amount": 16, "Maximum amount": 24 }, "Chance": 25.0, "Display Name": "", "ShortName": "grenade.beancan", "Skin": 0 } ] }, "Drop Settings": { "Enabled": false, "Containers": [ { "Prefab": "assets/bundled/prefabs/radtown/crate_normal.prefab", "Chance": 5.0, "Amount": { "Minimal amount": 1, "Maximum amount": 1 } }, { "Prefab": "assets/bundled/prefabs/radtown/loot_barrel_2.prefab", "Chance": 5.0, "Amount": { "Minimal amount": 1, "Maximum amount": 1 } }, { "Prefab": "assets/bundled/prefabs/radtown/loot_barrel_1.prefab", "Chance": 5.0, "Amount": { "Minimal amount": 1, "Maximum amount": 1 } } ] } }, { "Name": "clothes", "Item Settings": { "Display Name": "Clothes Supply Signal", "ShortName": "supply.signal", "Skin": 2912968179 }, "Loot Settings": { "Speed": { "Enabled?": false, "Incoming Space Delivery Supply Drop velocity": 120.0, "Parachute deploy distance from ground": 120.0 }, "Amount": { "Minimal amount": 2, "Maximum amount": 12 }, "Items": [ { "Amount": { "Minimal amount": 1, "Maximum amount": 2 }, "Chance": 70.0, "Display Name": "", "ShortName": "coffeecan.helmet", "Skin": 0 }, { "Amount": { "Minimal amount": 1, "Maximum amount": 1 }, "Chance": 60.0, "Display Name": "", "ShortName": "hazmatsuit", "Skin": 0 }, { "Amount": { "Minimal amount": 1, "Maximum amount": 1 }, "Chance": 80.0, "Display Name": "", "ShortName": "hoodie", "Skin": 0 }, { "Amount": { "Minimal amount": 1, "Maximum amount": 1 }, "Chance": 80.0, "Display Name": "", "ShortName": "pants", "Skin": 0 }, { "Amount": { "Minimal amount": 1, "Maximum amount": 1 }, "Chance": 80.0, "Display Name": "", "ShortName": "shoes.boots", "Skin": 0 }, { "Amount": { "Minimal amount": 1, "Maximum amount": 1 }, "Chance": 50.0, "Display Name": "", "ShortName": "roadsign.jacket", "Skin": 0 }, { "Amount": { "Minimal amount": 1, "Maximum amount": 1 }, "Chance": 50.0, "Display Name": "", "ShortName": "roadsign.kilt", "Skin": 0 }, { "Amount": { "Minimal amount": 1, "Maximum amount": 1 }, "Chance": 25.0, "Display Name": "", "ShortName": "metal.facemask", "Skin": 0 }, { "Amount": { "Minimal amount": 1, "Maximum amount": 1 }, "Chance": 25.0, "Display Name": "", "ShortName": "metal.plate.torso", "Skin": 0 }, { "Amount": { "Minimal amount": 1, "Maximum amount": 1 }, "Chance": 15.0, "Display Name": "", "ShortName": "heavy.plate.jacket", "Skin": 0 }, { "Amount": { "Minimal amount": 1, "Maximum amount": 1 }, "Chance": 15.0, "Display Name": "", "ShortName": "heavy.plate.pants", "Skin": 0 } ] }, "Drop Settings": { "Enabled": false, "Containers": [ { "Prefab": "assets/bundled/prefabs/radtown/crate_normal.prefab", "Chance": 5.0, "Amount": { "Minimal amount": 1, "Maximum amount": 1 } }, { "Prefab": "assets/bundled/prefabs/radtown/loot_barrel_2.prefab", "Chance": 5.0, "Amount": { "Minimal amount": 1, "Maximum amount": 1 } }, { "Prefab": "assets/bundled/prefabs/radtown/loot_barrel_1.prefab", "Chance": 5.0, "Amount": { "Minimal amount": 1, "Maximum amount": 1 } } ] } }, { "Name": "cash", "Item Settings": { "Display Name": "Cash Supply Signal", "ShortName": "supply.signal", "Skin": 2912967918 }, "Loot Settings": { "Speed": { "Enabled?": false, "Incoming Space Delivery Supply Drop velocity": 120.0, "Parachute deploy distance from ground": 120.0 }, "Amount": { "Minimal amount": 2, "Maximum amount": 4 }, "Items": [ { "Amount": { "Minimal amount": 5, "Maximum amount": 10 }, "Chance": 75.0, "Display Name": "RUSTNote", "ShortName": "sticks", "Skin": 2536195910 }, { "Amount": { "Minimal amount": 10, "Maximum amount": 20 }, "Chance": 70.0, "Display Name": "RUSTNote", "ShortName": "sticks", "Skin": 2536195910 }, { "Amount": { "Minimal amount": 20, "Maximum amount": 50 }, "Chance": 40.0, "Display Name": "RUSTNote", "ShortName": "sticks", "Skin": 2536195910 }, { "Amount": { "Minimal amount": 50, "Maximum amount": 150 }, "Chance": 20.0, "Display Name": "RUSTNote", "ShortName": "sticks", "Skin": 2536195910 }, { "Amount": { "Minimal amount": 150, "Maximum amount": 300 }, "Chance": 5.0, "Display Name": "RUSTNote", "ShortName": "sticks", "Skin": 2536195910 } ] }, "Drop Settings": { "Enabled": false, "Containers": [ { "Prefab": "assets/bundled/prefabs/radtown/crate_normal.prefab", "Chance": 5.0, "Amount": { "Minimal amount": 1, "Maximum amount": 1 } }, { "Prefab": "assets/bundled/prefabs/radtown/loot_barrel_2.prefab", "Chance": 5.0, "Amount": { "Minimal amount": 1, "Maximum amount": 1 } }, { "Prefab": "assets/bundled/prefabs/radtown/loot_barrel_1.prefab", "Chance": 5.0, "Amount": { "Minimal amount": 1, "Maximum amount": 1 } } ] } }, { "Name": "cars", "Item Settings": { "Display Name": "Cars Supply Signal", "ShortName": "supply.signal", "Skin": 2912968057 }, "Loot Settings": { "Speed": { "Enabled?": false, "Incoming Space Delivery Supply Drop velocity": 120.0, "Parachute deploy distance from ground": 120.0 }, "Amount": { "Minimal amount": 1, "Maximum amount": 2 }, "Items": [ { "Amount": { "Minimal amount": 1, "Maximum amount": 1 }, "Chance": 40.0, "Display Name": "RUSTSharing Ferrari", "ShortName": "box.wooden.large", "Skin": 2591806406 }, { "Amount": { "Minimal amount": 1, "Maximum amount": 1 }, "Chance": 40.0, "Display Name": "RUSTSharing Mazda", "ShortName": "box.wooden.large", "Skin": 2591806406 }, { "Amount": { "Minimal amount": 1, "Maximum amount": 1 }, "Chance": 40.0, "Display Name": "RUSTSharing Skoda", "ShortName": "box.wooden.large", "Skin": 2591806406 }, { "Amount": { "Minimal amount": 1, "Maximum amount": 1 }, "Chance": 40.0, "Display Name": "RUSTSharing Opel", "ShortName": "box.wooden.large", "Skin": 2591806406 } ] }, "Drop Settings": { "Enabled": false, "Containers": [ { "Prefab": "assets/bundled/prefabs/radtown/crate_normal.prefab", "Chance": 5.0, "Amount": { "Minimal amount": 1, "Maximum amount": 1 } }, { "Prefab": "assets/bundled/prefabs/radtown/loot_barrel_2.prefab", "Chance": 5.0, "Amount": { "Minimal amount": 1, "Maximum amount": 1 } }, { "Prefab": "assets/bundled/prefabs/radtown/loot_barrel_1.prefab", "Chance": 5.0, "Amount": { "Minimal amount": 1, "Maximum amount": 1 } } ] } }, { "Name": "lucky", "Item Settings": { "Display Name": "Lucky Supply Signal", "ShortName": "supply.signal", "Skin": 2912968671 }, "Loot Settings": { "Speed": { "Enabled?": false, "Incoming Space Delivery Supply Drop velocity": 120.0, "Parachute deploy distance from ground": 120.0 }, "Amount": { "Minimal amount": 2, "Maximum amount": 12 }, "Items": [ { "Amount": { "Minimal amount": 1000, "Maximum amount": 3000 }, "Chance": 60.0, "Display Name": "", "ShortName": "sulfur", "Skin": 0 }, { "Amount": { "Minimal amount": 3000, "Maximum amount": 9000 }, "Chance": 20.0, "Display Name": "", "ShortName": "sulfur", "Skin": 0 }, { "Amount": { "Minimal amount": 50, "Maximum amount": 100 }, "Chance": 60.0, "Display Name": "", "ShortName": "metal.refined", "Skin": 0 }, { "Amount": { "Minimal amount": 100, "Maximum amount": 250 }, "Chance": 15.0, "Display Name": "", "ShortName": "metal.refined", "Skin": 0 }, { "Amount": { "Minimal amount": 1000, "Maximum amount": 3000 }, "Chance": 55.0, "Display Name": "", "ShortName": "gunpowder", "Skin": 0 }, { "Amount": { "Minimal amount": 3000, "Maximum amount": 9000 }, "Chance": 15.0, "Display Name": "", "ShortName": "gunpowder", "Skin": 0 }, { "Amount": { "Minimal amount": 3000, "Maximum amount": 9000 }, "Chance": 50.0, "Display Name": "", "ShortName": "metal.fragments", "Skin": 0 }, { "Amount": { "Minimal amount": 9000, "Maximum amount": 15000 }, "Chance": 30.0, "Display Name": "", "ShortName": "metal.fragments", "Skin": 0 }, { "Amount": { "Minimal amount": 150, "Maximum amount": 300 }, "Chance": 50.0, "Display Name": "", "ShortName": "scrap", "Skin": 0 }, { "Amount": { "Minimal amount": 300, "Maximum amount": 900 }, "Chance": 25.0, "Display Name": "", "ShortName": "scrap", "Skin": 0 }, { "Amount": { "Minimal amount": 1, "Maximum amount": 1 }, "Chance": 45.0, "Display Name": "", "ShortName": "autoturret", "Skin": 0 } ] }, "Drop Settings": { "Enabled": false, "Containers": [ { "Prefab": "assets/bundled/prefabs/radtown/crate_normal.prefab", "Chance": 5.0, "Amount": { "Minimal amount": 1, "Maximum amount": 1 } }, { "Prefab": "assets/bundled/prefabs/radtown/loot_barrel_2.prefab", "Chance": 5.0, "Amount": { "Minimal amount": 1, "Maximum amount": 1 } }, { "Prefab": "assets/bundled/prefabs/radtown/loot_barrel_1.prefab", "Chance": 5.0, "Amount": { "Minimal amount": 1, "Maximum amount": 1 } } ] } } ] }
-
Industrial Recycler
Introducing Industrial Recycler: Automate Your Recycling Process in Rust!
Enhance your Rust server's efficiency with the Industrial Recycler plugin. Designed for players aiming to streamline resource management and boost productivity in material recycling, this plugin caters to diverse play styles and server requirements with its flexible settings, permissions, and new access control options.
Key Features:
Automated & Standard Recycling
Streamline item processing with industrial recyclers that can be linked to storage containers and adapters for full automation. For players seeking simplicity, standard recyclers are available without industrial features.
Buy Commands
/buyindustrialrecycler
Permission: industrialrecycler.buyindustrial
/buyrecycler
Permission: industrialrecycler.buystandard
Give Commands (Permission: industrialrecycler.give):
/giveindustrialrecycler
/givestandardrecycler
Advanced Access Control
Restrict recycler usage with robust access control options based on ownership, team membership, or friendships (via the Friends plugin), ensuring secure and balanced gameplay.
Customizable Limits
Define player-specific recycler limits, with special permissions for VIPs and admins to enjoy increased or unlimited ownership.
Intuitive User Interface
Manage recyclers effortlessly with a clean and user-friendly UI, providing quick access to input and output storage.
Permission-Based Access
Control who can receive, place, or upgrade recyclers with a comprehensive, role-based permission system.
Localization Support
Fully localized for multiple languages, including English, Portuguese, German, and Spanish, ensuring a seamless experience for players worldwide.
Configurable Base Item
The base item for recyclers can now be customized through plugin settings, allowing greater flexibility.
Multi-Tier Permissions
Recycler limits and access permissions are now tiered, enabling different limits for roles like Standard, VIP1, and VIP2 players.
Tugboat Placement (Stantard Recycler Only)
Recyclers can now be placed on Tugboats, with dedicated logic to handle this unique scenario.
Here’s how to add the recycler to your shop:
Use the Command:
giveindustrialrecycler %steamID% givestandardrecycler %steamID%
How to Pick Up the Recycler
Hit with the Hammer or Aim at the adapters with a hammer and pick up.
Permissions:
industrialrecycler.vip
VIP Access: Additional Recyclers on the config file.
industrialrecycler.admin
Admin Access: Ilimited Recyclers.
industrialrecycler.pickup
Pick up the recycler
UI Control:
An interactive panel simplifies the management of storages, enhancing the recycling experience without hassle.
The Industrial Recycler plugin transforms recycling processes, catering to expansive communities and intimate server environments. Set up optimized recycling hubs and watch as your players' bases become models of efficiency. Embrace the future of recycling with Industrial Recycler!
Configuration File:
{ "Recycler Commands": [ "industrialrecycler", "giveindustrialrecycler" ], "Standard Recycler Commands": [ "standardrecycler", "givestandardrecycler" ], "Standard Recycler Purchase Commands": [ "buyrecycler" ], "Industrial Recycler Purchase Commands": [ "buyindustrialrecycler" ], "BaseItem": "box.wooden.large", "Standard MaxRecyclers": 1, "Vip1 Standard MaxRecyclers (industrialrecycler.vip)": 2, "Vip2 Standard MaxRecyclers (industrialrecycler.vip2)": 3, "Industrial MaxRecyclers": 1, "Vip1 Industrial MaxRecyclers (industrialrecycler.vip)": 2, "Vip2 Industrial MaxRecyclers (industrialrecycler.vip2)": 3, "Standard Recycler SkinId": 3363257468, "Industrial Recycler Item SkinId": 3373542609, "AnchorMin": "0.5 0", "AnchorMax": "0.5 0", "Alternative Adapter Configuration": false, "Hide Storage Containers": false, "Only owner can access recycler": true, "Allow team members to access recycler": true, "Allow friends to access recycler": true, "Standard Recycler Purchase Cost": [ { "Shortname": "scrap", "Amount": 1000 }, { "Shortname": "sheetmetal", "Amount": 50 }, { "Shortname": "metal.refined", "Amount": 100 }, { "Shortname": "metal.fragments", "Amount": 500 } ], "Industrial Recycler Purchase Cost": [ { "Shortname": "scrap", "Amount": 2000 }, { "Shortname": "sheetmetal", "Amount": 100 }, { "Shortname": "metal.refined", "Amount": 200 }, { "Shortname": "metal.fragments", "Amount": 1000 } ], "Version": { "Major": 1, "Minor": 5, "Patch": 6 } }
Special thanks to Kobani for testing and helping improve this plugin even further. ❤️
- #recycler
- #industrial
-
(and 2 more)
Tagged with:
-
Water Bases
Water Bases rust plugin enables players with permissions to construct and expand structures on and underwater without the need for pillars, incorporating vanilla-like mechanics, special features like underwater nettings, and customizable settings for different player tiers.
Questions? Support? Join the discord: https://discord.nikhub.dev
In short
This Rust plugin enables players with the right permissions to construct structures on the water's surface and even extend them below water in a way that feels natural and in keeping with the game's original style. There's no need for tall, unstable pillars reaching down to the seabed; simply place your foundation on the water and use a building plan or hammer to expand it.
These aquatic constructions adhere to the same principles of stability, upkeep, and decay as traditional bases on your server but also introduce unique elements like underwater nettings for gathering random items (with fully customizable loot tables) and innovative building techniques.
The plugin accommodates various configuration profiles based on permissions, offering an excellent method to reward VIP players across different levels. It grants you control over who is allowed to build on the water, the size of their constructions, their proximity to the shore, and the highest tier of building blocks they can use, among other aspects.
Additionally, the plugin is designed to alert players if their construction interferes with the Cargo Ship's route. With the Submarine update on the horizon, it's time to prepare your server for aquatic adventures with Water Bases!
Watch the video below to see what water bases are all about.
"What about Cargo Ship, will it destroy structures in the way?"
By default, players will get a warning if they try to to build a water foundation in the path of the cargo ship, but their water foundation will stay. You can change this setting from "Warn" to "Prevent", and the player won't be able to build it in first place. Changing it to "None" will skip this check. Every ocean path node creates a "bubble" with a configurable radius. See Admin chat commands section below to visualise those bubbles and guide your players to areas where they will be able to build without issues.
Quick start (for players and admins)
Upload the WaterBases.cs file to your oxide/plugins folder and you should be good to go, it's all plug-and-play. No need to restart your server! Before you can build on water, you need some Water Foundations. Water foundations are re-skinned Inner Tube items (Shortname: innertube / Item ID: -697981032 ; mind the minus sign, it matters!) with a skin ID 2484982352 (https://steamcommunity.com/sharedfiles/filedetails/?id=2484982352) or 2485021365 (https://steamcommunity.com/sharedfiles/filedetails/?id=2485021365). That info is just in case you'd like to include those in your own Kits/Server Rewards shops/loot tables/custom crafting plugins. How to obtain those within the plugin?
Crafting water base foundations (with Building Planner)
By default, all players will be able to craft, deploy, expand and reinforce water foundations. More on the limits and how to change them (how far/close to the shore, min and max depth of the water, how many water foundations allowed per building etc) in the section Advanced Config. When a player equips a Building Plan, a small GUI will show in the bottom right (positions/colours etc can be changed in the config too). There, players will be able to craft deployable water foundations - both square and triangle. Those crafted items will also be consumed when players expand their already deployed foundations or reinforce them. The default permission profile requires a player to be close to a Level 2 Workbench - this requirement can be edited in the config to change the level needed, or you can turn off the need for a workbench altogether, per permission profile. If you don't want your players to be able to craft foundations - so they have to find them/buy them/earn them instead - you can disable it per-profile. In that case, they won't see the GUI.
Giving with chat commands (admins only)
Type /give_square [amount] or /give_triangle [amount] to give yourself some foundations of that type. If you don't specify an amount, you will only receive 1.
Deploying a "starter" foundation on water
Go out to the lake/ocean, select the water foundation as your active item and using the doughnut-shaped guide, deploy it on the water surface. After trying to deploy/expand upon an existing water foundation, a couple of checks will be performed according to global config and individual permission profile for that player:
Does the player have permission to deploy the first foundation/expand existing one? Is the player building blocked? How far is the player trying to build from shore (based on the map topology)? Too close/too far? How deep is the water where the player is trying to build? Is it too deep/too shallow? Is the player trying to build too close to the path of cargo/Oil Rig? Is the player allowed to have this many water foundations in the building? If all the checks have been successful, a new twig floor, with a stability 100% (like normal foundations) will be built. It will have some indestructible floatation barrels attached to it, partially covering the water foundation's soft side (the bottom). Then, a water foundation can be expanded, upgraded, protected with a Tool Cupboard (like any other buildings, really), or reinforced.
Expanding
Once you've deployed your first "starter" water foundation, all the subsequent foundations will be placed using vanilla building mechanics - just take a building plan and build some floors neighbouring your water foundation on the sides! If you have enough water foundation items of the required kind in your inventory, those newly placed floors will also turn into water foundations. And they can call be demolished/upgraded, just like normal twig structures, as soon as you place a Tool Cupboard. Expanding a single-sided water foundation requires 1 proper water foundation item, expanding a double sided water foundation (reinforced one) requires two.
Reinforcing
Reinforcing a water foundation means making it double sided - so it fully covers the soft side AND gives you the ability to build from the surface down, to the seabed/lakebed! To reinforce, make sure a built water foundation is fully repaired, and them hit it with a hammer. If you have a required water foundation item in your inventory, it will be consumed and the foundation will be reinforced: you will see another floor with floatation barrels attached upside down. If you try to expand a reinforced foundation (by attaching a floor at the bottom, reinforced side) and there's no water foundation above it (normal orientation), it will try to create one, provided you have enough items in your inventory. Reinforcements (upside down water foundations) are always associated with the water foundation they're attached to and cannot exist on their own - if you destroy the water foundation, its reinforcement will be destroyed too. However, destroying the reinforcement will not destroy is water foundation.
Upgrading Water base structures
Building blocks inside your water bases have certain tier limits associated with them - it's to help balance things out. By default, non-VIP and non-admin players will be able to upgrade water foundations to sheet metal tier, floor frames and wall frames to stone tier, and everything else (including walls, floors and reinforcement foundations) to wood tier. You can easily decide which permission profile has which max tier (per type of building block) in the config.
Water Base exclusive features
Because water foundations are treated as floors with the stability of a foundation, you can place roofs at "ground level", which is not possible with normal foundations! Similarly, you can leave a "hole" where a water foundation would be and place a floor frame with a hatch instead - now you can enter your base from the bottom, underwater! Reinforcing a water foundation means you'll be able to build down from the surface to the bottom of the water to create extra layers of protection, or... Nettings deployed in wall frames underwater will collect random junk items with editable loot tables, including fish and diving equipment! This feature is heavily configurable and can even be disabled. But also Sharks! Read just below.
NEW IN 1.0.5: Beware the Netting Sharks!
If enabled, Sharks will randomly spawn around Nettings underwater. Especially ones that have accumulated a lot of items, but only if there's at least 1 player within the distance of 100 meters from the Netting. As soon as the first item is caught in an empty Netting, a random silent timer will be set. Every additional item spawning reduces the timer left by a certain percentage (default by 8%). When it hits 0, AND local/global Netting Shark population limits haven't yet been reached (all in the config), a Shark will spawn somewhere near that Netting. The sharks have a configurable aggro distance and multipliers for speed and health. They will linger around the position of the netting that attracted them and try to pursue anyone in sight. Harvesting a Netting Shark corpse with a proper tool will yield some free items from its entrails - by default 5 times more than you'd normally get from a netting full of items from the default loot tables. Of course the default Shark loot tables in the config are, just like the Netting loot tables, completely configurable - check the config section below.
All in all, it's like any other base... just on water, without annoying seafloor supports.
The stability of the water foundation is always 100% and goes down the higher you built. The stability of a reinforcement foundation also starts at 100% and goes down the deeper towards the seafloor you build. All the decaying things (walls, floors, doors etc) will require appropriate upkeep materials in the Tool Cupboard. Structures can be repaired, demolished, upgraded and removed using plugins. Bases can be raided, taken over or left to decay.
Water Bases Permissions (Oxide.Grant user YourName [permission name starting with waterbases.])
By default, the plugin generates 3 permission profiles in the config - one for admins, one for normal players with no specific permissions (default) and one for VIP. More on permission profiles and config values they can handle can be found in the section Advanced Config. Unless you have added more permission profiles, only these two below are going to be used by your config:
waterbases.admin
Holders of the admin permission will also be able to run the /wb_cfg, /give_square and /give_triangle commands. Also, by default, they will be associated with the permission profile that has no limits on placing water foundations.
waterbases.vip1
Holders of this permission will follow settings and limits associated with with that permission profile. The permissions below are also registered, but not used by default. To use them, just create some permission profiles with those permissions as the key.
waterbases.vip2 waterbases.vip3 waterbases.vip4 waterbases.vip5
Admin chat commands (must have ownerid/moderatorid/waterbases.admin permission)
/give_square [optional arg: amount of items to receive] Will give the player a given amount of square-shaped water foundations. If no amount is provided, only 1 will be received. /give_triangle [optional arg: amount of items to receive] Will give the player a given amount of triangle-shaped water foundations. If no amount is provided, only 1 will be received. /draw_cargo This will draw a "bubble" (only for you, not every player) around every path node, and the bubble's radius will be taken from your config. If a player tries building inside one of these bubbles, they might get a warning or get prevent from doing so (because cargo ship destroys all structures in its way). Useful to visualise where your players can and cannot build, based on the cargo ship path. /shore_distance This will show you the current distance from the shore, to help you decide how close to/far from the shore to allow players to build. The unit used by Rust to measure shore distance is not in meters, it's something roughly equivalent to 1/10th of a map grid length. Mind you though, it's based off of the map's topology, so it should be fine on procgens, but if you have a custom map without topology layers reflecting the actual shoreline, you might want to disable relying on shore distance in your config. Admin console / chat command
This command will work both from the chat (in that case, prefix it with a forward slash / ) and the console, (F1 or server/RCON console). Running this command as a player will require the waterbases.admin permission for players that are not moderatorid/ownerid enabled.
wb.give [square/triangle] [partial player name or full steam ID] If a player executes it in the chat or console in-game and they don't specify a recipient, it will be given to the player executing this command. Executing from the server console requires specifying the player.
Configuration (oxide/config/WaterBases.json and /wb_cfg chat command)
Vast majority of the settings can be configured with the /wb_cfg chat command. Typing it in the chat with no parameters should dump a rundown of config fields and their values. In order to run any of the config commands, you will need to have ownerid or moderatorid (or the waterbases.admin permission).
/wb_cfg RelyOnShoreDistance [logical values (true or false)] /wb_cfg GlobalOceanLevelCheckBeforePlacing [logical values (true or false)] /wb_cfg GlobalOceanLevelBaseline [fractions (like 1.2345) between -1000.00 and 1000.00] /wb_cfg CargoShipPathHandling ["Warn", "Prevent" or "None"] /wb_cfg MinDistanceFromCargoShipNode [fractions (like 1.2345) between 0.00 and 10000.00] /wb_cfg UnderwaterNetsCollectJunk [logical values (true or false)] /wb_cfg UnderwaterNetsRandomTimerMin [fractions (like 1.2345) between 0.00 and 10000.00] /wb_cfg UnderwaterNetsRandomTimerMax [fractions (like 1.2345) between 0.00 and 10000.00] /wb_cfg UnderwaterNetsItemLimit [integers (like 12345) between 0 and 100] /wb_cfg UnderwaterNetsSpawnSharks [logical values (true or false)] /wb_cfg UnderwaterNetsSharkRandomTimerMin [fractions (like 1.2345) between 1.00 and 100000.0] /wb_cfg UnderwaterNetsSharkRandomTimerMax [fractions (like 1.2345) between 1.00 and 100000.0] /wb_cfg UnderwaterNetsSharkTimerShortenByPercent [fractions (like 1.2345) between 1.00 and 100000.0] /wb_cfg UnderwaterNetsSharkSpawningMinDistance [fractions (like 1.2345) between 2.00 and 100000.0] /wb_cfg UnderwaterNetsSharkSpawningMaxDistance [fractions (like 1.2345) between 2.00 and 100000.0] /wb_cfg UnderwaterNetsSharkPopulationLimitLocal [integers (like 12345) between 0 and 1000] /wb_cfg UnderwaterNetsSharkPopulationLimitGlobal [integers (like 12345) between 0 and 1000] /wb_cfg UnderwaterNetsSharkSleepDespawnTimer [fractions (like 1.2345) between 2.00 and 100000.0] /wb_cfg UnderwaterNetsSharkHealthMultiplier [fractions (like 1.2345) between 0.001 and 100.0] /wb_cfg UnderwaterNetsSharkSpeedMultiplier [fractions (like 1.2345) between 0.001 and 100.0] /wb_cfg UnderwaterNetsSharkAggroRange [fractions (like 1.2345) between 0.001 and 100.0] /wb_cfg SharkHarvestingLootEnabled [logical values (true or false)] /wb_cfg GuiNEW1AnchorMinX [fractions (like 1.2345) between 0.00 and 1.00] /wb_cfg GuiNEW2AnchorMinY [fractions (like 1.2345) between 0.00 and 1.00] /wb_cfg GuiNEW3AnchorMaxX [fractions (like 1.2345) between 0.00 and 1.00] /wb_cfg GuiNEW4AnchorMaxY [fractions (like 1.2345) between 0.00 and 1.00] /wb_cfg GuiNEW5OffsetMinX [fractions (like 1.2345) between 0.00 and 1.00] /wb_cfg GuiNEW6OffsetMinY [fractions (like 1.2345) between 0.00 and 1.00] /wb_cfg GuiNEW7OffsetMaxX [fractions (like 1.2345) between 0.00 and 1.00] /wb_cfg GuiNEW8OffsetMaxY [fractions (like 1.2345) between 0.00 and 1.00] /wb_cfg GuiTextSize [integers (like 12345) between 0 and 100] /wb_cfg GuiButtonColor [hexadecimal numbers WITHOUT preceding # (like 3db4b3)] /wb_cfg GuiTextColor [hexadecimal numbers WITHOUT preceding # (like 3db4b3)] /wb_cfg GuiButtonAlpha [fractions (like 1.2345) between 0.00 and 1.00] /wb_cfg GuiTextAlpha [fractions (like 1.2345) between 0.00 and 1.00] /wb_cfg EnableBarrelEntities [logical values (true or false)]
Advanced config (only editable through oxide/config/WaterBases.json) Water foundation crafting cost
Here you can adjust how much it costs to craft water foundations. Make it more expensive, less expensive, or add/remove required materials. The cost will stay the same for all permission profiles. A full list of short names for items can be found at https://www.corrosionhour.com/rust-item-list/
"CraftingCostSquare": [ { "Shortname": "wood", "Amount": 100 }, { "Shortname": "metal.fragments", "Amount": 200 } ], "CraftingCostTriangle": [ { "Shortname": "wood", "Amount": 50 }, { "Shortname": "metal.fragments", "Amount": 100 } ], Shortname should belong to one of the available items in-game. The amount should be a whole number larger than 0 and smaller than the limit of a signed 32-bit integer (2 147 483 647).
Permission profiles
Using profiles you can quickly create/edit different permissions for different players, for example, if you have more than 1 VIP tier on your server - just add some new profiles. Different players can have different limits and permissions associated with building water bases. To check which permission profile the player should fall under, the plugin goes through all permission profiles and checks whether the player has that permission granted. The permissions are checked in order, meaning that if the player doesn't have the first permission, it will try the next permission on the list, etc (similar to how Auto Kits checks which kit to give to a player based on their permissions in order). If the player doesn't have any permissions from the list granted, they will fall back to the "default" profile. That's the only one that you shouldn't remove! If you remove it, a new one with default values will be created. So if you don't want your default, non-VIP players to build water bases, don't remove the default profile, just take away privileges in that profile (like deploying/expanding/reinforcing). You don't have to use the built-in VIP permissions - any permission from any plugin will do just fine! By default, three permission profiles are generated in the config: default, waterbases.admin and waterbases.vip1. The default permission profile will apply to any player who doesn't have any permissions listed in the profile list - let's have a look at it:
"PermissionProfiles": { "default": { "PermissionRequired": "default", "MaxBuildingGradeGeneric": "Wood", "MaxBuildingGradeFrames": "Stone", "MaxBuildingGradeWaterFoundations": "Metal", "WaterDepthMin": 2.0, "WaterDepthMax": 100.0, "MaxWaterFoundationsPerBuilding": 25, "MinDistanceFromOilrig": 200.0, "MinDistanceFromShore": 2.0, "MaxDistanceFromShore": 20.0, "CanDeployWaterFoundations": true, "CanReinforceWaterFoundations": true, "CanExpandWaterFoundations": true, "CanExpandReinforcedFoundations": true, "CanCraftWaterFoundations": true, "RequireMaterialsForCrafting": true, "WorkbenchLevelRequired": 2.0, "CanDeployUnderwaterNets": true, }
PermissionRequired should contain an already existing permission registered by any plugin in the form of pluginname.permissionname MaxBuildingGradeGeneric, MaxBuildingGradeFrames andMaxBuildingGradeWaterFoundations define the highest allowed grade for a particular part of a water base. Generic means anything that's not a water foundation or a door/floor frame (that includes normal floors, walls, half walls, and inverse foundations). For those 3 settings, the accepted options are "Twigs", "Wood", "Stone", "Metal" or "TopTier". Set all of them to "TopTier" if you don't want any tier limits on water bases. WaterDepthMin and WaterDepthMax define the allowed range for water depth when placing water foundations - to make sure that certain players are not building in water that is too shallow/too deep. The unit meters. MaxWaterFoundationsPerBuilding is what it sounds like it will prevent a player under this permission profile from adding more water foundations to a water base, limiting their size. Set to a large value like 100000 for virtually no limits. MinDistanceFromOilrig will define the minimum distance from the closest oilrig (in meters) that has to be respected before placing a water foundation down. Decrease to let players build closer, increase to make them build farther away. MinDistanceFromShore and MaxDistanceFromShore both rely on your map topology. If you're sure that you're quite close to the shore, but the /shore_distance command shows you ridiculous values, it means your map does not have the topology map painted properly (contact the map dev and let them know!). In that case, you should set the RelyOnShoreDistance option in the config to false and instead rely on water depth (if shore distance is enabled, it will rely on both). The unit here is not a meter, but roughly 1/10th of a map grid (around 15 meters). CanDeployWaterFoundations if set to true, will allow players using this profile to deploy newly started foundations (using the doughnut guide, provided they have a properly shaped water foundation item to be consumed). CanReinforceWaterFoundations if set to true, will allow players using this profile to reinforce water foundations by hitting them with a hammer (provided they have a properly shaped water foundation item to be consumed). CanExpandWaterFoundations if set to true, will allow players using this profile to build more water foundations upon already existing ones by placing neighboring floors with their building plan (provided they have a properly shaped water foundation item to be consumed). CanExpandReinforcedFoundations if set to true, will allow players using this profile to attach a floor to the side of a reinforcement foundation - and as long as they have 2 water foundation items in their inventory, they will expand that reinforced foundation along with its water foundation. CanCraftWaterFoundations if set to true, will allow players using this profile to craft water foundations using a GUI in the bottom-right (showing while a Building Plan is equipped). Profiles with this setting set to false won't display those GUIs and players will have to find other ways of obtaining water foundations (loot, kits, server rewards etc). RequireMaterialsForCrafting if set to true, players using this profile will need to have required crafting materials in their inventory when trying to craft a Water Foundation. If set to false, the player will be able to craft an infinite amount of water foundations for free, so use them with caution. WorkbenchLevelRequired Set to 0.0 (no workbench nearby required), 1.0 (Level 1 required), 2.0 (Level 2 required) or 3.0 (Level 3 required) for crafting Water Foundations. CanDeployUnderwaterNets if set to true, players will be able to deploy nettings in underwater wall frames. Those settings will slowly accumulate underwater junk items if the feature is enabled on your server - look below for the loot table configuration.
Underwater junk & Netting Shark loot tables
If you have not disabled underwater nets collecting junk, this is where you can adjust the kind and rarity of certain items. You can even remove entries and add your own, including a custom skin and item name! A "loot table" is perhaps not the right term, as the list contains individual chances of a "caught" item being of a particular kind. There can be only 1 item caught at a time, and the table defines random weights for every possible entry. The larger the weight (compared to the sum of all weights), the bigger chance of encountering a particular item. So if you have 10 entries and each of them have a weight of 1, each item will have an equal 10% chance of being one of the random entries in the list (as the weights sum up to 10). Thus you can have some items really common, and some of them really rare. Here are 2 sample entries from the list:
{ "Shortname": "innertube", "CustomName": null, "SkinID": 2484982352, "RandomChanceWeight": 1.0, "MinRandomAmount": 1, "MaxRandomAmount": 1 }, { "Shortname": "innertube", "CustomName": null, "SkinID": 2485021365, "RandomChanceWeight": 1.0, "MinRandomAmount": 1, "MaxRandomAmount": 1 },
Shortname is the most important bit - make sure it's correct! You can find a link to a full list of those names above. CustomName lets you give items caught in the netting different names. You can leave that null to leave a default item name. In this example, the two items are water foundations - the proper name for those items will be applied automatically by the plugin anyway. Whatever you type there, make sure to encompass it in quotes, like "CustomName": "My Custom Item Name" if it's not null! SkinID is pretty self-explanatory - it's the long number in the URL of a Steam Workshop item. By default, it's 0 (no skin). RandomChanceWeight lets you decide the item's rarity when spawning - relative to the rarity of other items. Increase or decrease this number (it can be fractional) to make the item more or less rare. MinRandomAmount and MaxRandomAmount are what they sound like - they should both be larger than 0 (whole numbers) and when that particular item is caught, the stack will contain an amount between these two numbers.
Translation support (oxide/lang/en/WaterBases.json)
Almost every string the players see, including names for the water foundation items and messages displaying in the chat and the GUI, can be edited. Just load the plugin and let it generate the file - after you edit it, reload the plugin.