
Mighty3z's Wishlist
-

$19.99
Heli Signals
Heli Signals allows players with permission to call an Attack Helicopter to their location with a custom Supply Signal, where it will engage players and patrol, allowing players to fight it to win the valuable Heli crates.
The plugin comes with 8 default heli profiles, Easy, Medium, Hard and Elite, with a duplicate profile of each set up for calling multiple helis at once for each tier. In addition there is also 2 Wave Heli profiles, which will call in a wave of different helis one after the other. Each default profile has it's own custom supply signal skin (below). Server owners can add as many profiles as they like in the config by copying and pasting an existing profile within the config and editing to suit. This may require the server owner to create their own custom skin for the inventory item.
If you are setting up Multi heli signals, set the global and player limit in the config accordingly to accommodate higher numbers of helicopters per player.
There is also an option to have a BotReSpawn profile spawn at the crash site, just set the BotReSpawn profile name in the config.
IMPORTANT:
Each heli profile or wave profile in the config MUST have its own unique name and skin ID, otherwise you will have issues.
NOTE ABOUT SHOPS:
The profile name in the config should match the Custom Supply Signal name which the shop gives the player. The Helicopter Name is separate and can be set independently from the Signal item. Also, when giving players items from shop plugins, if available, I always recommend adding the item to the shop using custom name, skinID etc, rather than the console command, but either will work.
NOTE ABOUT DEEP SEA:
There are config options to allow or disallow calling a Heli Signal while in the Deep Sea. There is also a config option to retire a players active Heli Signals if they teleport to Deep Sea. If you allow players to teleport to Deep Sea with active helis and you have return to player set to true, the heli will eventually (after a good few minutes of flying) reach the players location in the Deep Sea.
Plugin default Supply Signal Skin ID's to add items to various shops, loot plugins, kits etc are:
Heli Signal (Easy) : 2920175997
Heli Signal (Medium) : 2920176079
Heli Signal (Hard) : 2920176050
Heli Signal (Elite) : 2920176024
Heli Signal (Expert) : 3099117081
Heli Signal (Nightmare) : 3099117372
Multi Heli (Easy) : 3083234542
Multi Heli (Medium) : 3083234833
Multi Heli (Hard) : 3083234755
Multi Heli (Elite) : 3083234647
Multi Heli (Expert) : 3099124338
Multi Heli (Nightmare) : 3099124426
Heli Wave Signal : 3099117224
Heli Wave Signal (Normal): 3104667036
Heli Wave Signal (Hard): 3104666951
Default Permissions:
helisignals.admin (to use give|hsclearcd command) helisignals.buy (to use /hsbuy command) helisignals.bypasscooldown helisignals.easy helisignals.medium helisignals.hard helisignals.elite helisignals.easy_multi helisignals.medium_multi helisignals.hard_multi helisignals.elite_multi helisignals.wave_normal helisignals.wave_hard Please note: Permissions above are with default config, permission for each Heli profile can be customised in the config.
Commands (Prefix with / to use in game):
hsgive <Profile ShortName> <Steam64ID> <Amount> hsbuy list hsbuy <Profile Shortname> hsreport (Get details of all active helis) hsretire (Retire all a player or their teams called Helis, no refunds) hsclearcd (clear all cooldowns) hsclearcd <SteamID|Name> (clear cooldown for player) (Buy and Retire command customisable in config)
Please note correct usage for Supply Signal name and Helicopter display name. These values CAN be different if you wish:
Default Config:
Default has Heli Signal (Easy) - Elite
The skins for Expert adn Nightmare can be found above for you to create your own profiles if you need those.
Loot Options:
Use the loot item example entries in the default config to create custom loot tables for crates.
How to Add Loot Table Items (Example):
For Other Developers:
The following hook is available to use in your plugins to check custom Supply Signals or Patrol Helicopters to avoid conflict with your plugins:
object IsHeliSignalObject(ulong skinID)
This will return true if the item is a Bradley Drop item/entity, or null if not.
Call it directly without referencing the plugin:
if (Interface.Call("IsHeliSignalObject", skinID) != null) return true; // IsHeliSignalObject Or reference my plugin and call like this:
[PluginReference] Plugin HeliSignals; if (HeliSignals.Call("IsHeliSignalObject", skinID) != null) return true; // IsHeliSignalObject To return some basic info about a Heli Signal object:
object GetHeliSignalData(Patrolhelicopter heli)
Returns object as Dictionary<string, object>.
Returned data is:
["heliProfile"] // string - Actual heli profile (from config) ["heliName"] // string - Heli display name ["skinId"] // ulong ["heliId"] // ulong (Net.ID.Value) ["owner"] // BasePlayer ["lastAttacker"] // BasePlayer ["calledPosition"] // Vector3 ["callingTeam"] // List ["cratesToSpawn"] // Number of Heli crates to spawn ["lockedCratesToSpawn"] // Number of locked crates to spawn Example usage:
var hdata = HeliSignals.Call("GetHeliSignalData", heli) as Dictionary<string, object>; string _heliProfile = hdata["heliProfile"]; string _heliName = hdata["heliName"]; string _heliSkin = hdata["skinId"]; string _owner = hdata["owner"]; etc Hooks:
object CanSpawnHeliSignalCrates (PatrolHelicopter heli, BasePlayer lastAttacker, ulong ownerId, ulong skinId, string heliProfile) { // Returning non-null prevents Heli crates spawning Puts("CanSpawnHeliSignalCrates hook fired!); return null; } object CanSpawnHeliSignalLockedCrates (PatrolHelicopter heli, BasePlayer lastAttacker, ulong ownerId, ulong skinId, string heliProfile) { // Returning non-null prevents locked crates spawning Puts("CanSpawnHeliSignalLockedCrates hook fired!); return null; } void OnHeliSignalHeliKill (PatrolHelicopter heli) { // No return behaviour Puts("OnHeliSignalHeliKill hook fired!); } void OnHeliSignalHeliRetire (PatrolHelicopter heli) { // No return behaviour Puts("OnHeliSignalHeliRetire hook fired!); }
- #helicopter
- #helicopters
- (and 17 more)
-
$19.99
SimplePVE
By Iftebinjan in Plugins
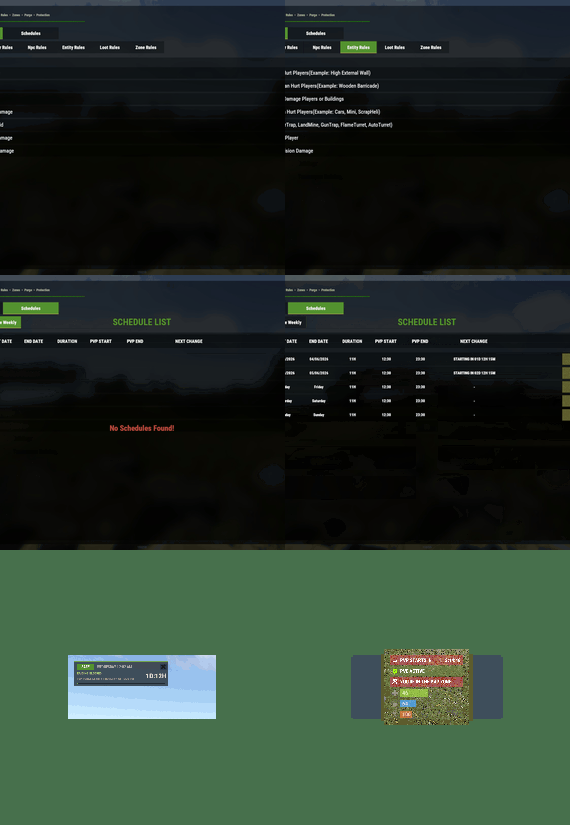
SimplePVE is exactly what the name suggests: a simple and easy-to-use PVE plugin for Rust servers. It allows server owners to control and customize PVE rules individually, either through the config or with a clean in-game CUI. You can also create, edit, and manage PVE/PVP schedules directly, making it easy to run full PVE servers, purge events, or hybrid PVE/PVP setups.
⭐ Key Features
Control PVE rules directly from in-game CUI or through the config Easy-to-understand rule system for managing damage, raiding, looting, and protection Enable or disable PVE/PVP manually with commands Create automatic PVP schedules for purge times Supports weekly schedules, such as Sunday to Friday or weekend-only PVP Supports date-specific schedules, such as January 1 to January 7, holiday events, wipe-weekend events, and custom purge periods Automatic PVE/PVP purge events based on your configured schedule Loot protection system to prevent unauthorized looting Zone Manager support for custom PVE/PVP zones Exclude specific zones from global PVE rules Supports many popular event plugins Works without using `server.pve true` In-game rule manager using `/sprules` Debug command to help check why damage is blocked or allowed Optional PVE/PVP status UI for players Customizable UI position, status text, icons, and colors Discord embed messages when PVP purge starts or ends Optional Discord warning messages before PVE/PVP schedule changes Run custom server commands when PVP purge starts or ends Admin bypass permissions for loot and damage control Supports PVP delay when leaving PVP zones Flexible config for server owners who want full control Designed for simple PVE servers, purge servers, hybrid PVE/PVP servers, and event-based servers NEW • CUSTOM STATUS NEW • PVE/PVP HUD FOR DISPLAYING PURGE EVENTS 📌 Commands
/simplepve - Use to enable or disable pve toggle (Chat & Console command) /simplepve on or off - Use to enable disable pve (Chat & Console command) /sprules - Use to Open a Cui to control PVE Rules & Creating Schedules (Chat command) /spdebug - Use this for debuging rules /sp_change - Use this to change the SimplePVE hud from ingame (Chat command) 📜 Permissions
simplepve.admin - Required to enable or disable SimplePVE simplepve.adminloot - Required to view Loots of other players simplepve.admindamage - Required for Admin damages to any entity
🎉 Game hosting perfected, that's Physgun
Join the thousands of server owners using Physgun to take their game server communities to the top.
🎬 Video Showcase
🚀 API & Hooks
void OnSPVEPurgeStarted() void OnSPVEPurgeEnded() TimeSpan GetPVPStartTimeRemaining() TimeSpan GetPVPEndTimeRemaining() ⚙️ Configurations
🗃️ Rules Data file in Oxide/data/SimplePVE
📜 FAQ
Question: Does SimplePVE require server.pve to be set to false?
Yes, it requires server.pve set to false. Question: Where can I change the rules for my PVE server?
You can use the `/sprules` command to open the in-game CUI rule manager. You must have the `simplepve.admin` permission assigned to use this command. Question: PVE/PVP schedules times are not working properly, why is that happening?
You may need to adjust the `UTC Time Difference` value in the config. Make sure the UTC offset matches your server’s intended timezone. For more details, please check the Info tab below. Question: How do I enable or disable PVE manually?
You can use `/simplepve on` to enable PVE and `/simplepve off` to disable it. You need the `simplepve.admin` permission to use these commands. Question: Can I create automatic PVP purge schedules?
Yes. SimplePVE supports scheduled PVP/PVE times, allowing you to automatically enable PVP during purge events and return to PVE when the schedule ends. Question: Can I do Weekly schedules like Sunday To Friday or specific date to another date?
Yes. SimplePVE supports both option and you can only use one of them at once. Question: Can admins damage players or entities while PVE is enabled?
Yes, but only if the admin damage settings and permissions allow it. The permission `simplepve.admindamage` is used for admin damage access. Question: Why is damage still happening during PVE mode?
This usually means one of your rules allows that damage type, or another plugin is modifying damage before or after SimplePVE. Use `/spdebug` to help debug which rule is being applied. Question: What does `/spdebug` do?
The `/spdebug` command helps you debug damage rules. It can be useful when you are trying to understand why damage is blocked or allowed. Question: How does loot protection work?
Loot protection prevents players from looting protected entities or containers, depending on your config settings. Admins can be allowed to bypass this using the `simplepve.adminloot` permission. Question: Can I exclude specific entities from loot protection?
Yes. You can add entity shortnames to the `Loot Protection Excluded Entitys` list in the config. Question: Does SimplePVE support zones?
Yes. SimplePVE supports Zone Manager, allowing you to create different PVE/PVP behavior inside specific zones. Question: Can I exclude specific zones from SimplePVE rules?
Yes. You can add zone IDs to the `Exclude Zone IDs From Rules` config option. Question: Can SimplePVE send Discord notifications?
Yes. SimplePVE can send Discord embed messages when PVP purge starts, ends, or when a scheduled event is approaching, depending on your Discord config settings. Question: Can I run server commands when PVP purge starts or ends?
Yes. You can add commands to the config options for commands that run when PVP purge starts or ends. ⚙️ Schedules Settings for your own timezone
🛠️ For Developers
💬 Support
Check Out My Other plugins as Well
-
$20.00
Raidable Base Event Islands + Barge
By monsterqueen in Prefabs
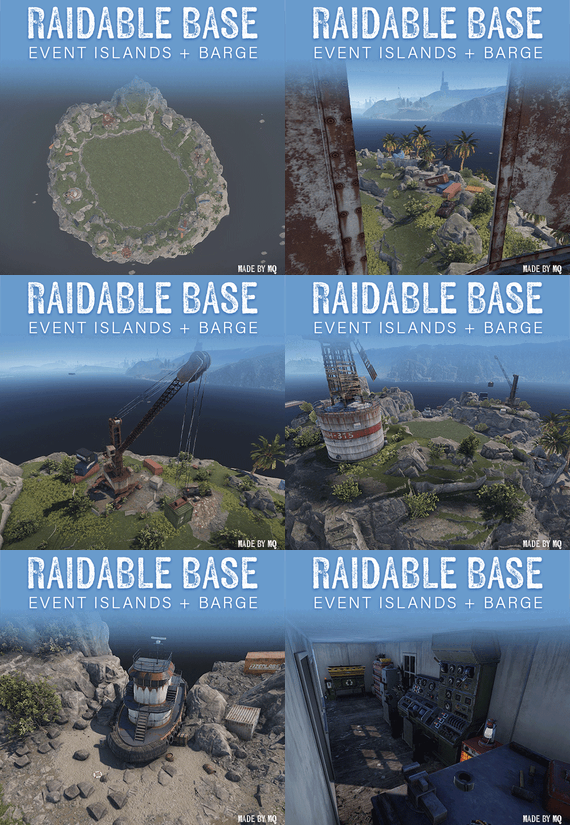
These islands were created to be event locations for your custom maps and were made with Raidable Bases in mind. These islands are approved by nivex for the use of Raidable Bases.
To use custom Spawn Points with Raidable Bases you must use the "Spawns Database” PlugIn by k1lly0u.
Included
1 Large Event Island 1 Small Event Island 1 "Landing Barge” The Landing Barge was created to be used as a teleporting point to the islands for players if you use those. Features
Recycler + Repair Bench at prefab T3 Workbench on Landing Barge Different vantage points around the islands for unique base raiding angles Installation
NOTE: Clear the ocean topology layer layer over the islands after placing.
These floating prefabs work best when placed at the specified height (Y Value):
MQ Large Event Island 1 - Y Height: 6.684 MQ Small Event Island 1 - Y Height: 2.075 MQ Landing Barge 1 - Y Height: 2.059 Helpful Links
Rustedit Training: HOW TO INSTALL RUSTEDIT
RustEdit - Working With Custom Prefabs Tutorial
Tutorial for Spawns Database
Feel free to reach out to me on Discord (MonsterQueen) for any questions or help needed.
-
$45.95$31.95Clans
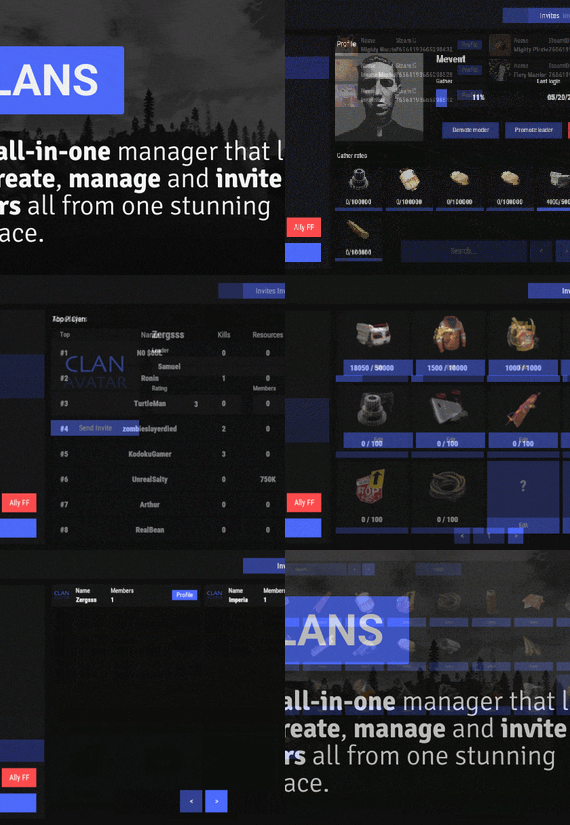
Clans is an all-in-one manager that lets you create, manage and invite players all from one stunning interface. Toggle friendly fire, view clan, and player leaderboards, create and break alliances, modify gather rates for clan members and set clan skins to identify clan members abroad easily.
Features
Beautiful user interface Performance Allied clans Gather rate for players (allows you to set how much each clan member must collect resources. For example: each member of the clan must collect 10 thousand sulfur, so that later it can be used to craft explosives and attack another clan) Clan skins (allows you to set common skins for all clan players. All the clothes on the players of the same clan will be the same, which allows you to distinguish your own from the enemies during the battle) The clan TAG min- and max-length can be defined in the config The clan overview shows offline member names Clan members can toggle friendly-fire protection for clan mates and allies Clan creation can check TAG’s against a blocked word list Clan tagging can be optionally disabled Old (not updated since x days) clans can be automatically purged Clans rating Players rating Setting a personal avatar for your clan Autowipe with wipe (optional)
Commands
clans (display clan menu) clans help (get information about commands) clan create (create a clan) clan leave (leave from your clan) clan join (open UI with invitations) clan ff (toggle friendlyfire status) clan allyff (toggle friendlyfire status for allies) clan invite <name/steamid> (invite a player) clan withdraw <name/steamid> (cancel an invite) clan kick <name/steamid> (kick a member) clan allyinvite <clanTag> (invite a clan to ally) clan allywithdraw <clanTag> (cancel the offer of an alliance) clan allyaccept <clanTag> (accept the offer of an alliance) clan allycancel <clanTag> (cancen the offer of an alliance) clan promote <name/steamid> (promote a member) clan demote <name/steamid> (demote a member) clan disband (disband your clan) clans.loadavatars (download avatars of all players) clans.manage list - lists all clans, their owners and their member-count clans.manage listex - lists all clans, their owners/members and their on-line status clans.manage show [name/userId] - lists the chosen clan (or clan by user) and the members with status clans.manage msg [clanTag] [message] - sends a clan message clans.manage create [name/userId] [clanTag] - creates a clan clans.manage rename [oldTag] [newTag] - renames a clan clans.manage disband [clanTag] - disbands a clan clans.manage invite [clanTag] [name/userId] - sends clan invitation to a player clans.manage join [clanTag] [name/userId] - joins a player into a clan clans.manage kick [clanTag] [name/userId] - kicks a member from a clan clans.manage owner [clanTag] [name/userId] - sets a new owner clans.manage promote [clanTag] [name/userId] - promotes a member clans.manage demote [clanTag] [name/userId] - demotes a member clans.reborn.convert (convert data from Clans Reborn plugin) clans.umod.convert (convert data from uMod Clans (v0.2.2+) plugin) clans.convert.olddata (convert data from old data) clans.convert.old.stats – used to update player data when upgrading from older versions of the game to 1.1.31 and above.
Permissions
clans.cancreate (permission to create a clan) clans.canjoin (permission to join a clan) clans.canleave (permission to leave a clan) clans.candisband (permission to disband a clan) clans.cankick (permission to kick a clan member) clans.admin (permission to use command 'clans.manage')
Loot Types
None – used for disabled loot Gather – used for gathering loot LootCrate – used for a loot crate Look – used to look at loot Kill – used to kill entities Craft – used for crafting items HackCrate – used for hacking a loot crate
FAQ
Q: Where can I see an example of a config?
A: Config
Q: Does the Clans plugin support other plugins?
A: Yes, this Clans plugin has an API similar to other popular clans plugins. If the plugin works with Clans - it works with this plugin too.
Q: How do I enable the display of clan ratings on the screen?
A: You need to install the Clans Top plugin
Q: Does the Clans plugin work with other Rust plugins?
A: The Clans plugin is designed to work with a wide range of other Rust plugins, but compatibility may vary depending on the specific plugins you are using.
-
$40.00$30.00Raidable Bases
Create fully automated raidable bases with NPCs in Rust.
Raidable Bases supports maintained, scheduled, buyable and manually spawned events, with separate options for each difficulty.
📄Compatibility notes
server.pve true is not supported; please use TruePVE or another compatible PVE plugin that calls the necessary hooks required by Raidable Bases. Raidable Bases does not currently use Harmony patches. I could implement such patches, but it's often better to use a supported hook when it exists instead. Raidable Bases is not compatible with Raid Windows in Softcore mode after the Tool Cupboard is destroyed or after raidwindow_fresh_tc_seconds elapses. This will be supported when the appropriate hooks exist for this behavior. 📄Raidable Bases & Boats Loot Editor by @beee 😎
This is the easiest way to create and manage Raidable Bases loot tables. It provides a visual editor for item selection, amounts, probability, skins and other loot fields, making it the best starting point for most server owners.
https://codefling.com/tools/raidable-bases-boats-loot-editor/ ⚙️Built with performance in mind
Raidable Bases manages a lot of work behind the scenes, so performance is treated as a core part of development. Pasting and cleanup are batched, recurring work is shared through central schedulers, temporary collections are pooled, and spawn searches are spread across frames to reduce noticeable spikes.
These systems help provide a smoother experience across a wide range of server sizes. Performance will continue to be reviewed and improved anywhere measurable gains can be made.
📄There are just a few steps
Get bases spawning within minutes
An experienced administrator may finish in a few minutes. A novice should allow roughly 30 minutes, while a complete beginner may need 60 to 120 minutes. Fine-tuning depends on how large you want the project to become. Once the initial setup is complete, maintaining the plugin is fairly simple, and growing your base catalog becomes an art form of its own. Server owners regularly report that players love the variety, which makes building that collection rewarding for everyone involved.
Step 1 - Add your bases
You can obtain bases by:
Downloading them from Fortify. Purchasing a Raidable Bases package. Purchasing compatible CopyPaste files from another creator. Creating your own bases. Place the CopyPaste JSON files in:
Oxide — oxide/data/copypaste/ Carbon — carbon/data/copypaste/ Step 2 - Set up profiles
Profiles serve a specific purpose: they extend the main configuration file. For clarity, they should always be referred to as profiles.
Profiles are located in:
Oxide — oxide/data/RaidableBases/Profiles/ Carbon — carbon/data/RaidableBases/Profiles/ Bases can be added manually or with the command:
rb.config add "Easy Bases" raideasy1 raideasy2 raideasy3 rb.config add "Medium Bases" raidmed1 raidmed2 raidmed3 The named profile can contain any number of CopyPaste bases that share its options. Quotes around the profile name are required, and it is best practice to use them even when the name has no spaces. Use straight double quotes only; curly quotes will not work correctly.
Step 3 - Enable automatic events
For public automated events, enable Maintained Events or Scheduled Events in the main configuration and choose how many events you would like active.
The main configuration file is located in:
Oxide — oxide/config/RaidableBases.json Carbon — carbon/configs/RaidableBases.json Edit the configuration file.
Maintained Events: keeps the configured number of raids available. Max Maintained Events: Set this to the amount of events that you want to always have spawned. Max Amount Allowed To Automatically Spawn Per Difficulty: Set this to the amount of events that you want to spawn per difficulty. Scheduled Events: spawns raids according to a timer. Max Scheduled Events: Set this to the amount of events that you want spawned on a timed basis. Max To Spawn At Once: Set this to the amount of events that can spawn at once from Max Scheduled Events. Set to 0 to use the full amount from Max Scheduled Events. Step 4 - Save your files then use the commands:
Oxide: o.reload RaidableBases Carbon: c.reload RaidableBases Shortcuts: rb.reloadconfig rb.reloadprofiles Once grid initialization completes, automatic events can begin spawning. The included Default_Loot table is enough to get started and can be replaced whenever you are ready. Ultimately, the Default_Loot table should be discarded once your other loot tables are configured.
📁File locations
Main configuration
Oxide: oxide/config/RaidableBases.json Carbon: carbon/configs/RaidableBases.json Profiles
Oxide: oxide/data/RaidableBases/Profiles/ Carbon: carbon/data/RaidableBases/Profiles/ CopyPaste bases
Oxide: oxide/data/copypaste/ Carbon: carbon/data/copypaste/ Loot and data
Oxide: oxide/data/RaidableBases/ Carbon: carbon/data/RaidableBases/ The main configuration controls server-wide behavior. Profiles contain options for specific difficulties, while loot tables and CopyPaste files provide the content used by each event.
🗺️Map terrain and spawn locations
Raidable Bases depends on the map having enough flat, unobstructed terrain for automated events. Most procedural maps provide plenty of locations, while custom or heavily modified maps may need additional flat terrain, islands, or custom spawn points.
The grid scans the map when the plugin initializes and reports the number of potential spawn locations. A low location count usually means the map offers fewer suitable areas or the current settings narrow the available terrain. Spawns Database files are useful for sky bases, underwater bases, custom maps and any setup that needs exact locations. You can disable using the grid by providing a valid spawn file for each raid type (buyable, maintained, scheduled and manual). You may view the grid by typing /rb grid in-game to view detailed drawings of all locations on the grid.
X - Green - Potential spawn point, generally in clusters X - Red - Currently in use C - Cyan - Construction detected nearby TC - Yellow - TC detected nearby W - Blue - Water depth is too high - Refreshes on ocean level change Green clusters have the highest chance of being picked as a spawn point, constantly changing depending on player activity and remaining a safe distance away.
📄Profiles and difficulties
A profile is where options can be found that pertain to specific difficulties. Any number of CopyPaste bases can share the same profile, so a large base rotation can be managed while the difficulty is adjusted in one place.
Profiles can control loot, NPCs, PVP or PVE behavior, protection radius, damage, doors, locks, water placement, height, rewards, building options and much more. Dynamic difficulties
rb.difficulty add "Sky" rb.difficulty remove "Sky" Adding a difficulty creates the matching configuration and language entries. Profiles and loot tables can then be assigned to it. Removing a difficulty removes its active configuration entries without deleting the related files.
📄Event types
Maintained — Keeps up to the configured number of public raids available. Another can spawn after one despawns. Scheduled — Spawns public raids between the configured minimum and maximum interval. Buyable — Lets players purchase a raid through the configured buy command, subject to availability, costs and cooldowns. Manual — Lets an administrator spawn a selected raid at a chosen location. Each event type can use the automatic grid or its own Spawns Database file.
🔧Loot tables
Loot can come from a base-specific table, difficulty table, weekday table and the default table. The plugin combines the available sources according to the profile and loot settings until it has enough usable entries.
Default loot
Default_Loot.json contains a small demonstration loot list. It is enough to show how the plugin works, but most servers should replace it with loot tables in the Base_Loot and/or Difficulty_Loot folders. Loot table editor
For most servers, the Loot Table Editor by @beee 😎 is the quickest way to build and manage these files. Thanks, beee!
https://codefling.com/tools/raidable-bases-boats-loot-editor/ Important loot fields
shortname — Rust item shortname. amount — Maximum amount created for the entry. amountMin — Minimum amount created for the entry. probability — Spawn chance from 0.0 to 1.0, where 1.0 is 100%. stacksize — Optional stack-size override. Use -1 to use the item's normal Rust stack size. skin — Optional skin ID. Editable item lists
The rb.populate all command creates a file for each difficulty inside the Editable_Lists folder. Each file contains every available Rust item, allowing you to remove unwanted entries and configure the amounts for items you would like to spawn. Any items with an amount set to 0 will be inactive, so you do not have to remove any entry.
A list containing hundreds of items may look intimidating at first, but deleting unwanted entries or configuring from a preset list is usually much faster than adding every item manually. The command also includes items already present in your Difficulty_Loot files. This makes it useful when you want to rebuild a list and reevaluate which items should be available later. Files inside Editable_Lists are for editing only. Their contents need to be copied into an active loot file before the plugin will use them.
To use Editable_Lists/Easy.json for Easy raids, copy its contents into Difficulty_Loot/Easy.json. To use Editable_Lists/Expert.json for a profile named Expert Bases, copy its contents into Base_Loot/Expert Bases.json. Item amounts and probability
An item will not spawn when both amount and amountMin are set to 0. You may remove these entries or leave them in the file for later use.
When amountMin is 0, probability determines whether the item spawns. If the item fails its probability check, another item will not automatically replace it unless additional eligible entries are available. Tool Cupboard loot
Items moved into the Tool Cupboard may combine into larger stacks. The visible stack count can therefore be lower than the amount that was originally generated. Loot priority
Loot is loaded from the data files inside:
Oxide: oxide/data/RaidableBases/ Carbon: carbon/data/RaidableBases/ The Profiles folder is not a loot source. It contains the options used by each profile and difficulty. Please do not place any file in the Profiles folder that is not a profile, the hamsters will cry.
Base Loot
If a file inside Base_Loot has the same name as a profile, the bases assigned to that profile can use that loot table. For example: Base_Loot/Expert Bases.json applies to the profile named: Expert Bases Enable Always Spawn Base Loot Table in the profile when items from that table should always be included. Difficulty Loot
Files inside Difficulty_Loot are selected according to the difficulty assigned to the profile. For example: Difficulty_Loot/Hard.json is used by profiles assigned to the Hard difficulty. Day of Week Loot
When Use Day Of Week Loot is enabled, the plugin selects the loot table matching the current day. Default Loot
Default_Loot.json acts as the fallback table. It is used when the other available loot tables do not provide enough eligible items to satisfy Amount Of Items To Spawn. Generally, this file should be discarded once Base Loot and Difficulty Loot tables have been created. 🤖NPCs
Profiles include NPC options for scientists, murderers and sleepers. You can keep the defaults or tailor their amount, health, accuracy, kits, movement and loot to suit each difficulty.
Valid Kits entries take priority over the matching manual loadout lists. NPCs spawned inside bases remain stationary, while outdoor NPCs can roam and engage players around the event. More NPCs naturally create more work, so busy servers may prefer to increase counts gradually. ⚔️PVP, PVE, ownership and raid options
Raid behavior is controlled by a combination of profile options and server-wide configuration. Together, these determine whether a raid is PVP or PVE and can control ownership, team or clan access, building, teleporting, cupboard access, damage across the dome, PVP delay, completion requirements and rewards.
Ownership and participation
Public raids can lock to the first attacker, while purchased raids can remain associated with their buyer. Players may become participants by damaging the base, killing NPCs, looting or using other supported raiding methods. PVP delay
PVP delay can keep a player temporarily vulnerable after leaving a PVP raid. This discourages zone hopping across the event boundary to gain an unfair advantage on a PVE server, where normal protection would otherwise resume immediately after leaving. 🛒Buyable raids and shop plugins
Buyable raids use the configured buy command, commonly /buyraid. A purchase can still be declined by cooldowns, ownership options, event limits, permissions, availability or the inability to find a suitable location.
Using a shop plugin (support is not guaranteed)
The shop should provide the buyraid command for free or at zero cost, while Raidable Bases handles the actual payment and any refund. This allows the plugin to safely return the payment when the raid cannot be created. Shop plugins that cannot sell the command at zero cost are not supported. buyraid 0 <steamid> The player placeholder depends on the shop plugin. Prices are configured in Raidable Bases and should remain zero in the external shop. If using a Tier Package of mine, the only requirement to use Buyable Events with the /buyraid command is to enable a cost per difficulty in the config file. These are not configured for obvious reasons; I don't know your servers economy. 🙂
Config snippet: https://i.ibb.co/x8XW9Lbs/image.png
⚙️ Options that benefit from an explanation (the majority have names that are meant to be self-explanatory to save time)
The complete configuration already lists every available option. This section only covers settings that are easier to understand with a little context.
Advanced Protection Radius — Controls the event area used by domes, markers, damage checks, ejection, NPC ranges and nearby spawn checks. Configurable per event type: Buyable Events, Maintained Events, Manual Events, and Scheduled Events. Amount Of Items To Spawn — Sets the target amount of generated loot, limited by available entries from your loot tables and container space in each base. Divide Loot Into All Containers — Spreads generated loot across the raid's available containers. This does not serve much purpose when disabled, it is advised to keep it set to true. Create Dome Around Event Using Spheres — Creates the visible event boundary. Set to 0 to disable it. Spawn Silently — Hides the normal announcement, dome and map marker for the profile. Height Adjustment Applied To This Paste — Adds the same vertical offset whenever a base using this profile is pasted. Forced Height — Uses a fixed world height for controlled sky or special-event setups. Allow Players To Raid With Items Up To What Workbench Level? — Limits raiding items according to their workbench level. Water Settings — Controls floating, surface, underwater and seabed placement. Workbench-level option
-1 — No workbench-level limit, future-proof where level 3 may be increased to 4 in a later Rust update. 0 — Allows raiding items that require no workbench. 1 — Allows items up to Workbench Level 1. 2 — Allows items up to Workbench Level 2. 3 — Allows items up to Workbench Level 3. The plugin checks the available workbench information for weapons, ammunition, attack entities and projectiles. A player is notified when the item being used exceeds the profile's allowed level.
⌨️Commands and permissions
Many command names are configurable. The examples below use their common defaults.
/buyraid — Open or use the buyable raid system. /rb — View player-facing raid information and available subcommands. rbe [base] [difficulty] — Spawn a manual event using the configured event command. rb.config add "<profile>" <bases...> — Add CopyPaste bases that share the selected profile options. Straight quotes around the profile name are required. rb.config list — List configured bases. rb.config remove <base> — Remove a configured base from any profiles containing it. rb.config maintained — Toggle Maintained Events in the config on or off. rb.config scheduled — Toggle Scheduled Events in the config on or off. rb.toggle - Temporarily toggles events on or off, refreshing when toggled back on or when the plugin is reloaded again. rb.reloadconfig — Reload the main configuration. rb.reloadprofiles — Reload profiles. rb.reloadtables — Reload loot tables. rb.populate all — Create editable item reference lists. rb.difficulty add "name" — Create a new difficulty and its matching configuration entries. rb.difficulty remove "name" — Remove a difficulty from the active configuration without deleting its files. rbe despawn - Despawns the base you are nearest to. Use noclip or vanish to ensure other options do not block the despawn. Cannot be used while a base is pasting or being setup by the plugin, wait to use until after the event has started. Players do not require permissions by default. Administrative permissions are best limited to trusted administrators, moderators and staff only.
raidablebases.allow — Allows player to use the available ADMIN commands. This is NOT recommended as players can use the commands 'buyraid' and 'rb' already. raidablebases.canbypass — Bypass dome restrictions. Noclip or vanish will bypass many features too, so you can assist players without interfering. raidablebases.blockbypass — Bypass Owning More Than One Raid settings for Clans/Friends/Teams raidablebases.mapteleport — Teleporting to map marker now simply requires this permission and to be enabled in config raidablebases.ddraw — Allows support for direct draw to players. raidablebases.config — Allows access to rb.config command in-game (server console does not require this permission) raidablebases.banned — Bans the user from entering any raids - accidentally banned yourself? Use /rb unban raidablebases.durabilitybypass — Bypass `Block Plugins Which Prevent Item Durability Loss` raidablebases.notitle — Exclude users from ranked title rewards raidablebases.buyraid — Optionally require this permission with `Use Permission (raidablebases.buyraid)` (not required by default) See other permissions using Permissions Manager (click the link to visit the page on Codefling) 🧾RBE DEBUG
The RBE DEBUG command displays information related to the configuration, profiles, map and spawn checks. Using it before requesting support usually makes the cause much easier to identify.
Too much information displayed at once? Not a problem, it is constantly recording data but the solution is very simple. Run RBE DEBUG once to enable it, then run it again to disable it and clear the previously recorded data. Next, attempt to spawn the raid using /buyraid or /rbevent Run RBE DEBUG again to view any newly recorded information. Do this promptly, as it will immediately continue to record. When you are finished, toggle it off by typing the command again. It will continue to output debug until it is turned off. Helpful information to include
Raidable Bases and CopyPaste versions. The base filename, profile, difficulty and event type. The command used and relevant console output. Whether the same file works when pasted directly with CopyPaste. Map seed, size and whether the map is procedural or custom when the issue involves placement. Debug contains all relevant information to events, good or bad. Use this information to determine what is happening and how to resolve the issue on your own. 📄Facepunch Terms of Service
Raidable Bases includes safeguards designed to help servers remain compliant with Facepunch policies for paid DLC items and restricted cosmetic content. These safeguards may remove restricted deployables or loot and prevent unauthorized pickup.
Server-owner responsibility
Changes that disable or bypass these safeguards can place a server outside Facepunch policy. Custom loot tables, imported workshop skins, CopyPaste files and third-party content should be reviewed before use. 🧰Tools and further reference
Community-made Facepunch content checker by ninco90: https://app.rustspain.com/facepunch/checkitems Loot Table Editor: https://codefling.com/tools/raidable-bases-boats-loot-editor/ 🧩Developer API
Signatures reflect Raidable Bases 3.1.5
The following hooks receive this argument set: OnRaidableBaseStarted, OnRaidableBaseEnded, OnRaidableBasePrivilegeDestroyed, OnRaidableBaseDespawn, OnRaidableBaseDespawned and one overload of OnRaidableBaseCompleted and OnRaidableAwardOwner. Please note that unused args will be removed in a future update.
object[] raidData = { Vector3 location, int level, bool allowPVP, string id, float unused1, float unused2, float loadTime, ulong ownerId, BasePlayer owner, List<BasePlayer> raiders, List<BasePlayer> intruders, List<BaseEntity> entities, string baseName, DateTime spawnDateTime, DateTime despawnDateTime, float protectionRadius, int lootRemaining }; OnPlayerPvpDelayStart, OnPlayerPvpDelayReset and OnPlayerPvpDelayExpired receive this argument set.
object[] delayData = { BasePlayer player, ulong userid, int level, Vector3 location, bool allowPVP, string id, ulong ownerId, string baseName, DateTime spawnDateTime, DateTime despawnDateTime, int lootRemaining }; Event hooks
Purchase, ownership, backpack, and other special hooks
Callable API methods