
Magnumk's Wishlist
-
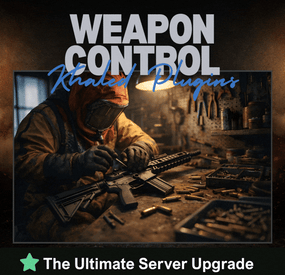
$14.99$11.24Weapon Control
WeaponControl is an advanced combat balancing plugin for Rust.
It allows server owners to fully control weapon damage, magazine capacity, and explosive damage using a clean in-game UI
Take Your Rust Server to the Next Level
Premium performance, lightning-fast support, and an exclusive 30% OFF using code KHALED
⭐ Key Features :
• Weapon damage multipliers
• Magazine capacity control
• Full explosive damage support (C4, Satchel, Beancan, Molotov, Catapult explosives)
• Separate profiles: Default / VIP I / VIP II / VIP III
• Automatic weapon detection
• Dedicated Explosives configuration tab
• Live in-game UI editor
💣 Explosives System :
Take full control over explosive damage:
• Supports C4, Satchel, Beancan, Molotov
• Supports Catapult explosives (Propane, Fire Bomb, Scattershot)
• Independent explosive multipliers
• Per-profile explosive balancing
• Accurate projectile and heat damage detection
👑 VIP System (Optional) :
Flexible VIP system with priority-based tiers.
Each VIP level can have its own:
• Weapon damage values
• Magazine capacity values
• Explosive damage values
Includes full control over affected entities and blacklist support.
🖥️ In-Game UI :
Manage everything directly in-game:
• Separate tabs for Weapons & Explosives
• Search and sort items
• Apply global presets
• Edit values live
• Safely apply or discard changes
• Admin change summary confirmation
⚙️ Performance & Compatibility
• Optimized for PVP and PVE servers
• Lightweight and server-friendly
• Accurate damage detection for projectiles and fire-based explosives
• Compatible with Oxide and Carbon
-
$99.99$79.99Complete Build System / Sandbox System
By hionet.com in Plugins
🏗️ BuildSystem
A complete creative building and sandbox suite for Rust servers.
BuildSystem provides managed plots, procedural land claims, native save/load tools, community build sharing, guest collaboration, creative tools, protection, and modern player/admin interfaces.
Live Test
client.connect 23.81.34.186:25015 ✨ Main Features
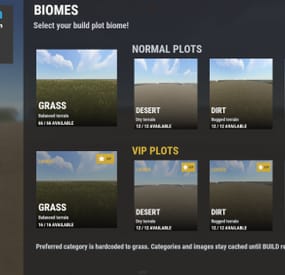
Fixed plot, procedural claim, or combined build modes Normal and VIP plot categories with configurable limits Central lobby with teleport, respawn, dome, and map marker support Biome-based plot layouts and optional randomized allocation Explore mode with `/claim` for procedural maps Free building, repairing, crafting, and blueprint unlocks God mode, noclip, auto-upgrade, mass upgrade, and auto-lock One-click electrical power and door controls Built-in hammer removal Entity and vehicle limits with optional HUD Automatic plot saving and cleanup Plot sound isolation and boundary protection Configurable startup convars and creative restrictions
💾 Native Save System
BuildSystem includes its own `BuildSaves` backend. CopyPaste is not required.
Save, load, rename, and delete builds Unlimited saves by default Optional permission-based save limits Automatic saving on leave, disconnect, server save, and shutdown Category-aware loading High-fidelity entity, inventory, lock, authorization, sign, vehicle, and IO restoration Serialized save/load queue with timeout protection Legacy CopyPaste migration Save-file sanitization and index repair tools
🌐 Community Builds
Players can publish builds using share codes.
Publish with or without a Rust camera photo Browse community builds through the UI Import builds using cards or share codes Community titles, descriptions, authors, images, and ratings Preview imported builds before saving a personal copy Admin controls for hiding, editing, or removing published builds
👥 Guest / Friends Building
Invite players or request access to their plots Search online players through the UI Accept, decline, or cancel requests Automatic cupboard and turret authorization Owner-controlled guest permissions for building, removing, demolishing, and crafting Guests are returned safely when the owner leaves
🪞 Symmetry Building
BuildMirror provides advanced building symmetry using a hammer-selected foundation pivot.
Square, triangle, and hexagon layouts Reflection and rotational modes Rot2, Rot3, Rot4, Rot6, and Quad modes where supported Visual placement guides Mirrored upgrading, rotating, and removal Pause, resume, cycle, and disable controls Optional `buildmirror.use` permission
🖥️ Player UI
The interface includes:
Start and plot selection Build Tools My Builds Community Builds Join Other Player Guest Settings Server Information Entity and vehicle limit HUD Auto-upgrade and symmetry overlays Middle-click menu shortcut
🛠️ Admin UI
Use `/badmin` to open the administration panel.
Create, rename, and remove plot categories Add, remove, teleport to, and identify plot slots Manage active plots and players Manage community builds and photos Edit supported settings at runtime Refresh markers, UI, categories, and lobby Run plot cleanup and maintenance actions Admin actions are logged
🗺️ Included Build Map
The package includes a purpose-built creative map and matching plot data.
Central lobby Organized normal and VIP plot locations Grass, desert, dirt, and snow categories Ready-to-use fixed plot layout Procedural and combined modes can also be used on compatible custom or procedural maps.
💬 Player Commands
`/build` or `/b` - Open BuildSystem `/leave` - Leave the current plot or roaming session `/myplot` - Return to your active plot `/claim` - Claim land in procedural mode `/request <player>` - Request access to a plot `/invite <player>` - Invite a guest `/accept <player>` - Accept a request or invitation `/decline <player>` - Decline a request or invitatio `/fly`, `/f`, or `/noclip` - Toggle noclip `/god` or `/g` - Toggle god mode `/buildcost` - Calculate build and upkeep costs Build and claim chat aliases are configurable.
🔐 Permissions
`buildcore.normal` - Optional normal save-limit tier `buildcore.vip` - VIP plots, radius, limits, and save tier `buildcore.vipmax` - Additional category/save tier support `buildplots.freeroam` - Bypass normal plot containment `buildplots.lobbyexit` - Allow supported off-plot menu flow `buildmirror.use` - Optional symmetry access `buildadmin.use` - Access the admin panel
⚙️ Admin Commands
`/badmin` Console: `buildio.rebuildindex`
🧩 Included Plugins
BuildAdmin.cs BuildConfig.cs BuildCore.cs BuildCosts.cs BuildGuests.cs BuildIO.cs BuildLang.cs BuildMirror.cs BuildOptions.cs BuildPlots.cs BuildSaves.cs BuildUI.cs
🔌 Developer Hooks
`CanBuildSystemKillEntity` `CanBuildSystemHammerRemoveEntity` `OnBuildSystemEntityValidated` `OnBuildZoneEnter` `OnBuildZoneExit` `OnBuildConfigChanged` `OnBuildMirrorStateChanged` If you need more details about the hooks or you want something to be added feel free to contact me!
-
$19.99
Weapon Enchantments Pack
By hionet.com in Plugins
Introduction System Overview Installation (Oxide/uMod & Carbon) Configuration Guide Commands Reference Permissions System
1. Introduction
Welcome to Weapon Enchantments Pack, a professional-grade weapon enchantment system designed for Rust servers that require full control over progression, balance, and monetization.
What Is Weapon Enchantments Pack?
Weapon Enchantments Pack is a fully configurable enchantment framework that stores all enchantment data directly on weapon items. This architecture removes the need for world entities, background scanning, or wipe-sensitive databases, making it ideal for long-term wipes and high-population servers.
Key Features
Complete weapon coverage (all Rust weapon categories). Physical enchant books (store- and kit-friendly). Custom Forge UI for player progression. Permission-driven VIP and tiered access. Store-safe, performance-focused design (no entity scanning / polling loops). Fully configurable — no fixed balance values locked behind code.
Who Should Use This Pack?
Monetized servers with web stores or donation systems. VIP-based progression servers. Long-term wipe servers (monthly or longer). PvP-focused servers. Vanilla+ servers seeking controlled progression.
2. System Overview
Plugin Structure
Weapon Enchantments Pack consists of two plugins that work together:
EnchantCore.cs Core framework: registry, item storage, Forge UI, enchanting tables, and book handling. EnchantWeapons.cs Weapon-specific logic and default enchantments (requires EnchantCore)
Data Storage Model
All enchantment data is stored directly on the item instance. This ensures:
No wipe-sensitive external databases are required. Enchantments persist through plugin reloads. No performance impact from entity scanning or polling loops. Enchanted items can be traded without losing enchantments.
3. Installation (Oxide/uMod & Carbon)
Prerequisites
Rust server running Oxide/uMod or Carbon. Access to server file system (FTP or panel). Ability to reload plugins or restart the server. Install Steps
Upload both plugin files:
EnchantCore.cs EnchantWeapons.cs Oxide/uMod: oxide/plugins/EnchantCore.cs oxide/plugins/EnchantWeapons.cs Carbon: carbon/plugins/EnchantCore.cs carbon/plugins/EnchantWeapons.cs Loading / Reloading
Plugins compile automatically on upload. You can also load/reload manually:
Oxide/uMod console: o.reload EnchantCore o.reload EnchantWeapons Carbon console: c.reload EnchantCore c.reload EnchantWeapons Verify Installation
Check server console for successful load messages (version text may vary by build):
Loaded plugin EnchantCore v1.0.0 by hionet.com Loaded plugin EnchantWeapons v1.0.0 by hionet.com Quick Test Commands
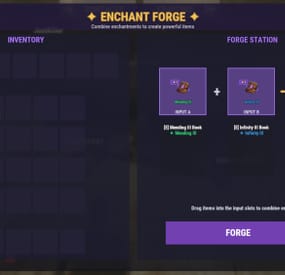
Give yourself an Enchanting Table and a test book:
enchantcore.givetable YourName 1 enchantcore.givebook YourName sharpness 1 1 Then as server admin (ownerid <YourSteamID> ) run:
/forge
4. Configuration Guide
Weapon Enchantments Pack uses two configuration files. Both Oxide/uMod and Carbon use the same JSON structure, but the config paths differ.
Config File Paths
Oxide/uMod: oxide/configs/EnchantCore.json oxide/configs/EnchantWeapons.json Carbon: carbon/configs/EnchantCore.json carbon/configs/EnchantWeapons.json
EnchantCore.json config file explanation
General Settings
"Config Version": 1 - Internal version used for safe upgrades. Do not change this manually.
"Command Prefix": "enchant" - Controls the admin chat command prefix. Useful if another plugin already uses /enchant
Enchanting Table Settings
"Enchanting Table": { "Entity Shortname": "box.repair.bench", "Skin ID": 3653802947, "Open Forge By Default": true } Entity Shortname - Base Rust entity used as the table, default: box.repair.bench
Skin ID (IMPORTANT) - Required skin to identify the table. Prevents normal repair benches from becoming enchanting tables. Only benches with this skin will open the Forge.
Open Forge By Default:
true: Opening the table opens the Forge UI automatically (recommended) false: Players must manually use /forge while looting the table
UI Settings (Forge Appearance)
"UI Settings": { "Panel Background Color": "0.1 0.1 0.1 0.95", "Accent Color": "0.4 0.2 0.8 1.0", ... } These settings control visual appearance only.
Rarity Colors (Hex)
"Rarity Colors (Hex)": { "Common": "#B0B8C2", "Uncommon": "#2ECC71", "Rare": "#3498DB", "Epic": "#9B59B6", "Legendary": "#F39C12" } Used for:
Forge UI Book display Weapon tooltip text If an enchant rarity has no color, it uses:
"Default Rarity Color (Hex)": "#FFFFFF"
Display Settings (Item Text)
"Display Settings": { "Enchant Prefix": "[E]", "Enchant Suffix": "", "Separator": ", " } Controls how enchantments appear on weapons.
Example output:
[E] Sharpness III, Lifesteal II Prefix/Suffix are purely visual Separator controls spacing between enchants
Performance Settings (IMPORTANT)
"Performance Settings": { "Cache Permission Results": true, "Cache Item Applicability Results": true, "Max Enchantments Per Item (Default)": 3, "Purge Unknown Enchantments": true, "Purge Unknown Delay Seconds": 300 } These settings keep the plugin safe for high-pop servers.
Cache Permission Results
Caches permission checks per player Strongly recommended to keep true Cache Item Applicability Results
Caches which enchants apply to which items Prevents repeated weapon-category checks Max Enchantments Per Item (Default)
Base limit for players without VIP permissions Can be overridden by: VIP permissions Admin overrides Other plugins via hooks Purge Unknown Enchantments
Automatically removes enchants that no longer exist in config Prevents broken items after config updates Purge Unknown Delay Seconds
Delay before purge runs after server start Prevents race conditions during load
Loot Books System (Optional LootTable Books inject system)
"Loot Books": { "Enabled": false, ... } This system injects enchant books into loot containers.
Loot Injection Controls
"Max Container Capacity": 36, "Replace Random Item If Full": true Prevents loot overflow Allows replacement if container is full "Refresh Existing Containers On Load": true Refreshes already-spawned containers on server start Useful for long wipes Containers
"Containers": { "crate_normal": { "Chance": 0.05, "Min": 0, "Max": 1, "Pool": "default" } } Explanation:
Chance: Spawn probability (0.05 = 5%) Min / Max: Number of books spawned Pool: Which enchant pool to use Pools (Balance Control)
"Pools": { "default": { "Rarity Weights": { "Common": 60.0, "Uncommon": 30.0, "Rare": 9.0, "Epic": 1.0 }, "Min Level": 1, "Max Level (0 = enchant max)": 0 } } Pools control what kind of books drop.
Rarity Weights
Higher value = more common Percentages do not need to total 100 Min / Max Level
Controls enchant level range 0 = use the enchant’s configured max level 💡 This is your main anti-pay-to-win lever.
Recommended Defaults (Best Practice)
For monetized servers:
❌ Disable loot books ✅ Sell books via store ✅ Use Forge for progression For survival / grind servers:
✅ Enable loot books ✅ Low spawn chances (1–5%) ✅ Restrict high rarities to elite pools
EnchantWeapons.json config file explanation
This section explains the major sections of the EnchantWeapons configuration file and how it affects weapon balance, VIP tiers, book progression, and compatibility.
EnchantCore handles UI + storing enchants on items. EnchantWeapons defines what the enchants actually do and which weapons they apply to.
Global Settings
"Global Settings": { "Default Book Item": "documents", "Default Book Skin": 3653712312, "Max Enchants Per Item (Default)": 3, "VIP Max Enchants": { "enchantweapons.vip": 4, "enchantweapons.elite": 5 }, "Combine Success Rates": { "1": 100, "2": 85, "3": 65, "4": 40, "5": 25 }, "Electric Hit Effect": "...", "Electric Chain Effect": "...", "AOE Center Effect": "...", "AOE Target Effect": "" } Default Book Item
"Default Book Item": "documents" - The default Rust item used as enchant books. Most servers use documents because it’s common and visually “book-like”.
"Default Book Skin": 3653712312 - Skin ID applied to enchant books. This is important for consistency and presentation (store / kits).
"Max Enchants Per Item (Default)": 3 - Base maximum number of enchantments allowed on a weapon for players without VIP permissions.
"VIP Max Enchants": { "enchantweapons.vip": 4, "enchantweapons.elite": 5, "enchantweapons.customname": 10 } This is how you create VIP tiers safely.
If a player has enchantweapons.vip, they can have 4 enchants on a weapon If a player has enchantweapons.customname, they can have 10 enchants on a weapon
Combine Success Rates
"Combine Success Rates": { "1": 100, "2": 85, "3": 65, "4": 40, "5": 25 } Controls the success chance (%) when combining or upgrading books to produce the result level.
Example:
Level 3 result: 65% success chance Level 5 result: 25% success chance 💡 This is your main “progression speed” lever.
Lower rates = grind + scarcity. Higher rates = casual / fast progression.
Effect Prefabs (Visuals Only)
"Electric Hit Effect": "assets/...", "Electric Chain Effect": "assets/...", "AOE Center Effect": "assets/...", "AOE Target Effect": "" These define the visual effects used for specific enchant types.
Changing these does not change damage or mechanics — it only changes visuals. If AOE Target Effect is empty, no “target FX” will play.
Enchantments
"Enchantments": { "sharpness": { ... }, "lifesteal": { ... }, "critical": { ... } } This is the heart of the plugin.
Each enchantment is a dictionary entry:
Key = enchant ID (used in commands and internal logic) Example: sharpness Value = the enchant definition Enchantment Definition Fields
Example structure:
"sharpness": { "Name": "Sharpness", "Description": "Increases all damage dealt", "Max Level": 5, "Book Item": "documents", "Book Skin": 3653712312, "Permission": "", "Rarity": "Common", "Applies To": [ "all_weapons" ], "Conflicts With": [], "Target Types": [ "all" ], "Conditions": null, "Levels": [ ... ] } Name / Description
Display-only text shown in UI and info commands.
Max Level
Maximum level this enchantment can reach.
Also defines how far upgrades can go. Should match the number of entries you provide in Levels. ⚠️ Common mistake: setting Max Level to 5 but only defining 3 Levels.
Book Item / Book Skin
Overrides the global defaults for this enchant only.
Use this when you want:
Different book visuals by rarity Special store-only book appearances Permission (VIP/Store Lock)
If empty: anyone can use it. If set: players must have that permission to use/apply/upgrade that enchant. Example:
"Permission": "" "Permission": "enchantweapons.legendary" This is the cleanest way to create VIP-exclusive or store-tier enchantments without giving admin access.
Rarity
"Rarity": "Common" Used for:
UI rarity colors (from EnchantCore UI settings) Loot book weighting (if EnchantCore Loot Books is enabled) Rarity does not automatically balance anything — it’s a classification.
Applies To (Weapon Compatibility)
"Applies To": [ "ranged", "bows" ] Controls which weapons can receive the enchant.
Usually you reference categories from Weapon Categories:
melee ranged snipers shotguns bows launchers all_weapons
Conflicts With
"Conflicts With": [ "frost" ] Prevents incompatible enchants from being placed on the same weapon.
Example:
fire_aspect conflicts with frost This is critical for balance and prevents “stack abuse”.
Target Types
"Target Types": [ "living" ] Defines what the enchant can affect.
Common values:
all player animal scientist npc living building vehicle helicopter bradley deployable Example use:
Armor Piercing only targets player Looting only targets living entities
Conditions (Optional Extra Rules)
The Conditions block allows you to restrict when an enchant is allowed to activate.
All conditions are optional — if a condition is not set (or set to zero / empty), it is ignored.
Conditions are evaluated after TriggerChance succeeds. (check Levels for TriggerChance)
"Conditions": { "HeadshotOnly": false, "TargetHealthBelow": 0.30, "TargetHealthAbove": 0.0, "DistanceBelow": 0.0, "DistanceAbove": 0.0, "TimeOfDay": "" } You can use one, multiple, or none of these conditions together.
All enabled conditions must pass for the enchant to trigger.
Examples:
HeadshotOnly - The enchant will only trigger on headshots TargetHealthBelow - The enchant only triggers if the target’s current health percentage is below this value. (0.30 = target below 30% HP) TargetHealthAbove - The enchant only triggers if the target’s current health percentage is above this value. (0.50 = target above 50% HP) DistanceBelow - The enchant only triggers if the distance between attacker and target is below this value (in meters). DistanceAbove - The enchant only triggers if the attacker is farther than this distance from the target. TimeOfDay - Restricts the enchant to a specific time of day. ("day" , "night" ) Using TargetHealthBelow + TargetHealthAbove Together
You can combine both to define a health window.
"TargetHealthBelow": 0.60, "TargetHealthAbove": 0.30 Enchant only triggers when target is between 30% and 60% HP
DistanceBelow + DistanceAbove Together
You can define a distance band.
"DistanceAbove": 10.0, "DistanceBelow": 50.0 Enchant triggers only between 10m and 50m
Levels (How Enchant Power Is Defined)
The Levels section defines what an enchant does and how strong it is at each level.
"Levels": [ { "DamageMultiplier": 1.1 }, { "DamageMultiplier": 1.2 } ] How this works:
First entry = Level 1 Second entry = Level 2 And so on The number of entries must match Max Level ⚠️ IMPORTANT
If Max Level is 5, you must define 5 level entries.
How Level Effects Work
Each level is a list of effects Any effect you don’t define is ignored Any effect set to 0 is disabled Multiple effects can be combined in one level Effects only activate if: TriggerChance succeeds (if used) Conditions pass (if used)
Most Common Effects and Examples
Damage Bonus (Always On)
{ "DamageMultiplier": 1.20 } Increases all damage 1.20 = +20% damage Best for simple enchants Chance-Based Damage
{ "DamageMultiplier": 1.50, "TriggerChance": 0.25, "Cooldown": 2.0 } 25% chance to trigger Can’t trigger again for 2 seconds (per target) Prevents constant burst damage Critical Strike
{ "CritMultiplier": 1.75, "TriggerChance": 0.15, "Cooldown": 1.0 } Occasional high-damage hits Classic RPG “crit” behavior
Lifesteal
{ "Lifesteal": 0.10, "TriggerChance": 0.30, "Cooldown": 2.0 } Heals for 10% of damage Cooldown prevents infinite sustain Lifesteal With Cooldown and 2 Levels
"Levels": [ { "Lifesteal": 0.10, "TriggerChance": 0.30, "Cooldown": 2.0 // this is Level 1 }, { "Lifesteal": 0.15, "TriggerChance": 0.35, "Cooldown": 2.0 // this is Level 2 } ] DamageMultiplier
Increases all damage dealt. Example: 1.20 = +20% damage. FlatDamage
Adds a fixed amount of extra damage on hit. Useful for low-damage weapons. CritMultiplier
Deals extra damage when the enchant triggers. Usually used with TriggerChance. ArmorPierce
Deals extra damage that ignores armor. Example: 0.25 = 25% of damage bypasses armor. Lifesteal
Heals the attacker for a percentage of damage dealt. Example: 0.10 = heal for 10% of damage. FlatHeal
Heals a fixed amount on hit. Safer than lifesteal for PvP balance. RegenAmount
Applies slow healing over time. Good for sustain builds. HealFromDamageMultiplier
Turns damage into healing instead (no damage dealt). Example: 1.00 = heal for 100% of damage. BurnDamage
Sets the target on fire, dealing damage over time. Uses Duration if set. PoisonDamage
Applies poison damage instantly. Affects player metabolism or damage types. ColdDamage
Applies cold damage instantly. Useful for exposure-style effects. BleedDamage
Applies bleeding damage instantly. RadiationDamage
Applies radiation poisoning (players only). KnockbackForce
Pushes the target away from the attacker. Higher value = stronger push. NoSprintDuration
Prevents the target from sprinting for a short time. Strong control effect. Radius
Enables area-of-effect behavior. Applies effects to nearby targets. ElectricDamage
Deals electric shock damage on hit. ChainRadius
How far electric damage can jump to nearby targets. ChainMaxTargets
Total number of targets hit by chain lightning (including the first target). DurabilityBonus
Reduces weapon durability loss. Example: 2.0 = weapon loses durability twice as slowly. Mending
Repairs weapon condition on hit. AmmoSave
Chance to not consume ammo when firing. Any value above 0 enables it. LootBonus
Increases loot dropped from killed enemies. Stacks additively with other LootBonus effects. TriggerChance
Chance for the enchant to activate. Example: 0.25 = 25% chance. Cooldown
Minimum time (seconds) before the enchant can trigger again on the same target. Duration
How long time-based effects last (fire, some AOE effects). HydrationDrain
Drains water from the target player. CaloriesDrain
Drains food from the target player. WetnessAdd
Adds wetness to the target player. ComfortReduce
Reduces the target’s comfort level.
Weapon Categories
"Weapon Categories": { "melee": [ "salvaged.sword", "machete", ... ], "ranged": [ "rifle.ak", "pistol.python", ... ] } This section maps category names to Rust item shortnames.
Why it exists:
Makes configs clean and readable Lets you balance entire weapon groups easily Prevents copy/paste errors across enchants To add more weapons:
Add their shortname into the correct category Or create your own category and reference it from Applies To ⚠️ Common mistake: spelling shortnames wrong → enchant will never apply.
5. Commands Reference
Admin Chat Commands
Admin command prefix is configurable (default: /enchant). These commands are restricted to BasePlayer.IsAdmin (not permission-based).
/enchant (shows help) /enchant give /enchant apply /enchant remove /enchant list /enchant info /enchant inspect Console / RCON Commands
enchantcore.givebook <player> <enchant_id> <level> [amount] enchantcore.givetable <player> [amount] [skinId] 6. Permissions System
Core Permissions
enchantcore.forge — Allows players to use the Forge UI (must give this permission if you want to allow players to combine books or to place an enchantment to an item) VIP Enchant Limits
VIP enchant limits are configured in EnchantWeapons.json under "VIP Max Enchants". Example defaults:
No permission: 3 enchants per weapon enchantweapons.vip: 4 enchants per weapon enchantweapons.elite: 5 enchants per weapon Per-Enchant Permissions
Each enchant definition supports an optional Permission field.
If set, a player must have that permission to use/apply/combine/upgrade that enchant. This is the recommended method for VIP-exclusive or store-tier enchantments.
- #enchantment
- #enchantments
- (and 13 more)
-

$25.00
Social Media Rust
By Iftebinjan in Plugins
SocialMedia is the ultimate community-engagement tool for Rust. It brings a modern social networking experience directly into the game, allowing players to post updates, share images from the web, follow their rivals, and message friends—all through a sleek, high-performance UI. Whether they are bragging about a successful raid or looking for a team, SocialMedia keeps your players logged in and interacting.
⭐Key Features
Custom Modular UI: A high-fidelity, responsive interface that mimics modern social platforms, featuring a Home Feed, Profiles, Notifications, and Chat. Dynamic Posting System: Text & Image Support, Hashtag Integration, Reactions & Bookmarks, Reactions & Bookmarks Real-Time Messaging: A private, 1-on-1 chat system allowing players to communicate securely without using global chat. Player Profiles: Customizable Bios & Covers, Stats Tracking, Follow System Trending & Discovery: Trending Hashtags, Leaderboards Permission-Based Badges: Reward your VIPs, Admins, or Veteran players with custom badges (like "Verified" checkmarks) that appear next to their names. Moderation & Safety: Word Filter, Spam Prevention, Admin Controls 📌Commands
/social, /x - Customizable in the config /social_reset_all - Reset all social media data 📜Permissions
socialmedia.admin - Requires to do admin commands and deleting other users posts socialmedia.badge.CustomName - Changesable in the config for different badges 🎬Video Showcase
⚙️Configurations
📖Lang
💬Support
- #social media
- #social
- (and 5 more)
-

$24.99
Chat Styles (Names, Messages & Prefixes)
By xNullPointer95 in Plugins
xChatStyles
xChatStyles adds smooth gradient colors to player names, prefixes, and chat messages, giving your server a premium, modern look without clutter or spam.
It’s clean, readable, and designed to enhance chat - not overpower it.
It lets you customize how players appear in chat using animated-looking color gradients. Perfect for VIPs, staff, donators, or special roles. No flashy UI. No complicated setup. Just beautiful chat.
⭐ Features
🎨 Gradient Names & Messages
Smooth color gradients instead of flat colors, but you can also use a solid color Player names Chat messages Prefixes (VIP, Admin, etc.) Looks great without hurting readability Styled Mentions (@PLAYERNAME) 🏷️ Multiple Prefix Support
Players can have more than one prefix Each prefix can have its own color style 👑 Great for VIP & Donator Perks
Instantly makes VIP ranks feel premium Visual reward without gameplay imbalance Easy to sell as a cosmetic perk 🪙 Trade System for Prefixes (REQUIRES Economics if you want to use trade feature)
⚡Server Friendly
No lag or spam Optimized to run smoothly on live servers Works quietly in the background 🔑 Supports permission-based style, not just permanent chat style.
🌍 xChatStyles Web Editor
📌 Plugin Preview
🔐 Permissions (Custom Tab)
xchatstyles.customtab - Ability to see the "Custom" Tab in /xcs xchatstyles.customprefix - Ability to see and select "Prefix" in "Custom" Tab xchatstyles.custommessagecolor - Ability to see and select "Message" in "Custom" Tab xchatstyles.customusernamecolor - Ability to see and select "Username" in "Custom" Tab
💬 Chat Commands (Player)
/xcs - Opens the Ui /xcs <PLAYERNAME/STEMAID> - Opens the Ui with the view of the target player and you can remove owned styles from that user.
💬 Chat & Console Commands (Admin)
/* Add chat styles without permission */ /addprefix <STEAMID> <PREFIXNAME> <#HEX> <#HEX> <#HEX>... /addmessagecolor <STEAMID> <#HEX> <#HEX> <#HEX>... /addusernamecolor <STEAMID> <#HEX> <#HEX> <#HEX>... /addall <STEAMID> <PREFIXNAME> <#HEX> <#HEX> <#HEX>... [This will add a prefix with provided color(s), message style with provided color(s) and username style with provided color(s) with just 1 command.] /* Add chat styles without permission */ /* Add chat styles WITH permission */ /addprefix <xchatstyles.PERMISSIONNAME> <PrefixName> <#HEX> <#HEX> <#HEX> ... /addall <xchatstyles.PERMISSIONNAME> <PrefixName> <#HEX> <#HEX> <#HEX> ... /addmessagecolor <xchatstyles.PERMISSIONNAME> <#HEX> <#HEX> <#HEX> ... /addusernamecolor <xchatstyles.PERMISSIONNAME> <#HEX> <#HEX> <#HEX> ... /* Add chat styles WITH permission */ ---> As long as the player has permission, they can select it with /xcs ---> Automatically removed when permission is revoked ---> Permission-Based ChatStyles has (Permission) indicator in /xcs ---> The permission must start with 'xchatstyles.*'. Example: /addall <xchatstyles.vip> VIP <#HEX> <#HEX> <#HEX> ... /*********************************************************************************************************/ /* Use 1 #HEX Color (Example: #fcba03) for a single color, use multiple #HEX Colors for a color gradient */ /* */ /* Example: /addprefix 76561198412496844 OMEGA #32a852 #71a67f */ /* */ /*********************************************************************************************************/ /removeprefix <steamid> <index|PrefixName> /removemessagecolor <steamid> <index> /removeusernamecolor <steamid> <index>
⏳ Recommended Plugin for >TIMED< PERMISSION:
⚙️ Config
{ "MaxPrefixes": 3, "DefaultUsernameColor": "#55aaff", "DefaultMessageColor": "#ffffff", "DefaultSize": 15, "AllowSelectingDuplicatePrefixNames": true, "NotifyOnStyleReceived": true, "PrefixBrackets": "[]", "ShowPrefixBracketsWithSizeTag": true, "Trade": { "AllowTrading": false, "PlayerCanSellPermissionBasedPrefix": false, "UseCurrencySign": true, "CurrencySign": "$", "AnnounceNewPrefixSaleGlobally": true, "AnnouncePrefixPriceUpdateGlobally": true }, "PermissionStyles": {} }