


About Solar Panel Upgrades
Solar Panel Upgrades adds a part-based upgrade system to electrical solar panels, allowing their performance to be enhanced through modular components. Each part type includes 3 tiers of progression.
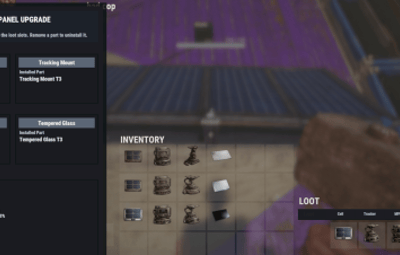
Players can open an upgrade interface while looking at a solar panel and holding a hammer, then install custom parts by dragging them into specific slots. The menu input button is fully configurable, supporting RELOAD, USE, MIDDLE CLICK, and RIGHT CLICK.
Each upgrade part modifies the panel’s behavior, letting you fine-tune max output, sun angle efficiency, low-light performance, and damage power retention through a simple and intuitive interface. Upgrades are saved per panel, and all changes are applied directly to the entity in a lightweight and persistent system.
The plugin also includes optional loot crate support, allowing you to control whether upgrade parts spawn in containers and define per-container drop chances for each tier. Alternatively, parts can be integrated into your existing systems such as shops or crafting plugins.
All upgrade parts are fully configurable, including their stats and visuals, making it easy to adapt the system to your server’s balance and progression. A default English localization file is included, with full support for custom translations.
Part shortnames and skins are pre-configured but can be modified or replaced with items from systems like Custom Item Manager.
Permissions:
solarpanelupgrades.use – Allows players to open and use the solar panel upgrade interface
solarpanelupgrades.admin – Allows access to the admin part-giving command
Commands:
/sppart – Admin chat command to give yourself all available parts for testing or shop setup. Optionally specify an amount.
Pre-Configured Parts:
Cells:
Cells T1
- Max Power Output: +40%
Cells T2
- Max Power Output: +60%
Cells T3
- Max Power Output: +100%
Cells increase the solar panel’s maximum power output.
Tracking Mount:
Tracking Mount T1
- Sun Start Threshold: Reduced
- Full Output Threshold: Reduced
Tracking Mount T2
- Improved angle efficiency
Tracking Mount T3
- Significantly improved angle efficiency
Tracking mounts improve how effectively the panel captures sunlight at different angles, allowing it to generate power earlier and maintain output longer.
MPPT Controller:
MPPT Controller T1
- Weak Sun Efficiency: +15%
MPPT Controller T2
- Weak Sun Efficiency: +30%
MPPT Controller T3
- Weak Sun Efficiency: +50%
MPPT controllers improve energy generation during low-light conditions such as sunrise, sunset, or poor alignment.
Tempered Glass:
Tempered Glass T1
- Damage Power Retention: +15%
Tempered Glass T2
- Damage Power Retention: +30%
Tempered Glass T3
- Damage Power Retention: +50%
Tempered glass helps maintain power output even when the panel is damaged.
Default Config:
{
"Open Menu Button - RELOAD | USE | MIDDLE CLICK | RIGHT CLICK": "RELOAD",
"Allow Non-Team Players To Open Owner Panel": false,
"Module Types": {
"cells": {
"Display Name": "Cells",
"Slot Index": 0,
"Tiers": {
"t1": {
"Display Name": "Cells T1",
"Required Part Item": {
"ShortName": "sticks",
"SkinId": 3707941478,
"Display Name": "Solar Part: Cells T1"
},
"Stat Changes": {
"Maximal Power Output": {
"Add": 0.0,
"Multiplier": 1.4
},
"Dot Minimum": {
"Add": 0.0,
"Multiplier": 1.0
},
"Dot Maximum": {
"Add": 0.0,
"Multiplier": 1.0
},
"Weak Sun Efficiency": {
"Add": 0.0,
"Multiplier": 1.0
},
"Damage Power Retention": {
"Add": 0.0,
"Multiplier": 1.0
}
}
},
"t2": {
"Display Name": "Cells T2",
"Required Part Item": {
"ShortName": "sticks",
"SkinId": 3707941691,
"Display Name": "Solar Part: Cells T2"
},
"Stat Changes": {
"Maximal Power Output": {
"Add": 0.0,
"Multiplier": 1.7
},
"Dot Minimum": {
"Add": 0.0,
"Multiplier": 1.0
},
"Dot Maximum": {
"Add": 0.0,
"Multiplier": 1.0
},
"Weak Sun Efficiency": {
"Add": 0.0,
"Multiplier": 1.0
},
"Damage Power Retention": {
"Add": 0.0,
"Multiplier": 1.0
}
}
},
"t3": {
"Display Name": "Cells T3",
"Required Part Item": {
"ShortName": "sticks",
"SkinId": 3707941842,
"Display Name": "Solar Part: Cells T3"
},
"Stat Changes": {
"Maximal Power Output": {
"Add": 0.0,
"Multiplier": 2.0
},
"Dot Minimum": {
"Add": 0.0,
"Multiplier": 1.0
},
"Dot Maximum": {
"Add": 0.0,
"Multiplier": 1.0
},
"Weak Sun Efficiency": {
"Add": 0.0,
"Multiplier": 1.0
},
"Damage Power Retention": {
"Add": 0.0,
"Multiplier": 1.0
}
}
}
}
},
"trackingmount": {
"Display Name": "Tracking Mount",
"Slot Index": 1,
"Tiers": {
"t1": {
"Display Name": "Tracking Mount T1",
"Required Part Item": {
"ShortName": "sticks",
"SkinId": 3707943339,
"Display Name": "Solar Part: Tracking Mount T1"
},
"Stat Changes": {
"Maximal Power Output": {
"Add": 0.0,
"Multiplier": 1.0
},
"Dot Minimum": {
"Add": -0.04,
"Multiplier": 1.0
},
"Dot Maximum": {
"Add": -0.04,
"Multiplier": 1.0
},
"Weak Sun Efficiency": {
"Add": 0.0,
"Multiplier": 1.0
},
"Damage Power Retention": {
"Add": 0.0,
"Multiplier": 1.0
}
}
},
"t2": {
"Display Name": "Tracking Mount T2",
"Required Part Item": {
"ShortName": "sticks",
"SkinId": 3707943469,
"Display Name": "Solar Part: Tracking Mount T2"
},
"Stat Changes": {
"Maximal Power Output": {
"Add": 0.0,
"Multiplier": 1.0
},
"Dot Minimum": {
"Add": -0.07,
"Multiplier": 1.0
},
"Dot Maximum": {
"Add": -0.08,
"Multiplier": 1.0
},
"Weak Sun Efficiency": {
"Add": 0.0,
"Multiplier": 1.0
},
"Damage Power Retention": {
"Add": 0.0,
"Multiplier": 1.0
}
}
},
"t3": {
"Display Name": "Tracking Mount T3",
"Required Part Item": {
"ShortName": "sticks",
"SkinId": 3707943635,
"Display Name": "Solar Part: Tracking Mount T3"
},
"Stat Changes": {
"Maximal Power Output": {
"Add": 0.0,
"Multiplier": 1.0
},
"Dot Minimum": {
"Add": -0.1,
"Multiplier": 1.0
},
"Dot Maximum": {
"Add": -0.15,
"Multiplier": 1.0
},
"Weak Sun Efficiency": {
"Add": 0.0,
"Multiplier": 1.0
},
"Damage Power Retention": {
"Add": 0.0,
"Multiplier": 1.0
}
}
}
}
},
"mpptcontroller": {
"Display Name": "MPPT Controller",
"Slot Index": 2,
"Tiers": {
"t1": {
"Display Name": "MPPT Controller T1",
"Required Part Item": {
"ShortName": "sticks",
"SkinId": 3707941942,
"Display Name": "Solar Part: MPPT Controller T1"
},
"Stat Changes": {
"Maximal Power Output": {
"Add": 0.0,
"Multiplier": 1.0
},
"Dot Minimum": {
"Add": 0.0,
"Multiplier": 1.0
},
"Dot Maximum": {
"Add": 0.0,
"Multiplier": 1.0
},
"Weak Sun Efficiency": {
"Add": 0.0,
"Multiplier": 1.15
},
"Damage Power Retention": {
"Add": 0.0,
"Multiplier": 1.0
}
}
},
"t2": {
"Display Name": "MPPT Controller T2",
"Required Part Item": {
"ShortName": "sticks",
"SkinId": 3707942141,
"Display Name": "Solar Part: MPPT Controller T2"
},
"Stat Changes": {
"Maximal Power Output": {
"Add": 0.0,
"Multiplier": 1.0
},
"Dot Minimum": {
"Add": 0.0,
"Multiplier": 1.0
},
"Dot Maximum": {
"Add": 0.0,
"Multiplier": 1.0
},
"Weak Sun Efficiency": {
"Add": 0.0,
"Multiplier": 1.3
},
"Damage Power Retention": {
"Add": 0.0,
"Multiplier": 1.0
}
}
},
"t3": {
"Display Name": "MPPT Controller T3",
"Required Part Item": {
"ShortName": "sticks",
"SkinId": 3707942278,
"Display Name": "Solar Part: MPPT Controller T3"
},
"Stat Changes": {
"Maximal Power Output": {
"Add": 0.0,
"Multiplier": 1.0
},
"Dot Minimum": {
"Add": 0.0,
"Multiplier": 1.0
},
"Dot Maximum": {
"Add": 0.0,
"Multiplier": 1.0
},
"Weak Sun Efficiency": {
"Add": 0.0,
"Multiplier": 1.5
},
"Damage Power Retention": {
"Add": 0.0,
"Multiplier": 1.0
}
}
}
}
},
"temperedglass": {
"Display Name": "Tempered Glass",
"Slot Index": 3,
"Tiers": {
"t1": {
"Display Name": "Tempered Glass T1",
"Required Part Item": {
"ShortName": "sticks",
"SkinId": 3707942614,
"Display Name": "Solar Part: Tempered Glass T1"
},
"Stat Changes": {
"Maximal Power Output": {
"Add": 0.0,
"Multiplier": 1.0
},
"Dot Minimum": {
"Add": 0.0,
"Multiplier": 1.0
},
"Dot Maximum": {
"Add": 0.0,
"Multiplier": 1.0
},
"Weak Sun Efficiency": {
"Add": 0.0,
"Multiplier": 1.0
},
"Damage Power Retention": {
"Add": 0.15,
"Multiplier": 1.0
}
}
},
"t2": {
"Display Name": "Tempered Glass T2",
"Required Part Item": {
"ShortName": "sticks",
"SkinId": 3707942806,
"Display Name": "Solar Part: Tempered Glass T2"
},
"Stat Changes": {
"Maximal Power Output": {
"Add": 0.0,
"Multiplier": 1.0
},
"Dot Minimum": {
"Add": 0.0,
"Multiplier": 1.0
},
"Dot Maximum": {
"Add": 0.0,
"Multiplier": 1.0
},
"Weak Sun Efficiency": {
"Add": 0.0,
"Multiplier": 1.0
},
"Damage Power Retention": {
"Add": 0.3,
"Multiplier": 1.0
}
}
},
"t3": {
"Display Name": "Tempered Glass T3",
"Required Part Item": {
"ShortName": "sticks",
"SkinId": 3707943004,
"Display Name": "Solar Part: Tempered Glass T3"
},
"Stat Changes": {
"Maximal Power Output": {
"Add": 0.0,
"Multiplier": 1.0
},
"Dot Minimum": {
"Add": 0.0,
"Multiplier": 1.0
},
"Dot Maximum": {
"Add": 0.0,
"Multiplier": 1.0
},
"Weak Sun Efficiency": {
"Add": 0.0,
"Multiplier": 1.0
},
"Damage Power Retention": {
"Add": 0.5,
"Multiplier": 1.0
}
}
}
}
}
},
"Loot Drops": {
"Enabled": false,
"Containers": {
"assets/bundled/prefabs/radtown/crate_normal.prefab": {
"Enabled": true,
"Tier 1 Chance": 2.0,
"Tier 2 Chance": 0.0,
"Tier 3 Chance": 0.0
},
"assets/bundled/prefabs/radtown/crate_normal_2.prefab": {
"Enabled": true,
"Tier 1 Chance": 2.0,
"Tier 2 Chance": 0.0,
"Tier 3 Chance": 0.0
},
"assets/bundled/prefabs/radtown/crate_elite.prefab": {
"Enabled": true,
"Tier 1 Chance": 15.0,
"Tier 2 Chance": 2.0,
"Tier 3 Chance": 0.0
},
"assets/bundled/prefabs/radtown/underwater_labs/crate_elite.prefab": {
"Enabled": true,
"Tier 1 Chance": 15.0,
"Tier 2 Chance": 2.0,
"Tier 3 Chance": 0.0
},
"assets/bundled/prefabs/radtown/crate_underwater_advanced.prefab": {
"Enabled": true,
"Tier 1 Chance": 2.0,
"Tier 2 Chance": 0.0,
"Tier 3 Chance": 0.0
},
"assets/bundled/prefabs/radtown/crate_tools.prefab": {
"Enabled": true,
"Tier 1 Chance": 2.0,
"Tier 2 Chance": 0.0,
"Tier 3 Chance": 0.0
},
"assets/prefabs/npc/m2bradley/bradley_crate.prefab": {
"Enabled": true,
"Tier 1 Chance": 0.0,
"Tier 2 Chance": 10.0,
"Tier 3 Chance": 3.0
},
"assets/prefabs/npc/patrol helicopter/heli_crate.prefab": {
"Enabled": true,
"Tier 1 Chance": 0.0,
"Tier 2 Chance": 10.0,
"Tier 3 Chance": 3.0
},
"assets/prefabs/deployable/chinooklockedcrate/codelockedhackablecrate_ghostship.prefab": {
"Enabled": true,
"Tier 1 Chance": 10.0,
"Tier 2 Chance": 5.0,
"Tier 3 Chance": 1.0
},
"assets/prefabs/deployable/chinooklockedcrate/codelockedhackablecrate_oilrig.prefab": {
"Enabled": true,
"Tier 1 Chance": 10.0,
"Tier 2 Chance": 5.0,
"Tier 3 Chance": 1.0
},
"assets/prefabs/deployable/chinooklockedcrate/codelockedhackablecrate.prefab": {
"Enabled": true,
"Tier 1 Chance": 10.0,
"Tier 2 Chance": 5.0,
"Tier 3 Chance": 1.0
}
}
}
}


.thumb.png.fb9ddd0dd32a18cd863c001b2267bd5e.png)

.thumb.png.1bc156f67ae8b768c52a61af7e0ea77d.png)