
SoftArmy's Wishlist
-
$14.99
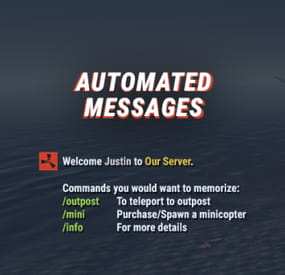
Automated Messages
Automated chat messages based on chat keywords, timer or various other triggers. Plugin comes with an easy to use Admin UI for complete setup, and supports special localization for your messages. You can define messages to be sent only to specific Groups or Permissions, and you can allow players to toggle on/off messages if they do not find them useful.
SUPPORTED TRIGGERS If what you need is not here and still falls under the scope of the plugin description, reach out to me
Timed | ChatCommand | AutoReply | NewPlayerJoined | PlayerConnected | PlayerDisconnected | PermissionGranted | PermissionRevoked | AddedToGroup | RemovedFromGroup | PlayerDead | CrateHacked | EnteredDeepSea | LeftDeepSea | EnteredZone | LeftZone | EnteredMonument | LeftMonument
COMMANDS
/am.edit - (Admin UI for complete setup) - requires automatedmessages.admin permission /tips - (Player command for toggling on/off messages) command can be changed in the config file
MESSAGES LOCALIZATION
You can switch between languages in Admin UI to setup localized replies for every language the game supports. Check config section below for how to add languages.
Game Tips
You can utilize Rust's native game tip UI to show specific messages instead or along with sending it to chat.
VARIABLES
Variables can be included in the messages text to show further info based on the trigger or player. The plugin also supports https://umod.org/plugins/placeholder-api with the extensive list of variables it brings.
{playername} {playerid} - Player steam id {playercountry} {hacklocation} - Specific to messages with type CrateHacked {wipetimeremaining} - Days/Hours till wipe (based on rust convar settings if a missile silo monument is present) {online} - # of players online {sleeping} - # of players sleeping {joining} - # of players joining
CONFIG SETTINGS Below are only settings not currently available in Admin UI, highly recommended to edit triggers or actions using /am.edit
Chat Icon (Steam Id) - Icon that will be used for all messages sent by the plugin, must be a steam id. Toggle Chat Command - "tips" - Chat command that allows a player to toggle on/off messages. AutoReply Cooldown (in seconds) - Per action cooldown timer when players type a keyword set. ChatCommand Cooldown (in seconds) - Per player cooldown timer when a player types a chat command. ZoneManager Cooldown (in seconds) - Per player cooldown timer on enter or exit zone. MonumentWatcher Cooldown (in seconds) - Per player cooldown timer on enter or exit monument. Replies Server Languages - Languages your server will support. Available options: af, ar, ca, cs, da, de, el, en-PT, en, es-ES, fi, fr, hu, it, ja, ko, nl, no, pl, pt-PT, pt-BR, ro, ru, sr, sv, tr, uk, vi, zh-CN, zh-TW Default Server Language - Fallback language if player client language had no available replies, you must have at least one reply for this language for the action to function. AutoReply `Broadcast to all` option to broadcast to team only if keywords sent from team chat - true/false -

$40.00$31.95Server Panel
ServerPanel adds a player information menu to your server, where you can both share important and useful information with your players and integrate your plugins into it!
🌟 Features
User-Friendly Interface: Intuitive GUI for easy navigation and interaction. Economy Integration: Supports various economy plugins for seamless financial management. Dynamic Menu Categories: Organize functionalities into customizable categories for better user experience. Extensive Configuration Options: Almost every aspect of the plugin can be customized, including messages, colors, sizes, fonts, tion. Auto-Open Menu: Automatically displays the menu upon player connection, configurable per server settings. Block Settings: Control access to the menu during building, raiding, or combat situations to enhance gameplay balance. Multiple Economy Head Fields: Display various economic metrics such as balance, server rewards, and bank information. Permission Management: Fine-tune permissions for different user roles to control access to features. Localization Support: Easily translate and customize all messages for different languages. Performance Optimized: Designed to minimize server lag while providing rich functionality. Customizable Hooks: Integrate with existing economy systems using customizable hooks for adding, removing, and displaying balances. Editor Position Change: Admins can now change editor positions with a simple click, choosing between left, center, or right alignments. Command Enhancements: Commands are now processed with multiple arguments separated by "|", enabling bulk command processing.
🎮 Commands
/info – open menu /sp.install (or) /welcome.install – open installer menu sp.migrations – console command for updating plugin data structure when upgrading to new versions. Automatically creates backups before making changes. sp.migrations list – shows available migrations and whether they need to run sp.migrations run <version> – runs specific migration (e.g., "1.3.0") sp.migrations run <version> force – forces migration even if not detected as needed
🛡️ Permissions
serverpanel.edit – allows players to edit the plugin settings and open the edit menu serverpanelinstaller.admin - required to access the plugin installation functions
🎥 Video
🖼️ Showcase
Templates
Template V1
Template V2
Template V3
Template V5
Editor
Installer
🧪 TEST SERVER
Join our test server to view and experience all our unique features yourself!
Copy the IP Address below to start playing!
connect 194.147.90.239:28015
📊 Update Fields
ServerPanel supports dynamic update fields that can be used in your templates to display real-time information. These fields are automatically updated and can be used in text components, headers, and other interface elements.
Player Information
{online_players} – Number of currently online players {sleeping_players} – Number of sleeping players {all_players} – Total number of players (online + sleeping) {max_players} – Maximum server capacity {player_kills} – Player's kill count (requires KillRecords, Statistics, or UltimateLeaderboard) {player_deaths} – Player's death count (requires KillRecords, Statistics, or UltimateLeaderboard) {player_username} – Player's display name {player_avatar} – Player's Steam ID for avatar display Economy
{economy_economics} – Economics plugin balance {economy_server_rewards} – ServerRewards points {economy_bank_system} – BankSystem balance Note: Economy fields are fully customizable in "oxide/config/ServerPanel.json" under "Economy Header Fields". You can add support for any economy plugin by configuring the appropriate hooks (Add, Balance, Remove). Custom keys can be created and used in templates just like the default ones.
Server Information
{server_name} – Server hostname {server_description} – Server description {server_url} – Server website URL {server_headerimage} – Server header image URL {server_fps} – Current server FPS {server_entities} – Number of entities on server {seed} – World seed {worldsize} – World size {ip} – Server IP address {port} – Server port {server_time} – Current server time (YYYY-MM-DD HH:MM:SS) {tod_time} – Time of day (24-hour format) {realtime} – Server uptime in seconds {map_size} – Map size in meters {map_url} – Custom map URL {save_interval} – Auto-save interval {pve} – PvE mode status (true/false) Player Stats
{player_health} – Current health {player_maxhealth} – Maximum health {player_calories} – Calorie level {player_hydration} – Hydration level {player_radiation} – Radiation poisoning level {player_comfort} – Comfort level {player_bleeding} – Bleeding amount {player_temperature} – Body temperature {player_wetness} – Wetness level {player_oxygen} – Oxygen level {player_poison} – Poison level {player_heartrate} – Heart rate Player Position
{player_position_x} – X coordinate {player_position_y} – Y coordinate (height) {player_position_z} – Z coordinate {player_rotation} – Player rotation (degrees) Player Connection
{player_ping} – Connection time in seconds {player_ip} – Player's IP address {player_auth_level} – Authorization level (0=Player, 1=Moderator, 2=Admin) {player_steam_id} – Steam ID {player_connected_time} – Connection start time {player_idle_time} – Idle time (HH:MM:SS) Player States
{player_sleeping} – Is sleeping (true/false) {player_wounded} – Is wounded (true/false) {player_dead} – Is dead (true/false) {player_building_blocked} – Is building blocked (true/false) {player_safe_zone} – Is in safe zone (true/false) {player_swimming} – Is swimming (true/false) {player_on_ground} – Is on ground (true/false) {player_flying} – Is flying (true/false) {player_admin} – Is admin (true/false) {player_developer} – Is developer (true/false) Network & Performance
{network_in} – Network input (currently shows 0) {network_out} – Network output (currently shows 0) {fps} – Server FPS {memory} – Memory allocations {collections} – Garbage collections count Usage Example:
You can use these fields in any text component like: "Welcome {player_username}! Server has {online_players}/{max_players} players online."
🔧 API Documentation for Developers
ServerPanel provides an API for plugin developers to integrate their plugins into the menu system.
Required Methods
API_OpenPlugin(BasePlayer player) - Main integration method that returns CuiElementContainer OnServerPanelClosed(BasePlayer player) - Called when panel closes (cleanup) OnServerPanelCategoryPage(BasePlayer player, int category, int page) - Called when category changes (cleanup) OnReceiveCategoryInfo(int categoryID) - Receives your category ID Integration Example
[PluginReference] private Plugin ServerPanel; private int _serverPanelCategoryID = -1; private void OnServerInitialized() { ServerPanel?.Call("API_OnServerPanelProcessCategory", Name); } private void OnReceiveCategoryInfo(int categoryID) { _serverPanelCategoryID = categoryID; } private void OnServerPanelCategoryPage(BasePlayer player, int category, int page) { // Cleanup when player switches categories } private CuiElementContainer API_OpenPlugin(BasePlayer player) { var container = new CuiElementContainer(); // Create base panels (required structure) container.Add(new CuiPanel() { RectTransform = {AnchorMin = "0 0", AnchorMax = "1 1"}, Image = {Color = "0 0 0 0"} }, "UI.Server.Panel.Content", "UI.Server.Panel.Content.Plugin", "UI.Server.Panel.Content.Plugin"); container.Add(new CuiPanel() { RectTransform = {AnchorMin = "0 0", AnchorMax = "1 1"}, Image = {Color = "0 0 0 0"} }, "UI.Server.Panel.Content.Plugin", "YourPlugin.Background", "YourPlugin.Background"); // Add your plugin's UI elements here container.Add(new CuiLabel { RectTransform = {AnchorMin = "0.1 0.8", AnchorMax = "0.9 0.9"}, Text = {Text = "Your Plugin Interface", FontSize = 16, Align = TextAnchor.MiddleCenter, Color = "1 1 1 1"} }, "YourPlugin.Background", "YourPlugin.Title"); // Add buttons, panels, etc. using "YourPlugin.Background" as parent return container; } private void OnServerPanelClosed(BasePlayer player) { // Cleanup when panel closes } Header Update Fields
API_OnServerPanelAddHeaderUpdateField(Plugin plugin, string updateKey, Func<BasePlayer, string> updateFunction) - Registers a per-player string provider for a header placeholder. Returns true on success. API_OnServerPanelRemoveHeaderUpdateField(Plugin plugin, string updateKey = null) - Unregisters a specific updateKey for your plugin, or all keys for your plugin when updateKey is null. Returns true on success. Usage Example
[PluginReference] private Plugin ServerPanel; private void OnServerInitialized() { // Register a dynamic header field for each player ServerPanel?.Call("API_OnServerPanelAddHeaderUpdateField", this, "{player_kdr}", (Func<BasePlayer, string>)(player => GetKdr(player))); } private string GetKdr(BasePlayer player) { // Compute and return the value to display in the header for this player return "1.23"; } Using in UI: Place your key (e.g., {player_kdr}) directly in Header Field texts. The value will be updated per player using your function.
📚 FAQ
Q: Why can't I open the menu?
A: Make sure that the plugin is installed and activated on your server. If the problem persists, contact the server administrator.
Q: How do I enable Expert Mode? (disables automatic template updates)
A: In the data file "Template.json", turn on the "Use an expert mod?" option:
"Use an expert mod?": true, P.S. "Template.json” is located in the "oxide/data/ServerPanel" directory (if you use Oxide) or in the "carbon/data/ServerPanel" directory (if you use Carbon)
Q: I see black images with Rust logo or get error 429 when loading images. What should I do?
A: These issues occur when there are problems downloading images from the internet. To fix this, enable Offline Image Mode which will use local images instead:
Enable the mode in config: Open "oxide/config/ServerPanel.json" (or "carbon/config/ServerPanel.json" for Carbon) Set "Enable Offline Image Mode": true Set up the images: Create folder "TheMevent" in "oxide/data" (or "carbon/data" for Carbon) Download PluginsStorage (click "CODE" → "Download ZIP") Extract the ZIP and copy all contents to the "TheMevent" folder Reload the plugin: Type o.reload ServerPanel (Oxide) or c.reload ServerPanel (Carbon) Note: If using a hosting service, you may need to use their file manager or FTP to upload the files.
Q: Does ServerPanel work only with Mevent's plugins?
A: Currently, ServerPanel integrates seamlessly with Mevent's plugins (Shop, Kits, Daily Rewards, etc.). However, other developers can use the provided API to integrate their plugins into the menu system. The plugin system is designed to be extensible for third-party integrations.
Q: Why do integrated plugins (Shop, Kits) have different window sizes?
A: Different plugins may use different templates for integration. Make sure all your integrated plugins use the same template version (V1, V2, etc.) that matches your ServerPanel template. Update the template in each plugin to ensure consistent sizing.
Q: The panel displays differently for different players. How can I make it show the same on everyone's screen?
A: This issue occurs when players have different UI scale settings. To fix this and ensure consistent display for all players:
Open the "Template.json" file located in "oxide/data/ServerPanel" (or "carbon/data/ServerPanel" for Carbon) Find the "Parent (Overlay/Hud)" setting in the "Background" section Change the value from "Overlay" to "OverlayNonScaled" Save the file and restart your server or reload the plugin Q: How can I change the video displayed in the ServerPanel interface to my own custom video?
A: Yes, you can replace the default video with your own! You need to find and modify the command:
serverpanel_broadcastvideo [your_video_url] Replace [your_video_url] with the direct link to your video. For best compatibility, we recommend hosting your video on imgur.com.
Q: My custom images are not loading or show as blank/question marks. What image hosting should I use?
A: For custom images, we recommend using imgbb.com for image hosting. Avoid Imgur and services without direct access to the image. For the most reliable experience, use Offline Image Mode with local images instead.
Q: How can I make plugin UIs open outside of the ServerPanel menu instead of inside categories?
A: You can configure buttons to execute chat commands that open plugin UIs independently. To do this:
In your button configuration, set "Chat Button": true Set the "Commands" field to "chat.say /command" (replace "command" with the actual plugin command) Example: To open the Cases plugin outside the menu:
"Chat Button": true "Commands": "chat.say /cases" This will execute the command as if the player typed it in chat, opening the plugin's interface independently rather than within the ServerPanel menu.
Q: Text in V4 template is shifting or sliding out of place. How can I fix this?
A: This issue occurs when text width isn't properly configured. ServerPanel provides "TITLE LOCALIZATION" settings to control text width for categories and pages:
Open the ServerPanel editor (click the "ADMIN MODE" button to open the edit menu) Select the category or page you want to edit (click to "EDIT CATEGORY" or "EDIT PAGE" button) In the editor, find the "TITLE LOCALIZATION" section For each language (en, ru, etc.), you'll see three columns: LANGUAGE - The language code TEXT - The localized text content WIDTH (px) - The width setting in pixels Adjust the "WIDTH (px)" value to match your text length. Longer text requires larger width values Save your changes and test in-game Tip: Start with a width value around 100-150 pixels for short text, and increase it for longer titles. You can adjust this value until the text displays correctly without shifting.
- #serverpanel
- #info
- (and 32 more)
-
$14.99
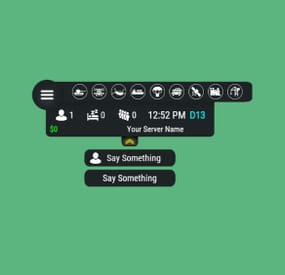
Server Hud
🗒️Features:
You can add any plugin event in the UI (if it has hooks, usually specified in the plugin description) Has ingame UI menu for configure your Hud The time format is adjusted to the player (depending on his language in the game), it checks which time format is used for this language You can also enable an additional menu that opens on the arrow. You can add various buttons to this menu, for example, to open a store, your server menu, etc. Almost all elements are customizable [for example: visibility of each element, Logo, Icons, Color e.t.c (check config down below)]
📕Commands:
/h setup - open UI for ingame config
/h - show all Server Hud UI commands
/h open - open Server Hud UI
/h events - open Events Bar
/h close - close Server Hud UI
/h hide - hide Server Hud UI
Q&A:
Q: Where i can find a base icon for creating my events icons?
A: Take a base icon below this message and using f.e photoshop for create you personal event icon!
Q: Where i can find a ready to use icons?
A: Here some links to ready to use icons packs(1 free, 2 paid):
https://codefling.com/customizations/free-custom-hud-icons
https://codefling.com/customizations/custom-hud-icons-paid
https://codefling.com/customizations/server-hud-custom-icon-pack
API:
string API_PlayerHudState(string id)
CanHudChangeState(BasePlayer player, string currentState, strint nextState)
🗒️Config:
{ "Auto reload [If you change the config and save the file the plugin will reload itself]": true, "Main setup": { "Overall layer [you will see the hud in your inventory]": false, "Size ALL [0% - inf]": 100, "Logo [HUD interact button]": "https://media.discordapp.net/attachments/335512864548847617/1134455399756607549/logo.png", "Events background opacity [0% - 100%]": 100, "Background opacity [0% - 100%]": 100, "Position": { "Align [TopLeft | TopRight | BottomLeft | BottomRight": "TopLeft", "Left | Right - offset": 40, "Top | Bottom - offset": 25 }, "Server name": "Your Server Name", "Active players": { "Icon": "https://cdn.discordapp.com/attachments/335512864548847617/1134455395813965934/active.png", "Color": "#fff", "Enable": true }, "Sleep players": { "Icon": "https://cdn.discordapp.com/attachments/335512864548847617/1134455395138670652/sleep.png", "Color": "#fff", "Enable": true }, "Queue players": { "Icon": "https://cdn.discordapp.com/attachments/335512864548847617/1134455393972654171/line.png", "Color": "#fff", "Enable": true }, "Time": true, "Player position [hide permisson - hud.streamer]": { "Enable": true, "true - grid | false - x,z coordinates": true, "Color": "cyan" }, "Economy plugin [Economics | ServerRewards]": { "Currency": "$", "Value color": "#10ff10", "Enable": true }, "Info messages": { "Update interval [in seconds]": 60, "Align [BottomCenter | TopCenter | TopRight]": "BottomCenter", "Width [in px]": 260, "Offset [top | bottom]": 0, "Offset [right]": 15, "Outline color": "#000", "Overall [you will see messages in your invenotory]": true, "Enable": true, "Messages": [ "Welcome to Your Server Name", "Good luck" ] }, "Additional menu": { "Auto close timer [seconds | 0 - disable]": 60, "Auto close after command use": true, "Open/Close button color": "yellow", "Commands background opacity [0% - 100%]": 100, "Enable": true, "Commands": [ { "Background image": "https://media.discordapp.net/attachments/335512864548847617/1134455392420761671/command.png", "Icon [optional]": "https://media.discordapp.net/attachments/335512864548847617/1134455395813965934/active.png", "Command": "chat.say Hello there", "Text": "Say Something", "Outline color": "#000", "Is Console": true }, { "Background image": "https://media.discordapp.net/attachments/335512864548847617/1134455392420761671/command.png", "Icon [optional]": "", "Command": "/shop", "Text": "Say Something", "Outline color": "#000", "Is Console": false } ] } }, "Base Events": [ { "Name": "Bradley", "Active color": "#10ff10", "Icon": "https://media.discordapp.net/attachments/335512864548847617/1134455316654850049/bradley.png", "Color": "#fff", "Enable": true }, { "Name": "PatrolHeli", "Active color": "#10ff10", "Icon": "https://media.discordapp.net/attachments/335512864548847617/1134455315073597530/heli.png", "Color": "#fff", "Enable": true }, { "Name": "CH47", "Active color": "#10ff10", "Icon": "https://media.discordapp.net/attachments/335512864548847617/1134455317485342803/ch47.png", "Color": "#fff", "Enable": true }, { "Name": "Cargo", "Active color": "#10ff10", "Icon": "https://media.discordapp.net/attachments/335512864548847617/1134455317086879794/cargo.png", "Color": "#fff", "Enable": true }, { "Name": "AirDrop", "Active color": "#10ff10", "Icon": "https://cdn.discordapp.com/attachments/335512864548847617/1134455316143161374/airdrop.png", "Color": "#fff", "Enable": true } ], "Custom Events": [ { "Hook OnEventStart": "OnConvoyStart", "Hook OnEventStop": "OnConvoyStop", "Name": "Convoy", "Active color": "#10ff10", "Icon": "https://media.discordapp.net/attachments/335512864548847617/1134455318030598154/convoy.png", "Color": "#fff", "Enable": false }, { "Hook OnEventStart": "OnSputnikEventStart", "Hook OnEventStop": "OnSputnikEventStop", "Name": "Sputnik", "Active color": "#10ff10", "Icon": "https://cdn.discordapp.com/attachments/335512864548847617/1134455315488854016/sputnik.png", "Color": "#fff", "Enable": false }, { "Hook OnEventStart": "OnArmoredTrainEventStart", "Hook OnEventStop": "OnArmoredTrainEventStop", "Name": "ArmoredTrain", "Active color": "#10ff10", "Icon": "https://cdn.discordapp.com/attachments/335512864548847617/1134455315841155173/train.png", "Color": "#fff", "Enable": false }, { "Hook OnEventStart": "OnHarborEventStart", "Hook OnEventStop": "OnHarborEventEnd", "Name": "Harbor", "Active color": "#10ff10", "Icon": "https://cdn.discordapp.com/attachments/335512864548847617/1134455318332592219/harbor.png", "Color": "#fff", "Enable": false } ] }- #hud
- #interface
- (and 6 more)
-
$30.00
BetterTC
Fed up with the need to use multiple addons on my server for functions that players could execute from within the game, and considering the constant increase of new Skins for builds, I found myself dissatisfied with the limited supply of automatic upgrades on the market.
For this reason, I have reworked the most used TC-related features on my server into a single plugin, which has been enriched with ideas contributed by players and other Rust administrators.
All this under an attractive graphical interface, inspired by the item store of the game itself.
Video Update 1.5.0
Video Update 1.4.9
Video Update 1.4.0
Old Video
Features
AUTOMATIC CONSTRUCTION SKINS
With BetterTC your players will be able to improve their builds to any level of improvement, but they will also be able to choose their favorite Skin (if you enable it) completely free of charge or offering it to the VIPS on your server. Update system: I have added a small system that checks for new skins to automatically add them to the configuration. When you install the plugin for the first time and once you obtain permission from bettertc.admin, you must click on "Check Update" so that it performs an internal check and adds all the skins and options that exist to date.
LIST OF AUTHORIZED PLAYERS
It allows players or simply the rest of the Staff to easily see which players are authorized in the locker. Except for the administrators themselves, if you activate it in the config. (I don't think any player needs to know that the admin was authorized in their locker to check something) You can also allow authorizations to be deleted individually.
AUTOMATIC IMPROVEMENT SYSTEM
Allows your players to upgrade the grade of their bases automatically by obtaining resources directly from the TC. As long as they don't have RaidBlock (if you use NoEscape/RaidBlock plugin of course). You can configure different speed levels and costs depending on the player's permission from the plugin's own settings. That is, you can have players improve a building every 5 seconds for free and VIPs can improve every 2 or 1... Use your imagination! In addition, you can also calculate the cost of materials that will be required to carry out said improvement by clicking on the info button.
A new setting has been added to disable the Container skin's multi-color option. Disabling this option, which is enabled by default, will slightly improve frame rates in builds using this skin: Fewer colors = Better performance (FPS Client).
AUTOMATIC RESKIN OF EXTERNAL WALLS
The plugin also includes an automatic reskin system for external walls.
Previously, it was only compatible with standard stone external walls and their adobe variant. Now, it also includes the ability to switch wooden walls to Frontier and vice versa. Ice walls have also been added as a variant for stone.
If you place regular stone external walls (the usual ones), you can change their appearance to adobe or ice by clicking on the corresponding wall icon.
When changing the skin, the original wall's health will be preserved, so if it’s damaged, it won’t be fully restored. This prevents players from abusing the system.
Important:
I recommend using the system for external walls as an appearance modification system, not as an upgrade system. In other words, with the following configuration: "Only reskin on wall of the same grade": true
If you disable this parameter, you will be able to change from wood to stone, or vice versa, completely free of charge. Since the wall system doesn’t have a cost mechanism for players, I recommend keeping this option enabled.
AUTOMATIC REPAIR SYSTEM
Allows your players to repair their bases automatically by obtaining resources directly from the TC. As long as they don't have RaidBlock (if you use NoEscape of course). Now since version 1.4.0 it will also repair damaged objects such as doors, trapdoors, windows, boxes!
With configurable cooling system to prevent repair abuse during raids. ("Repair Cooldown After Recent Damage (seconds)": 30.0)
AUTOMATIC CONSTRUCTION DEGRADATION
It allows players to regret upgrading their huge base to metal and not being able to afford it anymore. Of course, it will charge them resources as if they improved it from 0. However, if you do not want to allow downgrade you can disable it from the config.
AUTOMATIC WALLPAPER PLACEMENT
Allows your players to place any available wallpaper in the game automatically based on the building type. Support for wallpapers on walls, ceilings, and floors.
Wallpapers are always kept up-to-date automatically. So if FacePunch adds new wallpapers, they will be instantly added to the list.
You'll also enjoy my exclusive wallpapers. Since update 1.5.0, you can also add and remove custom wallpapers with the following commands.
Chat Command:
Usage: /addwp <skinid> <Wall|Floor|Ceiling>, Example: /addwp 3356517390 Wall, Usage: /wpb (It allows you to place wallpapers on boats. To do this, you must first sit at the boat’s steering wheel.) Console Command:
Usage: addwp <skinid> <Wall|Floor|Ceiling>, Example: addwp 3356517390 Wall I've added a new parameter to the config: "Wallpaper Damage": true Setting this parameter to false prevents wallpapers from being broken in melee or with ammunition. However, you can still break them with C4 or missiles. Blocking damage completely is more complex and, in my opinion, unnecessary.
In addition, with BetterTC you can place wallpapers on both sides of the walls, even if they are on the outside of the building, as it includes an option in the configuration to force this placement.
TC SKINS
Give your players the ability to change the appearance of their TC.
ALLOWS TO SAVE OLD ITEMS
A new configuration option has been added to allow saving items back to the TC.
"Allow items in TC inventory": { "gunpowder": false, "sulfur": false, "sulfur.ore": false, "explosives": false, "diesel_barrel": false, "cctv.camera": false, "targeting.computer": false }
CONSTRUCTION EFFECTS
Allows players to disable auto-build buff effects and reduces headaches.However, if you do not want to allow them to disable this, you can disable it from the config.
BETTER GUI
The plugin's interface has been programmed so that it maintains its size regardless of the interface scaling settings of each player. It has also been taken into account that perhaps not everyone wants to enable all options for their players. Therefore, the buttons that appear at the top of the TC have been programmed so that if a player does not have permission for a specific function, instead of leaving the space empty, the buttons adapt their position automatically. The player list GUI and construction SKINS have also been prepared with a pagination system if necessary. 95% of the images used in the plugin are loaded directly from the client side, thus optimizing the loading and rendering of the interface and reducing the use of Image Library. Carbon Image Module support. If your server is running Carbon instead of Oxide, it will now use the built-in module instead of the Image Library.
Permissions
bettertc.admin Exclusive for Admin. It allows you to check if there are new skins to add. You will not appear in the list of authorized players if the option in the settings is activated. bettertc.authlist Shows a button at the top of the TC to check which players are authorized. bettertc.deleteauth Allows you to individually revoke an authorized player. You can give this permission to players if you want them to be able to delete individually. bettertc.use It is the basic degree of use found in the configuration. bettertc.vip It is the level of use for advanced that is found in the configuration. Depending on how you configure it, it makes players with this permission improve/repair/change skin faster. Or it simply costs them less resources. bettertc.repair Displays a button on top of the TC to repair the build automatically. bettertc.repair.nocost No explanation needed I think. (USE WITH CAUTION) bettertc.reskin Allows players to change the skin of their build automatically. Imagine one day you upgrade your entire foundation to container and the next day you regret losing FPS and would like to leave it on normal metal. bettertc.reskin.nocost No explanation needed I think. bettertc.updefault Shows players the default upgrade options. Without SKINS. bettertc.upskin Show players upgrade options with SKINS. bettertc.upwall Allows players to change the skin of external walls. bettertc.upgrade Permission to evade blocking of all items. bettertc.upgrade.nocost No explanation needed I think. (USE WITH CAUTION) bettertc.wallpaper Allows players to place Wallpaper. bettertc.wallpaper.nocost No explanation needed I think. (USE WITH CAUTION) bettertc.wallpaper.custom Display custom wallpapers to players with this permission. bettertc.tcskinchange Allows players to change the TC skin. bettertc.tcskindeployed Allows players to place TC with Skin.
Commands
Chat Command:
Usage: /addwp <skinid> <Wall|Floor|Ceiling>, Example: /addwp 3356517390 Wall, Console Command:
Usage: addwp <skinid> <Wall|Floor|Ceiling>, Example: addwp 3356517390 Wall
Configuration
DEFAULT CONFIGURATION
{ "Check for updates when loading": true, "Bypass DLC ownership check (⚠ only allowed on creative/test servers per Facepunch rules)": false, "Use NoEscape Plugin": false, "Use RaidBlock Plugin": true, "GUI Buttons TC - Color Default": "0.3 0.40 0.3 0.60", "GUI Buttons TC - Color Active": "0.90 0.20 0.20 0.50", "GUI Buttons TC - OffsetMin": "280 621", "GUI Buttons TC - OffsetMax": "573 643", "GUI Buttons TC - AnchorMin": "0.5 0", "GUI Buttons TC - AnchorMax": "0.5 0", "Alert Gametip": true, "Alert Chat": true, "Alert Notify Plugin": false, "Notify: select what notification type to be used": { "error": 0, "info": 0 }, "Color Prefix Chat": "#f74d31", "Show Admin Auth List": false, "Show SteamID Auth List": true, "Upgrade Effect": true, "Colour Selection MultiColor Option": false, "Reskin Enable": true, "Reskin Wall Enable": true, "Only reskin on wall of the same grade": true, "Reskin Wall TC Distance (Default: 100)": 100.0, "Deployables Repair": true, "Repair Cooldown After Recent Damage (seconds)": 30.0, "Downgrade Enable": true, "Downgrade only Owner Entity Build": false, "Upgrade only Owner Entity Build": false, "Upgrade / Downgrade only Owner and Team": true, "Wallpaper Enable": true, "Wallpaper placement Cost (Cloth)": 5, "Wallpaper Damage": true, "Wallpaper both sides": true, "Force both sides including external sides": true, "Cooldown Frequency Upgrade (larger number is slower)": { "bettertc.use": 2.0, "bettertc.vip": 1.0 }, "Cooldown Frequency Reskin (larger number is slower)": { "bettertc.use": 2.0, "bettertc.vip": 1.0 }, "Cooldown Frequency Repair (larger number is slower)": { "bettertc.use": 2.0, "bettertc.vip": 1.0 }, "Cooldown Frequency Wallpaper (larger number is slower)": { "bettertc.use": 2.0, "bettertc.vip": 1.0 }, "Cost Modifier for repairs": { "bettertc.use": 1.5, "bettertc.vip": 1.0 }, "Allow Items in TC Inventory": { "gunpowder": false, "sulfur": false, "sulfur.ore": false, "explosives": false, "diesel_barrel": true, "cctv.camera": true, "targeting.computer": true }, ... ] }
Bonus
KNOWN ISSUES
Random spawn of default (blue) wallpapers in constructions. If this happens on your server, it's likely because you have the TruePVE plugin or a similar one installed. Make sure to disable the configuration option that protects wallpaper damage in that plugin.
Instead, enable wallpaper damage protection in BetterTC. While it won't prevent 100% of the damage to wallpapers, it will significantly reduce it—especially from melee weapons.
For any problem, doubt, suggestion or assistance do not hesitate to contact me by Discord ninco90#6219
If you need me to configure everything from scratch, according to your tastes, for your server I can also do it for an additional fee. Although you should be able to configure everything yourself 😊
- #builder
- #automation
- (and 9 more)
-
$29.95$21.95Shop
Enjoy a highly customizable Shop that can be configured in game! Use NPCs as shopkeepers, and set up a shop with ease using the game interface to add, edit, or remove items on the fly!
⭐ Features of Shop
Beautiful user interface with multiple templates (Fullscreen, In-Menu V1/V2/V4) Shopping Basket - add multiple items to cart and purchase them all at once Search functionality - search for items by name across all categories Pagination - efficient item browsing with page-by-page navigation Discount system (by permissions) with per-item custom discounts Automatic shop filling (+ the plugin has support for the ItemCostCalculator plugin) Selling items (players can sell items to the store and receive money for it) Sell containers configuration - choose which containers (main, belt) players can sell from Blocked skins - prevent selling of specific item skins High performance with optimized item loading Adding/editing/removing items IN GAME with visual editor Supports NPC shops (HumanNPC integration) Supports Custom Vending Machines Supports NoEscape plugin integration Supports Duel/Duelist - blocks shop access during duels Convert from ServerRewards Favorite items system - players can mark items as favorites Buy Again feature - quick repurchase of previously bought items By default, the plugin has English, Russian and Chinese translations LangAPI integration for custom translations Transfer money between players directly in the plugin (including offline players option) Shop allows you to use multiple economy plugins at once (players can choose what they want to pay with) For each item, you can choose which payment methods are available and how much they will cost, based on the selected method Cooldown system - per-item buy/sell cooldowns with per-permission overrides Wipe cooldown - block items for purchase/sale after server wipe Respawn cooldown - prevent shop access immediately after respawn Buy/Sell limits - lifetime and daily limits per permission Max buy/sell amount - limit items per transaction Force buy - fast purchase without confirmation dialogs Plant genes configuration for plant items Weapon configuration - spawn weapons with ammo and attachments Content system - configure container contents (liquid, weapon mods, etc.) Customizable UI - full color customization and formatting options Offline Image Mode - use local images instead of downloading from internet Image loading on login - preload images when players connect Console and file logging - comprehensive logging system ServerPanel integration - add Shop to ServerPanel menu Notify/UINotify integration for notifications Auto-wipe settings - automatically reset cooldowns, limits, and player data on wipe Discord Logging - Track all purchases, sales, and transfers directly in your Discord server via webhooks with customizable embeds API methods for other plugins to interact with Shop
🎮 Commands
shop - open shop interface shop.install – starts the shop installation process shop.refill <recovery_rate> - refill shop again
recoveryRate: A value between 0 and 1 that determines the multiplier for the cost of selling items. For example, shop.refill 0.5 means that items will have a sale cost of 50% of their purchase cost. shop.convert.sr [clear] - convert items from ServerRewards to Shop. The option clear means clearing Shop items before converting shop.setvm [categories: cat1 cat2 ...] - add custom VM in config shop.setnpc [categories: cat1 cat2 ...] - add NPC in config shop.remove all - a console command to remove all items and categories from the plugin shop.remove item [category name/all] - a console command to remove an item (or all items) shop.remove category [category name/all] - a console command to remove a category (or all categories) shop.fill.icc [all/buy/sell] - a console command for updating prices of items in the store using ItemCostCalculator. all - updates both Price and SellPrice, buy - updates Price, sell - updates SellPrice shop.convert.from.1.2.26 – command to convert Shop plugin version 1.2.26 to version 1.3.0+ shop.reset – resets store data, including templates, configurations, and items. shop.reset template – resets the store interface template data. shop.reset config – resets store configuration data. shop.reset items – resets store items data. shop.reset full – completely resets all store data (templates, configurations and items). shop.manage – used to manage the Shop plugin. shop.manage economy list – displays a list of all available economic systems in the plugin. shop.manage economy set <economy_ID> <name> – sets the selected economic system by plugin ID and name. The command updates the corresponding economic system on the server and saves the changes in the configuration. FOR EXAMPLE:
shop.manage economy set 0 Economics – sets the main economy plugin to "Economics".
shop.manage economy set 1 ServerRewards – sets the additional economy system with ID 1 to "ServerRewards". shop.wipe – manually trigger wipe (resets cooldowns, limits, and player data) shop.change – change item category (used in editor) shop.item – console command for item actions
🛡️ Permissions
shop.setvm - for command "shop.setvm" shop.setnpc - for command "shop.setnpc" shop.free - for free item purchases shop.admin - admin permission shop.bypass.dlc - allows bypassing Facepunch ToS item restrictions (WARNING: your server may be banned for this)
📈 API Methods
The Shop plugin provides API methods for other plugins to interact with it:
API_OpenPlugin(BasePlayer player) – opens the shop UI for a player. Returns empty string if failed, or UI data if successful. API_GetShopPlayerSelectedEconomy(ulong playerID) – returns the economy ID (0 = main, 1+ = additional) that the player has selected for shopping. Note: Other plugins can call these methods using Shop.Call("API_MethodName", ...) syntax.
⚖️ Sort Types
None Name Amount PriceDecrease PriceIncrease
🧬 Category Types
None – normal category for items Favorite – category for favorite items Hidden – hidden category, available only in NPC stores or Vending Machines
🎥 Video
P.S. Video of the old version, video for the V2+ version is now in development
🖼️ Showcase
Full screen Templates
Template OLD STYLE
Template NEW RUST
In-Menu Templates
Template V1 (V1.1)
Template V1 (V1.1) with BASKET
Template V2
Template V2 with BASKET
Template V4
Template V4 with BASKET
Installer
Editor
📢 Discord Logging
Track all shop activity via Discord webhooks: purchases, sales, and money transfers.
🧪 TEST SERVER
Join our test server to view and experience all our unique features yourself!
Copy the IP Address below to start playing!
connect 194.147.90.239:28015
📚 FAQ
Q: I get the message "The plugin does not work correctly, contact the administrator!”. What should I do?
A: This means that your plugin is not installed. To install the plugin, use the command "/shop.install”. You need to have "shop.admin” permission to access this command.
Q: Where can I see an example of a config?
A: Config
Q: How to use BankSystem to store the economy
A:
"Economy": { "Type (Plugin/Item)": "Plugin", "Plugin name": "BankSystem", "Balance add hook": "Deposit", "Balance remove hook": "Withdraw", "Balance show hook": "Balance", "ShortName": "", "Display Name (empty - default)": "", "Skin": 0, "Lang Key (for Title)": "LangTitle", "Lang Key (for Balance)": "BalanceTitle" }, Q: How to use ServerRewards to store the economy
A:
"Economy": { "Type (Plugin/Item)": "Plugin", "Plugin name": "ServerRewards", "Balance add hook": "AddPoints", "Balance remove hook": "TakePoints", "Balance show hook": "CheckPoints", "ShortName": "", "Display Name (empty - default)": "", "Skin": 0, "Lang Key (for Title)": "LangTitle", "Lang Key (for Balance)": "BalanceTitle" }, Q: How to use Economics to store the economy
A:
"Economy": { "Type (Plugin/Item)": "Plugin", "Plugin name": "Economics", "Balance add hook": "Deposit", "Balance remove hook": "Withdraw", "Balance show hook": "Balance", "ShortName": "", "Display Name (empty - default)": "", "Skin": 0, "Lang Key (for Title)": "LangTitle", "Lang Key (for Balance)": "BalanceTitle" }, Q: How to use IQEconomic to store the economy
A:
"Economy": { "Type (Plugin/Item)": "Plugin", "Plugin name": "IQEconomic", "Balance add hook": "API_SET_BALANCE", "Balance remove hook": "API_GET_BALANCE", "Balance show hook": "API_REMOVE_BALANCE", "ShortName": "", "Display Name (empty - default)": "", "Skin": 0, "Lang Key (for Title)": "LangTitle", "Lang Key (for Balance)": "BalanceTitle" }, Q: How to use scrap to pay for items
A:
"Economy": { "Type (Plugin/Item)": "Item", "Plugin name": "", "Balance add hook": "", "Balance remove hook": "", "Balance show hook": "", "ShortName": "scrap", "Display Name (empty - default)": "", "Skin": 0, "Lang Key (for Title)": "LangTitle", "Lang Key (for Balance)": "BalanceTitle" }, Q: How to add KIT as shop item
A: https://pastebin.com/4szBQCgz
Q: How to add Command as shop item
A: https://pastebin.com/bcCkzBEL
Q: How do I make a weapon spawn with ammo in it?
A: You need to configure the "Weapon" section in the item config:
"Weapon": { "Enabled": true, "Ammo Type": "ammo.rifle.explosive", "Ammo Amount": 128 } Q: How do I make items spawn some content (liquid, weapon modifications)?
A: You need to configure the "Content" section in the item config:
"Content": { "Enabled": true, "Contents": [ { "ShortName": "weapon.mod.lasersight", "Condition": 100.0, "Amount": 1, "Position": -1 } ] }, Q: How to turn off the sell feature?
A: You need to turn off "Enable item selling” in the config, or do it in the item setting in the game.
"Enable item selling?": false,
Q: How to use the ItemCostCalculator with Shop?
A: You need to use command "shop.refill" (command to refill the Shop)
Q: What should be the size of images for item icons?
A: Typically, the image dimensions for item icons are 512x512 pixels, but any square image can suffice.
Q: I get the error "UI is unavailable for player. Reason: Menu UI is not initialized". How to fix it?
A: This error occurs when the interface template is not installed or configured. Follow these steps:
1. Reset the template using the command: shop.reset template (use only template to avoid data loss).
2. Install the interface via shop.install in the game (to visually select a template) or through the console.
Note: Ensure you have the shop.admin permission to execute these commands.
Q: How do I add Shop to the ServerPanel menu?
A: Follow these simple steps:
1. Open ServerPanel menu in-game and click "+ADD CATEGORY" button
2. Set these exact parameters:
Type: Plugin Plugin Name: Shop Plugin Hook: API_OpenPlugin 3. Click "SAVE" button to create the category
4. Reset Shop template and install it:
Type in console: shop.reset template (IMPORTANT: use only "template"!) Then type: shop.install Note: If Shop doesn't appear in ServerPanel menu, make sure both plugins are loaded and you typed the parameters exactly as shown above.
Q: I see black images with Rust logo or get error 429 when loading images. What should I do?
A: These issues occur when there are problems downloading images from the internet. The Shop plugin sends images to ImageLibrary but is not responsible for the downloading process itself. Error 429 typically occurs due to rate limits imposed by image hosting services like Imgur (see HTTP 429 documentation for more details). To fix this, enable Offline Image Mode which will use local images instead:
Enable the mode in config: Open "oxide/config/Shop.json" (or "carbon/config/Shop.json" for Carbon) Set "Enable Offline Image Mode": true Set up the images: Create folder "TheMevent" in "oxide/data" (or "carbon/data" for Carbon) Download PluginsStorage (click "CODE" → "Download ZIP") Extract the ZIP and copy all contents to the "TheMevent" folder Reload the plugin: Type o.reload Shop (Oxide) or c.reload Shop (Carbon) Note: If you want to add your own custom images, place them in the "TheMevent" folder and reference them with the "TheMevent/" prefix. For example: "TheMevent/Icon1.png", "TheMevent/MyCustomIcon.jpg", etc.
Q: What placeholders are available for commands and what do they do?
A: You can use these placeholders in shop commands and they will be automatically replaced when a player purchases a command item:
%steamid% - Replaced with the player's Steam ID (e.g., "76561198000000000") %username% - Replaced with the player's display name (e.g., "PlayerName") %player.x% - Replaced with the player's X coordinate position %player.y% - Replaced with the player's Y coordinate position %player.z% - Replaced with the player's Z coordinate position Example usage in shop commands:
"Command (%steamid%)": "say Welcome %username%!|teleport %steamid% %player.x% %player.y% %player.z%" Note: Multiple commands can be separated by the "|" character, and they will be executed in sequence when the item is purchased.
Q: How to set different prices for different currencies (RP and balance)?
A: You can configure separate currency prices for each item. Edit the file oxide/data/Shop/Shops/Default.json and find the item you want to modify. In the "Currencies" section, set different prices for each economy:
"Currencies": { "Enabled": true, "Currencies": { "0": {"Price": 1000}, "1": {"Price": 500} } } This means players pay 1000 from their main balance (Economics) or 500 RP from their ServerRewards balance. Economy ID 0 = main economy, ID 1 = ServerRewards.
Q: How to create a shop using HumanNPC plugin and set specific categories?
A: To create a shop with HumanNPC, follow these steps:
Create an NPC using HumanNPC plugin Get the NPC ID (you can find it in the HumanNPC config or use the command humannpc.list) Use the Shop command to add the NPC: shop.setnpc [categories: cat1 cat2 ...] Example:
shop.setnpc categories: Weapon Ammunition Tools - adds the NPC with Weapon, Ammunition, and Tools categories
shop.setnpc categories: * - adds the NPC with all available categories
Note: You need the shop.setnpc permission to use this command. Make sure both HumanNPC and Shop plugins are loaded on your server.
Q: How to add Custom Vending Machines to Shop plugin?
A: To add Custom Vending Machines to Shop, follow these steps:
Place a Custom Vending Machine in your world Look at the vending machine and use the command: shop.setvm [categories: cat1 cat2 ...] Example:
shop.setvm categories: Weapon Ammunition - adds the vending machine with Weapon and Ammunition categories
shop.setvm categories: * - adds the vending machine with all available categories
Note: You need the shop.setvm permission to use this command. The vending machine will be automatically added to the Shop configuration.
Q: How does the Shopping Basket feature work?
A: The Shopping Basket allows players to add multiple items to a cart before purchasing. Players can add items to the basket, review their selection, and purchase everything at once. The basket shows the total cost and allows players to remove items before checkout. This feature must be enabled in the template settings.
Q: How does the Search functionality work?
A: The Search feature allows players to search for items by name across all categories. Simply type in the search box and the shop will filter items matching your query. Search works across all enabled categories and respects permission settings. The search feature can be enabled/disabled in the template configuration.
Q: What are Wipe Cooldown and Respawn Cooldown?
A: These are time-based restrictions:
Wipe Cooldown: Blocks items from being bought/sold for a specified time after a server wipe. This is useful for preventing powerful items from being purchased immediately after wipe. Configure in config: "Wipe Cooldown": true and "Wipe Cooldown Timer": 3600 (seconds). Respawn Cooldown: Prevents players from opening the shop immediately after respawning. Helps prevent abuse. Configure in config: "Respawn Cooldown": true and "Respawn Cooldown Timer": 60 (seconds). Q: How do Daily and Lifetime Limits work?
A: Limits control how many times players can buy/sell items:
Lifetime Limits: Total number of times a player can buy/sell an item across their entire account. Set to 0 for unlimited. Daily Limits: Maximum number of times per day a player can buy/sell an item. Resets daily. Set to 0 for unlimited. Limits are per-permission, so you can set different limits for VIP players, regular players, etc. The plugin uses the highest limit among all permissions the player has. Q: What is the "Buy Again" feature?
A: Buy Again allows players to quickly repurchase items they have bought before. This feature shows a history button in the shop UI (if enabled) and requires a permission. To enable, set "Buy Again Settings": {"Enabled": true, "Permission": "shop.buyagain"} in the config.
Q: How do I configure blocked skins for selling?
A: You can prevent players from selling specific item skins. In the config, add entries to "Blocked skins for sell":
"Blocked skins for sell": { "rifle.ak": [52, 25], "pistol.m92": [100, 200] } Q: How do I configure which containers players can sell from?
A: In the config, set "Settings available containers for selling item":
"Settings available containers for selling item": { "Enabled": true, "Containers": ["main", "belt"] } Available container names: "main" (inventory), "belt" (hotbar), "wear" (clothing), etc.
Q: What are Auto-Wipe Settings?
A: Auto-Wipe Settings automatically reset certain data when you run the shop.wipe command. Configure in config:
"Auto-Wipe Settings": { "Cooldown": true, "Players": true, "Limits": true } Cooldown: Resets all item cooldowns Players: Resets all player data (favorites, economy selection, etc.) Limits: Resets all buy/sell limits Q: How do I customize price formatting?
A: In the config, set "Formatting Settings" to control how prices are displayed:
"Formatting Settings": { "Buy Price Format": "G", "Sell Price Format": "G", "Shopping Bag Cost Format": "G", "Balance Format": "G" } Format options: "G" (general), "N" (number with separators), "C" (currency), "F" (fixed-point), etc. See .NET number formatting for all options.
Q: How do I enable transfers to offline players?
A: In the config, set "Allow money transfers to offline players?": true. By default, this is disabled for security reasons.
Q: How do I configure Duel/Duelist integration?
A: To block shop access during duels, set "Blocking the opening in duels?": true in the config. Make sure you have the Duel or Duelist plugin loaded.
Q: What do all shop item settings mean and how should I configure them?
A: Below is a short explanation of the most important item fields and how they affect the plugin.
Type – what this entry does: Item (gives an in-game item), Command (runs server commands), Plugin (calls another plugin hook), Kit (gives a kit). ID – unique numeric ID of the item inside Shop. Used internally (for logs, favorites, editor); normally you don’t change it manually. Image – custom UI icon key. If empty, Shop will try to use the item icon found by ShortName. Permission – Oxide/Carbon permission required to see and use this item. Leave empty to make the item available to everyone, or set e.g. shop.vip for VIP‑only items. Title – custom title shown in the UI. If empty, the plugin will try to use DisplayName, then the in‑game display name of the item, or fall back to an empty string. Description – additional text shown in the item window. Optional, purely visual. Command (%steamid%) – used when Type = Command. The plugin will execute this command on the server. You can use placeholders like %steamid%, %username%, %player.x%, %player.y%, %player.z%. Each purchase can run multiple commands (split internally by |). Kit – kit name for Type = Kit. The plugin will give a kit with this name when the player buys the item. Plugin – used for Type = Plugin. Contains plugin name, hook name and amount. When the item is purchased, the specified hook will be called in the target plugin. DisplayName (empty – default) – overrides the in‑game item name shown to the player (for Type = Item). If empty, the plugin uses the original item display name (optionally via Lang API). ShortName – shortname of the item (e.g. rifle.ak). This is required for Type = Item; it is used to find ItemDefinition, icon, stack size, etc. Skin – workshop skin ID for the item. Only used when Type = Item. Is Blueprint – if enabled, Shop will give the item as a blueprint instead of the regular item. Amount – how many items are given/sold per one purchase. For blueprints this is how many separate blueprint items are created. Enable item buying? (CanBuy) – if disabled, the item cannot be bought (only sold, if selling is enabled). Price – default purchase price. Can be overridden per‑economy in Currencies – if a currency is configured for buying, its price will be used instead of this value. Enable item selling? (CanSell) – if disabled, players cannot sell this item back to the shop. Sell Price – default sell price. Can also be overridden in Currencies for selling. Buy Cooldown / Sell Cooldown – base cooldown in seconds between purchases/sales of this item. Can be overridden by per‑permission cooldowns below. Buy Cooldowns / Sell Cooldowns – per‑permission cooldowns. Keys are permission names (e.g. shop.vip), values are cooldown seconds. The plugin uses the lowest cooldown among permissions that the player has. Use custom discount? – if enabled, the item will use its own Discount map instead of the global discount configuration. Discount (%) – per‑permission discount percentages for this item (only if custom discount is enabled). The highest discount from permissions that the player has will be applied. Sell Limits / Buy Limits – global lifetime limits per permission. A value of 0 means “no limit”. The plugin selects the highest limit among permissions the player has. Daily Buy Limits / Daily Sell Limits – per‑day limits (reset by the plugin’s daily logic). 0 means “no daily limit”. Max Buy Amount / Max Sell Amount – maximum number of items that can be bought/sold in a single transaction (0 disables this limit). Force Buy – if enabled, the item will use fast purchase flow (without extra confirmation windows, depending on UI settings). Prohibit splitting item into stacks? – if enabled, the plugin will try to give the item in a single stack instead of splitting it into multiple stacks, when possible. Purchase/Sale block duration after wipe – time (in seconds) after a wipe during which this item cannot be bought/sold. Useful for limiting powerful items early in the wipe. Localization – per‑language messages for the item title. If enabled and a translation exists for the player’s language, it will override the normal title. Content – configuration of contents for containers (e.g. boxes, weapons with attachments, etc.). You can add inner items (shortname, amount, condition, position). Weapon – additional settings for weapons (ammo type, ammo amount, etc.). Applied when the item is created. Genes – plant gene configuration. If enabled, the plugin will set specified genes on the created item. Currencies – per‑economy price configuration. You can set different prices for each enabled economy plugin (by economy ID) for both buying and selling. If a currency is configured and enabled for the player’s selected economy, its price takes priority over the default Price/Sell Price. Q: What do shop category settings mean and how should I configure them?
A: Categories group your shop items and control how they are shown, sorted and filtered for players.
Enabled – turns this category on or off. If disabled, the category and all its items will not appear in the shop UI at all. Category Type – controls special behavior of the category: None – a normal category that shows the items you added to Items. Favorite – a virtual category that shows each player’s favorite items (based on their own favorites list). Items here are taken from other categories the player marked as favorite. Hidden – a hidden category. It is stored in data and can be used for management, but is not shown in the normal category list in UI. Title – the name of the category displayed in the UI. If Localization is enabled and contains a translation for the player’s language, that localized text will be shown instead of this value. Permission – permission required to see and use this category. If you leave it empty, all players can see the category (subject to item‑level rules). If you set e.g. shop.category.vip, only players with that permission will see this category in the shop. Sort Type – how items inside the category are sorted: None – items are shown in the order they are stored/edited. Name – items are sorted alphabetically by their PublicTitle (what the player sees). Amount – items are sorted by Amount (stack size) in ascending order. PriceIncrease – items are sorted by price from cheaper to more expensive. PriceDecrease – items are sorted by price from more expensive to cheaper. Sorting is applied every time the category items are requested. Items – the list of ShopItem entries that belong to this category. For normal categories (Type = None/Hidden) this is what will be displayed in the item grid. For Favorite categories this list is not used for display – the plugin uses the player’s favorites instead. Localization – optional localized title for the category. When enabled, the plugin will try to show a translated title based on the player’s language. If no translation is found, it falls back to the Title field. How visibility and filtering work – when the shop builds a category: For normal categories, only items that are available for the player (permission, currencies, buy/sell rules, etc.) are included. Skip/take pagination is applied on top of that filtered list to show items page by page. For favorite categories, the plugin takes the player’s favorite items, applies sorting, and displays them in this special category. Reordering categories and items – categories and items can be moved up/down (or left/right) in the in‑game editor. This changes the order in which categories are shown in the UI and the default order of items when Sort Type = None. Q: How do I enable and use ADMIN MODE?
A: ADMIN MODE is a visual in-game editor that allows you to manage your shop without editing files manually.
Step 1: Enable ADMIN MODE
Ensure you have the shop.admin permission Open shop with /shop command Click the "ADMIN MODE" button in the header (shows "■" when active) Step 2: Create/Edit Categories
To create a new category:
With ADMIN MODE enabled, click the "+" button in categories list Fill in category details (Title, Enabled, Type, Permission, Sort Type) Click "SAVE" To edit an existing category:
Click the "Edit" button (pencil icon) next to the category Modify settings Click "SAVE" or "CANCEL" Step 3: Create/Edit Items
To create a new item:
Open the target category Click "+ADD ITEM" button Select item from the selection panel Configure all item properties (price, amount, permissions, etc.) Click "SAVE" To edit an existing item:
Click the "Edit" button on the item Modify properties Click "SAVE" or "CANCEL" Additional ADMIN MODE Features:
Use ↑↓ arrows to reorder categories Use ←→ arrows to reorder items within categories Use "DELETE" button in editor to remove categories/items All changes save automatically - no manual file editing needed Q: Where are shop files stored and what do they contain?
A: Shop plugin data is organized in the following structure:
📁 Configuration (oxide/config/Shop.json or carbon/config/Shop.json)
Plugin settings (permissions, commands, economy configuration) Notification settings Discord logging configuration Global plugin options 📁 Shop Data (oxide/data/Shop/Shops/Default.json or carbon/data/Shop/Shops/Default.json)
This is the main shop inventory file All categories and their settings All items with prices, permissions, cooldowns, limits Item configurations (weapons, content, currencies, etc.) Edited through ADMIN MODE or manually 📁 UI Template (oxide/data/Shop/UI.json or carbon/data/Shop/UI.json)
Interface template configuration Colors, sizes, positions Display settings Reset with: shop.reset template then shop.install 📁 Player Data (oxide/data/Shop/Players/ or carbon/data/Shop/Players/)
Individual player files (one per player)