Chill Roleplay's Wishlist
-
$25.00
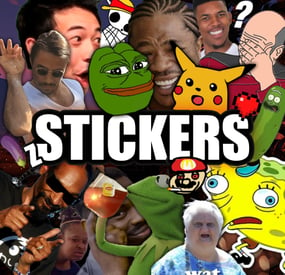
ZStickers
Forget about emoji, STICKERS are the next best thing to use in chat.
This plugin gives you and your players the ability to unlock stickers that can be used to express yourself in chat. Besides that, it adds a sticker market: Here stickers can be traded, which adds a great way for your players to make some good money on rare stickers.
Stickers are shown by using their :tag: in chat. By default, stickers are shown to every online player (players can turn them off individually by command). They popup on their screen and disappear in a few seconds. The possibilities are endless, and a lot of fun and interaction are guaranteed. You can add your own memes, cat pictures, word art or whatever image you can think of, tip: sneaky spiders give good results.
Sticker Editor
The main command for stickers is /sticker, but you will need some stickers first! Add any new stickers by using this command:
/sticker add :stickername: https://imgur.com/yoursticker.png After adding a sticker, you can find it in the sticker browser. Open the UI by using:
/sticker For admins (or people with the right permission) there is an in game sticker editor. From the browser, click the pencil icon on any sticker to start editing the sticker. The 3x3 grid sets your sticker’s start position, then you can align your sticker with the other values.
A group can be entered or chosen by clicking the … icon.
The 4 main tiers are only used for colors and not for real rarity, the only important tier here is the HIDE tier. Every sticker in this tier will not be available for players. Stickers are added in the hidden tier by default, so make sure to select another tier when you finish editing your sticker.
The TOTAL field is the maximum amount of copies of this sticker to be owned by players in total *. The right field shows the current number of owners.
* Stickers are limited!
Every sticker added to the plugin requires you to set up a maximum number of ‘owners’ for that sticker. The sticker can only be unlocked this many times.
Note that players can also have duplicate stickers. A sticker that has almost reached its max owners will be way harder to get when buying stickers. This rarity is useful in the sticker market and the recycler.
In the config file are settings for inactive players. After a certain amount of inactive days, X stickers will be taken from the player and become available again in the market.
Sticker Browser
Browse your stickers and click any sticker for details. The sticker browser has handy filters to quickly find the sticker you are looking for. Use the lock icons to toggle (un)locked stickers. Sorting is possible by age, a-z, rarity, collections (groups) and availability.
On the right side of the screen all sticker groups are shown.
These are basically collections of stickers that can be used like sticker packs. Collect them all!
Click any of the stickers to get more details, trade or recycle them. The eye icon on top of the sticker sends a chat message to show the sticker. Only visible for admins are the edit button (pencil) and lock/unlock button. The number on the top right shows the amount of this sticker you own. This sticker will be shown if a player who owns it uses :care: in global chat.
Buy Stickers
Players need sticker tokens to be able to unlock new random stickers.
Different packs with tokens can be set up in the config file. The (token) price of a sticker can also be configured. At the moment only random stickers are available.
You can unlock specific stickers for players by command. Tokens can also be given by (server) command, for example to be used as a vote or quest reward.
Sticker Market
In the sticker market, players can trade stickers they own. After setting a price, the sticker will be shown in the list of available trades. Other players can then buy the sticker and ownership will be transferred.
Sellers get paid in the same currency as the one setup for buying sticker tokens. In case you use items as a currency, the seller has to be online to make a trade.
Failed trades are being removed after a (configurable) amount of time.
Sticker Recycler
Besides trading your stickers, you can also decide to recycle them for sticker tokens.
The reward for recycling depends on the rarity of the sticker at that moment and the amount of the same sticker being recycled.
Recycling more of the same sticker results in higher rewards.
Permissions
zstickers.admin - needed for all sticker management zstickers.use - enables /sticker command zstickers.trade - allows to trade stickers zstickers.teamchat - allows players to use stickers in team chat (ninja mode)
Commands
/sticker - almost everything can be done inside the UI /sticker add :stickername: https://imgur.com/sticker.png - add stickers /sticker give <player name or id> <amount> - gives player x number of sticker tokens /sticker unlock <player name or id> :stickername: - unlocks a sticker for a player /sticker hide - hide all stickers /sticker show - show stickers again There are some debug commands in case something looks off (please report):
/sticker list - prints your unlocked stickers to chat /sticker clearallmystickers - clears all your stickers /sticker valid - validates all stickers and their owners /sticker update - refresh all sticker stats / find missing stickers /sticker cleanuptrades - manually cleans up sticker trades /sticker debug - logs what's happening to console /sticker stats - shows totals of stickers and their availability
Console commands
These commands can be used by admins and other plugins.
sticker givetokens <player name or id> <amount> - gives a player sticker tokens sticker unlock <player name or id> :stickername: - unlocks a sticker for a player sticker import <sticker pack name> - import sticker pack, see below for more info sticker import <sticker pack name> hidden - import a sticker pack but hide all stickers instead of using the sticker pack tiers
Config & Data
The config file is pretty straight forward. You can add or remove token packs. The currency is set by picking one of the numbers. If you want to use items as currency, make sure to setup the shortname of the item. Optionally you can add a skin ID too, so only items with a certain skin can be used to buy sticker tokens.
The plugin will create 3 files in /oxide/data/ZStickers/:
market_data.json - contains all trades, this data is automatically managed/wiped player_stickers.json - contains ownership data and token balance, you CAN wipe this, but this is not required: Players can keep their stickers forever, as long as they are active. stickers.json - contains all sticker data - don't wipe this if you want to keep your stickers. If you wipe this file, make sure to wipe the others too. New in version 1.1.0 is the ability to configure the buttons used to buy stickers. Check out the config below: The first item is the default buy-button (buy 1 sticker for 5 tokens). The 2nd item is a new custom buy button: Here you but 5 stickers at once for 22 tokens. Optionally you can also define what permission is needed to see the button and what collection (group) the sticker should be picked from.
Import Sticker Packs
Sticker packs are a way to easily add or share a bunch of stickers. They come with predefined settings, so it's basically plug and play. For sticker packs, a data folder called 'import' is created
/oxide/data/ZStickers/import/ Sticker packs can be added here to easy import a list of stickers. If the import folder is not there, you can create it yourself.
Add the sticker pack json file(s) to the folder and run the import command from your console. Results will be shown in your console. Stickers with the same :tag: can not be added this way. Make sure to remove other sticker first.
If you don't want the stickers to be visible for everyone right away, add the parameter 'hidden' to the import command. This will put all stickers in the hidden tier. Console command for example:
sticker import SuperCoolPack hidden
Dependencies & Plugin support
Required plugins: ImageLibrary
Optional currency plugins: ServerRewards, ZCoins
Economics plugin is added but untested, let me know if this works for you. This plugin will be fully supported.
Note: You can use any item with any skin if you're not using any of these plugins on your server.
Support / Contact me
If you encounter any problems or if you have any suggestions, feature requests or questions, please message me on Discord (josh.z) for the fastest response.
This plugin is made with love and I feel it's never really 'done'. I'd love to discuss your ideas for it on my Discord server here: https://discord.gg/KveEUQhGsZ
There's also a cool dude there (Nexus) who always sees your questions quicker than I do. If my response takes too long, find Nexus!
-
$25.00
Phone
By CommandoSoldat in Plugins
Phone is a roleplay based Plugin that give you a much better Phone book then the standart one from rust itselfe.
You can search for Phones by name and call directly from the ui.
If you have missed a call from a other person you can see those missed calls in the Missedcalls list and call them back from that list.
Also you are able to register more Apps in the PhoneUI and make it a universal tool to execute other plugin commands by a visual Phone app.
Whatch my Tutorial video to see all the details about it.
For more help and service check out my discord server.
Discord: https://discord.gg/5DDvvgyzsG
Tutorial Video
!!! [UI Updated] UI is not the same as in the video see pictures above !!!
Permissions
Phone.use - allows the player to use the Phone Plugin Lang files
German and English translation included
Data file
Missed calls will be saved
Config
{ "UI-Phone-Images": { "PhoneBook": { "URL": "https://cdn.discordapp.com/attachments/1096420611460448288/1113742113180495923/telefonbuch.png", "Command": "tb" } } } -
$18.89
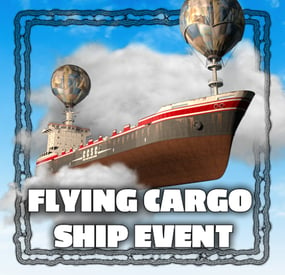
Flying Cargo Ship Event
By The_Kiiiing in Plugins
The Flying Cargo Ship introduces a new gameplay experience, with a cargo ship soaring through the skies, guarded by anti-air turrets. Players must disable these defenses by confronting NPCs at the control center, where they can also find the Air Card, granting access to the ship's lower deck.
Control Center
The Control Center spawns at a random monument and is guarded by NPCs. There is a button inside to disable the turrets on the flying cargo ship. An Air Card can also be found there, granting you access to the lower deck of the cargo ship.
Anit-Air Turret
The Flying Cargo Ship is equipped with Anti-Air Turrets. The turrets need to be disabled before approaching the ship.
Commands
Commands can be executed from the server console or the in-game F1 console
fcargo start fcargo stop Required permission:
flyingcargoship.admin
For developers
This hook gets called when the event starts
void OnFlyingCargoStart() This hook gets called when the event is over
void OnFlyingCargoEnd()
Configuration
{ "Schedule event": true, "Time between events (minutes)": 60, "Event duration (minutes)": 40, "Time before ship leaves after all crates have been looted (seconds)": 300, "Time before radiation when ship is leaving (seconds)": 30, "Double NPC count on ship": false, "Control center destroy time (seconds)": 300, "Control center NPC count": 8, "Use Loottable plugin for loot (requires Loottable)": true, "Ship loot configuration": { "IMPORTANT NOTICE": "The maximum total crate count is 21. If the crate count in the config is higher, excess crates will be ignored, starting at the lowest tier", "Locked crate count (total crate count shold be less than or equal to 21)": 4, "Elite crate count (total crate count shold be less than or equal to 21)": 4, "Military crate count (total crate count shold be less than or equal to 21)": 6, "Normal crate count (total crate count shold be less than or equal to 21)": 7, "Locked crate loot table": { "Enabled": true, "Item list": [ { "Short name": "scrap", "Min amount": 10, "Max amount": 100, "Chance (1 = 100%)": 1.0, "Skin id": 0 }, // Removed for legibility ] }, "Elite crate loot table": { "Enabled": false, "Item list": [] }, "Military crate loot table": { "Enabled": false, "Item list": [] }, "Normal crate loot table": { "Enabled": false, "Item list": [] }, "NPC loot table": { "Enabled": true, "Item list": [ // Removed for legibility ] } }, "Control center NPC loot table": { "Enabled": true, "Item list": [ // Removed for legibility ] }, "Control center NPC configuration": { "Npc name": "Air Scientist", "Health": 200.0, "Enable radio chatter": true, "Sense range (m)": 50.0, "Vision cone (degrees)": 135.0, "Damage scale (1 = 100%)": 1.0, "Memory duration (seconds)": 30.0, "Roam range (m)": 20.0, "Chase range (m)": 40.0, "Remove corpse on death and drop bag": true, "Kit (requires Kits plugin)": "", "Clothing items": [ { "shortName": "hazmatsuittwitch", "amount": 1, "skinId": 0 } ], "Belt items": [ { "shortName": "rifle.lr300", "amount": 1, "skinId": 0 }, { "shortName": "grenade.f1", "amount": 10, "skinId": 0 } ] }, "Cargo ship NPC configuration (Top)": { "Npc name": "Air Scientist", "Health": 250.0, "Enable radio chatter": true, "Sense range (m)": 100.0, "Vision cone (degrees)": 135.0, "Damage scale (1 = 100%)": 1.0, "Memory duration (seconds)": 30.0, "Roam range (m)": 1.0, "Chase range (m)": 1.0, "Remove corpse on death and drop bag": true, "Kit (requires Kits plugin)": "", "Clothing items": [ { "shortName": "hazmatsuittwitch", "amount": 1, "skinId": 0 } ], "Belt items": [ { "shortName": "rifle.lr300", "amount": 1, "skinId": 0 } ] }, "Cargo ship NPC configuration (Normal)": { "Npc name": "Air Scientist", "Health": 200.0, "Enable radio chatter": true, "Sense range (m)": 40.0, "Vision cone (degrees)": 135.0, "Damage scale (1 = 100%)": 1.0, "Memory duration (seconds)": 30.0, "Roam range (m)": 20.0, "Chase range (m)": 40.0, "Remove corpse on death and drop bag": true, "Kit (requires Kits plugin)": "", "Clothing items": [ { "shortName": "hazmatsuittwitch", "amount": 1, "skinId": 0 } ], "Belt items": [ { "shortName": "smg.mp5", "amount": 1, "skinId": 0 }, { "shortName": "grenade.f1", "amount": 10, "skinId": 0 } ] }, "Cargo ship NPC configuration (Inside)": { "Npc name": "Air Scientist", "Health": 250.0, "Enable radio chatter": true, "Sense range (m)": 20.0, "Vision cone (degrees)": 135.0, "Damage scale (1 = 100%)": 1.0, "Memory duration (seconds)": 30.0, "Roam range (m)": 10.0, "Chase range (m)": 20.0, "Remove corpse on death and drop bag": true, "Kit (requires Kits plugin)": "", "Clothing items": [ { "shortName": "hazmatsuittwitch", "amount": 1, "skinId": 0 } ], "Belt items": [ { "shortName": "shotgun.spas12", "amount": 1, "skinId": 0 }, { "shortName": "grenade.f1", "amount": 10, "skinId": 0 } ] } }
- #cargo
- #cargo ship
- (and 4 more)
-
$28.99
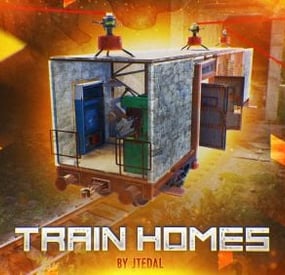
Train Homes
Live in one place? It's not interesting. Live in a camping car module? Too small. Have a full-fledged mobile home? That's what you need!
Video
Description
With this plugin, your players will be able to build their own small base on the wagon and wander around the server with it. Or you can even assemble a whole train of such wagons.
Chat Command (For admins)
/showfreewagons - Writes the number of available wagons to the console, and also shows their location on the server. (Permission is required for use)
/givewagon <amount> <SteamID or Name> - gives the specified player an item for the spawn of the wagon in the amount that you specify (Permission is required for use)
Chat Command (For Player)
/thinstruction - instructions on some features of the plugin
/removewagon - take a hammer in your hands, write a command and hit the wagon
Console Command (RCON only)
clearallwagons - clears the server of all custom wagons. Be careful! The action is irreversible and players will lose all their items and resources. It should be used only before you want to turn off the plugin from the server, because after unloading, custom wagons can be created on the server.
givewagon <amount> <SteamID or Name> - gives the specified player an item for the spawn of the wagon in the amount that you specify
Plugin Config
https://pastebin.com/jbsateCv Permissions
trainhomes.givewagon - gives permission to use the chat command /givewagon
trainhomes.showfreewagons - gives permission to view the location of free wagons
Hooks
private bool OnWagonSpawn(BasePlayer player) API
private bool IsEntityFromBaseWagon(ulong netIdValue) Returns true if the netId of the object belongs to the wagon
private bool IsBaseWagon(ulong netIdValue) Returns true if the netId belongs to a wagon on the base
private bool IsTrainHomes(ulong netIdValue) Returns true if the netId belongs to a wagon on the track
private bool IsFreeWagon(ulong netIdValue) Returns true if the netId belongs to a free wagon on the track
Check out more of my work here JTedal's library.
Come see our whole teams work Mad Mapper Library.
- #jtedal
- #mad mappers
- (and 10 more)
-
$6.00
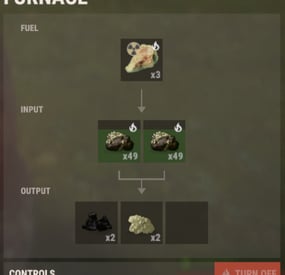
High Quality Fuel
⛽ This plugin adds a new fuel for furnaces, it allows the furnace to work longer, but it is radioactive and it will be dangerous to transfer it.
My other plugins
⛔ Does not work with:
Simple Splitter; ❔ New fuel can be extracted from certain containers, a list of which is specified in the configuration. You can turn it off, you can also turn off fuel recycling.
⚠️ While you have this fuel in your inventory, your radiation meter increases.
There is also a FuelAmountMultiple parameter that is responsible for the duration of 1 piece of fuel. Calculation formula, 1 point = ~2.2 seconds:
Time in seconds = FuelAmountMultiple * 2.2 / 60 (by default it is set ~7m 20s); 📄 Console commands:
give.nuclear.fuel PLAYER (example: give.nuclear.fuel DAez); ⚙️ Configuration:
"Fuel": { "Name": "Nuclear fuel", "SkinID": 3047814399, "FuelAmountMultiple": 200.0, "CanLootSpawn": true, "LootSpawnChance": 10.0, "WhichContainers": [ "oil_barrel", "loot_barrel_1", "loot_barrel_2", "crate_normal_2" ], "CanRecycle": true, "PossibleItemsAfterRecycler": [ { "ShortName": "sulfur", "Name": "default", "SkinID": 0, "MinAmount": 100, "MaxAmount": 300 }, { "ShortName": "charcoal", "Name": "default", "SkinID": 0, "MinAmount": 100, "MaxAmount": 1000 } ], "IncreaseRadiation": 2, "RadiationDelay": 3 }