
xXBIGSPENDERXx's Wishlist
-
$24.99
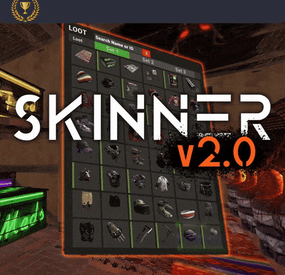
Skinner
By Whispers88 in Plugins
Skinner! The unrivaled no.1 performance skinning plugin. Skin any item in the game with a unique skinbox giving you live skinning, auto skinning and skin sets.
Thanks for everyone who has given feed back through the duration of the beta release. Skinner 3.0 is finally here!
Visual overhaul! - with dynamic UI menus for permission based player menus Automatic skin filtering and dev modes for new TOS Permission based skin sets Team share skins! Auto unlock owned skins! and More!!!
Live Skinning - Skin items in place without moving them Auto import - Automatically import and use all game approved skins Skin Sets - Create a variety of different skin sets for any item Skin Requests - Allows players to request and Admins to accept new skins in game Auto Skins - Automatically apply selected skins to every item that enters your inventory
Skinner 2.0 offers unrivaled performance in plugin efficiency. Our standard testing shows runtime results were 60x faster and memory usage was 200x more efficient than the closest peforming plugin.
SkinMenu Commands:
/Skin or /S - Live skin any item in your inventory by selecting a skin you wish to apply /SkinCraft or /Sc - Create multiple skin sets for use in other functions such as skinauto or skinteam /Skinitem or /Si - Skin a deployable item you are looking at ingame. Args - Spectify 1, 2 or 3 to automatically use a skin set. Automatic Commands:
/Skincon or /scon - sets all items in a container you are looking at to your default craft set Args - Optional, spectify 1, 2 or 3 to automatically use a skin set. /Skininv or /sinv - sets all items in your inventory to your default craft set Args - Optional, spectify 1, 2 or 3 to automatically use a skin set. /Skinauto or /Sauto - Automatically apply selected skins to every item that enters your inventory based off your skin sets. Args - Optional, spectify 1, 2 or 3 to automatically use a skin set. /Skinteam or /st - sets all items in your inventory and your teams to your default craft set Args - Optional, spectify 1, 2 or 3 to automatically use a skin set. Toggle - Use /skinteam toggle to opt in or out of the team skin set /SkinBase - Allows you to skin all deployables in your base to your default skincraft skins. Args - Optional, specify item name to filter items being skinned example: /Skinbase sleepingbag to only skin sleeping bags. /SkinAll Command - Skin all the items in all the containers in your base. Args - Optional, specify item by shortname example: /SkinAll rifle.ak to only skin ak47's. Skin Import Commands:
/Skinimport or /sip - Import custom workshop skins Args - WorkshopID example: /Skinimport 2397648701
/Colimport or /cip - Import custom workshop collection using /skinimport collectionID Args - Collection ID example: /Colimport 2921147807
/Skinrequest or /Sr - Request a skin to be added to skinner, requested skins will show in the /Skinrequests UI for approval Args - WorkshopID example: /Skinrequest 2397648701
/Skinrequests or /Srs - Opens the the skinner menu with a box of skins awating approval Button Usage - Select an option and remove the skin to enact the process
Try - Recieve a copy of an item with that skin
Approve - Adds the skin from the menu to the imported skins list
Deny - Removes the skin Note: All chat commands are universal meaning they can be used via the console, rcon(for import commands) and can be customized via the configuration.
Player Permissions:
Skinner.default - enables /skin command Skinner.items - enables /skinitem command Skinner.craft - enables /skincraft command Skinner.skinauto - enables /skinauto command Skinner.skincon - enables /skincon command Skinner.skininv - enables /skininv command Skinner.skinbase - for use of the /skinbase command Skinner.skinteam - Allows the use of the /skinteam command Skinner.skinall - for the use of the /skinall command Skinner.skinrequest - enables /skinrequest Cooldowns Permissions:
Cooldown settins can be adjusted via the plugin config. Applying the cooldown permission example skinner.default30 will enforce cooldowns on those with the permission. If no cooldown permission is applied no cooldowns will be enforced. If multiple cooldown perms are assigned to a single player they fastest cooldown will be used.
"Command based cooldowns ('permission' : 'command' seconds": { "Default30CD": { "skin": 30.0, "skinitem": 30.0, "skincraft": 30.0, "skincon": 30.0, "skininv": 30.0, "skinteam": 30.0, "skinbase": 60.0, "skinall": 60.0 } Admin Permissions:
Skinner.import – enables /Skinimport, /Colimport and /Skinrequests Skinner.bypassauth - bypasses the building auth requirement when using /Skinitem Skinner.permskintry - enables try feature when using /Skinrequests Warning: trying a skin will make a copy of that item. Only give this perm to admins who are allowed to spawn items. Other Permissions:
Skinner.skinautotoggled - applied when a player disables skinauto Skinner.skinteamblock - applied when a player disables team skins
Skinner offers multiple ways of importing skins including via the config and through commands:
Importing via the config:
To import skins via the config insert workshopIDs into the imported skins list as per the code snippet below, once finished reload skinner and the shortname and displayname fields will be automatically populated. You can add extra skins at any stage using this method.
"Imported Skins List": { "861142659": {}, "2617744110": {} },
Optionally entire workshop skin collections can be added to conifg, each item skin is automatically imported to your imported skins list on plugin load.
"Import Skin collections (steam workshop ID)": [496517795,2921147807],
Importing via commands:
Commands can be used to edit the config options for imported skins and collections via RCON, chat commands and the f1 console. Commands include:
/Skinimport WorkshopID /Colimport CollectionID Importing via Skin Requests:
Players can requests skins to be added to the game using the skinrequests feature. By using the command /skinrequest WorkshoID a skin gets automatically uploaded to the skin requests box. Admins with the skinner.import permission can open the requests box with the /skinrequests command.
Skins from the request box can then be "tried" approved or denied.
Each skin requested can be logged to discord using the webhook in the config.
Importing from other plugins:
Skinner now has a tool for windows to import data from skinbox, xskins and skincontroller. Simply select your json data file with imported skins into the tool and copy the new imported skins list into the skinner config.
https://github.com/Whispers88/SkinDataConverter/releases/tag/Main
Note: The "Imported Skins (skinid : 'shortnamestring', skinid2 : 'shortnamestring2'": {}" is now redundant and automatically converted to imported skins list.
{ "Skin Commands (skin items in you inventory": [ "skin", "s", "skinbox", "sb" ], "Skin Items Commands (skin items you have already placed": [ "skinitem", "si", "skindeployed", "sd" ], "Set default items to be skinned": [ "skincraft", "sc" ], "Automatically set all items in you inventory to your default skins": [ "skininv", "sinv" ], "Automatically set all items a container to your default skins": [ "skincon", "scon" ], "Automatically skin all deployables in your base": [ "skinbase", "skinbuilding" ], "Automatically skin all items in your base": [ "skinall", "sa" ], "Automatically skin all items that are moved into you inventory": [ "skinauto", "sauto" ], "Skin your teams inventories with your skin set": [ "skinteam", "st" ], "Request workshop skins via workshop ID": [ "skinrequest", "sr" ], "Approve workshop skin requests": [ "skinrequests", "srs" ], "Set your selected skin set": [ "skinset", "ss" ], "Import Custom Skins": [ "skinimport", "sip" ], "Import Workshop Collection Command": [ "colimport", "cip" ], "Skin Request Notification Discord Webhook": "", "Custom Page Change UI Positon anchor/offset 'min x, min y', 'max x', max y'": [ "0.5 0.0", "0.5 0.0", "198 60", "400 97" ], "Custom Searchbar UI Positon anchor/offset 'min x, min y', 'max x', max y'": [ "0.5 0.0", "0.5 0.0", "410 635", "572 660" ], "Custom Set Selection UI Positon anchor/offset 'min x, min y', 'max x', max y'": [ "0.5 0.0", "0.5 0.0", "250 610", "573 633" ], "Auto import approved skins": true, "Remove player data after inactivity (days)": 14, "Apply names of skins to skinned items": true, "Add Search Bar UI": true, "Use on itemcraft hook (skin items after crafting - not required when using skinauto)": false, "Override spraycan behaviour": false, "Use spraycan effect when holding spraycan and skinning deployables": true, "Blacklisted Skins (skinID)": [], "Blacklisted Itemms (itemID)": [], "Import Skin collections (steam workshop ID)": [], "Command based cooldowns ('permission' : 'command' seconds": { "Default30CD": { "skin": 30.0, "skinitem": 30.0, "skincraft": 30.0, "skincon": 30.0, "skininv": 30.0, "skinteam": 30.0, "skinbase": 60.0, "skinall": 60.0 } }, "Imported Skins List": {} }
//Get all Cached skins public Dictionary<int, List<ulong>> GetAllCachedSkins() { return _cachedSkins; } //Check if skin is a Redirect item public bool IsRedirectID(ulong uID) { return HasMask(uID); } //Convert Redirect ID to item ID public int RedirectIDtoItemID(ulong uID) { return (int)UnsetMask(uID); } //Get a list of skins for a particular item public List<ulong>? GetSkinsItemList(int itemid) { _cachedSkins.TryGetValue(itemid, out List<ulong>? cachedSkins); return cachedSkins; }
-

$10.00
Admin Video
Want to troll cheaters you have on your server? Maybe you have taken a clip of them cheating, or want to rick roll them. Maybe you want to show an advertisement to your players?
Then this is the plugin for you!
A friend had wanted to know how he could send a video to play on a cheaters screen, because this person was streaming while cheating, and he had clipped it.
This plugin integrates with Rust's built in "client.playvideo" command, but with the added benefit of being able to just supply a Youtube URL, or a Twitch URL. The integration with the Twitch and Youtube API is offloaded onto my web server, to minimize outside web calls, and to minimize load on your server.
WARNING! Be careful of the length of the video that you add! Player will have NO input, will NOT be able to F1 kill, or even log out of server until the video is completed! They will need to ALT+F4 if they want to leave before video finishes.
Known Issues:
Video "could” be closed by a player if they know the client commands and send a video to themselves thinking of implementing a "close” button that you can enable on ads etc to allow the user to close the video
Any comments, concerns, questions, or suggestions are greatly appreciated
To show video on first join of wipe:
Config set both Show a welcome video, Show welcome video ONLY on first join of the wipe to true. Make sure to delete the file "data/AdminVideo.json" each wipe
"Show a welcome video": true, "Show welcome video ONLY on first join of the wipe": true, "Welcome Video URL": "https://www.youtube.com/shorts/hT5BqdjT1Hs",
Links Supported:
Direct .mp4 link - eg. https://archive.org/download/rick-roll/Rick Roll.mp4 Youtube Video Link - eg. https://www.youtube.com/watch?v=OvQkif96CTg - Currently fixing due to an api change Youtube Shorts Link - eg. https://www.youtube.com/shorts/8sTHiZI_tus - Currently fixing due to an api change Twitch Clip Link - eg. https://www.twitch.tv/camomo_10/clip/NastySleepyCockroachFutureMan-ihrWpONnkxv4ayv4
Command works from both ingame console, and RCON console.
Safety Checks:
Commands with safety checks will only send video if the player is:
In a SafeZone AND not mounted (such as on a mini) OR TC Authorized and INSIDE AND not mounted (such as on a mini) AND Has not been in combat for at least 20 seconds
These are to limit the possibility of players being killed while frozen and unable to move. Additional safety checks can be added if needed
Command format:
Send a forced video to a player (no safety checks, perfect for forcing on cheaters): adminvideo {steam_id|displayname} {url|shortname} Send a video to all players (has some safe checks): adminvideo all {url|shortname} Send a video to all players (has NO safe checks): adminvideo allunsafe {url|shortname} Send an ad video to a player (has some safe checks): adminvideo ad {steam_id|displayname} {url|shortname} Send an ad video to all players (has some safe checks): adminvideo ad all {url|shortname} Add a video shortname into the config: adminsavevideo add {shortname} {url} Remove a video shortname from the config: adminsavevideo remove {shortname} eg.
Send video to specified steamID (no safety checks) adminvideo 123456789 https://www.youtube.com/shorts/8sTHiZI_tus Send video to player name (no safety checks) adminvideo sickness https://www.youtube.com/shorts/8sTHiZI_tus Send RickRoll video to player name based on saved shortname adminvideo sickness rickroll Send RickRoll video to all online players based on saved shortname (has safety checks) adminvideo all rickroll Send ad video to specific player (has safety checks) adminvideo ad sickness https://www.youtube.com/shorts/8sTHiZI_tus Send ad video to all online players (has safety checks) adminvideo ad all https://www.youtube.com/shorts/8sTHiZI_tus Add a video shortname into the config: adminsavevideo add boom https://www.youtube.com/shorts/8sTHiZI_tus Remove a video shortname from the config: adminsavevideo remove boom
Permissions:
adminvideo.use - to be able to issue videos to players adminvideo.admin - allows you to use the shortname creation command adminvideo.adbypass - allows you to bypass "ad" videos
Default Config:
{ "Admin Bypass Ads/Welcome": false, "Show a welcome video": false, "Show welcome video ONLY on first join of the wipe": false, "Welcome Video URL": "https://www.youtube.com/watch?v=ScMzIvxBSi4", "ShortNameVideos": { "rickroll": "https://archive.org/download/rick-roll/Rick Roll.mp4" } }
(Note: Video player auto resizes to fit the content aspect ratio)
Shoutout to @ELF for the original idea and for some live testing
NOTICE:
The backend API for converting youtube/twitch videos, is to be used by the Admin Video Plugin.
Using it for any other purposes, eg. integrating into a bot, or integrating it into another plugin, without express consent/permission from SiCkNeSs, can result in blocking of access to the IP address's/services that are integrating it, with no notice, or refund.
-
$24.00
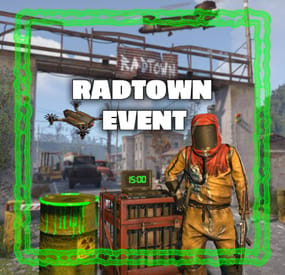
Radtown Event
By The_Kiiiing in Plugins
This plugin adds a high-risk, high-reward element to the newly introduced Radtown Monument. This dynamic event spawns a hazardous shipping container filled with valuable loot but surrounded by dangerous radioactive material. The challenge is twofold: not only must players manage the intense radiation levels, but they must also defend the container from relentless attack drones that aim to destroy it.
Key Features:
Valuable Loot: The container holds rare and powerful resources, making it a highly coveted prize.
Multiple drone attack waves: Drones attack in mul
Intense Radiation: High levels of radiation require careful planning and protective gear to approach safely.
Drone Defense: As players attempt to claim the loot, AI-controlled drones will attack the container. Players must defend it until the crate unlocks.
Catastrophic Explosion: If players fail to protect the container or take too long, it will trigger a massive explosion, devastating the area and killing any nearby players.
Configuration options:
Drone wave count, drone count per wave Drone health and damage Container health Crate Loot and much more ...
This plugin enhances the Radtown Monument with intense, timed gameplay, rewarding those who can outlast both the environment and the drones—but punishing failure with explosive consequences!
Permissions:
radtownevent.admin - Required to run admin commands
Commands:
radtown start - Start the event radtown stop - Stop the event
Developer Api:
void OnRadtownEventContainerDelivered() // Called when the container has been delivered and the event is ready to start void OnRadtownEventStart() // Called when the locked crate inside the container has been hacked void OnRadtownEventWin(ulong steamId) // Called when the event was successfully completed by a player void OnRadtownEventEnd(bool success) // Called when the event is over. Success is false when the container exploded
Configuration:
{ "Time between events (minutes)": 60, "Crate hack time (seconds; drone waves will spawn until the crate is fully hacked)": 600, "Container health": 8000, "Time before despawn after event has been completed (seconds)": 300, "Time before despawn if event is not started (minutes)": 30, "Make event zone visible": false, "Drone wave configuration": [ { "Wave number": 1, "Preparation time before drones spawn (seconds)": 5, "Maximum number of concurrent drones": 3, "Explosive drone configuration": { "Number of attack drones to spawn (0 to disable)": 20, "Drone health": 100, "Damage per shell": 40, "Target players": false }, "Kamikaze drone configuration": { "Number of kamikaze drones to spawn (0 to disable)": 0, "Drone health": 100, "Damage on explosion": 60, "Target players": false } }, { "Wave number": 2, "Preparation time before drones spawn (seconds)": 20, "Maximum number of concurrent drones": 4, "Explosive drone configuration": { "Number of attack drones to spawn (0 to disable)": 20, "Drone health": 150, "Damage per shell": 50, "Target players": false }, "Kamikaze drone configuration": { "Number of kamikaze drones to spawn (0 to disable)": 30, "Drone health": 150, "Damage on explosion": 60, "Target players": false } }, { "Wave number": 3, "Preparation time before drones spawn (seconds)": 20, "Maximum number of concurrent drones": 5, "Explosive drone configuration": { "Number of attack drones to spawn (0 to disable)": 40, "Drone health": 200, "Damage per shell": 40, "Target players": true }, "Kamikaze drone configuration": { "Number of kamikaze drones to spawn (0 to disable)": 40, "Drone health": 200, "Damage on explosion": 60, "Target players": false } }, { "Wave number": 4, "Preparation time before drones spawn (seconds)": 20, "Maximum number of concurrent drones": 8, "Explosive drone configuration": { "Number of attack drones to spawn (0 to disable)": 40, "Drone health": 250, "Damage per shell": 70, "Target players": true }, "Kamikaze drone configuration": { "Number of kamikaze drones to spawn (0 to disable)": 40, "Drone health": 250, "Damage on explosion": 80, "Target players": true } }, { "Wave number": 5, "Preparation time before drones spawn (seconds)": 20, "Maximum number of concurrent drones": 8, "Explosive drone configuration": { "Number of attack drones to spawn (0 to disable)": 40, "Drone health": 250, "Damage per shell": 70, "Target players": true }, "Kamikaze drone configuration": { "Number of kamikaze drones to spawn (0 to disable)": 40, "Drone health": 250, "Damage on explosion": 80, "Target players": true } } ], "Locked crate loot table": { "Enabled": false, "Minimum items": 4, "Maximum items": 8, "Item list": [ { "Short name": "scrap", "Min amount": 12, "Max amount": 48, "Chance (1 = 100%)": 1.0, "Skin id": 0, "Custom name": "" } ] } }
NEW: Halloween Update
The Halloween update adds pumpkin drones and spooky decorations to the container
-
$21.00
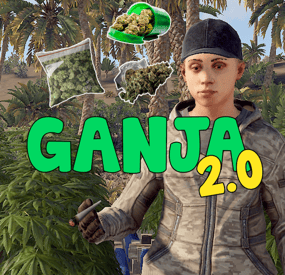
Ganja
By The_Kiiiing in Plugins
This plugin allows players to gather weed from hemp plants and craft joints using a mixing table. There are different types of weed where each type can be found in a different biome. Joints can be crafted at a mixing table and will give the player configurable buffs and healing with each tier having different effects.
Features:
Fully customizable Different types of weed Configurable effects for each type Custom crafting UI integrates in the mixing table UI Configurable recipes for mixing table Yield amount and chance configurable for each type Ideal for Roleplay Servers
New in v2.0.15: Advanced modifiers
Advanced modifiers allow you to use any tea/pie modifier that's currently in the game. I did not test all of them so there is a chance that some modifiers might not work as expected.
List of modifiers:
Wood_Yield, Ore_Yield, Radiation_Resistance, Radiation_Exposure_Resistance, Max_Health, Scrap_Yield, MoveSpeed, ObscureVision, Warming, Cooling, CoreTemperatureMinAdjustment, CoreTemperatureMaxAdjustment, Crafting_Quality, VisionCare, MetabolismBooster, Harvesting, DigestionBoost, FishingBoost, Collectible_DoubleYield, Farming_BetterGenes, HorseGallopSpeed, HorseDungProductionBoost, Comfort, Clotting, HunterVision, Radiation,
Configuration Example:
"Advanced modifiers (only works for joints)": [ { "Name (case sensitive! see plugin description for all modifiers)": "Warming", "Duration (seconds)": 60.0, "Value": 10.0 } ]
New in v2.0.10: Give command
Server owners can use this command to give weed or joints to themselves or a certain player. The identifier has to be specified in the config file for every type of weed or joint.
ganja.give <weed|joint> <identifier> <amount> <player?>
Permission:
ganja.give - Required to use ganja.give command
New in v2.0.0: Fully configurable crafting:
With Version 2.0.0 the crafting system has been integrated in the mixing table. Joints can now be crafted by using the right ingredients in the right slot. The crafting recipes are fully configurable. New recipes can also be added.
New in v1.0.8: Loot Table integration:
This plugin now supports the custom item api of Loot Table and Stack Size GUI, so you can easily add weed to the loot table. When both plugins are installed on the server, the weed items will show up in the custom items tab of Loottable (right image):
Different tiers:
Depending on the biome, you will receive different tiers of weed, the biomes can also be changed in the config. By default, tier2 weed can be gathered in the snow biome, tier1 in the desert and tier0 everywhere else.
Names, droprates, and boosts can also be configured individually for each tier.
Controls:
With a joint selected in the hot bar:
Right click to ignite / extinguish a joint When joint is bruning: left click to use a joint
Permissions:
Permissions can be disabled in the config, making gathering and crafting accessible to everyone regardless of permissions.
ganja.craft - Required to craft joints ganja.gather - Required to obtain weed
Biome masks:
The biome mask is a simple 4-bit number that determines where a certain tier of weed can be found. Each biome has its own number; add these numbers together to select multiple biomes. The numbers for each biome are as follows:
1 - Arid 2 - Temperate 4 - Tundra 8 - Arctic 16 - Jungle 32 - Deep Sea For example: Low Quality Weed has the biome mask 6 by default (see configuration below). That means it can be found in the Temperate and the Tundra biome.
Configuration:
{ "Weed configuration": [ { "Drop chance when harvesting (1 = 100%)": 0.4, "Drop amount when harvesting": { "min": 1, "max": 3 }, "Biome mask (see description for details)": 6, "Gene configuration": { "h": { "Minimum amount for a chance to yield": 1, "Minimum amount for guaranteed yield": 3, "Maximum amount (-1 = no limit, set to 0 to disable gathering from plants with that gene)": -1 } }, "Disable gathering from collectable hemp": false, "Disable gathering from growable hemp": false, "Item identifier (used with ganja.give command)": "low_quality", "Custom item name (null = default name)": "Low Quality Weed", "Item short name": "sticks", "Item skin id": 2661029427 }, { "Drop chance when harvesting (1 = 100%)": 0.3, "Drop amount when harvesting": { "min": 1, "max": 3 }, "Biome mask (see description for details)": 1, "Gene configuration": { "h": { "Minimum amount for a chance to yield": 1, "Minimum amount for guaranteed yield": 3, "Maximum amount (-1 = no limit, set to 0 to disable gathering from plants with that gene)": -1 } }, "Disable gathering from collectable hemp": false, "Disable gathering from growable hemp": false, "Item identifier (used with ganja.give command)": "med_quality", "Custom item name (null = default name)": "Medium Quality Weed", "Item short name": "sticks", "Item skin id": 2661031542 }, { "Drop chance when harvesting (1 = 100%)": 0.1, "Drop amount when harvesting": { "min": 1, "max": 2 }, "Biome mask (see description for details)": 8, "Gene configuration": { "h": { "Minimum amount for a chance to yield": 1, "Minimum amount for guaranteed yield": 3, "Maximum amount (-1 = no limit, set to 0 to disable gathering from plants with that gene)": -1 } }, "Disable gathering from collectable hemp": false, "Disable gathering from growable hemp": false, "Item identifier (used with ganja.give command)": "high_quality", "Custom item name (null = default name)": "High Quality Weed", "Item short name": "sticks", "Item skin id": 2660588149 } ], "Crafting Recipes": [ { "Ingredient Slots": { "0": { "Amount": 1, "Item short name": "note", "Item skin id": 0 }, "1": { "Amount": 1, "Item short name": "sticks", "Item skin id": 2661029427 }, "2": { "Amount": 1, "Item short name": "sticks", "Item skin id": 2661029427 } }, "Produced Item": { "Amount": 1, "Custom item name (null = default name)": "Low Quality Joint", "Item short name": "horse.shoes.basic", "Item skin id": 2894101592 }, "Identifier (used with ganja.give command)": "low_quality", "Is joint": true, "Boosts (only works for joints)": { "Wood boost percentage (1 = 100%)": 0.4, "Wood boost duration (seconds)": 20.0, "Ore boost percentage (1 = 100%)": 0.0, "Ore boost duration (seconds)": 0.0, "Scrap boost percentage (1 = 100%)": 0.0, "Scrap boost duration (seconds)": 0.0, "Max Health percentage (1 = 100%)": 0.0, "Max Health duration (seconds)": 0.0, "Healing per use": 1.0, "Health regeneration per use": 0.0, "Poisoning per use(a negative value will decrease poisoning)": 0.0, "Radiation poisoning per use (a negative value will decrease radiation)": 0.0, "Bleeding per use (a negative value will decrease bleeding)": 0.0, "Calories per use (a negative value will decrease calories)": 0.0, "Hydration per use (a negative value will decrease hydration)": 0.0, "Joint durability (seconds)": 120.0, "Joint durability loss per hit (seconds)": 10.0 }, "Advanced modifiers (only works for joints)": [ { "Name (case sensitive! see plugin description for all modifiers)": "Warming", "Duration (seconds)": 60.0, "Value": 10.0 } ] }, { "Ingredient Slots": { "0": { "Amount": 1, "Item short name": "note", "Item skin id": 0 }, "1": { "Amount": 1, "Item short name": "sticks", "Item skin id": 2661031542 }, "2": { "Amount": 1, "Item short name": "sticks", "Item skin id": 2661031542 } }, "Produced Item": { "Amount": 1, "Custom item name (null = default name)": "Medium Quality Joint", "Item short name": "horse.shoes.basic", "Item skin id": 2894101290 }, "Identifier (used with ganja.give command)": "med_quality", "Is joint": true, "Boosts (only works for joints)": { "Wood boost percentage (1 = 100%)": 0.0, "Wood boost duration (seconds)": 0.0, "Ore boost percentage (1 = 100%)": 0.8, "Ore boost duration (seconds)": 20.0, "Scrap boost percentage (1 = 100%)": 0.0, "Scrap boost duration (seconds)": 0.0, "Max Health percentage (1 = 100%)": 0.0, "Max Health duration (seconds)": 0.0, "Healing per use": 4.0, "Health regeneration per use": 0.0, "Poisoning per use(a negative value will decrease poisoning)": 0.0, "Radiation poisoning per use (a negative value will decrease radiation)": 0.0, "Bleeding per use (a negative value will decrease bleeding)": 0.0, "Calories per use (a negative value will decrease calories)": 0.0, "Hydration per use (a negative value will decrease hydration)": 0.0, "Joint durability (seconds)": 120.0, "Joint durability loss per hit (seconds)": 10.0 }, "Advanced modifiers (only works for joints)": [ { "Name (case sensitive! see plugin description for all modifiers)": "Warming", "Duration (seconds)": 60.0, "Value": 20.0 } ] }, { "Ingredient Slots": { "0": { "Amount": 1, "Item short name": "note", "Item skin id": 0 }, "1": { "Amount": 1, "Item short name": "sticks", "Item skin id": 2660588149 }, "2": { "Amount": 1, "Item short name": "sticks", "Item skin id": 2660588149 } }, "Produced Item": { "Amount": 1, "Custom item name (null = default name)": "High Quality Joint", "Item short name": "horse.shoes.basic", "Item skin id": 2893700325 }, "Identifier (used with ganja.give command)": "high_quality", "Is joint": true, "Boosts (only works for joints)": { "Wood boost percentage (1 = 100%)": 0.0, "Wood boost duration (seconds)": 0.0, "Ore boost percentage (1 = 100%)": 0.0, "Ore boost duration (seconds)": 0.0, "Scrap boost percentage (1 = 100%)": 1.0, "Scrap boost duration (seconds)": 30.0, "Max Health percentage (1 = 100%)": 0.3, "Max Health duration (seconds)": 30.0, "Healing per use": 8.0, "Health regeneration per use": 0.0, "Poisoning per use(a negative value will decrease poisoning)": 0.0, "Radiation poisoning per use (a negative value will decrease radiation)": 0.0, "Bleeding per use (a negative value will decrease bleeding)": 0.0, "Calories per use (a negative value will decrease calories)": 0.0, "Hydration per use (a negative value will decrease hydration)": 0.0, "Joint durability (seconds)": 120.0, "Joint durability loss per hit (seconds)": 10.0 }, "Advanced modifiers (only works for joints)": [ { "Name (case sensitive! see plugin description for all modifiers)": "Cooling", "Duration (seconds)": 60.0, "Value": 10.0 } ] } ], "Require permission for crafting": true, "Require permission for gathering": true, "Disable built-in stack fix (set to true if you have problems with item stacking/splitting)": false, "Automatically extinguish joint when unequiping it": true } -

$10.00
Portals Plus
PortalsPlus adds the ability to have portal for player to monuments or teammates
Permissions
PortalsPlus.admin - needed to get portal placements when creating new portals at monuments with command /makeportal PortalsPlus.monumentuse - needed to alow monument to monument portal
Commands
giveportal <playername/ID> - console command to give players portal makeportal - spawn portal to get position and rotation relative to monument to add to config (this is not a spawn for portal use command)) Videos
Config
{ "Use Teamate Portals": true, "Use LastDeath Portals": true, "Use Monument Portals": true, "Monument To Monument Cooldown time (Seconds)": 30.0, "Use Monument to Monument Portals": true, "Monument Portals": { "Launch Site": { "Monument Portal Active?": true, "Position Corrected": { "x": 211.0, "y": 9.2, "z": 97.1 }, "Rotation Corrected": 89.77 }, "Airfield": { "Monument Portal Active?": true, "Position Corrected": { "x": -142.3, "y": 0.2, "z": -112.0 }, "Rotation Corrected": 89.49 }, "The Dome": { "Monument Portal Active?": true, "Position Corrected": { "x": -1.05, "y": 19.83, "z": -5.2 }, "Rotation Corrected": 197.38 }, "Junkyard": { "Monument Portal Active?": true, "Position Corrected": { "x": -46.5, "y": 11.32, "z": 11.7 }, "Rotation Corrected": 195.0 }, "Radtown": { "Monument Portal Active?": true, "Position Corrected": { "x": 34.3, "y": 1.0, "z": -17.6 }, "Rotation Corrected": 181.0 }, "Water Treatment Plant": { "Monument Portal Active?": true, "Position Corrected": { "x": -4.35, "y": 60.35, "z": 69.1 }, "Rotation Corrected": 0.321 }, "Bandit Camp": { "Monument Portal Active?": true, "Position Corrected": { "x": 44.0, "y": 7.0, "z": -31.7 }, "Rotation Corrected": 135.34 }, "Power Plant": { "Monument Portal Active?": true, "Position Corrected": { "x": -74.5, "y": 18.25, "z": 15.4 }, "Rotation Corrected": -90.0 }, "Outpost": { "Monument Portal Active?": true, "Position Corrected": { "x": -24.4, "y": 0.12, "z": -29.9 }, "Rotation Corrected": 90.0 }, "Military Tunnel": { "Monument Portal Active?": true, "Position Corrected": { "x": -53.96, "y": 8.9, "z": -6.2 }, "Rotation Corrected": 180.0 }, "Missile Silo": { "Monument Portal Active?": true, "Position Corrected": { "x": 62.142, "y": 39.996, "z": -16.69 }, "Rotation Corrected": 99.037 }, "Large Fishing Village": { "Monument Portal Active?": true, "Position Corrected": { "x": -26.926, "y": 2.065, "z": -20.859 }, "Rotation Corrected": 358.677 }, "Sewer Branch": { "Monument Portal Active?": true, "Position Corrected": { "x": -35.453, "y": 19.747, "z": -37.653 }, "Rotation Corrected": 73.628 }, "Ferry Terminal": { "Monument Portal Active?": true, "Position Corrected": { "x": -3.0, "y": 10.874, "z": -61.2 }, "Rotation Corrected": 180.0 }, "Arctic Research Base": { "Monument Portal Active?": true, "Position Corrected": { "x": 2.45, "y": 5.4, "z": 6.2 }, "Rotation Corrected": 357.405 }, "Ranch": { "Monument Portal Active?": true, "Position Corrected": { "x": 4.2, "y": 3.037, "z": 24.0 }, "Rotation Corrected": 179.0 }, "Large Barn": { "Monument Portal Active?": true, "Position Corrected": { "x": 3.872, "y": 9.022, "z": -3.73 }, "Rotation Corrected": 359.736 }, "Satellite Dish": { "Monument Portal Active?": true, "Position Corrected": { "x": 10.615, "y": 0.2, "z": -0.979 }, "Rotation Corrected": 90.741 }, "Giant Excavator Pit": { "Monument Portal Active?": true, "Position Corrected": { "x": -92.618, "y": 1.165, "z": -48.787 }, "Rotation Corrected": 316.17 } }, "Max Monument Portal Rows (6 max)": 6, "Enable PortalItem world spawns?": true, "Drop Settings": [ { "Object Short prefab name": "crate_elite", "Minimum item to drop": 1, "Maximum item to drop": 1, "Item Drop Chance": 7.0 }, { "Object Short prefab name": "codelockedhackablecrate", "Minimum item to drop": 1, "Maximum item to drop": 1, "Item Drop Chance": 9.0 }, { "Object Short prefab name": "crate_ammunition", "Minimum item to drop": 1, "Maximum item to drop": 1, "Item Drop Chance": 5.0 } ] }
Lang File
{ "NoPerm": "You dont have the Perms to use this", "NoAdminPerm": "Admin Permission needed for this command", "Rejectbutton": "Reject", "Acceptbutton": "Accept", "RejectMessage": "{playername} Rejected your Request", "RaycastFail": "Target Has something in the way for portal to spawn", "ActivePortalMessage": "There is a active portal for you already", "NoMon": "Monument to Monument is turned of in config , Sorry." }
Example of console output
[Portals Plus] Outpost : Position Correction = X: -19.588f, Y: 0.141f, Z: 30.933f : Rotation Correction = X: 0.000f, Y: 267.224f, Z: 0.000f
Future Plans
more portal aplications