
GangstaPichu's Wishlist
-
$21.95$11.95Auto Recycler
Plugin Description
"Auto Recycler" is a Rust plugin that offers players advanced recycling features. It enables automatic item recycling, access to a virtual recycler, and special recycling crates. With admin permission, you can configure which items players are not allowed to automatically recycle.
Features
Automatic Recycling: Players can set specific items for automatic recycling. These items will be recycled automatically when they enter their inventory.
Virtual Recycler: Allows players to access a virtual recycler to recycle items directly from anywhere in the game.
Recycling Crate: A special item that functions as a portable recycler.
Customizable Configuration: The plugin configuration can be customized to exclude or allow specific items from recycling.
Permissions
autorecycler.admin: Grants access to all admin functions of the plugin.
autorecycler.autorec: Allows players to use automatic recycling.
autorecycler.recvirtual: Provides access to the virtual recycler.
autorecycler.characteristics: Allows modification of item characteristics related to recycling.
autorecycler.recboxbuy: Enables the purchase of the Recbox.
Chat Commands
/ar: Allows players to use the automatic recycler.
/vrec: Allows players to use a virtual recycler (configurable command).
/recbox: Displays information about the costs of purchasing a Recbox.
/recboxbuy: Allows players to buy a Recbox if they have the required resources.
NEW
/autorectoggle activate and deactivate the AutoRecycler
Additional Information
The plugin offers extensive UI integration to simplify interaction with its features. It stores player data to maintain automatic recycling settings between sessions. The configuration file allows admins to customize the plugin's behavior, including Recbox costs and adjustable recycling properties of items.
Note
Ensure that players have the appropriate permissions to fully utilize the plugin's features.
If you have any questions or problems, join my discord
https://discord.gg/D2zTWCEnrN
-

$20.00$14.99Admin Eye
This plugin adds logs of players action and convenient control panel for viewing them.
Features
Logs KIlls + Destruction of buildings (detailed description of the killed / destroyed, distance and what killed 'weapon, damage type etc.') Death (detailed description of the killer, the distance and how player was killed 'weapon, damage type etc.') Respawn (location of respawn and on the sleeping bag or not) Teams (create, invite, accept, leave) Loot (crates, personal boxes, wounded players and all other "lootable" entities) Authorization (in code locks, tool cups, turrets) Construction (everything that builds) Transport (the moment of boarding the transport) Convenient and functional control panel Convenient search for online players Search by name or steam ID throughout the database The ability to conveniently select the date and time, as well as view individual categories of logs Teleport to the log location and its visualization (available only for admins) The history of searching and viewing profiles Save of all the nicknames of the player with whom he logged into the server The first and last connection The database is optimized as much as possible, the data is split, which allows you to store a large number of logs for a long time The ability to clear the database on wipe and players who have not logged on server for a long time, in automatic mode The ability to turn off the log globally and turn it on for certain players Filters for logs The plugin is fully localized for EN and RU languages Permission
admineye.usemenu - for open and use panel Command
/ae - for open panel Time Zones
Time zone its different time between 0 UTC and player time UTC.
You need add to configuration all time zones of your admins in seconds.
How do it? Go to site UTC Time Standart select city, then you will get the difference in hours
behind its + ahead its - Then you need multiply hours to second ( -6 * 3600 )
Done - its difference between zones. Write in config "Washington" : -21600
Then administrator must select (only once) his zone in menu "Time Zones", else plugin use default time zone config
Discord
At first you must create and copy discord Webhook, then paste url at config (you can use different channels)
if you want change color, choose Colors, copy 0xNNNNNN, then paste Here, copy number and paste at config ^_^
Filters
If you dont want use filters, set it EMPTY
If you want have specific logs, then add short prefabs names to filter
EX.
For kills - player, scientistnpc_bradley, wall and etc. For loots - names of crates, names of looting ents and etc. For auths - turrets, toolcups For builts - wall, floor and other deployeble entities
🧪TEST SERVER
Join our test server to view and experience all our unique features yourself!
Copy the IP Address below to start playing!
connect 194.147.90.147:28015
Future plans
Add console commands for search logs Add discord support for send logs (implemented) Add more logs I am waiting for your suggestions for improvement in the discussions
Video
Config
{ "Main settings": { "Enable delete all data on wipe": false, "Delete old players data every X hours [0 - off](It works on server startup or plugin reload)": 40, "After how many days the player's data is considered old": 14, "Time zone difference in seconds (set automatically by server zone)": 10800.0, "Time zone of counties (in seconds)": { "New York": -18000, "Moscow": 10800, "Berlin": 3600, "Paris": 3600, "Canberra": 39600, "London": 0, "Beijing": 28800, "Rome": 3600, "Washington": -21600 }, "Permission for use menu": "admineye.usemenu" }, "Log settings": { "Enable logging of kill for all": true, "Enable logging of death for all": true, "Enable logging of respawn for all": true, "Enable logging of team for all": true, "Enable logging of loot for all": true, "Enable logging of auth for all": true, "Enable logging of buildings for all": true, "Enable logging of mount for all": true, "Discord webhooks for logs": { "kills": { "Webhook url": "", "Color": 15105570 }, "deaths": { "Webhook url": "", "Color": 15548997 }, "respawns": { "Webhook url": "", "Color": 2067276 }, "teams": { "Webhook url": "", "Color": 3066993 }, "loots": { "Webhook url": "", "Color": 3447003 }, "auths": { "Webhook url": "", "Color": 9807270 }, "builts": { "Webhook url": "", "Color": 15658993 }, "mounts": { "Webhook url": "", "Color": 10181046 } } }, "Config version": { "Major": 1, "Minor": 2, "Patch": 0 } }
-
.thumb.png.fb9ddd0dd32a18cd863c001b2267bd5e.png)
$16.98
WoundedNPC
Introducing WoundedNPC — where NPCs don't just die; they make a scene!
Watch in amusement as your NPCs go from tough guys to crybabies, collapsing and crying out in pain. They'll lie there, whining and wailing, giving you a show worth watching!
Perfect for adding a touch of humor to your Rust world. Your NPCs will now collapse similar to players, with customizable scream (or other sound of your choice!) with a configurable chance to get back up for a second chance.
Get ready for the most entertaining and theatrical NPC deaths ever with WoundedNPC!
Features:
NPCs will enter a wounded state Configurable % chance for them to get back up Configurable wounded timer for them Configurable scream sounds Lightweight format sounds stored in data for minimal delay Automatically checks if screams listed in config exist, if not, it's downloaded. Ability to exclude specific NPCs by either prefab path, or partial name matching (useful to exclude zombies or any other NPC which you wish to die immediately) Notes:
Dependency plugin - TapeLibrary by Nikedemos - Included 5 scream sound files included Audio file format .ogg Mono channel (can convert mp3 to a mono .ogg here , then upload to a file host of your choice ensuring link leads directly to downloading the file) Sound Loops - worth ensuring your wounded timer is around the same length as sound files.
Example config
{ "Enabled: ": true, // can disable the plugin features from the config if needed "Wounded timer: ": 20, // how long will the NPC stay in wounded state "Chance to die after wounded timer: ": 50, // percentage chance NPC will NOT get back up after being wounded "NPC Prefab paths to exclude: ": [], // can exclude an entire prefab path for an npc (eg for scarecrow) "Exclude NPC where their displayname contains: ": [ "Marauder", "Zombie" ], // can exclude NPCs by their full or partial display name. "Boombox Prefab Path: ": "assets/prefabs/voiceaudio/boombox/boombox.deployed.prefab", // don't need to touch unless boombox prefab path ever changes or there's a new boombox type item introduced. "Wounded Sounds URLs: ": [ "https://www.dropbox.com/scl/fi/vyhsne1efaictwl39oqgu/Scream-Medium-C1-www.fesliyanstudios.com.ogg?rlkey=7ae1rnbtwj662puo874t823y6&st=svp1qa0x&dl=1", "https://www.dropbox.com/scl/fi/j6zo85v7uuwje4scenmm3/longpain1.ogg?rlkey=7cmumo9z40no1xkdzkcwzxl36&st=gef2dhc7&dl=1", "https://www.dropbox.com/scl/fi/gb2jkxu1gxfsqjxmtum32/longpain2.ogg?rlkey=81iwgqqw9j26t7f7vfbzg1diw&st=f5s5k1to&dl=1", "https://www.dropbox.com/scl/fi/04o1ukje93tly4rjx9dvu/longpain3.ogg?rlkey=cjkv5ks97307yadnah0pvua8b&st=ns0tqygh&dl=1", "https://www.dropbox.com/scl/fi/e6ey5eqevqwey43b16xj2/longpain4.ogg?rlkey=28vksom5xd5o82rhvy5kmiaj7&st=wgo8v7ue&dl=1" ], // Direct URL to scream sound files "Enable Debug Messages: ": true // debug messages in console. Turn off to reduce spam. Turn on for troubleshooting }
-
$18.00
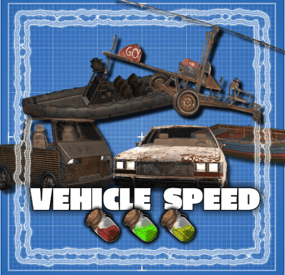
Vehicle Speed
By The_Kiiiing in Plugins
SUPPORTS EVERY VEHICLE IN THE GAME! A simple plugin that brings in new types of fuel. Depending on the fuel type helis fly faster or slower.
Out of the box this plugin adds 2 new fuel types to the game: Medium Grade Fuel and High Quality Fuel. For each fuel type you can configure a speed multilplier. For example High Quality Fuel makes helis go 3x as fast by default. Furthermore you can configure the fuel consumption per minute for each fuel type.
Supported vehicles:
Minicopter, Scrap Heli, Attack Heli Rowboat, RHIB Modular Car Small & Large Submarine Horse Bike, Motorbike Snowmobile Diver Propulsion Vehicle
Configuration:
Item name: The name of the ingame item; set it to null to use the default item name.
Fuel skin id: the skin id of the fuel item. Note that each skin id has to be unique and can not be used for multiple fuel types
Speed multiplier: the speed multiplier for the heli, 1 = default speed. It is not recommended to set this higher than 4.
Fuel consumption per minute: fuel consumption per minute, set to -1 to use the default fuel consumption.
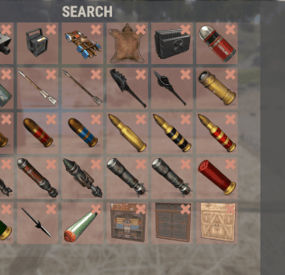
Loot Table integration:
This plugin supports the custom item api of Loot Table and Stack Size GUI, so you can easily add your custom fuel items to the loot table. When both plugins are installed on the server, the fuel items you configured will show up in the custom items tab of Loottable (right image):
Admin commands:
fuel list - View fuel types and their id fuel <id> <amount> - Give yourself x amount of fuel with the given id fuel <id> <amount> <player name or id> - Give the specified player x amount of fuel with the given id These commands are intended for admin use only and require the permission
helispeed.admin
Default configuration:
{ "Fuel Configuration": [ { "Item name": null, "Fuel skin id": 0, "Minicopter speed multiplier": 0.8, "Minicopter fuel consumption per minute (-1 for default)": -1.0, "Scap heli speed multiplier": 0.8, "Scap heli consumption per minute (-1 for default)": -1.0, "Row boat speed multiplier": 0.8, "Row boat fuel consumption per minute (-1 for default)": -1.0, "RHIB speed multiplier": 0.8, "RHIB fuel consumption per minute (-1 for default)": -1.0, "Modular car speed multiplier": 0.8, "Tugboat speed multiplier": 0.8, "Tugboat fuel consumption per minute (-1 for default)": -1.0, "Attack helicopter speed multiplier": 0.8, "Attack helicopter fuel consumption per minute (-1 for default)": -1.0 }, { "Item name": "Medium Grade Fuel", "Fuel skin id": 2501207890, "Minicopter speed multiplier": 1.5, "Minicopter fuel consumption per minute (-1 for default)": -1.0, "Scap heli speed multiplier": 1.5, "Scap heli consumption per minute (-1 for default)": -1.0, "Row boat speed multiplier": 1.5, "Row boat fuel consumption per minute (-1 for default)": -1.0, "RHIB speed multiplier": 1.5, "RHIB fuel consumption per minute (-1 for default)": -1.0, "Modular car speed multiplier": 1.5, "Tugboat speed multiplier": 1.5, "Tugboat fuel consumption per minute (-1 for default)": -1.0, "Attack helicopter speed multiplier": 1.5, "Attack helicopter fuel consumption per minute (-1 for default)": -1.0 }, { "Item name": "High Quality Fuel", "Fuel skin id": 2664651800, "Minicopter speed multiplier": 3.0, "Minicopter fuel consumption per minute (-1 for default)": -1.0, "Scap heli speed multiplier": 3.0, "Scap heli consumption per minute (-1 for default)": -1.0, "Row boat speed multiplier": 3.0, "Row boat fuel consumption per minute (-1 for default)": -1.0, "RHIB speed multiplier": 3.0, "RHIB fuel consumption per minute (-1 for default)": -1.0, "Modular car speed multiplier": 3.0, "Tugboat speed multiplier": 3.0, "Tugboat fuel consumption per minute (-1 for default)": -1.0, "Attack helicopter speed multiplier": 3.0, "Attack helicopter fuel consumption per minute (-1 for default)": -1.0 } ] }
-
$15.00
Deployable Nature
By imthenewguy in Plugins
Adds 85 new deployable items to your server!. Custom item collection system. Players can obtain these items while cutting trees, mining rocks and collecting plants. Includes a built in market that can be accessed via a chat command or a HumanNPC. Each base item can be configured to allow for a wide variety of placement options/restrictions. A large amount of configuration options are available for each item. Adjustable placement options while holding shift. Items can be picked up by holding a hammer, looking at the deployed entity and pressing your mouse3 button (scroll wheel button).
deployablenature.admin - Required to use the giveprefab command.
deployablenature.market.chat - Required to use the market chat command.
deployablenature.ignore.restrictions - Allows a player to deploy items without restriction (TC etc).
deployablenature.gather - Required for players to obtain drops while gathering.
deployablenature.use - Required to deploy nature items.
deployablenature.free - allows access to the nature market for free.
There is also the option to create groups via the config, which will receive discounts in the market based on the value assigned to them.
Example:
"Permissions that will receive a discount on the store cost when purchasing [1.0 is full price]. Prefix with deployablenature.": { "deployablenature.vip": 0.5 }, This would give players with the deployablenature.vip permission a discount of 50% off of the market price.
Command: giveprefab
Parameters: <skin id> <quantity>
Example: /giveprefab 2609145017 100 - spawns the user 100x medium clutter rocks"
Permission: deployablenature.admin
Command: naturemarket
Permission: deployablenature.market.chat
Command: dnpickup
Permission: None
Command: giveprefab (console)
Parameters: <player id/name> <skin id> <quantity>
Example: /giveprefab "new guy" 2609145017 100 - spawns the user 100x medium clutter rocks for new guy"
Permission: deployablenature.admin
Command: dnsetprefab
Parameters: None
Console Command: dnkillentities - wipes all nature entities from the map.
Parameters: <optional parameter: true> - this wipes the data after the command executes. If not used, the nature items will respawn on plugin reload.
Example: dnkillentities or dnkillentities true.
Permission: deployablenature.admin if running from player console.
Console Command: dnkillentitiesforplayer - wipes all nature entities from the map for the specified player
Parameters: <player name/id>
Example: dnkillentitiesforplayer "new guy" - would delete all entities for the player whose name contained "new guy".
Permission: deployablenature.admin if running from player console.
Console Command: dnpurge - enables purge mode, wiping all entities from the map (does not delete data), and preventing them from spawning on server start/being deployed by players while active. Automatically resets to false on server wipe.
Parameters: <true/false>
Example: dnpurge true - would enable purge mode.
Permission: deployablenature.admin if running from player console.
You most likely won't need the below information, but it is here for more advanced users.
Prefab Types
0: Rock 1: Tree 2: Bush 3: Animal 4: Furniture 5: World
Tree Types
0: None 1: Palm 2: Oak 3: Swamp 4: Birch 5: Beech 6: Pine 7: Cacti 8: Snow 9: Mauritia_Flexuosa 10: Hura_Crepitans 11: Trumpet_Tree 12: Schizolobium 13: Dead_Log 14: Dead_Log_Snow 15: Driftwood
Bush Types
0: None 1: Willow 2: Willow_snow 3: Spice 4: Spice_snow 5: Creosote 6: Berries 7: Mushrooms 8: Ocotillo 9: Monstera_Deliciosa 10: Bromeliad 11: Heliconia_Rostrata
API
public bool IsDeployableNature(BaseEntity entity) Returns if an entity is a DeployableNature entity that has the prevent_gather attribute.