Search the Community
Showing results for tags 'neko'.
-
Version 1.0.1
553 downloads
This is an incredibly simple, and potentially misleading with its name, plugin that will edit your hostname & description to include your wipe dates. Specify your preferred date format (DD/MM, MM/DD, etc) and the hostname + description you wish to use. This WILL completely override your server.cfg's hostname & description! This WILL display an incorrect wipe date if loaded halfway through your wipe! The plugin must be loaded before your server(s) wipe to function correctly! Config { "Date Format (dd, mm)": "dd/mm", "How many days counts as 'Just Wiped'?": 1, "What text should be added if the server is 'Just Wiped'?": "JUST WIPED", "Hostname ({wipe} goes where you want the wipe text)": "My Server | Active Admins | {wipe}", "Description ({wipe} goes where you want the wipe text, 'Just Wiped' will not be added here)": "Welcome to XXYY, join our discord: discord.gg/abcdef\nLast wipe was on {wipe}", "Hostname Update Interval (seconds)": 3600 } In your hostname & description, simply put {wipe} anywhere and it'll get replaced with the date of your wipe. Want your server to say "RECENTLY WIPED" for the first 3 days of your wipe? Simply use "How many days counts as 'Just Wiped'?": 3 and "What text should be added if the server is 'Just Wiped'?": "RECENTLY WIPED" and you're set! Replacements JReplacements are: {wipe} - The date of the wipe, which is formatted as specified in the config {just} - The 'JUST WIPED' text. If you want your JUST WIPED text separated from your date format, this is how to do it. Why is an 'Update Interval' needed? Let's say your server wipes on 22/11, and you only want it to say "Just Wiped" for the first 3 days of your 7 day wipe cycle. At some point during the third day, the server will no longer count as "Just Wiped" by your own definition, and there needs to be a good way to check this. You can alter the update interval to be as long or as short as you wish. Don't fancy having a timer running? Set it to 0 and it'll never be created Be warned though, unless you have daily server restarts or plugin reloads, the plugin will not know that it needs to update the hostname accordingly.Free -
Version 2022.03
262 downloads
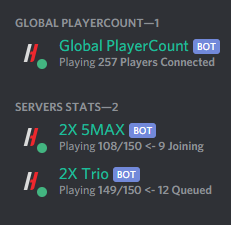
Discord Pop Bot+ is the ultimate population display tool for Rust, CS;GO, ARK, and Minecraft servers. Multiple bots, one instance Launch your fleet of bots together with a single command Performance Critical Minimal server impact* by leveraging existing connections Flexible Structure With totals, conditions, and more, make something that truly feels like your own bot *When using information provided by BattleMetrics. Data Collection Methods BattleMetrics Public API - Find your server's public entry, and show your population hassle free BattleMetrics RCON API - Directly query your gameserver using a BattleMetrics RCON Subscription and game-specific command. Steam A2S Queries - Use a commonly-implemented Steam protocol to fetch population data from just an IP + Port. Supported by games such as CS;GO, ARK:SE, CS1.6, TF2 Global Bot - Combine the output of other bots into a single total, with all the same display features. Documentation / Support / More Information Help & Information are available in the support server - https://discord.gg/ZWAr5UuGnx You may need Administrator privileges on the system to setup & run this script depending on your server's setup. Discord Pop Bot+ is not affiliated with or endorsed by BattleMetrics. Legacy Market Purchases If you previously purchased this application through another site, please get in touch with support to have a purchase generated on CodeFling free of charge. CodeFling is the only place you can purchase Discord Pop Bot+.$5.00 -
Version 2022.01
79 downloads
A utility bot that helps with administrating your Rust servers without going in-game for the information - pure magic! Features Simple-setup config Supports BattleMetrics RCON and direct RCON to your server Seamlessly include all your servers from this single bot Smart pagination when the results are too large to display (e.g combatlog) Customisable combatlog output Colour config options to keep output in line with your brand Full Playing ... Discord status customisation View the combatlog of any steamID on any of your servers See who's in a player's team or clan directly from Discord Convert steam vanity URLs to Steam IDs and find their profile on BattleMetrics quickly Automatic name conversion so you always have a player's most recent Steam name Disable commands you don't need or want Restrict command usage to specific roles using their names or IDs Free-to-use emojis included to be used as templates or the real thing - they help keep things looking organised! Includes and integrates with Wxll's ClansRcon.cs plugin to provide additional features not usually available from console. Detailed logging NetworkID logging & searching Combatlog + NetworkID linking - no more unresolveable combatlogs. Adaptive and clear error handling - so you know what's gone wrong. Player notifications - see when a player you want to spectate comes on and offline Anti staff mention system - warns users not to tag your staff members! Rust Game ban checking - check if a SteamID has been game banned from Rust Chat Sync that works BOTH WAYS! And nearly all of the above is fully customisable through the simple configuration file. Custom commands to allow for restarting your server from Discord, muting from Discord, etc with a customisable syntax. I am completely open to ideas, bug reports, suggestions, and other comments so please get in touch in Discord and mention you have some feedback for this product <3 Documentation / Installation / Issues / Extensions As of RustMagic 1.5 (29/04/2021), contacting me on Discord is no longer the place to go for support, and coming here is not where you should come to see installation steps. I have setup a Public Wiki as well as a fair few tutorials for everyone to use and view. Please see the appropriate links. Public Wiki / Documentation Tutorials / Guides Issues / Feature Requests / Support v1.5 Update The 1.5 update is the largest overhaul of RustMagic ever done, and as such requires an entirely new configuration setup. You will have to re-do your configs. Additionally, Battlemetrics-Only Installations are no longer supported. Please use a direct RCON connection, and if you have any problems with this on a trust level please see the debugging notice on the wiki. v1.5 Update The 1.6 update introduces recent changes to how distribution requirements are satisfied. There is no longer any need to manually drag a file from the Distributions/ directory into the root directory. Simply run the file run.py with Python and RustMagic will attempt to start. Emojis Preview$30.00- 3 reviews
-
- 1
-

-
- #rust
- #rust magic
-
(and 4 more)
Tagged with:
-
Version 2022.01b
21 downloads
This is an extension for my existing product Rust Magic! Please do not purchase this if you do not already own the base product. Features Fully customisable lightweight pugin RustMagicAuth.cs using Oxide's Config, Data, and Lang systems. Reads from your existing Rust Magic config file - no need to re-specify what you already entered. Uses Rust Magic's connection logic - no unnecessary RCON connections. One single command to view any SteamID's, Discord ID's, Discord @'s, or Discord Name's link data. Re-assign a user's Discord role when they rejoin your Discord server after leaving. Revoke permissions if they leave your Discord. Re-grant permissions if they decide to join your Discord again. Name syncing from in-game to Discord Role syncing that works both ways, depending on how you set it up. TBA: MySQL Database support. Authentication Flow User types /auth in-game, and receives a code. User PMs this code in a command to your RustMagic bot, e.g. /auth ab12cd34 User is asked to select which server they received this code on using the same reaction-based menu as with other Rust Magic commands. The code is checked against what that server has on record, and if invalid is asked to re-enter their code. Once the code is confirmed as valid, the user will receive 3 things: All of the oxide groups or permissions you have specified across all of your servers. A thank you message on the server they received their code on (if logged in) A discord role in your server to show that they are authenticated. The authentication flow is now complete. Requirements Rust Magic > v1.1.0 ("extensions update") A windows, linux, or mac server that is already setup to run Rust Magic Knowledge of the Oxide Permissions System Installation Extract the ZIP to your Desktop or other appropriate location. Select the distribution that most closely resembles your setup (should be the same as your chosen Distribution for Rust Magic) Drag the rustmagicauth.xxxxx.xx file into your Rust Magic Extensions/ folder Ensure your config is setup correctly Restart Rust Magic Configuration Plugin The plugin uses Oxide's default systems to handle config, language settings, and data. It is recommended you clear oxide/data/RustMagicAuth.json as frequently as you wipe to ensure codes cannot be guessed. { "Chat Icon (Steam64 ID)": 76561199093053926, "Chat Prefix": "<color=#d464e8>Magic Auth</color>:", "Valid Auth Code Characters": "1234567890abcdef", "Auth Code Length": 8, "Oxide Group To Check User For": "auth" } While most of this is self explanatory, it's important to note the following: Valid Auth Code Characters must match the config for the extension. Auth Code Length must match the config for the extension. The oxide group to check for is used solely to prevent a user from generating a code after they've authenticated. It is assumed that you will grant authenticated users an oxide group instead of a single permission. Extension Please see sample.json after purchase for fully-detailed explanations on what each option does. Briefly, however: You can get Discord Role/Server/Channel IDs by going to Settings > Appearance > Developer Mode This bot will work if you want to have logs in a Staff discord, but if this is the case ensure settings.discord_server_id has been explicitly set. Commands find <steam64ID, @User, Discord Username, Discord ID> Retrieves the link data for the specified user if available. unlink <@User, Steam64 ID, Discord User ID> This will remove all in-game permissions, their Discord role, and all data about their accounts that the bot has stored. reward @User Allows you to trigger a manual execution of all tasks that would be needed to give a user their rewards. Useful if, for example, your server is offline when the bot tries to reward the user. rewards This is a command intended for users of your community! It will allow them to perform a re-execution of all commands only for themself, with a cooldown of 1 hour. If you’re tired of users saying “I didn’t get my rewards”, this is perfect for you as you can just tell them to run /rewards and the ticket is resolved. Migration As of version 1.2.0, you will be required to merge your existing in-game auth.json file! Once you are using the latest version of the plugin, you will see that there is a now folder: oxide/data/RustMagicAuth You can drag and rename your old RustMagicAuth.json data file into here, the new name you want to use is auth.json. Additionally, there is a new config option: Clear Name Data on Wipe which you can set to true to make the (potentially large) date files clear themselves of useless & old data. Name Sync The latest version of Rust Magic Auth now has name syncing! The RustMagicAuth.cs plugin gathers all of this information and provides an RCON command that the RustMagic bot will execute perioidcally. It will set the nickname of people in your Discord server to the latest recorded Steam name that they have (authenticated members only). Role Sync Along with name syncing, role syncing is now an available feature. Please be incredibly careful when setting it up, as it has the power to very easily result in financial losses if you are using it with VIPs and Nitro Boosters. First of all, two-way syncs can be incredibly dangerous. When RustMagicAuth detects that a user has a Discord role you want to sync, it will perform that command across all servers. This means if setup incorrectly, a user receiving VIP on one server could potentially end up having VIP on all servers. Secondly, due to the nature of Oxide, there is no simple and efficient way to detect when an oxide group is added or removed from a user. Because of this, data is updated only when the user joins a server. This means the previous data doesn’t persist anywhere, and we’re left only with a list of what groups they currently have. Finally, it’s important to read the sample.json file as you may have missed new command configs or new mandatory settings.$20.00 -
Version 1.0.0
23 downloads
This is a script that can be used to automatically wipe your servers on a set schedule, changing either your seeds or level URL. You may need Administrator privileges on the system to setup & run this script depending on your server's setup. Files Batch script which turns on/off your server and deletes your chosen data/map/bp files Executable which will handle changing the seed/levelurl seeds.txt file which stores all your seeds/levelurls which will be randomly chosen every wipe (the name can be changed later) Requirements Rust Server(s) setup in a standard way on a Windows dedicated server. Administrator privileges on said Dedicated server. File editing software (Notepad++ works) Rust server(s) running as a service (you can use NSSM to set this up) Microsoft Visual C++ Redistributable Package (64 Bit, 32 Bit) How to Setup Open auto-wipe.bat Enter your server's service name Replace the example paths with the plugin and map file paths you want to be deleted on wipe Note: Using *.db will delete all .db files in the folder Open config.json in Notepad++ Replace the example server config path with your own server.cfg location Replace the example seed / txt file with the path of your own seeds.txt or levels.txt file (the name of the file does not matter) Note: Make sure to use double \\ just like in the example provided or it will not work! Optional: Change the value of replacement from server.seed to server.levelurl if you wish to change the server levelurl each wipe. Choosing your "Replacement" value This can be anything that you wish for the code to look for, but it is necessary that the seed or levelurl is the last thing on the line and it is separated by a space. For example, if you wanted to change something where the line started with +server.seed you can change the replacement property to match this. For most standard setups and usages, the default of server.seed will be sufficient. Open Task Scheduler in Windows Click Create Task Select "Run whether user is logged on or not" Select "Run with highest privileges" In the drop-down box select "Configure for Windows Server 2016" (may be different depending on server version) In the "Triggers" tab click "New..." and select your schedule In the "Actions" tab click "New..." and select the auto-wipe.bat file In the "Conditions" tab deselect any power options Populate your seeds.txt file If you're using levelurls, the same will apply just with different values Open seeds.txt (you may have called it something else) in Notepad++ Go to https://just-wiped.net/search-rust-maps and search for some seeds using your map size. Put each seed or levelurl on a new line Save the file Perform a Dry-Run Whilst your server is online with no pop, manually run the auto-wipe.bat to ensure that it is working as expected. If not, please go through all of the steps again and make sure you read everything! It is very common to forget double backslashes in the config file, or to have a typo in one of your file paths. This is a general method to setup your auto wipes, each setup will be different so you must ensure you adapt and change ALL file paths to match your setup and desires. I cannot aid you in making your server into a service, though it is highly recommended for all servers to do so as it will make your setup safer and more relaible. There are numerous tutorials available on YouTube if you desire to do so. If you have time, and would like to help better this product, please fill out this form: https://forms.gle/pvssvoM3KxEPAxVj9.Thank you.$30.00- 3 comments
-
- 1
-


