
MortuusVivensX's Wishlist
-
$29.95$21.95Shop
Enjoy a highly customizable Shop that can be configured in game! Use NPCs as shopkeepers, and set up a shop with ease using the game interface to add, edit, or remove items on the fly!
⭐ Features of Shop
Beautiful user interface with multiple templates (Fullscreen, In-Menu V1/V2/V4) Shopping Basket - add multiple items to cart and purchase them all at once Search functionality - search for items by name across all categories Pagination - efficient item browsing with page-by-page navigation Discount system (by permissions) with per-item custom discounts Automatic shop filling (+ the plugin has support for the ItemCostCalculator plugin) Selling items (players can sell items to the store and receive money for it) Sell containers configuration - choose which containers (main, belt) players can sell from Blocked skins - prevent selling of specific item skins High performance with optimized item loading Adding/editing/removing items IN GAME with visual editor Supports NPC shops (HumanNPC integration) Supports Custom Vending Machines Supports NoEscape plugin integration Supports Duel/Duelist - blocks shop access during duels Convert from ServerRewards Favorite items system - players can mark items as favorites Buy Again feature - quick repurchase of previously bought items By default, the plugin has English, Russian and Chinese translations LangAPI integration for custom translations Transfer money between players directly in the plugin (including offline players option) Shop allows you to use multiple economy plugins at once (players can choose what they want to pay with) For each item, you can choose which payment methods are available and how much they will cost, based on the selected method Cooldown system - per-item buy/sell cooldowns with per-permission overrides Wipe cooldown - block items for purchase/sale after server wipe Respawn cooldown - prevent shop access immediately after respawn Buy/Sell limits - lifetime and daily limits per permission Max buy/sell amount - limit items per transaction Force buy - fast purchase without confirmation dialogs Plant genes configuration for plant items Weapon configuration - spawn weapons with ammo and attachments Content system - configure container contents (liquid, weapon mods, etc.) Customizable UI - full color customization and formatting options Offline Image Mode - use local images instead of downloading from internet Image loading on login - preload images when players connect Console and file logging - comprehensive logging system ServerPanel integration - add Shop to ServerPanel menu Notify/UINotify integration for notifications Auto-wipe settings - automatically reset cooldowns, limits, and player data on wipe Discord Logging - Track all purchases, sales, and transfers directly in your Discord server via webhooks with customizable embeds API methods for other plugins to interact with Shop
🎮 Commands
shop - open shop interface shop.install – starts the shop installation process shop.refill <recovery_rate> - refill shop again
recoveryRate: A value between 0 and 1 that determines the multiplier for the cost of selling items. For example, shop.refill 0.5 means that items will have a sale cost of 50% of their purchase cost. shop.convert.sr [clear] - convert items from ServerRewards to Shop. The option clear means clearing Shop items before converting shop.setvm [categories: cat1 cat2 ...] - add custom VM in config shop.setnpc [categories: cat1 cat2 ...] - add NPC in config shop.remove all - a console command to remove all items and categories from the plugin shop.remove item [category name/all] - a console command to remove an item (or all items) shop.remove category [category name/all] - a console command to remove a category (or all categories) shop.fill.icc [all/buy/sell] - a console command for updating prices of items in the store using ItemCostCalculator. all - updates both Price and SellPrice, buy - updates Price, sell - updates SellPrice shop.convert.from.1.2.26 – command to convert Shop plugin version 1.2.26 to version 1.3.0+ shop.reset – resets store data, including templates, configurations, and items. shop.reset template – resets the store interface template data. shop.reset config – resets store configuration data. shop.reset items – resets store items data. shop.reset full – completely resets all store data (templates, configurations and items). shop.manage – used to manage the Shop plugin. shop.manage economy list – displays a list of all available economic systems in the plugin. shop.manage economy set <economy_ID> <name> – sets the selected economic system by plugin ID and name. The command updates the corresponding economic system on the server and saves the changes in the configuration. FOR EXAMPLE:
shop.manage economy set 0 Economics – sets the main economy plugin to "Economics".
shop.manage economy set 1 ServerRewards – sets the additional economy system with ID 1 to "ServerRewards". shop.wipe – manually trigger wipe (resets cooldowns, limits, and player data) shop.change – change item category (used in editor) shop.item – console command for item actions
🛡️ Permissions
shop.setvm - for command "shop.setvm" shop.setnpc - for command "shop.setnpc" shop.free - for free item purchases shop.admin - admin permission shop.bypass.dlc - allows bypassing Facepunch ToS item restrictions (WARNING: your server may be banned for this)
📈 API Methods
The Shop plugin provides API methods for other plugins to interact with it:
API_OpenPlugin(BasePlayer player) – opens the shop UI for a player. Returns empty string if failed, or UI data if successful. API_GetShopPlayerSelectedEconomy(ulong playerID) – returns the economy ID (0 = main, 1+ = additional) that the player has selected for shopping. Note: Other plugins can call these methods using Shop.Call("API_MethodName", ...) syntax.
⚖️ Sort Types
None Name Amount PriceDecrease PriceIncrease
🧬 Category Types
None – normal category for items Favorite – category for favorite items Hidden – hidden category, available only in NPC stores or Vending Machines
🎥 Video
P.S. Video of the old version, video for the V2+ version is now in development
🖼️ Showcase
Full screen Templates
Template OLD STYLE
Template NEW RUST
In-Menu Templates
Template V1 (V1.1)
Template V1 (V1.1) with BASKET
Template V2
Template V2 with BASKET
Template V4
Template V4 with BASKET
Installer
Editor
📢 Discord Logging
Track all shop activity via Discord webhooks: purchases, sales, and money transfers.
🧪 TEST SERVER
Join our test server to view and experience all our unique features yourself!
Copy the IP Address below to start playing!
connect 194.147.90.239:28015
📚 FAQ
Q: I get the message "The plugin does not work correctly, contact the administrator!”. What should I do?
A: This means that your plugin is not installed. To install the plugin, use the command "/shop.install”. You need to have "shop.admin” permission to access this command.
Q: Where can I see an example of a config?
A: Config
Q: How to use BankSystem to store the economy
A:
"Economy": { "Type (Plugin/Item)": "Plugin", "Plugin name": "BankSystem", "Balance add hook": "Deposit", "Balance remove hook": "Withdraw", "Balance show hook": "Balance", "ShortName": "", "Display Name (empty - default)": "", "Skin": 0, "Lang Key (for Title)": "LangTitle", "Lang Key (for Balance)": "BalanceTitle" }, Q: How to use ServerRewards to store the economy
A:
"Economy": { "Type (Plugin/Item)": "Plugin", "Plugin name": "ServerRewards", "Balance add hook": "AddPoints", "Balance remove hook": "TakePoints", "Balance show hook": "CheckPoints", "ShortName": "", "Display Name (empty - default)": "", "Skin": 0, "Lang Key (for Title)": "LangTitle", "Lang Key (for Balance)": "BalanceTitle" }, Q: How to use Economics to store the economy
A:
"Economy": { "Type (Plugin/Item)": "Plugin", "Plugin name": "Economics", "Balance add hook": "Deposit", "Balance remove hook": "Withdraw", "Balance show hook": "Balance", "ShortName": "", "Display Name (empty - default)": "", "Skin": 0, "Lang Key (for Title)": "LangTitle", "Lang Key (for Balance)": "BalanceTitle" }, Q: How to use IQEconomic to store the economy
A:
"Economy": { "Type (Plugin/Item)": "Plugin", "Plugin name": "IQEconomic", "Balance add hook": "API_SET_BALANCE", "Balance remove hook": "API_GET_BALANCE", "Balance show hook": "API_REMOVE_BALANCE", "ShortName": "", "Display Name (empty - default)": "", "Skin": 0, "Lang Key (for Title)": "LangTitle", "Lang Key (for Balance)": "BalanceTitle" }, Q: How to use scrap to pay for items
A:
"Economy": { "Type (Plugin/Item)": "Item", "Plugin name": "", "Balance add hook": "", "Balance remove hook": "", "Balance show hook": "", "ShortName": "scrap", "Display Name (empty - default)": "", "Skin": 0, "Lang Key (for Title)": "LangTitle", "Lang Key (for Balance)": "BalanceTitle" }, Q: How to add KIT as shop item
A: https://pastebin.com/4szBQCgz
Q: How to add Command as shop item
A: https://pastebin.com/bcCkzBEL
Q: How do I make a weapon spawn with ammo in it?
A: You need to configure the "Weapon" section in the item config:
"Weapon": { "Enabled": true, "Ammo Type": "ammo.rifle.explosive", "Ammo Amount": 128 } Q: How do I make items spawn some content (liquid, weapon modifications)?
A: You need to configure the "Content" section in the item config:
"Content": { "Enabled": true, "Contents": [ { "ShortName": "weapon.mod.lasersight", "Condition": 100.0, "Amount": 1, "Position": -1 } ] }, Q: How to turn off the sell feature?
A: You need to turn off "Enable item selling” in the config, or do it in the item setting in the game.
"Enable item selling?": false,
Q: How to use the ItemCostCalculator with Shop?
A: You need to use command "shop.refill" (command to refill the Shop)
Q: What should be the size of images for item icons?
A: Typically, the image dimensions for item icons are 512x512 pixels, but any square image can suffice.
Q: I get the error "UI is unavailable for player. Reason: Menu UI is not initialized". How to fix it?
A: This error occurs when the interface template is not installed or configured. Follow these steps:
1. Reset the template using the command: shop.reset template (use only template to avoid data loss).
2. Install the interface via shop.install in the game (to visually select a template) or through the console.
Note: Ensure you have the shop.admin permission to execute these commands.
Q: How do I add Shop to the ServerPanel menu?
A: Follow these simple steps:
1. Open ServerPanel menu in-game and click "+ADD CATEGORY" button
2. Set these exact parameters:
Type: Plugin Plugin Name: Shop Plugin Hook: API_OpenPlugin 3. Click "SAVE" button to create the category
4. Reset Shop template and install it:
Type in console: shop.reset template (IMPORTANT: use only "template"!) Then type: shop.install Note: If Shop doesn't appear in ServerPanel menu, make sure both plugins are loaded and you typed the parameters exactly as shown above.
Q: I see black images with Rust logo or get error 429 when loading images. What should I do?
A: These issues occur when there are problems downloading images from the internet. The Shop plugin sends images to ImageLibrary but is not responsible for the downloading process itself. Error 429 typically occurs due to rate limits imposed by image hosting services like Imgur (see HTTP 429 documentation for more details). To fix this, enable Offline Image Mode which will use local images instead:
Enable the mode in config: Open "oxide/config/Shop.json" (or "carbon/config/Shop.json" for Carbon) Set "Enable Offline Image Mode": true Set up the images: Create folder "TheMevent" in "oxide/data" (or "carbon/data" for Carbon) Download PluginsStorage (click "CODE" → "Download ZIP") Extract the ZIP and copy all contents to the "TheMevent" folder Reload the plugin: Type o.reload Shop (Oxide) or c.reload Shop (Carbon) Note: If you want to add your own custom images, place them in the "TheMevent" folder and reference them with the "TheMevent/" prefix. For example: "TheMevent/Icon1.png", "TheMevent/MyCustomIcon.jpg", etc.
Q: What placeholders are available for commands and what do they do?
A: You can use these placeholders in shop commands and they will be automatically replaced when a player purchases a command item:
%steamid% - Replaced with the player's Steam ID (e.g., "76561198000000000") %username% - Replaced with the player's display name (e.g., "PlayerName") %player.x% - Replaced with the player's X coordinate position %player.y% - Replaced with the player's Y coordinate position %player.z% - Replaced with the player's Z coordinate position Example usage in shop commands:
"Command (%steamid%)": "say Welcome %username%!|teleport %steamid% %player.x% %player.y% %player.z%" Note: Multiple commands can be separated by the "|" character, and they will be executed in sequence when the item is purchased.
Q: How to set different prices for different currencies (RP and balance)?
A: You can configure separate currency prices for each item. Edit the file oxide/data/Shop/Shops/Default.json and find the item you want to modify. In the "Currencies" section, set different prices for each economy:
"Currencies": { "Enabled": true, "Currencies": { "0": {"Price": 1000}, "1": {"Price": 500} } } This means players pay 1000 from their main balance (Economics) or 500 RP from their ServerRewards balance. Economy ID 0 = main economy, ID 1 = ServerRewards.
Q: How to create a shop using HumanNPC plugin and set specific categories?
A: To create a shop with HumanNPC, follow these steps:
Create an NPC using HumanNPC plugin Get the NPC ID (you can find it in the HumanNPC config or use the command humannpc.list) Use the Shop command to add the NPC: shop.setnpc [categories: cat1 cat2 ...] Example:
shop.setnpc categories: Weapon Ammunition Tools - adds the NPC with Weapon, Ammunition, and Tools categories
shop.setnpc categories: * - adds the NPC with all available categories
Note: You need the shop.setnpc permission to use this command. Make sure both HumanNPC and Shop plugins are loaded on your server.
Q: How to add Custom Vending Machines to Shop plugin?
A: To add Custom Vending Machines to Shop, follow these steps:
Place a Custom Vending Machine in your world Look at the vending machine and use the command: shop.setvm [categories: cat1 cat2 ...] Example:
shop.setvm categories: Weapon Ammunition - adds the vending machine with Weapon and Ammunition categories
shop.setvm categories: * - adds the vending machine with all available categories
Note: You need the shop.setvm permission to use this command. The vending machine will be automatically added to the Shop configuration.
Q: How does the Shopping Basket feature work?
A: The Shopping Basket allows players to add multiple items to a cart before purchasing. Players can add items to the basket, review their selection, and purchase everything at once. The basket shows the total cost and allows players to remove items before checkout. This feature must be enabled in the template settings.
Q: How does the Search functionality work?
A: The Search feature allows players to search for items by name across all categories. Simply type in the search box and the shop will filter items matching your query. Search works across all enabled categories and respects permission settings. The search feature can be enabled/disabled in the template configuration.
Q: What are Wipe Cooldown and Respawn Cooldown?
A: These are time-based restrictions:
Wipe Cooldown: Blocks items from being bought/sold for a specified time after a server wipe. This is useful for preventing powerful items from being purchased immediately after wipe. Configure in config: "Wipe Cooldown": true and "Wipe Cooldown Timer": 3600 (seconds). Respawn Cooldown: Prevents players from opening the shop immediately after respawning. Helps prevent abuse. Configure in config: "Respawn Cooldown": true and "Respawn Cooldown Timer": 60 (seconds). Q: How do Daily and Lifetime Limits work?
A: Limits control how many times players can buy/sell items:
Lifetime Limits: Total number of times a player can buy/sell an item across their entire account. Set to 0 for unlimited. Daily Limits: Maximum number of times per day a player can buy/sell an item. Resets daily. Set to 0 for unlimited. Limits are per-permission, so you can set different limits for VIP players, regular players, etc. The plugin uses the highest limit among all permissions the player has. Q: What is the "Buy Again" feature?
A: Buy Again allows players to quickly repurchase items they have bought before. This feature shows a history button in the shop UI (if enabled) and requires a permission. To enable, set "Buy Again Settings": {"Enabled": true, "Permission": "shop.buyagain"} in the config.
Q: How do I configure blocked skins for selling?
A: You can prevent players from selling specific item skins. In the config, add entries to "Blocked skins for sell":
"Blocked skins for sell": { "rifle.ak": [52, 25], "pistol.m92": [100, 200] } Q: How do I configure which containers players can sell from?
A: In the config, set "Settings available containers for selling item":
"Settings available containers for selling item": { "Enabled": true, "Containers": ["main", "belt"] } Available container names: "main" (inventory), "belt" (hotbar), "wear" (clothing), etc.
Q: What are Auto-Wipe Settings?
A: Auto-Wipe Settings automatically reset certain data when you run the shop.wipe command. Configure in config:
"Auto-Wipe Settings": { "Cooldown": true, "Players": true, "Limits": true } Cooldown: Resets all item cooldowns Players: Resets all player data (favorites, economy selection, etc.) Limits: Resets all buy/sell limits Q: How do I customize price formatting?
A: In the config, set "Formatting Settings" to control how prices are displayed:
"Formatting Settings": { "Buy Price Format": "G", "Sell Price Format": "G", "Shopping Bag Cost Format": "G", "Balance Format": "G" } Format options: "G" (general), "N" (number with separators), "C" (currency), "F" (fixed-point), etc. See .NET number formatting for all options.
Q: How do I enable transfers to offline players?
A: In the config, set "Allow money transfers to offline players?": true. By default, this is disabled for security reasons.
Q: How do I configure Duel/Duelist integration?
A: To block shop access during duels, set "Blocking the opening in duels?": true in the config. Make sure you have the Duel or Duelist plugin loaded.
Q: What do all shop item settings mean and how should I configure them?
A: Below is a short explanation of the most important item fields and how they affect the plugin.
Type – what this entry does: Item (gives an in-game item), Command (runs server commands), Plugin (calls another plugin hook), Kit (gives a kit). ID – unique numeric ID of the item inside Shop. Used internally (for logs, favorites, editor); normally you don’t change it manually. Image – custom UI icon key. If empty, Shop will try to use the item icon found by ShortName. Permission – Oxide/Carbon permission required to see and use this item. Leave empty to make the item available to everyone, or set e.g. shop.vip for VIP‑only items. Title – custom title shown in the UI. If empty, the plugin will try to use DisplayName, then the in‑game display name of the item, or fall back to an empty string. Description – additional text shown in the item window. Optional, purely visual. Command (%steamid%) – used when Type = Command. The plugin will execute this command on the server. You can use placeholders like %steamid%, %username%, %player.x%, %player.y%, %player.z%. Each purchase can run multiple commands (split internally by |). Kit – kit name for Type = Kit. The plugin will give a kit with this name when the player buys the item. Plugin – used for Type = Plugin. Contains plugin name, hook name and amount. When the item is purchased, the specified hook will be called in the target plugin. DisplayName (empty – default) – overrides the in‑game item name shown to the player (for Type = Item). If empty, the plugin uses the original item display name (optionally via Lang API). ShortName – shortname of the item (e.g. rifle.ak). This is required for Type = Item; it is used to find ItemDefinition, icon, stack size, etc. Skin – workshop skin ID for the item. Only used when Type = Item. Is Blueprint – if enabled, Shop will give the item as a blueprint instead of the regular item. Amount – how many items are given/sold per one purchase. For blueprints this is how many separate blueprint items are created. Enable item buying? (CanBuy) – if disabled, the item cannot be bought (only sold, if selling is enabled). Price – default purchase price. Can be overridden per‑economy in Currencies – if a currency is configured for buying, its price will be used instead of this value. Enable item selling? (CanSell) – if disabled, players cannot sell this item back to the shop. Sell Price – default sell price. Can also be overridden in Currencies for selling. Buy Cooldown / Sell Cooldown – base cooldown in seconds between purchases/sales of this item. Can be overridden by per‑permission cooldowns below. Buy Cooldowns / Sell Cooldowns – per‑permission cooldowns. Keys are permission names (e.g. shop.vip), values are cooldown seconds. The plugin uses the lowest cooldown among permissions that the player has. Use custom discount? – if enabled, the item will use its own Discount map instead of the global discount configuration. Discount (%) – per‑permission discount percentages for this item (only if custom discount is enabled). The highest discount from permissions that the player has will be applied. Sell Limits / Buy Limits – global lifetime limits per permission. A value of 0 means “no limit”. The plugin selects the highest limit among permissions the player has. Daily Buy Limits / Daily Sell Limits – per‑day limits (reset by the plugin’s daily logic). 0 means “no daily limit”. Max Buy Amount / Max Sell Amount – maximum number of items that can be bought/sold in a single transaction (0 disables this limit). Force Buy – if enabled, the item will use fast purchase flow (without extra confirmation windows, depending on UI settings). Prohibit splitting item into stacks? – if enabled, the plugin will try to give the item in a single stack instead of splitting it into multiple stacks, when possible. Purchase/Sale block duration after wipe – time (in seconds) after a wipe during which this item cannot be bought/sold. Useful for limiting powerful items early in the wipe. Localization – per‑language messages for the item title. If enabled and a translation exists for the player’s language, it will override the normal title. Content – configuration of contents for containers (e.g. boxes, weapons with attachments, etc.). You can add inner items (shortname, amount, condition, position). Weapon – additional settings for weapons (ammo type, ammo amount, etc.). Applied when the item is created. Genes – plant gene configuration. If enabled, the plugin will set specified genes on the created item. Currencies – per‑economy price configuration. You can set different prices for each enabled economy plugin (by economy ID) for both buying and selling. If a currency is configured and enabled for the player’s selected economy, its price takes priority over the default Price/Sell Price. Q: What do shop category settings mean and how should I configure them?
A: Categories group your shop items and control how they are shown, sorted and filtered for players.
Enabled – turns this category on or off. If disabled, the category and all its items will not appear in the shop UI at all. Category Type – controls special behavior of the category: None – a normal category that shows the items you added to Items. Favorite – a virtual category that shows each player’s favorite items (based on their own favorites list). Items here are taken from other categories the player marked as favorite. Hidden – a hidden category. It is stored in data and can be used for management, but is not shown in the normal category list in UI. Title – the name of the category displayed in the UI. If Localization is enabled and contains a translation for the player’s language, that localized text will be shown instead of this value. Permission – permission required to see and use this category. If you leave it empty, all players can see the category (subject to item‑level rules). If you set e.g. shop.category.vip, only players with that permission will see this category in the shop. Sort Type – how items inside the category are sorted: None – items are shown in the order they are stored/edited. Name – items are sorted alphabetically by their PublicTitle (what the player sees). Amount – items are sorted by Amount (stack size) in ascending order. PriceIncrease – items are sorted by price from cheaper to more expensive. PriceDecrease – items are sorted by price from more expensive to cheaper. Sorting is applied every time the category items are requested. Items – the list of ShopItem entries that belong to this category. For normal categories (Type = None/Hidden) this is what will be displayed in the item grid. For Favorite categories this list is not used for display – the plugin uses the player’s favorites instead. Localization – optional localized title for the category. When enabled, the plugin will try to show a translated title based on the player’s language. If no translation is found, it falls back to the Title field. How visibility and filtering work – when the shop builds a category: For normal categories, only items that are available for the player (permission, currencies, buy/sell rules, etc.) are included. Skip/take pagination is applied on top of that filtered list to show items page by page. For favorite categories, the plugin takes the player’s favorite items, applies sorting, and displays them in this special category. Reordering categories and items – categories and items can be moved up/down (or left/right) in the in‑game editor. This changes the order in which categories are shown in the UI and the default order of items when Sort Type = None. Q: How do I enable and use ADMIN MODE?
A: ADMIN MODE is a visual in-game editor that allows you to manage your shop without editing files manually.
Step 1: Enable ADMIN MODE
Ensure you have the shop.admin permission Open shop with /shop command Click the "ADMIN MODE" button in the header (shows "■" when active) Step 2: Create/Edit Categories
To create a new category:
With ADMIN MODE enabled, click the "+" button in categories list Fill in category details (Title, Enabled, Type, Permission, Sort Type) Click "SAVE" To edit an existing category:
Click the "Edit" button (pencil icon) next to the category Modify settings Click "SAVE" or "CANCEL" Step 3: Create/Edit Items
To create a new item:
Open the target category Click "+ADD ITEM" button Select item from the selection panel Configure all item properties (price, amount, permissions, etc.) Click "SAVE" To edit an existing item:
Click the "Edit" button on the item Modify properties Click "SAVE" or "CANCEL" Additional ADMIN MODE Features:
Use ↑↓ arrows to reorder categories Use ←→ arrows to reorder items within categories Use "DELETE" button in editor to remove categories/items All changes save automatically - no manual file editing needed Q: Where are shop files stored and what do they contain?
A: Shop plugin data is organized in the following structure:
📁 Configuration (oxide/config/Shop.json or carbon/config/Shop.json)
Plugin settings (permissions, commands, economy configuration) Notification settings Discord logging configuration Global plugin options 📁 Shop Data (oxide/data/Shop/Shops/Default.json or carbon/data/Shop/Shops/Default.json)
This is the main shop inventory file All categories and their settings All items with prices, permissions, cooldowns, limits Item configurations (weapons, content, currencies, etc.) Edited through ADMIN MODE or manually 📁 UI Template (oxide/data/Shop/UI.json or carbon/data/Shop/UI.json)
Interface template configuration Colors, sizes, positions Display settings Reset with: shop.reset template then shop.install 📁 Player Data (oxide/data/Shop/Players/ or carbon/data/Shop/Players/)
Individual player files (one per player) -

$19.99
Discord Link
Discord Link is a very simple, performant, and feature-rich Discord and Rust linking system. 2 Simple steps and a player can link to Discord!
NO DISCORD.DLL!!
FEATURES
- NO DISCORD.DLL REQUIRED!!! - Link Rust and Discord accounts - Grant a role in discord and group in game for linked players - Soft unlinking (All past data on a user's account links will be forever stored) - 2 Way role syncing between rust to discord and discord to rust - Supports multi server linking - Booster perks for linked players boosting your discord - Steam to discord name syncing (Auto renames users in discord to their steam name) - Admin perms to unlink players - Search link commands in discord and in game to get who a player is linked to - Logs to discord when players link and unlink - Auto remove players from being linked when they leave the Discord - Syncing your old database files from steamcord, discord auth, or discord core PERMISSIONS
discordlinkbot.search - ability to search players and use the UI
The Plugin and Discord Bot both have very simple installations.
We have included a readme.md file to make it even easier to setup!
Need support or want updates about what is coming to the bot? Join the support discord here https://discord.gg/ZsRgCUNv2x
This will require bot hosting to run the bot 24/7 since we do not use the Discord DLL therefore the server cannot host the bot.
Thanks to @shady14u for co-developing!!
-
$14.99
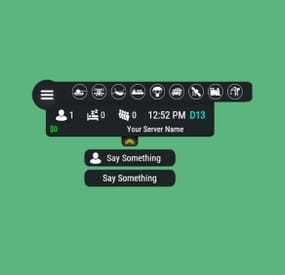
Server Hud
🗒️Features:
You can add any plugin event in the UI (if it has hooks, usually specified in the plugin description) Has ingame UI menu for configure your Hud The time format is adjusted to the player (depending on his language in the game), it checks which time format is used for this language You can also enable an additional menu that opens on the arrow. You can add various buttons to this menu, for example, to open a store, your server menu, etc. Almost all elements are customizable [for example: visibility of each element, Logo, Icons, Color e.t.c (check config down below)]
📕Commands:
/h setup - open UI for ingame config
/h - show all Server Hud UI commands
/h open - open Server Hud UI
/h events - open Events Bar
/h close - close Server Hud UI
/h hide - hide Server Hud UI
Q&A:
Q: Where i can find a base icon for creating my events icons?
A: Take a base icon below this message and using f.e photoshop for create you personal event icon!
Q: Where i can find a ready to use icons?
A: Here some links to ready to use icons packs(1 free, 2 paid):
https://codefling.com/customizations/free-custom-hud-icons
https://codefling.com/customizations/custom-hud-icons-paid
https://codefling.com/customizations/server-hud-custom-icon-pack
API:
string API_PlayerHudState(string id)
CanHudChangeState(BasePlayer player, string currentState, strint nextState)
🗒️Config:
{ "Auto reload [If you change the config and save the file the plugin will reload itself]": true, "Main setup": { "Overall layer [you will see the hud in your inventory]": false, "Size ALL [0% - inf]": 100, "Logo [HUD interact button]": "https://media.discordapp.net/attachments/335512864548847617/1134455399756607549/logo.png", "Events background opacity [0% - 100%]": 100, "Background opacity [0% - 100%]": 100, "Position": { "Align [TopLeft | TopRight | BottomLeft | BottomRight": "TopLeft", "Left | Right - offset": 40, "Top | Bottom - offset": 25 }, "Server name": "Your Server Name", "Active players": { "Icon": "https://cdn.discordapp.com/attachments/335512864548847617/1134455395813965934/active.png", "Color": "#fff", "Enable": true }, "Sleep players": { "Icon": "https://cdn.discordapp.com/attachments/335512864548847617/1134455395138670652/sleep.png", "Color": "#fff", "Enable": true }, "Queue players": { "Icon": "https://cdn.discordapp.com/attachments/335512864548847617/1134455393972654171/line.png", "Color": "#fff", "Enable": true }, "Time": true, "Player position [hide permisson - hud.streamer]": { "Enable": true, "true - grid | false - x,z coordinates": true, "Color": "cyan" }, "Economy plugin [Economics | ServerRewards]": { "Currency": "$", "Value color": "#10ff10", "Enable": true }, "Info messages": { "Update interval [in seconds]": 60, "Align [BottomCenter | TopCenter | TopRight]": "BottomCenter", "Width [in px]": 260, "Offset [top | bottom]": 0, "Offset [right]": 15, "Outline color": "#000", "Overall [you will see messages in your invenotory]": true, "Enable": true, "Messages": [ "Welcome to Your Server Name", "Good luck" ] }, "Additional menu": { "Auto close timer [seconds | 0 - disable]": 60, "Auto close after command use": true, "Open/Close button color": "yellow", "Commands background opacity [0% - 100%]": 100, "Enable": true, "Commands": [ { "Background image": "https://media.discordapp.net/attachments/335512864548847617/1134455392420761671/command.png", "Icon [optional]": "https://media.discordapp.net/attachments/335512864548847617/1134455395813965934/active.png", "Command": "chat.say Hello there", "Text": "Say Something", "Outline color": "#000", "Is Console": true }, { "Background image": "https://media.discordapp.net/attachments/335512864548847617/1134455392420761671/command.png", "Icon [optional]": "", "Command": "/shop", "Text": "Say Something", "Outline color": "#000", "Is Console": false } ] } }, "Base Events": [ { "Name": "Bradley", "Active color": "#10ff10", "Icon": "https://media.discordapp.net/attachments/335512864548847617/1134455316654850049/bradley.png", "Color": "#fff", "Enable": true }, { "Name": "PatrolHeli", "Active color": "#10ff10", "Icon": "https://media.discordapp.net/attachments/335512864548847617/1134455315073597530/heli.png", "Color": "#fff", "Enable": true }, { "Name": "CH47", "Active color": "#10ff10", "Icon": "https://media.discordapp.net/attachments/335512864548847617/1134455317485342803/ch47.png", "Color": "#fff", "Enable": true }, { "Name": "Cargo", "Active color": "#10ff10", "Icon": "https://media.discordapp.net/attachments/335512864548847617/1134455317086879794/cargo.png", "Color": "#fff", "Enable": true }, { "Name": "AirDrop", "Active color": "#10ff10", "Icon": "https://cdn.discordapp.com/attachments/335512864548847617/1134455316143161374/airdrop.png", "Color": "#fff", "Enable": true } ], "Custom Events": [ { "Hook OnEventStart": "OnConvoyStart", "Hook OnEventStop": "OnConvoyStop", "Name": "Convoy", "Active color": "#10ff10", "Icon": "https://media.discordapp.net/attachments/335512864548847617/1134455318030598154/convoy.png", "Color": "#fff", "Enable": false }, { "Hook OnEventStart": "OnSputnikEventStart", "Hook OnEventStop": "OnSputnikEventStop", "Name": "Sputnik", "Active color": "#10ff10", "Icon": "https://cdn.discordapp.com/attachments/335512864548847617/1134455315488854016/sputnik.png", "Color": "#fff", "Enable": false }, { "Hook OnEventStart": "OnArmoredTrainEventStart", "Hook OnEventStop": "OnArmoredTrainEventStop", "Name": "ArmoredTrain", "Active color": "#10ff10", "Icon": "https://cdn.discordapp.com/attachments/335512864548847617/1134455315841155173/train.png", "Color": "#fff", "Enable": false }, { "Hook OnEventStart": "OnHarborEventStart", "Hook OnEventStop": "OnHarborEventEnd", "Name": "Harbor", "Active color": "#10ff10", "Icon": "https://cdn.discordapp.com/attachments/335512864548847617/1134455318332592219/harbor.png", "Color": "#fff", "Enable": false } ] }- #hud
- #interface
- (and 6 more)
-
$40.00
BotReSpawn
By Steenamaroo in Plugins
Spawns set numbers of customised npcs at monuments,
various events, supply drops, biomes, custom locations, and 'toplayer'.
Plugin Description.
Highly customisable and intuitive npc plugin, setup exclusively via UI.
See images for an overview of the available options globally, and per npc profile.
Every option in the UI is clickable, showing a detailed description of its use.
Optional dependencies -
Kits (free at uMod.org) CustomLoot
Permissions.
botrespawn.allowed - Required for non-admin use
Chat commands.
/botrespawn - Opens UI. /botrespawn add *profilename* - Adds a custom profile then opens UI. (please don't use spaces or hyphens) /botrespawn remove *profilename* - Removes a custom profile. /botrespawn info - Tells you about the npc you're looking at. Console commands.
bot.count - Gives total number of spawned npcs. bots.count - Gives a breakdown of spawned npcs per profile. botrespawn toplayer NameOrId ProfileName amount(optional) botrespawn enable/disable "Profile name here" botrespawn tempspawn "Profile name here" - Spawns npcs from a profile at random points around that profile's location addspawn - Enabled via UI, in Edit Spawnpoints menu - for keybinding. botrespawn showspawns - Added for binding convenience. botrespawn checknav - Added for binding convenience. * Note = addspawn and showspawns commands require the user to select "Edit with console commands" first, from a profile's spawnpoints menu.
Default locations.
All major monuments are automatically included, plus profiles for the four biomes.
The following events also have default profiles
Airdrop (supply grenade optional) Locked Crate Spawn Locked Crate Hack Start APC Kill PatrolHeli Kill CH47 Kill
Configurable via json, per profile.
BotNames BotNamePrefix Announcement_Text Instant_Death_From_Headshot_Allowed_Weapons (accepts item shortnames) See note at end for weapon list formatting.
Everything else is configurable via UI - All options have a description in UI, accessible by clicking the name/label.
Kits.
Kits are managed, per profile, in UI.
As with BotSpawn, kit probability can be balanced by assigning a number to a kit.
When selecting multiple kits, increasing a kit's number increases its chances of being picked.
Only kits with weapons in the belt are shown in UI.
Most weapons are supported for npc use, including normal bullet and melee weapons,
rocket launchers, bows, crossbows, MGLs, nailguns, flamethrowers, etc.
Throwable explosives can be used but throwable melee (like spears) can be used but will not be thrown.
Spawnpoints.
Adding and managing spawnpoints is done, per profile, in UI,
or by enabling 'add by command' in spawnpoints menu, then using 'addspawn' console command.
You can bind this command for your convenience.
When opting to use the 'addspawn' command, a button will show in UI main page, allowing you to quickly return to the profile you were editing.
A new feature is that each spawn point can have overrides, forcing that specific npc to have different values to the rest of the profile's npcs.
At present you can override
Stationary Kits Health RoamRange
If you choose to use Parent_Monument, you can select it via UI, but do so before you add custom spawn points (if applicable).
Parent_Monument ensures that your profile and its spawn points will relocate after a map change,
so that they are in the same place, relative to that chosen monument.
If a profile uses custom spawn points, but does not have enough custom spawn points to cover the whole population,
it will spawn randomly placed npcs to make up the numbers, in accordance with the profile "Radius" setting.
EG :
Day_Time_Spawn_Amount 10
Number of custom spawn points 5
Result : 5 npcs on custom spawn points, and 5 randomly placed around the area, within the specified radius.
Murderer
Murderer true/false is no longer an option.
Instead, the AI will respond differently based on the weapons you give it.
If you want the AI to run directly at victims and attack, give it melee weapons only.
I believe you can still make murderer-style kits, although you also have Frankenstein clothing options built into the the UI options now.
Peacekeeper
Peacekeeper is now based on whether or not players are marked hostile.
An additional option 'Peacekeeper_Uses_Damage' restores the old behaviour,
where peacekeeper npcs will completely ignore players until attacked by them.
Configuration.
"DataPrefix": "default", (tells BotReSpawn which data files to load),
Allow_Parented_HackedCrates Allow_HackableCrates_With_OwnerID Allow_HackableCrates_From_CH47 Allow_HackableCrates_At_Oilrig Allow_All_Other_HackedCrates
Disable_WaterWells Disable_Substations Disable_UndergroundCaves Disable_UnderwaterLabs
"UseServerTime": Uses server IsNight check, instead of manual day/hour settings, "Show_Profiles_Seconds": 10, "DayStartHour": 8, "NightStartHour": 20, "SuicideBoom": true, (toggles explosion sound for suicide npcs), "Animal_Safe": true, "Supply_Enabled": false, (spawn 'airdrop' bots for user-called supplys), "Ignore_Skinned_Supply_Grenades": true, "Remove_BackPacks_Percent": 100 is always : 0 is never, "Remove_KeyCard": true, (any keycards in bot default loot will be destroyed), "Remove_Frankenstein_Parts": true, (any frankenstein parts in bot default loot will be destroyed), "Ignore_Sleepers": true/false, "Pve_Safe": true, (bots will not be injured by fire/barbs, etc.), "Max_Chute_Fall_Speed": 100, "Chute_Speed_Variation": 100, "Staggered_Despawn": false, "Disable_Non_Parented_Custom_Profiles_After_Wipe": false "Announce_Toplayer": false "RustRewards_Whole_Numbers": true "XPerience_Whole_Numbers: true "NPCs_Damage_Armour": true "Limit_ShortRange_Weapon_Use": false "Allow_Ai_Dormant": false "Prevent_Biome_Ai_Dormant": false "Scale_Meds_To_Health": false (increases npc heal amount relative to npc's max health. "Ignore_Factions": false - Makes all profiles fight all profiles if true. "Reduce_Damage_Over_Distance: false "Deaggro_Memory_Duration: 20 - Number of seconds it takes an npc to forget you outside deaggro range/line of sight. "Ignore_HackableCrates_With_OwnerID" - Makes hackable crate profiles only respond to crates with OwnerID 0 (server spawned) "NPCs_Assist_NPCs" - true/false. When a botrespawn npc is attacked, nearby botrespawn npcs will also respond and defend. "Enable_Targeting_Hook": false "Allow_AlphaLoot": true Can be used to prevent AlphaLoot from giving loot to BotReSpawn npcs. "Parachute_From_Height": 200 "Smooth_Damage_Scale": false "Allow_Oilrigs": false - NPCs here must be custom spawn point and stationary true. "Show_Spawns_Duration": 20, These values are adjustable and described in detail in in-game UI, with the exception of DataPrefix.
Profile values.
Each profile value and description is not listed here, but all (apart from text strings) are now configurable via UI,
and have sensible default values.
Every option has a full in-game description, accessible by clicking an option's name/label.
If any specific setting/value is unclear, please just ask in CF discord, my discord, or the support section here.
Notes :
Durations which used to be in seconds are now in minutes.
"Type" is an internal use variable - Users should not change this option.
Profile copy/paste does not include location, Parent_Monument, or custom spawnpoints.
BotNames, and Headshot weapons should be formatted as follows:
["name1"], for single or ["name1", "name2", "name3"], for many.
["rifle.lr300"], for single or [ "rifle.lr300", "pistol.m92" ], for many.
Faction and Subfaction of 0 means this profile will not fight any other, and will not be attacked by any other.
Faction and Subfaction settings greater than 1 are used for configuring which profiles should be allies / enemies.
API :
string[] AddGroupSpawn(Vector3 location, string profileName, string group, int quantity) string[] RemoveGroupSpawn(string group) string NPCProfile(NPCPlayer npc) (returns "No Name" for non BotReSpawn npcs) object OnBotReSpawnNPCTarget(ScientistNPC npc, BasePlayer player) void OnBotReSpawnNPCSpawned(ScientistNPC npc, string profilename, string group) void OnBotReSpawnNPCKilled(ScientistNPC npc, string profilename, string group, HitInfo info) bool IsBotReSpawn(NPCPlayer npc) bool IsBotReSpawn(ulong id)
For preventing BotReSpawn npc spawns for event profiles.
object OnBotReSpawnCrateDropped(HackableLockedCrate crate) object OnBotReSpawnCrateHackBegin(HackableLockedCrate crate) object OnBotReSpawnAPCKill(BradleyAPC apc) object OnBotReSpawnPatrolHeliKill(PatrolHelicopterAI heli) object OnBotReSpawnCH47Kill(CH47HelicopterAIController ch) object OnBotReSpawnAirdrop(SupplyDrop drop)
Example usage.
[PluginReference] private Plugin BotReSpawn; Vector3 location = new Vector3(0,0,0); string[] Spawn = BotReSpawn?.Call("AddGroupSpawn", location, "The Dome 0", "MadeUpNameHere", 5) as string[]; Puts($"{Spawn[0]}"); Puts($"{Spawn[1]}"); Passing 0 for quantity will spawn the appropriate amount of npcs for the time of day, according to the profile.
Method call OnBotReSpawnNPCSpawned(ScientistNPC npc, string profile, string group, notifies of spawned npcs.
Example.
void OnBotReSpawnNPCSpawned(ScientistNPC npc, string profile, string group) { if (String.IsNullOrEmpty(group)) Puts($"BotReSpawn spawned an npc from profile {profile}"); else Puts($"BotReSpawn spawned an npc from profile {profile} - API group name {group}"); }
FAQ.
Q: My npcs don't move and/or won't attack
A: If you have any PVE plugins or settings please try disabling those temporarily to test.
A: Make sure the server has the following settings.
nav_wait true nav_disable false ai.think true A: If you use Rust Admin, please ensure that the animal AI option is enabled.
A: If you have Vanish installed please try unloading it. If this worked, check you don't have the permission for permanent Vanish.
Q: There's a million options. Where do I start?
A: Open the UI with /botrespawn and set AutoSpawn to true for at least one monument, then click the button to reload that profile.
A: Everything else is preference/user customisation.
A: If the monument has a building/structure near the middle, like Dome, you may need to increase the spawn radius option to get going.
Q: My bots won't die / my bots take damage when attacking people.
A: Make sure Godmode permissions allow you to do damage.
A: Same for vanish ^.
A: Ensure you don't have a PVE plugin which is causing this damage behaviour.
Q: I take damage when attacking my bots.
A: This can also be caused by server, or plugin, PVE settings.
Q: Will X kill my bots?
A: Radiation, drowning, falling, and helicopters should not kill your bots.
A: Turrets targeting bots can be toggled. Bradleys targeting bots can be toggled.
A: Fire (campfires etc) will kill your bots. Damage from barbs, cacti etc will kill your bots, but can be prevented with the 'Pve_Safe' config option set to true.
Q: What weapons can my bots use?
A: As far as I know they should use all weapons except for throwable melee (eg. spears).
A: Flamethrowers, nail guns, rocket launchers, bows, grenade launchers, etc were added in a recent update.
A: Throwable explosives can be used as 'backup' weapons and are thrown when line-of-sight is temporarily broken.
A: All npcs, even those with throwables, must have at least one valid held weapon to use.
Q: Can I have custom profile locations?
A: Yes. Your custom locations are stored in data with a filename of *YourPrefix*-CustomProfiles.json.
Use chat command '/botrespawn add NewNameHere' to create a profile at your present location.
A: Doing so will open the UI, at the page for your new profile's settings.
Q: Can I spawn bots at events.
A: Yes. There are event profiles for aidrop, hackable crate spawn and hack start, and the destruction of CH47, Patrol Heli, and APC.
For the airdrop profile, spawn at user-supply call is an additional option, found in the global config.
Q: Can I have specific custom spawn points? (underground, etc)
A: Yes. Use the built in UI to create custom spawn points and set UseCustomSpawns to true, for some profile..
A: That BotReSpawn profile will now ignore radius settings and use the precise spawn points from your file.
A: Event profiles which can occur underground should work automatically now (crate spawn/crate hack).
A: Even if parachutes are enabled, these profiles should still work with underground-spawning npcs, if the event takes place under ground.
Q: My bot kits aren't working.
A: Kits which don't have a valid weapon in the belt will not be made available in the UI.
A: Please redeem the kit yourself to an empty inventory, to ensure that the expected items are definitely in it.
Q: How can I prove that bots have spawned? I can't find them.
A: Type bot.count into console for a total number, or bots.count for a per-profile breakdown.
A: Respawn timer is taken into account so if you spawn one and kill him, bot.count will show 0 until respawn.
Q: bot.count console command shows that there are 0 bots.
A: Double check that at least one monument is set "AutoSpawn": true in your config, and reload the plugin.
A: Also, don't forget their respawn timer. If they're all dead when you do bot.count, it will show 0.
-
$30.00$20.00Abandoned Bases
Allows bases to become raidable when all players in a base become inactive.
Compatible with TruePVE and NextGenPVE servers. This plugin is not compatible with servers that have server.pve set true. It is possible to implement this, but I see no reason to do so as TruePVE provides the same protection and more.
Abandoned Bases checks each building on the server in order to determine which bases are inactive. Bases become inactive when all players authorized on the tool cupboard have been offline for the configured amount of days. When a base becomes inactive there are one of two outcomes.
1.) It will be immediately destroyed if it does not meet the configured minimum requirements.
2) It will become raidable for a configurable period of time, and when the time expires the base will be destroyed.
Each zone has a map marker, allows PVP and is surrounded by a dome that protects it from being attacked from the outside. Players who zone hop will be flagged with a PVP delay where they can still be attacked for a configurable amount of time.
Command /sar - requires abandonedbases.convert permission and converts a base into an abandoned base - this can be used on any base that you are authorized to and will cause the base to be destroyed when the timer expires
Command /sab - starts a manual check for each building on the server in order to determine which bases are inactive (requires abandonedbases.admin permission)
Command /sar radius - requires abandonedbases.convert permission and converts a base into an abandoned base and uses the specified radius for the dome / zone radius. Min and max radius are configurable.
Command /sar cancel - requires abandonedbases.convert and abandonedbases.convert.cancel permissions - completely cancels an event (destroys map marker and dome, disables PVP and prevents base from being despawned) effectively allowing the base to be taken over
Command /sar claim - requires abandonedbases.convert and abandonedbases.convert.claim permissions and converts a finished abandoned base into a claimed base that can be taken over by players
"Loot Required (SAR)"
"Foundations Required (SAR)"
"Walls Required (SAR)"
These options should be set realistically so that players cannot exploit the /sar command. I recommend Loot Required 100, Foundations Required 10, Walls Required 10 at minimum Command /sar purge - converts all bases on the server into abandoned bases for purge day (requires abandonedbases.convert, abandonedbases.admin and abandonedbases.purgeday permissions)
This is a two part command that requires you type /sab afterwards to begin. Requires abandonedbases.purgeday, abandonedbases.convert, and abandonedbases.admin permissions. Announcements are muted during purge to prevent spam. Time To Wait Between Spawns (15) will delay how quickly every base is converted Permissions (ADMINS REQUIRE PERMISSIONS TOO)
abandonedbases.convert - required to use /sar command
abandonedbases.convert.free - converting is free for users that have this permission
abandonedbases.convert.claim - required to use /sar claim command
abandonedbases.purgeday - required to use /sar purge command
abandonedbases.admin - required to use /sab and purge commands
abandonedbases.notices - users with this command can see event-opened notices from the plugin
abandonedbases.attack - lets players hunt bases and convert them by attacking if they're abandoned
abandonedbases.attack.time - shows players how much time is left before a base becomes abandoned when they attack it
abandonedbases.attack.lastseen - required to see the last time the player was online when attacking a base
Auto-add abandonedbases.immune to configuration if one does not exist already (lifetime set to "none")
- abandonedbases.immune will not be automatically added if the configuration contains a different immunity permission already
- abandonedbases.immune will give the user immunity to any base they've built at or are authed at from becoming abandoned
- abandonedbases.exclude does not provide immunity and is explicitly intended for the plugin to ignore the player only
- abandonedbases.exclude is intended for admins, mods, staff or helpers to be able to freely make repairs or auth at bases without interfering with the abandoned timer
abandonedbases.exclude:
excludes the user from being checked as an authorized user to a TC this permission should not be used to exempt users - exempt users with immunity by assigning them a permission from a role that has the lifetime set to "none" example roles that includes permission abandonedbases.immune and lifetime set to "none" to properly exempt a user or group by granting abandonedbases.immune to a user or group:
"Purge Settings": [ { "Permission": "abandonedbases.immune", "Lifetime (Days)": "none" }, { "Permission": "abandonedbases.vip", "Lifetime (Days)": "7" }, { "Permission": "abandonedbases.veteran", "Lifetime (Days)": "5" }, { "Permission": "abandonedbases.basic", "Lifetime (Days)": "3" } ], Purge Settings
Permission - The permission to use with this setting Lifetime (Days) - The amount of time in days before a base is considered abandoned. Set to none to not consider players with this permission as inactive. Conversions Before Destroying Base (1) - The amount of times a base can become abandoned before it is finally destroyed when the Despawn Timer expires. Comes with 3 configured permissions and lifetime days by default Abandoned Settings
Blacklisted Commands (command1, command2, command3) - Commands players are not allowed using at a raid or marked with PVP delay Marker Name (Minutes) (Abandoned Player Base [{time}m]) - Text shown on map marker for minutes Marker Name (Seconds) (Abandoned Player Base [{time}s]) - Text shown on map marker for seconds Foundations Required (4) - Minimum amount of foundations required to become raidable Walls Required (3) - Minimum amount of walls required to become raidable Sphere Amount (10) - Increase to darken the dome, or decrease to brighten it Sphere Radius (50) - How big the dome is in meters Use Dynamic Sphere Radius (false) - Allow the dome to detect the best dome size Max Dynamic Radius (75.0) - How maximum size of the dynamic radius Min Custom Sphere Radius - The minimum radius allowed when using /sar <radius> Max Custom Sphere Radius - The maximum radius allowed when using /sar <radius> PVP Delay (15.0) - The amount of time in seconds that players can take damage after leaving the dome Despawn Timer (1800.0) - The amount of time in seconds that players have to finish the raid Reset Despawn Timer When Base Is Attacked (true) - When enabled this will reset the above despawn timer back to 1800 seconds by default Do Not Destroy Base When Despawn Timer Expires (false) - Use this to override and prevent a base from being destroyed when Despawn Timer expires Backpacks Can Be Opened (true) - When enabled players will be allowed to open their backpacks while inside of the dome Backpacks Can Be Looted By Anyone (false) - Bypass PreventLooting plugin and allow backpacks to be lootable if enabled Corpses Can Be Looted By Anyone (true) - Bypass PreventLooting plugin and allow backpacks to be lootable if enabled Allow PVP (true) - Allows PVP while inside of the dome, and when flagged with a PVP delay Seconds Until Despawn After Looting (600) Seconds Until Despawn After Looting Resets When Damaged (true) Cancel Automated Events If Abandoned Owner Comes Online (false) Message Raiders When Event Ends During Automated Cancellation (true) Change Marker Color On First Entity Destroyed (true) Cooldown Between Conversions (3600) - Time required between each manual conversion of a base using /sar Cooldown Between Events (3600) - Time between each event - prevents looting, damage and using /sar claim Cooldown Between Cancel (3600) - Time the player must wait to use /sar cancel Cooldown Between Conversions Ignored During Purge (true) Cooldown Between Cancel Ignored During Purge (true) Cooldown Between Events Ignored During Purge (true) Prevent Hogging Ignored During Purge (false) Run Once On Server Startup (false) - Check for abandoned bases immediately after server startup is complete Run Every X Seconds (0.0) - The time in seconds to check for each building on the server in order to determine which bases are inactive Kill Inactive Sleepers (false) - When enabled players with a permission from purge settings will be executed when they are offline for the configured amount of lifetime days Let Players Kill Abandoned Sleepers (false) - Allows players to kill anyone sleeping inside of an abandoned base rather than the server killing them automatically Economics/ServerRewards Cost To Manually Convert (0 = disabled) - Used with /sar command to convert any base into an abandoned base Use Map Marker (true) Require Event Be Finished Before It Can Be Canceled (true) Various auto turret settings
Hooks (implemented in 2.1.4, updated in 2.2.5)
participants - anyone that has actively participated (excludes admin if configured, and those in noclip or vanish) - this should not contain null elements
participantIds - contains the userid of all participants - this list is better as anyone offline and dead will be included in this but not in the participants list because they would be null!
intruders - anyone currently inside of the event (does not exclude anyone) - this should not contain null elements
intruderIds - contains the userid of everyone inside of the event (does not exclude anyone) - this list is better as anyone offline and dead will be included in the list but not in the intruders list because they would be null!
void OnBaseSkipped(Vector3 v, ulong userid, HashSet<ulong> owners, string reason, BuildingManager.Building building) { } void OnTugboatSkipped(Vector3 v, ulong userid, HashSet<ulong> owners, string reason, BaseEntity entity) { } void OnShelterSkipped(Vector3 v, ulong userid, HashSet<ulong> owners, string reason, BaseEntity entity) { } void OnAbandonedBaseStarted(Vector3 center, float radius, bool AllowPVP, List<BasePlayer> intruders, List<ulong> intruderIds, List<BaseEntity> entities, List<BuildingPrivlidge> privs, bool canDropBackpack, bool automatedEvent, bool attackEvent, Guid guid) { } void OnAbandonedBaseEnded(Vector3 center, float radius, bool AllowPVP, List<BasePlayer> participants, List<ulong> participantIds, List<BaseEntity> entities, List<BuildingPrivlidge> privs, bool canDropBackpack, bool automatedEvent, bool attackEvent, Guid guid) { } void OnAbandonedBaseTurretsInitialized(List<AutoTurret> turrets,Vector3 center, float radius, bool AllowPVP, ulong raiderId, bool CanDropBackpack, List<BaseEntity> entities, List<BuildingPrivlidge> privs, bool canDropBackpack, bool automatedEvent, bool attackEvent, Guid guid) { } void OnRaidableDespawnUpdate(Vector3 center, float radius, bool AllowPVP, ulong raiderId, DateTime DespawnDateTime, List<BasePlayer> intruders, List<ulong> intruderIds, List<BaseEntity> entities, List<BuildingPrivlidge> privs, bool canDropBackpack, bool automatedEvent, bool attackEvent, Guid guid) { } void OnPlayerEnteredAbandonedBase(BasePlayer player, Vector3 center, float radius, bool AllowPVP, List<BasePlayer> intruders, List<ulong> intruderIds, List<BaseEntity> entities, List<BuildingPrivlidge> privs, bool canDropBackpack, bool automatedEvent, bool attackEvent, Guid guid) { } void OnPlayerExitAbandonedBase(BasePlayer player, Vector3 center, float radius, bool AllowPVP, List<BasePlayer> intruders, List<ulong> intruderIds, List<BaseEntity> entities, List<BuildingPrivlidge> privs, bool canDropBackpack, bool automatedEvent, bool attackEvent, Guid guid) { } void OnAbandonedBaseCompleted(Vector3 center, float radius, bool AllowPVP, List<BasePlayer> intruders, List<ulong> intruderIds, List<BaseEntity> entities, List<BuildingPrivlidge> privs, bool canDropBackpack, bool automatedEvent, bool attackEvent, Guid guid) { } void OnAbandonedBaseClaimed(BasePlayer player, Vector3 center, float radius, bool AllowPVP, List<BasePlayer> participants, List<ulong> participantIds, List<BaseEntity> entities, List<BuildingPrivlidge> privs, bool canDropBackpack, bool automatedEvent, bool attackEvent, Guid guid) { } void OnAbandonedBaseClaimFailed(BasePlayer player, Vector3 center, float radius, bool AllowPVP, List<BasePlayer> participants, List<ulong> participantIds, List<BaseEntity> entities, List<BuildingPrivlidge> privs, bool canDropBackpack, bool automatedEvent, bool attackEvent, Guid guid) { } object OnBlockRaidableBasesTeleport(BasePlayer player, Vector3 to) => null; // return true to allow the blocked teleport, return a string to block with your message instead void OnAbandonedBasePrivilegeDestroyed(Vector3 center, float radius, bool AllowPVP, List<BasePlayer> intruders, List<ulong> intruderIds, List<BaseEntity> entities, List<BuildingPrivlidge> privs, bool canDropBackpack, bool automatedEvent, bool attackEvent, BuildingPrivlidge priv, bool areCupboardsTaken, Guid guid) { } void OnPlayerPvpDelayStart(BasePlayer player, ulong userid, Vector3 eventPos, float radius, List<BasePlayer> intruders, List<ulong> intruderIds, List<BaseEntity> entities, List<BuildingPrivlidge> privs, bool canDropBackpack, bool automatedEvent, bool attackEvent, Guid guid) { } void OnPlayerPvpDelayExpiredII(BasePlayer player, ulong userid, Vector3 eventPos, float radius, List<BasePlayer> intruders, List<ulong> intruderIds, List<BaseEntity> entities, List<BuildingPrivlidge> privs, bool canDropBackpack, bool automatedEvent, bool attackEvent, Guid guid) { } void OnPlayerPvpDelayReset(BasePlayer player, ulong userid, Vector3 eventPos, float radius, List<BasePlayer> intruders, List<ulong> intruderIds, List<BaseEntity> entities, List<BuildingPrivlidge> privs, bool canDropBackpack, bool automatedEvent, bool attackEvent, Guid guid) { } void OnAbandonedBaseDespawned(Vector3 eventPos, float radius, bool allowPVP, List<BasePlayer> intruders, List<ulong> intruderIds, List<BaseEntity> entities, Guid guid) { } object OnProcessPlayerEntity(BaseEntity entity, HitInfo info) => null; // cancel to prevent the plugin from handling this entity, though it can still be an event entity already in some cases void OnAbandonedBaseDespawn(List<BaseEntity> entities) { } // only called when a base is not eligible to convert void OnAbandonedBaseDespawn(Vector3 center, float radius, bool AllowPVP, List<BasePlayer> intruders, List<ulong> intruderIds, List<BaseEntity> entities, List<BuildingPrivlidge> privs, bool canDropBackpack, bool automatedEvent, bool attackEvent, Guid guid) { } void OnAbandonedBaseStart(Vector3 center, float radius, bool allowPVP, List<BasePlayer> intruders, List<ulong> intruders, List<ulong> intruderIds, List<BaseEntity> entities, bool canDropBackpack, bool automatedEvent, bool attackEvent, Guid guid) Added OnEntityEnteredAbandonedBase(BaseEntity entity, Vector3 center, float radius, bool allowPVP, List<BasePlayer> intruders, List<ulong> intruderIds, List<BaseEntity> entities, List<BuildingPrivlidge> privs, bool canDropBackpack, bool automatedEvent, Guid guid) Convert Bases and/or Claim Bases
Credits:
misticos for giving permission to use some of his code 🙂- #rust
- #rust plugin
- (and 6 more)