
GangstaPichu's Wishlist
-
.thumb.gif.d17619639442f8fcee4c0974e23e8302.gif)
$6.49
aMAZEingPro
By Raul-Sorin Sorban in Plugins
aMAZEingPro is a Rust mini-game which allows you and your friends to enjoy amazeingly fun but confusing mazes.
Features
The plugin currently features the following:
Extremely customizable. Asynchronous maze creation. Batch maze creation & destruction. Configurable maze sizes. Maze modes. Multiple floors. Multiplayer. Spectating mode. Host & helper player lives & respawning on trap death. Rewards: Economics and / or ServerRewards Events: Christmas, Halloween, Valentine's Day & Easter modes. Configurable per floor:
Posters. Traps (landmines, gun traps & bear traps). Block tier configurations (twigs, wood, stone, metal, top tier). Entrance / exit (reward box) loot configurations. Skins for entrance (small) / exit (large) storage boxes and rugs. Trap spawn chance amounts. Locked doors & gifts.
API
The plugin currently features the following:
(string) CreateBuilding(ulong playerId, string modeJson, Vector3 rootPosition, int seed) // Generates a maze building with the mode configuration and returns the id which can be used to destroy it. (string) CreateBuilding (ulong playerId, Mode mode, Vector3 rootPosition, int seed, bool persistent) // Generates a maze building with the mode configuration and returns the id which can be used to destroy it. (void) DestroyBuilding(ulong playerId, string buildingId) // Destroys a building with the id. (bool) IsHosting(ulong playerId) // Returns true if the player with the ID is currently hosting / playing a game. (bool) IsHelping(ulong playerId) // Returns true if the player with the ID is currently playing or is participating in someone's game. (bool) IsHelpingPlayer (ulong playerId, ulong helpedPlayer) // Returns true if a player is playing in someones' maze game. (bool) IsCooledDown(ulong playerId) // Returns true if the player with the ID is currently cooled down. (int) GetCooldown(ulong playerId) // Returns the amount in seconds of someone's cooldown. Warning: On plugin reload, the buildings created with the API (along with the running games) are going to be destroyed.
Configuration
The config comes with a few handy links, quick to access when you wanna make changes, like change the skins of small / large storage box, or need the item short-names and block tier indicators.
{ "ItemsListWebsite": "https://www.corrosionhour.com/rust-item-list/", "LargeWoodenStorageBoxWorkshopWebsite": "https://steamcommunity.com/workshop/browse/?appid=252490&searchtext=&childpublishedfileid=0&browsesort=trend§ion=mtxitems&requiredtags%5B%5D=Large+Wood+Box", "SmallWoodenStorageBoxWorkshopWebsite": "https://steamcommunity.com/workshop/browse/?appid=252490&searchtext=&childpublishedfileid=0&browsesort=trend§ion=mtxitems&requiredtags%5B%5D=Wood+Storage+Box", "RugWorkshopWebsite": "https://steamcommunity.com/workshop/browse/?appid=252490&searchtext=&childpublishedfileid=0&browsesort=trend§ion=mtxitems&requiredtags%5B%5D=Rug", "BlockTiers": "0 = Twigs, 1 = Wood, 2 = Stone, 3 = Metal, 4 = Top Tier", "GrimstonMoods": "0 = Angry, 1 = Helpful, 2 = Annoying", "WelcomeCommand": "maze", "InfoCommand": "maze.info", "PlayCommand": "maze.play", "LeaveCommand": "maze.leave", "KickCommand": "maze.kick", "InviteCommand": "maze.invite", "InviteAcceptCommand": "maze.accept", "InviteDeclineCommand": "maze.decline", "ModesCommand": "maze.modes", "LeaderboardCommand": "maze.lead", "ResetModesCommand": "maze.resetmodes", "MaximumInvites": 5, "DefaultHeight": 250.0, "BatchKillCount": 15, "BatchCreationRowCount": 5, "EnableLogging": true, "UseNPipesSignText": false, "EnablePlayerNoclip": false, "EnablePlayerNoclipLerp": true, "PlayerNoclipLerp": 4.0, "PlayerNoclipSprintMultiply": 3.0, "Themes": { "Auto": true, "Theme (0 = None, 1 = Valentine's Day, 2 = Easter, 3 = Halloween, 4 = Christmas)": 4, "Settings": { "StockingChanceAmount": 5, "StockingChanceTimes": 2, "ScarecrowChanceAmount": 5, "ScarecrowChanceTimes": 2, "RustigeChanceAmount": 5, "RustigeChanceTimes": 2 } }, "GroupCooldowns": { "admin": 0, "vip": 25, "default": 120 }, "Modes": {} }
Modes
To set up a mode with one or more floors, it must look something like this:
{ "DisplayName": "Easy Run", "DisplayDescription": "Fun but complicated. Don't give up too easily. There're memes for your enjoyment.", "Size": 15, "Disabled": false, "Group": "default", "EnableInvites": false, "RespawnOnFloorWherePlayerDied": true, "HostMaximumLives": 1, "HelperMaximumLives": 1, "Rewards": { "Currency (0 = Economics, 1 = ServerRewards - balance is divided by 100)": 0, "Completion Depositing Balance": 100, "Door Unlocking Depositing Balance": 5, "Losing Withdrawal Balance": 50, "Leaving Withdrawal Balance": 10 }, "Floors": [ { "EnableLanterns": true, "Posters": { "Urls (Must be an accessible direct download link to an image - PNG or JP[E]G)": [ "https://i.redd.it/cbcz02c3wlv51.jpg", "https://i.redd.it/xhyxowes0gv51.jpg", "https://i.redd.it/y30leeu81lv51.jpg", "https://i.redd.it/qbo7ot73ojv51.jpg", "https://i.redd.it/78v3jj30hjv51.jpg" ], "PosterSpawnChanceAmount": 5, "PosterSpawnChanceTimes": 2 }, "Doors": { "DoorChanceAmount": 10, "DoorChanceTimes": 6, "DoorMaximumAmount": 7, "GiftStorageChanceAmount": 5, "GiftStorageChanceTimes": 2, "GiftStorageSkinId": 0, "WrapGifts": true, "GiftLoot": [] }, "Traps": { "EnableLandMines": false, "EnableGunTraps": true, "EnableBearTraps": false, "EnableFog (Works only if Halloween mode is enabled)": true, "GunTrapAmmoChanceAmount": 5, "GunTrapAmmoChanceTimes": 2, "GunTrapAmmoAmount": 64, "LandMineChanceAmount": 5, "LandMineChanceTimes": 2, "BearTrapChanceAmount": 5, "BearTrapChanceTimes": 2 }, "Blocks": { "RugSkinId": 0, "EntranceWallTier": 2, "ExitWallTier": 2, "WallTier": 1, "WallFrameTier": 1, "FoundationTier": 1, "FloorTier": 2 }, "Loot": { "EntranceSignFormat": "START", "EntranceStorageLoot": [], "EntranceStorageSkinId": 0, "ExitSignFormat": "FINISH\nGood job, {0}!", "ExitStorageLoot": [ { "ShortName": "scrap", "MinAmount": 500, "MaxAmount": 1000 } ], "ExitStorageSkinId": 0 } } ] }
Permissions
Here are all the permissions you can use:
aMAZEingPro.play: Allows anyone to start a new maze. Invited players do not require this permission. aMAZEingPro.admin: Allows anyone to execute [admin command]s.
Commands
Here are all the commands you can use:
Welcome: /maze by default, will print some information about this plugin, including the commands. It'll open the HUD for aMAZEingCUI if you have it installed. Info: /maze.info by default, will print some information the current game the player's playing, including mode information. Play: /maze.play by default, [1/2/3 or mazeId (easy, hard, etc.)] will start a game with the specified maze id or index. Leave: /maze.leave by default, will make a player or a helper teleport back to where they were. If the same player started the maze, the maze will be destroyed. Invite: /maze.invite by default, will invite another player if you're already in a maze. They'll be secretly notified about it, where they can: Accept: /maze.accept by default, [none or playerName] will accept a request to help a player to the maze. Accepting without having any input, will accept any games that the player's been requested to. Decline: /maze.decline by default, [none or playerName] will decline a request to help a player to the maze. Declining without having any input, will decline any games that the player's been requested to. Kick: /maze.kick by default, [playerName] will kick a helper player from a player's game. Modes: /maze.modes by default, will print a list of all the maze modes a player can play in. Leaderboard: /maze.lead by default, will print a list of all the maze modes with top 5 players best completion times. Reset Modes: /maze.resetmodes by default [admin command], will reset the configuration.
Dependencies
The plugin currently depends on the following plugins:
SignArtist by Whispers88 The following are optional but highly recommended plugin dependencies:
TruePVE by nivex HelpText by Calytic ServerRewards by k1lly0u Economics by Wulf Rust Kits by Whispers88
Feedback
If you have any ideas or feedback you wanna give me, please comment down below.
-
$15.00
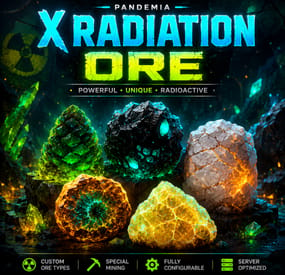
XRadiationOre
The plugin enhances gameplay by introducing the capability for players to mine radiation ore with a specific probability, as well as the ability to smelt it in a furnace. It offers a range of customization options, allowing server administrators to define various aspects of the ore and the resulting meltdown.
Youtube Overview
Customization options include:
Drop Source: Specifies the source from which the radiation ore item can be obtained. Drop Chance: Determines the likelihood of obtaining the radiation ore item when mining the designated source. (Don't put the same odds, the drop chance won't work correctly.) Minimum Drop Amount: Sets the minimum quantity of radiation ore that can be obtained per successful drop. Maximum Drop Amount: Sets the maximum quantity of radiation ore that can be obtained per successful drop. "Minimum Melting Amount: Specifies the minimum amount of radiation ore that can be obtained when smelting the ore. Maximum Melting Amount: Specifies the maximum amount of radiation ore that can be smelted at once. Displayed Name: Allows customization of the name displayed for the radiation ore item. Key Name or Shortname: Provides the option to assign a unique identifier or abbreviated name for the radiation ore item. Skin: Enables the application of a customized visual appearance to the radiation ore item. Meltdown Result: Defines the outcome when the radiation ore is smelted in the furnace. Result Displayed Name: Allows customization of the name displayed for the result of the meltdown. Result Key Name or Shortname: Provides the option to assign a unique identifier or abbreviated name for the meltdown result. Result Skin: Enables the application of a customized visual appearance to the meltdown result. Radiation Settings: Radius: Specifies the radius of the radiation zone surrounding the radiation ore or meltdown result. Damage per Tick: Sets the amount of damage inflicted on players per game tick within the radiation zone. Configuration file:
{ "Enable Melting Speed Modifier": false, "Melting Speed Modifier": 4.0, "Melting Items": [ { "Valid Prefabs": [ "assets/bundled/prefabs/autospawn/resource/ores/metal-ore.prefab", "assets/bundled/prefabs/autospawn/resource/ores_sand/metal-ore.prefab", "assets/bundled/prefabs/autospawn/resource/ores_snow/metal-ore.prefab" ], "Drop Chance": 8, "Min Drop Amount": 1, "Max Drop Amount": 1, "Min Melt Amount": 3500, "Max Melt Amount": 5000, "Custom Item": { "Display Name": "Radioactive Metal Ore", "Shortname": "metal.ore", "Skin ID": 2886986763 }, "Melt Result": { "Display Name": "", "Shortname": "metal.fragments", "Skin ID": 0 }, "Radiation Settings": { "Radius": 15.0, "Tick Damage": 1.5 } }, { "Valid Prefabs": [ "assets/bundled/prefabs/autospawn/resource/ores/sulfur-ore.prefab", "assets/bundled/prefabs/autospawn/resource/ores_sand/sulfur-ore.prefab", "assets/bundled/prefabs/autospawn/resource/ores_snow/sulfur-ore.prefab" ], "Drop Chance": 5, "Min Drop Amount": 1, "Max Drop Amount": 1, "Min Melt Amount": 2500, "Max Melt Amount": 4000, "Custom Item": { "Display Name": "Radioactive Sulfur Ore", "Shortname": "sulfur.ore", "Skin ID": 2886986316 }, "Melt Result": { "Display Name": "", "Shortname": "sulfur", "Skin ID": 0 }, "Radiation Settings": { "Radius": 15.0, "Tick Damage": 1.7 } }, { "Valid Prefabs": [ "assets/bundled/prefabs/autospawn/resource/ores/metal-ore.prefab", "assets/bundled/prefabs/autospawn/resource/ores_sand/metal-ore.prefab", "assets/bundled/prefabs/autospawn/resource/ores_snow/metal-ore.prefab" ], "Drop Chance": 6, "Min Drop Amount": 1, "Max Drop Amount": 1, "Min Melt Amount": 300, "Max Melt Amount": 500, "Custom Item": { "Display Name": "Radioactive HQ Metal Ore", "Shortname": "hq.metal.ore", "Skin ID": 2887107494 }, "Melt Result": { "Display Name": "", "Shortname": "metal.refined", "Skin ID": 0 }, "Radiation Settings": { "Radius": 15.0, "Tick Damage": 1.9 } }, { "Valid Prefabs": [ "assets/bundled/prefabs/autospawn/resource/ores/metal-ore.prefab", "assets/bundled/prefabs/autospawn/resource/ores_sand/metal-ore.prefab", "assets/bundled/prefabs/autospawn/resource/ores_snow/metal-ore.prefab", "assets/bundled/prefabs/autospawn/resource/ores/sulfur-ore.prefab", "assets/bundled/prefabs/autospawn/resource/ores_sand/sulfur-ore.prefab", "assets/bundled/prefabs/autospawn/resource/ores_snow/sulfur-ore.prefab" ], "Drop Chance": 4, "Min Drop Amount": 1, "Max Drop Amount": 1, "Min Melt Amount": 200, "Max Melt Amount": 500, "Custom Item": { "Display Name": "Radioactive Coal Ore", "Shortname": "coal", "Skin ID": 2889416743 }, "Melt Result": { "Display Name": "", "Shortname": "charcoal", "Skin ID": 0 }, "Radiation Settings": { "Radius": 15.0, "Tick Damage": 1.2 } }, { "Valid Prefabs": [ "assets/bundled/prefabs/autospawn/resource/ores/stone-ore.prefab", "assets/bundled/prefabs/autospawn/resource/ores_sand/stone-ore.prefab", "assets/bundled/prefabs/autospawn/resource/ores_snow/stone-ore.prefab" ], "Drop Chance": 9, "Min Drop Amount": 1, "Max Drop Amount": 1, "Min Melt Amount": 2000, "Max Melt Amount": 3000, "Custom Item": { "Display Name": "Radioactive Stone Ore", "Shortname": "stones", "Skin ID": 2886986572 }, "Melt Result": { "Display Name": "", "Shortname": "metal.fragments", "Skin ID": 0 }, "Radiation Settings": { "Radius": 15.0, "Tick Damage": 1.1 } } ] }
- #xradiationore
- #radiation ore rust
- (and 1 more)
-
$10.00
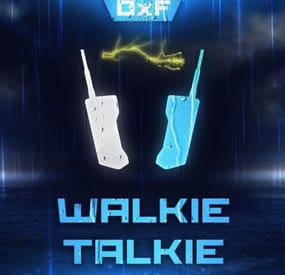
Walkie-Talkie
Introducing the Walkie-Talkie Plugin: Seamlessly integrate real-time communication into your gaming experience! Stay connected with your teammates, strategize on-the-go, and coordinate your moves effortlessly with this immersive in-game communication tool. Whether you're navigating treacherous terrains or planning tactical maneuvers, the Walkie-Talkie keeps you in sync, enhancing teamwork and elevating your gaming adventure to a whole new level!
Features:
Gives players the ability to commiserate with each other, come up with strategies, and ambush each other. It is possible to create different variations of walkie-talkies for different distances. By default, 5 variations of walkie-talkies are given ready-made. Walkie-talkies can be both automatic and manual (in manual mode it is necessary to press LMB to hold the walkie-talkie, in automatic mode it is not required).
Installation:
Before installing the plugin, make sure you have the CustomItemDefinitions library installed.
It is necessary for the plugin to work. Download it here. Put this plugin in the plugins folder How does a walkie-talkie work?
Several players must have a walkie-talkie tuned to the same frequency in their inventory.
To start talking into the walkie-talkie you need to take it in your hand, then press LMB (in case of manual walkie-talkie, for automatic walkie-talkie it is not required) and then press V button (if the microphone mode is enabled), that's it, now you can start talking.
How do I get a walkie-talkie?
Since each walkie-talkie has its own unique shortname and ItemId you can receive it like any other item. That is, you can give it out via the give or giveto command, or add it to the loot table or other ways via plugins.
- #custom item
- #walkie
- (and 4 more)
-

$12.00
Restore Corpse
This plugin give the possibility to restore the very last corpse via chat or console command, and teleport the lootbag from a corpse back to the player, independently from the location. Only the content of the corpse, dropped tool/weapon is not supported, if not stick to the corpse. If the player die repeatedly, the previous corpses can't be restored, only the last.
Permissions
restorecorpse.allow - Permission to use the plugin feature via Chat command.
Configuration
SecurityStringAgainstF1use - used as additional protection, if the players knows the console command, and want to try the console command, without the restorecorpse.allow permission, to bypass it, for example if you want to put this console call into your shop as a buy-able feature.
RestoreCommand and RestoreCommandConsole - Manually set-able commands for Chat and Console Usage.
EnableReminder - Send reminder to the player, that there is a feature to restore the corpse, after death and weak-up.
Example Configuration:
{ "SecurityStringAgainstF1use": "Abc123", "RestoreCommand": "restorecorpse", "RestoreCommandConsole": "restorecorpseconsole", "EnableReminder": true } Commands
/restorecorpse - (If you set it as RestoreCommand) - Chat command, restore the last, still active corpse content and teleport the lootbag under the player. restorecorpseconsole Abc123 usersteamID - Console command, restore the last, still active corpse content and teleport the lootbag under the player, without the Security password, it is restricted. Localization
English language file generated by default, texts supported by the language files.
-
$12.99
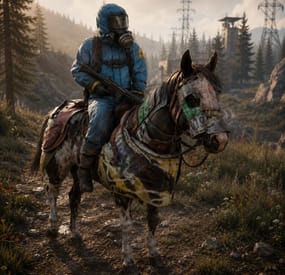
Scientist Horse
Mounted NPCs The road stops being empty Between monuments a Rust map is nothing — trees, gravel, and a run you have already made a hundred times. This puts armoured scientists on horseback out there. They patrol terrain you never had a reason to watch, they ride you down when provoked, and they are gone from the save file the moment you unload the plugin.
60 Seconds between population top-ups 25 Metre no-spawn ring around bases 4 Things you define per rider type 0 Dependencies ✓ Rider types you write yourself — NPC prefab, weapon, every worn item with its skin ID, and the horse's armour ✓ Peaceful until you shoot first — and then that player is remembered for the rest of the rider's life ✓ Never spawns on somebody's roof — the map is pre-scanned and anything within 25 m of a building block is thrown out ✓ The horses don't rot — decay damage is zeroed and Rust's decay replacement is blocked, so a patrol doesn't end in a pile of parts ✓ Nothing touches your save file — riders and horses are unsaveable by design and every one of them dies on unload 01 — Riders Dress them however you like A rider type is four fields, and you can have as many types as you want. Every spawn picks one at random, so a road can hand you a hazmat scientist with an LR300 and then something you built yourself.
Any NPC prefab as the base The default is the full-kit LR300 scientist, but the prefab path is a plain config string — heavy scientists, tunnel dwellers, anything on the scientist chassis goes in the same field. Clothing with skin IDs The wear list is shortname paired with skin ID, so a rider can turn up in your server's own skinned gear rather than the stock hazmat suit. The prefab's default clothing is cleared first, so you get exactly what you listed and nothing underneath it. One weapon, by shortname Name a weapon and the belt is cleared and rebuilt around it. Leave it empty and the prefab keeps whatever it came with. Bows are the one exception — they are skipped deliberately, because a mounted NPC cannot draw one. Armour on the horse too Roadsign barding by default, and it is equipped properly rather than dropped in the inventory — the horse renders with it on. 02 — Spawning Out in the world, not in your compound The map is surveyed once on startup and the plugin keeps a list of places a horse can actually stand. Nothing is placed blind.
Terrain only, and above the waterline Candidate points are traced straight down from 100 m and kept only if they land on terrain. Water, construction and prevent-building volumes are rejected, and so is anything at or below sea level — no riders trotting along the seabed. A 25-metre ring around anything built A point with a building block inside 25 m is dropped, and the check runs against the live map, not a snapshot. Players who wall off a hillside stop riders appearing on it. Topped up every minute A timer refills the roster to your population figure once a minute, so a night of hunting doesn't leave the map empty by morning. /spawnrider puts one in front of you when you want to look at your config instead of waiting for one to ride past. 03 — Behaviour Scenery until you make it personal Riders do not open fire on sight. Left alone they are something you watch cross a ridge; shoot one and it becomes a problem that follows you.
They shadow you before they shoot you With the passive switch on, a rider will still ride over and pace you — the scientist just won't pull the trigger. It is a far better encounter than an NPC that either ignores you or kills you, and a rider who is only shadowing gets bored after 25 seconds and goes looking for somebody else. Hit one and it never forgets Damage the scientist or the horse and you are added to that rider's grudge list permanently. The 25-second boredom timer does not apply to you any more — it will keep coming while you are both alive. It knows when a chase is over Targets are dropped the moment they enter a safe zone, start swimming, go to sleep, disconnect or die. Nobody gets shot at while loading into an outpost, and no rider stands in the surf waiting for a swimmer. A damage dial so the fight stays winnable A mounted scientist is a small target sitting behind a large animal, so incoming damage to him is multiplied — six times by default. Turn it down for a rider who takes real work to bring down, or to 1 for stock scientist health. 04 — Horses The mount is handled properly Rust's horses were built to be owned, fed and stabled. Three of those systems have to be switched off before a horse can just live outdoors, and all three are.
No decay, no decay replacement Decay damage to a rider's horse is zeroed outright, and the engine's swap-it-for-a-wreck routine is refused. A rider left alone on the far side of the map is still a rider tomorrow. No ragdoll flailing A Harmony patch suppresses the horse ragdoll for plugin mounts only, keyed on their own skin ID. Your players' horses ragdoll exactly as they always did. You decide what happens to the horse Kill the scientist and the horse either drops with him or is cut loose as a riderless animal standing where the fight ended — one switch. The second option turns every encounter into a horse worth walking over for. Reliability Leaves nothing behind ✓ Riders and horses are never saved — both are marked unsaveable at spawn, so they cannot accumulate in your map file or come back as orphans after a wipe ✓ Unload kills every one of them — scientist and horse together, no strays left standing in a field ✓ A dead rider frees its slot immediately — the roster is corrected on death, not on a sweep, so the population figure means what it says ✓ The AI stops itself — the moment a horse or its scientist is gone, the controlling component tears itself down instead of ticking against a dead entity ✓ No dependencies — nothing to install alongside it, and no economy or NPC framework required Commands One command, for you Players never type anything, and there is nothing to hand out — the command is gated on admin, not on a permission.
/spawnrider Spawn a random rider type at your feet — the fast way to check a config change Questions Before you buy Can I change what they wear and what they carry? Yes, per rider type. The wear list takes a shortname and a skin ID for each item, so custom-skinned outfits work, and the weapon is a single shortname. Bows are ignored on purpose. There is no kit-plugin integration — the items are named directly in the config. Can I have several kinds of rider on one map? Yes. Rider types are a list, and each spawn picks one at random. Each type carries its own scan radius, so a lightly armed scout can notice you from further away than a heavy. Can I set my own spawn points, or spawn a type in one region? No. Positions are generated from the terrain at startup and used for every type equally. There is no per-type placement and no way to hand-pick a location beyond spawning one yourself with the command. Do they drop the gear I dressed them in? Yes — the corpse carries whatever you put on the rider, and there is no switch to strip it. Price the outfit accordingly: expensive clothing on a common rider is a loot faucet. What about snowmobiles or other vehicles? Horses only. The movement code drives the horse's own gait and steering directly, so it does not transfer to another vehicle. Will they camp new players or shoot into outposts? No. Safe-zone players are never valid targets and an existing target is dropped the moment they enter one, along with anyone swimming, sleeping, disconnected or dead. Leave the passive switch on and a rider will not fire at all until it is shot. Do they survive a restart? No, and that is deliberate — they are never written to the save. The map is re-surveyed and the population rebuilt on load, so a restart costs you nothing but gives you a fresh spread of riders.- #scientist
- #horse
- (and 4 more)