
Vinni_TV_'s Wishlist
-
$19.49
IQDefenderSupply
IQDefenderSupply is a plugin for RUST servers that adds new types of airdrops. These airdrops come equipped with additional protection such as armor, drones*, NPCs*, and turrets, providing more complex and engaging interactions in the game!
An excellent solution for any type of server, whether it's an automated event or a scheduled manual launch!
The video showcases all types of protection with enabled NPCs* and drone defenses*. The video demonstrates the visual presentation of protected airdrops, their deployment, and player interactions with the protected airdrops!
You can also review everything in the "Screenshots" section. Feel free to use the video link on your social media and channels as a demonstration of the update and plugin for your players.
Plugin Installation:
When you download the resource, you will receive an archive with "plugins" and "data" folders.
Move the file from "data" to the exact path as in the archive (oxide/data/IQSystem/IQDefenderSupply). This folder contains pre-configured standard positions and will hold your future positions. Move IQDefenderSupply.cs from "plugins" to the exact path as in the archive (oxide/plugins). Note for users who use "Web File Editors" on hosting services: Before moving the files, unpack the archive to a convenient location and then transfer the files from there.
List of Features:
Protection and Defense of Airdrops:
Easy: Features protective walls with an embedded turret. No access card required.
Medium: Features a fully enclosed dome with grates, with a door secured by an access card.
The card can be set to a specific level or randomly assigned. No turret is included in the protection.
Hard: Features a fully enclosed dome similar to the medium level, but includes two defensive turrets.
NPC and/or Drone Protection:
Each protection level can be further enhanced with NPCs* and drones* with various settings.
You can assign different outfits and weapons to NPCs* for each preset, and use custom presets for drones*.
Customizable number of NPCs* and drones* around the protected airdrop.
Turret Protection:
Turrets are used directly from the game and are minimally modified, except for certain details such as: detection radius, accuracy, health level, weapon, and ammunition.
Turrets have increased damage, so players can destroy them with any weapon. The time to destroy and the amount of ammunition depend on the turrets' health level!
Preset Configuration:
The plugin is not limited to three types of protection; you can create an unlimited number of presets using the three protection types.
You can use any type of protection in different presets with varying defense settings, loot drops, and more.
Loot Configuration:
For each preset, you can configure the loot in the protected airdrop. You can adjust the items, drop chances, and their quantities!
Similarly, you can configure the items dropped by killed NPCs*.
The plugin features its own randomization system that ensures unique and non-repeating results each time!
Automatic Start:
You can use the plugin with automatic start based on a timer!
It supports chat and GameTip notifications for players.
Discord Integration:
The plugin includes integration with Discord!
You can send beautifully formatted messages with @everyone support to your Discord chat, such as: the airdrop plane has taken off, the plane has dropped the cargo, the protected airdrop was opened by a player, or the protected airdrop was removed.
Messages are nicely formatted and configurable in the settings.
G-Map Display:
The plugin supports displaying each preset on G-Map, with customizable marker color and border settings.
Notes:
Drones* - Requires the IQDronePatrol plugin.
For drone operations and protecting the cargo with drones - an additional plugin is required.
NPCs* - Requires the NPCSpawn plugin.
For protecting the cargo with NPCs - an additional plugin is required.
List of Console and Chat Commands:
Notes:
* Administrative rights (ownerID) are required for usage.
* Commands for setting and editing positions require the administrator to be on the server and execute the command in chat or the F1 console.
* Items marked with "*" are mandatory arguments.
* You can specify presets as a list (lite_supply, middle_supply, etc.), or use just one.
iqds send.supply NamePos PresetName - send a plane to drop cargo at the specified position. iqds setup.pos NamePos* PresetName (Example: iqds setup.pos myPosName lite_supply,middle_supply) - set a position linked to a monument. iqds custom.pos NamePos* PresetName (Example: iqds custom.pos myPosName lite_supply,middle_supply) - set a custom position. iqds remove.pos NamePos* - remove a position. iqds edit.pos NamePos* PresetName (Example: iqds edit.pos myPosName lite_supply,middle_supply) - edit the coordinates of an existing monument-linked position. iqds edit.custom NamePos* (Example: iqds edit.custom myPosName lite_supply,middle_supply) - edit the coordinates of an existing custom position. iqds info.custom.pos - display all custom positions. iqds info.monument.pos - display all monument-linked positions. iqds info.all.pos - display all positions.
API :
Boolean IsValidTurret(UInt64 ownerID) // Returns true if it is a plugin turret Boolean IsValidSupplyDrop(UInt64 ownerID) // Returns true if it is a plugin drop List<String> GetAllPresetsKeys() // Returns a list of all preset keys from the configuration List<String> GetAllPositionsKeys() // Returns all position keys for drop locations List<String> GetParentPositionsKeys() // Returns all position keys for drop locations linked to monuments List<String> GetCustomPositionsKeys() // Returns all position keys for drop locations not linked to monuments void SendCargo() // Sends protected cargo to a random position with a random key void SendCargo(String keyPreset) // Sends protected cargo to a random position with the specified preset key void SendCargo(String keyPreset, String keyPosition) // Sends protected cargo to the specified position key with the specified preset key
Configuration example :
{ "Auto event settings for protected cargo plane launch": { "Use automatic launch of planes with protected cargo (true - yes/false - no)": true, "Preset list settings for automatic launch [Preset] = Chance (From 0 to 100)": { "lite_supply": 80, "middle_supply": 45, "hard_supply": 10 }, "How often the protected drop will be launched automatically (specify the time in seconds)": 3600 }, "Other settings": { "Time after which protected cargo will be removed after being fully looted": 180, "When will the protected loot be removed if players do not loot it": 1800, "Notification settings from the plugin": { "IQChat: Notification format settings": { "IQChat : Custom prefix in chat": "<color=#CD412B>[IQDefenderSupply]</color> ", "IQChat : Custom chat avatar (If required)": "0" }, "Use GameTip notification for cargo plane takeoff": true, "Use chat notification for cargo plane takeoff": true, "Use chat notification for dropped protected cargo": true, "Use chat notification when player starts looting protected cargo": true }, "Automatically clear custom drop positions on map change/server wipe (true - yes/false - no)": true, "Discord notification settings. [MessageType (CargoSpawned - Plane departure, SupplyDropped - Supply drop, SupplyDestroyed - Supply removed, SupplyOpened - Supply opened)] = Setting": { "CargoSpawned": { "WebHook (leave empty to not use this type of notification)": "", "Title": "Cargo plane launched", "Description": "A plane has launched to your island, carrying a special cargo of scientists with special protection!", "Color (Embed discord format)": 9824766, "Footer text": "", "Author name": "Scientist records intercepted", "Author avatar (use direct .png link)": "https://i.ibb.co/RjyHCbs/air-plane-New.png", "Thumbnail avatar (use direct .png link)": "https://i.ibb.co/RjyHCbs/air-plane-New.png", "Message above embed (e.g., @everyone)": "@everyone" }, "SupplyDropped": { "WebHook (leave empty to not use this type of notification)": "", "Title": "Supply dropped", "Description": "Protected cargo has been dropped on your island. You can seize it! If you can...", "Color (Embed discord format)": 9830049, "Footer text": "", "Author name": "Scientist records intercepted", "Author avatar (use direct .png link)": "https://i.ibb.co/GM1hf85/supply.png", "Thumbnail avatar (use direct .png link)": "https://i.ibb.co/GM1hf85/supply.png", "Message above embed (e.g., @everyone)": "" }, "SupplyOpened": { "WebHook (leave empty to not use this type of notification)": "", "Title": "Protected cargo opened", "Description": "Protected cargo has started being looted!", "Color (Embed discord format)": 16709013, "Footer text": "", "Author name": "Scientist records intercepted", "Author avatar (use direct .png link)": "https://i.ibb.co/GM1hf85/supply.png", "Thumbnail avatar (use direct .png link)": "https://i.ibb.co/GM1hf85/supply.png", "Message above embed (e.g., @everyone)": "" }, "SupplyDestroyed": { "WebHook (leave empty to not use this type of notification)": "", "Title": "Protected cargo removed", "Description": "Protected cargo has been completely looted!", "Color (Embed discord format)": 16684437, "Footer text": "", "Author name": "Scientist records intercepted", "Author avatar (use direct .png link)": "https://i.ibb.co/GM1hf85/supply.png", "Thumbnail avatar (use direct .png link)": "https://i.ibb.co/GM1hf85/supply.png", "Message above embed (e.g., @everyone)": "" } } }, "Protected cargo presets settings": { "lite_supply": { "Drop protection settings": { "Drop protection level: 0 - Easy, 1 - Medium, 2 - Hard": 0, "Drop protection settings with access card (for defender levels `Medium` and `Hard`)": { "Use access cards for drop (true - yes/false - no)": false, "Use random access card for drop": false, "Required access card: 1 - Green, 2 - Blue, 3 - Red": 0 }, "G-Map marker display settings": { "Display marker with protected cargo on the map (true - yes/false - no)": false, "Main marker color": "#738D45", "Outline marker color": "#C26D33", "Marker radius on the map": 0.25 }, "Additional settings": { "IQDronePatrol: Drone protection settings for the drop": { "Use defender drones in this preset": false, "Number of drones spawned to protect the drop": { "Minimum quantity": 3, "Maximum quantity": 6 }, "Number of drones that can attack one player simultaneously": 2, "Drone preset settings and selection chance [PresetFromConfig] = Chance": { "LITE_DRONE": 100 } }, "NPCSpawn: NPC protection settings for the drop": { "Use NPCSpawn in this preset": false, "Number of NPCs to spawn near the drop": { "Minimum quantity": 6, "Maximum quantity": 6 }, "Bot settings": { "Bot health": 150.0, "Damage multiplier": 1.25, "Aim cone multiplier": 1.0, "Running speed": 7.0, "NPC clothing": [ { "Shortname": "roadsign.jacket", "SkinID": 2991830202, "Mods weapon": [] }, { "Shortname": "coffeecan.helmet", "SkinID": 2991835101, "Mods weapon": [] }, { "Shortname": "roadsign.kilt", "SkinID": 2991832819, "Mods weapon": [] }, { "Shortname": "hoodie", "SkinID": 2936196960, "Mods weapon": [] }, { "Shortname": "pants", "SkinID": 2936196259, "Mods weapon": [] }, { "Shortname": "shoes.boots", "SkinID": 2980941295, "Mods weapon": [] } ], "NPC weapon variation": [ { "Shortname": "smg.mp5", "SkinID": 2873774818, "Mods weapon": [ "weapon.mod.flashlight" ] } ], "Drop loot settings from NPC": { "Use custom loot list (true - yes/false - no)": true, "Maximum loot drops": 3, "List of loot drops": [ { "Drop chance": 1, "Shortname": "smg.mp5", "SkinID": 2873774818, "Drop quantity setting": { "Minimum quantity": 1, "Maximum quantity": 1 } }, { "Drop chance": 52, "Shortname": "ammo.pistol", "SkinID": 0, "Drop quantity setting": { "Minimum quantity": 15, "Maximum quantity": 60 } }, { "Drop chance": 12, "Shortname": "metalpipe", "SkinID": 0, "Drop quantity setting": { "Minimum quantity": 3, "Maximum quantity": 5 } }, { "Drop chance": 10, "Shortname": "sheetmetal", "SkinID": 0, "Drop quantity setting": { "Minimum quantity": 1, "Maximum quantity": 3 } }, { "Drop chance": 10, "Shortname": "metalspring", "SkinID": 0, "Drop quantity setting": { "Minimum quantity": 1, "Maximum quantity": 5 } }, { "Drop chance": 10, "Shortname": "sparkplug3", "SkinID": 0, "Drop quantity setting": { "Minimum quantity": 1, "Maximum quantity": 1 } }, { "Drop chance": 20, "Shortname": "smgbody", "SkinID": 0, "Drop quantity setting": { "Minimum quantity": 1, "Maximum quantity": 1 } }, { "Drop chance": 35, "Shortname": "syringe.medical", "SkinID": 0, "Drop quantity setting": { "Minimum quantity": 1, "Maximum quantity": 3 } }, { "Drop chance": 15, "Shortname": "largemedkit", "SkinID": 0, "Drop quantity setting": { "Minimum quantity": 1, "Maximum quantity": 1 } }, { "Drop chance": 50, "Shortname": "bandage", "SkinID": 0, "Drop quantity setting": { "Minimum quantity": 1, "Maximum quantity": 3 } }, { "Drop chance": 8, "Shortname": "pickaxe", "SkinID": 0, "Drop quantity setting": { "Minimum quantity": 1, "Maximum quantity": 1 } }, { "Drop chance": 5, "Shortname": "knife.combat", "SkinID": 0, "Drop quantity setting": { "Minimum quantity": 1, "Maximum quantity": 1 } }, { "Drop chance": 20, "Shortname": "weapon.mod.simplesight", "SkinID": 0, "Drop quantity setting": { "Minimum quantity": 1, "Maximum quantity": 1 } }, { "Drop chance": 15, "Shortname": "weapon.mod.silencer", "SkinID": 0, "Drop quantity setting": { "Minimum quantity": 1, "Maximum quantity": 1 } }, { "Drop chance": 15, "Shortname": "roadsign.gloves", "SkinID": 0, "Drop quantity setting": { "Minimum quantity": 1, "Maximum quantity": 1 } }, { "Drop chance": 10, "Shortname": "roadsign.kilt", "SkinID": 2991832819, "Drop quantity setting": { "Minimum quantity": 1, "Maximum quantity": 1 } }, { "Drop chance": 20, "Shortname": "grenade.beancan", "SkinID": 0, "Drop quantity setting": { "Minimum quantity": 1, "Maximum quantity": 1 } }, { "Drop chance": 25, "Shortname": "grenade.flashbang", "SkinID": 0, "Drop quantity setting": { "Minimum quantity": 1, "Maximum quantity": 1 } }, { "Drop chance": 25, "Shortname": "grenade.f1", "SkinID": 0, "Drop quantity setting": { "Minimum quantity": 1, "Maximum quantity": 1 } }, { "Drop chance": 30, "Shortname": "grenade.molotov", "SkinID": 0, "Drop quantity setting": { "Minimum quantity": 1, "Maximum quantity": 1 } } ] } } } } }, "Turret settings for protected drop": { "Will loot drop from the turret upon destruction? (true - yes/false - no)": false, "Turret mode: true - passive / false - active": false, "Enemy detection radius (according to the standard - 30.0)": 40.0, "Turret accuracy (aimCone) (default 4)": 4.0, "Turret health level (default 1000)": 1000, "Turret weapon configuration": { "Turret weapon": { "shortname": "smg.thompson", "skinID": 0 }, "List of weapon mods in turret": [ { "shortname": "weapon.mod.silencer", "skinID": 0 } ], "List of ammo in turret": [ { "shortname": "ammo.pistol.fire", "amount": 150 }, { "shortname": "ammo.pistol.hv", "amount": 150 } ] } }, "Custom loot settings in drop": { "Use custom loot list (true - yes/false - no)": true, "Maximum loot drops": 8, "List of loot drops": [ { "Drop chance": 30, "Shortname": "keycard_green", "SkinID": 0, "Drop quantity setting": { "Minimum quantity": 1, "Maximum quantity": 1 } }, { "Drop chance": 86, "Shortname": "ammo.pistol", "SkinID": 0, "Drop quantity setting": { "Minimum quantity": 25, "Maximum quantity": 93 } }, { "Drop chance": 63, "Shortname": "ammo.shotgun", "SkinID": 0, "Drop quantity setting": { "Minimum quantity": 12, "Maximum quantity": 42 } }, { "Drop chance": 53, "Shortname": "ammo.rifle", "SkinID": 0, "Drop quantity setting": { "Minimum quantity": 25, "Maximum quantity": 128 } }, { "Drop chance": 33, "Shortname": "metal.refined", "SkinID": 0, "Drop quantity setting": { "Minimum quantity": 42, "Maximum quantity": 100 } }, { "Drop chance": 73, "Shortname": "metal.fragments", "SkinID": 0, "Drop quantity setting": { "Minimum quantity": 700, "Maximum quantity": 3000 } }, { "Drop chance": 33, "Shortname": "scrap", "SkinID": 0, "Drop quantity setting": { "Minimum quantity": 169, "Maximum quantity": 320 } }, { "Drop chance": 25, "Shortname": "hoodie", "SkinID": 0, "Drop quantity setting": { "Minimum quantity": 1, "Maximum quantity": 1 } }, { "Drop chance": 20, "Shortname": "roadsign.kilt", "SkinID": 0, "Drop quantity setting": { "Minimum quantity": 1, "Maximum quantity": 1 } }, { "Drop chance": 5, "Shortname": "metal.facemask", "SkinID": 0, "Drop quantity setting": { "Minimum quantity": 1, "Maximum quantity": 1 } }, { "Drop chance": 20, "Shortname": "pants", "SkinID": 0, "Drop quantity setting": { "Minimum quantity": 1, "Maximum quantity": 1 } }, { "Drop chance": 3, "Shortname": "metal.plate.torso", "SkinID": 0, "Drop quantity setting": { "Minimum quantity": 1, "Maximum quantity": 1 } }, { "Drop chance": 20, "Shortname": "coffeecan.helmet", "SkinID": 0, "Drop quantity setting": { "Minimum quantity": 1, "Maximum quantity": 1 } }, { "Drop chance": 21, "Shortname": "roadsign.jacket", "SkinID": 0, "Drop quantity setting": { "Minimum quantity": 1, "Maximum quantity": 1 } }, { "Drop chance": 20, "Shortname": "bucket.helmet", "SkinID": 0, "Drop quantity setting": { "Minimum quantity": 1, "Maximum quantity": 1 } }, { "Drop chance": 20, "Shortname": "jackhammer", "SkinID": 0, "Drop quantity setting": { "Minimum quantity": 1, "Maximum quantity": 1 } }, { "Drop chance": 10, "Shortname": "explosive.timed", "SkinID": 0, "Drop quantity setting": { "Minimum quantity": 1, "Maximum quantity": 1 } }, { "Drop chance": 8, "Shortname": "supply.signal", "SkinID": 0, "Drop quantity setting": { "Minimum quantity": 1, "Maximum quantity": 1 } }, { "Drop chance": 4, "Shortname": "military flamethrower", "SkinID": 0, "Drop quantity setting": { "Minimum quantity": 1, "Maximum quantity": 1 } }, { "Drop chance": 13, "Shortname": "smg.mp5", "SkinID": 0, "Drop quantity setting": { "Minimum quantity": 1, "Maximum quantity": 1 } }, { "Drop chance": 12, "Shortname": "pistol.m92", "SkinID": 0, "Drop quantity setting": { "Minimum quantity": 1, "Maximum quantity": 1 } }, { "Drop chance": 2, "Shortname": "rifle.ak", "SkinID": 0, "Drop quantity setting": { "Minimum quantity": 1, "Maximum quantity": 1 } }, { "Drop chance": 11, "Shortname": "rifle.m39", "SkinID": 0, "Drop quantity setting": { "Minimum quantity": 1, "Maximum quantity": 1 } }, { "Drop chance": 15, "Shortname": "pistol.prototype17", "SkinID": 0, "Drop quantity setting": { "Minimum quantity": 1, "Maximum quantity": 1 } }, { "Drop chance": 29, "Shortname": "grenade.f1", "SkinID": 0, "Drop quantity setting": { "Minimum quantity": 1, "Maximum quantity": 3 } }, { "Drop chance": 35, "Shortname": "explosive.satchel", "SkinID": 0, "Drop quantity setting": { "Minimum quantity": 2, "Maximum quantity": 2 } }, { "Drop chance": 25, "Shortname": "smg.thompson", "SkinID": 0, "Drop quantity setting": { "Minimum quantity": 1, "Maximum quantity": 1 } }, { "Drop chance": 25, "Shortname": "smg.2", "SkinID": 0, "Drop quantity setting": { "Minimum quantity": 1, "Maximum quantity": 1 } }, { "Drop chance": 25, "Shortname": "rifle.semiauto", "SkinID": 0, "Drop quantity setting": { "Minimum quantity": 1, "Maximum quantity": 1 } }, { "Drop chance": 12, "Shortname": "shotgun.spas12", "SkinID": 0, "Drop quantity setting": { "Minimum quantity": 1, "Maximum quantity": 1 } } ] } }, } }
- #supplydrop
- #defenders
- (and 7 more)
-
$19.90
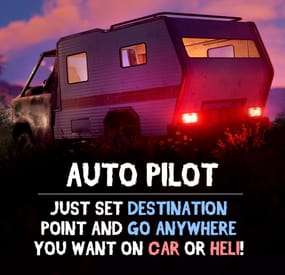
Auto Pilot
Give your players an autopilot, a feature that enables AI-controlled driving and flying! Players simply set a destination, sit back, and let the autopilot take them there!
Features:
🚗 Autopilot for Ground, Air and Water Vehicles
• Works with cars, motorcycles, bicycles, helicopters, boats and horses.
🎯 Navigation System
• AI determines the most efficient route to the selected destination.
• Obstacle detection helps prevent car crashes.
⚙ Complete Customization & Control
• Adjust maximum speed and AI behavior for ground vehicles.
• Fine-tune altitude, pitch, and throttle strength for helicopters.
💡 How to Use:
1️⃣ Type /autopilot in chat.
2️⃣ Select a location on the in-game map.
3️⃣ Your AI autopilot will take over and drive or fly you there!
📜 Permissions:
🚗 Land Vehicles
autopilot.modularcar – Grants access to autopilot for modular cars.
autopilot.motorbike – Grants access to autopilot for motor bikes (motorcycles)
autopilot.pedalbike – Grants access to autopilot for pedal bikes (bicycles)
autopilot.horse – Grants access to autopilot for horses
🚁 Air Vehicles
autopilot.attackhelicopter – Grants access to autopilot for attack helicopters
autopilot.scraptransporthelicopter – Grants access to autopilot for scrap transport helicopters
autopilot.minicopter – Grants access to autopilot for minicopters
🚤 Water Vehicles
autopilot.motorrowboat – Grants access to autopilot for motor rowboats
autopilot.rhib – Grants access to autopilot for RHIBs
autopilot.tugboat – Grants access to autopilot for tugboats
📸 See It in Action! Watch the Video
📄 Configuration:
{ "Mini helicopter autopilot settings": { "Process control update timer(0 - 0.2)": 0.0, "Disable autopilot when trying to control the player": true, "Max speed": 20.0, "Distance to route control point to reach": 15.0, "Transport push force from obstacle in collision(0 - disables push)": 3.0, "Automatic supply of the specified amount of fuel from the player inventory (0 - disables supply)": 100, "Flight height setting": { "Min": 50.0, "Max": 150.0 } }, "Transport helicopter autopilot settings": { "Process control update timer(0 - 0.2)": 0.0, "Disable autopilot when trying to control the player": true, "Max speed": 20.0, "Distance to route control point to reach": 15.0, "Transport push force from obstacle in collision(0 - disables push)": 3.0, "Automatic supply of the specified amount of fuel from the player inventory (0 - disables supply)": 100, "Flight height setting": { "Min": 50.0, "Max": 150.0 } }, "Attack helicopter autopilot settings": { "Process control update timer(0 - 0.2)": 0.0, "Disable autopilot when trying to control the player": true, "Max speed": 20.0, "Distance to route control point to reach": 15.0, "Transport push force from obstacle in collision(0 - disables push)": 3.0, "Automatic supply of the specified amount of fuel from the player inventory (0 - disables supply)": 100, "Flight height setting": { "Min": 50.0, "Max": 150.0 } }, "Boat Auto Pilot Settings": { "Process control update timer(0 - 0.2)": 0.0, "Disable autopilot when trying to control the player": true, "Max speed": 20.0, "Distance to route control point to reach": 15.0, "Transport push force from obstacle in collision(0 - disables push)": 3.0, "Number of processes per cycle in 1 tick when searching for a route(increasing the parameter - reduces the time of searching for a route, but increases the load on fps)": 10, "Grid step for route search (increasing the parameter - increases the time of searching for a route, but makes it harder to lay out a route in narrow places)": 60, "Automatic supply of the specified amount of fuel from the player inventory (0 - disables supply)": 100, "Minimum depth for determining transport passability when searching for a route": 0.5, "Max speed on obstacle detection": 5.0 }, "RHIB Auto Pilot Settings": { "Process control update timer(0 - 0.2)": 0.0, "Disable autopilot when trying to control the player": true, "Max speed": 20.0, "Distance to route control point to reach": 15.0, "Transport push force from obstacle in collision(0 - disables push)": 3.0, "Number of processes per cycle in 1 tick when searching for a route(increasing the parameter - reduces the time of searching for a route, but increases the load on fps)": 10, "Grid step for route search (increasing the parameter - increases the time of searching for a route, but makes it harder to lay out a route in narrow places)": 60, "Automatic supply of the specified amount of fuel from the player inventory (0 - disables supply)": 100, "Minimum depth for determining transport passability when searching for a route": 0.5, "Max speed on obstacle detection": 5.0 }, "Tugboat Auto Pilot Settings": { "Process control update timer(0 - 0.2)": 0.0, "Disable autopilot when trying to control the player": true, "Max speed": 20.0, "Distance to route control point to reach": 15.0, "Transport push force from obstacle in collision(0 - disables push)": 3.0, "Number of processes per cycle in 1 tick when searching for a route(increasing the parameter - reduces the time of searching for a route, but increases the load on fps)": 10, "Grid step for route search (increasing the parameter - increases the time of searching for a route, but makes it harder to lay out a route in narrow places)": 60, "Automatic supply of the specified amount of fuel from the player inventory (0 - disables supply)": 100, "Minimum depth for determining transport passability when searching for a route": 0.5, "Max speed on obstacle detection": 5.0 }, "Car Auto Pilot Settings": { "Disable autopilot when trying to control the player": true, "Max speed": 20.0, "Distance to route control point to reach": 15.0, "Transport push force from obstacle in collision(0 - disables push)": 3.0, "Number of processes per cycle in 1 tick when searching for a route(increasing the parameter - reduces the time of searching for a route, but increases the load on fps)": 10, "Grid step for route search (increasing the parameter - increases the time of searching for a route, but makes it harder to lay out a route in narrow places)": 60, "Max speed on obstacle detection": 5.0, "Allow you to search for a route on roads (takes precedence over off-road)": true, "Allow you to search for an off-road route": true, "Automatic supply of the specified amount of fuel from the player inventory (0 - disables supply)": 100 }, "Motor Bike Auto Pilot Settings": { "Process control update timer(0 - 0.2)": 0.0, "Disable autopilot when trying to control the player": true, "Max speed": 20.0, "Distance to route control point to reach": 15.0, "Transport push force from obstacle in collision(0 - disables push)": 3.0, "Number of processes per cycle in 1 tick when searching for a route(increasing the parameter - reduces the time of searching for a route, but increases the load on fps)": 10, "Grid step for route search (increasing the parameter - increases the time of searching for a route, but makes it harder to lay out a route in narrow places)": 60, "Max speed on obstacle detection": 5.0, "Allow you to search for a route on roads (takes precedence over off-road)": true, "Allow you to search for an off-road route": true, "Automatic supply of the specified amount of fuel from the player inventory (0 - disables supply)": 100 }, "Pedal Bike Auto Pilot Settings": { "Process control update timer(0 - 0.2)": 0.0, "Disable autopilot when trying to control the player": true, "Max speed": 20.0, "Distance to route control point to reach": 15.0, "Transport push force from obstacle in collision(0 - disables push)": 3.0, "Number of processes per cycle in 1 tick when searching for a route(increasing the parameter - reduces the time of searching for a route, but increases the load on fps)": 10, "Grid step for route search (increasing the parameter - increases the time of searching for a route, but makes it harder to lay out a route in narrow places)": 60, "Max speed on obstacle detection": 5.0, "Allow you to search for a route on roads (takes precedence over off-road)": true, "Allow you to search for an off-road route": true } }
- #rust
- #walkinrey
- (and 9 more)
-
$8.00
MBMainMenu
By Barry_Allenn in Plugins
✨ MBMainMenu - Premium Main Menu for Rust 🚀
MBMainMenu - a stylish, animated, and fully customizable main menu that welcomes players from the very first seconds on your server and transforms a regular join into a true WOW experience 🔥
Make your server look modern, professional, and truly premium.
🎯 Core Features
📊 Real-Time Server Information
👥 Online players 🔝 Max player limit ➕ Player joins ⏳ Queue size 🕒 Server time 🗺 Map size ⚡ Server rates 👨👩👧 Team size 🎮 Game mode (PvP / PvE / Solo / Duo / Trio, etc.)
🚁 Live Event Tracking
Icons automatically switch between ON / OFF states:
📦 Airdrop 🚢 Cargo Ship 🚁 Chinook 🚁 Patrol Helicopter 🛡 Bradley APC 👉 Players always know what’s happening on the server right now
💰 Economy & Rewards
Supports 3 popular economy systems:
✅ Economics ✅ ServerRewards ✅ MBCoins Features
📈 Balance progress indicator 🎁 First join reward ⏱ Online time rewards 🕹 Total playtime tracking
🌐 Website & Social Integration
All links open in clean UI windows with QR codes:
🌍 Website 💬 Discord 🎵 TikTok 📸 Instagram ▶️ YouTube Each window includes
📋 Copy button 🔳 QR code 🎨 Stylish banner ❌ Quick close button
🌍 Multilingual Support
🌐 Full multi-language support 📝 Custom welcome text for each language 🤖 Automatic language detection
🎨 Visual Design
🌫 Blurred background ✨ Smooth animations 🧼 Clean and modern UI 🖼 Custom backgrounds 🧍 NPC character in menu 📊 Online and balance indicators 👉 Your server will feel like a high-end Rust project, not a basic setup
📦 Requirements
ImageLibrary Economics or ServerRewards or MBCoins
👨💻 Author
Barry_Allenn 🛠 Regular updates and support 💬 Discord https://discord.gg/6b5tkpDb57
-
$16.99
Santa's Secret Workshop
Let me introduce you to my new monument: Santa's Secret Workshop. It is based in an innocent, unassuming barn in the North Pole, operated by farmers. However, this barn holds a secret—below its floor lies Santa's workshop, where his elves are hard at work on a bustling production line.
Quick Start
Extract the zip file into your RustEdit install folder. Start Rust Edit. Click on Prefabs at the top & open up your Prefab List. Under the Custom category, you will now find RobJs Premium Prefabs. Double-click on the prefab file, which will spawn it into the map for you. Drag it to the general area you want to place it. Apply the Height Mask, Topology Mask, and Splat Mask. Contact And Help
If you need to contact me discord is best: RobJ2210#2553
For help/support my discord group is best: Join RobJ Maps Discord
- #xmas
- #christmas monument
- (and 2 more)
-
$40.00$30.00Rust Map Vote Discord Bot
By Storption in Discord Bots
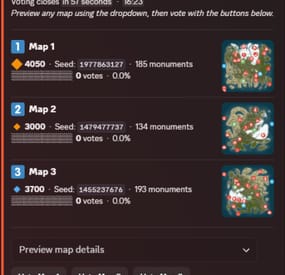
🗺️ Map Vote Bot 🗺️
MapVote is a self-hosted Discord bot that lets your Rust community vote on the next wipe map. Built for server owners who want a clean, reliable voting system.
✨ What's New in v3.0.0
Admin dashboard — Everything is managed through a single persistent message in your staff channel. No more slash commands for voting — the dashboard handles vote creation, scheduling, history, and settings all in one place.
Wipe schedule automation — Set a weekly, biweekly, or monthly wipe schedule and let the bot handle it. Supports auto-pick: the bot queries RustMaps at fire time and selects maps automatically based on your size, biome, terrain, and monument filters.
Three ways to create a vote — Enter a map manually, pick from a live RustMaps search with filters, or let the bot auto-pick.
Live vote editing — Change the title, duration, voter roles, or swap a map on an active vote without ending it.
Map cooldown — Prevent recently-won maps from being picked again. Configure how many past winners to skip.
Voter roles — Restrict who can vote on a per-vote basis by assigning one or more Discord roles at creation time.
Recovery — If the vote message or the dashboard message gets deleted, the bot automatically re-sends it.
Multiple schedules — Run independent wipe schedules simultaneously — useful for multi-server setups or different wipe types.
🗳️ Features
- Persistent admin dashboard with tabbed navigation (Overview, Vote, Automation, History, Settings)
- Live vote tracking with animated progress bars
- 2–5 maps per vote
- Standard maps (any size/seed) and custom RustMaps.com maps
- Detailed map info — biomes, islands, rivers, monuments, and more
- Automatic winner determination with random tie-breaking
- Wipe schedule automation — weekly, biweekly, and monthly (by Nth weekday or last weekday)
- Auto-pick maps from RustMaps based on size, biome, terrain, and monument filters
- Per-vote voter role gating — restrict who can vote per session
- Live vote editing without ending the vote
- Paginated vote history with winner links, vote counts, and win-rate stats
- Vote and dashboard message recovery on deletion
- 24-hour advance reminder when a scheduled wipe has no maps set
- All votes and config stored in SQLite — nothing is lost on restart
- Full multi-guild support
⚙️ Commands
/setup Create or move the admin dashboard to a channel
/search Browse RustMaps with filters — size range, biomes, terrain, monuments (available to all members)
🔐 Restricting Access
/setup requires Administrator by default. You can grant it to specific roles without giving them full admin — go to Server Settings > Integrations > MapVote and configure per-command role access.
/search is available to all members by default and can be restricted the same way.
📋 Requirements
Node.js 24+
Discord bot token
RustMaps.com API key
🚀 Setup
Download and extract the files
Run npm install
Fill in your TKN & RUSTMAPS_API_KEY in the .env file
Run npm start
Use /setup #your-admin-channel to create the dashboard
Need help? Join the support server: Click Here
🔄 Updating
Stop the bot
Delete the src/ folder
Copy in the new src/ folder and overwrite package.json, CHANGELOG, and README.md files
Delete the node_modules/ folder and package-lock.json file
Run npm install
Start the bot (npm start)
Your .env and db/ files are not touched — all settings and data are preserved.
- #discordbot
- #rustmaps
- (and 1 more)