suhturhn's Wishlist
-
$13.99
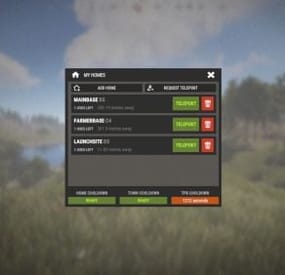
My Homes
MyHomes is a plugin that provides a convenient user interface for the NTeleportation plugin.
Streamline your players' experience on your server by eliminating the need to remember multiple different chat commands for just one plugin.
With this plugin, all your players need to remember is the "/homes" command to open the interface where they can manage their teleports. MyHomes is fully plug & play; no configuration needed.
Just load it on your server and start using.
Latest version comes with:
- option for Easy Home button, which makes accessing MyHomes interface just with a button, no command needed, button appears upon opening Inventory situated next to "Missions" button
- Extra buttons for TP Outpost, Tp Bandit, TP Town and TP Island which off course support multiple island teleports
- Optionable Screen Blur, You can disable in config
- Off course also work with permissions
-
$20.00
Admin Map
Admin Map is an innovative plugin for the game of Rust, designed to make server administration easier and improve the quality of the gaming experience. Focused on optimization and functionality, this plugin provides admins with the tools to effectively control players, minimizing the negative impact on the server and other participants.
Main features:
Interactive map with players: Admin Map provides server admins with a detailed and user-friendly map showing the positions of all players. This allows admins to easily monitor player activity and movements, and quickly detect suspicious activity. Large variety of different admin map layers:
- Marker,
- Text ,
- Sleeper,
- TC,
- Stash,
- Sleeping Bag Quick Commands on Players: The plugin allows admins to perform quick actions on players directly from the map. Send messages, punish or help players in real time, minimizing reaction time and increasing interaction efficiency. Minimal server load: One of the key features of Admin Map is its low server load. All processing takes place solely on the client side, which means that the plugin will not slow down the server or create additional delays for players. This makes it an ideal choice even for servers with high traffic. Ease of use: The plugin's intuitive user interface provides admins with easy access to functionality. Navigating the map, sending commands and monitoring players is done with minimal effort, making server administration easy. Customization: Admin Map provides admins with the option to customize the functionality to suit their needs. Scanning area, available commands, buttons, permissions and other options. Hardcore bypass: Admins will be able to access the map on servers with the hardcore game mode installed.
After permission is granted, it is necessary to rejoin the server Support in RUST+: You will be able to view players online on the map directly in your phone without going to the server! Admin Map is an innovative solution that combines convenience, functionality and optimization. It provides administrators with tools to effectively manage players without negatively impacting gameplay and other server participants. The Admin Map plugin is an essential asset for any Rust server administrator looking to create a comfortable and safe gaming environment.
Permissions:
adminmap.allow - for use adminmap and hardcore bypass adminmap.<button perm> - any permissions specified in the button settings adminmap.teleport2marker - teleportation by marker via CTRL+RMB adminmap.invis - hide player from the player map adminmap.rust+ - enable rust+ admin map adminmap.rust+.invis - hide from rust+ admin map (recommended in case of giving the map to players)
Commands:
/amap - show sidebar /amap off - disable everything and hide the sidebar
Color designations on the cupboards map:
Default Config:
{ "Auto show sidebar panel": true, "Open the admin menu instead of the action menu": false, "Text Map Settings": { "Font size": 8.0, "Use color generation for teams?": true, "Color for team": "ffaf4d", "Color for solo player": "9bd92f", "Color for sleeper": "404040" }, "Command Buttons": [ { "Permission (adminmap.<perm>)": "", "Label": "TP", "Command": "teleport {steamid}", "Color": "1 1 1 1" }, { "Permission (adminmap.<perm>)": "", "Label": "TP2ME", "Command": "teleport {steamid} {admin.steamid}", "Color": "1 1 1 1" }, { "Permission (adminmap.<perm>)": "", "Label": "INV", "Command": "/viewinv {username}", "Color": "1 1 1 1" }, { "Permission (adminmap.<perm>)": "", "Label": "SPECTATE", "Command": "spectate {steamid}", "Color": "1 1 1 1" }, { "Permission (adminmap.<perm>)": "", "Label": "KILL", "Command": "kill {steamid}", "Color": "0.9 0.1 0.25 1" }, { "Permission (adminmap.<perm>)": "", "Label": "KICK", "Command": "kick {steamid}", "Color": "0.9 0.1 0.25 1" }, { "Permission (adminmap.<perm>)": "", "Label": "SHOW\nTEAMMATES", "Command": "adminmap.cmd show_player_teammates {steamid}", "Color": "1 1 1 1" }, { "Permission (adminmap.<perm>)": "", "Label": "SHOW\nPRIVLIDGES", "Command": "adminmap.cmd show_player_privlidges {steamid}", "Color": "1 1 1 1" }, { "Permission (adminmap.<perm>)": "", "Label": "SHOW\nSLEEPING\nBAGS", "Command": "adminmap.cmd show_player_sleepingbags {steamid}", "Color": "1 1 1 1" }, { "Permission (adminmap.<perm>)": "", "Label": "SHOW\nSTASHES", "Command": "adminmap.cmd show_player_stashes {steamid}", "Color": "1 1 1 1" } ] }
Button Library:
Give item to player for AdminMenu by k1lly0u | Minimum required version 1.0.1 { "Permission (adminmap.<perm>)": "", "Label": "GIVE", "Command": "adminmenu.callback {steamid}.4;adminmenu.callback {steamid}.4", "Color": "1 1 1 1" } Permanent ban
{ "Permission (adminmap.<perm>)": "", "Label": "BAN", "Command": "ban {steamid}", "Color": "1 0 0 1" } View backpack (for Backpack Pro)
{ "Permission (adminmap.<perm>)": "", "Label": "Backpack", "Command": "/b {steamid}", "Color": "1 1 1 1" } View backpack (for Backpacks plugin from uMod)
{ "Permission (adminmap.<perm>)": "", "Label": "Backpack", "Command": "viewbackpack {steamid}", "Color": "1 1 1 1" } Spectate
{ "Permission (adminmap.<perm>)": "", "Label": "SPECTATE", "Command": "spectate {steamid}", "Color": "1 1 1 1" }
If you want to add buttons here, message me on my discord server
-
$22.00$19.80Npc Random Raids
Optional Dependency Raidable Bases - https://codefling.com/plugins/raidable-bases
Optional Dependency Custom Loot - https://codefling.com/plugins/custom-loot
How To Call In Random Raids
Randomly calls in npc raids with options for Mlrs and Attack Hele Set a configurable timer and chance to auto call in raid
With Raidable bases plugin set a chance with configurable options for the npc's to come back and attack the raiders at one of there bases.
After a certain amount of npc kills have a random chance.
With item found in loot containers or given in shops by admins.
If the players base is by water the npc may go under the water and still fight.
SEE ALL CONFIG SETTINGS!
Chat Command - Permission = randomraids.admin
/randomraid -- Will display command usage.
/randomraid item list - will display list of raid item for admin to give them self.
/randomraid item <type> - example config types = easy, medium, hard
Server command
randomraid <playerid> <type> - Gives player raid item to start a raid.
{ "Random settings": { "GUI AnchorMin": "0.807 0.96", "GUI AnchorMax": "0.996 0.99", "GUI2 AnchorMin": "0.807 0.92", "GUI2 AnchorMax": "0.996 0.95", "GameTip display time in seconds": 2.0, "Total raids allowed at once": 10, "A player on the tc must be online": true, "Use random raid timer": false, "Random raid timer time": 3600, "Chance of random raid at time (1-100)": 10, "Authorized players Cooldown minutes before random raided again by chance": 1440, "The maximum amount of time a rocket will fly before exploding": 4.0, "Npc spawn damage delay": 2.0, "Display global chat message on raid start": true, "Display global map marker on raid start": true, "Display Gui to base owners": false, "Use GameTip announcement to player": false, "Disable radio chatter": false, "Wait until all NPC are dead before sending in next wave": false, "Player must have randomraids.use inorder to get raided": false, "Use world text to show base location": false, "World text display time": 60.0, "Use discord Webhook": false, "Discord Webhook URL": "", "Discord Avatar URL": "http://images.myvector.xyz/discordimage.png" }, "All Random Raid Types": { "Random raid types": { "easy": { "Total auth players on tc needed": 1, "Total npcs per wave": 10, "How many extra waves": 1, "Seconds untell next wave": 120, "Npc fires Mlrs at base": false, "Send in Attack Copter support": false, "Total event time in seconds": 640, "Npc drop loot on death": true, "Spawn health of the npc": 100.0, "Total rockets npc can fire": 20, "Total explosives npc can toss": 10, "Total AirDrops on event win": 1, "Rocket damage scale": 1.0, "Player damage scale from npc": 1.0, "Auto turret damage scale to npc": 1.0, "Raiders aimConeScale": 2.0, "Throw Explosive item shortnames": [ "explosive.timed", "explosive.satchel" ], "Spawn Attack Heli profile": [ "easy" ], "Spawn kits for the npcs": [], "Names to give the npcs": [ "Cobalt Scientist" ], "CustomLoot config profile name": [], "CustomLoot config profile names for AirDrop": [], "AlphaLoot config profile names": [], "AlphaLoot config profile names for AirDrop": [], "Juggernaut config": [ "easy" ], "Surrender costs": 200 }, "medium": { "Total auth players on tc needed": 2, "Total npcs per wave": 15, "How many extra waves": 1, "Seconds untell next wave": 120, "Npc fires Mlrs at base": false, "Send in Attack Copter support": true, "Total event time in seconds": 900, "Npc drop loot on death": true, "Spawn health of the npc": 200.0, "Total rockets npc can fire": 20, "Total explosives npc can toss": 10, "Total AirDrops on event win": 1, "Rocket damage scale": 1.0, "Player damage scale from npc": 1.0, "Auto turret damage scale to npc": 1.0, "Raiders aimConeScale": 2.0, "Throw Explosive item shortnames": [ "explosive.timed", "explosive.satchel" ], "Spawn Attack Heli profile": [ "easy" ], "Spawn kits for the npcs": [], "Names to give the npcs": [ "Cobalt Scientist" ], "CustomLoot config profile name": [], "CustomLoot config profile names for AirDrop": [], "AlphaLoot config profile names": [], "AlphaLoot config profile names for AirDrop": [], "Juggernaut config": [ "easy" ], "Surrender costs": 400 }, "hard": { "Total auth players on tc needed": 3, "Total npcs per wave": 20, "How many extra waves": 1, "Seconds untell next wave": 120, "Npc fires Mlrs at base": false, "Send in Attack Copter support": true, "Total event time in seconds": 1200, "Npc drop loot on death": true, "Spawn health of the npc": 400.0, "Total rockets npc can fire": 20, "Total explosives npc can toss": 10, "Total AirDrops on event win": 1, "Rocket damage scale": 1.0, "Player damage scale from npc": 1.0, "Auto turret damage scale to npc": 1.0, "Raiders aimConeScale": 2.0, "Throw Explosive item shortnames": [ "explosive.timed", "explosive.satchel" ], "Spawn Attack Heli profile": [ "easy" ], "Spawn kits for the npcs": [], "Names to give the npcs": [ "Cobalt Scientist" ], "CustomLoot config profile name": [], "CustomLoot config profile names for AirDrop": [], "AlphaLoot config profile names": [], "AlphaLoot config profile names for AirDrop": [], "Juggernaut config": [ "easy" ], "Surrender costs": 600 }, "expert": { "Total auth players on tc needed": 4, "Total npcs per wave": 30, "How many extra waves": 1, "Seconds untell next wave": 120, "Npc fires Mlrs at base": false, "Send in Attack Copter support": true, "Total event time in seconds": 1500, "Npc drop loot on death": true, "Spawn health of the npc": 400.0, "Total rockets npc can fire": 20, "Total explosives npc can toss": 10, "Total AirDrops on event win": 1, "Rocket damage scale": 1.0, "Player damage scale from npc": 1.0, "Auto turret damage scale to npc": 1.0, "Raiders aimConeScale": 2.0, "Throw Explosive item shortnames": [ "explosive.timed", "explosive.satchel" ], "Spawn Attack Heli profile": [ "easy" ], "Spawn kits for the npcs": [], "Names to give the npcs": [ "Cobalt Scientist" ], "CustomLoot config profile name": [], "CustomLoot config profile names for AirDrop": [], "AlphaLoot config profile names": [], "AlphaLoot config profile names for AirDrop": [], "Juggernaut config": [ "medium" ], "Surrender costs": 800 }, "nightmare": { "Total auth players on tc needed": 5, "Total npcs per wave": 30, "How many extra waves": 1, "Seconds untell next wave": 120, "Npc fires Mlrs at base": false, "Send in Attack Copter support": true, "Total event time in seconds": 2100, "Npc drop loot on death": true, "Spawn health of the npc": 400.0, "Total rockets npc can fire": 20, "Total explosives npc can toss": 10, "Total AirDrops on event win": 1, "Rocket damage scale": 1.0, "Player damage scale from npc": 1.0, "Auto turret damage scale to npc": 1.0, "Raiders aimConeScale": 2.0, "Throw Explosive item shortnames": [ "explosive.timed", "explosive.satchel" ], "Spawn Attack Heli profile": [ "easy" ], "Spawn kits for the npcs": [], "Names to give the npcs": [ "Cobalt Scientist" ], "CustomLoot config profile name": [], "CustomLoot config profile names for AirDrop": [], "AlphaLoot config profile names": [], "AlphaLoot config profile names for AirDrop": [], "Juggernaut config": [ "medium" ], "Surrender costs": 1000 } } }, "AttackCopter profiles": { "Profile Names": { "easy": { "Heli float health": 1000.0, "Total crates to drop": 2, "Heli strafe cooldown": 50.0, "Heli can strafe x times": 3 } } }, "Block Random raid in colider": { "Blocked": [ "iceberg", "ice_berg", "ice_sheet", "icesheet", "cliff", "cave" ] }, "Raidable Base plugin settings": { "Raid player on Raidable Base Completed": false, "Warn player in chat of upcoming revenge on them": false, "Raidable Base Settings": { "0": { "Total amount of mode complete before ever has chance": 3, "Reset kill count after chance happened": false, "Raidable Base Completed Delay Before Raid chance happens": 320.0, "raid chance (1-100)": 10, "Random raid to send them if chance": [ "easy" ] }, "1": { "Total amount of mode complete before ever has chance": 3, "Reset kill count after chance happened": false, "Raidable Base Completed Delay Before Raid chance happens": 320.0, "raid chance (1-100)": 10, "Random raid to send them if chance": [ "easy", "medium" ] }, "2": { "Total amount of mode complete before ever has chance": 3, "Reset kill count after chance happened": false, "Raidable Base Completed Delay Before Raid chance happens": 320.0, "raid chance (1-100)": 10, "Random raid to send them if chance": [ "easy", "medium" ] }, "3": { "Total amount of mode complete before ever has chance": 3, "Reset kill count after chance happened": false, "Raidable Base Completed Delay Before Raid chance happens": 320.0, "raid chance (1-100)": 10, "Random raid to send them if chance": [ "easy", "medium", "hard" ] }, "4": { "Total amount of mode complete before ever has chance": 3, "Reset kill count after chance happened": false, "Raidable Base Completed Delay Before Raid chance happens": 320.0, "raid chance (1-100)": 10, "Random raid to send them if chance": [ "hard", "expert", "nightmare" ] } } }, "Trigger by npc kills": { "Enable log kills and random raid on kills": false, "Reset npc kills on player raided.": false, "Warn player in chat of upcoming revenge on them": false, "Use total players on tc check on type": false, "Enable combine npc kills list": false, "Combine npc kills list": [ "scientistnpc_patrol", "scientistnpc_oilrig", "scientistnpc_heavy", "sentry.scientist.barge", "sentry.scientist.barge.static", "sentry.scientist.static", "heavyscientist_youtooz.deployed", "ch47scientists.entity", "scientist_corpse", "scientistnpc_arena", "scientistnpc_cargo", "scientistnpc_cargo_turret_any", "scientistnpc_cargo_turret_lr300", "scientistnpc_ch47_gunner", "scientistnpc_excavator", "scientistnpc_full_any", "scientistnpc_full_lr300", "scientistnpc_full_mp5", "scientistnpc_full_pistol", "scientistnpc_full_shotgun", "scientistnpc_junkpile", "sientistnpc_peacekeeper", "scientistnpc_roam", "scientistnpc_roam_nvg_variant", "scientistnpc_roamtethered", "npc_tunneldweller", "npc_tunneldwellerspawned", "npc_underwaterdweller", "scarecrow" ], "Combine Profile to use": { "Total amount of Npc killed before chance can happen": 70, "Reset kill count after chance happened": false, "Delay before chance happens": 320.0, "Raid chance (1-100)": 10, "Cooldown minutes before chance can happen again": 1440, "Random raid to send them if chance": [ "easy" ] }, "Npc kills settings": { "scientistnpc_heavy": { "Total amount of Npc killed before chance can happen": 30, "Reset kill count after chance happened": false, "Delay before chance happens": 320.0, "Raid chance (1-100)": 10, "Cooldown minutes before chance can happen again": 1440, "Random raid to send them if chance": [ "medium" ] }, "scientistnpc_oilrig": { "Total amount of Npc killed before chance can happen": 60, "Reset kill count after chance happened": false, "Delay before chance happens": 320.0, "Raid chance (1-100)": 10, "Cooldown minutes before chance can happen again": 1440, "Random raid to send them if chance": [ "easy" ] }, "scientistnpc_patrol": { "Total amount of Npc killed before chance can happen": 60, "Reset kill count after chance happened": false, "Delay before chance happens": 320.0, "Raid chance (1-100)": 10, "Cooldown minutes before chance can happen again": 1440, "Random raid to send them if chance": [ "easy" ] }, "scientistnpc_junkpile": { "Total amount of Npc killed before chance can happen": 60, "Reset kill count after chance happened": false, "Delay before chance happens": 320.0, "Raid chance (1-100)": 10, "Cooldown minutes before chance can happen again": 1440, "Random raid to send them if chance": [ "easy" ] } } }, "Juggernaut profiles": { "easy": { "Juggernaut spawns on witch Wave number/Total to spawn": { "1": 1 }, "Spawn health of the juggernaut": 500.0, "Player damage scale from the juggernaut": 1.0, "juggernaut aimConeScale": 2.0, "Names to give the juggernaut": [ "Juggernaut Raider" ], "Spawn kits for the juggernaut": [] }, "medium": { "Juggernaut spawns on witch Wave number/Total to spawn": { "1": 2 }, "Spawn health of the juggernaut": 700.0, "Player damage scale from the juggernaut": 1.0, "juggernaut aimConeScale": 2.0, "Names to give the juggernaut": [ "Juggernaut Raider" ], "Spawn kits for the juggernaut": [] } }, "Item profiles": { "easy": { "Raid call item skin": 2893480896, "Raid call item name": "Npc Raid Level 1", "LootContainer Spawn enabled": false, "Can Spawn In LootContainer types": [ "crate_normal", "crate_normal_2" ], "LootContainer Spawn Chance 1-100": 5.0 }, "medium": { "Raid call item skin": 2893480635, "Raid call item name": "Npc Raid Level 2", "LootContainer Spawn enabled": false, "Can Spawn In LootContainer types": [ "crate_normal", "crate_normal_2", "heli_crate" ], "LootContainer Spawn Chance 1-100": 5.0 }, "hard": { "Raid call item skin": 2893481009, "Raid call item name": "Npc Raid Level 3", "LootContainer Spawn enabled": false, "Can Spawn In LootContainer types": [ "bradley_crate", "crate_elite" ], "LootContainer Spawn Chance 1-100": 5.0 }, "expert": { "Raid call item skin": 2893481137, "Raid call item name": "Npc Raid Level 4", "LootContainer Spawn enabled": false, "Can Spawn In LootContainer types": [ "bradley_crate", "crate_elite" ], "LootContainer Spawn Chance 1-100": 5.0 }, "nightmare": { "Raid call item skin": 2893482048, "Raid call item name": "Npc Raid Level 5", "LootContainer Spawn enabled": false, "Can Spawn In LootContainer types": [ "bradley_crate", "crate_elite" ], "LootContainer Spawn Chance 1-100": 5.0 } }, "Version": { "Major": 1, "Minor": 7, "Patch": 7 } }
WARNING: Npc will go in and under water if there base is by water
-
$45.00
Defendable Bases
This plugin adds a new dynamic zombie event to your server, the appearance of which you can customize in the configuration for any standard and custom monuments
Description
The event begins with a message in chat that the evacuation of the general from the island will begin soon. At the end of the configured timer, a military checkpoint randomly appears on the map and it is said in the chat that the general's guard was killed, and the general himself was seriously wounded
The player and his friends (if you have any) need to arrive at the military checkpoint and call for help for the general with the laptop located at the checkpoint control center
After the player calls for help, waves of zombies will attack the base. During the preparation phase, players can upgrade the base with turrets, purchase ammunition for them, or place it from their inventory through the checkpoint control center. In the doorways, players can install barricades of different types (5 types of barricades, which differ in the amount of Hit Points) to contain the incoming waves of zombies. The player can also use a hammer to repair the barricades. During the attack phase, waves of zombies will be directed at you. You cannot allow zombies to kill the general, otherwise, the event will end. There are several zombie types (in future updates it is planned to add to the list of zombie types). Each type of zombie has its own tasks. After the end of each wave, a room with crates opens, where there will be a reward for you
At the end of the event, a helicopter arrives for the general and picks him up, and you are notified in chat that the event has been successfully completed. When the general dies, the event ends, as will the attack wave, the event, and all hope is lost!
All the necessary settings of zombies, timers, items in crates for each wave, as well as settings for each wave (the number of zombies of each type, the time of the preparation phase and the attack wave, etc.), settings of the military checkpoint (the price of buying something or improving the base, used ammo in turrets, etc.), the price of repairs, barricade options, and many other settings are available in the plugin configuration
Also in the event there are additional missions during the waves of attack, during which you will receive an additional reward (in future updates it is planned to add to the list of additional missions). You can set up additional missions in the settings of each attack wave
The event provides the use of several military base designs. The Mad Mappers team will add to the list of constructions for the event in the future. When an event appears, the plugin randomly selects the construction of the base from those that you have in the data folder, and also randomly selects a place to appear from all those that have been set in the plugin configuration
Also, the Mad Mappers team will begin to offer support in our custom maps for this event and contain files for the appearance of bases in custom monuments and locations on our maps
Constructions of other bases
Defendable Bases (Bundle-1) Defendable Bases (Bundle-2)
Custom Map
Maps that have a configuration for the appearance of bases on their custom monuments
You can also download all these files for all maps here
Deathland Badlands Destroyed World Detroit: Irreparable Damage Oregon 2: Last Hope Oregon: Land of Dead Pandora All files for custom maps are stored in the folder oxide/data/DefendableBases/CustomMap. You don't have to delete files from there, the plugin will understand by itself which map is currently installed on the server and will download only the necessary file if there is one in this folder. The plugin will tell you about this process in the console during the plugin loading. It will write in the console what file works on the current map, and what ones don’t work
If you want to create a custom place for the base to appear on your custom map or on a map that is not in this list, you have to create the ID of this custom map. After that you need to place an item such as a RAND Switch on your map. It must be placed randomly, where it will not be visible to other players. You will get the identifier, if you add up the three coordinates of the position of this object from RustEdit (x, y and z) and write the resulting value in the parameter of your file (an example file can be taken from ready-made files) - ID
As an example, let's take the coordinates (26.896, -456.158, 527.258), then our identifier is 26.896 - 456.158 + 527.258 = 97.996
Then you need to indicate a list of bases that will appear on your map. You need to copy the configuration data block for each base construction. In the database parameters you will specify the name of the base construction and a list of positions where it can appear
The list of positions consists of several parameters. First you need to specify the position and rotation of the appearance of the base on your map, then you can get these values using RustEdit. You need to choose the place for the appearance of the event on the custom monument, where the player has a ban on construction
You have such a parameter as the pursuit radius for such a type of zombie as Blazer. These zombies run around the base along this radius and shoot at the players. Please note! Some object sometimes may be on your map in this radius, for example a fence, and they will not be able to overcome it, because they cannot run inside this circle, and they haven’t a way out for them so you need to leave them a way or adjust it by increasing or decreasing the radius
You have a list of coordinates for the points of appearance of all zombies. It is necessary to indicate these coordinates evenly around the base so that the zombies run from different sides and attack all sides of the base, not just a few ones. So it will be more interesting to play this event. Also note the fact that you can indicate the coordinate where a player can create his house, so it is advisable to specify all the coordinates that are in the construction ban zone, they are in the zone of your custom monument. You can also get the coordinates of the appearance of zombies using RustEdit
Images
You may want to change some parameters during the plugin installation or the base configuration
In the plugin configuration these parameters are:
Custom Barricades => Price for repairs (per hammer hit) => List of items, 3 maximum (if the economy method is 3) In the base configuration, these parameters are:
List of turrets => Price to unlock => List of items, 3 maximum (if the economy method is 3) List of turrets => List of ammo => Price => List of items, 3 maximum (if the economy method is 3) List of barricades to buy => Price => List of items, 3 maximum (if the economy method is 3) A list of items that are in the laptop inventory when the base appears List of attack waves => Additional missions => Reward for completing the mission => List of items If you change items in the current configuration items, you need to upload the image for this item to the oxide/data/Images folder. In order for the plugin to load this image and can use it for display in the player's GUI. If it is a standard Rust item, you need to name this image file by its ShortName. If it is a custom item, you need to name the image file by the SkinID of the item
Then you need to make a few changes to the plugin configuration in the List of paths to GUI images item. You need to add a new image to this list. The name is the ShortName or SkinID of the item. The path to the image will look something like this: Images/{ShortName or SkinID}.png
If you use the economy of some following points on your server as prices, you can change the image with the name Economic to your own with the same name
All images must be used square. Attention! The lower size of the image file will be displayed to the player faster
Dependencies Required
NpcSpawn
Dependencies (optional, not required)
True PVE PveMode GUI Announcements Notify Discord Messages AlphaLoot CustomLoot NTeleportation Economics Server Rewards IQEconomic
Chat commands (only for administrators)
/warstart {name} – start the event ({name} – name of the base)
/warstop - end the event
Console commands (RCON only)
warstart {name} – start the event ({name} – name of the base)
warstop - end the event
givebarricade {steamid} {level} {amount} - a player with a SteamID ({steamid}) is given a certain number of barricades ({amount}) of a certain level ({level})
Plugin Config
en - example of plugin configuration in English ru - example of plugin configuration in Russian
Base Config
en - example of base configuration in English ru - example of base configuration in Russian
Custom Map Config
en - example of custom map configuration in English ru - example of custom map configuration in Russian
My Discord: KpucTaJl#8923
Join the Mad Mappers Discord here!
Check out more of my work here!
Creator of the default configuration and the bases – jtedal
Help in creating a plugin description – Jbird#2022
- #barricade
- #ch47
- (and 27 more)
-

$40.00
Defendable Homes
Defend your home.. well.. defend what's left of it! Welcome to an epic new event where the players will defend their bases against waves of Frankenraiders! They will use any weapons they have available to try to raid your base. Some will come with whatever they can swing at you and your base, some will just try to defend their kin, some have found some heavy weaponry too! I think that one has a rocket launcher?!
Description
To launch the event first you must find a flare bright enough to attract their attention. You'll be able to find flares bright enough to attract an Easy Frankenraid in Bradley, Elite, Military, and Supply crates. When you've found a flare just toss it on or near the base within Tool Cupboard range. Once you successfully defend an Easy Frankenraiding party, you will be rewarded with a flare bright enough for a Medium party. Then upon defending successfully against a Medium raid, well if you really want to risk your wipe being wiped by a full Frankenraider party, then you will have earned a flare bright enough to attract a Hard Frankenraid! When you complete any difficulty level and are able to defend your base, a chinook will be sent to your location with rewards for your service to the island in clearing out the threat!
If your base is destroyed, the event ends, chat notifications are sent, and there you stand in shame. Hopefully you're on a low pop server and not too many people noticed. It's okay champ, happens to the best of us some days! Just keep an eye on the in game UI like the timer and wave information to give yourself the best shot at keeping your base standing!
There are various ways to configure this plugin to customize it for your server, for any level and number of players. The creativity is in your hands with the configuration file as well as your communities wants or needs. The loot table, the flare spawns, the different enemy types and their setups, everything is there for you to customize this if you so choose.
Dependencies (optional, not required)
True PVE GUI Announcements Notify AlphaLoot CustomLoot Base Repair
Chat commands
/defstop - in game command to end event in your current Tool Cupboard range (be near the event you are trying to end) - only for administrators!
/checkfoundations - checks all the foundations of the house for the event (it is necessary to be inside the Cupboard area of the house)
⊘ - you or your friends are not the owner of the foundation ⊝ - the foundation does not match in height/depth ⊛ - the foundation does not match the topology (prohibited topologies: Cliff, Cliffside, Decor, Building, Monument, Clutter, Mountain) ◉ - the foundation is located within a radius of 40 meters from the custom monument
Console commands (RCON only)
giveflare {skinid} {steamid} - Console command to give a custom flare with a Steam Workshop SkinID ({skinid}) to a player using their SteamID ({steamid})
Plugin Config
en - example of plugin configuration in English ru - example of plugin configuration in Russian
My Discord: KpucTaJl#8923
Join the Mad Mappers Discord here!
Check out more of my work here!
Creator of the default configuration – jtedal
Help in creating a plugin description – Jbird