
G_SAPLING's Wishlist
-

$8.49
Craft Controller
Crafting rules Every craftable item, on your terms One crafting speed for everyone, a workbench ladder you can't touch, and a tech tree that hands out everything eventually. Servers that want tiered craft speed, a banned weapon, or an item nobody is allowed to research end up stacking three plugins to get there. This is one file that owns crafting from end to end — speed by permission group, and seven switches on every item in the game.
7 Switches on every craftable item 3 Routes to a blueprint, each closable 2 Speed tiers shipped, add as many as you like 0 Dependencies ✓ Craft speed per permission group — name the permission, name the multiplier, it is registered for you ✓ Workbench tier per item — raise it, lower it, or take the bench requirement off entirely ✓ Research table, blueprint paper and tech tree — three separate switches, because players will try all three ✓ A blocked tech tree node doesn't have to wall off the branch — the plugin unlocks around it and charges the right scrap ✓ Every craftable item is listed for you — an icon grid with search, no shortname hunting 01 — Speed Faster crafting as something you sell Craft speed is one of the few perks players will actually pay for, and the only one that costs a server nothing to give. Here it is a two-column list: permission on the left, multiplier on the right.
As many tiers as your shop has Two come configured — 1.5× for everyone and 3× for VIP — but the list is yours. Write craftcontroller.bronze, .silver, .gold with the numbers you want and the plugin registers every one of them on load. Nothing to declare anywhere else. Worked out per craft, not per session The multiplier is resolved the moment a craft starts, from the item's own base time. Grant a permission mid-wipe and the next thing that player queues is already faster — no relog, no reload. 02 — Items Seven switches on anything with a recipe On first load every craftable item in the game is written into the config with its vanilla values, so there is no list to build and no shortname to look up. Open the menu, click the icon, change what you need.
Move an item up or down the bench ladder The plugin takes the workbench requirement off the engine and enforces its own, which is what lets you go both ways: put an AK behind tier 3, or let players craft a tier-2 item with no bench at all by setting it to zero. A player who tries too early gets a game tip naming the tier they need. Block an item outright One toggle and the recipe is closed — caught on both the inventory craft and the crafter itself, so there is no second path in. The player gets a message instead of a silent failure, and it is in the language file like everything else. A default skin, applied on the way out Give an item a skin ID and everything crafted comes out wearing it, held entity included, so it looks right in hand and not just in the inventory. A player who deliberately picked a skin keeps theirs — the default only fills the gap. 03 — Research Closing a door means closing all three There are three ways to learn something in Rust, and blocking one is worth nothing on its own. Each gets its own switch, so you can leave a route open on purpose — researchable from a found blueprint, but never from the tech tree.
The table and the paper One switch covers both the research table and studying a blueprint that dropped in loot — the two routes players reach for first, and the pair that plugins usually forget to close together. The tech tree, node by node Mark a node blocked and it cannot be unlocked at the workbench, with a notice on screen and in chat rather than a dead button. And what happens to everything behind it This is the part most plugins get wrong. Block a node in the middle of a branch and you have accidentally banned the whole branch. A second switch decides which you meant: seal the path, or let players through it. Let them through and the plugin rebuilds the unlock itself — it works out which nodes are still needed, prices them in scrap at the correct tier including tax, takes the payment, unlocks them, and tells other plugins it happened through the standard hook so your logging and reward plugins still see it. Reliability Puts the game back ✓ Vanilla values are saved before anything is touched — every recipe's original time and bench level go into a data file on first load, and that file is the reference point from then on ✓ Unload restores every recipe — times and bench levels are written back from that file and the client is told to go back to normal crafting, so removing the plugin is not a wipe-day job ✓ Joining players are handled properly — if someone is still loading their snapshot the plugin waits and retries instead of firing into the void and leaving them with the wrong crafting rules ✓ Edits apply live — change a bench level or a block in the menu and it is in force before you close it, on a server full of people ✓ Four messages, all translatable — and no dependencies to install alongside it Commands One command, and the tiers you invent Players never type anything — the rules apply to them through the vanilla crafting menu.
/craftcontrole Open the item grid — search, pick an icon, edit its seven settings craftcontroller.use Open the editor. Server admins have it without being granted anything craftcontroller.default 1.5× craft speed as shipped — rename it or change the number craftcontroller.vip 3× as shipped, and the template for every extra tier you add Questions Before you buy The workbench labels disappear from the crafting menu. Is that expected? Yes, and it is the trade for being able to move items between tiers at all. Those coloured “requires workbench X” lines are drawn by the client straight from the recipe, so the requirement has to come off the recipe before the plugin can enforce a different one. The rule itself still holds — a player crafting too early is stopped and told which tier they need — but the label is gone until they try. If untouched tier labels matter more to you than per-item tiers, this plugin is the wrong trade. A player is in two speed groups. Which multiplier applies? The last one they match in the config file, not the largest. Write the list slowest first and fastest last and the answer is always the one you want. Do I have to know item shortnames? No. Every craftable item writes itself into the config on the first load with its vanilla values, and the in-game grid shows real item icons with a search box above them. Shortnames are there if you prefer editing the file, but nothing requires it. Can players still find a banned item as a blueprint in loot? The blueprint can still drop, but studying it is refused if you closed that route, and blocking the craft closes it even for a player who learned the item before you installed the plugin. If I block one tech tree node, do I lose everything past it? Only if you want to. That is a separate switch on the same item — leave it off and players unlock straight through the blocked node to what is behind it, paying the correct scrap for the nodes they actually get. Can I let players craft without standing at a workbench? Set an item's bench level to 0 and it crafts anywhere. Do it for everything and you have a no-workbench server without a second plugin. What happens if I remove the plugin later? Every recipe is written back to the values captured before it ever changed anything, and connected players are switched back to normal crafting on the spot. Blueprints players unlocked while it was running stay unlocked — those live in the game's own save, not in the plugin.- #craft
- #workbench
- (and 9 more)
-
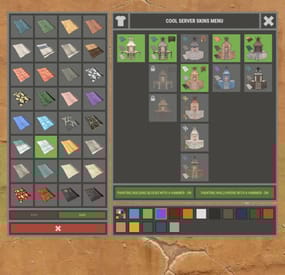
$18.99$14.81XBuildingSkinMenu
XBuildingSkinMenu - building block skins menu for your server.
- Optimization of the interface for different monitor resolutions.
- Storing player data in - oxide/data/XDataSystem/XBuildingSkinMenu
- There is a lang ru/en/uk/es.
- Sound effects when interacting with the menu.
- Possibility to allow only the owner of the cupboard to paint the building blocks of the house.
- Possibility to paint building blocks only when authorized in the cupboard.
- Possibility to paint building blocks with a hit of a hammer.
[ Each player can turn on/off in the main menu for convenience. ]
- Possibility to paint building blocks when upgraded.
- Possibility to use effects when painting.
- Possibility to paint each house separately.
[ You can paint an unlimited number of houses at the same time. ]
- Plugin support - BGrade and IQGradeRemove.
- Chat messages about the started/completed of painting the house.
[ The number of painted building blocks. ]
- Chat messages about the started/completed of painting items/constructions inside the house.
[ The number of painted items/constructions. ]
- Chat messages: the house is already being painted - items/constructions in the house are already being painted.
- To paint the containers, the color chosen by the player through the Spray can is used.
- UI button for easy transition from the XBuildingSkinMenu menu to the XSkinMenu menu. [ And vice versa. ]
- Possibility to choose color in UI.
- Automatic replenishment of the configuration with new skins of building blocks.
- Permissions for each skin.
- Automatically reset selected skins from a player, if revoke away their permission.
Permissions
xbuildingskinmenu.use - access to plugin functionality. [ Skins menu, hammer, building. ] xbuildingskinmenu.painting - access to paint the entire house through the cupboard. xbuildingskinmenu.simpleblock - access to paint high Walls/Gates. [ Hammer hit only. ] xbuildingskinmenu.entity - access to painting items/constructions inside the house. [ Requires XSkinMenu plugin version 1.1.14 and above. ] xbuildingskinmenu.default - default permission for skins. Commands
/bskin - open the building block skins menu. API
ulong GetBuildingSkin(BasePlayer player, string grade) - returns the skin of the building block selected by the player. ulong GetBuildingSkin(BasePlayer player, BuildingGrade.Enum grade) - returns the skin of the building block selected by the player. ulong GetBuildingSkin(BasePlayer player, BuildingBlock block) - returns the skin of the building block selected by the player. Config
{ "General setting": { "Automatically add actual skins of building blocks to the configuration": true, "Only the owner of the cupboard can start painting the house": false, "Use effects when painting home": true, "Use effects when painting items/constructions in the house": true, "Use effects when painting building blocks by hitting a hammer": false, "Enable painting of items/constructions in the house using player skins from the XSkinMenu plugin": false, "Skins for buildings": { "Wood": { "0": { "ImageURL": "", "Permission": "" } }, "Stone": { "0": { "ImageURL": "", "Permission": "" }, "10220": { "ImageURL": "", "Permission": "xbuildingskinmenu.default" }, "10223": { "ImageURL": "", "Permission": "xbuildingskinmenu.default" }, "10225": { "ImageURL": "", "Permission": "xbuildingskinmenu.default" } }, "Metal": { "0": { "ImageURL": "", "Permission": "" }, "10221": { "ImageURL": "", "Permission": "xbuildingskinmenu.default" } }, "TopTier": { "0": { "ImageURL": "", "Permission": "" } } }, "Default skins for new players": { "Wood": 0, "Stone": 0, "Metal": 0, "TopTier": 0 } }, "GUI setting": { "Close the menu by tapping on an empty area of the screen": false, "Material_background_0": "assets/icons/greyout.mat", "Color_background_0": "0 0 0 0", "Color_background_1": "0.517 0.521 0.509 0.95", "Color_background_2": "0.217 0.221 0.209 0.95", "Skin background color": "0.517 0.521 0.509 0.5", "Background color of the selected skin": "0.53 0.77 0.35 0.8", "Close button (icon) color": "1 1 1 0.75", "Color of buttons in cupboard": "0.35 0.45 0.25 1", "Button text color in cupboard": "0.75 0.95 0.41 1", "Hammer button color - On": "0.35 0.45 0.25 1", "Hammer button text color - On": "0.75 0.95 0.41 1", "Hammer button color - Off": "0.65 0.29 0.24 1", "Hammer button text color - Off": "0.92 0.79 0.76 1", "AnchorMin - button 1": "0.5 0", "AnchorMax - button 1": "0.5 0", "OffsetMin - button 1": "395 621.5", "OffsetMax - button 1": "572.5 641.5", "AnchorMin - button 2": "0.5 0", "AnchorMax - button 2": "0.5 0", "OffsetMin - button 2": "395 646.5", "OffsetMax - button 2": "572.5 666.5" } } -
$24.99
Grid Power
Grid Power rust plugin allows players to harness electricity directly from the Power Grid on any map by climbing Power line Poles to upgrade Transformers with components and protect their grid section, while also enhancing vanilla visuals with realistic, adjustable slack on hanging wires and lights.
Questions? Support? Join the discord: https://discord.nikhub.dev
In short
Draw electricity straight from the Power Grid in Rust - on any map, be it a procedurally generated or a custom one! Ladder up the Power line Poles to upgrade their Transformers with components like Root Combiners (to replace missing/stolen/destroyed outlets that you plug into) and Tech Trash (to permanently upgrade power output level, up to a configurable point). Maintain the service with long-lasting Fuses. But most importantly, protect your precious part of the grid from vandalism, theft and sabotage that will inevitably come from those jealous players! Whatever you do, just be careful up there... high voltage happens to be highly dangerous. Always wear protective gear (like a hazmat suit) and don't touch the wires while they're live! As a bonus, this plugin also improves vanilla visuals with realistically hanging wires / hoses / Xmas lights, the slack of which (how loose they appear to be hanging) can be adjusted while placing. And this feature is completely optional, too. Goodbye, straight lines that look like steel rods - hello, actual laws of physics!
But don't take my word for it - let the video speak for itself:
Still not convinced? Check out this in-depth, 20+ minutes long review and tutorial by srtbull!
1.0.2 UPDATE: Introducing working Street Lights for eligible poles! The lights go on between between 20:00 and 8:00 by default.
Quick start (for admins)
Upload the GridPower.cs file to your oxide/plugins folder and you should be good to go, it's all plug-and-play. No need to restart your server! If you're loading it for the first time or it's a new map wipe, the plugin will automatically locate all Power Line Prefabs on your map, randomly choose some of them (according to chances set in the default config) and attach extra electrical entities to them to make them functional. Those entities should persist throughout the wipe and will be replaced if missing, on every plugin reload/server restart. Each Power line Pole will be assigned a number and its position will be stored in the data. This will work on any map that contains at least one of the following prefabs:
assets/bundled/prefabs/autospawn/decor/powerline-small/powerline_pole_a.prefab assets/content/props/powerline_poles/powerline_pole_a.prefab
Quick start (for players)
Locating functional Transformers
Not all Power Line Poles were made equally. Only a percentage of them (by default, 33% on average) will be functional. How do you recognise a functional one? Look up - if you see a Button attached to the top of the Pole, and maybe even some pre-existing Root Combiner Outlets, that's it! [insert image here, maybe a player looking at a powerline pole with binoculars]
Laddering Up
Now that you have located a functional pole, you need to climb it. Normally you cannot deploy Ladders on Power Line Poles and many other places (but oddly enough, you CAN deploy them on the horizontal planks at the top of a Pole!). However, Grid Power re-implements all the client-sided deployment logic to allow bypassing of that arbitrary-seeming limitation. If you try to deploy a Ladder on a Power Line Pole, don't be discouraged by the fact that the "ghost guide" is red instead of blue/amber. Click anyway and it will force it through! Ignore the message in the chat saying that the deployment failed - just like the colour of the ghost guide, it's all client-sided and as such there's nothing the plugin can do about it, visually speaking. But trust me, everything works as intended, despite what the client messages are telling you. The Ladders can then be destroyed/picked up to be reused.
Maintenance
A Transformer can have up to 4 Outlets (Root Combiners). That's where the players draw the electricity from. Those Root Combiners can be damaged/destroyed/repaired/picked up with a hammer (if you have Building Privilege) any time. If there's less than 4 Outlets, right-click on a Root Combiner Item in your inventory or drag it into the Fuse Box of the Transformer. You will hear a deployment effect and the Root Combiner will be deployed on the pole. In order to be able to draw power from that Transformer, you need to put a Fuse inside. Right-click a Fuse in your inventory or drag it directly to the Fuse Box. Don't worry - inside of the Transformers, those Fuses will last for much, MUCH longer than inside regular monument Fuse Boxes. By default, a brand new Fuse inside of a Transformer Fuse Box will last you for 12000 seconds (= 200 minutes, = 3.33 hours). This value can be increased or decreased in the config. You can see how much time a fuse has left in the Transformer GUI. By default, the Power Grid will produce electricity between 8 AM and 8 PM. The power output will follow a smooth curve, being the lowest in the morning/evening, and peaking at 2 PM. Exactly how much RWs will be produced on each Outlet is determined by the Transformer's Tech Trash level. By default, each Tech Trash inserted increases the peak power output by 5 RWs (up until a certain point - by default, that level is capped at 50, which translates to 250 RWs per Outlet at peak hours). Upgrade the level by right-clicking the Tech Trash item in your inventory or dragging it directly into the Fuse Box. Inserting Root Combiners/Tech Trash is still possible even if there's already a Fuse inside of the Fuse Box. The Fuse won't be replaced as the sole Item in the slot, since Root Combiners/Tech Trash are consumed immediately.
Hooking Up & Hanging Out
Once there's at least 1 Outlet present, you have a Fuse at hand, and the Grid is currently producing power - you're all set. Take a Wire Tool, pick your favourite wire colour with the [RELOAD] button, typically R, and connect to the outputs of the Root Combiner Outlets to your own electrical devices, usually a Battery or another Root Combiner. You will notice the text on top of your screen telling you what the current Slack of your wire tool / hose tool is. You can increase it with the [DUCK] button, typically CTRL, and decrease it with the [SPRINT] button, typically SHIFT. Larger Slack value means that the wire/hose will appear to be hanging more loosely. Smaller values will make it look tighter. Values close to zero will make it look like they look in vanilla Rust - i.e. not so good in comparison 😉 The final Slack value will be applied the moment you finalise your wire/hose connection. This hanging improvement applies to anything you do with Wire Tools/Hose Tools, not just Transformer Outlet connections! For the Advanced Xmas Lights, it's even better: you can adjust the Slack of each segment individually! After you place the Advanced Xmas Lights segment down, and you're just about to place the next segment, adjust the Slack of the segment you have just placed down with [DUCK] and [SPRINT] buttons. You will see a preview of what it will make the segment look like. Placing the next segment down confirms the Slack for the segment before it.
Danger! High Voltage!
If the Grid is currently producing Power (by default, during daytime) AND a Fuse is inserted in the Transformer, all Root Combiner Outlets are considered live on that Transformer. You can tell whether a Transformer is live or not: first, check your electric devices plugged in directly to the Grid. If they're not currently receiving any charge, they're not live. Similarly, you can look at the diodes on the Root Combiner Outlets. If they're not on, the Transformer is not live either. Lastly, it's pretty clear from the Transformer GUI. If a player tries to connect/disconnect a wire to/from a live Outlet, or they're trying to pick up the Root Combiner Outlet with a hammer, and they're not wearing one of the items on a pre-approved list (see the Advanced Config section below), there is a 1.0 (100%) chance they will get electrocuted to death. Another way to guarantee electrocution is trying to clear connections named INTERNAL. Leave those alone! Wearing protective clothing reduces that chance to 1 in 10 (10%, according to the default permission profile - see below). You can set that chance to 0.0 (0%) if you want to give your players a peace of mind. Another way to guarantee 0% electrocution chance is making sure the Transformer is not live: either wait for the Grid to stop producing Power or take out the Fuse before doing anything else.
Permissions (Oxide.Grant user YourName [permission name starting with gridpower.])
By default, the plugin generates 3 permission profiles in the config - one for admins, one for normal players with no specific permissions (default) and one for VIP. More on permission profiles and config values they can handle can be found in the section Advanced Config. Unless you have added more permission profiles, only these two below are going to be used by your config:
gridpower.admin
Holders of the admin permission will also be able to run the /gp_cfg and /gp_emergency_cleanup commands
gridpower.vip1
Holders of this permission will follow settings and limits associated with with that permission profile. The permissions below are also registered, but not used by default. To use them, just create some permission profiles with those permissions as the key.
gridpower.vip2 gridpower.vip3 gridpower.vip4 gridpower.vip5
Automatic street lights
Depending on your map design, some power line poles might have lamps on them. All those lamps will now emit light, by default between 20:00 an 8:00, which just so happens to be the time when the grid production goes back to 0. You can also set the street lights to be always on, regardless of the time of day. The time settings for the street lights are independent of your power production time settings - they can overlap, one can start before midnight and end after midnight while the other one does not, etc. Those street lights will work even on non-functional power line poles, e.g those without a button on top of them. When on, the lights will flicker from time to time. How often they will flicker and how long individual flickers are going to be depends on your config - look below.
Admin F1 console/chat commands (must have ownerid/moderatorid/gridpower.admin permission)
If you're typing those commands from the F1 console or the server console, drop the preceding slash in the command name.
/gp_cfg Will allow the admins to change non-permission profile related config values on the fly (see below) /gp_emergency_cleanup Instantly kills all the plugin-related entities: fuseboxes, admin generators, root combiners and buttons. It won't remove the power line entries in your data, however. All the killed entities will be re-generated according to your current generation settings in the config next time your server restarts or the plugin reloads. If you want to permanently get rid of them, unload the plugin, delete your oxide/data/GridPower.json, and load it back in. /gp_pole [add/remove] This command will allow admins to add or remove functional power line poles at any time. Just look directly at the pole you want to modify and type the command with an argument (either "add" or "remove", depending on what you want to achieve). If you want to add a pole and it already is functional, or if you want to remove a pole, but it isn't functional - you will get a warning. Same if you try to add a pole, but the pole you're looking at is building blocked by a nearby monument. "Ent killing" (or using a plugin like Remover) the power line fusebox is the equivalent of permanently removing it from the data and it won't be re-generated any more on next reload. Wiping your save file also automatically removes all the extra components and replaces them with new ones tailored to your map, in accordance to your generation settings.
Configuration (oxide/config/GridPower.json and /gp_cfg console/chat command)
Vast majority of the settings can be configured with the /gp_cfg chat command. Typing it in the chat/console with no parameters should dump a rundown of config fields and their values. In order to run any of the config commands, you will need to have ownerid or moderatorid (or the gridpower.admin permission).
/gp_cfg GridConstantPower [logical values (true or false)] If set to true, the Grid will always produce electricity at its peak (100%), 24 hours a day (DEFAULT: false) /gp_cfg GridProductionStartAtHour [fractions (like 13.37) between 0.00 and 24.00] The hour of the day when the power production starts climbing up from 0 (DEFAULT: 8.0) /gp_cfg GridProductionEndAtHour [fractions (like 0.69, nice) between 0.00 and 24.00] The hour of the day when the power production settles back at 0 (DEFAULT: 20.0) /gp_cfg StreetlightsConstantPower [logical values (true or false)] If set to true, the Streetlights will be on 24 hours a day. (DEFAULT: FALSE) /gp_cfg StreetlightsTurnOnAtHour [fractions (like 20.4) between 0.00 and 24.00] The hour of the day when the street lights turn on (DEFAULT: 20.0) /gp_cfg StreetlightsTurnOffAtHour [fractions (like 8.2) between 0.00 and 24.00] The hour of the day when the street lights turn off (DEFAULT: 8.0) /gp_cfg StreetlightsReliability [fractions (like 0.5) between 0.00 and 1.00] The reliability of the streetlight. The less it is, the more often it will flicker. At 1, which represents 100%, it never flickers. (DEFAULT: 0.95) /gp_cfg StreetlightsFlickerLengthMin [fractions (like 1.2) between 0.00 and Positive Infinity] The minimum random length of the flicker, in seconds (DEFAULT: 0.1) /gp_cfg StreetlightsFlickerLengthMax [fractions (like 2.4) between 0.00 and Positive Infinity] The maximum random length of the flicker, in seconds (DEFAULT: 0.5) /gp_cfg GeneratorChancePowerlineFunctional [fractions (like 0.5) between 0.00 and 1.00] The chance that a valid Power Line Pole will be made functional during generation. (DEFAULT: 0.33) /gp_cfg FuseRequired [logical values (true or false)] If set to false, the Transformers won't need Fuses to produce power, just the right time of the day (if power is not 24/7) (DEFAULT: TRUE) /gp_cfg BuildingBlockPreventsButtonPress [logical values (true or false)] If set to true, if there's any Tool Cupboards in the range of the Transformer, you need to be authorised on all of them to open the Transformer GUI (DEFAULT: TRUE) /gp_cfg GeneratorInitialLevelMin [integers (like 7) between 0 and 1000] The lower limit for the random Tech Trash level of valid Power Line Poles during generation (DEFAULT: 1) /gp_cfg GeneratorInitialLevelMax [integers (like 7) between 0 and 1000] The upper limit for the random Tech Trash level of valid Power Line Poles during generation (DEFAULT: 5) /gp_cfg GeneratorInitialOutletsMin [integers (like 1) between 0 and 4] The lower limit for the random number of Outlets of valid Power Line Poles during generation (DEFAULT: 0) /gp_cfg GeneratorInitialOutletsMax [integers (like 3) between 0 and 4] The upper limit for the random number of Outlets of valid Power Line Poles during generation (DEFAULT: 4) /gp_cfg PowerlinePowerPerTechTrash [integers (like 7) between 0 and 1000] How much RWs at peak hours are provided per 1 Tech Trash Level upgrade (DEFAULT: 5) /gp_cfg PowerlineMaxTechTrashLevel [integers (like 7) between 0 and 1000] The maximum level that a Transformer can be upgraded to (DEFAULT: 50) /gp_cfg PowerlineFuseDurationSeconds [fractions (like 420.69, nice) between 0.0 and Infinity] How long (in seconds) a brand new Fuse inserted in the Transformer Fusebox will last (DEFAULT: 12000.0) /gp_cfg FuseItemShortname [strings (like "fuse")] The shortname of the item that acts as the Fuse for Transformer Fuseboxes, must be a valid Rust item shortname /gp_cfg FuseItemGuiName [strings (like "Transformer Fuse")] The custom GUI display name of the item that acts as the Fuse for Transformer Fuseboxes, can be anything, or left blank for default /gp_cfg FuseItemSkinID [positive long integers (like 2783151202)] The skin ID of the Fuse item if using custom, leave at 0 to accept any items of the shortname specified by FuseItemShortname
Protective clothing (only editable through oxide/config/GridPower.json)
"ProtectiveClothing": { "hazmatsuit": null, "scientistsuit_heavy": null, "hazmatsuit_scientist": null, "hazmatsuit_scientist_peacekeeper": null, "hazmatsuit.spacesuit": null, "boots.frog": null, "hazmatsuit.nomadsuit": null, "pants": [ 1581896222 ], "hoodie": [ 1581890527, 1582492745 ] }, Each entry has a key (the item shortname in quotes) and a value. If the value is null, it means all possible skins for that item shortname are accepted. In the example above, we're allowing all rubbery one-pieces (value is null, so any skin) and we're also allowing pants with 1 possible skin or a hoodie with 2 possible skins to be treated as protective clothing. You will see that there's no comma after the last entry on the list. BEFORE SAVING, ALWAYS VALIDATE YOUR JSON WITH A TOOL LIKE JSON LINT!
Permission profiles
Using profiles you can quickly create/edit different permissions for different players, for example, if you have more than 1 VIP tier on your server - just add some new profiles. Different players can have different limits and permissions associated with using the Power Grid. To check which permission profile the player should fall under, the plugin goes through all permission profiles and checks whether the player has that permission granted. The permissions are checked in order, meaning that if the player doesn't have the first permission, it will try the next permission on the list, etc (similar to how Auto Kits checks which kit to give to a player based on their permissions in order). If the player doesn't have any permissions from the list granted, they will fall back to the "default" profile. That's the only one that you shouldn't remove! If you remove it, a new one with default values will be created. So if you don't want your default, non-VIP players to use the power grid, don't remove the default profile, just take away privileges in that profile (like upgrading/deploying ladders/pressing the button). You don't have to use the built-in VIP permissions - any REGISTERED permission from any plugin will do just fine! By default, three permission profiles are generate in the config: default, gridpower.admin and gridpower.vip1. The default permission profile will apply to any player who doesn't have any permissions listed in the profile list - let's have a look at it:
"PermissionProfiles": { "default": { "PermissionRequired": "default", "GridCanDeployLadder": true, "GridCanDeployRootCombiners": true, "GridCanConnectDisconnect": true, "GridCanPressButton": true, "GridCanUpgrade": true, "GridDangerousWireElectricutionChance": 0.1, "HangingXmasLights": false, "HangingWiresAndHoses": false, "SubdivisionsPreview": 10, "SubdivisionsFinal": 50, "SlackMax": 5.0 },
PermissionRequired should contain an already existing permission registered by any plugin in the form of pluginname.permissionname GridCanDeployLadder allows players to deploy ladders on Power Line Poles GridCanDeployRootCombiners allows players to deploy Root Combiners on Power Line Pole transformers by inserting them into the Fuse Box GridCanConnectDisconnect allows players to use a Wire Tool to connect their own electrical devices to the Grid GridCanPressButton allows players to access the Transformer GUI GridCanUpgrade allows the players to upgrade the Transformer peak output by inserting Tech Trash into the Fuse Box GridDangerousWireElectricutionChance defines how likely it is that a player will die from electrical accidents, even while wearing protective clothing HangingXmasLights allows the players more control over how much the Advanced Xmas Lights will be hanging (purely visual) HangingWiresAndHoses allows the players more control over how much the Wires/Hoses will be hanging (purely visual) SubdivisionsPreview is the number of intermediary points used while showing the hanging Xmas Lights preview catenary curve of the last placed segment. The more points, the smoother it looks. (purely visual) SubdivisionsFinal is it the number of intermediary points used for the final catenary curve of the hanging wires/hoses/xmas lights. The more points, the smoother it looks (purely visual) SlackMax sets the maximum "looseness" of the wire/hose/xmas lights that the player is allowed. The more the slack, the longer the wire appears overall.
API hooks (for plugin developers)
All methods utilise the [HookMethod] attribute, which means you don't call them through Interface.Call, you need to first create this field in your plugin's main class...
[PluginReference] private Plugin GridPower; Then, call the hooks like so. It's pretty self-explanatory what information they will provide you with.
bool isPowerConstant = (bool) GridPower.Call("GridPowerIsConstant"); bool isGridProducing = (bool) GridPower.Call("GridIsProducing"); float productionHourStart = (float) GridPower.Call("GridGetProductionHourStart"); float productionHourEnd = (float) GridPower.Call("GridGetProductionHourEnd"); float currentGridEfficiency = (float) GridPower.Call("GridGetEfficiency"); bool areStreetlightsAlwaysOn = (bool) GridPower.Call("StreetlightsPowerIsConstant"); bool areStreetlightsOn = (bool) GridPower.Call("StreetlightsAreOn"); float streetlightsHourStart = (float) GridPower.Call("StreetlightsGetTurnOnHour"); float streetlightsHourEnd = (float) GridPower.Call("StreetlightsGetTurnOffHour");
Translation support (oxide/lang/en/GridPower.json)
Almost every string the players see, including the text displaying in the chat and the GUI, can be edited. Just load the plugin and let it generate the file - after you edit it, reload the plugin.
-
$15.99
AutoRestart
[ ! ] AutoRestart 4.0 needs the Oxide.Ext.CrashExtensions extension. The DLL is in the zip, and VenuxUpdater (also in the zip) installs it for you. Some hosts do not allow DLLs - check with your host before buying. [ ! ]
AutoRestart restarts your Rust server on a schedule and makes sure nobody is caught by surprise. Pick your restart times in UTC, skip them on wipe days, and let the plugin warn every player on the channels you choose: a custom panel, the game's own toast, chat, a sound, the vanilla restart banner and a row in the vitals stack.
Players can vote to delay a restart that comes at a bad time, and the ones who come back afterwards can claim a reward in items, Economics or ServerRewards. Your Discord hears about it too: a countdown, the final restart and the server coming back online, each one an embed you design.
Everything is set up in game. /restart config opens one window with eight sections, drafts that only save when you say so, a colour picker, an icon browser and a preview that puts the real panel and the countdown strip on your screen, so you can drag them exactly where you want them. Built and load tested for 500+ player servers.
🌟 Features of AutoRestart
Scheduled restarts in UTC, as many a day as you want, and wipe days that skip them on their own cycle: weekly, every 2 or 3 weeks, the 1st to 4th or the last of the month Restart in... on top of the schedule: a one-off restart from the window, chat or RCON, and cancelling it brings the schedule straight back Six warning channels, each on its own switch: a custom notification panel, the native toast in six styles, chat, a sound, the vanilla restart banner and a vitals row next to health and hunger Warning times as chips, set apart for the game and for Discord A notification panel you design: position, size, colours with opacity, 137 game icons, border, your own title and message, font sizes, and it counts the last minute down on its own A countdown strip that appears at a trigger time you choose, with a live MM:SS and a progress line, in one of four spots or anywhere you drag it Restart voting: a live panel where players vote to delay or continue, with the share needed, a minimum player count and your own chat command Reconnect rewards: items, Economics money or ServerRewards points for the players who come back within the claim window Discord webhook with three embeds (countdown, final restart, server online), a live Discord style preview while you edit them and a test button A player count guard that skips a scheduled restart while too many players are online An optional update check that restarts the server when a new Oxide build is out Seven languages built in: English, Spanish, Italian, Russian, Ukrainian, French and Brazilian Portuguese, each player in their own Smooth slide and fade animations everywhere, all on one switch, on Oxide and Carbon
🎮 Commands
/restart - when the next restart is /restart status - detailed restart info /restart help - the command list /vote delay, /vote continue - vote on a restart in progress (the command name is set in the config) Admin
/restart config - the admin window /restart <time> or /restart set <time> - restart in 30s, 5m, 1h or a number of seconds /restart cancel - cancel the running restart. A scheduled one skips to the next slot /restart now - restart right away /restart reload - reload the schedule and forget the skipped slots Console and RCON
autorestart status, autorestart cancel, autorestart now, autorestart set <time> (or just autorestart <time>) autorestart.testdiscord - send a test message to your webhook autorestart.forceonline - post the server online embed now
🛡️ Permissions
autorestart.use - /restart, /restart status and /restart help autorestart.admin - the admin window and every command that changes something Voting and rewards need no permission: every online player can vote and claim.
🗒️ In-Game Admin Window
No file editing needed. /restart config opens every setting in one window. Each section is a draft: unsaved sections show a dot in the sidebar, Save applies only the section you are on, and closing with unsaved changes asks first. Two admins can work at the same time.
Overview - a live clock to the next restart, what is on at a glance, today's restart times, and Restart in..., Cancel restart and Reload schedule Schedule - restart times and wipe days Alerts - the channels, the warning times and the player count guard Notification UI - the panel, its style and text, the countdown strip and the toast style, with Preview on screen Voting - every timing and threshold, with a live facsimile of the vote panel Rewards - the claim window, Economics, ServerRewards and an item catalogue with search Discord - webhook, bot, message and the three embeds with a live preview Advanced - the update check and a reload button
🖼️ Showcase
Every screen below is the plugin running in game
The Overview
The final minute, as players see it
The countdown strip and the vote panel
Preview on screen: the real panel on your HUD
Notification UI: position, size and fine tuning
The colour picker
137 game icons for the panel
Alerts: every channel and warning time
Schedule: restart times and wipe days
Discord: embeds with a live preview
Rewards: items, Economics and ServerRewards
The reward catalogue
Drafts: nothing is lost by accident
🎥 Video
AutoRestart-4.0.0-trailer-720p.mp4
⚙️ Configuration
Everything lives in oxide/config/AutoRestart.json, and the admin window edits all of it:
Restart - restart times, wipe days, chat alerts and the alert sound Alerts - the in-game and the Discord warning times PlayerRestrictions - the player count guard UI - the channels (custom panel, native toast and its style, vanilla banner, vitals row), the animations, and the panel and strip design Voting - on or off, the share needed (60%), the vote window, when voting opens, how long a passed vote delays the restart, the new countdown after it, the minimum players and the chat command Rewards - the claim window, Economics, ServerRewards and the item list Discord - webhook, server name, bot name and avatar, message content and the three embeds UpdateCheck - the Oxide update check and its interval
📚 FAQ
Q: Does it start the server again after the restart?
A: AutoRestart saves and shuts the server down cleanly, and your host brings it back. Tested on Pterodactyl and Wisp. On a Windows machine, make sure your .bat starts the server again when it exits.
Q: What is the extension for, and what if I do not want one?
A: AutoRestart 4.0 draws its interface with the Oxide.Ext.CrashExtensions extension. The DLL is in the zip, and VenuxUpdater, free and also in the zip, installs it by itself, no restart needed on Oxide. If you would rather not run an extension, stay on 3.9.3: it does not need it and keeps working as before.
Q: Does it work on Carbon?
A: Yes. The DLL goes into carbon/extensions instead of RustDedicated_Data/Managed, then restart once. Everything else is the same.
Q: I am on 3.x. Do I lose my settings?
A: No. Your config, the pending reconnect rewards and the Discord state carry over, and old values migrate on load. Image Library and Player DLCAPI are no longer needed.
Q: Can players stop a restart?
A: They can vote to delay it. When enough of them agree (60% by default, with at least 3 players online), the restart waits 50 minutes and then runs a new 15 minute countdown. Every number is in the config, and voting can be turned off.
Q: Can I skip a restart while the server is busy?
A: Yes. Turn on the player count guard and a scheduled restart is skipped while more players than your limit are online. A restart you start yourself always goes ahead.
Q: Can I translate it?
A: Seven languages are built in and each player sees their own. For another one, copy oxide/lang/en/AutoRestart.json into your language folder and translate it.
Q: How heavy is it?
A: Built and load tested for 500+ player servers. Every animation can be turned off with one switch.
🔧 API / Hooks
void OnRestartScheduled(int seconds, bool isCustom) void OnRestartWarning(int secondsLeft) void OnRestartInitiated() void OnRestartCancelled(string reason, int secondsRemaining)
Questions, ideas or bug reports? Join our Discord.
- #restart
- #rustplugin
- (and 18 more)
-
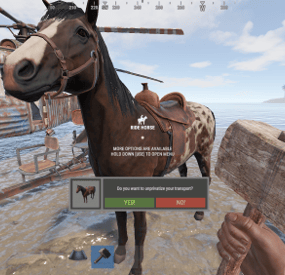
$16.99$13.59XTransportPrivat
XTransportPrivat - private transport for your server - PvP/PvE. Transport limit.
- Optimization of the interface for different monitor resolutions.
- Storing player data in - oxide/data/XDataSystem/XTransportPrivat
- There is a lang ru/en/uk/es.
- Sound effects.
- Ability to set up a limited number of private vehicles per player.
[ You can set a total limit on the number of transport per player ]
- Possibility to prohibit unprivatize transport.
- The ability to prohibit interaction with non-private transport if the limit is reached.
[ Settings in config ]
- The ability to allow players to board the TAXI module without restrictions.
[ Settings in config ]
- It is forbidden to loot private vehicles.
- It is forbidden to push private vehicles and lead a horse.
[ Allowed in the area of your closet. For moments with blocking the passage and other obstacles to the game. ]
- Transport can only be privatized within the range of your cupboard or anywhere on the map. You just need to get into the transport.
- You can unprivatize a transport by hitting it with a mallet only in the area of action of someone else's cupboard or anywhere on the map.
There is a list of trusted players. [ The player can add to this list those players whom he trusts and who are not in his team (green). ]
- A tugboat can only be privatized when the transport privatization option is selected in the config: False - anywhere as soon as the player gets into a non-private transport.
-> Overview - YouTube <-
Commands
/privatplayer - interaction with the trusted list. Config
{ "General settings": { "Use private transport limit": false, "Allow unprivatize transport": true, "Privatize transport option - [ True - only in the area of your cupboard | False - anywhere as soon as the player gets into a non-private transport ]": true, "Unprivatize transport option - [ True - only in the area of action of someone else's cupboard | False - anywhere ]": true, "Forbid buying a horse if the limit is reached": false, "Prohibit getting into non-private transport if the limit is reached": false, "Forbid leading a non-private horse if the limit is reached": false, "Allow to lead a non-private horse in the area of your cupboard. [ If prohibited by paragraph above ]": false, "Prohibit pushing non-private transport if the limit is reached": false, "Allow pushing non-private transport within the range of your cupboard. [ If prohibited by paragraph above ]": false, "Allow players to board the TAXI module without restrictions": true, "Transport limit setting - [ Change value only ]": { "kayak": 2, "rowboat": 2, "rhib": 1, "tugboat": 1, "testridablehorse": 3, "2module_car_spawned.entity": 1, "3module_car_spawned.entity": 1, "4module_car_spawned.entity": 1, "minicopter.entity": 2, "attackhelicopter.entity" : 1, "scraptransporthelicopter": 1, "submarinesolo.entity": 2, "submarineduo.entity": 1, "sled.deployed": 3, "sled.deployed.xmas": 3, "snowmobile": 1, "tomahasnowmobile": 1 } } }- #private
- #transport
- (and 10 more)