Search the Community
Showing results for tags 'electricity'.
Found 15 results
-

Version 1.1.0
1,189 downloads
PowerlessNeon removes the power requirement for Neon signs to function. Implementation is simple, just install the file and all existing neon lights will become powered, as well as any placed after loading. There is no configuration necessary and no variables to modify.Free -

Version 1.0.18
20 downloads
Grid Power rust plugin allows players to harness electricity directly from the Power Grid on any map by climbing Power line Poles to upgrade Transformers with components and protect their grid section, while also enhancing vanilla visuals with realistic, adjustable slack on hanging wires and lights. Questions? Support? Join the discord: https://discord.nikhub.dev In short Draw electricity straight from the Power Grid in Rust - on any map, be it a procedurally generated or a custom one! Ladder up the Power line Poles to upgrade their Transformers with components like Root Combiners (to replace missing/stolen/destroyed outlets that you plug into) and Tech Trash (to permanently upgrade power output level, up to a configurable point). Maintain the service with long-lasting Fuses. But most importantly, protect your precious part of the grid from vandalism, theft and sabotage that will inevitably come from those jealous players! Whatever you do, just be careful up there... high voltage happens to be highly dangerous. Always wear protective gear (like a hazmat suit) and don't touch the wires while they're live! As a bonus, this plugin also improves vanilla visuals with realistically hanging wires / hoses / Xmas lights, the slack of which (how loose they appear to be hanging) can be adjusted while placing. And this feature is completely optional, too. Goodbye, straight lines that look like steel rods - hello, actual laws of physics! But don't take my word for it - let the video speak for itself: Still not convinced? Check out this in-depth, 20+ minutes long review and tutorial by srtbull! 1.0.2 UPDATE: Introducing working Street Lights for eligible poles! The lights go on between between 20:00 and 8:00 by default. Quick start (for admins) Upload the GridPower.cs file to your oxide/plugins folder and you should be good to go, it's all plug-and-play. No need to restart your server! If you're loading it for the first time or it's a new map wipe, the plugin will automatically locate all Power Line Prefabs on your map, randomly choose some of them (according to chances set in the default config) and attach extra electrical entities to them to make them functional. Those entities should persist throughout the wipe and will be replaced if missing, on every plugin reload/server restart. Each Power line Pole will be assigned a number and its position will be stored in the data. This will work on any map that contains at least one of the following prefabs: assets/bundled/prefabs/autospawn/decor/powerline-small/powerline_pole_a.prefab assets/content/props/powerline_poles/powerline_pole_a.prefab Quick start (for players) Locating functional Transformers Not all Power Line Poles were made equally. Only a percentage of them (by default, 33% on average) will be functional. How do you recognise a functional one? Look up - if you see a Button attached to the top of the Pole, and maybe even some pre-existing Root Combiner Outlets, that's it! [insert image here, maybe a player looking at a powerline pole with binoculars] Laddering Up Now that you have located a functional pole, you need to climb it. Normally you cannot deploy Ladders on Power Line Poles and many other places (but oddly enough, you CAN deploy them on the horizontal planks at the top of a Pole!). However, Grid Power re-implements all the client-sided deployment logic to allow bypassing of that arbitrary-seeming limitation. If you try to deploy a Ladder on a Power Line Pole, don't be discouraged by the fact that the "ghost guide" is red instead of blue/amber. Click anyway and it will force it through! Ignore the message in the chat saying that the deployment failed - just like the colour of the ghost guide, it's all client-sided and as such there's nothing the plugin can do about it, visually speaking. But trust me, everything works as intended, despite what the client messages are telling you. The Ladders can then be destroyed/picked up to be reused. Maintenance A Transformer can have up to 4 Outlets (Root Combiners). That's where the players draw the electricity from. Those Root Combiners can be damaged/destroyed/repaired/picked up with a hammer (if you have Building Privilege) any time. If there's less than 4 Outlets, right-click on a Root Combiner Item in your inventory or drag it into the Fuse Box of the Transformer. You will hear a deployment effect and the Root Combiner will be deployed on the pole. In order to be able to draw power from that Transformer, you need to put a Fuse inside. Right-click a Fuse in your inventory or drag it directly to the Fuse Box. Don't worry - inside of the Transformers, those Fuses will last for much, MUCH longer than inside regular monument Fuse Boxes. By default, a brand new Fuse inside of a Transformer Fuse Box will last you for 12000 seconds (= 200 minutes, = 3.33 hours). This value can be increased or decreased in the config. You can see how much time a fuse has left in the Transformer GUI. By default, the Power Grid will produce electricity between 8 AM and 8 PM. The power output will follow a smooth curve, being the lowest in the morning/evening, and peaking at 2 PM. Exactly how much RWs will be produced on each Outlet is determined by the Transformer's Tech Trash level. By default, each Tech Trash inserted increases the peak power output by 5 RWs (up until a certain point - by default, that level is capped at 50, which translates to 250 RWs per Outlet at peak hours). Upgrade the level by right-clicking the Tech Trash item in your inventory or dragging it directly into the Fuse Box. Inserting Root Combiners/Tech Trash is still possible even if there's already a Fuse inside of the Fuse Box. The Fuse won't be replaced as the sole Item in the slot, since Root Combiners/Tech Trash are consumed immediately. Hooking Up & Hanging Out Once there's at least 1 Outlet present, you have a Fuse at hand, and the Grid is currently producing power - you're all set. Take a Wire Tool, pick your favourite wire colour with the [RELOAD] button, typically R, and connect to the outputs of the Root Combiner Outlets to your own electrical devices, usually a Battery or another Root Combiner. You will notice the text on top of your screen telling you what the current Slack of your wire tool / hose tool is. You can increase it with the [DUCK] button, typically CTRL, and decrease it with the [SPRINT] button, typically SHIFT. Larger Slack value means that the wire/hose will appear to be hanging more loosely. Smaller values will make it look tighter. Values close to zero will make it look like they look in vanilla Rust - i.e. not so good in comparison The final Slack value will be applied the moment you finalise your wire/hose connection. This hanging improvement applies to anything you do with Wire Tools/Hose Tools, not just Transformer Outlet connections! For the Advanced Xmas Lights, it's even better: you can adjust the Slack of each segment individually! After you place the Advanced Xmas Lights segment down, and you're just about to place the next segment, adjust the Slack of the segment you have just placed down with [DUCK] and [SPRINT] buttons. You will see a preview of what it will make the segment look like. Placing the next segment down confirms the Slack for the segment before it. Danger! High Voltage! If the Grid is currently producing Power (by default, during daytime) AND a Fuse is inserted in the Transformer, all Root Combiner Outlets are considered live on that Transformer. You can tell whether a Transformer is live or not: first, check your electric devices plugged in directly to the Grid. If they're not currently receiving any charge, they're not live. Similarly, you can look at the diodes on the Root Combiner Outlets. If they're not on, the Transformer is not live either. Lastly, it's pretty clear from the Transformer GUI. If a player tries to connect/disconnect a wire to/from a live Outlet, or they're trying to pick up the Root Combiner Outlet with a hammer, and they're not wearing one of the items on a pre-approved list (see the Advanced Config section below), there is a 1.0 (100%) chance they will get electrocuted to death. Another way to guarantee electrocution is trying to clear connections named INTERNAL. Leave those alone! Wearing protective clothing reduces that chance to 1 in 10 (10%, according to the default permission profile - see below). You can set that chance to 0.0 (0%) if you want to give your players a peace of mind. Another way to guarantee 0% electrocution chance is making sure the Transformer is not live: either wait for the Grid to stop producing Power or take out the Fuse before doing anything else. Permissions (Oxide.Grant user YourName [permission name starting with gridpower.]) By default, the plugin generates 3 permission profiles in the config - one for admins, one for normal players with no specific permissions (default) and one for VIP. More on permission profiles and config values they can handle can be found in the section Advanced Config. Unless you have added more permission profiles, only these two below are going to be used by your config: gridpower.admin Holders of the admin permission will also be able to run the /gp_cfg and /gp_emergency_cleanup commands gridpower.vip1 Holders of this permission will follow settings and limits associated with with that permission profile. The permissions below are also registered, but not used by default. To use them, just create some permission profiles with those permissions as the key. gridpower.vip2 gridpower.vip3 gridpower.vip4 gridpower.vip5 Automatic street lights Depending on your map design, some power line poles might have lamps on them. All those lamps will now emit light, by default between 20:00 an 8:00, which just so happens to be the time when the grid production goes back to 0. You can also set the street lights to be always on, regardless of the time of day. The time settings for the street lights are independent of your power production time settings - they can overlap, one can start before midnight and end after midnight while the other one does not, etc. Those street lights will work even on non-functional power line poles, e.g those without a button on top of them. When on, the lights will flicker from time to time. How often they will flicker and how long individual flickers are going to be depends on your config - look below. Admin F1 console/chat commands (must have ownerid/moderatorid/gridpower.admin permission) If you're typing those commands from the F1 console or the server console, drop the preceding slash in the command name. /gp_cfg Will allow the admins to change non-permission profile related config values on the fly (see below) /gp_emergency_cleanup Instantly kills all the plugin-related entities: fuseboxes, admin generators, root combiners and buttons. It won't remove the power line entries in your data, however. All the killed entities will be re-generated according to your current generation settings in the config next time your server restarts or the plugin reloads. If you want to permanently get rid of them, unload the plugin, delete your oxide/data/GridPower.json, and load it back in. /gp_pole [add/remove] This command will allow admins to add or remove functional power line poles at any time. Just look directly at the pole you want to modify and type the command with an argument (either "add" or "remove", depending on what you want to achieve). If you want to add a pole and it already is functional, or if you want to remove a pole, but it isn't functional - you will get a warning. Same if you try to add a pole, but the pole you're looking at is building blocked by a nearby monument. "Ent killing" (or using a plugin like Remover) the power line fusebox is the equivalent of permanently removing it from the data and it won't be re-generated any more on next reload. Wiping your save file also automatically removes all the extra components and replaces them with new ones tailored to your map, in accordance to your generation settings. Configuration (oxide/config/GridPower.json and /gp_cfg console/chat command) Vast majority of the settings can be configured with the /gp_cfg chat command. Typing it in the chat/console with no parameters should dump a rundown of config fields and their values. In order to run any of the config commands, you will need to have ownerid or moderatorid (or the gridpower.admin permission). /gp_cfg GridConstantPower [logical values (true or false)] If set to true, the Grid will always produce electricity at its peak (100%), 24 hours a day (DEFAULT: false) /gp_cfg GridProductionStartAtHour [fractions (like 13.37) between 0.00 and 24.00] The hour of the day when the power production starts climbing up from 0 (DEFAULT: 8.0) /gp_cfg GridProductionEndAtHour [fractions (like 0.69, nice) between 0.00 and 24.00] The hour of the day when the power production settles back at 0 (DEFAULT: 20.0) /gp_cfg StreetlightsConstantPower [logical values (true or false)] If set to true, the Streetlights will be on 24 hours a day. (DEFAULT: FALSE) /gp_cfg StreetlightsTurnOnAtHour [fractions (like 20.4) between 0.00 and 24.00] The hour of the day when the street lights turn on (DEFAULT: 20.0) /gp_cfg StreetlightsTurnOffAtHour [fractions (like 8.2) between 0.00 and 24.00] The hour of the day when the street lights turn off (DEFAULT: 8.0) /gp_cfg StreetlightsReliability [fractions (like 0.5) between 0.00 and 1.00] The reliability of the streetlight. The less it is, the more often it will flicker. At 1, which represents 100%, it never flickers. (DEFAULT: 0.95) /gp_cfg StreetlightsFlickerLengthMin [fractions (like 1.2) between 0.00 and Positive Infinity] The minimum random length of the flicker, in seconds (DEFAULT: 0.1) /gp_cfg StreetlightsFlickerLengthMax [fractions (like 2.4) between 0.00 and Positive Infinity] The maximum random length of the flicker, in seconds (DEFAULT: 0.5) /gp_cfg GeneratorChancePowerlineFunctional [fractions (like 0.5) between 0.00 and 1.00] The chance that a valid Power Line Pole will be made functional during generation. (DEFAULT: 0.33) /gp_cfg FuseRequired [logical values (true or false)] If set to false, the Transformers won't need Fuses to produce power, just the right time of the day (if power is not 24/7) (DEFAULT: TRUE) /gp_cfg BuildingBlockPreventsButtonPress [logical values (true or false)] If set to true, if there's any Tool Cupboards in the range of the Transformer, you need to be authorised on all of them to open the Transformer GUI (DEFAULT: TRUE) /gp_cfg GeneratorInitialLevelMin [integers (like 7) between 0 and 1000] The lower limit for the random Tech Trash level of valid Power Line Poles during generation (DEFAULT: 1) /gp_cfg GeneratorInitialLevelMax [integers (like 7) between 0 and 1000] The upper limit for the random Tech Trash level of valid Power Line Poles during generation (DEFAULT: 5) /gp_cfg GeneratorInitialOutletsMin [integers (like 1) between 0 and 4] The lower limit for the random number of Outlets of valid Power Line Poles during generation (DEFAULT: 0) /gp_cfg GeneratorInitialOutletsMax [integers (like 3) between 0 and 4] The upper limit for the random number of Outlets of valid Power Line Poles during generation (DEFAULT: 4) /gp_cfg PowerlinePowerPerTechTrash [integers (like 7) between 0 and 1000] How much RWs at peak hours are provided per 1 Tech Trash Level upgrade (DEFAULT: 5) /gp_cfg PowerlineMaxTechTrashLevel [integers (like 7) between 0 and 1000] The maximum level that a Transformer can be upgraded to (DEFAULT: 50) /gp_cfg PowerlineFuseDurationSeconds [fractions (like 420.69, nice) between 0.0 and Infinity] How long (in seconds) a brand new Fuse inserted in the Transformer Fusebox will last (DEFAULT: 12000.0) /gp_cfg FuseItemShortname [strings (like "fuse")] The shortname of the item that acts as the Fuse for Transformer Fuseboxes, must be a valid Rust item shortname /gp_cfg FuseItemGuiName [strings (like "Transformer Fuse")] The custom GUI display name of the item that acts as the Fuse for Transformer Fuseboxes, can be anything, or left blank for default /gp_cfg FuseItemSkinID [positive long integers (like 2783151202)] The skin ID of the Fuse item if using custom, leave at 0 to accept any items of the shortname specified by FuseItemShortname Protective clothing (only editable through oxide/config/GridPower.json) "ProtectiveClothing": { "hazmatsuit": null, "scientistsuit_heavy": null, "hazmatsuit_scientist": null, "hazmatsuit_scientist_peacekeeper": null, "hazmatsuit.spacesuit": null, "boots.frog": null, "hazmatsuit.nomadsuit": null, "pants": [ 1581896222 ], "hoodie": [ 1581890527, 1582492745 ] }, Each entry has a key (the item shortname in quotes) and a value. If the value is null, it means all possible skins for that item shortname are accepted. In the example above, we're allowing all rubbery one-pieces (value is null, so any skin) and we're also allowing pants with 1 possible skin or a hoodie with 2 possible skins to be treated as protective clothing. You will see that there's no comma after the last entry on the list. BEFORE SAVING, ALWAYS VALIDATE YOUR JSON WITH A TOOL LIKE JSON LINT! Permission profiles Using profiles you can quickly create/edit different permissions for different players, for example, if you have more than 1 VIP tier on your server - just add some new profiles. Different players can have different limits and permissions associated with using the Power Grid. To check which permission profile the player should fall under, the plugin goes through all permission profiles and checks whether the player has that permission granted. The permissions are checked in order, meaning that if the player doesn't have the first permission, it will try the next permission on the list, etc (similar to how Auto Kits checks which kit to give to a player based on their permissions in order). If the player doesn't have any permissions from the list granted, they will fall back to the "default" profile. That's the only one that you shouldn't remove! If you remove it, a new one with default values will be created. So if you don't want your default, non-VIP players to use the power grid, don't remove the default profile, just take away privileges in that profile (like upgrading/deploying ladders/pressing the button). You don't have to use the built-in VIP permissions - any REGISTERED permission from any plugin will do just fine! By default, three permission profiles are generate in the config: default, gridpower.admin and gridpower.vip1. The default permission profile will apply to any player who doesn't have any permissions listed in the profile list - let's have a look at it: "PermissionProfiles": { "default": { "PermissionRequired": "default", "GridCanDeployLadder": true, "GridCanDeployRootCombiners": true, "GridCanConnectDisconnect": true, "GridCanPressButton": true, "GridCanUpgrade": true, "GridDangerousWireElectricutionChance": 0.1, "HangingXmasLights": false, "HangingWiresAndHoses": false, "SubdivisionsPreview": 10, "SubdivisionsFinal": 50, "SlackMax": 5.0 }, PermissionRequired should contain an already existing permission registered by any plugin in the form of pluginname.permissionname GridCanDeployLadder allows players to deploy ladders on Power Line Poles GridCanDeployRootCombiners allows players to deploy Root Combiners on Power Line Pole transformers by inserting them into the Fuse Box GridCanConnectDisconnect allows players to use a Wire Tool to connect their own electrical devices to the Grid GridCanPressButton allows players to access the Transformer GUI GridCanUpgrade allows the players to upgrade the Transformer peak output by inserting Tech Trash into the Fuse Box GridDangerousWireElectricutionChance defines how likely it is that a player will die from electrical accidents, even while wearing protective clothing HangingXmasLights allows the players more control over how much the Advanced Xmas Lights will be hanging (purely visual) HangingWiresAndHoses allows the players more control over how much the Wires/Hoses will be hanging (purely visual) SubdivisionsPreview is the number of intermediary points used while showing the hanging Xmas Lights preview catenary curve of the last placed segment. The more points, the smoother it looks. (purely visual) SubdivisionsFinal is it the number of intermediary points used for the final catenary curve of the hanging wires/hoses/xmas lights. The more points, the smoother it looks (purely visual) SlackMax sets the maximum "looseness" of the wire/hose/xmas lights that the player is allowed. The more the slack, the longer the wire appears overall. API hooks (for plugin developers) All methods utilise the [HookMethod] attribute, which means you don't call them through Interface.Call, you need to first create this field in your plugin's main class... [PluginReference] private Plugin GridPower; Then, call the hooks like so. It's pretty self-explanatory what information they will provide you with. bool isPowerConstant = (bool) GridPower.Call("GridPowerIsConstant"); bool isGridProducing = (bool) GridPower.Call("GridIsProducing"); float productionHourStart = (float) GridPower.Call("GridGetProductionHourStart"); float productionHourEnd = (float) GridPower.Call("GridGetProductionHourEnd"); float currentGridEfficiency = (float) GridPower.Call("GridGetEfficiency"); bool areStreetlightsAlwaysOn = (bool) GridPower.Call("StreetlightsPowerIsConstant"); bool areStreetlightsOn = (bool) GridPower.Call("StreetlightsAreOn"); float streetlightsHourStart = (float) GridPower.Call("StreetlightsGetTurnOnHour"); float streetlightsHourEnd = (float) GridPower.Call("StreetlightsGetTurnOffHour"); Translation support (oxide/lang/en/GridPower.json) Almost every string the players see, including the text displaying in the chat and the GUI, can be edited. Just load the plugin and let it generate the file - after you edit it, reload the plugin.$24.99 -

Version 1.0.0
30 downloads
Automatic traffic light system from 59 prefabs. Automatic changing of colors. You only have to align the traffic light Perfect for roleplay servers. Have Fun$5.00- 1 comment
-
- 3
-

-

-
- #electricity
- #roleplay
- (and 1 more)
-
If it is possible can someone make a mod for using electricity items on tub boats, I've seen it done but it but it was a glitch and used a shelf to hold a solar panel and battery, but has been patched out of the game, see the image for proof. Would be an awesome mod for RP server like mine, I would defiantly buy it, and would make things more fun! Thanks

-

Version 2.0.4
93 downloads
Supports: Wind Mills | Solar Panels | Fuel & Test Generators | Small-Medium-Large Batteries | Tesla Coils | Heaters Both Globally & with permission-based settings allowing you to create as many different levels as you wish! Written for the best performance possible! Defaults to first permission assigned in the config if you give out multiple. Wind Mill Note: Max height Needed for Max output is floor 18 Battery Options Explained MaxOutput: Maximum Power Out Put Efficiency: How Efficient Battery is When Charging ( this How Fast it Charges ) MaxCapacitySeconds: How Much Energy We Can Request From Power Sources For Charging is this value * our maxOutput Batteries will not show new Max Out-Puts Batteries will show New Power Usage! ( Pic is below, this is because its hardcoded on client side ) Fuel Generator Options Explained StackSize: Sets Inventory Stack Size for Fuel Inside The Fuel Generator OutputEnergy: Sets Power OutPut FuelPerSec: Sets How Much Fuel to Use Per Second Electrical Heater Options Explained GLOBAL SETTER ONLY > "Sets the Max Temperature Range for Electric Heaters Only (Default is 4.0)": 4.0, FadeDuration: Sets How Long Before Heat Dissipates ( when powered off ) HeatAmount: Sets Heat Amount ( when powered on ) Solar Panel Explained To get max Output you Need 1 floor up else it will only ever be half! + Panel must Face Direct Sun-light! Tesla Coil Options Explained A TeslaCoils Power consumption amount Is Calculated By ( MaxDamageOutput Divided / By PowerToDamageRatio ) A TeslaCoils DamageAmount is Calculated By Its (currentEnergy input * powerToDamageRatio) * dischargeTickRate A TeslaCoils SelfHarmAmount is Calculated By Its ( dischargeTickRate Divided / By maxDischargeSelfDamageSeconds * SetHealth ) SetHealth: Sets Item Condition Level MaxDamageOutput: Sets the Maximum Damage it Can OutPut Like Ever PowerForHeavyShorting: Sets Electrical Input Amount Needed for Strong-Zap Zap else = Weak-Zap Zap DischargeTickRate: Sets How Fast A TeslaCoil Discharges its Zap Zap MaxDischargeSelfDamageSeconds: Configuration { "Sets Global Powers": { "Sets the Max Generation OutPut for Wind Mills (Default is 100)": 100, "Overrides target speed for Wind Mills (Default is 0)": 0.0, "Sets the Max Generation OutPut for Solar Panels (Default is 20)": 20, "Sets the Max Generation OutPut for Test Gens (Default is 8)": 8, "Sets the Max Temperature Range for Electric Heaters Only (Default is 4.0)": 4.0, "Reset all Powers on unload (recommended true if uninstalling)": false, "Large Battery Settings": { "MaxOutput": 100, "Efficiency": 0.8, "MaxCapacitySeconds": 1440000 }, "Medium Battery Settings": { "MaxOutput": 50, "Efficiency": 0.8, "MaxCapacitySeconds": 540000 }, "Small Battery Settings": { "MaxOutput": 10, "Efficiency": 0.8, "MaxCapacitySeconds": 9000 }, "Fuel Generator Settings": { "StackSize": 1000, "OutputEnergy": 35, "FuelPerSec": 1.0 }, "Tesla Coil Trap Settings": { "SetHealth": 350.0, "PowerToDamageRatio": 2.0, "DischargeTickRate": 0.25, "MaxDischargeSelfDamageSeconds": 120.0, "MaxDamageOutput": 35.0, "PowerForHeavyShorting": 10 }, "Electrical Heater Settings": { "FadeDuration": 1.0, "HeatAmount": 5.0 } }, "Enables use of permissions based settings": true, "Player Permissions": { "powermodifier.vip": { "Sets the Max Generation OutPut for Wind Mills (Default is 100)": 250, "Overrides target speed for Wind Mills (Default is 0)": 0.0, "Sets the Max Generation OutPut for Solar Panels (Default is 20)": 20, "Sets the Max Generation OutPut for Test Gens (Default is 8)": 8, "Large Battery Settings": { "MaxOutput": 100, "Efficiency": 0.8, "MaxCapacitySeconds": 1440000 }, "Medium Battery Settings": { "MaxOutput": 50, "Efficiency": 0.8, "MaxCapacitySeconds": 540000 }, "Small Battery Settings": { "MaxOutput": 10, "Efficiency": 0.8, "MaxCapacitySeconds": 9000 }, "Fuel Generator Settings": { "StackSize": 1000, "OutputEnergy": 35, "FuelPerSec": 1.0 }, "Tesla Coil Trap Settings": { "SetHealth": 250.0, "PowerToDamageRatio": 2.0, "DischargeTickRate": 0.25, "MaxDischargeSelfDamageSeconds": 120.0, "MaxDamageOutput": 35.0, "PowerForHeavyShorting": 10 }, "Electrical Heater Settings": { "FadeDuration": 1.0, "HeatAmount": 5.0 } } } }$20.00 -
Version 1.0.0
131 downloads
Just a basic 24 hour clock; feel free to use this as an idea on how to make this yourself or to paste it into your own server. If you wanted to build this yourself, you would require; Power Source (requires 25 power minimum) 8 Electrical Branches 1 Timer 1 Switch 1 Blocker 3 Counters Total cost - 1075 Metal Frags Enjoy. To paste this into your server, you will require the CopyPaste plugin which can be downloaded for free here. Simply upload the 24HourClock.json into the data/copypaste folder inside your server. If you would like a Fortify version of this, let me know and I'll make that too. 24HourClock.jsonFree-
- 1
-
-
- #electric
- #electrical
- (and 3 more)
-
Version 2.0.0
90 downloads
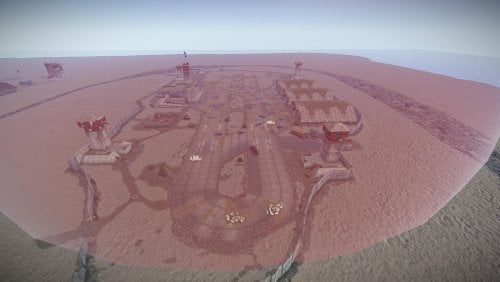
This will allow map makers to create their own unique style of the main monuments by adding or modifying the prefabs. Big thanks to all from KBEdits for the work on helping to make these prefabs, also to EndlessDisorder for the research and help. Due to the size of the monument, its been uploaded by itself on a map, after its been fully tested it will also be created as a prefab. Whats on the map. Complete IO Puzzle, Metal ore in the mines and Loot Spawn Points same as standard Airfield that can be modified by the user to suit their needs. Original version of Airfield and broken version. The original version on the side can me moved with movement snap of 10 when selected and overlays on the broken version, when creating a prefab overlay the original and then when placed on the map use the original for the prefab modifiers and then delete the original. If you notice anything missing or out of place please let us know via pm or on our Discord. Left in a map for users to create their own prefabs. Tested on Live server. (May) Tested on RustEdit v-1-1-37 Prefab count 1719. We ask that you leave in the text saying Supplied by Knockcree and Codefling.com as a way of helping support us. If you need any help or more info then feel free to join our Discord https://discord.gg/3DYPGMxG5s$9.95 -
Version 2.0
7 downloads
Doomsday-Vault is a wealthy families abandoned hide away for dangerous times, hidden in plain sight deep in the forest. They disappeared under mysterious circumstances and the vault door require's a coded call to open the main blast door. Inside is military grade weapons and ammo with loot that was to keep them safe. Introducing a new twist to electrical puzzles with telephone calls. Very small topside entrance and ideal to be placed as an extra puzzle for your players to find and explore. Contains 2 versions of the Prefab. Summer and Winter Green, Blue and Red card puzzle including a new way to use telephones. Contains Elite, military and assortment of useful loot crates. Red card spawn. Prefab Count: 692 Read me file included for easy installation$18.95 -

Version 3.0.0
11 downloads
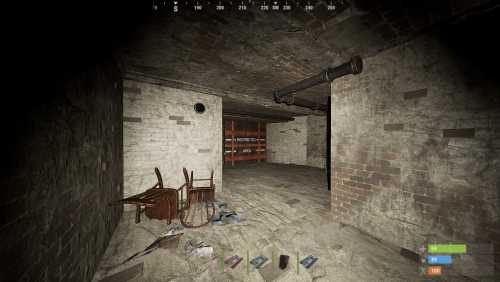
| Secret Missile Silo A | What appears to be a government cover-up, Cobalt was tasked with concealing one of the many decomissioned missile silos. By using clever decorating, and what seems like a pop-up mining quarry, the rushed attempt to hide the mystery had become a failure. While both the quarry and silo lay abandoned, those who have authorized access, can attain the loot which was left behind. Question left to be asked is, will you be one of them? Drag n' drop! Features: Simple, High Detail, low prefab count! 1321 prefabs in total! Can easily be inserted into a existing map. A refreshing look based apon Facepunch's Large Excavator and Sewer Branch . Something all players can recognize. Loot consists of: Numerous Barrels, 6 military (green) crates, 10 basic (tan) crates, scattered food and medical boxes. Does not include a "Monument Marker" keep this in mind when placing the monument. Custom Silo Blast Door, requires 2 fuses and blue keycard. Thanks to !knockree for the help! NOTE: It is suggested to place this prefab on the axis it’s on once spawned in since Rust’s terrain ‘pixelation’ limits terrain slopes when pasting in prefabs. So when dropping this prefab within your map you may have to grab the entire prefab and slightly move it to align with the terrain due to this handicap (not the prefab’s fault, just how Rust’s works). NOTE #2: It is suggested to paint your own alpha texture onto the missle silo entrance, this is a problem within Rust Edit.$14.95 -

Version 1.0.1
10 downloads
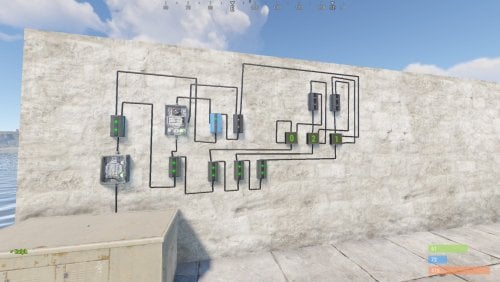
This DIY pack is to help teach people how to set up electricals inside Rust Edit. Create security door access via fuses and colour cards, 3 colour coded security doors with electrical kickstart for rust. Allowing players to exit monuments via press button. ATTENTION: WHEN USING THIS PREFAB PACK PLEASE ENSURE YOU ARE USING THE MOST UPDATED Oxide.Ext.RustEdit.dll https://github.com/k1lly0u/Oxide.Ext.RustEdit This pack includes the following. 1. Two-way Triple Door/Fusebox prefabs. a. All prefabs needed to set up a 3 Door, 3 Card reader and 3 Fusebox setup. 2. Easy to use Test Area. 2. "README.txt" to help you make the proper electrical connections. 3. "Visual Diagram" to help you make the proper electrical connections. What do I do with this? 1. Open the "Visual Diagram" that came with the download. 2. Open the "README.txt" that came with the download. (Use both of these as references) 3. Place the downloaded prefab pack somewhere in your map on RustEdit. 4. Start at step 1, use the visual references to guide you along. 5. Once all electrical connections have been made, use the Test Area. 6. Drag all non-interactable prefabs into the back right of the Test Area. a. All Generator Static b. All Orswitch, Andswitch, Timerswitch, etc.. 7. Drag all interactable prefabs into the Test Area. a. Security Doors(s) b. Card Reader(s) c. Door Manipulator(s) d. Fusebox(s) 8. Once everything is in place group all your prefabs using the "Make Custom Prefab" 9. Set a password on your map that you'll remember. 10. Load up your map and test your electricals. (in rare cases an autosave and restart are needed for electrics to work) Any Issues, bugs, broken or missing prefabs, questions, etc... Please refer to the support section where you downloaded this pack. Want to hang out with KBEdit's Team! Feel free to use the discord link below. Kbedits Discord https://discord.gg/7PQAwsU Kbedits Website https://kbedits.io$9.99 -

Version 1.0.0
287 downloads
Create a security door with access via fuse and colour cards. Allowing players to exit monuments via press button. This DIY pack is to help teach people how to set up electricals inside Rust Edit. ATTENTION: WHEN USING THIS PREFAB PACK PLEASE ENSURE YOU ARE USING THE MOST UPDATED Oxide.Ext.RustEdit.dll https://github.com/k1lly0u/Oxide.Ext.RustEdit This pack includes the following. 1. Two-way Single Door/Fusebox prefabs. a. All prefabs needed to set up a Green Door/Card reader and Fusebox. b. All prefabs needed to set up a Blue Door/Card reader and Fusebox. c. All prefabs needed to set up a Red Door/Card reader and Fusebox. 2. Easy to use Test Area. 2. "README.txt" to help you make the proper electrical connections. 3. "Visual Diagram" to help you make the proper electrical connections. What do I do with this? 1. Open the "Visual Diagram" that came with the download. 2. Open the "README.txt" that came with the download. (Use both of these as references) 3. Place the downloaded prefab pack somewhere in your map on RustEdit. 4. Start at step 1, use the visual references to guide you along. 5. Once all electrical connections have been made, use the Test Area. 6. Drag all non-interactable prefabs into the back right of the Test Area. a. All Generator Static b. All Orswitch, Andswitch, Timerswitch, etc.. 7. Drag all interactable prefabs into the Test Area. a. Security Doors(s) b. Card Reader(s) c. Door Manipulator(s) d. Fusebox(s) 8. Once everything is in place group all your prefabs using the "Make Custom Prefab" 9. Set a password on your map that you'll remember. 10. Load up your map and test your electricals. (in rare cases an autosave and restart are needed for electrics to work) Any Issues, bugs, broken or missing prefabs, questions, etc... Please refer to the support section where you downloaded this pack. Want to hang out with KBEdit's Team! Feel free to use the discord link below. Kbedits Discord https://discord.gg/7PQAwsU Kbedits Website https://kbedits.ioFree -

Version 1.0.0
4 downloads
Create security door access via fuses and colour cards, 3 colour coded security doors with electrical kickstart for rust. Allowing players to exit monuments via press button. ATTENTION: WHEN USING THIS PREFAB PACK PLEASE ENSURE YOU ARE USING THE MOST UPDATED Oxide.Ext.RustEdit.dll - https://github.com/k1lly0u/Oxide.Ext.RustEdit Brought to you by KBedits, this prefab pack allows you to quickly setup triple-door/fuse monument puzzles. The electrical connections made in this prefab pack are NOT meant to be broken. If any electrical connections are broken by disconnecting Input/Output's can break the entire electrical set up. If you are curious on how to do these yourself, please refer to our DIY prefab packs. This pack includes the following. 1. Two-way Triple Security Door setups. a. Green Door/Card Reader to Blue Door/Card Reader to Red Door/Card Reader, Fusebox and Electric connections. b. Red Door/Card Reader to Blue Door/Card Reader to Red Door/Card Reader, Fusebox and Electric connections. Timerswitch included, to allow more time to pass, than standard fuse time. c. Green Door/Card Reader to Green Door/Card Reader to Green Door/Card Reader, Fusebox and Electric connections. Timerswitch included, to allow more time to pass, than standard fuse time. 2. Electrical Kickstart a. Start electrical flow to prevent electrical failure. b. Some components need to be triggered to work, this is that solution. What does this do? This allows setting up triple door puzzles. a. Player puts fuse in, and opens first door. b. Player puts 2nd fuse in, and opens second door. c. Player puts 3rd fuse in, and opens third door. What do I do with this? 1. Place downloaded prefab in rust edit and break the prefab. 2. Adjust Card Reader duration to specific time needed. (default: 10 seconds) 3. Adjust Timerswitch duration to specific time needed. (default: 10 seconds) 4. Depending on your needs, you will need to adjust times depending on the distance between each door. 5. Move Interactable prefabs. a. Security Doors(s) b. Card Reader(s) c. Door Manipulator(s) d. Fusebox(s) 6. Hide Power sources and switches to a place a player will not interact with. a. Hide Kickstarter (Source of Power) b. All Orswitch, Andswitch, Timerswitch, etc... c. Any and all prefabs the player should NOT interact with. All electrical prefabs in this pack have been tested and are working. If you have ANY issues, please post in the support section.$5.99 -

Version 1.0.0
4 downloads
Create security door access via fuses and colour cards, 2 colour coded security doors. Allowing players to exit monuments via press button. ATTENTION: WHEN USING THIS PREFAB PACK PLEASE ENSURE YOU ARE USING THE MOST UPDATED Oxide.Ext.RustEdit.dll - https://github.com/k1lly0u/Oxide.Ext.RustEdit Brought to you by KBedits, this prefab pack allows you to quickly setup double-door monument puzzles. The electrical connections made in this prefab pack are NOT meant to be broken. If any electrical connections are broken by disconnecting Input/Output's can break the entire electrical set up. If you are curious on how to do these yourself, please refer to our DIY prefab packs. This pack includes the following. 1. Two-way Double Security Door setups. a. Green Door/Card Reader to Green Door/Card Reader, Fusebox and Electric connections. b. Green Door/Card Reader to Blue Door/Card Reader, Fusebox and Electric connections. c. Blue Door/Card Reader to Red Door/Card Reader, Fusebox and Electric connections. What do I do with this? 1. Place downloaded prefab in rust edit and break the prefab. 2. Move Interactable prefabs. a. Security Doors(s) b. Card Reader(s) c. Door Manipulator(s) d. Fusebox(s) 3. Hide Power sources and switches to a place a player will not interact with. a. All Generator Static b. All Orswitch, Andswitch, Timerswitch, etc.. All electrical prefabs in this pack have been tested and are working. If you have ANY issues, please post in the support section.$4.99 -

Version 1.0.0
275 downloads
Create security door access via fuses and colour cards, 1 colour coded security door. Allowing players to exit monuments via press button. ATTENTION: WHEN USING THIS PREFAB PACK PLEASE ENSURE YOU ARE USING THE MOST UPDATED Oxide.Ext.RustEdit.dll https://github.com/k1lly0u/Oxide.Ext.RustEdit Brought to you by KBedits, this prefab pack allows you to quickly setup basic monument puzzles. The electrical connections made in this prefab pack are NOT meant to be broken. If any electrical connections are broken by disconnecting Input/Output's can break the entire electrical set up. If you are curious on how to do these yourself, please refer to our DIY prefab packs. This pack includes the following. 1. Two-way Single Security Door w/Fusebox setups. a. Green Security/Card Reader, Fusebox and Electric connections. b. Blue Security/Card Reader, Fusebox and Electric connections. c. Red Security/Card Reader, Fusebox and Electric connections. What do I do with this? 1. Place downloaded prefab in rust edit and break the prefab. 2. Move interactable prefabs. a. Security Doors(s) b. Card Reader(s) c. Door Manipulator(s) d. Fusebox(s) 3. Hide Power sources and switches to a place a player will not interact with. a. All Generator Static b. All Orswitch, Andswitch, Timerswitch, etc.. All electrical prefabs in this pack have been tested and are working. If you have ANY issues, please post in the support section.Free -

Version 1.0.0
280 downloads
Allows modifying the igniter entity. Changing different properties of it to make it fit your server. Requires editing the config, and reloading to take affect. SelfDamagePerIgniteAmount - of damage the igniter sustains while on IgniteRangeAmount - of reach the igniter extends to IgniteFrequencyAmount - of times igniter tries to light other entities PowerConsumptionAmount - power igniter drains while active Power - Is powered or is not poweredFree