
ELF's Wishlist
-
$3.00
Scrap Vending Exchange
Plugin gives players the ability to exchange scrap for currency at npc vending machines, with the ability to set exchange rates via the config.
By default the plugin runs a command set in the config for Economics on Umod.
Permission:
scrapvendingexchange.use scrapvendingexchange.admin Commands:
/sve add|del <prefab-path>, full vending machine prefab path /sve min|max <number>, sets min and max amount to exchange per transaction /sve percent <number>, sets the exchange percentage Deposit Example commands:
Economics:
deposit {userid} {amount} Server Rewards:
sr add {userid} {amount} Configuration:
{ "deposit command (default Economics arguments {userid} {amount})": "deposit {userid} {amount}", "setup command name": "sve", "exchange item id": -932201673, "exchange item skinid": 0, "exchange percent (default 80% percent ex: 1000 = 800)": 80, "min amount to exchange per transaction": 1, "max amount to exchange per transaction": 1000, "max amount to increment/decrement per click": 1, "user interface": { "success button color": "0.337 0.424 0.196 0.85", "success button font color": "0.607 0.705 0.431", "clear button color": "0.75 0.75 0.75 0.3", "clear button font color": "0.75 0.75 0.75 1", "panel color": "0.65 0.65 0.65 0.25", "PanelFontColor": "0.75 0.75 0.75 0.9", "panel input color": "0 0 0 0.42", "panel input font color": "1 1 1 0.58", "panel input placeholder color": "0.7 0.7 0.7 0.25", "panel offset position": { "position": { "x": -10.0, "y": 470.0 }, "size": { "x": 310.0, "y": 118.0 } }, "popup font color": "1 1 1 0.89", "popup error color": "0.631 0.282 0.22 0.98", "popup success color": "0.337 0.424 0.196 0.98", "popup offset position": { "position": { "x": -10.0, "y": 390.0 }, "size": { "x": 310.0, "y": 28.0 } } }, "allowed prefabs (leave empty to allow all vending machines)": [ "assets/prefabs/deployable/vendingmachine/npcvendingmachines/npcvendingmachine_tools.prefab" ], "VersionNumber: current version of the plugin": { "Major": 1, "Minor": 0, "Patch": 13 } } -
.thumb.gif.f380fd02cd6a6dfea5a947a4b1ddcae0.gif)
$39.90
Sunkenland
Melting glaciers is one of the modern environmental problems associated with global warming. In the near future, global warming has affected our planet, some islands have been flooded, but humanity has adapted to survive in harsh conditions. I present to your attention a new experiment on a new survival on islands with a lot of water, aquatic and underwater monuments to explore (map was created by popular demand). I also want to recommend the Barges plugin from Adem, it is ideal for this map, since you can use them to move around almost the entire map. There are many bridges, ziplines and boats on the map, you can also use aquascuters from a recent update, it is ideal for exploring underwater locations, but do not forget that sharks are waiting for you at the bottom, which are not averse to eating players. Good luck to you in surviving in the vastness of the ocean.
Attention: The Train Home and Barges plugins shown in the video does not come with the map, it is sold separately
Features:
Prefab Count: ~62к prefabs Size: 4000 A lot of interesting locations to explore A huge bridge in the center of the map with loot and places for the construction of bases Railway Custom ways to overcome distances on boats and tugboat Profiles for the Better Npc plugin Custom plugin Npc Moving Control (by Adem) - This plugin controls NPCs in its radius, disguises them as random hazmats Custom plugin UnderwaterGuard (by Adem) - This plugin adds sharks to underwater monuments Interesting underwater locations Custom zipline points Many bridges This map is constantly supported and updated for the current version of the game with all updates!
How can I view the map?
You can do this in our Discord server by submitting a request for an invitation to our servers. There you will be given the rights of an "administrator” and without any difficulties you will be able to fly around the map and fully familiarize yourself with it.
Custom Monuments:
Floating Citadel Wreckage Sunken Dam Ship of Dead Water Plane Deadly Hollow Water MLRS Pirate Base Last Port Gargo Icebreaker Loading Docks Laguna Compound Satellite Debris Camp on Barges Left Fault of Dam Right Fault of Dam Train Home Sunken Oil Rig Monument Facepunch:
Launch Site Ferry Terminal Missile Silo Junkyard Harbor 1 and 2 Arctic Research Base Airfield Outpost Giant Excavator Pit Water Treatment Military Tunnel The Dome Ranch Fishing Village 1,2,3 Lighthouse Underwater Lab Railway HQM, Sulfur, Stone Quarry Roadside Monument RadTown Water Well Ziggurat
-
$12.50
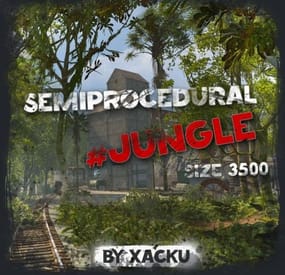
Semi-Procedural Jungle #1
By Xacku Mapping in Maps
Explore a meticulously crafted map with optimized landscape, railway tracks, and custom monuments. Uncover hidden treasures and navigate through various landmarks for an immersive gaming experience.
Map size: 3500
Number of prefabs: 21000
Railway tracks: yes
Metro availability: yes
Fixed a large number of errors after map generation
The landscape has been optimized
Unnecessary stones have been removed and added in missing places
Added railway tracks with the possibility to go down to the subway by train
Added a custom unloading station for wagons
Bridges at river crossings (someday, facepunches will start doing this, but that's a completely different story)
All necessary monuments have been added:
Facepunch Monument:
Launchsite
Excovator
Airfield
Missle Silo
Arctic Research Base
The Dome
Large harbor
Harbor
Satellite Dish
Junkyard
Fery Terminal
Large Oil Rig
Oil Rig
Warehouse
Gas Station
Supermarket
Outpost
BanditTowm
Fishing Village x3
LightHouse
Quarry (stone, sulfur, HQM)
Abandoned Cabins
Custom Monument:
Coaling Tower
-
$20.00
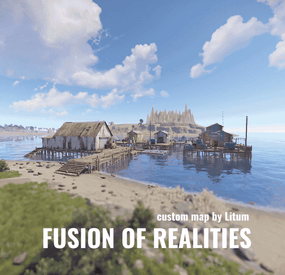
Fusion of Realities (custom map)
The space-time continuum was disrupted. And anomalies began to appear in our world in the form of pillars and locations that should not have existed in our reality... The Middle Ages, cyberpunk, magic, everything was mixed up in this world.
This greatly affected the landscape of the island and in some places completely unimaginable mountains and depressions appeared.
But everything has more or less stabilized and now you can explore these places.
Marked on the map:
point of interest "?" places to build a house "^" airships "-o-"
Features:
Size: 4000 Prefab: ~32к All locations are connected with the road Ring railway Ring road Unique custom locations Magnificent and realistic landscape Lot of places to explore Subway and train are connected by tunnel Advanced subway network
Custom Monuments:
Deserter Camp Main train station Train station Airship (-o-) Wrecked airship (?) Hidden Pillars Shrine(?) Forest House(^) Reactor Cave (?) Ruined Temple (?) Litum Sanctuary Tower + cave(^) Thunder Arch(?) Wezaemon`s grave Oasis Stronghold Castle Road tunnel Unexploded rocket(?) Flying boulder ripped from the ground(?)
Monument Rust:
Jungle Ziggurat Jungle Ruins Jungle Trees with vines Jungle Swamps Harbor 1 and 2 Missle Silo Ferry Terminal Trainyard Abandoned MIlitary Base Launch Site Arctic Research Base Satellite Dish+ Airfield Bandit Camp Outpost Giant Excavator Pit Junkyard Military Tunnel The Dome Lighthouse Ranch Large Barn Water Treatment Fishing Village 1,2,3 Underwater Lab Oil rig and Large Oil Rig Railway Sewer Branch HQM, Sulfur, Stone Quarry Roadside Monument Mining Outpost Supermarket Gas Station Please rate ⭐⭐⭐⭐⭐ the map. Thank you!
The map is password protected, if you want to make changes or you have any questions please write to me in discord.
Litum on -
- #map
- #custom map
- (and 1 more)
-

$9.90
Cuesta Verde
- Cuesta Verde is a residential area inspired by the movie Poltergeist.
- Build freely on the foundations. These reserved areas are equipped with electricity and water.
- Climb the electricity towers to get power for your house.
- Get water through the sewers you'll find under the electricity tower.
INCLUDES
- Poltergeist style television.
- Recyclers.
- Water supply.
- Electricity supply.
- 16 zones to build your house.
- 16 basements under the foundations where you can build.
- Telephone booths.
- Benches to rest.
- High walls to protect the players.
- Access to the residence through large doors.
- A beautiful decoration.
- #residencial
- #buildzone
- (and 19 more)