
Nogard
-
Posts
26 -
Joined
-
Last visited
-
Days Won
1
Content Type
Profiles
Warranty Claims
Downloads
Forums
Store
Services
Downloads Plus Support
DOWNLOADS EXTRA
Everything posted by Nogard
-
 Hi, at the time you asked the question it was working for PvE servers, with the latest update (v1.8.0) more configuration options were added for PvE servers.
 -
Version 1.2.0
29 downloads
SimpleStatus for NoEscape is a powerful Rust plugin that seamlessly integrates with NoEscape and SimpleStatus, providing real-time notifications when players enter or exit combat block or raid block. Designed for server administrators who want better visibility and control over player restrictions, this plugin enhances the user experience with customizable UI elements and reliable tracking. Why Choose SimpleStatus for NoEscape? This plugin is perfect for Rust servers looking to improve player awareness of combat and raid blocks, reducing confusion and enhancing gameplay fairness. With its lightweight and optimized design, it provides essential information without overwhelming the server. ✦ Real-Time Combat & Raid Detection – Automatically detects when players enter or leave combat or raid block states. ✦ Customizable UI Integration – Works with SimpleStatus to display visually appealing status indicators. ✦ Permission-Based System – Admins can restrict status updates to specific player groups. ✦ Optimized Performance – Efficient tracking and notification system to minimize server impact. ✦ Seamless Compatibility – Fully integrates with NoEscape, ensuring accurate block status detection. ✦ Image & Color Customization – Modify background colors, icons, and text to fit your server's theme. If you need help setting it up or just want to clear up any doubts before making the purchase, you can contact me via discord. In order for this plugin to work, you need to make a small modification to the "NoEscape" plugin as follows: Since the last official update of No Escape was three years ago (v2.1.35), I am attaching the edited plugin with the additions described in these steps. If you prefer not to follow the steps below, you can download the file clicking here. 1. Right click on the "NoEscape.cs" file and then select the option to open with your favorite text editor (for example: Notepad, VS Code or just the default one on Windows). 2. Then you need to go to approximately line 1218 within the "API" section. 3. Once you are on the mentioned line, you need to paste the following code: 4. Done! float GetRemainingBlockTime(BasePlayer player, string type) { Type blockType = type == "raid" ? typeof(RaidBlock) : typeof(CombatBlock); UnityEngine.Component block = player.GetComponent(blockType); if (block == null) return 0; FieldInfo lastBlockField = blockType.GetField("lastBlock", BindingFlags.Public | BindingFlags.Instance); if (lastBlockField == null) return 0; DateTime lastBlock = (DateTime)lastBlockField.GetValue(block); float blockDuration = type == "raid" ? raidDuration : combatDuration; return Math.Max(0, blockDuration - (float)(DateTime.Now - lastBlock).TotalSeconds); } { "General": { "Only with permission": false, "Permissions": { "Combat": "noescapesimplestatus.combat", "Raid": "noescapesimplestatus.raid" } }, "Blockages": { "Combat": { "Enabled": true, "Duration set in NoEscape plugin settings": 180, "Simple Status Settings": { "Title": "Combat", "Title Color (RGB Hexadecimal format)": "#E9C6C1", "Text Color (RGB Hexadecimal format)": "#E9C6C1", "Background Color (RGB Hexadecimal format)": "#C53D28", "Icon URL": "https://i.postimg.cc/65SyPLf2/espada.png", "Icon Color (RGB Hexadecimal format)": "#E9C6C1" } }, "Raid": { "Enabled": true, "Duration set in NoEscape plugin settings": 300, "Simple Status Settings": { "Title": "Raid", "Title Color (RGB Hexadecimal format)": "#419CDC", "Text Color (RGB Hexadecimal format)": "#419CDC", "Background Color (RGB Hexadecimal format)": "#164163", "Icon URL": "https://i.postimg.cc/dVNXK3Sx/explosion.png", "Icon Color (RGB Hexadecimal format)": "#419CDC" } } } }$4.99 -
Version 1.8.0
10 downloads
Take your Rust server to the next level with King and Mercenary, an immersive PvP event system that introduces a competitive battlefield where players fight to claim dominance. This plugin enhances player engagement by rewarding skill, survival, and strategy. Two Unique Roles: King & Mercenary ✦ King : Gains extra health and periodic rewards while holding the throne. Location is periodically revealed, challenging them to defend their title. ✦ Mercenary : Deals extra damage and earns rewards for hunting down the King and other opponents. ✦ Dynamic Role System – Players fight to become the King or Mercenary, each with unique buffs and rewards. ✦ Automated Events – Set custom intervals and conditions for role rotation, cooldowns, and eligibility. ✦ Killstreak Bonuses – Players earn extra rewards for consecutive eliminations. ✦ Clans Integration - Prevent players from swapping roles to maintain their position. ✦ Live Map & Location Broadcasts – The King’s position is periodically revealed to intensify the hunt. ✦ Death Markers - The king's or mercenary's death location will be displayed on the map using a vending machine marker. ✦ Customizable Rewards – Configure item and commands rewards, time intervals, and kill-based bonuses. ✦ Discord Integration – Send automated updates when players claim or lose a role. ✦ Compatible with PvE Servers - Full compatibility. ✦ Full Admin Control – Set permissions, debug settings, and event restrictions. ✦ Zone Management & Compatibility – Fully compatible with Zone Manager, allowing servers to restrict the event to specific areas. All Zone Flags from Zone Manager can be applied for complete control over event rules and mechanics. Perfect for high-action Rust servers looking to add competitive, role-based combat with real incentives. Get King and Mercenary today and create legendary battles on your server! ✦ /kam set <king | mercenary | all> <SteamID64> – Manually assigns a player the King or Mercenary role using their SteamID64. Use all to assign both roles at once. ✦ /kam reset <king | mercenary | all> – Resets the specified role, removing the King, Mercenary, or both from the server. ✦ /kam info – Displays current event details, including who holds the King and Mercenary roles. ✦ /kam stats – Shows player statistics related to the event, such as kill counts, survival time, and streaks. Available Placeholders for Discord Embed ✦ {victim} – Displays the name of the player who was defeated. ✦ {role} – Shows the role of the defeated player (e.g., King or Mercenary). ✦ {attacker} – Displays the name of the player who eliminated the victim. ✦ {kills} – Shows the total number of kills the victim had before dying. ✦ {killStreak} – Indicates the victim's current kill streak before they were eliminated. ✦ {duration} – Represents the total time the victim held their role before being defeated. ✦ {attribute} – Displays the special attribute of the role (e.g., extra health for King or damage multiplier for Mercenary). ✦ {position} – Shows the location where the battle took place. ✦ {hp} – Displays the remaining health of the attacker after defeating the victim. Available Placeholders for Command Rewards ✦ {player} – Displays the name of the player who will receive the reward. ✦ {steamid} – SteamID64 of the player who will receive the reward. ✦ {role} – Shows the role of the player who will receive the reward (e.g., King or Mercenary). If you need help setting it up or just want to clear up any doubts before making the purchase, you can contact me via discord All you will see is the default settings, you can change everything to your liking if you wish. Some of the chat notifications Simple Status Death Markers Zone Marker Discord Messages /* * Returns true if the specified user has the King role, otherwise false. */ public bool HasKingRole(string userID) /* * Returns true if the specified user has the Mercenary role, otherwise false. */ public bool HasMercenaryRole(string userID)$14.99 -
Dm me on discord. nnogard
-

Version 1.2.0
13 downloads
Boost your online store with the MercadoPago Integration Module, a powerful solution designed to simplify and enhance payment processing. With this module, you can offer your customers a fast, secure, and user-friendly checkout experience while leveraging the benefits of MercadoPago’s trusted payment gateway. ✦ Seamless Integration – Connect MercadoPago effortlessly to your ember. ✦ Multiple Payment Methods – Accept credit/debit cards, MercadoPago balance, and more. ✦ Automatic Currency Conversion – Supports real-time exchange rate calculations for accurate pricing. ✦ Secure Transactions – Encrypted payments ensure the highest level of security. ✦ Customizable Checkout – Personalize your payment process to fit your brand. ✦ Instant Notifications – Get real-time updates on payment status. ✦ Optimized for Performance – Lightweight and efficient for smooth operation. Why Choose Our Module? ✦ Easy Setup: Simple configuration with minimal effort required. ✦ Fully Documented & Supported: Includes setup guides and expert support. Upgrade your store with MercadoPago Integration today and start processing payments with confidence! Configuration Test package How to Apply the Custom Styles After Purchase 1. Go to your website and log in to your admin dashboard. 2. Navigate to Appearance Settings and Click on Admin → Appearance → Advanced. 3. Apply Custom CSS 4. Locate the Custom CSS section. 5. Open the file /resources/css/styles.css in your module directory. 6. Copy the entire CSS code from the file. 7. Paste the copied CSS into the Custom CSS section. 8. Save Changes Once completed, your MercadoPago icons and styles will be correctly displayed on your site. How to Generate Your MercadoPago API Key Integrate MercadoPago seamlessly into your application by generating your API credentials. Follow this step-by-step guide to create your API key and start accepting payments securely. Step 1: Log in to Your MercadoPago Account 1. Visit the MercadoPago Developers Portal: https://www.mercadopago.com 2. Click on Log In at the top-right corner. 3. Enter your account credentials and sign in. Step 2: Access the Developer Dashboard 1. Once logged in, navigate to Your Name (or Business Name) → Your Business Information. 2. Click on Developers or go directly to https://www.mercadopago.com/developers. Step 3: Create API Credentials 1. Locate the Credentials section. 2. Choose between Sandbox Mode (for testing) or Production Mode (for live transactions). 3. Click Create API Credentials to generate: - Access Token: Used for secure backend transactions. Step 4: Copy and Store Your Keys Securely 1. Copy the Access Token. 2. Store them in the configuration section of the module. 3. Never share your Access Token publicly. Step 5: Configure Webhook Notifications To receive automatic payment status updates, configure a Webhook Notification URL in your MercadoPago account. 1. Navigate to Developers → Webhooks & Notifications in your MercadoPago dashboard. 2. Click on Add New Webhook. 3. In the Webhook URL field, enter the Endpoint URL provided in the module configuration of your store. - Example: https://yourstore.com/store/mercadopago/ipn 4. Choose the event types you want to receive notifications for (e.g., payment updates, chargebacks). 5. Click Save to apply the webhook configuration. Step 6: Test Your Webhook Integration 1. Use Sandbox Mode to simulate a transaction. 2. Check if the webhook receives the correct payment status updates in your system. 3. If everything works correctly, switch to Production Mode. \ You're all set! Your MercadoPago API key is now ready, and webhook notifications will keep your system updated with real-time payment statuses. For more details, check the official documentation: https://www.mercadopago.com/developers If you need help, feel free to contact me via discord.$14.99 -

Version 1.0.4
15 downloads
The Quarry Notification plugin for Rust is a plugin designed to enhance the gameplay experience by providing detailed notifications and map markers for specific quarry activities. This plugin is ideal for server administrators looking to keep players informed about quarry statuses and activities in real-time. Real-Time Notifications ✦ Activation Alerts: Receive notifications when a quarry is activated. ✦ Player Identification: Identify the last player who toggled the quarry. ✦ Grid Positioning: Get precise grid locations of activated quarries. ✦ Spam Protection: Prevent excessive notifications with cooldown settings. Customizable Markers ✦ Individual Quarry Settings: Configure markers for Sulfur, Stone, and High-Quality Metal quarries independently. ✦ Marker Attributes: Adjust alpha, radius, center color, ring color, and duration for each quarry type. Configurable Advice Messages ✦ Interval Settings: Set the interval for periodic advice messages. ✦ Custom Message Formats: Personalize the format of notification messages. Additional Features ✦ Discord Notifications: Send activation updates to a Discord channel. ✦ Flexible Permissions: Assign different permissions for players and admins. ✦ Language Customization: Easily modify in-game messages to fit server preferences. ✦ /quarry: Displays the current status of all quarries. ✦ /addquarry <type> <x> <y> <z>: Adds a new quarry at the specified coordinates. ✦ /removequarry <type>: Removes the specified type of quarry. ✦ /listquarries: Lists all configured quarries. ✦ /clearquarries: Clears all quarries from the configuration. If you need help setting it up or just want to clear up any doubts before making the purchase, you can contact me via discord. { "Permission required to use chat commands": "quarrynotification.use", "Permission required for admin commands": "quarrynotification.admin", "SteamID icon for chat messages": 0, "Enable advice messages": true, "Interval for advice messages in seconds": 1800, "Notification message format": "{0} has activated a {1} Quarry at {2}!", "Anti-spam cooldown in seconds": 30.0, "Maximum toggles per minute before spam protection": 3, "Spam protection duration in minutes": 5, "Quarry marker configurations": { "SulfurQuarry": { "Enabled": true, "Alpha": 0.5, "Radius": 0.6, "Center Color": "#FF0000", "Ring Color": "#FFFFFF", "Duration": 30.0 }, "StoneQuarry": { "Enabled": true, "Alpha": 0.5, "Radius": 0.6, "Center Color": "#FFA07A", "Ring Color": "#20B2AA", "Duration": 30.0 }, "HQMQuarry": { "Enabled": true, "Alpha": 0.5, "Radius": 0.6, "Center Color": "#9370DB", "Ring Color": "#FF69B4", "Duration": 30.0 } }, "Enable Discord notifications": false, "Discord webhook URL": "" } { "QuarryStatusHeader": "<size=18><color=#4A90E2>Quarry Status Monitor</color></size>", "QuarryNameFormat": "<color=#F6C177>{0}</color>", "QuarryActivatedFormat": "<color=#4A90E2>|</color> Status: {0}", "QuarryLastPlayerFormat": "<color=#4A90E2>|</color> Last User: <color=#9ECBFF>{0}</color>", "QuarryGridPositionFormat": "<color=#4A90E2>|</color> Location: <color=#9ECBFF>{0}</color>", "QuarryNoActivationInfo": "<color=#4A90E2>|</color> <color=#E06C75>No activity recorded</color>", "QuarryLastActivated": "<color=#4A90E2>|</color> Last active: <color=#98C379>{0} {1}</color> ago at <color=#9ECBFF>{2}</color>", "QuarryOn": "<color=#98C379>✓</color> <color=#9ECBFF>{0}</color> activated the <color=#F6C177>{1}</color> quarry at <color=#9ECBFF>{2}</color>", "QuarryOff": "<color=#E06C75></color> <color=#9ECBFF>{0}</color> deactivated the <color=#F6C177>{1}</color> quarry at <color=#9ECBFF>{2}</color>", "PermissionError": "<color=#E06C75>Access denied: Insufficient permissions</color>", "QuarryAdded": "<color=#98C379>✓ Added {0} quarry at {1}</color>", "QuarryRemoved": "<color=#E06C75>Removed {0} quarry</color>", "NoQuarriesFound": "<color=#E06C75>No quarries found in the system</color>", "Minutes": "minutes", "Minute": "minute", "Seconds": "seconds", "Second": "second", "Hours": "hours", "Hour": "hour", "Days": "days", "Day": "day", "SulfurQuarry": "Sulfur", "StoneQuarry": "Stone", "HQMQuarry": "HQM", "QuarryNotFound": "<color=#E06C75>Quarry not found at specified location</color>", "InvalidCoordinates": "<color=#E06C75>Invalid coordinates format. Use: <x> <y> <z></color>", "InvalidType": "<color=#E06C75>Invalid quarry type. Available: SulfurQuarry, StoneQuarry, HQMQuarry</color>", "AddQuarryUsage": "<color=#4A90E2>Usage: /addquarry <type> <x> <y> <z></color>", "RemoveQuarryUsage": "<color=#4A90E2>Usage: /removequarry <type></color>", "NotificationHeader": "<size=18><color=#4A90E2>Quarry Activity Report</color></size>", "NotificationQuarryName": "<color=#F6C177>{0} Quarry</color>", "NotificationActivated": "<color=#4A90E2>|</color> Active: <color=#98C379>{0}</color> ago", "NotificationLastPlayer": "<color=#4A90E2>|</color> Operator: <color=#9ECBFF>{0}</color>", "NotificationGridPosition": "<color=#4A90E2>|</color> Grid: <color=#9ECBFF>{0}</color>", "NotificationSeparator": "<color=#4A90E2>└──--------------</color>", "InvalidPermissions": "<color=#E06C75>Access denied: Insufficient permissions</color>", "QuarryClearSuccess": "<color=#98C379>✓ All quarries cleared successfully</color>", "QuarryUpdateSuccess": "<color=#98C379>✓ Quarry information updated</color>", "SpamProtection": "<color=#E06C75>Anti-spam protection active. Please wait...</color>", "QuarryStatus": "<color=#4A90E2>|</color> Status: {0}", "StatusActive": "<color=#98C379>Active</color>", "StatusInactive": "<color=#E06C75>Inactive</color>" }$4.99 -
Hello, I need someone who is capable of implementing mercadopago in the existing system "Ember". The work is paid, contact me via discord: nnogard. Ember MercadoPago API Reference Ember Module Reference
- 1 reply
-
- 1
-

-
NOT SOLVED
-
NOT SOLVED
-
Hello, I need someone who is capable of implementing mercadopago in the existing system "Ember". The work is paid, contact me via discord: nnogard. Ember MercadoPago API Reference Ember Module Reference
-
Version 1.2.0
27 downloads
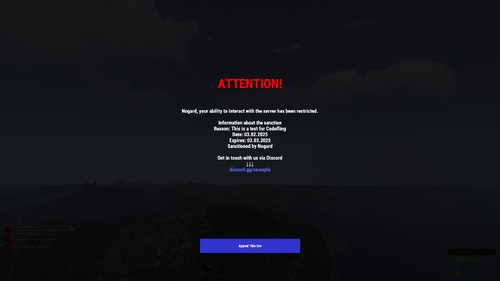
This plugin allows you to sanction users without kicking them from the server. Ideal for situations where you need the user to contact you via Discord or another platform. The user cannot interact with the server while banned. Everything the user sees on the interface is fully customizable. ✦ Permanent & Temporary Bans – Set bans for a fixed duration or permanently, with automatic expiration. ✦ Customizable Ban Screen – Personalize everything the player sees, including messages and background images. ✦ Ban Appeal System – Option to add a button for players to request an unban. ✦ Admin Tools – Easily manage bans with commands to view, modify, and remove them. ✦ Real-Time Notifications – Get alerts when a banned player joins or when a ban expires. ✦ Detailed Ban Information – See when and why a player was banned, with additional notes for context. ✦ Optimized Performance – Lightweight and efficient, ensuring smooth operation without affecting server performance. Available Chat Commands ✦ /uiban <steamid> <reason> [duration] [notes] – Ban a user with a specified reason. ✦ /unuiban <steamid> – Unban a user. ✦ /uibanlist – View all banned players. ✦ /uibaninfo <steamid> – View detailed ban information for a specific player. ✦ /uibanupdate <steamid> <reason | duration | notes> <value> – Modify an existing ban. Available Console Commands ✦ uiban <steamid> – Ban a user from the console. ✦ unuiban <steamid> – Unban a user from the console. ✦ uiban.ban – Allows the use of chat commands for banning/unbanning. ✦ uiban.admin - Advanced admin permissions for modifying bans and using additional commands. Available placeholders to use in configuration: ✦ {name} - Username. ✦ {reason} - Established reason for the interface sanction. ✦ {date} - Date on which the sanction was carried out. ✦ {created_by} - Administrator who performed the sanction against the user. ✦ {expiry_info} - Information about expiry date. If you need help setting it up or just want to clear up any doubts before making the purchase, you can contact me via discord. { "Title": "ATTENTION!", "Title color": "#FF0000", "Title Anchor Min": "0 0.5028116", "Title Anchor Max": "1 0.8997387", "Description": "{name}, your ability to interact with the server has been restricted.\n\nInformation about the sanction\nReason: {reason}\nDate: {date}\n{expiry_info}\nSanctioned by {created_by}\n\nGet in touch with us via Discord\n↓↓↓\n<color=#5865F2>discord.gg/example</color>", "Description default color": "#FFFFFF", "Description Anchor Min": "0 0", "Description Anchor Max": "1 1", "Date format": "MM.dd.yyyy", "Can the user take damage while they have a active ban?": true, "Delete banned user's inventory?": false, "Check for expired bans interval (seconds)": 300, "Notify admins when a player with active ban connects": true, "Log bans to file": true, "Background image URL (leave empty for default)": "", "Show ban history in UI": true, "Maximum ban history entries to show": 10, "Enable ban appeals": true, "Appeal button text": "Appeal This Ban", "Appeal URL": "https://example.com/appeal" } { "playerNotFound": "Player not found!", "playerDisconnected": "The player is not in the game!", "banPermanent": "You banned player {0}\nReason: {1}", "NFound": "Sorry, but this player was not found, or the player is offline", "nPermission": "You do not have permission to execute this command", "Args": "You are entering the command incorrectly, example: /uiban NAME/STEAMID Reason", "IsBanned": "Player already banned", "nFoudsBans": "The player is not on the ban list", "UnBanned": "Ban removed from player {0}", "banApplied": "You banned player {0}\nReason: {1}\nDuration: {2}", "adminNotify": "{0} has banned player {1}. Reason: {2}. Duration: {3}", "adminUnbanNotify": "{0} has removed the ban from player {1}", "bannedPlayerConnected": "Banned player {0} has connected. Reason: {1}", "banExpired": "Your ban has expired. You can now play normally.", "noBannedPlayers": "There are no banned players.", "appealInfo": "To appeal your ban, please visit:" }$4.99 -
 Buenas, me podrías pasar tu discord? Saludos.
 -
Add me on Discord. Nogard#0001
-
Hi, add me on Discord. Nogard#0001
-
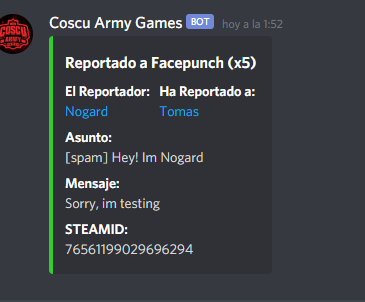
 Hello, I was modifying my plugin for teletransport an admin when he clicks on the map, and to receive user reports to discord through a webhook What do you think? My discord is Nogard#0001 Attached images of the notification in discord Demo video
-
Contact me at discord. I have a system made that includes receiving logs of the reports made with F7. Nogard#0001