
Vinni_TV_'s Wishlist
-

$30.00$20.00Abandoned Bases
Allows bases to become raidable when all players in a base become inactive.
Compatible with TruePVE and NextGenPVE servers. This plugin is not compatible with servers that have server.pve set true. It is possible to implement this, but I see no reason to do so as TruePVE provides the same protection and more.
Abandoned Bases checks each building on the server in order to determine which bases are inactive. Bases become inactive when all players authorized on the tool cupboard have been offline for the configured amount of days. When a base becomes inactive there are one of two outcomes.
1.) It will be immediately destroyed if it does not meet the configured minimum requirements.
2) It will become raidable for a configurable period of time, and when the time expires the base will be destroyed.
Each zone has a map marker, allows PVP and is surrounded by a dome that protects it from being attacked from the outside. Players who zone hop will be flagged with a PVP delay where they can still be attacked for a configurable amount of time.
Command /sar - requires abandonedbases.convert permission and converts a base into an abandoned base - this can be used on any base that you are authorized to and will cause the base to be destroyed when the timer expires
Command /sab - starts a manual check for each building on the server in order to determine which bases are inactive (requires abandonedbases.admin permission)
Command /sar radius - requires abandonedbases.convert permission and converts a base into an abandoned base and uses the specified radius for the dome / zone radius. Min and max radius are configurable.
Command /sar cancel - requires abandonedbases.convert and abandonedbases.convert.cancel permissions - completely cancels an event (destroys map marker and dome, disables PVP and prevents base from being despawned) effectively allowing the base to be taken over
Command /sar claim - requires abandonedbases.convert and abandonedbases.convert.claim permissions and converts a finished abandoned base into a claimed base that can be taken over by players
"Loot Required (SAR)"
"Foundations Required (SAR)"
"Walls Required (SAR)"
These options should be set realistically so that players cannot exploit the /sar command. I recommend Loot Required 100, Foundations Required 10, Walls Required 10 at minimum Command /sar purge - converts all bases on the server into abandoned bases for purge day (requires abandonedbases.convert, abandonedbases.admin and abandonedbases.purgeday permissions)
This is a two part command that requires you type /sab afterwards to begin. Requires abandonedbases.purgeday, abandonedbases.convert, and abandonedbases.admin permissions. Announcements are muted during purge to prevent spam. Time To Wait Between Spawns (15) will delay how quickly every base is converted Permissions (ADMINS REQUIRE PERMISSIONS TOO)
abandonedbases.convert - required to use /sar command
abandonedbases.convert.free - converting is free for users that have this permission
abandonedbases.convert.claim - required to use /sar claim command
abandonedbases.purgeday - required to use /sar purge command
abandonedbases.admin - required to use /sab and purge commands
abandonedbases.notices - users with this command can see event-opened notices from the plugin
abandonedbases.attack - lets players hunt bases and convert them by attacking if they're abandoned
abandonedbases.attack.time - shows players how much time is left before a base becomes abandoned when they attack it
abandonedbases.attack.lastseen - required to see the last time the player was online when attacking a base
Auto-add abandonedbases.immune to configuration if one does not exist already (lifetime set to "none")
- abandonedbases.immune will not be automatically added if the configuration contains a different immunity permission already
- abandonedbases.immune will give the user immunity to any base they've built at or are authed at from becoming abandoned
- abandonedbases.exclude does not provide immunity and is explicitly intended for the plugin to ignore the player only
- abandonedbases.exclude is intended for admins, mods, staff or helpers to be able to freely make repairs or auth at bases without interfering with the abandoned timer
abandonedbases.exclude:
excludes the user from being checked as an authorized user to a TC this permission should not be used to exempt users - exempt users with immunity by assigning them a permission from a role that has the lifetime set to "none" example roles that includes permission abandonedbases.immune and lifetime set to "none" to properly exempt a user or group by granting abandonedbases.immune to a user or group:
"Purge Settings": [ { "Permission": "abandonedbases.immune", "Lifetime (Days)": "none" }, { "Permission": "abandonedbases.vip", "Lifetime (Days)": "7" }, { "Permission": "abandonedbases.veteran", "Lifetime (Days)": "5" }, { "Permission": "abandonedbases.basic", "Lifetime (Days)": "3" } ], Purge Settings
Permission - The permission to use with this setting Lifetime (Days) - The amount of time in days before a base is considered abandoned. Set to none to not consider players with this permission as inactive. Conversions Before Destroying Base (1) - The amount of times a base can become abandoned before it is finally destroyed when the Despawn Timer expires. Comes with 3 configured permissions and lifetime days by default Abandoned Settings
Blacklisted Commands (command1, command2, command3) - Commands players are not allowed using at a raid or marked with PVP delay Marker Name (Minutes) (Abandoned Player Base [{time}m]) - Text shown on map marker for minutes Marker Name (Seconds) (Abandoned Player Base [{time}s]) - Text shown on map marker for seconds Foundations Required (4) - Minimum amount of foundations required to become raidable Walls Required (3) - Minimum amount of walls required to become raidable Sphere Amount (10) - Increase to darken the dome, or decrease to brighten it Sphere Radius (50) - How big the dome is in meters Use Dynamic Sphere Radius (false) - Allow the dome to detect the best dome size Max Dynamic Radius (75.0) - How maximum size of the dynamic radius Min Custom Sphere Radius - The minimum radius allowed when using /sar <radius> Max Custom Sphere Radius - The maximum radius allowed when using /sar <radius> PVP Delay (15.0) - The amount of time in seconds that players can take damage after leaving the dome Despawn Timer (1800.0) - The amount of time in seconds that players have to finish the raid Reset Despawn Timer When Base Is Attacked (true) - When enabled this will reset the above despawn timer back to 1800 seconds by default Do Not Destroy Base When Despawn Timer Expires (false) - Use this to override and prevent a base from being destroyed when Despawn Timer expires Backpacks Can Be Opened (true) - When enabled players will be allowed to open their backpacks while inside of the dome Backpacks Can Be Looted By Anyone (false) - Bypass PreventLooting plugin and allow backpacks to be lootable if enabled Corpses Can Be Looted By Anyone (true) - Bypass PreventLooting plugin and allow backpacks to be lootable if enabled Allow PVP (true) - Allows PVP while inside of the dome, and when flagged with a PVP delay Seconds Until Despawn After Looting (600) Seconds Until Despawn After Looting Resets When Damaged (true) Cancel Automated Events If Abandoned Owner Comes Online (false) Message Raiders When Event Ends During Automated Cancellation (true) Change Marker Color On First Entity Destroyed (true) Cooldown Between Conversions (3600) - Time required between each manual conversion of a base using /sar Cooldown Between Events (3600) - Time between each event - prevents looting, damage and using /sar claim Cooldown Between Cancel (3600) - Time the player must wait to use /sar cancel Cooldown Between Conversions Ignored During Purge (true) Cooldown Between Cancel Ignored During Purge (true) Cooldown Between Events Ignored During Purge (true) Prevent Hogging Ignored During Purge (false) Run Once On Server Startup (false) - Check for abandoned bases immediately after server startup is complete Run Every X Seconds (0.0) - The time in seconds to check for each building on the server in order to determine which bases are inactive Kill Inactive Sleepers (false) - When enabled players with a permission from purge settings will be executed when they are offline for the configured amount of lifetime days Let Players Kill Abandoned Sleepers (false) - Allows players to kill anyone sleeping inside of an abandoned base rather than the server killing them automatically Economics/ServerRewards Cost To Manually Convert (0 = disabled) - Used with /sar command to convert any base into an abandoned base Use Map Marker (true) Require Event Be Finished Before It Can Be Canceled (true) Various auto turret settings
Hooks (implemented in 2.1.4, updated in 2.2.5)
participants - anyone that has actively participated (excludes admin if configured, and those in noclip or vanish) - this should not contain null elements
participantIds - contains the userid of all participants - this list is better as anyone offline and dead will be included in this but not in the participants list because they would be null!
intruders - anyone currently inside of the event (does not exclude anyone) - this should not contain null elements
intruderIds - contains the userid of everyone inside of the event (does not exclude anyone) - this list is better as anyone offline and dead will be included in the list but not in the intruders list because they would be null!
void OnBaseSkipped(Vector3 v, ulong userid, HashSet<ulong> owners, string reason, BuildingManager.Building building) { } void OnTugboatSkipped(Vector3 v, ulong userid, HashSet<ulong> owners, string reason, BaseEntity entity) { } void OnShelterSkipped(Vector3 v, ulong userid, HashSet<ulong> owners, string reason, BaseEntity entity) { } void OnAbandonedBaseStarted(Vector3 center, float radius, bool AllowPVP, List<BasePlayer> intruders, List<ulong> intruderIds, List<BaseEntity> entities, List<BuildingPrivlidge> privs, bool canDropBackpack, bool automatedEvent, bool attackEvent, Guid guid) { } void OnAbandonedBaseEnded(Vector3 center, float radius, bool AllowPVP, List<BasePlayer> participants, List<ulong> participantIds, List<BaseEntity> entities, List<BuildingPrivlidge> privs, bool canDropBackpack, bool automatedEvent, bool attackEvent, Guid guid) { } void OnAbandonedBaseTurretsInitialized(List<AutoTurret> turrets,Vector3 center, float radius, bool AllowPVP, ulong raiderId, bool CanDropBackpack, List<BaseEntity> entities, List<BuildingPrivlidge> privs, bool canDropBackpack, bool automatedEvent, bool attackEvent, Guid guid) { } void OnRaidableDespawnUpdate(Vector3 center, float radius, bool AllowPVP, ulong raiderId, DateTime DespawnDateTime, List<BasePlayer> intruders, List<ulong> intruderIds, List<BaseEntity> entities, List<BuildingPrivlidge> privs, bool canDropBackpack, bool automatedEvent, bool attackEvent, Guid guid) { } void OnPlayerEnteredAbandonedBase(BasePlayer player, Vector3 center, float radius, bool AllowPVP, List<BasePlayer> intruders, List<ulong> intruderIds, List<BaseEntity> entities, List<BuildingPrivlidge> privs, bool canDropBackpack, bool automatedEvent, bool attackEvent, Guid guid) { } void OnPlayerExitAbandonedBase(BasePlayer player, Vector3 center, float radius, bool AllowPVP, List<BasePlayer> intruders, List<ulong> intruderIds, List<BaseEntity> entities, List<BuildingPrivlidge> privs, bool canDropBackpack, bool automatedEvent, bool attackEvent, Guid guid) { } void OnAbandonedBaseCompleted(Vector3 center, float radius, bool AllowPVP, List<BasePlayer> intruders, List<ulong> intruderIds, List<BaseEntity> entities, List<BuildingPrivlidge> privs, bool canDropBackpack, bool automatedEvent, bool attackEvent, Guid guid) { } void OnAbandonedBaseClaimed(BasePlayer player, Vector3 center, float radius, bool AllowPVP, List<BasePlayer> participants, List<ulong> participantIds, List<BaseEntity> entities, List<BuildingPrivlidge> privs, bool canDropBackpack, bool automatedEvent, bool attackEvent, Guid guid) { } void OnAbandonedBaseClaimFailed(BasePlayer player, Vector3 center, float radius, bool AllowPVP, List<BasePlayer> participants, List<ulong> participantIds, List<BaseEntity> entities, List<BuildingPrivlidge> privs, bool canDropBackpack, bool automatedEvent, bool attackEvent, Guid guid) { } object OnBlockRaidableBasesTeleport(BasePlayer player, Vector3 to) => null; // return true to allow the blocked teleport, return a string to block with your message instead void OnAbandonedBasePrivilegeDestroyed(Vector3 center, float radius, bool AllowPVP, List<BasePlayer> intruders, List<ulong> intruderIds, List<BaseEntity> entities, List<BuildingPrivlidge> privs, bool canDropBackpack, bool automatedEvent, bool attackEvent, BuildingPrivlidge priv, bool areCupboardsTaken, Guid guid) { } void OnPlayerPvpDelayStart(BasePlayer player, ulong userid, Vector3 eventPos, float radius, List<BasePlayer> intruders, List<ulong> intruderIds, List<BaseEntity> entities, List<BuildingPrivlidge> privs, bool canDropBackpack, bool automatedEvent, bool attackEvent, Guid guid) { } void OnPlayerPvpDelayExpiredII(BasePlayer player, ulong userid, Vector3 eventPos, float radius, List<BasePlayer> intruders, List<ulong> intruderIds, List<BaseEntity> entities, List<BuildingPrivlidge> privs, bool canDropBackpack, bool automatedEvent, bool attackEvent, Guid guid) { } void OnPlayerPvpDelayReset(BasePlayer player, ulong userid, Vector3 eventPos, float radius, List<BasePlayer> intruders, List<ulong> intruderIds, List<BaseEntity> entities, List<BuildingPrivlidge> privs, bool canDropBackpack, bool automatedEvent, bool attackEvent, Guid guid) { } void OnAbandonedBaseDespawned(Vector3 eventPos, float radius, bool allowPVP, List<BasePlayer> intruders, List<ulong> intruderIds, List<BaseEntity> entities, Guid guid) { } object OnProcessPlayerEntity(BaseEntity entity, HitInfo info) => null; // cancel to prevent the plugin from handling this entity, though it can still be an event entity already in some cases void OnAbandonedBaseDespawn(List<BaseEntity> entities) { } // only called when a base is not eligible to convert void OnAbandonedBaseDespawn(Vector3 center, float radius, bool AllowPVP, List<BasePlayer> intruders, List<ulong> intruderIds, List<BaseEntity> entities, List<BuildingPrivlidge> privs, bool canDropBackpack, bool automatedEvent, bool attackEvent, Guid guid) { } void OnAbandonedBaseStart(Vector3 center, float radius, bool allowPVP, List<BasePlayer> intruders, List<ulong> intruders, List<ulong> intruderIds, List<BaseEntity> entities, bool canDropBackpack, bool automatedEvent, bool attackEvent, Guid guid) Added OnEntityEnteredAbandonedBase(BaseEntity entity, Vector3 center, float radius, bool allowPVP, List<BasePlayer> intruders, List<ulong> intruderIds, List<BaseEntity> entities, List<BuildingPrivlidge> privs, bool canDropBackpack, bool automatedEvent, Guid guid) Convert Bases and/or Claim Bases
Credits:
misticos for giving permission to use some of his code 🙂- #rust
- #rust plugin
- (and 6 more)
-
$49.99
Shoppy Stock
By ThePitereq in Plugins
RUST Plugin Test Server
TEST MY PLUGINS THERE!
connect play.thepitereq.ovh:28050
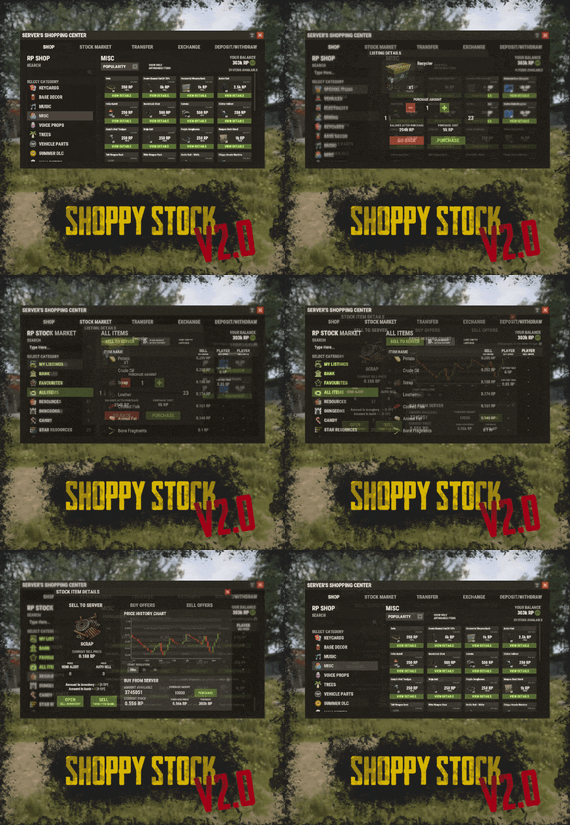
Shoppy Stock is a powerful and versatile economy system designed to enrich your Rust server with shops, stock markets, transfers, exchanges, and deposit features.
This plugin makes it easy to create multiple shops with unique currencies, set up dynamic stock markets with item listings, and manage a fully customizable server selling center—plus many more advanced options.
Plugin package (zip) contains:
ShoppyStock plugin ShoppyConverter plugin (Converts 1.x config to 2.0 config)
Global
Includes over 17 detailed Rust-themed GUI windows. Optimized for performance—actions are lightweight and won’t burden your server. Highly expandable, limited only by your imagination. Fully customizable popup messages through the PopUp API. Comprehensive command and API support for currency management. Full language support for all messages and items. Supports NoEscape integration. Complete UI color customization. NPC interaction support for shops and stock markets. Page memory feature remembers your position in the shop when reopened. Deposit and withdraw currencies to and from items. Currency exchange between different types. Built-in currency leaderboard. Shops
Create multiple shops, each using different currencies. Easily import your old currency from other economy plugins. Organize items into categories with custom icons for seamless browsing. Unified search bar across all categories. Buy exactly the amount of items you need. Full custom item support. If currency is item-based, allow deposits into the shop as virtual currency and withdrawals back to items. Granular permission system configurable for each action. Daily or wipe purchase limits. Purchase cooldowns. Configurable discount system. Random offer rotations with customizable listings. Progressive pricing — prices can increase by set values or multipliers on each purchase. Stock Market
Create multiple markets with different currencies. Favorite items tab for quick access. Automatic listing of all vanilla Rust items with blacklist support. Multiple sorting options for better market management. Buy and sell request creation. Configurable server sell price history. Permission-based limits on how many listings each player can create. Listings can be canceled, refunded, or returned to the market at no cost. Customizable taxes on market actions. Support for extra item info like durability and plant genes. Timed price rolls to adjust prices at set hours. Demand-based pricing that adjusts based on item popularity (DiscordCore required for messages). Advanced selling center with a price calculator using over 15 variables (e.g., amount sold, online player count). Stock Market Broker system—players can store or refund items, set alert prices, and even auto-sell resources while offline. Custom categories and full custom item support. Web API support for price checks or integration into server tools (requires web server). Statistics module for fine-tuning your economy. Timed listings with configurable availability durations. Ability to buy back resources sold to the market. Listing taxes based on listing time. Dynamic price history graphs. Individual configuration for server buy/sell offers per item. Generation of historical price data. Transfer
Send currencies to other players, whether they’re online or offline. Configurable transfer limits and taxes.
The following core permission is static and cannot be changed. However, the configuration files include hundreds of customizable permissions covering nearly every action.
shoppystock.admin - Grants full access to admin commands and management tools.
All commands can be fully customized in the configuration. Below are the default commands included with the plugin:
/shop or /s — Opens the main Shoppy Stock interface. /adminshop — Opens the admin shop management panel. (Available in version 2.1) /deposit — Opens the currency deposit inventory. /mshop or /goldshop — Opens a specific shop. /market — Opens the stock market interface for a specific currency (defaults to “money”). /sell — Opens the sell inventory to sell items directly to the server (defaults to “money”). /list — Opens the interface to list a new item on the stock market (defaults to “money”). /bank — Opens the bank interface for a specific stock market (defaults to “money”). /stockcode <code> — Displays a private listing using a code shared by the listing owner. updateprices — Console command showing details on rolling or updating item prices in the stock market.
Shoppy Stock is packed with powerful features, and configuring everything the first time can feel overwhelming.
This guide provides a quick walkthrough to help you get started and understand key parts of the plugin.
Optional Supported Currency Plugins
Economics ServerRewards BankSystem IQEconomic
Moving from V1 to V2.
Shoppy Stock V2 has been almost completely rewritten from scratch, reusing less than 10% of the old code.
The new configuration is redesigned to be more intuitive and feature-rich.
To help you migrate, use the provided ShoppyConverter, which can convert about 95% of your old configs and data files to the new format.
After converting, always review your new configs carefully — V2 includes dozens of new options that won’t automatically adjust to your preferred settings.
How to convert:
Place ShoppyConverter.cs in your plugins folder. Follow console instructions to move files to the required location. Run the conversion command as instructed. Once converted, place the new files in the correct folders as indicated.
Configuration Files
The plugin’s extensive features are divided across several files and folders:
/config/ShoppyStock.json
Main config containing default settings for currencies, shops, stock markets, and global options. /data/ShoppyStock/playersData.json
Stores global plugin data and player currencies. /data/ShoppyStock/Shops/Configs/<shopName>.json
Shop configs, including available categories and items. /data/ShoppyStock/Shops/Statistics/
Data on daily limits, unique purchases, and more. /data/ShoppyStock/StockMarkets/Configs/<stockName>.json
Stock market configs. /data/ShoppyStock/StockMarkets/Listings/
Player buy and sell offers. /data/ShoppyStock/StockMarkets/PlayerData/
Alert data, favorites, banked items, etc. /data/ShoppyStock/StockMarkets/PriceCache/
Historical price data and current server sell prices. /data/ShoppyStock/StockMarkets/Statistics/
Data on items sold to the server and total currency earned.
Main Config Highlights
Web API
You can use the Web API to show market prices on your website.
Requires web hosting with PHP support.
Download apiupdate.php by CLICKING HERE.
Place it in the directory set by your “Web Price API - Link” config.
Make sure it has permission to create api.html.
The generated file will be accessible at <Web Price API - Link>/api.html.
Server-Selling Items → Default Sell Amount Calculation (DSAC)
DSAC helps define the average number of items sold in a period, based on your server’s player activity. The period is an one price roll time.
Example: a PvE x10 server with ~20–30 players might set wood’s DSAC to 1,800,000 — based on my some calculations, but adjust based on your own stats and server needs.
Always Run Timer on Hour Minute
Controls when the plugin rolls stock prices.
For example:
Values: 0, 30, 60 → rolls at x:00 or x:30. Values: 0, 20, 40, 60 → rolls at x:00, x:20, or x:40.
Stock Market - Default Categories
By default, the stock market includes these categories:
Favourites MyListings Bank AllItems Use these codenames in your configs to customize display order.
Stock Market Item Text Info Display Method
If your server supports item.text, you can toggle this option to show listed item text info.
Currently plugin supports two ways of displaying data. You can enable them based on the config number:
0 - Disabled 1 - Reads raw item.text field and shows on screen 2- Reads item.text as Dictionary<string, string> and supports key translation, currently experimental. If your plugin works on item.text info and any of the solutions above doesn't fit you, feel free to message me to create another implementation!
Items - Custom Detail Info (skinId: languageKey)
You can add custom info tags in listings (similar to showing tool condition or clone genes).
For example, tag certain items as “Upgrade Ingredients.”
Redeem Inventory Name
Make sure to create a storage with this name in RedeemStorageAPI — otherwise, items from certain actions could disappear, and errors may occur.
Generating Shop Config With All Vanilla Items
To automatically add all vanilla RUST items to a shop:
In /config/ShoppyStock.json, set Generate Config With All Default RUST Items to true in the desired shop section. Delete the existing shop config file in /data/ShoppyStock/Shops/Configs/. Reload the plugin—this will generate a new config containing all default items.
Shop Data Config Highlights
Shop Items - Commands
Supports few types of dynamic variables in commands:
{userId} → buyer’s Steam ID {userName} → buyer’s nickname {userPosX}, {userPosY}, {userPosZ} → buyer’s coordinates
A collection of answers to common questions about demand systems, price multipliers, stock market trends, and developer API.
Multiplier Events & Demand System
Q: How does the demand system work? What is “weight”?
A: The demand system uses “Multiplier Events” defined in the main config. Each event has a weight that determines its chance to be chosen during a price roll. How often demands appear is configured in your stock market file at: /data/ShoppyStock/StockMarket/Configs/<shopName>.json. Make sure names in the main config and stock market config match exactly.
Q: How do “minimal” and “maximal” work?
A: These define a range for random price multipliers.
Example: if minimal is 1.4 and maximal is 1.8, and the original price is 1.4, the final rolled multiplier might be ~1.685 → final price becomes ≈ 2.359.
If the random roll goes above max or below min, it’s clamped to min/max.
Stock Market - Timestamps & Trends
Q: What are timestamps used for?
A: The plugin stores historical price data which appears in charts for players with the correct permission.
Tip: set a reasonable timestamp retention value even if you don't plan to show players now—this lets you start collecting useful data early.
Data Folder, Stock Market Config
Q: Blocked Multiplier Listing Keys
A: Certain items you want excluded from permission price multipliers.
Price Calculator
Q: Price Change - Price Fluctuation Percentage
A: Adds random small price changes to keep the market realistic when no other events run.
Q: Price Change - Same Price Actions Min/Max
A: Controls how many rolls prices must go up or down in sequence, making trends look more natural.
Q: Price Change - Chances To Increment Based On Current Price Percentage
A: It's the chance to run the action listed above. It's made in "<price percentage>": <price increase chance (percentage)> format. It's made to make prices go higher more easily when they are low and harder when they are high.
Q: Price Drop - Amount Sell Values Penalty Multiplier
A: When many items are sold fast, price roll becomes negative × penalty multiplier, making it drop quicker.
Q: Price Drop - Amount Sold Max Price Penalty
A: If a huge amount of an item (e.g., 10000% of DSAC) is sold, price is locked to e.g., 25% of original value for a period (e.g., 24 price rolls).
Q: Price Increase - DSAC Not Achieved
A: When item demand is too low (<100% DSAC sold), price increases faster to encourage farming, e.g., by x1.5.
Q: Default Sell Amount Calculation - Players Online Multiplier
A: Automatically scales DSAC based on current player count (checked each price roll). Useful if online population varies greatly.
Q: Price Multipliers - Minimal Time Distance Between Events
A: Sets a cooldown between multiplier events to avoid price spikes.
Q: Price Multipliers - Chance To Appear Based On Sold Amount
A: Lets multipliers trigger more often when few or many items are sold.
Q: Price Multiplier Events
A: Defines how many price rolls the price-increase/decrease event should last.
Server Sell Items
Q: What is the price parent system?
A: Lets you set base items (e.g., Metal Ore) and refined items (e.g., Metal Fragments) so that fragments always stay more valuable than ore by a set difference, encouraging refining.
int GetCurrencyAmount(string shopName, BasePlayer player) - Returns player's balance rounded down to integeer. If not found returns 0. int GetCurrencyAmount(string shopName, ulong userId) - Returns player's balance rounded down to integeer. If not found returns 0. float GetCurrencyAmountFloat(string shopName, BasePlayer player) - Returns player's balance. If not found returns 0. float GetCurrencyAmountFloat(string shopName, ulong userId) - Returns player's balance. If not found returns 0. bool TakeCurrency(string shopName, BasePlayer player, int amount) - Takes player currency. Returns true if taken and false if not. bool TakeCurrency(string shopName, BasePlayer player, float amount) - Takes player currency. Returns true if taken and false if not. bool TakeCurrency(string shopName, ulong userId, int amount) - Takes player currency. Returns true if taken and false if not. bool TakeCurrency(string shopName, ulong userId, float amount) - Takes player currency. Returns true if taken and false if not. void GiveCurrency(string shopName, ulong sellerId, int amount) - Gives player currency. void GiveCurrency(string shopName, ulong sellerId, float amount) - Gives player currency. string FormatCurrency(string shopName, BasePlayer player) - Returns player's formatted balance.
Video Configuration
Contains all configuration files shown on video.
My private configuration created for my purposes.
Note: many custom item features won’t work directly on your server—they're specific to the author’s private setup.
Example Configuration.zip
Default Main Config
CLICK HERE!
Default Shop Data Config
CLICK HERE!
Default Stock Market Data Config
CLICK HERE!
-
$28.99
Train Homes
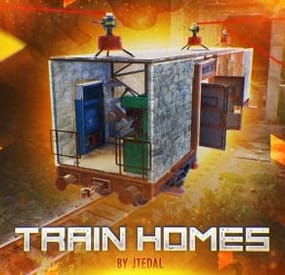
Live in one place? It's not interesting. Live in a camping car module? Too small. Have a full-fledged mobile home? That's what you need!
Video
How does it work?
You cannot build a base on a wagon while the wagon is on the rails. In order to place something on the wagon, you need to move it to your base, which has at least 7x3 foundations. Everything is shown in more detail in this video.:
With this plugin, your players will be able to build their own small base on the wagon and wander around the server with it. Or you can even assemble a whole train of such wagons.
Chat Command (For admins)
/showfreewagons - Writes the number of available wagons to the console, and also shows their location on the server. (Permission is required for use)
/givewagon <amount> <SteamID or Name> - gives the specified player an item for the spawn of the wagon in the amount that you specify (Permission is required for use)
Chat Command (For Player)
/thinstruction - instructions on some features of the plugin
/removewagon - take a hammer in your hands, write a command and hit the wagon
Console Command (RCON only)
clearallwagons - clears the server of all custom wagons. Be careful! The action is irreversible and players will lose all their items and resources. It should be used only before you want to turn off the plugin from the server, because after unloading, custom wagons can be created on the server.
givewagon <amount> <SteamID or Name> - gives the specified player an item for the spawn of the wagon in the amount that you specify
Plugin Config
https://pastebin.com/jbsateCv Permissions
trainhomes.givewagon - gives permission to use the chat command /givewagon
trainhomes.showfreewagons - gives permission to view the location of free wagons
Hooks
private bool OnWagonSpawn(BasePlayer player) API
private bool IsEntityFromBaseWagon(ulong netIdValue) Returns true if the netId of the object belongs to the wagon
private bool IsBaseWagon(ulong netIdValue) Returns true if the netId belongs to a wagon on the base
private bool IsTrainHomes(ulong netIdValue) Returns true if the netId belongs to a wagon on the track
private bool IsFreeWagon(ulong netIdValue) Returns true if the netId belongs to a free wagon on the track
Check out more of my work here JTedal's library.
Come see our whole teams work Mad Mapper Library.
- #jtedal
- #mad mappers
- (and 10 more)
-

$24.99
Vora Island
By Wonder_Fox in Maps
Vora Island – Custom Handcrafted Rust Map
Vora Island is a fully custom Rust map where almost everything is handcrafted, from the terrain and roads to unique locations and monuments.
The main highlight of my maps is creative custom places — unique locations designed to surprise players and make exploration truly rewarding.
🌍 Custom Places (30 Total)
Vora Island features 30 custom places, all marked on the map with the ◈ symbol.
You will find:
A glass sphere in the middle of winter, where it’s summer inside and green trees grow 🌿
Many custom locations with atmospheric lighting
Ready-to-use recyclers
Fully functional farms and stables
A cozy Hobbit House
Floating islands
Modern houses
And many more unique places to discover
Each custom place is carefully designed to feel alive and useful, not just decorative.
🏗 Custom Monuments
Vora Island includes a large number of custom monuments with puzzles and valuable loot:
🚆 Railway Station
Active railway passing through the monument
Loot crates
A room accessible with a Red Keycard
🏭 Large Warehouse
An improved version of the vanilla warehouse
Elite crates
A suspended container on a crane containing a hackable crate (requires a Red Keycard)
Radiation in certain areas
🚗 Car Service
Vehicle parts
Car modification area
Plenty of valuable loot
🏨 Motel
A unique monument with a custom loot system:
Lootable lockers, kitchens, and washing machines
Many blueprints for crafting workbenches
A shop where players can trade extra blueprints for components or clothing
🚁 Heli Tower
A tower designed for safely and effectively taking down the Patrol Helicopter
🧩 Challenge House
Puzzles and time-based challenges
Spikes, deadly lasers, and radiation
High-quality loot waiting at the end
🛡 Bradley Arena
Hackable crates in the center of the arena
Guarded by three Bradley APCs
Entry requires multiple Red Keycards
After opening the arena, temporary cover spawns
Players have 25 minutes to destroy the Bradleys — after that, the cover disappears, preventing long-term camping
🛢 Custom Oil Rig
Extremely detailed custom monument
Complex puzzles
Very high-tier loot
50+ hours spent creating this monument alone
⛽ Custom Gas Station
A superior alternative to the vanilla gas station
Chance to find a Red Keycard
Ability to buy fuel and food
🏴 Mini Bandit Camp
An addon for the standard Outpost
Includes all features of the vanilla Bandit Camp
❄ Visual Highlight
One of the signature features of my maps is the blue grass in snowy biomes — it glows at night, creating a stunning and unique atmosphere.
⭐ Why Vora Island?
Handcrafted terrain and roads
30 unique custom places
Numerous puzzle-based monuments
Strong visual identity and atmosphere
Vora Island is designed for players who love exploration, challenges, and high-quality custom content.
- #custom
- #custom map
- (and 4 more)
-
$19.99
NexusCheatRadar
By WinterChild84 aka Nexus84 in Plugins
💬DISCORD💬 🌐WEBSITE🌐 🖥️RCON🖥️
RCON is a separate product — NCR works completely standalone without it.
What it actually does
No anticheat plugin can go unmonitored and be 100% accurate, they have and will always need admin verification .. as cheats get more advanced detection must adapt , it wont happen automatically but the morre advanced cheats can sometimes slide right through so we update as we find and never share what we know
NCR runs quietly in the background on your server. It watches player behaviour across 9 detection categories, builds a risk profile for every player it sees, and sends a Discord alert with all the relevant info when something looks off. You get the data, you make the call.
What makes it different from a normal anticheat plugin is the network layer. Every server running NCR is connected. When someone who's already been flagged or banned somewhere else joins your server, you find out immediately on join — before they've done anything.
9 behavioural detection systems running in the background
Risk profiles that persist across disconnects, wipes, and server changes
Cross-server intelligence — flagged players carry their history to your server
Discord alerts with full context so you can make an informed call
Free web portal — public player lookup + private server owner dashboard
Admin report panel for submitting and managing reports in-game
F7 Cheat Report intercept , so you can see with ease what players are reporting suspected cheaters
remember every server is diffrent and your config must be adjusted to suit your server (there may at times be features that are set in a test setting so check thresholds and adjust as needed )
💡 For the full cross-server experience — shared violation history, network bans, IP cross-referencing, and join intelligence — enable the Web section in config. The web portal is completely free.
Detection Systems
Every system can be toggled on or off individually. Tuning is always required — every server is different. What works on a 2x will not work on vanilla, and a high-pop server needs different thresholds again. The config is built with this in mind, but expect to spend some time adjusting values to your environment.
ESP / Wallhack — Tracks how often a player is locking onto targets through walls and structures they can't actually see. Runs continuously, not just during fights.
Aimbot — Looks for snap patterns and alignment that just don't happen with a mouse. Compares across multiple engagements before flagging anything.
No-Recoil — Checks recoil compensation per weapon over sustained fire. Accounts for attachments, ping, and burst patterns so legit players don't get caught.
Speed Hack — Catches movement beyond server limits. SkillTree speed bonuses, vehicle movement, and dismount frames are all handled to keep noise low.
Wall Loot — Detects looting through player-built walls. Only fires when the blocking geometry is player-owned — world crates and terrain never trigger it.
Freecam / Debug Cam — Catches anyone using spectator or debug camera modes while still alive in the game world.
NoClip / Fly — Flags movement through solid geometry or flying without a valid surface. Teleport plugins are accounted for automatically.
Strafe / Backpedal — Picks up on movement bot behaviour — perfectly timed strafes and backpedal speeds that aren't physically possible.
Privilege Escalation — Watches for players trying to run admin commands they don't have access to, or attempting to grab permissions at runtime.
Risk Profiles
Every player gets a risk profile the first time NCR sees them. It builds up over time — each detection type contributes its own score into an overall risk level. Scores decay naturally so one old incident doesn't follow someone forever, but a pattern absolutely will.
Leaving and rejoining doesn't reset anything. The profile lives on the network, not on your server.
Per-category scoring with individual probability weights
Scores decay over time — isolated old incidents fade
Steam data pulled on every join — VAC bans, game bans, account age, library size
ServerArmour cross-referenced automatically
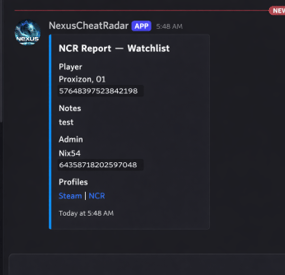
Watchlist for players you want to keep an eye on — whitelist for players you've cleared
Discord Alerts
When something gets flagged you get a full embed in Discord — not just "player X did something suspicious." You get the player's name, Steam ID, current risk level, exactly what was detected and at what confidence, their IP with country and VPN/proxy flags, and a link to their Steam profile.
There's a button to share the violation to the network and one to dismiss it. Nothing ever goes to the public network without you clicking the button. Everything stays private to your server unless you choose to share it.
You can set up a separate webhook channel for each detection type — ESP, Aimbot, No-Recoil, Speed, WallLoot, Freecam, NoClip, Strafe, Privilege, Bans, Join Reports, and Toxic Reports.
NCR Web Portal
Free — no extra subscription needed.
Public lookup — no account needed
Anyone can search a Steam ID and see that player's risk score, violation history, ban status, VAC history, account age, name aliases, and which NCR servers they've shown up on. There's a live feed showing recent bans and violations across the network as they happen.
Server owner dashboard — Steam login, no passwords
All your linked servers with live online/offline status
Live player list — who's on your server vs. other NCR servers right now
Recent violations, ban history, and IP intelligence per server
Detection charts and full player lookup with network-wide history
Team management — add admins and mods with their own Steam logins, granular permissions per role, fully separate from Oxide permissions
💡 To unlock the full network experience — shared history, network bans, IP cross-referencing, and join alerts for flagged players — enable the Web section in config and link your server. Set Enabled: true under Web, then grab your server key from the config file and enter it in the portal after signing in with Steam.
Nexus RCON
Nexus RCON Pro is a separate web-based console panel that connects to your Rust servers over RCON. It's built to work alongside NCR but is completely optional — NCR has no dependency on it and works fine without it.
If you do run both together, RCON gets a dedicated NCR tab that gets detections in real time and lets you act on them — ban, dismiss, share to network — without leaving the panel.
Live RCON console per server in the browser
Dedicated NCR tab — real-time detections, one-click actions
Player list, Permissions, ban management, plugin list
Multi-server support from a single dashboard — no software to install
⚠️ Nexus RCON is a separate subscription. NCR works completely independently — you don't need it to use any of NCR's features.
In-Game Report Panel
There's a built-in admin UI for submitting and managing reports directly from inside Rust. Open it with /ncr.report or via the radar strip button.
Report type selection and player search by name or Steam ID
Reports logged to the network database and forwarded to your Discord
There is leveled permissions control what each admin/moderator role can submit
Admin Commands
/ncrToggle the radar HUD overlay
/ncr.lookupFull player history, risk profile, and Steam data
/ncr.riskPer-category risk score breakdown
/ncr.incidentsLast 8 detections on a specific player
/ncr.historyFull violation history for a player
/ncr.watch / .unwatchAdd or remove a player from the watchlist
/ncr.watchlistView everyone currently on the watchlist
/ncr.statsServer-wide detection stats and top risk scores
/ncr.resetClear a player's risk score and local history
/ncr.ban / .unbanIssue or lift a ban with Discord embed and network log
/ncr.webshareManually push a violation to the public network
/ncr.reportOpen the admin report panel
/ncr.testSend a test alert to Discord
ncr.link / ncr.unlinkLink or unlink your server from the web portal (console)
Main permission: nexuscheatradar.admin
Report panel: .report.mod .report.admin .report.kick .report.tempban .report.serverban .report.networkban
Getting Started
Takes about 5 minutes.
Drop NexusCheatRadar.cs into oxide/plugins/
Start the server — config generates at oxide/config/NexusCheatRadar.json
Add your Discord webhook URLs and Steam Web API key. Set Enabled: true under the Web section
Grant the permission: oxide.grant group admin nexuscheatradar.admin
Reload: oxide.reload NexusCheatRadar
Go to the web portal, head to the Servers tab, and click Setting Up a New Server. Copy your server key from the config file and paste it in, then sign in with Steam — it will link to your account automatically
Test your Discord: /ncr.test
Works With
Oxide / uMod and Carbon
Rust (PC) — no required dependencies
False positive handling built in for SkillTree, Backpacks, RaidableBases, Kits, KitController, ServerKits, and teleport plugins
━━━━━━━━━━━━━━━━━━━━━━━━━━━━━━━━━━━━━━━━━━━━━━━
◈ TROUBLESHOOTING
━━━━━━━━━━━━━━━━━━━━━━━━━━━━━━━━━━━━━━━━━━━━━━━
No Discord alerts arriving?
» Check webhook URLs are correctly pasted — no trailing spaces
» Confirm Discord.Enabled is true in config
» Make sure the detection module is enabled
» Run ncr.testmode <steamid> true to simulate
Too many false positives?
» Raise threshold values in ESP, Aimbot, or NoRecoil config sections
» Increase shot/sample count requirements before alerts fire
» Whitelist high-ping players by SteamID
» Enable SuppressStrafeForSkillTree if using skill tree plugins
Radar or UI not showing?
» Grant nexuscheatradar.admin permission via Oxide
» Toggle with /ncr.radar — requires admin flag or the permission node
» Verify it loaded: oxide.reload NexusCheatRadar
Plugin fails to load?
» Delete the config file — NCR will regenerate it cleanly on next load
» Check oxide/logs for the specific error line
» Confirm you're on a compatible Oxide/uMod build
» Set AutoNormalizeConfigLists to true
━━━━━━━━━━━━━━━━━━━━━━━━━━━━━━━━━━━━━━━━━━━━━━━
https://nexuscheatradar-6yt.pages.dev
━━━━━━━━━━━━━━━━━━━━━━━━━━━━━━━━━━━━━━━━━━━━━━━