
DeutscherRitterPlatz's Wishlist
-
$14.99
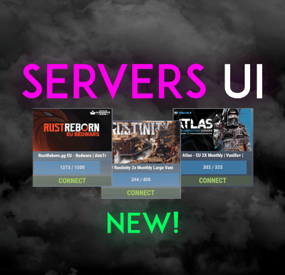
Servers UI | Controller
Easily display all your servers within a very clean a simple UI. Even put a quick connect button for people to instantly connect to the server!
FEATURES
- Simple setup - Very clean UI - Auto receives server info to display to your players - Instant connect buttons - Little to no performance impact - Easy integration with Welcome Controller
To get your battlemetrics server ID, all you need to do is view your server on Battlemetrics, and it's the little number at the end of the URL. https://www.battlemetrics.com/servers/rust/6803740
Support? Questions? Comments? Concerns?
Message me in my Discord! https://discord.gg/RVePam7pd7
{ "Servers Commands": [ "servers", "sv" ], "Servers": [ { "Server ID's (BattleMetrics Id's)": "6803740", "PlaceholderBanner": "https://i.ibb.co/c6Y58gQ/Placeholder-Banner.png" }, { "Server ID's (BattleMetrics Id's)": "12747928", "PlaceholderBanner": "https://i.ibb.co/c6Y58gQ/Placeholder-Banner.png" }, { "Server ID's (BattleMetrics Id's)": "7482472", "PlaceholderBanner": "https://i.ibb.co/c6Y58gQ/Placeholder-Banner.png" }, { "Server ID's (BattleMetrics Id's)": "10519728", "PlaceholderBanner": "https://i.ibb.co/c6Y58gQ/Placeholder-Banner.png" }, { "Server ID's (BattleMetrics Id's)": "16741517", "PlaceholderBanner": "https://i.ibb.co/c6Y58gQ/Placeholder-Banner.png" }, { "Server ID's (BattleMetrics Id's)": "15532055", "PlaceholderBanner": "https://i.ibb.co/c6Y58gQ/Placeholder-Banner.png" }, { "Server ID's (BattleMetrics Id's)": "8113880", "PlaceholderBanner": "https://i.ibb.co/c6Y58gQ/Placeholder-Banner.png" }, { "Server ID's (BattleMetrics Id's)": "9929204", "PlaceholderBanner": "https://i.ibb.co/c6Y58gQ/Placeholder-Banner.png" } ], "UI Colors": { "BlurBackgroundColor": "0 0 0 .4", "MainUIColor": "0 0 0 .4", "MultiMainPanelColor": "0 0 0 .5", "MultiServerTitlePanelColor": "0 0 0 .4", "MultiServerTitleTextColor": "1 1 1 1", "MultiPlayerPanelColor": "0 0 0 .5", "MultiPlayerPanelFillColor": "0.17 0.68 1 .5", "MultiPlayerPanelTextColor": "1 1 1 .6", "MultiPlayerConnectPanelColor": ".25 .31 .16 .8", "MultiPlayerConnectTextColor": ".66 .86 .30 .8", "SingleMainBlurColor": "0 0 0 .4", "SingleMainPanelColor": ".17 .17 .17 1", "SingleServerTitlePanelColor": "1 1 1 .1", "SingleServerTitleTextColor": "1 1 1 1", "SinglePlayerPanelColor": "1 1 1 .1", "SinglePlayerPanelFillColor": "0.17 0.68 1 .7", "SinglePlayerPanelTextColor": "1 1 1 .7", "SinglePlayerConfirmPanelColor": ".25 .31 .16 1", "SinglePlayerConfirmTextColor": ".66 .86 .30 1", "SinglePlayerCancelPanelColor": "0.76 0.14 0.14 .4", "SinglePlayerCancelTextColor": "0.93 0.18 0.18 .75", "SingleDescPanelColor": "1 1 1 .1", "SingleDescTextColor": "1 1 1 .7" } }
-

$12.99
IQPermissions
IQPermissions is your server's temporary privilege controller with the ability to transfer your data from TimedPermissions, Grant or TimePrivilage!
Why IQPermissions? :
- Multilingual permissions and groups (configurable in the configuration)
- Familiar commands, see the section "Commands"
- Logging system, logs will display all the actions of the plugin and its interactions with your players
- Support for logging in Discord (discord will receive notifications about the receipt and expiration of player privileges)
- It is possible to use MySQL in addition to the standard data file
- The ability to synchronize player privileges between your servers using MySQL (privileges and their duration will remain with the player, even if he moves to your other server)
- The ability to use a "whitelist" for permissions and groups available for synchronization between servers
- Safety! If the server crashes or the plugin is unloaded, it automatically clears the player's privileges before the plugin is loaded later (optional in the configuration)
- Encouraging newcomers. You will be able to give groups or permissions to newcomers at any time!
- Player notifications (3 types) :
- 1: Receiving a privilege, the player will receive a pop-up notification that he has received a privilege
- 2 : Expiration reminder, the player will receive a pop-up notification that his privilege is about to end (configurable in the configuration)
- 3 : Privilege expiration, the player will receive a pop-up notification that his privilege has expired
- Full customization of the UI plugin
- Setting up notifications, you can specify a list of permissions and groups the plugin will remind the player about the expiration date
- IQChat support
UI-Alert (3 type) - Example :
Discord Log - Example :
CONFIGURATION - https://pastebin.com/BCV2kK4H
Q: How can I transfer data from my plugin Time d Permissions/Grant/TimePrivilage?
A: It's very simple, download Impermissions, configure the configuration to suit your needs and start syncing with one of the commands (you must have your data file downloaded from one of the specified plugins)
Q: How to install images?
A: Navigate to the folder /data/IQSystem/IQPermissions/ and move the Images folder from the archive there, then reload the plugin.
Commands for transferring data from other plugins :
TimedPermissions - migration.timedpermissions Grant - migration.grant TimePrivilage - migration.timeprivilage *For more commands, see the "Commands" section
Commands :
Commands for transferring data from other plugins:
TimedPermissions - migration.timedpermissions Grant - migration.grant TimePrivilage - migration.timeprivilage Custom commands :
/pinfo - displaying information about privileges to the player Issuance of temporary permissions :
grantperm Steam64ID Permission Time(1d/1m/1s) - grant the player a temporary permission grant.permission Steam64ID Permission Time(1d/1m/1s) - alternative command Withdrawal of temporary permissions :
revokeperm Steam64ID Permission - completely take away the temporary permission of the player revoke.permission Steam64ID Permission - alternative command revokeperm Steam64ID Permission Time(1d/1m/1s) - reduce the duration of the player's permissions revoke.permission Steam64ID Permission Time(1d/1m/1s) - alternative command Issuing temporary groups :
addgroup Steam64ID Group Time(1d/1m/1s) - give the player a temporary group grant.group Steam64ID Group Time(1d/1m/1s) - alternative command Removing temporary groups :
revokegroup Steam64ID Group - completely take away the temporary group from the player revoke.group Steam64ID Group - alternative command revokegroup Steam64ID Group Time(1d/1m/1s) - reduce the duration of the player's group revoke.group Steam64ID Group Time(1d/1m/1s) - alternative command Informative commands :
perm.users Permission - withdraw all players who have the specified permission group.users Group - output all players who have the specified group user.perms Steam64ID - displays all active player permissions user.groups Steam64ID - displays all active player groups API :
Dictionary<String, DateTime> GetPermissions(UInt64 userID) - returns a list of the player's permissions and the time of their validity Dictionary<String, DateTime> GetGroups(UInt64 userID) - returns a list of the player's groups and the time of their action void SetPermission(UInt64 userID, String Permission, DateTime DataExpired) - granting temporary permissions to the player void SetPermission(UInt64 userID, String Permission, String DataExpired) - alternative API (DataExpired in 1d/1m/1s format) void SetGroup(UInt64 userID, String Group, DateTime DataExpired) - issuing a temporary group to a player void SetGroup(UInt64 userID, String Group, String DataExpired) - alternative API (DataExpired in 1d/1m/1s format) void RevokePermission(UInt64 userID, String Permission, DateTime DataExpired = default(DateTime)) - removing player permissions (if DataExpired = default(DateTime) - completely removes the permission from the player, if a period is specified, then it will cut the validity period to this period) void RevokePermission(UInt64 userID, String Permission, String DataExpired = null) - alternative API (DataExpired format 1d/1m/1s) (if DataExpired = null - completely remove the permissions from the player, if a deadline is specified, then the validity period will be scraped until this deadline) void RevokeGroup(UInt64 userID, String Group, DateTime DataExpired = default(DateTime))- removing player group (if DataExpired = default(DateTime) - completely remove the group from the player, if a deadline is specified, then the validity period will be scraped until this deadline) void RevokeGroup(UInt64 userID, String Group, String DataExpired = null) - alternative API (DataExpired format 1d/1m/1s) (если DataExpired = null - completely remove the group from the player, if a deadline is specified, then the validity period will be scraped until this deadline)
- #timedpermissions
- #grant
- (and 8 more)
-
$20.00
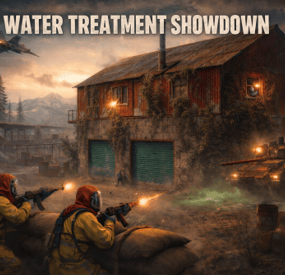
Water Treatment Showdown Event
By Yac Vaguer in Plugins
The Water Treatment Event plugin transforms the Water Treatment Monument into a high-stakes adventure. This event introduces a series of challenges, including zombie hordes, military defenses, and a dramatic escape sequence.
Overview
Event Details Location: Water Treatment Monument
Event Trigger: An explosion occurs following experimental activities within the monument, resulting in the infestation of zombies in the main building.
Security Measures To add a layer of difficulty, the monument is secured by:
Bradley APC Guards: Armed personnel stationed at key points. Snipers: Positioned to cover strategic locations.
Player Objectives
Acquire the Loot: Players must infiltrate the main building to retrieve valuable loot.
Escape Before the Nuke: After securing the loot, an F15 jet will approach and drop a nuclear bomb, causing radiation to spread across the monument. Players must evacuate the area before the nuke detonates.
Configuration Options
Server owners can customize the event settings, such as:
Zombie Density: Adjust the number of zombies in the main building. Guard Strength: Modify the health and equipment of the guards and snipers. Timing: Set the duration between loot acquisition and the nuke drop. Activation: The event can be triggered manually or set to run on a schedule. Sam Sites: On/Off And Several others see below for configuration example
PVE Configuration
We are compatible with two PVE Solutions, Simple PVE Sphere and PVE Mode
PVE Mode is a way better solution but it is also paid version, in order to avoid people to buy another tool to use this plugin I release Simple PVE Sphere that you need to install in your server in order to work.
Simple PVE Sphere is a way simplified version of the sphere, if you have any issue please report it in the Issues on the plugin directly.
In the configuration you can activate one of them and remember that the plugin need to exists in your server.
DO NOT ATTEMPT TO ACTIVATE BOTH AT THE SAME TIME !!!
"PVE Mode cofiguration": { "Use the PVE mode of the plugin? [true/false]": false, "The amount of damage that the player has to do to become the Event Owner": 500.0, "Damage Multipliers for calculate to become the Event Owner": { "Npc": 1.0, "Bradley": 2.0 }, "Can the non-owner of the event loot the crates? [true/false]": false, "Can the non-owner of the event hack locked crates? [true/false]": false, "Can the non-owner of the event loot NPC corpses? [true/false]": false, "Can the non-owner of the event deal damage to the NPC? [true/false]": false, "Can the non-owner of the event do damage to Bradley? [true/false]": false, "Can an Npc attack a non-owner of the event? [true/false]": false, "Can Bradley attack a non-owner of the event? [true/false]": false, "Allow the non-owner of the event to enter the event zone? [true/false]": false, "Allow a player who has an active cooldown of the Event Owner to enter the event zone? [true/false]": true, "The time that the Event Owner may not be inside the event zone [sec.]": 300, "The time until the end of Event Owner status when it is necessary to warn the player [sec.]": 60, "Prevent the actions of the RestoreUponDeath plugin in the event zone? [true/false]": true, "The time that the player can`t become the Event Owner, after the end of the event and the player was its owner [sec.]": 86400.0, "Darkening the dome (0 - disables the dome)": 12 }, "Simple PVE Mode cofiguration": { "Use the Simple PVE mode of the plugin? [true/false]": false, "Darkening the dome (0 - disables the dome)": 12 },
Integrations
You can assign rewards using:
Economics ServerRewards SkillTree You can also send message using GUI Announcements
Dependencies Required
NPC Spawn
Console Commands
wtestart This manually trigger the start of the event
wtestop Force to stop the event
Chat Commands
/wtestart This manually trigger the start of the event
/wtestop Force to stop the event
Permissions to run the console commands
watertreatmentevent.admin
Hooks of the Event
OnWaterTreatmentEventStart //Triggered when Event Start
OnWaterTreatmentEventEnded //Triggered when Event Finished
Backlog
Animation scene when the event start Improve FX Animation scene when the event ends Trigger hooks for other developers Different Awards for the winners PVE Mode
Icons for Server HUD
Thank you @Dead Nasty for the designs
-
$14.99
Collection Log
By imthenewguy in Plugins
Collection Log is a plugin that will track items collected from multiple sources against multiple collection logs. When a player discovers a new item that is contained in one of the logs, it is marked as found. Once a log has been entirely collected, the player is rewarded with that logs prizes. The sources that players can obtain items from are completely customizable, allowing for some unique logs to be created.
Fully customizable logs that also support custom items. 11 different sources that can be collected from (Crates, barrels, Farming, Fishing, Woodcutting etc). Support for item rewards and command rewards included. Supports UINotify for communicating newly collected items.
Here is an example of 2 collection logs with different sources:
The "Farming" collection log contains growable items such as cloth, corn and pumpkins, but the only valid source to obtain these items from is the Farming source. The "Resources" collection log contains many types of items, but has some overlap with the "Farming" log, which includes cloth, corn and pumpkins. The key difference is that this log supports multiple sources (Collecting, Crates, Barrels, and Woodcutting), but it does not contain the Farming source. In this situation: When a player collects a map generated hemp plant (hemp-collectible), it would register cloth under the "Resources" log as collected, but it will not do the same for the "Farming" log.
The "Farming" log would only register if the cloth was obtained from a grown hemp plant (hemp.entity).
This is an example of how you can differentiate the same items using different sources.
The plugin allows for multiple sources per collection log.
Barrel - Triggered when the player destroys a barrel or road sign Collecting - Triggered when the player picks up an entity (hemp-collectible, diesel_collectible etc). Crates - Triggered when the player opens a create (only the first player to open the crate will trigger it). Farming - Triggered when the player collects grown entities. Fishing, - Triggered when the player catches a fish. Mining - Triggered when the player mines ore. Woodcutting - Triggered when the player chops a tree. Skinning - Triggered when a player skins an animal/person. Crafting - Triggered when a craft completes. Unwrap - Triggered when a player uses the unwrap button on an item. Consume - Triggered when a player uses the eat/drink button on an item. Corpse - Triggered when a player loots the corpse of an NPC. Plugin - Triggered by a Third-party plugin.
The only permission in the plugin currently is collectionlog.use.
This is required to use any feature of the plugin.
Menu command (customizable via config): cl or collectionlog
API
// Triggers collection of an item. sourceType should be a CollectionSource enum. void CollectFromPlugin(BasePlayer player, Item item, string sourceType);
- #collecting
- #item
- (and 7 more)
-

$24.99
XCustomExcavator
Take full control of excavators on your Rust server with XCustomExcavator. This powerful plugin lets admins fine-tune excavator functionality, ensuring an optimized experience for players. Adjust mined resources, tweak interface settings, and enjoy multi-language support and robust data storage. Custom settings and progress are preserved after restarts. Seamlessly handle multiple excavators and integrate smoothly with your server.
Key Features
Multi-Language Support: Switch plugin language with ease. Available in EN, RU, UK, and ES. Interface Optimization: Adjusts for different monitor resolutions. Persistent Data Storage: Excavator data saved in oxide/data/XDataSystem/XCustomExcavator. Progress saved after server restarts. Sound Effects: Enjoy interactive menu sounds. Multi-Excavator Support: Works seamlessly with multiple excavators on the map. Customizable Resources: Modify resources including shortname, amount, custom name, permission, and skin. Unlimited Resources: No limit on the number of resources. Chat Integration: View excavator information in chat. User-Friendly Resource Selection: Features like check button, distance to button, permission checks, and more. Error Notifications: Informs you of configuration mistakes.
-> In the code you can switch the plugin language - LanguageEnglish = true <-
Permissions
xcustomexcavator.use - access to UI usage/resource selection. xcustomexcavator.info - chat information. xcustomexcavator.admin - administrator mode.
Commands
/einfo, /exinfo, /excavatorinfo - information about excavator in chat. [ Commands can be changed in the config. ] xcustomexcavator_unload - unload the plugin without consequences. [ For those cases when the plugin will be unloaded and will not be used for some time. ]
API
bool IsValidIndex(int index) - check if the resource index is valid. 1. string GetResourceCustomName(int index) - get the custom name of the resource. 2. string GetResourcePermission(int index) - get the resource permission. 3. ulong? GetResourceSkinID(int index) - get the skin of the resource. 4. string GetResourceAmountString(int index) - get a formatted string of the resource amount. 5. string GetResourceDisplayName(int index) - get the formatted name of the resource. ( For 1-5. If index is invalid, null will be returned. )
Hooks
object OnExcavatorResourceSetUI(ExcavatorArm excavator, int index, ulong skinID, BasePlayer player) - called when player tries to select a resource in UI. Returning non null will prevent this action!
Config
{ "General settings": { "SteamID profile for custom avatar": 0, "Chat prefix": "<size=12><color=#FFFFFF50>[</color> <color=#00FF0050>XCustomExcavator</color> <color=#FFFFFF50>]</color></size>\n", "List of commands to view information about the Excavator": [ "einfo", "exinfo", "excavatorinfo" ] }, "GUI settings": { "Color_background_1": "0.517 0.521 0.509 0.95", "Color_background_2": "0.217 0.221 0.209 0.95", "Color_background_3": "0.527 0.531 0.519 1", "Button color (icons)": "1 1 1 0.75", "Block color": "0.517 0.521 0.509 0.5", "Default block color": "0.417 0.521 0.409 0.5", "Color of the active button next": "0.35 0.45 0.25 1", "Color of the inactive button next": "0.35 0.45 0.25 0.4", "Text color of the active button next": "0.75 0.95 0.41 1", "Text color of the inactive button next": "0.75 0.95 0.41 0.4", "Color of the active button back": "0.65 0.29 0.24 1", "Color of the inactive button back": "0.65 0.29 0.24 0.4", "Text color of the active button back": "0.92 0.79 0.76 1", "Text color of the inactive button back": "0.92 0.79 0.76 0.4" }, "HQM": { "Shortname of the resource to be mined": "hq.metal.ore", "Amount of resource that will be mined - one barrel diesel": 100.0, "Custom item name": null, "Permission": null, "Item skin": 0 }, "Sulfur": { "Shortname of the resource to be mined": "sulfur.ore", "Amount of resource that will be mined - one barrel diesel": 2000.0, "Custom item name": null, "Permission": null, "Item skin": 0 }, "Stone": { "Shortname of the resource to be mined": "stones", "Amount of resource that will be mined - one barrel diesel": 10000.0, "Custom item name": null, "Permission": null, "Item skin": 0 }, "Metal": { "Shortname of the resource to be mined": "metal.fragments", "Amount of resource that will be mined - one barrel diesel": 5000.0, "Custom item name": null, "Permission": null, "Item skin": 0 }, "List of mined resources": [ ... ] }