
DeutscherRitterPlatz's Wishlist
-

$24.99
Drug Deals
Transform your Rust server with an immersive, player-driven drug economy! This plugin introduces a thrilling and profitable new gameplay mechanic where players can dive into the drug trade.
Here’s how it works:
Seed Purchase: Players can buy seeds for various "drugs" (e.g., weed, cocaine, tobacco, and opium) from any computer station. Seed Delivery: All orders are delivered by a cargo plane to the player's location when they make the purchase. Plant & Grow: Seeds must be planted and carefully grown over time. Obtaining Drugs: Once mature, players can harvest the drugs from the seeds they planted. The number of drugs they get depends on the plant's genetics. Selling Drugs: Players sell the drugs back to the Drug Dealer NPC or trade with other players, creating a new avenue for in-game profit. Features:
Ability to configure the number of drugs player receives when harvesting based on the plants genetics (eg. GGYYYY could give more than XXGYH) Advertise your server in the UI Animals and scientists ignore drug dealer NPC Charge players a delivery fee when they buy drugs based on permission Choose whether or not a harvested drug can be sold Compatible with the Auto Farm plugin by Razor Configure the dealers position, what items the dealer is wearing, and the dealer's display name Configurable drugs (names, items, skin ids and more)! Want players to get scrap or any other item when harvesting their drugs? Modify that in the config! Drug dealer NPC cannot be killed Discord logs when player purchases drugs Discord logs when player sells drugs Multiple currency options supported: economics, server rewards, custom items Option to lock drops to the player that bought it Option to require custom item to access the black market Option for keycards to lose condition (similar to being swiped) if black market item Option to not spawn the dealer Packaging of drugs before selling Plants must be fully grown (ripe) before they can be harvested Random dealer spawn points Visually see teammates and clanmates planters with drugs in them Vending machine map marker to show the dealer's position on the map See config for more customizable features Drugs:
This plugin comes with 4 default drug seeds, drug items, and drug clones provided by DrugsAPI. Drug Seeds: Weed Seeds Coca Seeds Tobacco Seeds Poppy Seeds Drug Items: Weed Leaf Cocaine Leaf Tobacco Leaf Opium Leaf Drug Clones: Weed Clone Cocaine Clone Tobacco Clone Opium Clone Don't like those options or want to add your own? You can do that in the DrugsAPI config, but you will need to add the image for them to ImageLoaderAPI to display in the UI. Chat Commands
/mydrugs - shows planter boxes and drugs belonging to player and their teammates / clanmates Chat Commands (for admin only):
/adddealerpos <dealer name> - sets player's position as the dealer's spawn point and saves to config Console Commands (for admin only):
givedrugseed <steamid> <drug item display name> <amount> - gives the player the specified drug seed (from config) givedrug <steamid> <drug item display name> <amount> - gives the player the specified drug item (from config) giveblackmarketitem <steamid> - gives player the item required to access the black market givewrappingpaper <steamid> <amount> - gives player x amount of wrapping paper used to package drugs Config:
{ "Black Market Settings": { "Require item to access black market": false, "Black market item display name": "Black Market Item", "Black market item shortname": "keycard_red", "Black market item skin ID": 0, "Black market item condition loss per swipe (if keycard). Default = 1": 1 }, "Delivery Fee Settings": [ { "Delivery fees": { "Key": "drugdeals.fee1", "Value": 10 } }, { "Delivery fees": { "Key": "drugdeals.fee2", "Value": 20 } }, { "Delivery fees": { "Key": "drugdeals.fee3", "Value": 30 } } ], "Discord Settings": { "Use discord webhook": false, "Discord webhook url": "https://support.discord.com/hc/en-us/articles/228383668-Intro-to-Webhooks", "Timezone ID for message timestamp": "America/Chicago", "Embed color": 65280 }, "Dealer Settings": [ { "Enabled [true/false]": true, "Dealer name": "Drug Dealer", "Dealer locations": [ "(0,0,0)", "(0,0,0)" ], "Dealer clothes": [ { "Item shortname": "hoodie", "Skin ID": 0 }, { "Item shortname": "pants", "Skin ID": 0 }, { "Item shortname": "shoes.boots", "Skin ID": 0 } ] } ], "Dealer Movement Interval [min.]": 30.0, "Payment Settings": { "Buy currency [economics/rp/custom]": "custom", "Sell currency [economics/rp/custom]": "custom", "Order confirmation message": "Order Confirmed! It will be delivered shortly.", "Buy custom currency": { "Custom currency item shortname": "scrap", "Custom currency item skin ID": 0, "Custom currency item display name": "Scrap", "Custom currency item image": "scrap" }, "Sell custom currency": { "Custom currency item shortname": "scrap", "Custom currency item skin ID": 0, "Custom currency item display name": "Scrap", "Custom currency item image": "scrap" } }, "UI Settings": { "Buy UI server name / adversisement": "SERVER NAME OR ADVERTISEMENT", "Sell UI server name / adversisement": "SERVER NAME OR ADVERTISEMENT" }, "Plane Settings": { "Plane speed": 20.0 }, "Drop Settings": { "Drop speed": 0.6, "Item slots in drop": 18, "Lock drop to owner": true, "Message to locked out player": "This does not belong to you." }, "Item Purchase Prices": { "Weed Seeds": 200, "Coca Seeds": 300, "Tobacco Seeds": 400, "Poppy Seeds": 600 }, "Required Drugs Per Package": { "Weed Leaf": 15, "Cocaine Leaf": 20, "Tobacco Leaf": 25, "Opium Leaf": 30 }, "Drug Sell Prices": { "Packaged Weed": 150, "Packaged Cocaine": 275, "Packaged Tobacco": 450, "Packaged Opium": 650 }, "Planter Display Settings": { "Display duration [sec.]": 10.0 }, "Harvesting Settings": { "Require drug plant to be ripe to harvest": true }, "Configuration version": { "Major": 2, "Minor": 1, "Patch": 6 } } Notes:
This plugin uses a separate plugin of mine called ImageLoaderAPI (included) to host/display all the images. To display your images in the UI, all you need to do is drop the image in the oxide/data/ImageLoaderAPI folder (create it if it doesn't exist) and specify the image name in the DrugDeals config for the drug seed or drug item you want to use it for. If you need help, just ask. Recommended image size for is 100x100 pixels. Feel free to use other sizes if you want. If you don't want a dealer to spawn, just set "Enabled [true/false]": false for each dealer THIS PLUGIN WORKS WITH AUTO FARM
Thank you for considering to support me, I really do appreciate it. If you have any suggestions on how to improve this product, please do not hesitate to reach out!
Join my Discord
-
$18.99$15.19XFarmRoom
XFarmRoom - farm room of ores for your server. Good donate for players.
- Optimization of the interface for different monitor resolutions.
- Storing player data in - oxide/data/XDataSystem/XFarmRoom
- There is a lang ru/en/uk/es.
- Sound effects when interacting with the menu.
- In the room is forbidden: pick up prefabs that are in the room, install anything in the room, damage the room, use console/chat commands ( customizing commands in the config ).
- Teleport from a room to the place you teleported from.
[ Teleportation from the room works correctly when: leaving the room, death, disconnecting from the server, unloading the plugin, restarting the server ]
- A player is automatically teleported out of the farm room if his permission to access the farm room is revoken away.
- Setting the CD to teleport into a room. [ Permission can be granted to disable the CD.]
- Automatically clear data after a wipe. [ Configure in config ]
- Ability to display room spawn points on the map. [ Administrator only ]
- Ability to set a limit of simultaneously active(occupied rooms) for optimization.
- Ability to customize how many items a player can take into a room.
- The player chooses his own ores from the available ones to mine.
[ For example: the player has all ores available, but in the UI menu he selects a stone and mines only it ]
- Ores can be given out individually, any number on command. [ For example: for sale in the store ]
- The ability to make the ores unlimited for the player.
[ Permissions and number of ores are configurable in the config. Ores can be updated once every N seconds or once per wipe ]
- Room prefabs are spawn without third party plugins.
- Notifications to chat when grant and revoke permission/group with permission to access farm room functionality.
Permissions
xfarmroom.use - access to the room/commands. xfarmroom.nocdtp - allow teleporting into a room without a CD. Commands
/roomtp - to join the room. /roomleave - to leave the room. /roomspawns - display spawn points of farming rooms. [ Administrator only ] xfarmroom_give_ore <SteamID> <ore - [ sulfur-ore | metal-ore | stone-ore ]> <amount - [ 10 | -10 ]> - give ores to the player. xfarmroom_clear_ore <SteamID> - reset the player available ores to zero. API
bool API_PlayerInRoom(ulong userID) - return TRUE/FALSE if the player is in the room. Config
{ "General settings": { "Button placement. [ True - 1 | False - 2 ]": true, "Option to update available ores. ( only with permission to update ). [ True - once per wipe | False - once every N seconds ]": false, "Clear the data after a wipe": true, "Limit the number of items that can be taken into a room": true, "Use UI button to leave the room": true, "Every how many sec. update the number of available ores. ( it is checked only when the player tries to/falls into the room )": 3600, "How many maximum simultaneously active rooms can there be. ( for optimization )": 10, "How many maximum items can be taken into a room": 6, "Room teleportation break sec.": 90, "Chat prefix": "<size=12><color=#FFFFFF50>[</color> <color=#00FF0050>XFarmRoom</color> <color=#FFFFFF50>]</color></size>\n", "Notify the player when he has been granted or revoked away access to the farm room functionality": false, "SteamID profile for custom avatar": 0, "List of allowed console commands in farm room": [ "global.farm_ore" ], "List of allowed chat commands in farm room": [ "roomtp", "roomleave" ] }, "Permission - number of ores. [ Only the value and permission can be changed ]": { "xfarmroom.300": { "sulfur-ore": 300, "metal-ore": 300, "stone-ore": 300 }, "xfarmroom.100": { "sulfur-ore": 100, "metal-ore": 100, "stone-ore": 100 } } } -

$7.00
Monument Loot Notifier
By JackMachine in Plugins
Why This Plugin is a Game-Changer
Transform your Rust server with Monument Loot Notifier, the essential tool to revolutionize gameplay for PVE and PVP alike! This plugin isn’t just functional—it’s a must-have for creating thrilling, efficient, and dynamic interactions on your server.
On PVE Servers: Keep the action flowing and eliminate wasted time. With real-time notifications, players can focus on what matters most: exploration, teamwork, and thriving in the environment. No more looting empty monuments—this plugin boosts efficiency and keeps your players engaged.
On PVP Servers: Turn up the heat! Notifications amplify the tension as players race to claim loot or ambush their rivals. Every notification becomes a high-stakes moment, transforming your server into a battleground of strategy and adrenaline.
Support for Custom Monuments: Do you have unique, hand-crafted monuments on your server? No problem! Monument Loot Notifier fully supports custom monuments, which can be added manually through an integrated system. With just a few simple commands, you can define the boundaries of your custom creations and make them part of the action. This feature ensures your custom content gets the recognition and integration it deserves.
Discord Support: Keep your community informed even when they're not in-game! Monument Loot Notifier can send notifications directly to your Discord server through a webhook. Monument activity, airdrop looting, and locked crate hacks can be shared with your Discord community in real time, keeping everyone connected to the action wherever they are.
Whether you’re fostering collaboration in PVE or creating heart-pounding moments in PVP, Monument Loot Notifier adds life and energy to your server!
Documentation
Commands
/monument_add <name> Start creating a new custom monument by providing a name.
Example: /monument_add CustomPowerPlant
/add_point Add points to define the bounding box of the custom monument.
Requires three points to complete.
How have to start the session first by typing /monument_add NameOfYourMonument
/monument_cancel Cancel the current monument creation session. No changes will be saved.
/monuments_list Display a list of all custom monuments, including their name, position, and size.
/monuments_show Visualize the bounding boxes of all custom monuments on the map for verification.
Bounding Box System
The bounding box system allows admins to define and manage custom monuments precisely. Here’s how it works:
Begin by setting three points: top-left, top-right, and bottom-right corners. The plugin automatically calculates the bounding box and the center point. Bounding boxes are visually represented using spheres and lines, ensuring easy verification. This feature ensures accurate monument management for any monument size or layout, including custom monuments created by your team.
Configuration File
The configuration file empowers you to tailor the plugin to your server’s unique needs. Key options include:
LootThreshold: Determines the number of loots required to trigger a notification.
Example: Set it to 3 to notify players after three containers are looted.
Default: 3. TrackLockedCrates: Enables or disables notifications for locked crate hacks.
Default: true. TrackAirdrops: Enables or disables notifications for airdrop loots.
Default: true. MapPreset: A critical setting that determines which custom monument configuration file to load.
If your map is a regular procedural map with a seed, leave this blank, otherwise, add the preset name and the plugin will load the file with the same name to get the monument layout configuration.
Example: Setting MapPreset to "CustomMap1" will load CustomMap1.json from the data folder.
This makes managing multiple map setups seamless, especially for servers with unique content. EnableDiscord: Enables or disables Discord notifications. When enabled, plugin notifications are also sent to the configured Discord webhook. *Default: false.* - DiscordWebhookUrl: The Discord webhook URL used to send notifications to your Discord server. Create a webhook for the desired Discord channel and paste its URL here. This option is only used when **EnableDiscord** is set to `true`. *Default: empty.*
To edit the configuration, navigate to the oxide/config folder and find the MonumentLootNotifier.json file.
Make your changes and reload the plugin to apply them.
Installation
Copy MonumentLootNotifier.cs into your oxyde/plugins folder
Copy Frostland.json into your oxyde/data/MonumentLootNotifier folder
Permissions
Control access to the plugin’s features with these permissions:
• monumentlootnotifier.exclude.monuments: Exclude a player from monument-related notifications.
• monumentlootnotifier.exclude.drops: Exclude a player from airdrop notifications.
• monumentlootnotifier.exclude.lockedcrates: Exclude a player from locked crate hack notifications.
• monumentlootnotifier.custommonument.create: Allow a player to create custom monuments using admin commands.
Custom map preset included
Map preset included in the ZIP file :
- Frostland (map from gruber)
Why Wait?
Install Monument Loot Notifier Now!
Whether you’re optimizing gameplay on your PVE server, cranking up the pressure in PVP, or showcasing your custom monuments, this plugin is the ultimate solution to transform your server into an unforgettable experience. Boost efficiency, increase adrenaline, and let your players thrive in the dynamic world of Rust.
What are you waiting for? 🎯
-
$5.00
Shipping Containers
By RIPJAWBONES in Plugins
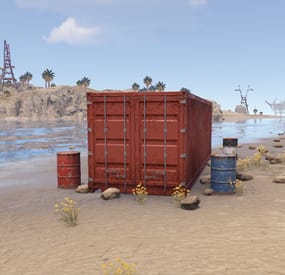
Spawns shipping containers on the beaches around the map with loot crates inside them and barrels around them. Beaches on Rust are currently pretty bare and now with this plugin players can farm the coast and get some worthy loot, this will also help solo players or small teams on high pop servers farm more.
If you cannot afford to pay for this plugin wishlist it and send me a message asking for it and I will give it to you for free.
Configuration:
{ "Max Amount Of Containers": 30, "Space Between Containers": 165.0, "Respawn Timer (Seconds)": 480.0, "Max Respawn Attempts (-1 for infinite)": 3, "Force Loot Respawn After Last Attempt": false, "Prevent Loot Respawn If Player Nearby": true, "Prevent Building Near Containers": true, "Prevent Building Radius": 25.0, "Disable Radiation": true, "Save Locations": true, "Crates and Barrels": [ { "Prefab Paths": [ "assets/bundled/prefabs/radtown/crate_normal.prefab" ], "Spawn Chance (%)": 100, "Position": { "x": -3.8, "y": 0.25, "z": 0.3 }, "Rotation": { "x": 0.0, "y": 90.0, "z": 0.0 } }, { "Prefab Paths": [ "assets/bundled/prefabs/radtown/crate_normal_2.prefab", "assets/bundled/prefabs/radtown/crate_normal_2_food.prefab", "assets/bundled/prefabs/radtown/crate_normal_2_medical.prefab" ], "Spawn Chance (%)": 50, "Position": { "x": 3.8, "y": 0.25, "z": 0.3 }, "Rotation": { "x": 0.0, "y": 90.0, "z": 0.0 } }, { "Prefab Paths": [ "assets/bundled/prefabs/radtown/oil_barrel.prefab" ], "Spawn Chance (%)": 50, "Position": { "x": -3.8, "y": 0.0, "z": 2.5 }, "Rotation": { "x": 0.0, "y": 0.0, "z": 0.0 } }, { "Prefab Paths": [ "assets/bundled/prefabs/radtown/loot_barrel_1.prefab" ], "Spawn Chance (%)": 50, "Position": { "x": -3.8, "y": 0.0, "z": -2.5 }, "Rotation": { "x": 0.0, "y": 0.0, "z": 0.0 } }, { "Prefab Paths": [ "assets/bundled/prefabs/radtown/loot_barrel_2.prefab" ], "Spawn Chance (%)": 50, "Position": { "x": 3.8, "y": 0.0, "z": 2.5 }, "Rotation": { "x": 0.0, "y": 0.0, "z": 0.0 } }, { "Prefab Paths": [ "assets/bundled/prefabs/static/hobobarrel_static.prefab" ], "Spawn Chance (%)": 100, "Position": { "x": 3.8, "y": 0.0, "z": -2.5 }, "Rotation": { "x": 0.0, "y": 0.0, "z": 0.0 } } ] }
-

$6.00
MBPromoCode
By Barry_Allenn in Plugins
🎁 MBPromoCode — Modern Promo Code System for Rust
📖 Overview
MBPromoCode is a clean and powerful promo code system for Rust servers.
It gives administrators full control over unique promo codes, rewards, activation limits, and expiration dates — all through a beautiful, user-friendly interface.
Whether you want to reward new players, promote your social media, or run limited-time events — MBPromoCode makes it effortless.
✨ Main Features
🎟️ Promo Code Management
Create unique promo codes with rewards, usage limits, and expiration dates. Automatically track activations per player. Prevent abuse with built-in validation and cooldown systems. Examples:
WELCOME → gives 1000 wood BONUS → gives 500 stone
🖥️ Simple & Modern Interface
Intuitive UI for entering and activating promo codes. Buttons for “Activate” and “Close” actions. Customizable background images via ImageLibrary.
💬 Notification System
Sends announcements to global chat when a promo code is activated. Fully customizable messages with color formatting and tags. Works in English, Russian, and Ukrainian.
🔐 Logging & Security
Every activation is logged. Expiration and usage limits are automatically checked. Safe and lightweight — no performance impact.
🌐 Media Integration
Add QR codes linking to your TikTok, Discord, or website. Great for promotional events and influencer campaigns.
⚙️ Configuration Highlights
{ "EnablePromoCodeBroadcast": true, "MessagePrefix": "<color=#0057b8>[Promo]</color>", "PromoCodes": { "WELCOME": { "Reward": "give {player} wood 1000", "Expires": "30.10.2025", "MaxUses": 50 }, "BONUS": { "Reward": "give {player} stone 500", "Expires": "01.11.2025", "MaxUses": 100 } } }
💡 Usage Workflow
The player opens the menu with /promo. They enter the code and press Activate. If the code is valid — the reward is granted. A message is displayed in global chat (optional).
🌍 Localization
English Russian Ukrainian All messages are stored in language files and can be freely customized.
💎 Perfect For
Servers running events or giveaways. Communities promoting social media engagement. Admins who want a polished promo code experience with full customization.