0g.Ghost.7373's Wishlist
-
$2.99
Random NPC Names
Random NPC Names is a simple plugin that will automatically rename all NPCs on your server with a more realistic human like name. As NPCs spawn they will be given a First name with a single letter for their last name ( John D. / Mary K. / Stan R.). You can edit/remove the prefix that appears in front of every NPC type in the config.
Chat Command:
commands shown use the default chat command prefix (/rnpcs), if you change the prefix command you must use that prefix with the values below
/rnpcs <value> - change <value> to one of the options below on - enables the Random NPC Names off - disables the Random NPC Names and returns NPC names to default debugon - turns Debug mode on debugoff - turns Debug mode off renameall - manually renames all active NPCs save - saves settings to config file prefix <type> "<name>" - changes the prefix of NPC type to the name you enter Available Types: scientist tunneldweller underwaterdweller scarecrow Chat Command Example: /rnpcs prefix scientist "Crazy Scientist"
API for Developers:
// Returns the NPC name as string (looks for BaseCombatEntity) GetNameBCE(BaseCombatEntity entity) // Returns the NPC name as string (looks for BaseEntity) GetNameBE(BaseEntity entity)
Config: Example only
{ "Settings": { "enable": true, "debug": true, "chatcommand": "rnpcs" }, "NPC Prefix": { "scientist": "[Scientist]", "tunneldweller": "[Dweller]", "underwaterdweller": "[Dweller]", "scarecrow": "[Scarecrow]", "zombie": "[Zombie]", "frankenstein": "[Frankenstein]" } }
Language:
{ "RNPC_001": "Random NPC Names: {0}", "RNPC_002": "Random NPC Names Debug Mode: {0}", "RNPC_003": "{0} NPCs have been renamed", "RNPC_004": "missing command value (on, off, debugon, debugoff, renameall)" }
-
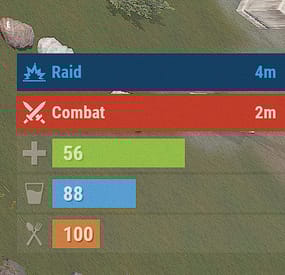
$4.99$3.99SimpleStatus for NoEscape
SimpleStatus for NoEscape is a powerful Rust plugin that seamlessly integrates with NoEscape and SimpleStatus, providing real-time notifications when players enter or exit combat block or raid block. Designed for server administrators who want better visibility and control over player restrictions, this plugin enhances the user experience with customizable UI elements and reliable tracking.
Why Choose SimpleStatus for NoEscape?
This plugin is perfect for Rust servers looking to improve player awareness of combat and raid blocks, reducing confusion and enhancing gameplay fairness. With its lightweight and optimized design, it provides essential information without overwhelming the server.
✦ Real-Time Combat & Raid Detection – Automatically detects when players enter or leave combat or raid block states.
✦ Customizable UI Integration – Works with SimpleStatus to display visually appealing status indicators.
✦ Permission-Based System – Admins can restrict status updates to specific player groups.
✦ Optimized Performance – Efficient tracking and notification system to minimize server impact.
✦ Seamless Compatibility – Fully integrates with NoEscape, ensuring accurate block status detection.
✦ Image & Color Customization – Modify background colors, icons, and text to fit your server's theme.
If you need help setting it up or just want to clear up any doubts before making the purchase, you can contact me via discord.
In order for this plugin to work, you need to make a small modification to the "NoEscape" plugin as follows:
Since the last official update of No Escape was three years ago (v2.1.35), I am attaching the edited plugin with the additions described in these steps. If you prefer not to follow the steps below, you can download the file clicking here.
1. Right click on the "NoEscape.cs" file and then select the option to open with your favorite text editor (for example: Notepad, VS Code or just the default one on Windows).
2. Then you need to go to approximately line 1218 within the "API" section.
3. Once you are on the mentioned line, you need to paste the following code:
4. Done!
float GetRemainingBlockTime(BasePlayer player, string type) { Type blockType = type == "raid" ? typeof(RaidBlock) : typeof(CombatBlock); UnityEngine.Component block = player.GetComponent(blockType); if (block == null) return 0; FieldInfo lastBlockField = blockType.GetField("lastBlock", BindingFlags.Public | BindingFlags.Instance); if (lastBlockField == null) return 0; DateTime lastBlock = (DateTime)lastBlockField.GetValue(block); float blockDuration = type == "raid" ? raidDuration : combatDuration; return Math.Max(0, blockDuration - (float)(DateTime.Now - lastBlock).TotalSeconds); }
{ "General": { "Only with permission": false, "Permissions": { "Combat": "noescapesimplestatus.combat", "Raid": "noescapesimplestatus.raid" } }, "Blockages": { "Combat": { "Enabled": true, "Duration set in NoEscape plugin settings": 180, "Simple Status Settings": { "Title": "Combat", "Title Color (RGB Hexadecimal format)": "#E9C6C1", "Text Color (RGB Hexadecimal format)": "#E9C6C1", "Background Color (RGB Hexadecimal format)": "#C53D28", "Icon URL": "https://i.postimg.cc/65SyPLf2/espada.png", "Icon Color (RGB Hexadecimal format)": "#E9C6C1" } }, "Raid": { "Enabled": true, "Duration set in NoEscape plugin settings": 300, "Simple Status Settings": { "Title": "Raid", "Title Color (RGB Hexadecimal format)": "#419CDC", "Text Color (RGB Hexadecimal format)": "#419CDC", "Background Color (RGB Hexadecimal format)": "#164163", "Icon URL": "https://i.postimg.cc/dVNXK3Sx/explosion.png", "Icon Color (RGB Hexadecimal format)": "#419CDC" } } } }- #noescape rust
- #noescape
- (and 6 more)
-

$9.99
Entity Lists
Entity Lists shows you all living entities on your server in an organized user friendly UI. Can view the name, health, location, ID, and alive time for each entity and includes group permissions where you can create different groups that can only see certain lists. Includes admin controls to teleport to a specific player/entity, teleport them to your location, and/or kill that entity.
Features:
UI with lists of all Entities Details of each entity (name, ID, location, alive time, health) Group Permissions Options to show/hide each list per group Option to allow locations per group
Admins:
Adjust all settings in game using UI Teleport to entity Teleport entity to you Kill entity
Config:
{ "Settings": { "openui": "elist", "requireperms": true, "refreshtime": 10 }, "Permission Groups": { "ELGroup1": { "groupname": "EL Group 1", "players": true, "sleepers": true, "npcs": false, "animals": false, "frankenstein": false, "locations": false }, "ELGroup2": { "groupname": "EL Group 2", "players": true, "sleepers": true, "npcs": true, "animals": true, "frankenstein": false, "locations": false } } }
Language:
{ "EL_admin_001": "Admin Settings", "EL_menu_001": "Menu", "EL_menu_002": "Main", "EL_menu_003": "Admin", "EL_menu_004": "Save", "EL_001": "Entity Lists", "EL_002": "Players", "EL_003": "Sleepers", "EL_004": "Scientists", "EL_005": "Tunnel Dwellers", "EL_006": "Underwater Dwellers", "EL_007": "Animals", "EL_008": "Scarecrows", "EL_009": "Zombies", "EL_010": "Name", "EL_011": "Health", "EL_012": "ID", "EL_013": "Location", "EL_014": "Time Alive", "EL_015": "{0} mins", "EL_016": "{0} hours", "EL_020": "You do not have permission to view Entity Lists", "EL_021": "Information Panel", "EL_022": "(Click any Entity to view details here)", "bear": "Bears", "polarbear": "Polar Bears", "wolf": "Wolves", "stag": "Stags", "boar": "Boars", "ridablehorse2": "Horses", "shark": "Sharks", "chicken": "Chickens", "close": "Close", "pageprev": "Prev", "pagenext": "Next", "EL_admin_002": "Open UI Chat Command", "EL_admin_003": "Require Permissions", "EL_admin_004": "Turning this off will allow everyone to view all UI pages and entities.", "EL_admin_005": "Permission Groups", "EL_admin_006": "Create Group", "EL_admin_007": "Require Permissions Disabled", "EL_group_001": "Permission Groups", "EL_group_002": "Editing Group: {0}", "EL_group_003": "Group Name", "EL_group_004": "View Options", "EL_017": "NPCs", "EL_admin_008": "Refresh Timer", "EL_admin_009": "⇧ Teleport ⇧", "EL_admin_010": "⇩ Teleport ⇩", "EL_admin_011": "Kill" }
-
$24.99
Battlemetrics Moderation Bot
By Bxcas in Discord Bots
THIS TOOL REQUIRES A BATTLEMETRICS RCON SUBSCRIPTION
📌 Overview
The BattleMetrics Moderation Bot is designed to allow trial staff to submit mutes, kicks, bans, and lift bans without requiring full access to BattleMetrics or other moderation tools.
How It Works:
- Trial staff submit moderation actions through Discord forms.
- Actions remain pending for approval until reviewed by verified staff.
- Verified staff can accept, deny, or create a discussion thread for further review.
- The bot integrates exclusively with BattleMetrics and requires a BattleMetrics RCON Subscription to function.
Additional Features:
- All bot actions are logged in a dedicated Logs folder for full transparency and record-keeping.
- Uses BattleMetrics API to ensure secure and efficient moderation.
If you need assistance, contact bxcas on Discord.
---
🔧 Configuration Settings for BattleMetrics Moderation Bot
This section explains each configuration setting in the config.json file, what it does, and where to find the necessary values.
---
🛠 Discord Configuration
The discord section contains the bot's authentication details, server settings, and channels for admin messages.
"discord": { "clientId": "BOT CLIENT ID", "token": "BOT TOKEN", "guildId": "DISCORD SERVER ID", "channels": { "message": "ADMINS CHANNEL ID", "request": "TRIAL CHANNEL REQUEST ID" }, "roles": { "trialStaff": ["TRIAL STAFF ROLE ID 1", "TRIAL STAFF ROLE ID 2"], "seniorStaff": ["SENIOR STAFF ROLE ID 1", "SENIOR STAFF ROLE ID 2"] } } 🔍 Where to Find These Values?
---
🛡 BattleMetrics Configuration (battlemetrics)
This section contains settings related to BattleMetrics, which is used for managing bans and tracking players.
"battlemetrics": { "organizationId": "BATTLEMETRICS ORGANIZATION ID", "banListId": "BATTLEMETRICS BAN LIST ID", "apiToken": "BATTLEMETRICS API TOKEN" }
🔍 Where to Find These Values?
🌐 Server Configuration (servers)
This section defines the Rust servers managed by the bot.
"servers": [ { "name": "SERVER NAME", "id": "SERVER ID" } ] 🔍 Where to Find These Values?
---
🔥 Example Full Configuration
{ "discord": { "clientId": "123456789012345678", "token": "YOUR_DISCORD_BOT_TOKEN", "guildId": "987654321098765432", "channels": { "message": "123456789012345678", "request": "876543210987654321" }, "roles": { "trialStaff": ["123456789012345678", "234567890123456789"], "seniorStaff": ["345678901234567890", "456789012345678901"] } }, "battlemetrics": { "organizationId": "112233", "banListId": "445566", "apiToken": "your_battlemetrics_api_token" }, "servers": [ { "name": "Main Rust Server", "id": "999999" }, { "name": "Test Server", "id": "888888" } ] }
---
🚀 Installation Guide - BattleMetrics Moderation Bot
📌 Requirements
To run the bot, you need a machine with:
- A server or hosting environment (e.g., a VPS, dedicated machine, or a Pterodactyl Egg).
- Node.js installed (recommended: latest LTS version => 22).
---
📌 Installation Steps
1️⃣ Ensure Node.js is installed on your machine.
2️⃣ Place the bot files in your preferred directory.
3️⃣ Open a terminal or command prompt in the bot’s directory.
4️⃣ Run the following command to install dependencies:
npm install
5️⃣ Start the bot by running:
node .
The bot will now run without any issues.
---
📌 Logs
A Logs folder will be created automatically.
All bot activity and errors will be logged inside this folder.
Support
If you need assistance, contact `bxcas` on Discord.
- #discordbot
- #bot
- (and 6 more)
-

$4.99
EggBox
EggBox enhances Chicken Coops by automatically collecting eggs into a small box within the coop.
Each box spawns inside the coop with a storage adapter attached allowing full integration with Industrial Conveyor systems for hands-free egg management!
This version requires no configuration and automatically applies to all coops that are placed after the plugin has been loaded.
Features
✅ Automatic Egg Collection – Eggs from Chicken Coops are instantly moved into a small wooden box inside the coop.
✅ Industrial Storage Adapter Support – Each box comes with a Storage Adapter pre-installed, allowing integration with conveyors.
✅ Persistence & Auto-Recovery – Coops and their storage remain saved across restarts, ensuring uninterrupted egg collection.
✅ Unbreakable Setup – The storage box and adapter cannot be picked up with a hammer, preventing players from breaking the system.
✅ Failsafe Mechanism – If the wooden box is destroyed, a new one is automatically placed inside the coop, keeping the system operational.
✅ Fully Config-Free – No setup required! Just place a Chicken Coop, and EggBox handles the rest.
Future Features
Food Automation - Provide the ability to automate food to each of the coops.
Water Automation - Provide the ability to automate water to each of the coops.
Chicken Health Alarms - Set off an alarm or flashing light on the coop when one of the chickens need some petting.