cameron
-
Posts
119 -
Joined
-
Last visited
-
Days Won
1
Content Type
Profiles
Warranty Claims
Downloads
Forums
Store
Support
DOWNLOADS EXTRA
Services
Everything posted by cameron
-
Can you add more context please. After flying? After spawning in? etc
-
Changed Status from Pending to Not a Bug
-
The command can be sent by the server so it can work with any other plugin. Shop, server rewards even tebex. Yes I can add an option to the text I'll have a think about the last one
-
Hey. It works by spawning in the explosive item. The plugin doesnt create the explosive so it should work how you would expect it. Ie in your case it wont damage buildings. I cant garantee that tho. Try spawn in an explosive threw your console see what happens. Thats how it will work
-
Changed Status from Pending to Work in Progress
-
I will add support but I can't translate it. I only speak English
-
Version 1.0.14
402 downloads
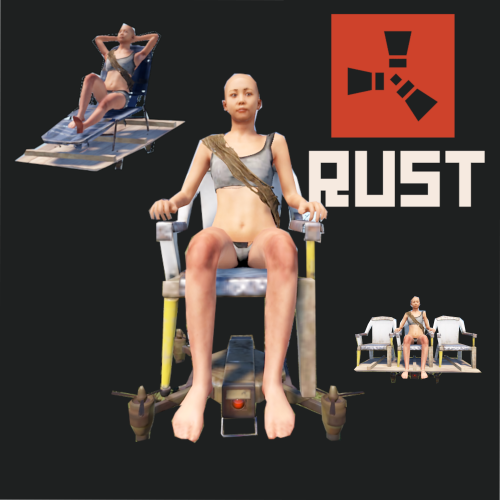
Drone Taxi adds another way to travel around the Rust World! Simply type /taxi to bring up a taxi selection screen. Each taxi has its benefits and different scrap costs to run. Prices are all customisable as well as who can use them! How To Use It? Typing /taxi will bring up a taxi UI. Select one of the three drone types available and it will be delivered near you. Once onboard right click on your map where you want to go. Make sure you have enough scrap to get there! The drone will try to avoid all obstacles and are restricted in where they can pick passengers up as well as a drop. Check the video for a demo Types Of Drones There are three types of drones, Drone X, Drone XL, and Drone Lux Drone X is the cheapest and simplest drone. It seats only one person! Drone XL seats three people Drone LUX is for the mega-rich players. This only seats one player but is a way better ride Permissions You require specific permission to be able to use each drone. They are as follows and respect the corresponding drone DroneTaxi.X DroneTaxi.XL DroneTaxi.LUX Commands There is only one command /taxi this brings up the taxi UI Config Each drone can have its price per second, as well as base price, tweaked. flatFeeX -> amount of scrap to charge for setting a destination for drone X flatFeeXL -> Same as above but for drone XL flatFeeLUX -> Same as above but for drone LUX varableFeeX - > How much scrap to charge per second of flight for drone X varableFeeXL -> Same as above but for drone XL varableFeeLUX -> Same as above but for drone LUX coolDown - > Time in seconds before a new taxi can be called ignoreBuildingBlocked -> Enable this to ignore building blocked sphere (monuments) This is not recommeneded Limitations Sometimes the chairs will appear invisible. This is purely cosmetic for the player and they tend to reshow after a few seconds. Contact Need to contact me for issues or private work mrcameron999#0001 on Discord$14.99 -
Version 1.0.1
47 downloads
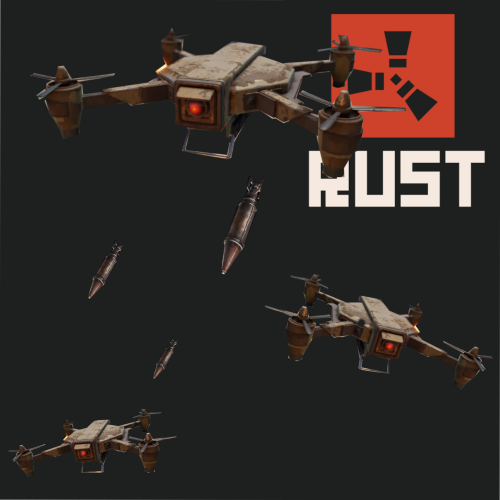
Call in drone strikes to bomb your enemies. Drone strikes are picked by selecting two points on the map. Highly customizable and perfect for economy servers, shop servers, vote rewards, donation rewards or an admin abuse tool! Designed to work with many other plugins. How do I use it! Drone Strike works on one command. This allows you to use it with any plugin that allows custom commands to be called. Some examples would be a shop plugin that executes a command when it's purchased. Because of how the command is designed you could add multiple drone strikes to the shop that differ in power or range. A vote reward, A donation reward could also be used. It can also be used by anyone with permission. The command and arguments are as follows. /addstrike [Steam Name or SteamId] [type] [range] [bombspeed] [heightAboveGround] [droneCount] [Steam Name or SteamId] -> Steam name or their steam id. They must be connected! [type] -> The ammo to use for the strike. The ammo and the type to enter are as follow 0 = bean can 1 = f1 grenade 2 = rockets 3 = Incendary rockets (THESE ARE LAGGY!) 4 = rocket hv (These act slow not fast) 5 = satchels 6 = c4 charges [range] -> Enter the range for the drone strike. If the user tries to make the strike longer than this value it will change the end zone to be the end of the range [bombspeed] -> How often bombs should be dropped. This value is in seconds and can be decimal points. [heightAboveGround] -> All drones independently fly and they will try to maintain this value above the ground. Setting this higher will help reduce the number of crashes the drones have [droneCount] -> The amount of drones to spawn. Setting 2 will spawn 5 drones. Example command = /addstrike cameron 6 100 2 20 6 To use this command either send it from the server console or have the permission "DroneStrike.use". You can give yourself drone strikes. One drone strike can be added per person until it's used. To call in the strike select two points on the map. The start and end zone Drone avoidance and navigation Drones will try to avoid obstacles the best they can but sometimes this will crash. If they crash they will simply despawn and stop dropping bombs. Need to contact me for issues or private work mrcameron999#0001 on Discord$11.99 -
 I have released an update that should help with this issue
 -
Ill work on how its pasted as well. Hopefully tomorrow Ill get an update out. Cant promise it tho
-
Not sure if every entity will work but give it a go. I had to strip some of it down. I know codelocks dont work for example
-
The bases provided are dummy bases. Ill try rework how they are spawned in it may help a bit however I highly recommend you make your own bases. The description tells you how to do this. Alternativly remove them from the config if there causing big issues. Ill loook into it tho. Side note the base with the two stair cases will always have the small walls break.
-
Just put it out let me know what you think. You can download both version if your finding issue. Do let me know tho
-
I just finsihed an update to it. Ill sort as soon as I restarted my servers
-
Sounds like a good idea. There is a check already that can be configured. Increasing the number will increase the check radius. It checks each block before its placed and if its not a valid spot it will just not place it
-
 I will be making an update indeed!
 -
.
-
Version 1.0.4
145 downloads
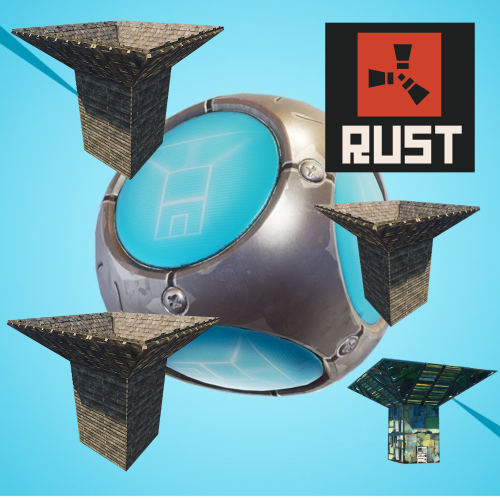
Add PORT-A-FORTS from Fornite into Rust. Turn specific F1 Grenades into PORT-A-FORTS famous from Fortnite! Once the grenade explodes a fort will begin to be built where it exploded. This fort can then be used to get a competitive advantage over your enemies. Create your own forts in-game and then use them within this plugin. What does the PORT-A-FORT do? Throwing a PORT-A-FORT F1 grenade causes a fort to be built over a period of time where it exploded. Once it's been built it will then be upgraded. A random fort is picked from a list of available forts provided in the config file. How do I use it? PORT-A-FORTS can be incorporated into your server in the following ways! Spawn then with /portafort– requires the permission "PORTAFORT.use” Add an F1 Grenade with the skin id in your PORT-A-FORTS config file to add them to your loot table or add them to kits in the same way! Alternatively, you can spawn a fort by typing /port - requires the permission "PORTAFORT.me” A fort will not be consucted in building blocked zone or if the foundations can not be placed (configurable) How To Install Drag the ports folder into the data folder for oxide Drag the .cs file into the plugin folder Commands and Perms /port - spawns a fort on your feet - "PORTAFORT.me" /portafort - gives you a PORT-A-FORT grenade. Permission "PORTAFORT.use" Config NamesOfPortFiles -> Add the names of the .json files for the specific forts that are within the ports folder in the oxide data folder. HpOnComplete -> The health forts will have once they have been completed FolderForPortFiles -> The folder where port data files are stored. May be good to change it to your CopyPaste folder. ObjectBlockingRange -> Change this if your having issues with forts being build in bad spots such as in rocks or houses. The higher the value the more likely a block will not be built. Default is 1. Setting it to 0 will disable the check SkinForPortAFort -> The skin id to determine if an f1 grenade is a PORT-A FORT or not. SpeedToBuild -> How fast a building will get built. 0.01 default. AmountToBuildPerLoop -> How many blocks will get placed per every cycle of the above time. Default 2 RefundOnBadPlacement - > If a grenade should be given back in the event of bad placement How do I add my own forts? Four forts are provided however you may wish to create your own more interesting ones. To do this you will need to get Misticos - Copy Paste plugin https://umod.org/plugins/copy-paste. Once a fort has been created copy the fort using the plugin stated. This will generate a .json file in the copypaste data folder and will be labelled the name of what you copied it as. Take this file and add it to the ports folder in the data folder. You then need to add the port to the config file under the section "NamesOfPortFiles". You're then done! Not all entities were tested so if your file doesn't work it may be because you added a weird entity. Need to contact me for issues or private work mrcameron999#0001 on Discord$9.99 -
You just have a XXL painting and keep changing what's on it. Would look like a gif
-
I'm sure I can have a go