Search the Community
Showing results for tags 'lockout'.
-
Version 2.3.0
76 downloads
Provides timed/manual/disabled unlocking of workbenches. Introduction This plugin will allows the server owner to lock out any or all workbenches from being crafted until specified amounts of time have elapsed since start of wipe, or indefinitely / until manually unlocked. Also optionally supports blocking research of locked workbenches so that players can't then replicate them via industrial crafters. Supports the following notification method(s) on craft/research failure: Chat (up to once every 5 seconds), sound, toast. Tutorial Island players are exempted from lockouts, as completing that requires crafting a Level 1 Workbench. Important This plugin is based on "Timed Workbench" by DizzasTeR, but is a significant overhaul. The two plugins cannot coexist in a single server installation. The plugin will detect map wipes and will automatically refresh the workbench locks. To facilitate other forms of wiping, the server owner/maintainer may manually invoke the `twwipe` command. Permissions * `timedworkbenchunlock.skiplock` — Allows crafting workbenches regardless of lock status * `timedworkbenchunlock.admin` — Gives access to **all** commands below * `timedworkbenchunlock.broadcast` — Gives access to the `twbroadcast` command * `timedworkbenchunlock.info` — Gives access to the `twinfo` command * `timedworkbenchunlock.modify` — Gives access to the `twmodify` command * `timedworkbenchunlock.reload` — Gives access to `twreload` command * `timedworkbenchunlock.reset` — Gives access to `twreset` command * `timedworkbenchunlock.wipe` — Gives access to `twwipe` command Note: No permissions are granted automatically. Commands * `twbroadcast <value>` — Configure global status broadcast period to the specified number of seconds, or specify a non-positive number to disable * `twinfo` — Prints elapsed time since wipe, and unlock status and times for each workbench tier * `twmodify <tier> <value>` — Configure lockout for the given workbench tier, where a negative value is indefinite lockout, zero is unlocked, and a positive value is the number of seconds to unlock after start of wipe * `twreload` — Reload the config file to pick up manual changes while the server is running * `twreset` — Resets config to the default settings (**be careful with this!**) * `twwipe` — Resets the last wipe timestamp to the current time, effectively restarting the lockout timers Configuration Example config file: { "Block crafting of locked workbench(es)": true, "Block researching of locked workbench(es)": true, "Report craft failure as chat message": false, "Report craft failure as sound effect": true, "Report craft failure as toast message": true, "Global status broadcast interval in seconds (0 to disable)": 300, "Time that current wipe started (UTC)": "2024-12-10T01:05:57Z", "Workbench unlock times (seconds from start of wipe, or 0 for unlocked, or -1 for permanently locked)": [ 86400, 172800, 259200 ] } Except for detailed tweaks to wipe time, all of the config settings are modifiable via ingame comands. Credits * DizzasTeR for the original "Timed Workbench" plugin on which this is based * Umod.org documentation/forums/discord * Other plugins as examples of best practices and Oxide API usage * MrBlue for being patient with me lol * misticos for detailed feedbackFree -
Version 2.0.0
28 downloads
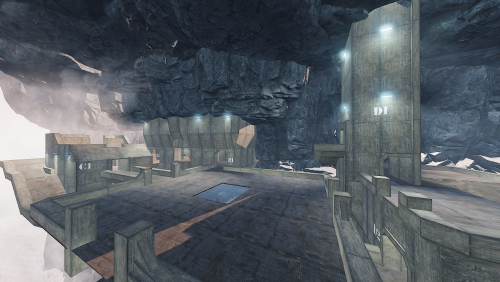
This is an arena style prefab based on Halo 2's Lockout map. Prefrab Count: 4130 Great nostalgia for any Halo fan. I wanted to re-create this for rust to try and bring both worlds together. I did this Arena as a challenge for myself, I learned a tremendous amount while putting this together. Was frustrating at times but the end result was better than expected. This includes: 1. Prefab a. .prefab b. prefab.alpha c. prefab.biome d. prefab.heights e. prefab.splat0 f. prefab.splat1 g. prefab.topology ATTENTION: To place and move Arena where you need it inside RustEdit, please follow these instructions carefully. 1. Update RustEdit. 2. Place the prefabs in your "custom prefabs" folder. 3. In RustEdit, load your own map, create a new map, or use the map provided. 4. Bring up your Scene Hierarachy - View > Sene Hierarachy. or Press H. 5. Click on Prefab List on the top right. 6. Under custom select "Kbedits-Halo-2-Lockout-Arena-v102". 7. Once placed and loaded, BEFORE moving it, break the prefab. 8. Immeadiately after breaking the prefab, in your scene hierarachy a. click on "All" b. at the bottom click Select All 9. Once everything has been selected click on "Disconnect Prefabs". 10. If done correctly you are now free to move the arena anywhere you want with out it breaking. ATTENTION: Protecting your map and your prefabs. 11. Once placed in your map use the prefab list, at the bottom Click Create custom Prefab. a. Radius: 275 b. Fade: 10 c. check all boxes d. In each drop down select "Everything" e. Make sure "Convert Selection To Group" IS CHECKED. d. Enter a new name for the prefab itself. f. Then click on Save Prefab. After this is all done, click "Edit" at the top left. Select "Password" Set a new password for your map and do not share it with anyone. Do not forget your password or you wont be able to edit your map. This prevents people from downloading your map and taking free prefabs from it. Repeat step 11. for your entire map, to protect everything on your map. If players complain about lag while playing in this arena, Try to distance the arena itself from any other major occupied areas in your map. Works best as a stand-alone. Alot of players don't have beefy computers, and this arena does have a lot of Lights. You can remove all the lights from the arena to help improve fps. a. Scene Hierarachy b. Search "Plight" or "Spotlight" c. Select all and then delete the prefabs by pressing your "Delete" key. (make sure your mouse isn't over any of the RustEdit UI's. This will delete all the lights used. If you have any issues, please post in the support section of this download.$30.00


