
venda_vole's Wishlist
-
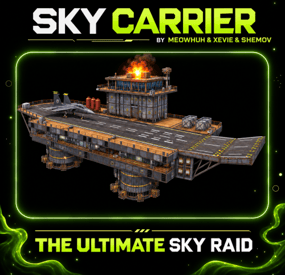
$49.99$39.99SkyCarrier
Bring an enormous flying aircraft carrier raid event to your Rust server.
Rust events should offer more than another familiar monument or a simple NPC fight. Imagine a heavily defended aircraft carrier flying above the ocean, protected by SAM Sites, Auto Turrets, and armed scientists, waiting for players brave enough to bring it down.
SkyCarrier introduces a massive, multi-stage PvE raid event built around a flying aircraft carrier. Players must approach by helicopter, destroy the carrier's propeller engines, survive its defenses, board the flight deck, and fight their way into the diesel generator room. Destroying the generators causes the carrier to catch fire, fall from the sky, crash into the ocean, and eventually sink.
With configurable flight routes, defensive systems, NPCs, custom loot, a scripted Chinook encounter, rescue boats, map markers, and an interactive event HUD, SkyCarrier delivers a complete aerial raid experience.
Perfect for PvE, PvP, modded, RPG/RP, survival, progression, and custom event Rust servers.
✨ Features
Adds a massive flying aircraft carrier event constructed from Rust entities. Fully explorable carrier with multiple decks, interior rooms, stairs, and a flight deck. Multi-stage raid progression requiring players to disable engines, board the carrier, and destroy generators. Animated carrier movement, turning, falling, crashing, and sinking. Configurable automatic event scheduling or manual event management. Automatically generates an offshore flight route when no custom checkpoints are configured. Supports custom flight routes, spawn positions, checkpoint stops, and route looping. Configurable flight altitude, movement speed, and turning speed. Route validation to avoid Deep Sea areas and portal locations. Four default destructible propeller-engine targets. Engine damage and health settings, including separate multipliers for different damage types. Destroying engines progressively reduces the carrier's movement speed. Destroying every propeller engine disables the carrier's SAM defenses and stops its movement. Two default diesel generator targets located inside the carrier. Diesel generators require explosive damage using the default settings. Destroying all diesel generators triggers the carrier's destruction sequence. Explosion, fire, and smoke effects during the raid and crash. Scripted falling and splashdown sequence with animated movement and rotation. Configurable evacuation delay before sinking begins. Gradual carrier sinking with a configurable sinking duration. Optional Chinook arrival and scripted shootdown encounter after the carrier crashes. Configurable locked Chinook crate with adjustable hacking time. Optional rescue boats that approach and dock beside the crashed carrier. Rescue scientists can climb aboard the carrier and join the fight. Configurable scientist counts, equipment, health, damage, and detection ranges. Eight default Auto Turrets with configurable weapons, ammunition, health, and damage. Two default SAM Sites with configurable ammunition, health, range, and reload behavior. Eight default scientist guards, including a Heavy Scientist, with configurable weapons and patrol locations. Configurable scientist spawn positions, weapons, health, and patrol areas. Optional destruction settings for Auto Turrets and SAM Sites. Configurable defensive behavior after the carrier crashes. Eleven default loot containers positioned across different areas of the carrier. Custom loot tables with configurable items, amounts, chances, and skin IDs. Additional reward crate appears after the carrier crashes. Optional locked Chinook crate containing configurable rewards. Player victory hook triggered when the final destruction reward crate is opened. Optional map marker that follows the carrier and displays its current event stage. Configurable map marker name and color. Optional in-game event HUD displaying raid objectives, target progress, and timers. Optional nearby guidance markers for engines, generators, and reward crates. Automatic server-wide event announcements. English and Russian plugin messages included. Admin console commands to start and stop events. Admin permission support for event management. Developer hooks and an API for integrating with other plugins. Automatic cleanup of event entities when the event ends. Includes custom carrier model and navigation data files. ✈️ SkyCarrier Raid Event
SkyCarrier is designed as a complete raid encounter with multiple objectives that players must complete in order.
The carrier begins high above the ocean, moving between route checkpoints while defending itself against approaching players.
To defeat it, players must complete several stages.
Stage Objective 1. Approach Find the flying carrier and approach using a helicopter. 2. Disable Engines Destroy the propeller engines underneath the carrier. 3. Board the Carrier Land on the flight deck and fight through its defenses. 4. Destroy Generators Reach the lower decks and destroy the diesel generators. 5. Carrier Crash Escape the danger as the carrier catches fire and falls toward the ocean. 6. Final Encounter Survive the post-crash events, including optional Chinook and rescue scientist encounters. 7. Collect Rewards Loot the reward crates before the carrier sinks. Tip
How to Complete the Event
Bring a helicopter, weapons, ammunition, and explosives.
First, attack the carrier's propeller engines to disable its SAM Sites. Then land on the carrier, defeat its guards and turrets, and reach the diesel generator room on the lower decks.
Destroy the generators to bring the carrier down and unlock the final reward phase.
🚁 Flying Aircraft Carrier
SkyCarrier features a large aircraft carrier that moves through the world rather than remaining at a fixed monument location.
The carrier follows configurable flight checkpoints, smoothly changes direction, and stops at configured route positions.
Flight Features
Configurable flying altitude. Adjustable movement and turning speed. Automatic offshore route generation. Custom route checkpoints. Configurable waiting time at checkpoints. Optional looping flight routes. Custom spawn coordinates. Deep Sea and portal clearance checks. Flight Setting Default Minimum flight height 120 meters Movement speed 12 m/s Turning speed 15 degrees/second Checkpoint waiting time 60 seconds Repeat flight route Enabled Deep Sea clearance 400 meters Note
Automatic Routes
When no custom route checkpoints are configured, SkyCarrier attempts to find a suitable offshore route automatically.
If no valid route is available, the event will not start until a suitable route can be found or configured.
The default flight route is designed to keep the carrier away from unsuitable land and Deep Sea locations.
💥 Destructible Propeller Engines
The first objective is to destroy the propeller engines mounted underneath the carrier.
The engines are special damage targets with configurable health, hit detection, damage types, and positions.
Setting Default Number of engines 4 Health per engine 750 HP Hit radius 6 meters Explosion damage multiplier 1.0 Anti-vehicle damage multiplier 1.0 Bullet damage multiplier 0.02 Engine Mechanics
Four propeller-engine targets by default. Each engine has its own health. Configurable engine positions. Separate damage multipliers for bullets, explosions, and anti-vehicle damage. Destruction effects when an engine is destroyed. Carrier movement speed decreases as engines are destroyed. Destroying all engines stops the carrier. SAM Sites are disabled when every propeller engine is destroyed. Tip
Example: With the default configuration, players can use explosives or anti-vehicle weapons to destroy the propeller engines efficiently.
Normal bullets deal significantly reduced damage because the default bullet damage multiplier is 0.02.
⚙️ Diesel Generator Objective
Once the carrier's engines are destroyed, players must board the carrier and locate the diesel generator room.
The diesel generators are the final objectives required to bring the carrier down.
Setting Default Number of generators 2 Health per generator 900 HP Hit radius 3.6 meters Explosion damage multiplier 1.0 Generator Mechanics
Two diesel generator targets by default. Located within the carrier's lower decks. Individual health and damage detection. Configurable generator positions. Damage-type multipliers. Destruction effects for each generator. Destroying every generator triggers the carrier crash sequence. Warning
Important: By default, diesel generators only accept damage from the configured explosion damage type.
Players should bring explosives to complete the generator objective.
🛡️ Carrier Defense System
SkyCarrier features several configurable defense systems that protect the carrier throughout the raid.
Defense Type Default Amount Description Auto Turrets 8 Armed turrets positioned around the carrier. SAM Sites 2 Anti-aircraft defenses protecting the carrier from approaching aircraft. Scientist Guards 8 Armed scientists guarding the flight deck and interior areas. Rescue Scientists Up to 6 Additional scientists arriving by rescue boats after the crash. 🔫 Auto Turrets
Auto Turrets defend the carrier against approaching and boarding players.
Configurable turret positions and rotations. Custom weapon and ammunition shortnames. Configurable ammunition per turret. Adjustable health. Configurable detection radius. Adjustable damage multiplier. Option to make turrets destructible or invulnerable. Optional continued operation after the carrier crashes. Default Auto Turret Settings
Setting Default Health 1,000 HP Weapon rifle.ak Ammunition ammo.rifle Rounds per turret 512 Detection range 45 meters Damage multiplier 1.0 Destructible Yes 🚀 SAM Sites
SAM Sites protect the flying carrier from approaching aircraft.
Configurable SAM Site positions. Adjustable health. Configurable rocket ammunition. Adjustable detection range. Configurable damage multiplier. Configurable delay between volleys. Option to make SAM Sites destructible. Automatically disabled when all propeller engines are destroyed. Default SAM Site Settings
Setting Default Health 1,000 HP Rockets per SAM Site 48 Detection range 150 meters Damage multiplier 1.0 Time between volleys 10 seconds Destructible Yes Tip
Raid Strategy
The carrier's SAM Sites make approaching by helicopter dangerous.
Destroy the propeller engines from a distance to disable the SAM defenses before attempting to land.
👨🔬 Scientist Guards
SkyCarrier includes armed scientists positioned throughout the carrier.
The default configuration contains eight scientist guards, including one Heavy Scientist. Guards are positioned to provide coverage of the carrier's flight deck and lower decks.
Guard Features
Eight guards in the default layout. Configurable scientist spawn locations and rotations. Supports standard and Heavy Scientist prefabs. Custom health per scientist. Configurable weapons and clothing. Adjustable damage multiplier. Configurable target detection range. Individual patrol radius settings. Guards respond to nearby threats. Custom navigation data supports movement around the carrier. Default Scientist Weapons
The default guards use a selection of Rust weapons, including:
LR-300 Assault Rifle. MP5A4. M249. SPAS-12 Shotgun. Assault Rifle (AK). Guard Type Default Health Default Equipment Regular Scientist 250 HP Configured firearms Heavy Scientist 500 HP M249 Note
Scientist Navigation
SkyCarrier includes SkyCarrierNavMesh.json to support scientist movement around the custom carrier.
If the navigation file is missing, the plugin can still load, but scientist guards will remain stationary instead of using the custom navigation system.
🔥 Crash & Sinking System
Destroying all diesel generators triggers a scripted destruction sequence.
The carrier stops its normal flight, catches fire, and begins falling toward a suitable ocean location.
After reaching the water, the carrier crashes, settles, and begins sinking.
Crash Sequence
Diesel generators are destroyed. Fire and explosion effects activate throughout the carrier. The carrier starts falling toward the ocean. The carrier impacts the water. The carrier settles after the initial impact. The final reward crate becomes available. Optional Chinook and rescue boat encounters begin. Players have a limited time to collect rewards and escape. The carrier gradually sinks beneath the water. Crash Configuration
Setting Default Target hull depth after impact 8 meters Evacuation time before sinking 20 seconds Sinking duration 600 seconds Keep Auto Turrets active after impact No Keep SAM Sites active after impact No Note
Sinking Timing
The default configured sinking duration is 600 seconds (10 minutes).
The carrier also has a short settling period after impact and a configurable delay before sinking begins.
The plugin enforces a minimum sinking duration of 90 seconds.
🚁 Chinook Encounter
SkyCarrier includes an optional scripted Chinook sequence after the carrier crashes.
When enabled and a suitable SAM Site is available, a Chinook approaches the crashed carrier and can be shot down over the flight deck.
Chinook Features
Optional Chinook arrival after the crash. Scripted helicopter approach. SAM Site aiming and missile effects. Chinook hit and crash animation. Explosion and wreck effects. Configurable crash position. Hackable locked crate after the Chinook crashes. Configurable hacking duration. Custom loot table for the Chinook crate. Setting Default Chinook encounter enabled Yes Locked crate hacking time 300 seconds Crate loot table Elite Tip
Additional Reward
Players can start hacking the locked Chinook crate and return after the configured hacking time to collect its loot.
This creates an additional reward objective during the carrier's final phase.
Note
Chinook Spawn Conditions
The Chinook sequence requires a suitable approach route and an available SAM Site capable of participating in the scripted encounter.
If these conditions cannot be met, the Chinook sequence may be skipped.
🚤 Rescue Boat System
SkyCarrier includes optional rescue boats that arrive after the carrier has crashed.
These boats carry armed scientists that can board the carrier and engage players.
Rescue Features
Configurable rescue boat arrival delay. Multiple boat docking positions. Uses Rust RHIB boats. Configurable scientists per boat. Armed rescue scientists. Custom scientist health, weapons, clothing, and damage. Animated boat approach and docking movement. Boarding ladders created beside the carrier. Scientists climb aboard and join the encounter. Boats can be released after their crews have disembarked. Default Rescue Settings
Setting Default Rescue boats enabled Yes Delay after crash 30 seconds Configured boats 2 Scientists per boat 3 Scientist health 200 HP Scientist weapon smg.mp5 Detection range 60 meters Tip
Example: Increase the number of scientists per boat from 3 to 5 for a more difficult final encounter.
You can also adjust rescue scientist health, weapon, damage, and patrol settings.
🎁 Loot & Rewards
SkyCarrier includes configurable loot containers positioned throughout the aircraft carrier.
The default configuration contains 11 loot containers, spread across the flight deck, interior areas, and multiple deck levels. Players can collect these while fighting through the carrier and receive additional rewards after bringing it down.
Loot Container Features
Eleven default loot containers positioned throughout the carrier. Normal, Tools, and Elite crate prefabs. Configurable container positions and rotations. Multiple Military loot locations. Custom loot tables. Configurable item shortnames. Minimum and maximum item amounts. Individual item drop chances. Optional custom skin IDs. Additional destruction reward crate. Separate loot table for the locked Chinook crate. Default Loot Tables
Loot Table Example Default Items Standard Scrap, Metal Pipes Military Assault Rifle, Rifle Ammo Elite Tech Trash, Rifle Bodies Technical Gears, CCTV Cameras Special Targeting Computers, Timed Explosives Destruction Scrap, Rockets, Tech Trash Final Destruction Reward
After the carrier crashes, a special reward crate appears on the flight deck.
The default destruction loot table contains:
Item Amount Chance Scrap 500–800 100% Rockets 2–4 100% Tech Trash 10–20 100% Tip
Custom Rewards
You can edit the existing loot tables or create additional tables using the configuration.
Each loot entry supports a minimum amount, maximum amount, drop chance, and optional skin ID.
Note
Loot Notes
The 11 regular loot containers are separate from the final destruction reward crate and the optional Chinook locked crate. The final reward crate is created after the carrier reaches the water. The Chinook locked crate is a separate optional reward. Loot containers use the plugin's configured loot tables rather than relying on normal container loot spawning. Opening the final destruction reward crate triggers the OnSkyCarrierEventWinner hook. 🗺️ Map Markers & Event Guidance
SkyCarrier includes optional systems to help players locate the event and understand its objectives.
Map Markers
Displays the carrier's location on the Rust map. Marker follows the moving carrier. Configurable marker name. Configurable marker color. Displays the current carrier event stage. Automatically removes markers when the event ends. Default marker name: SKY CARRIER
Default marker color: #E67E22
Objective Guidance
SkyCarrier can display temporary in-world guidance markers to help nearby players locate important objectives.
Propeller-engine targets. Diesel generator targets. Important access areas. Final destruction reward crate. Locked Chinook crate. Guidance symbols are displayed to nearby players within the supported guidance range.
Note
Default Settings
Map markers are enabled. Nearby objective guidance is enabled. Event announcements are enabled. Event HUD is enabled. Each system can be disabled separately in the configuration.
📊 Event HUD
SkyCarrier includes an in-game event HUD that updates as players progress through the raid.
The HUD helps players identify their next objective and monitor the remaining event time.
HUD Features
Displays the current raid objective. Shows destroyed engine progress. Shows destroyed generator progress. Displays the event timer. Displays the time until impact during the crash sequence. Shows the remaining evacuation time. Displays the sinking countdown. Updates objectives as the event progresses. Automatically appears for nearby players. Automatically disappears when players leave the event area or the event ends. Event HUD Objectives
Event Stage HUD Objective Flight Destroy the propeller engines. Carrier Disabled Destroy the diesel generators. Falling Carrier falling. Brace for impact. Impact Recovery Head up to the flight deck. Evacuation Get clear of the lower decks. Chinook Arrival Chinook approaching the carrier. Chinook Crash Chinook hit. Clear the flight deck. Final Phase Loot the flight deck and evacuate. Tip
Player Experience
The HUD updates automatically as players complete raid objectives, so players can follow the event without needing chat commands or an external guide.
⏰ Event Scheduling
SkyCarrier can be started manually by an administrator or automatically using the built-in event scheduler.
Setting Default Automatic events Disabled Delay before next automatic event 7,200 seconds Airborne event time limit 1,800 seconds Scheduling Features
Enable or disable automatic events. Configure the delay before the next event. Configurable airborne event time limit. Prevents multiple simultaneous SkyCarrier events. Automatically schedules another event after the previous event ends when scheduling is enabled. Manual commands for starting and stopping events. Note
Default Behavior
Automatic events are disabled by default.
To run SkyCarrier automatically, enable [Schedule] Start events automatically in the configuration.
The default interval is 7200 seconds (2 hours), and the default airborne event time limit is 1800 seconds (30 minutes).
⌨️ Admin Commands
SkyCarrier uses console commands for event management.
skycarrier.start - Starts a SkyCarrier event.
skycarrier.stop - Stops the currently active SkyCarrier event.
Command Examples
skycarrier.start skycarrier.stop Note
Command Notes
These are console commands, not chat commands. Commands can be executed through the server console. Authorized players can also use them through the in-game F1 console. Stopping an event manually sends a dedicated event-ended announcement when chat announcements are enabled. Only one SkyCarrier event can be active at a time. Starting an event requires valid carrier model data and a suitable flight route. 🔐 Permissions
skycarrier.admin - Allows authorized players to start and stop SkyCarrier events using the console commands.
Rust server admins can also manage the event without being granted the permission separately.
Players do not need permissions to participate in the event, attack the carrier, fight scientists, or collect loot.
📁 Installation
SkyCarrier supports Rust servers running Oxide (uMod) or Carbon.
The ZIP includes three plugin files:
SkyCarrier.cs - Main plugin file. data/SkyCarrier/SkyCarrier.json - Required aircraft carrier model data. data/SkyCarrier/SkyCarrierNavMesh.json - Navigation data for scientist movement. Installation Steps
Extract the downloaded SkyCarrier ZIP archive. Upload SkyCarrier.cs to your server's plugin folder: Oxide: oxide/plugins/ Carbon: carbon/plugins/ Upload SkyCarrier.json and SkyCarrierNavMesh.json to your server's data folder: Oxide: oxide/data/SkyCarrier/ Carbon: carbon/data/SkyCarrier/ Make sure both data files are located inside the SkyCarrier folder. Load or reload the SkyCarrier plugin. Edit the generated configuration: Oxide: oxide/config/SkyCarrier.json Carbon: carbon/configs/SkyCarrier.json Configure automatic scheduling if you want events to start automatically, or use skycarrier.start to begin an event manually. Oxide File Structure
oxide/ ├── plugins/ │ └── SkyCarrier.cs ├── data/ │ └── SkyCarrier/ │ ├── SkyCarrier.json │ └── SkyCarrierNavMesh.json └── config/ └── SkyCarrier.json Carbon File Structure
carbon/ ├── plugins/ │ └── SkyCarrier.cs ├── data/ │ └── SkyCarrier/ │ ├── SkyCarrier.json │ └── SkyCarrierNavMesh.json └── configs/ └── SkyCarrier.json Warning
Important Installation Requirement
The SkyCarrier.json data file is required for the plugin to function.
It contains the custom aircraft carrier model and entity positions. If this file is missing, the plugin will report an error and unload.
The SkyCarrierNavMesh.json file contains navigation data for scientist movement. The plugin can load without it, but scientist guards will remain stationary.
Install both supplied data files for the complete SkyCarrier experience.
⚙️ Example Configuration
The following configuration includes SkyCarrier's default settings, including eight scientist guard positions, eleven carrier loot containers, and the Config Version field.
{ "Event Settings": { "[Schedule] Start events automatically": false, "[Schedule] Delay before the next automatic event (seconds)": 7200.0, "Time limit while the carrier is airborne (seconds)": 1800.0 }, "Carrier Flight Settings": { "[Flight] Minimum height above terrain or sea (meters)": 120.0, "[Flight] Speed (meters per second)": 12.0, "[Flight] Turn speed (degrees per second)": 15.0, "[Route] Wait at each checkpoint (seconds)": 60.0, "[Route] Repeat after the last checkpoint": true, "[Route] Clearance from Deep Sea and its portals (meters)": 400.0, "[Route] Spawn coordinates (0, 0, 0 = automatic)": { "x": 0, "y": 0, "z": 0 }, "[Route] Checkpoint coordinates (empty = automatic offshore route)": [] }, "Propeller Engine Settings": { "Health per target (HP)": 750.0, "[Damage] Hit radius (meters)": 6.0, "[Damage] Multipliers by damage type (1 = full damage)": { "Explosion": 1.0, "AntiVehicle": 1.0, "Bullet": 0.02 }, "Target positions relative to the carrier": [ { "x": 8.06, "y": 3, "z": 14.05 }, { "x": -8.03, "y": 3, "z": 14.05 }, { "x": 8.06, "y": 3, "z": -11.78 }, { "x": -8.03, "y": 3, "z": -11.78 } ] }, "Diesel Generator Settings": { "Health per target (HP)": 900.0, "[Damage] Hit radius (meters)": 3.6, "[Damage] Multipliers by damage type (1 = full damage)": { "Explosion": 1.0 }, "Target positions relative to the carrier": [ { "x": -3.87, "y": 11.12, "z": -17.5 }, { "x": 0.57, "y": 11.12, "z": -17.5 } ] }, "Crash and Sinking Settings": { "Target hull depth after impact (meters)": 8.0, "Time to evacuate before sinking starts (seconds)": 20.0, "Time to fully sink (seconds, minimum 90)": 600.0, "Keep Auto Turrets active after impact": false, "Keep SAM Sites active after impact": false, "Fire positions relative to the carrier": [ { "x": -3.92, "y": 14.04, "z": -21.15 }, { "x": 6.08, "y": 14.03, "z": -3.15 }, { "x": -0.92, "y": 14.03, "z": 21.85 } ] }, "Chinook Settings": { "Send a Chinook after the carrier crashes": true, "Chinook crash position relative to the carrier": { "x": -6.92, "y": 14.05, "z": 8.85 }, "Time to hack the Chinook crate (seconds)": 300.0, "Locked crate": { "Container prefab path": "assets/prefabs/deployable/chinooklockedcrate/codelockedhackablecrate.prefab", "Loot table name": "Elite", "Position relative to the carrier": { "x": -2.92, "y": 14.03, "z": 8.85 }, "Rotation around Y (degrees)": 0.0 } }, "Rescue Boat Settings": { "Send rescue boats after the carrier crashes": true, "Delay before sending rescue boats (seconds)": 30.0, "Scientists per boat": 3, "Boat docking and boarding positions": [ { "Docking position relative to the carrier": { "x": -15.4, "y": 0, "z": 2 }, "Ladder top position relative to the carrier": { "x": -13.5, "y": 15.2, "z": 2 }, "Boat and ladder heading relative to the carrier (degrees)": 270.0 }, { "Docking position relative to the carrier": { "x": 15.4, "y": 0, "z": 2 }, "Ladder top position relative to the carrier": { "x": 13.5, "y": 15.2, "z": 2 }, "Boat and ladder heading relative to the carrier (degrees)": 90.0 } ], "Rescue scientist": { "Scientist prefab path": "assets/rust.ai/agents/npcplayer/humannpc/scientist/scientistnpc_cargo.prefab", "Health (HP)": 200.0, "Weapon shortname": "smg.mp5", "Clothing item shortnames": [ "hazmatsuit_scientist" ], "Damage multiplier": 1.0, "Target detection radius (meters)": 60.0, "Patrol radius (meters, 0 = no patrol)": 10.0 } }, "Defense Settings": { "Auto Turrets": { "Health (HP)": 1000.0, "Weapon shortname": "rifle.ak", "Ammo shortname": "ammo.rifle", "Rounds per turret": 512, "Target detection radius (meters)": 45.0, "Damage multiplier": 1.0, "Players can destroy turrets": true, "Turret placements": [ { "Position relative to the carrier": { "x": -10.36, "y": 24.86, "z": -2.48 }, "Rotation around Y (degrees)": 315 }, { "Position relative to the carrier": { "x": -5.1, "y": 24.86, "z": -2.47 }, "Rotation around Y (degrees)": 45 }, { "Position relative to the carrier": { "x": -10.35, "y": 24.86, "z": -11.93 }, "Rotation around Y (degrees)": 225 }, { "Position relative to the carrier": { "x": -5.09, "y": 24.86, "z": -11.92 }, "Rotation around Y (degrees)": 135 }, { "Position relative to the carrier": { "x": -11.39, "y": 14, "z": 21.61 }, "Rotation around Y (degrees)": 315 }, { "Position relative to the carrier": { "x": 11.39, "y": 14, "z": 21.62 }, "Rotation around Y (degrees)": 45 }, { "Position relative to the carrier": { "x": 11.4, "y": 14, "z": -17.71 }, "Rotation around Y (degrees)": 135 }, { "Position relative to the carrier": { "x": -7.34, "y": 14.01, "z": -33.09 }, "Rotation around Y (degrees)": 225 } ] }, "SAM sites": { "Health (HP)": 1000.0, "Rockets per SAM Site": 48, "Target detection radius (meters)": 150.0, "Damage multiplier": 1.0, "Time between volleys (seconds)": 10.0, "Players can destroy SAM Sites": true, "SAM Site placements": [ { "Position relative to the carrier": { "x": -11.58, "y": 21.11, "z": 0.15 }, "Rotation around Y (degrees)": 180 }, { "Position relative to the carrier": { "x": -11.58, "y": 21.11, "z": -19.35 }, "Rotation around Y (degrees)": 0 } ] }, "Scientist Guards": { "Clothing item shortnames": [ "hazmatsuit_scientist" ], "Damage multiplier": 1.0, "Target detection radius (meters)": 70.0, "Scientist spawn points": [ { "Scientist prefab path": "assets/rust.ai/agents/npcplayer/humannpc/scientist/scientistnpc_cargo.prefab", "Position relative to the carrier": { "x": -11.85, "y": 14.05, "z": -17.15 }, "Rotation around Y (degrees)": 0, "Health (HP)": 250, "Weapon shortname": "rifle.lr300", "Patrol radius (meters, 0 = no patrol)": 0.0 }, { "Scientist prefab path": "assets/rust.ai/agents/npcplayer/humannpc/scientist/scientistnpc_cargo.prefab", "Position relative to the carrier": { "x": 10.15, "y": 14.04, "z": -11.15 }, "Rotation around Y (degrees)": 180, "Health (HP)": 250, "Weapon shortname": "smg.mp5", "Patrol radius (meters, 0 = no patrol)": 3 }, { "Scientist prefab path": "assets/rust.ai/agents/npcplayer/humannpc/scientist/scientistnpc_heavy.prefab", "Position relative to the carrier": { "x": -5.85, "y": 14.05, "z": 18.85 }, "Rotation around Y (degrees)": 180, "Health (HP)": 500, "Weapon shortname": "lmg.m249", "Patrol radius (meters, 0 = no patrol)": 0.0 }, { "Scientist prefab path": "assets/rust.ai/agents/npcplayer/humannpc/scientist/scientistnpc_cargo.prefab", "Position relative to the carrier": { "x": -8, "y": 9.74, "z": -11 }, "Rotation around Y (degrees)": 0, "Health (HP)": 250, "Weapon shortname": "shotgun.spas12", "Patrol radius (meters, 0 = no patrol)": 0.0 }, { "Scientist prefab path": "assets/rust.ai/agents/npcplayer/humannpc/scientist/scientistnpc_cargo.prefab", "Position relative to the carrier": { "x": 3.25, "y": 9.74, "z": -15.5 }, "Rotation around Y (degrees)": 270, "Health (HP)": 250, "Weapon shortname": "rifle.ak", "Patrol radius (meters, 0 = no patrol)": 0.0 }, { "Scientist prefab path": "assets/rust.ai/agents/npcplayer/humannpc/scientist/scientistnpc_cargo.prefab", "Position relative to the carrier": { "x": 11.8277016, "y": 9.738968, "z": -1.47917366 }, "Rotation around Y (degrees)": 357.310181, "Health (HP)": 250, "Weapon shortname": "smg.mp5", "Patrol radius (meters, 0 = no patrol)": 3 }, { "Scientist prefab path": "assets/rust.ai/agents/npcplayer/humannpc/scientist/scientistnpc_cargo.prefab", "Position relative to the carrier": { "x": -2.014122, "y": 9.775375, "z": 21.6028633 }, "Rotation around Y (degrees)": 272.125122, "Health (HP)": 250, "Weapon shortname": "smg.mp5", "Patrol radius (meters, 0 = no patrol)": 3 }, { "Scientist prefab path": "assets/rust.ai/agents/npcplayer/humannpc/scientist/scientistnpc_cargo.prefab", "Position relative to the carrier": { "x": -12.2132111, "y": 9.738983, "z": 3.54932451 }, "Rotation around Y (degrees)": 176.950241, "Health (HP)": 250, "Weapon shortname": "rifle.ak", "Patrol radius (meters, 0 = no patrol)": 0.0 } ] } }, "Loot Settings": { "Loot containers on the carrier": [ { "Container prefab path": "assets/bundled/prefabs/radtown/crate_normal.prefab", "Loot table name": "Standard", "Position relative to the carrier": { "x": 11.15, "y": 14.04, "z": -3.15 }, "Rotation around Y (degrees)": 0.0 }, { "Container prefab path": "assets/bundled/prefabs/radtown/crate_tools.prefab", "Loot table name": "Technical", "Position relative to the carrier": { "x": -9.85, "y": 14.04, "z": 2.15 }, "Rotation around Y (degrees)": 0.0 }, { "Container prefab path": "assets/bundled/prefabs/radtown/crate_normal.prefab", "Loot table name": "Military", "Position relative to the carrier": { "x": 8.488968, "y": 9.765045, "z": -17.856781 }, "Rotation around Y (degrees)": 269.978638 }, { "Container prefab path": "assets/bundled/prefabs/radtown/crate_tools.prefab", "Loot table name": "Technical", "Position relative to the carrier": { "x": -12, "y": 9.74, "z": 10.5 }, "Rotation around Y (degrees)": 0.0 }, { "Container prefab path": "assets/bundled/prefabs/radtown/crate_elite.prefab", "Loot table name": "Special", "Position relative to the carrier": { "x": 6.5, "y": 9.74, "z": 21.5 }, "Rotation around Y (degrees)": 0.0 }, { "Container prefab path": "assets/bundled/prefabs/radtown/crate_elite.prefab", "Loot table name": "Elite", "Position relative to the carrier": { "x": -7.487793, "y": 24.9207, "z": -9.877808 }, "Rotation around Y (degrees)": 281.183716 }, { "Container prefab path": "assets/bundled/prefabs/radtown/crate_normal.prefab", "Loot table name": "Military", "Position relative to the carrier": { "x": -12.2138433, "y": 9.738968, "z": -16.3810635 }, "Rotation around Y (degrees)": 88.76069 }, { "Container prefab path": "assets/bundled/prefabs/radtown/crate_normal.prefab", "Loot table name": "Military", "Position relative to the carrier": { "x": 10.8315735, "y": 14.0387726, "z": 17.7017517 }, "Rotation around Y (degrees)": 268.3587 }, { "Container prefab path": "assets/bundled/prefabs/radtown/crate_normal.prefab", "Loot table name": "Military", "Position relative to the carrier": { "x": -8.18263149, "y": 21.3103485, "z": -19.04141 }, "Rotation around Y (degrees)": 359.363129 }, { "Container prefab path": "assets/bundled/prefabs/radtown/crate_normal.prefab", "Loot table name": "Military", "Position relative to the carrier": { "x": 0.1668787, "y": 9.740532, "z": -15.1512032 }, "Rotation around Y (degrees)": 357.473053 }, { "Container prefab path": "assets/bundled/prefabs/radtown/crate_normal.prefab", "Loot table name": "Military", "Position relative to the carrier": { "x": 11.5302668, "y": 9.738998, "z": 3.10289 }, "Rotation around Y (degrees)": 87.87798 } ], "Loot tables": { "Standard": [ { "Item shortname": "scrap", "Minimum amount": 100, "Maximum amount": 200, "Chance to include this item (0 to 100%)": 100.0, "Skin ID": 0 }, { "Item shortname": "metalpipe", "Minimum amount": 5, "Maximum amount": 10, "Chance to include this item (0 to 100%)": 100.0, "Skin ID": 0 } ], "Military": [ { "Item shortname": "rifle.ak", "Minimum amount": 1, "Maximum amount": 1, "Chance to include this item (0 to 100%)": 100.0, "Skin ID": 0 }, { "Item shortname": "ammo.rifle", "Minimum amount": 64, "Maximum amount": 128, "Chance to include this item (0 to 100%)": 100.0, "Skin ID": 0 } ], "Elite": [ { "Item shortname": "techparts", "Minimum amount": 5, "Maximum amount": 10, "Chance to include this item (0 to 100%)": 100.0, "Skin ID": 0 }, { "Item shortname": "riflebody", "Minimum amount": 2, "Maximum amount": 4, "Chance to include this item (0 to 100%)": 100.0, "Skin ID": 0 } ], "Technical": [ { "Item shortname": "gears", "Minimum amount": 5, "Maximum amount": 10, "Chance to include this item (0 to 100%)": 100.0, "Skin ID": 0 }, { "Item shortname": "cctv.camera", "Minimum amount": 1, "Maximum amount": 2, "Chance to include this item (0 to 100%)": 100.0, "Skin ID": 0 } ], "Special": [ { "Item shortname": "targeting.computer", "Minimum amount": 1, "Maximum amount": 2, "Chance to include this item (0 to 100%)": 100.0, "Skin ID": 0 }, { "Item shortname": "explosive.timed", "Minimum amount": 1, "Maximum amount": 1, "Chance to include this item (0 to 100%)": 25, "Skin ID": 0 } ], "Destruction": [ { "Item shortname": "scrap", "Minimum amount": 500, "Maximum amount": 800, "Chance to include this item (0 to 100%)": 100.0, "Skin ID": 0 }, { "Item shortname": "ammo.rocket.basic", "Minimum amount": 2, "Maximum amount": 4, "Chance to include this item (0 to 100%)": 100.0, "Skin ID": 0 }, { "Item shortname": "techparts", "Minimum amount": 10, "Maximum amount": 20, "Chance to include this item (0 to 100%)": 100.0, "Skin ID": 0 } ] }, "Reward crate after the carrier crashes": { "Container prefab path": "assets/bundled/prefabs/radtown/crate_elite.prefab", "Loot table name": "Destruction", "Position relative to the carrier": { "x": -0.08, "y": 14.13, "z": 0.15 }, "Rotation around Y (degrees)": 0.0 } }, "Notification Settings": { "[Chat] Send event announcements": true, "[Map] Show the carrier marker": true, "[Map] Carrier marker name": "SKY CARRIER", "[Map] Carrier marker color (HTML hex)": "#E67E22", "[Guidance] Show nearby objectives and loot": true, "[HUD] Show the event HUD to nearby players": true }, "Config Version": { "Major": 1, "Minor": 0, "Patch": 0 } } Note
Configuration Notes
Event Settings: Configure automatic event scheduling and the airborne event time limit. Carrier Flight Settings: Configure altitude, speed, turning, checkpoints, route looping, spawn coordinates, and Deep Sea clearance. Propeller Engine Settings: Configure engine health, damage types, hit radius, and target positions. Diesel Generator Settings: Configure generator health, explosive damage, hit radius, and target positions. Crash and Sinking Settings: Configure impact depth, evacuation delay, sinking duration, post-crash defenses, and fire positions. Chinook Settings: Configure the optional Chinook sequence, crash position, hacking time, and locked crate. Rescue Boat Settings: Configure rescue boat arrivals, scientist counts, docking positions, and NPC behavior. Defense Settings: Configure eight Auto Turrets, two SAM Sites, and eight scientist guards. Loot Settings: Configure eleven carrier loot containers, custom loot tables, and the final destruction reward. Notification Settings: Configure chat announcements, map markers, guidance symbols, and the event HUD. Config Version: Stores the plugin's configuration version. 🔌 Developer Hooks & API
SkyCarrier provides hooks that other plugins can use to respond to event activity.
OnSkyCarrierEventStart
Called when the carrier is fully spawned and the event begins.
void OnSkyCarrierEventStart(BaseEntity carrier, Vector3 position) OnSkyCarrierEventEnd
Called when an active SkyCarrier event ends.
void OnSkyCarrierEventEnd() OnSkyCarrierEventWinner
Called when a player opens the final destruction reward crate for the first time.
void OnSkyCarrierEventWinner(BasePlayer player) API_IsEventActive
Allows another plugin to check whether a SkyCarrier event is currently active.
bool API_IsEventActive() Returns true when an event instance exists and false otherwise.
Note
Developer Integration
These hooks can be used for custom event notifications, statistics, progression systems, achievements, and other plugin integrations.
The winner hook is specifically triggered by opening the final destruction reward crate, rather than simply damaging or destroying the carrier.
💡 Why Choose SkyCarrier?
Most Rust events take place at familiar monuments or involve enemies that players already know how to defeat. SkyCarrier brings an entirely different challenge to the server by transforming the sky into a dangerous, multi-stage raid environment.
Players must plan their approach, disable anti-air defenses, board a flying aircraft carrier, fight through armed scientists, destroy its generators, survive a dramatic ocean crash, and escape with valuable rewards before the carrier disappears beneath the waves.
With customizable flight routes, destructible objectives, multiple defense systems, animated crash sequences, optional Chinook and rescue encounters, custom loot tables, and an interactive event HUD, SkyCarrier gives server owners the tools to create a unique and memorable aerial raid event
-
$29.99
OreGolems
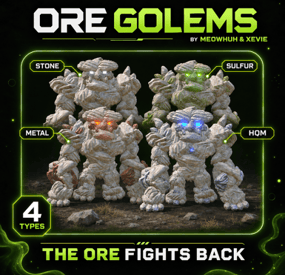
Turn ordinary ore nodes into massive, animated boss encounters in Rust.
Mining resources should not always be a predictable activity. Sometimes, the rocks you are mining should fight back.
OreGolems introduces powerful, animated ore golems that can awaken from resource nodes and attack nearby players. Each golem is constructed from Rust entities and features custom animations, multiple attack abilities, destructible armor, and rewarding loot when defeated.
Server owners can customize different golem types, health, damage, spawn chances, attack behavior, fixed spawn locations, rewards, health bars, map markers, and performance settings.
Perfect for PvE, PvP, Vanilla+, modded, RPG/RP, survival, custom progression, and boss-event Rust servers.
✨ Features
Adds massive, animated ore golems that players can encounter while mining resources. Four configurable golem types: Stone, Sulfur, Metal, and HQM. Unique appearances for different golem types using matching ore nodes, collectables, and colored lights. Golems are assembled from Rust entities using a custom bone, model, and animation system. Natural spawning system with configurable awakening chances for each ore type. Ore nodes can shake and display warning effects before a golem awakens. Configurable number of warning hits before awakening. Configurable maximum number of active golems for automatic awakening. Optional fixed spawn points with configurable ore types and respawn delays. In-game admin commands to create, remove, and list fixed spawn points. Admin commands to spawn golems manually and remove active golems. Custom animations for walking, waking, punching, ground slamming, grabbing, throwing rocks, staggering, sleeping, and dying. Four configurable attack abilities: Grab and Throw, Rock Throw, Ground Slam, and Punch. Separate damage, range, and cooldown settings for each attack. Per-golem-type attack damage multipliers. Rock throwing with configurable projectile speed, size, and target movement prediction. Grab and Throw attack that can pick up players and throw them through the air. Ground Slam attack with configurable area damage and impact effects. Destructible armor that breaks away as the golem loses health. Configurable armor-breaking stages based on remaining health. Heavy hits can stagger golems and interrupt their attacks. Custom targeting, movement speed, chasing distance, and sleeping behavior. Golems can return to a sleeping ore node while preserving their remaining health. Custom reward ore nodes appear when a golem is defeated. Configurable reward node amounts and resource contents for each golem type. Reward crates with configurable skins and vanilla or custom loot. Custom loot supports item amounts, drop chances, skin IDs, names, and text. Optional economy payouts to the player credited with defeating a golem. Optional UltimateLeaderboard integration for recording golem victories. Configurable lifetimes for reward nodes, debris, and loot crates. Optional in-game health bar displaying the golem type and remaining HP. Optional map markers with configurable radius or shop-style icons. Configurable animation update rate and distance-based network update optimization. Automatic cleanup of golem entities, temporary objects, and expired rewards. Plugin hooks for controlling targeting, awakening, and defeated events. No additional NPC framework required. ⛏️ Golem Types
OreGolems includes four different golem types, each with its own appearance, health, damage multiplier, rewards, and loot settings.
Golem Type Default Health Resource Type Stone Golem 12,000 HP Stone Sulfur Golem 18,000 HP Sulfur Metal Golem 24,000 HP Metal Ore HQM Golem 32,000 HP High Quality Metal Ore 🗿 Stone Golem
The Stone Golem is the lowest-health default golem type.
Health: 12,000 HP. Appearance: Stone ore body with standard industrial lights. Default reward: Stone resource nodes. Default crate loot: Normal crate loot. 🟡 Sulfur Golem
A stronger golem made from sulfur ore resources.
Health: 18,000 HP. Appearance: Sulfur ore body with green industrial lights. Default reward: Sulfur Ore and Stones. Default crate loot: Normal crate loot. ⚙️ Metal Golem
A powerful golem made from metal ore resources.
Health: 24,000 HP. Appearance: Metal ore body with red industrial lights. Default reward: Metal Ore and Stones. Default crate loot: Normal crate loot. 💎 HQM Golem
The strongest default golem type, offering a more challenging encounter.
Health: 32,000 HP. Appearance: HQM ore body with blue industrial lights. Default reward: High Quality Metal Ore and Stones. Default crate loot: Elite crate loot. Tip
Custom Golem Difficulty
Each golem type has its own configuration for health, attack damage multiplier, reward nodes, reward items, loot crates, and awakening chance.
This allows server owners to create different difficulty and reward levels for each resource type.
⚔️ Golem Attacks
OreGolems includes four animated combat abilities with separate settings for damage, cooldowns, range, and additional attack behavior.
Attack Default Damage Cooldown Range Grab and Throw 20 15 seconds 6.5 m Rock Throw 35 10 seconds 35 m Ground Slam 40 8 seconds 7 m Punch 25 4 seconds 7 m ✊ Grab and Throw
The golem can grab nearby players and throw them away.
Animated grabbing and throwing sequence. Configurable grab damage. Configurable attack range and cooldown. Configurable reach distance from the golem's hand. Adjustable forward and upward throwing speeds. Player throwing uses Rust's ragdoll mechanics. 🎯 Rock Throw
The golem can attack distant players by throwing large rocks.
Animated rock pickup and throwing sequence. Configurable minimum and maximum attack ranges. Configurable rock damage and cooldown. Adjustable projectile speed. Configurable rock size. Target movement prediction to help aim at moving players. Rock impact detection and damage. 💥 Ground Slam
The golem can slam the ground to damage nearby players.
Animated ground slam attack. Configurable attack damage. Adjustable attack range and hit radius. Configurable cooldown. Ground impact visual effects. Optional custom impact effect prefab. 👊 Punch
The golem can attack nearby players using animated punches.
Animated punching sequence. Configurable damage and cooldown. Adjustable attack range. Configurable hit radius. Directional hit detection. Tip
Example: Increase the Ground Slam damage to 60 and reduce its cooldown to 5 seconds to create a more aggressive boss encounter.
Each attack can also be enabled or disabled separately in the configuration.
🛡️ Destructible Armor & Staggering
OreGolems features an armor-breaking system that makes fights more visually dynamic as the golem takes damage.
Instead of remaining visually unchanged throughout the fight, golems can lose parts of their outer armor as their health decreases.
Armor Stage Remaining Health Stage 1 75% HP Stage 2 50% HP Stage 3 25% HP Armor pieces detach when configured health thresholds are reached. Detached pieces fall away from the golem. Armor stages can be customized in the configuration. Powerful hits can trigger a stagger animation. Configurable minimum hit damage required to stagger a golem. Configurable stagger cooldown. Staggering can interrupt the golem's current actions. Tip
Example: Set [Armor] Damage in one hit needed to stagger the golem (0.04 = 4% of max health) to 0.04 to allow individual hits dealing at least 4% of the golem's maximum health to trigger a stagger, subject to the configured cooldown.
For a Stone Golem with 12,000 HP, this means a hit dealing at least 480 damage can trigger a stagger.
🌋 Awakening & Natural Spawning
OreGolems can turn normal resource gathering into unexpected boss encounters.
When a player mines an eligible ore node, the plugin can randomly select that node to become a sleeping golem.
Once selected, the ore node begins displaying warning effects as the player continues mining.
After the configured warning hits, the golem awakens and begins attacking.
Awakening Settings
Setting Default Wake chance per ore type 1% Warning hits before awakening 3 Maximum active golems 3 Target radius 30 meters Chase radius 40 meters Different wake chances can be configured for each ore type. Warning effects indicate that a selected ore node may awaken. Golems emerge from their corresponding ore nodes. Golems automatically search for nearby valid player targets. Natural awakening is limited by the configured maximum active golem count. The spawning system checks surrounding terrain and obstacles before selecting natural spawn locations. Note
Natural Spawn Notes
The default wake chance is 0.01, equal to 1%. The chance applies when an eligible ore node is first considered for awakening. Selected nodes display warning effects during subsequent mining hits. Natural spawn checks avoid unsuitable locations such as monuments, water, nearby Tool Cupboards, steep terrain, and obstructed areas. When fixed spawns are enabled, the plugin uses the fixed-spawn system instead of random awakening from ordinary ore nodes. 📍 Fixed Spawn Points
Server owners can optionally create permanent golem encounter locations.
Fixed spawn points create sleeping ore nodes at configured positions, allowing players to trigger golem encounters by mining them.
Enable or disable fixed spawning. Create spawn points directly in-game. Select the ore type for each spawn point. Assign a unique name to each location. Automatically save spawn coordinates to the configuration. List all configured spawn locations. Remove unwanted spawn locations. Configurable respawn delay. Fixed spawn nodes can return after their encounter has ended. Fixed Spawn Commands
/golem point add <name> [type] - Saves a fixed spawn point at your current position.
/golem point remove <name> - Removes a saved spawn point.
/golem point list - Lists all saved spawn points and their coordinates.
Command Examples
/golem point add StoneBoss stone /golem point add SulfurBoss sulfur /golem point add MetalBoss metal /golem point add HQMBoss hqm /golem point list /golem point remove StoneBoss Note
Fixed Spawn Setup
Fixed spawns are disabled by default.
Set [Fixed Spawns] Enabled to true under Fixed spawns in the configuration.
The default respawn delay is 900 seconds (15 minutes).
You can create spawn points while the system is disabled, but they will not become active until fixed spawning is enabled and the plugin is reloaded.
🧠 Golem Behavior
OreGolems includes configurable movement and targeting behavior.
Setting Default Target radius 30 m Chase radius 40 m Walk speed 1.3 m/s Time without target before sleeping 30 seconds Sleeping node lifetime 1,800 seconds Searches for nearby valid players. Moves toward its target using animated walking. Uses configured attacks depending on the player's distance. Limits how far it can chase players from its awakening location. Can return toward its original position. Can return to a sleeping ore node after losing its target. Preserves remaining health when returning to sleep. Sleeping nodes can awaken again when mined. Temporary sleeping nodes expire after their configured lifetime. Tip
Example: Increase [Behavior] Walk speed (meters per second) to 2.0 and [Behavior] Maximum chase distance from where the golem woke up (meters) to 60 to make golems move faster and pursue players across a larger area.
🎁 Rewards & Loot
Defeating a golem can reward players with collectible resource nodes, loot crates, and optional economy payouts.
Reward Ore Nodes
Each golem type supports custom reward nodes containing configurable resource items.
Golem Type Default Resource Contents per Node Stone 1,000 Stones Sulfur 600 Sulfur Ore + 300 Stones Metal 600 Metal Ore + 300 Stones HQM 60 HQM Ore + 300 Stones By default, each golem can produce up to 3 reward nodes when defeated, depending on available ore parts.
Reward nodes can be mined to collect their configured resources.
Loot Crates
Each defeated golem also creates a reward crate.
Configurable crate skin for each golem type. Option to use vanilla loot. Configurable vanilla loot source crate. Optional custom loot tables. Configurable item shortnames. Minimum and maximum item amounts. Individual item drop chances. Custom item skin IDs. Custom item display names. Custom item text, including personalized messages on notes. Tip
Example: Configure a special HQM Golem reward crate using custom loot instead of the default elite crate loot.
You can add valuable items, set custom chances, and customize how much loot players receive when defeating the boss.
The default custom loot examples include Scrap with a configurable drop chance and a custom-named Golem Hunter's Note containing a message.
Note
Custom Loot Settings
Each golem type has its own custom loot list. You can configure item shortnames, amounts, chances, skins, names, and text. The included examples contain Scrap with a 50% chance and a Golem Hunter's Note with a 100% chance. Standard Rust crate loot is enabled by default. Custom loot is used only when standard Rust loot is disabled for that golem type. Reward Lifetimes
Reward Object Default Lifetime Reward ore nodes 900 seconds Golem debris 60 seconds Loot crates 900 seconds These values can be customized in the configuration.
💰 Economy & Leaderboard Integration
OreGolems supports optional integrations for rewarding and tracking boss victories.
Economy Payouts
Server owners can configure economy rewards for each golem type.
Configurable economy plugin name. Configurable balance addition hook. Separate payout amount for each golem type. Set the amount to 0 to disable economy rewards. Payouts are awarded to the player credited with defeating the golem. The default economy plugin name is Economics, using the Deposit hook.
Other economy plugins can be configured using their supported balance hooks.
UltimateLeaderboard
OreGolems includes optional UltimateLeaderboard integration.
When a golem is defeated, the plugin can record an event victory for the credited player through UltimateLeaderboard's API.
Note
Integration Notes
Economy integration is optional. Economy payouts are disabled by default. UltimateLeaderboard integration is optional. The plugin determines the credited killer using recorded damage contributions. Both integrations require their respective plugins to be installed and compatible. ❤️ Health Bar & Map Markers
OreGolems includes optional visual information to help players identify and track active golems.
Health Bar
Configurable in-game health bar. Shows the golem's ore type. Displays current and maximum health. Automatically updates during combat. Configurable display distance. Shows nearby active golems without requiring a chat command. Default health bar distance: 50 meters.
Map Markers
Optional map markers for active golems. Supports a radius-style map marker. Optional shop-style map icon. Configurable marker radius. Markers are removed when the golem is defeated or removed. Note
Default Settings
Health bars are enabled by default. Map markers are disabled by default. Both features can be configured separately. 🚀 Performance Settings
OreGolems includes configurable performance settings for controlling animation and network updates.
Configurable animation ticks per second. Distance-based update behavior. Reduced network update frequency for distant golems. Configurable distance for far update rates. Configurable distance beyond which pose network updates are suppressed. Automatic removal of temporary combat effects and objects. Configurable maximum active golem count for automatic awakening. Setting Default Animation ticks per second 20 Far update distance 80 m Far update rate 10 updates/second Network update cutoff distance 200 m Tip
Performance Tip
For servers expecting frequent boss encounters, adjust the maximum active golems, animation tick rate, and distance-based update settings to suit your server performance.
⌨️ Admin Commands
/golem spawn <type> - Spawns the selected golem type in front of the admin.
/golem play <sequence> - Plays an animation sequence on the nearest active golem.
/golem clear - Removes all active golems.
/golem point add <name> [type] - Creates a fixed spawn point at the admin's current location.
/golem point remove <name> - Removes a fixed spawn point.
/golem point list - Lists all configured fixed spawn points.
Command Examples
/golem spawn stone /golem spawn sulfur /golem spawn metal /golem spawn hqm /golem play wake /golem play punch /golem play slam /golem play grab /golem play rock /golem play stagger /golem play sleep /golem play death /golem play walk /golem clear /golem point add StoneBoss stone /golem point add SulfurBoss sulfur /golem point add HQMBoss hqm /golem point list /golem point remove StoneBoss Note
Command Notes
All /golem commands require oregolems.admin. The spawn command defaults to Stone when no ore type is provided. The play command targets the nearest active golem. The clear command removes active golems. Fixed spawn points are saved in the plugin configuration. The default ore type for new fixed spawn points is Stone. 🖥️ Console Commands
oregolems.spawn <type> - Spawns the selected golem type in front of the player using the client console.
oregolems.clear - Removes all active golems.
Note
Console Access
The spawn console command requires a player context and oregolems.admin. The clear console command supports authorized players and the server console. 🔐 Permissions
oregolems.admin - Grants access to all OreGolems admin commands, including spawning, animation playback, clearing golems, and managing fixed spawn points.
Normal players do not need permissions to encounter, fight, or collect rewards from ore golems.
📁 Installation
OreGolems supports both Oxide (uMod) and Carbon.
The downloaded ZIP contains two required files:
OreGolems.cs - Main plugin file. data/OreGolems/Golem.json - Golem model, parts, poses, and animation data. Installation Steps
Extract the downloaded ZIP archive. Upload OreGolems.cs to your server's plugin folder: Oxide: oxide/plugins/ Carbon: carbon/plugins/ Upload Golem.json to your server's data folder: Oxide: oxide/data/OreGolems/ Carbon: carbon/data/OreGolems/ Make sure both files are in the correct directories. Load or reload the OreGolems plugin. Edit the generated configuration: Oxide: oxide/config/OreGolems.json Carbon: carbon/configs/OreGolems.json Grant the admin permission if you want to use the management commands. Oxide File Structure
oxide/ ├── plugins/ │ └── OreGolems.cs ├── data/ │ └── OreGolems/ │ └── Golem.json └── config/ └── OreGolems.json Carbon File Structure
carbon/ ├── plugins/ │ └── OreGolems.cs ├── data/ │ └── OreGolems/ │ └── Golem.json └── configs/ └── OreGolems.json Warning
Important Installation Requirement
The Golem.json data file is required for OreGolems to function.
This file contains the custom model and animation definitions used to construct and animate the golems.
If the file is missing or cannot be loaded, the plugin will report an error and unload.
Do not upload only the .cs file. Make sure to include the supplied data folder.
⚙️ Example Configuration
{ "Ore types": { "stone": { "[Ore] Wake chance on the first hit of a natural ore node (0.50 = 50%)": 0.01, "[Ore] Maximum health (HP)": 12000.0, "[Ore] Attack damage multiplier": 1.0, "[Ore] Maximum ore nodes dropped on death": 3, "Items in each dropped ore node": [ { "Item shortname": "stones", "Amount": 1000 } ], "Loot crate dropped on death": { "[Loot] Crate skin ID": 2538049119, "[Loot] Use standard Rust crate loot": true, "[Loot] Rust crate prefab to copy loot from (e.g. crate_normal)": "crate_normal", "Custom loot (used when standard Rust loot is disabled)": [ { "Item shortname": "scrap", "Minimum amount": 25, "Maximum amount": 50, "Chance to include this item (0.5 = 50%)": 0.5, "Skin ID": 0, "Custom name": "", "Custom text": "" }, { "Item shortname": "note", "Minimum amount": 1, "Maximum amount": 1, "Chance to include this item (0.5 = 50%)": 1.0, "Skin ID": 0, "Custom name": "Golem Hunter's Note", "Custom text": "You defeated an Ore Golem. The loot is yours!" } ] }, "Economy reward for the player who dealt the most damage": { "[Economy] Economy plugin name": "Economics", "[Economy] Economy plugin hook that adds to the player's balance": "Deposit", "[Economy] Reward amount (0 = no payout)": 0.0 }, "[Ore] Ore node prefab used for the golem body": "stone-ore", "[Ore] Ore collectible prefab used for body parts and thrown rocks": "stone-collectable", "[Ore] Lamp prefab used for the golem's eyes": "industrial.wall.lamp.deployed" }, "sulfur": { "[Ore] Wake chance on the first hit of a natural ore node (0.50 = 50%)": 0.01, "[Ore] Maximum health (HP)": 18000.0, "[Ore] Attack damage multiplier": 1.0, "[Ore] Maximum ore nodes dropped on death": 3, "Items in each dropped ore node": [ { "Item shortname": "sulfur.ore", "Amount": 600 }, { "Item shortname": "stones", "Amount": 300 } ], "Loot crate dropped on death": { "[Loot] Crate skin ID": 2517917450, "[Loot] Use standard Rust crate loot": true, "[Loot] Rust crate prefab to copy loot from (e.g. crate_normal)": "crate_normal", "Custom loot (used when standard Rust loot is disabled)": [ { "Item shortname": "scrap", "Minimum amount": 25, "Maximum amount": 50, "Chance to include this item (0.5 = 50%)": 0.5, "Skin ID": 0, "Custom name": "", "Custom text": "" }, { "Item shortname": "note", "Minimum amount": 1, "Maximum amount": 1, "Chance to include this item (0.5 = 50%)": 1.0, "Skin ID": 0, "Custom name": "Golem Hunter's Note", "Custom text": "You defeated an Ore Golem. The loot is yours!" } ] }, "Economy reward for the player who dealt the most damage": { "[Economy] Economy plugin name": "Economics", "[Economy] Economy plugin hook that adds to the player's balance": "Deposit", "[Economy] Reward amount (0 = no payout)": 0.0 }, "[Ore] Ore node prefab used for the golem body": "sulfur-ore", "[Ore] Ore collectible prefab used for body parts and thrown rocks": "sulfur-collectable", "[Ore] Lamp prefab used for the golem's eyes": "industrial.wall.lamp.green.deployed" }, "metal": { "[Ore] Wake chance on the first hit of a natural ore node (0.50 = 50%)": 0.01, "[Ore] Maximum health (HP)": 24000.0, "[Ore] Attack damage multiplier": 1.0, "[Ore] Maximum ore nodes dropped on death": 3, "Items in each dropped ore node": [ { "Item shortname": "metal.ore", "Amount": 600 }, { "Item shortname": "stones", "Amount": 300 } ], "Loot crate dropped on death": { "[Loot] Crate skin ID": 2509860100, "[Loot] Use standard Rust crate loot": true, "[Loot] Rust crate prefab to copy loot from (e.g. crate_normal)": "crate_normal", "Custom loot (used when standard Rust loot is disabled)": [ { "Item shortname": "scrap", "Minimum amount": 25, "Maximum amount": 50, "Chance to include this item (0.5 = 50%)": 0.5, "Skin ID": 0, "Custom name": "", "Custom text": "" }, { "Item shortname": "note", "Minimum amount": 1, "Maximum amount": 1, "Chance to include this item (0.5 = 50%)": 1.0, "Skin ID": 0, "Custom name": "Golem Hunter's Note", "Custom text": "You defeated an Ore Golem. The loot is yours!" } ] }, "Economy reward for the player who dealt the most damage": { "[Economy] Economy plugin name": "Economics", "[Economy] Economy plugin hook that adds to the player's balance": "Deposit", "[Economy] Reward amount (0 = no payout)": 0.0 }, "[Ore] Ore node prefab used for the golem body": "metal-ore", "[Ore] Ore collectible prefab used for body parts and thrown rocks": "metal-collectable", "[Ore] Lamp prefab used for the golem's eyes": "industrial.wall.lamp.red.deployed" }, "hqm": { "[Ore] Wake chance on the first hit of a natural ore node (0.50 = 50%)": 0.01, "[Ore] Maximum health (HP)": 32000.0, "[Ore] Attack damage multiplier": 1.0, "[Ore] Maximum ore nodes dropped on death": 3, "Items in each dropped ore node": [ { "Item shortname": "hq.metal.ore", "Amount": 60 }, { "Item shortname": "stones", "Amount": 300 } ], "Loot crate dropped on death": { "[Loot] Crate skin ID": 2446262619, "[Loot] Use standard Rust crate loot": true, "[Loot] Rust crate prefab to copy loot from (e.g. crate_normal)": "crate_elite", "Custom loot (used when standard Rust loot is disabled)": [ { "Item shortname": "scrap", "Minimum amount": 25, "Maximum amount": 50, "Chance to include this item (0.5 = 50%)": 0.5, "Skin ID": 0, "Custom name": "", "Custom text": "" }, { "Item shortname": "note", "Minimum amount": 1, "Maximum amount": 1, "Chance to include this item (0.5 = 50%)": 1.0, "Skin ID": 0, "Custom name": "Golem Hunter's Note", "Custom text": "You defeated an Ore Golem. The loot is yours!" } ] }, "Economy reward for the player who dealt the most damage": { "[Economy] Economy plugin name": "Economics", "[Economy] Economy plugin hook that adds to the player's balance": "Deposit", "[Economy] Reward amount (0 = no payout)": 0.0 }, "[Ore] Ore node prefab used for the golem body": "hqm-ore", "[Ore] Ore collectible prefab used for body parts and thrown rocks": "hqm-collectable", "[Ore] Lamp prefab used for the golem's eyes": "industrial.wall.lamp.blue.deployed" } }, "Wake-up settings": { "[Wake] Warning hits before a natural ore node wakes up": 3, "[Wake] Maximum golems awake at once": 3 }, "Fixed spawns": { "[Fixed Spawns] Enabled": false, "[Fixed Spawns] Respawn delay (seconds)": 900.0, "Saved spawn points": {} }, "Golem behavior": { "[Behavior] Distance to detect players (meters)": 30.0, "[Behavior] Maximum chase distance from where the golem woke up (meters)": 40.0, "[Behavior] Walk speed (meters per second)": 1.3, "[Behavior] Wait without a target before returning to sleep (seconds)": 30.0, "[Behavior] Time before a sleeping golem outside a fixed spawn disappears (seconds)": 1800.0 }, "Attacks": { "Grab and throw": { "[Attack] Enabled": true, "[Attack] Damage": 20.0, "[Attack] Wait before using this attack again (seconds)": 15.0, "[Attack] Maximum distance to start this attack (meters)": 6.5, "[Attack] Distance the hand can grab a player from (meters)": 4.0, "[Attack] Player throw speed forward (meters per second)": 12.0, "[Attack] Player throw speed upward (meters per second)": 9.0 }, "Rock throw": { "[Attack] Enabled": true, "[Attack] Damage": 35.0, "[Attack] Wait before using this attack again (seconds)": 10.0, "[Attack] Maximum distance to start this attack (meters)": 35.0, "[Attack] Minimum distance to throw a rock (meters)": 12.0, "[Attack] Rock speed (meters per second)": 24.0, "[Attack] How much to aim ahead of moving players (0 to 1)": 0.8, "[Attack] Rock size multiplier (1 = normal size)": 1.4 }, "Ground slam": { "[Attack] Enabled": true, "[Attack] Damage": 40.0, "[Attack] Wait before using this attack again (seconds)": 8.0, "[Attack] Maximum distance to start this attack (meters)": 7.0, "[Attack] Hit radius (meters)": 4.0 }, "[Slam] Extra ground slam effect prefab (leave blank to disable)": "assets/bundled/prefabs/fx/impacts/physics/phys-impact-stone-hard.prefab", "Punch": { "[Attack] Enabled": true, "[Attack] Damage": 25.0, "[Attack] Wait before using this attack again (seconds)": 4.0, "[Attack] Maximum distance to start this attack (meters)": 7.0, "[Attack] Hit radius (meters)": 3.0 } }, "Armor": { "[Armor] Remaining health levels where armor falls off (0.75 = 75%)": [ 0.75, 0.5, 0.25 ], "[Armor] Damage in one hit needed to stagger the golem (0.04 = 4% of max health)": 0.04, "[Armor] Minimum time between staggers (seconds)": 12.0 }, "Rewards": { "[Rewards] Time before dropped ore nodes disappear (seconds)": 900.0, "[Rewards] Time before golem debris disappears (seconds)": 60.0, "[Rewards] Time before the loot crate disappears (seconds)": 900.0 }, "Performance": { "[Performance] Use fewer network updates beyond this distance (meters)": 80.0, "[Performance] Network updates per second for distant golems": 10.0, "[Performance] Stop sending movement updates beyond this distance (meters)": 200.0 }, "Health bar": { "[Health Bar] Enabled": true, "[Health Bar] Distance at which players can see the health bar (meters)": 50.0 }, "Map markers": { "[Map Markers] Enabled": false, "[Map Markers] Use a shop icon (false = circle marker)": false, "[Map Markers] Circle marker size": 0.15 }, "[Animation] Updates per second": 20.0, "Config Version": { "Major": 1, "Minor": 0, "Patch": 0 } } Note
Configuration Notes
Ore Types: Configure individual golem health, wake chance, damage multipliers, rewards, crate loot, economy payouts, and appearance prefabs. Wake-up Settings: Control warning hits and the maximum number of automatically awakened golems. Fixed Spawns: Enable permanent encounter locations and configure their respawn delays. Golem Behavior: Configure targeting range, chasing distance, movement speed, and sleeping behavior. Grab and Throw: Configure grabbing range, damage, cooldown, and throwing force. Rock Throw: Configure projectile damage, range, speed, size, and target prediction. Ground Slam: Configure area damage, hit radius, cooldown, and impact effects. Punch: Configure melee damage, hit radius, and cooldown. Armor: Configure armor-breaking stages and stagger behavior. Rewards: Configure temporary reward node, crate, and debris lifetimes. Performance: Adjust distance-based network update behavior. Health Bar: Enable or disable the in-game boss health bar and configure its display distance. Map Markers: Enable optional map indicators for active golems. Animation Rate: Configure animation updates per second. 🔌 Developer Hooks
OreGolems exposes hooks that other plugins can use to control encounters or respond to golem events.
CanOreGolemWake
Called before a golem awakens.
object CanOreGolemWake(BasePlayer player, string type, Vector3 position) Return false to prevent the golem from awakening.
OnOreGolemWake
Called when a golem awakens.
void OnOreGolemWake(BasePlayer player, string type, Vector3 position) Useful for integrations such as event notifications or custom encounter tracking.
CanOreGolemTarget
Called when checking whether a player can be targeted by a golem.
object CanOreGolemTarget(BasePlayer player, string type) Return false to exclude the player from golem targeting.
OnOreGolemDefeated
Called when a golem is defeated and its rewards are created.
void OnOreGolemDefeated(BasePlayer killer, string type, Vector3 position) Useful for custom rewards, statistics, achievements, and event integrations.
Note
Hook Notes
type identifies the golem type, such as stone, sulfur, metal, or hqm. The killer is determined using recorded player damage contributions. killer can be null when no valid credited player is available. These hooks allow other plugins to integrate with OreGolems without modifying its source code. 💡 Why Choose OreGolems?
Mining in Rust should not always be a simple, predictable activity. OreGolems transforms ordinary resource nodes into unexpected boss encounters that challenge players and reward them for surviving.
With four different golem types, custom animations, multiple attack abilities, destructible armor, dynamic spawning, configurable rewards, optional economy integration, and detailed behavior controls, OreGolems adds a new layer of danger and excitement to resource gathering.
Whether you want rare boss encounters while mining, dedicated boss locations with fixed spawns, or challenging PvE content with valuable rewards, OreGolems gives server owners the flexibility to create memorable encounters using Rust's existing world and entities