
AlaEddineYahia's Wishlist
-

$4.99
SeekerOnSteroids
Introduction
SeekerOnSteroids is a strong, powerful missile plugin.
The features are as follows:
It allows you to change/add custom targets to the Homing Missile Launcher, providing you with the ability to add more targets, making the launcher more flexible.
Players can purchase a missile attack, for example, 1000 scrap and 4 homing missiles, to eliminate a player. This feature is balanced to prevent it from being overpowered.
It includes several commands/operations to use the homing missiles.
Command overview:
/gseek => Spawns 4 missiles on each corner of the map and targets the specified player.
/seek => Spawns a specified number of missiles to attack the player.
/cseek => Spawns a specified number of missiles above a player (missile cloud). After a while, they descend and target the specified player.
/godstrike => Every time you fire a shot, a strong, fast homing missile targets the object wherever you are currently looking.
Permissions:
seekeronsteroids.admin => Master permission. Don't give this normal players.
seekeronsteroids.gridseek => This is for the grid seek attack (payed attack)
Configuration:
{ "PluginPicture": 76561198838421574, "PluginChatPrefix": "<color=#191A28>[</color><color=#CC3B28>SeekerOnSteroids</color><color=#191A28>]</color> ", "CustomSeekerTargets": [ { "PrefabName": "assets/rust.ai/agents/wolf/wolf.prefab", "Enabled": true, "Strength of missles (LOW, MEDIUM, HIGH, HIGHEST)": "LOW" } ], "Missle behavior of grid-seek command": { "Amount of scrap a player needs to start the attack.": 1000, "SeekerMissleConfiguration": { "Min amount of time until missle explods": 100.0, "Max amount of time until missle explods": 100.0, "ExplosionRadiusMultiplier": 1.0, "DamageScaleMultiplier": 1.0, "Handling-smoothness of the missle": 6.0, "Strength of missles (LOW, MEDIUM, HIGH, HIGHEST)": "LOW", "MissleSpeedMultiplier": 1.2 } }, "Missle behavior of godstrike command": { "Missle offset (spawn distance between player and missles)": { "x": 0.0, "y": 10.0, "z": 0.0 }, "SeekerMissleConfiguration": { "Min amount of time until missle explods": 10.0, "Max amount of time until missle explods": 10.0, "ExplosionRadiusMultiplier": 10.0, "DamageScaleMultiplier": 10.0, "Handling-smoothness of the missle": 4.0, "Strength of missles (LOW, MEDIUM, HIGH, HIGHEST)": "LOW", "MissleSpeedMultiplier": 3.0 } }, "Missle behavior of cloud-seek command": { "Time until missles attack in milliseconds": 10000.0, "Missle offset (spawn distance between player and missles)": { "x": 0.0, "y": 100.0, "z": 0.0 }, "SeekerMissleConfiguration": { "Min amount of time until missle explods": 100.0, "Max amount of time until missle explods": 100.0, "ExplosionRadiusMultiplier": 1.0, "DamageScaleMultiplier": 1.0, "Handling-smoothness of the missle": 6.0, "Strength of missles (LOW, MEDIUM, HIGH, HIGHEST)": "LOW", "MissleSpeedMultiplier": 1.0 } }, "Missle behavior of seek command": { "Min amount of time until missle explods": 100.0, "Max amount of time until missle explods": 100.0, "ExplosionRadiusMultiplier": 1.0, "DamageScaleMultiplier": 1.0, "Handling-smoothness of the missle": 4.0, "Strength of missles (LOW, MEDIUM, HIGH, HIGHEST)": "LOW", "MissleSpeedMultiplier": 1.0 } }
-
.thumb.png.37ecc2edda122ed15e73aa10a522b410.png)
$19.95$11.95Capture Zone
Adds a new event to the server - zone capture. If you gather resources on the territory of the occupied zone, a commission is removed from you and falls into the "capture cupboard".
Features:
Markers on the map Spawn in crates/barrels Percentage setting with permissions Setting limits with permissions Bypass setting (for teammates, friends, clanmates, cupboard)
Commands
give.capturezone [target] [amount] - gives out a cupboard for capturing a zone
Permissions
capturezone.ignore - allows you not to pay resources for tax
Video
Config
{ "Work with Notify?": true, "Zone Radius": 40.0, "Permission (ex: capturezone.use)": "", "Item Settings": { "DisplayName": "Zone Сapture", "ShortName": "cupboard.tool", "SkinID": 2767790029 }, "Marker": { "Enabled": true, "Display Name": "Zone by {owner}", "Radius": 0.3, "Refresh Rate": 3.0, "Duration": 0, "Color 1": "#EA9999", "Color 2": "#A73636FF" }, "Drop Settings": { "Enabled": true, "Drop Settings": [ { "Prefab name": "assets/bundled/prefabs/radtown/crate_normal.prefab", "Min amount": 1, "Max amount": 1, "Chance": 50.0 }, { "Prefab name": "assets/bundled/prefabs/radtown/loot_barrel_2.prefab", "Min amount": 1, "Max amount": 1, "Chance": 5.0 }, { "Prefab name": "assets/bundled/prefabs/radtown/loot_barrel_1.prefab", "Min amount": 1, "Max amount": 1, "Chance": 5.0 } ] }, "Notification during mining in the occupied territory": { "Enabled": true, "Cooldown": 5.0 }, "Percent Settings": { "Default": 20.0, "Permissions": { "capturezone.vip": 25.0, "capturezone.deluxe": 30.0 } }, "Limits Settings": { "Enabled": true, "Default": 3, "Permissions": { "capturezone.vip": 5, "capturezone.deluxe": 7 } }, "Bypass Settings": { "Teammates (Rust in-game system)": true, "Friends": true, "Clanmates": true, "Authorized in the cupboard": true } } -

$24.99
Optimize - Player FPS Optimization for Rust
Optimize A stylishly designed plugin that boosts player FPS and includes a wide range of performance optimizations. 15+ optimization settings Oxide & Carbon English · Russian Supports Community Servers Depending on the hardware, client FPS either goes up or becomes noticeably more stable. Goals Before developing any plugin, we define the goals it should achieve when running on your game server. Improve players FPS Make your project stand out Improve the overall quality Features and Capabilities We provide extensive functionality for both server owners who purchase the plugin and the players who use it. General Polished and thoughtfully designed interface Extensive plugin customization Players One time notification when low FPS is detected Numerous optimization settings Optimization Settings Players enable exactly what they need — every option is toggled individually, and choices are saved automatically. World Around You Draw distance The server stops sending buildings, boxes and other objects that are far away. Distant trees Trees load only around you instead of the whole map — as you move, they stream in on their own. Saves memory and speeds up joining the server. Images and drawings Drawings on signs, photos, paintings and spray art stop loading. Saves memory and bandwidth. Unapproved Skins Disables skins that have not been accepted into the game but may still be used by other players. Fire, Light & Animations Destruction debris No debris flies around when walls and structures collapse. The difference is most noticeable during raids. Flames Furnaces, campfires, and torches will no longer display flames.
The difference is especially noticeable in large, heavily built-up bases. Wind turbine rotation Wind turbines stop spinning. They generate power just like before. Turret lasers Laser sights on turrets and SAM sites are turned off. Falling trees A chopped tree simply disappears — no falling animation, no cracking sounds. Construction smoke Smoke and effects from placing, upgrading and repairing structures are no longer shown. Lights Lamps and searchlights will no longer emit light.
The difference is especially noticeable in large, heavily built-up bases. Electricity & Industrial Items in industrial pipes Item animation inside industrial conveyors and pipes is turned off. The conveyors themselves keep working as usual. Recyclers and quarries Recyclers, quarries and pumpjacks stop shaking and animating. They keep on working. Water flow Water inside hoses and pipes is no longer rendered. Sprinklers and water supply work as usual. Effects & Sounds Distant effects Explosions, muzzle flashes and smoke from other players' distant fights are hidden. Everything happening near you stays visible as usual. Voice chat You won't hear other players' voice chat, or will hear it only at a reduced range. Frequently Asked Questions We have anticipated your questions and answered the most common ones below.
You can ask any additional questions in the plugin's discussion section. Do you accept suggestions for improving the plugin? Sure! To submit an idea, join our Discord Server obtain the required role, and post your suggestion in the #suggestions channel. What should I do if the plugin is not working? Create a support ticket on our Discord Server and we will help you resolve the issue. Does the plugin require a powerful game server? No. The plugin is well optimized and will not place a significant load on your server, even on low-end hardware or with a high player count. Permissions and Commands Below is a list of the permissions and commands available in the plugin.
Permissions optimize.use Grants players access to the plugin Commands /fps Opens the plugin menu Console Commands optimize.wipe Clears the player settings database Join our
Click on this text to join our server, get support, updates, and more.
Developed in Authors Code by DezLife Design by Illumination- #rust
- #rust plugin
- (and 14 more)
-

$9.99
PlayerPings
PlayerPings is a convenient plugin that enhances communication and tactical gameplay for your players in Rust. It features a user-friendly interface and dynamic object type detection—whether it's ore, a building, or loot objects, each will have a unique marker.
Players can choose their own marker color and toggle automatic object type detection on/off.
The plugin has an adaptive interface and supports localization in multiple languages.
Markers can be set through several options:
Binding via console command - playerping.set Aiming + key use (E) Clicking mouse wheel To open the settings menu, use: /pingmenu
To access usage, the playerpings.use permission needs to be granted. You can grant it via console command:
oxide.grant <user or group> <name or steam id> playerpings.use
Config Example
{ "Basic setup": { "Color(0-yellow,1-blue,2-green,3-red,4-purple,5-blue)": 3, "Maximum number of pings per player": 5, "Maximum distance": 300.0, "Ping display time": 3.0, "Enable ping metod Aiming + key use (E)": true, "Enable ping metod Center mouse wheel": true, "Delay between pings (seconds): 0.2 seconds as standard": 0.2, "Command to set ping": "playerping.set", "Menu Open Command": "pingmenu" }, } -
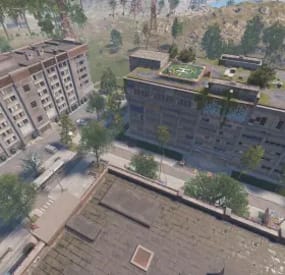
$15.00
ApartmentsPlus
ApartmentsPlus is the perfect addition to improve the gameplay experience around Rust's new apartment monument. It is designed to make it easier to customize apartment rooms or add extra items and functionality to the monument area.
It combines Outpost + Bandit Camp + Stables + Apartments, all inside the same monument.
The plugin also allows administrators to edit, save and reapply furniture layouts either by individual room number or by room category/type.
This is one of the most important parts of the plugin: you can create a unique design for a specific apartment, or define a shared default layout for all rooms of the same type. The plugin already includes a default configuration that adds more boxes, furnaces, workbench changes and workshop skins in the rooms. Edit them to your liking, as long as they are not approved workshop skins.
ApartmentsPlus supports additional deployables, monument-level entities, skins, automatic IO power for electrical deployables and optional monument additions such as helicopter vendors, stable vendors, horse spawn points and everything related to the casino setup.
The goal of the plugin is simple: provide administrators with a fast way to turn the standard apartment monument into a complete custom rental experience.
Important Installation Note
The download ZIP includes a data/ApartmentsPlus/ folder.
You must upload this folder and its files to your server data directory.
Those data files contain the configured additions for the apartment monument itself, as well as the saved layouts for the different apartment room types. Without these data files, the plugin will load, but the preconfigured monument additions and room layouts included with the purchase will not be applied.
Features
INDIVIDUAL AND CATEGORY-BASED ROOM LAYOUTS
ApartmentsPlus can save and reapply apartment room layouts in two different ways.
Individual room layout: You can configure a specific room by its room number. This is useful when you want one apartment to have a unique design. Room category/type layout: You can configure a default layout for a room type, so every room of that category can share the same furniture, deployables and decorations. This makes it easy to prepare small, medium or large apartments with their own default design, while still allowing special rooms to be customized individually.
When a room is rented, the plugin can automatically apply the configured extras. When the room becomes unrented, managed extras are cleaned up.
ROOM EDITING SYSTEM
The plugin includes an in-game editing workflow for staff members.
You can select the room you are currently standing in, or directly select a room by number, for example: /ap edit 602
This is useful when Rust detects the player inside the apartment monument but not inside the exact room you want to edit.
Once a room is selected, you can add looked-at entities, move the last edited extra, rotate it, apply skins and remove saved extras directly from chat commands.
EXTRA ENTITIES
ApartmentsPlus allows administrators to save additional deployables and entities as room extras.
Examples:
Boxes Lockers Furnaces Lights Decorations Other deployables Extra entities are saved with:
Prefab Enabled state Local position Local rotation Skin ID This means your layouts stay relative to the apartment room or monument, making them reusable after restarts and wipes.
SKIN SUPPORT
Staff can apply a skin to a looked-at saved extra using: /ap skin <skinid>
The skin is applied to the entity and saved into the corresponding room configuration.
This works with extras that were placed recently or existing saved extras that are already in the apartment, as long as the entity can be identified in the saved layout.
MONUMENT EXTRAS
ApartmentsPlus can also save entities directly to the apartment monument instead of a specific room.
This is useful for adding global monument features such as casino objects, vendors, spawners, decorative deployables or other custom additions.
Monument extras are saved in their own data file and reapplied to every matching apartment monument instance.
AUTOMATIC IO POWER
The plugin includes an optional automatic power system for IO entities added as extras.
If enabled, compatible electrical deployables can be powered automatically when spawned. This is useful for lights and other IO deployables that should appear active without requiring a full electrical setup.
HELICOPTER VENDOR SUPPORT
ApartmentsPlus includes optional helicopter vendor support for apartment monuments.
The plugin can spawn:
Helicopter vendor Helicopter spawn point Important: This feature requires the RustEdit extension.
STABLE VENDOR AND HORSE SPAWNS
ApartmentsPlus can optionally add a stable vendor to the apartment monument.
The plugin can spawn:
Stable shopkeeper Invisible vending machine linked to the shopkeeper Horse spawn points The stable vending machine can also be configured automatically with default stable sales, including saddles, horse armor, horseshoes and plant exchange orders.
Important: This feature requires the RustEdit extension.
CASINO SUPPORT
If you save a casino big wheel and big wheel betting terminals as monument extras, ApartmentsPlus can automatically connect the terminals to the nearest big wheel.
The plugin can also generate the required static chair next to each betting terminal automatically, using a fixed internal offset to prevent misconfiguration.
This makes it possible to add functional casino setups to apartment monuments.
Permissions
apartmentsplus.admin Allows access to all ApartmentsPlus commands. This plugin is designed as an administrator/staff tool, not a player-facing plugin.
Commands
/ap Shows the command help. /ap here Shows information about the current apartment room. /ap edit Selects the current room for editing. /ap edit <room number> Selects a specific room for editing. Example: /ap edit 602 /ap ent Saves the looked-at entity as a room extra or monument extra. /ap move <x> <y> <z> Moves the last edited room extra by local offset. Example: /ap move 0 0.1 0 /ap rot <yaw> Rotates the last edited room extra. Example: /ap rot 90 /ap skin <skinid> Applies a skin to the looked-at saved extra and saves it. Example: /ap skin 2843382048 /ap remove Removes the looked-at saved extra from the configuration. /ap save Saves and reapplies the current room layout. /ap save default Saves and reapplies the default layout for the current room size.
Data Files
ApartmentsPlus stores layouts in data files.
The purchase ZIP includes a data/ApartmentsPlus/ folder that must be uploaded to the server.
These files include the ready-made configuration for:
Apartment monument additions Room layouts by room type/category Specific room layouts when needed Room profiles can be stored by individual room number or by room size/type.
Monument extras are stored separately, so global monument additions are independent from apartment room layouts.
Saved entities include prefab, enabled state, local position, local rotation and skin ID.
Requirements
Rust server running Oxide or Carbon. RustEdit extension is required only for the helicopter vendor, stable vendor and horse spawner features.
Known Notes
This plugin is intended for staff/admin use.
Casino big wheel support requires both the big wheel and betting terminals to be saved as monument extras. The plugin will then connect terminals to the nearest big wheel and create the required chairs automatically.
For any problem, doubt, suggestion or assistance do not hesitate to contact me by Discord ninco90#6219
If you need me to configure everything from scratch, according to your tastes, for your server I can also do it for an additional fee. Although you should be able to configure everything yourself.
- #apartments
- #rooms customs
- (and 4 more)