Search the Community
Showing results for tags 'page'.
Found 2 results
-
Version 1.1.5
80 downloads
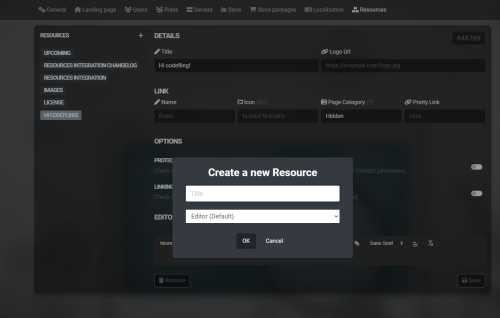
The resources integration is a simple way to add things such as Rules pages, Glossary pages, Changelogs and more to your Ember application. There is an admin interface for easily adding and removing resources, as well as a front end interface for viewing them. Links to the resources are automatically added to the navbar, and you can also limit certain resources to only be visible to certain roles, such as staff. IMPORTANT INFO: If you are using MacOS or a non-chromium browser, inside the select boxes in the Changelog editor you will see question marks instead of the option you pick. This is an issue I cannot solve, as MacOS and non-chromium browsers do not allow custom fonts inside the select box options. A fix is planned to show text describing the element in the future, but this has not been implemented yet. A full description is available here: https://ember.joyte.cc/resources/resources-integration$24.99 -
Version 1.0.0
11 downloads
Explore the Rust Theme for Azuriom! Enhance the aesthetics of your Azuriom platform with our exclusive Rust Theme. Inspired by the Rust world, this theme provides a unique and engaging user interface that perfectly complements your gaming community. see in action: https://rust-deutschland.de Features: Stylish Design: Immerse your users in a visually appealing Rust atmosphere. The theme has been carefully crafted to offer a rustic yet modern look. Easy Installation: Thanks to our step-by-step guide, installation is a breeze. Download the theme, copy it to the theme directory, activate it in the Admin Dashboard, and your Azuriom with the Rust Theme is ready. Customizable Configuration: Tailor the theme to your preferences. Choose pages for the homepage, enable the page background set in `Settings/Global`, and add individual header images for up to 8 servers. One-Click Server Connection: Clicking the "Connect" button automatically copies the connection link to the clipboard. Paste it effortlessly into Rust in the console and initiate the gaming experience seamlessly. Ongoing Enhancements: Our Rust Theme is continually updated and expanded with new features. Benefit from regular updates to ensure your Azuriom stays up-to-date with the latest Rust aesthetics. Optimized User-Friendliness: The Rust Theme not only offers an impressive appearance but also optimized user-friendliness. Your gaming platform will not only look good but also feel great. Make your Azuriom unique and distinctive – get the Rust Theme now and immerse your gaming community in a new dimension of design! Installation and Configuration Guide for the Rust Theme in Azuriom ## Step 1: Copy Theme to the Theme Directory 1. Download the `Rust Theme` if not done already. 2. Copy the `rust` folder into the theme directory of your Azuriom installation. Typically, you can find this directory under `resources/themes` in your Azuriom root. ## Step 2: Activate Theme in Azuriom Admin Dashboard 1. Log in to the Azuriom Admin Dashboard. 2. Navigate to the "Designs" section. 3. Locate the `Rust Theme` in the list and click on "Enable." ## Step 3: Configure Theme 1. Navigate to the "Designs" section. 2. Click on "Edit Configuration" at the top. 3. In the first section, you can activate the page title. Choose a page created under "Pages" to be displayed on the homepage. Alternatively, deactivate it here if you don't want any page to be shown. 4. The page background set in `Settings/Global` can be activated here on all pages. Otherwise, it will only be displayed on the homepage. Note that a page background is mandatory. 5. In the following section, depending on the number of servers you've set up in Azuriom, you'll have the option to insert the header image for each server (up to 8 servers). Tip: Under "Content -> Images" in Azuriom, you can upload images. After uploading, find the link in the "File" column. Right-click on it, choose "Copy link address," and paste the link here.$24.00- 1 review
-
- 1
-

-
- #rust theme
- #rust design
- (and 11 more)