Search the Community
Showing results for tags 'library'.
Found 2 results
-
Version 1.1.5
227 downloads
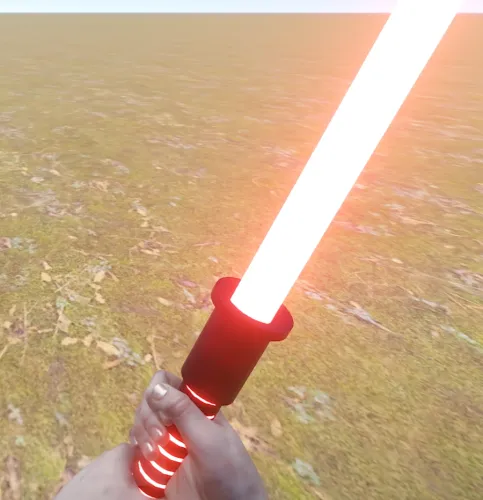
This library allows developers to create their own ItemDefinitions, which will allow them to create custom items with their own unique values. What is an ItemDefinition created with the library? It is a full-fledged ItemDefinition just like the other ones created by Rust developers, a new item definition is created based on an existing one with modified settings. It has its own shortname and itemid, and can also have its own itemMods created by the developer, which is very convenient. You can use the give command, item.info.[anything], and any other way you want. A simple example of item creation: // Requires: CustomItemDefinitions using static Oxide.Plugins.CustomItemDefinitions; namespace Oxide.Plugins { [Info("LightsaberItem", "0xF", "1.0.0")] public class LightsaberItem : RustPlugin { public static LightsaberItem PluginInstance; ItemDefinition PARENT_DEFINITION = ItemManager.FindItemDefinition("longsword"); void Init() { PluginInstance = this; CustomItemDefinitions.RegisterPluginItemDefinition(new CustomItemDefinition { shortname = "lightsaber", parentItemId = PARENT_DEFINITION.itemid, maxStackSize = 1, category = ItemCategory.Weapon, defaultName = "Lightsaber", defaultSkinId = 3035762342, itemMods = new ItemMod[] { PARENT_DEFINITION.GetComponentInChildren<ItemModEntity>(), new ItemModLightsaberCreatedNotice() { exampleField_message = "Item with name \"{0}\" just created! Yay!" } } }, this); } public class ItemModLightsaberCreatedNotice : ItemMod { public string exampleField_message; public override void OnItemCreated(Item item) { base.OnItemCreated(item); if (exampleField_message != null) PluginInstance.Puts(string.Format(exampleField_message, item.name)); } } } } What are some things to keep in mind? Always register new item definitions in the Init hook! This is important! You must take care to register unique shortnames and item ids. ItemId should never be changed in your plugin, as items created with an old itemId will break if they don't have their definition. After your plugin is unloaded, all items created with your item definitions will lose interaction, as all ItemMods will be removed. This is done for safety, don't worry, after loading the plugin back in, all items will work again as before. CustomItemDefinition class structure: public class CustomItemDefinition { public int parentItemId; public string shortname; public int? itemId; // optional public string defaultName; public string defaultDescription; // For use by other plugins, this will not be displayed on the client side when selecting an item public ulong defaultSkinId; public int? maxStackSize; public ItemCategory? category; public ItemDefinition.Flag flags; public ItemMod[] itemMods; } ItemMods details: ItemMods are overwritten, this means the new item definition will not include the itemMods of the parent. If you need to import an item mod from the parent, you can use PARENT_DEFINITION.GetComponent<ItemModYouNeed>() if you need to import everything ItemMods new List<ItemMod>(PARENT_DEFINITION.itemMods).ToArray() Custom itemMods are added using the method of creating a new class, i.e. new YourItemMod() Here you can also specify the fields you want, example: new YourItemMod() { field: value } Quick answers to questions: Items have become coal, what does that mean? This is a fallback ItemDefinition in case the plugin providing this item is no longer available. The items will be restored if the plugin is returned.Free -
Version 1.0.5
168 downloads
Admin and player UI for saving/recalling/deleting sign drawings. Gives players a 25 capacity image library so they can save, and restore, their artwork. Saved images exist even after the signs they're on are destroyed. Multi-layer support for animated signs allows save from and restore to each layer separately. Admin can view a 25 image history for any sign, with the SteamID of the painter shown. Clicking a SteamID shows a 25 image history for that player. UI delete allows for very easy moderation of unwanted images. Permissions SignManager.admin – Allows use of /sma command. SignManager.autosave – Allows auto-saving of paintings upon completion. SignManager.manualsave – Allows manual saving of paintings in UI menu. Chat commands Players. /sm – Opens SignManager UI. Player must be close to a sign Admin. /sma – Opens admin menu for closest sign. /sma <steamID> – Opens admin menu for closest sign /sma export – Exports all images/library data to file. These are auto imported on next server boot. Console commands sma export -Exports all images/library data to file. These are auto imported on next server boot. Configuration ButtonColour : “0.7 0.32 0.17 1” CommandAlias = "SignManager"; AdminCommandAlias = "SignManagerAdmin"; Note : SignManager uses Rust storage and, therefore, saved images will be wiped when the server is wiped. To avoid this, use the the `/sma export` chat command or `sma export` console command before shutdown and wipe.$10.00